Hatco AWD Series Le manuel du propriétaire
- Taper
- Le manuel du propriétaire

P/N 07.04.356.00 © 2016 Hatco Corporation
Register Online!
(see page 2)
S'inscrire en ligne!
(voir page 16)
hatcocorp.com
Atmospheric Hot Water Dispenser
Distributeur d'eau chaude
atmosphérique
AWD Series/Série
Installation and Operating Manual
Manuel d'installation et d'utilisation
Do not operate this equipment unless you
have read and understood the contents of
this manual! Failure to follow the
instructions contained in this manual may
result in serious injury or death. This
manual contains important safety
information concerning the maintenance,
use, and operation of this product. If
you’re unable to understand the contents
of this manual, please bring it to the
attention of your supervisor. Keep this
manual in a safe location for future
reference.
English = p 2
No opere este equipo al menos que haya
leído y comprendido el contenido de este
manual! Cualquier falla en el seguimiento
de las instrucciones contenidas en este
manual puede resultar en un serio lesión
o muerte. Este manual contiene
importante información sobre seguridad
concerniente al mantenimiento, uso y
operación de este producto. Si usted no
puede entender el contenido de este
manual por favor pregunte a su
supervisor. Almacenar este manual en
una localización segura para la referencia
futura.
Ne pas utiliser cet équipement sans avoir
lu et compris le contenu de ce manuel !
Le non-respect des instructions
contenues dans ce manuel peut entraîner
de graves blessures ou la mort. Ce
manuel contient des informations
importantes concernant l'entretien,
l'utilisation et le fonctionnement de ce
produit. Si vous ne comprenez pas le
contenu de ce manuel, veuillez le signaler
à votre supérieur. Conservez ce manuel
dans un endroit sûr pour pouvoir vous y
référer plus tard.
Français = p 16
WARNING
ADVERTENCIA
AVERTISSEMENT

2
Form No. AWDM-1016
English
Important Owner Information ..............................................2
Introduction...........................................................................2
Important Safety Information...............................................3
Model Description.................................................................4
Model Designation................................................................4
Specifications........................................................................4
Plug Configurations .............................................................4
Electrical Rating Chart .........................................................4
Dimensions ..........................................................................5
Installation.............................................................................6
General ................................................................................6
Operation...............................................................................7
General ................................................................................7
Dispensing Hot Water..........................................................7
Programming the Dispenser ................................................8
Maintenance ..........................................................................9
General ................................................................................9
Daily Cleaning......................................................................9
Draining the Dispenser ........................................................9
De-Liming the Dispenser ...................................................10
Resetting the High Temperature Safety Switch .................11
Troubleshooting Guide ......................................................12
Error Codes .......................................................................12
Options and Accessories...................................................13
Limited Warranty.................................................................15
Authorized Parts Distributors............................Back Cover
IMPORTANT OWNER INFORMATION
Record the model number, serial number (specification label
located on the lower side of the unit), voltage, and purchase
date of the unit in the spaces below. Please have this
information available when calling Hatco for service assistance.
Model No. ____________________________________
Serial No. ____________________________________
Voltage ______________________________________
Date of Purchase ______________________________
Register your unit!
Completing online warranty registration will prevent delay in
obtaining warranty coverage. Access the Hatco website at
www.hatcocorp.com, select the Parts & Service pull-down
menu, and click on “Warranty Registration”.
Business
Hours: 7:00
AM to 5:00 PM Central Standard Time (CST)
(Summer Hours: June to September—
7:00
AM to 5:00 PM CST Monday–Thursday
7:00
AM to 4:00 PM CST Friday)
Telephone: 800-558-0607; 414-671-6350
e-mail: part[email protected]
Additional information can be found by visiting our web site at
www.hatcocorp.com.
24 Hour 7 Day Parts and Service
Assistance available in the United States
and Canada by calling 800-558-0607.
INTRODUCTION
Hatco Atmospheric Hot Water Dispensers quickly provide 2, 3,
or 4 quarts (1.9, 2.8, or 3.8 liters) of hot water for food
preparation or cleaning. A 12 gallon (45 liter) stainless steel tank
provides up to 8 gallons (30 liters) of continuous hot water. The
setpoint temperature can be adjusted from 75–195°F
(24–91°C), with the factory default setting at 195°F (91°C). The
tank can be emptied using the convenient bottom drain.
Hatco Atmospheric Hot Water Dispensers design features
include an electronic temperature controller with a digital
temperature display, POWER ON/OFF (I/O) switch,
premeasure dispense buttons, and a manual dispense button
for additional water volume options.
Standard equipment includes a stainless steel base, a powder
coated body, 4" (102 mm) legs and a 6' (1829 mm) electrical
cord and plug. All electric heating elements are metal sheathed
and controlled by a submersed thermistor. The units are
protected with a high-temperature limit switch and low-water
cutoff.
The unit electrical and plumbing connections are factory-
assembled and ready for installation.
This manual provides the installation, safety, and operating
instructions for Atmospheric Hot Water Dispensers. Hatco
recommends all installation, operating, and safety instructions
appearing in this manual be read prior to installation or
operation of a unit.
Safety information that appears in this manual is identified by
the following signal word panels:
WARNING indicates a hazardous situation which, if not
avoided, could result in death or serious injury.
CAUTION indicates a hazardous situation which, if not
avoided, could result in minor or moderate injury.
NOTICE is used to address practices not related to
personal injury.
WARNING
CAUTION
NOTICE
CONTENTS

Form No. AWDM-1016
3
English
IMPORTANT SAFETY INFORMATION
ELECTRIC SHOCK HAZARD:
• Plug unit into a properly grounded electrical receptacle
of the correct voltage, size, and plug configuration. If
plug and receptacle do not match, contact a qualified
electrician to determine and install the proper voltage
and size electrical receptacle.
• Unit must be installed by qualified, trained installers.
Installation must conform to all local electrical and
plumbing codes. Installation by unqualified personnel
will void the unit warranty and may lead to electric
shock or burn, as well as damage to unit and/or its
surroundings. Check with local plumbing and electrical
inspectors for proper procedures and codes.
• Turn OFF power switch, unplug power cord, and allow
unit to cool before performing any cleaning,
adjustments, or maintenance.
• DO NOT submerge or saturate with water. Unit is not
waterproof. Do not operate if unit has been submerged
or saturated with water.
• Unit is not weatherproof. Locate unit indoors where
ambient air temperature is a minimum of 70°F (21°C).
• Do not steam clean or use excessive water on unit.
• This unit is not “jet-proof” construction. Do not use jet-
clean spray to clean this unit.
• Do not pull unit by power cord.
• Discontinue use if power cord is frayed or worn.
• Do not attempt to repair or replace a damaged power
cord. The cord must be replaced by Hatco, an
Authorized Hatco Service Agent, or a person with
similar qualifications.
• This unit must be serviced by qualified personnel only.
Service by unqualified personnel may lead to electric
shock or burn.
• Use only Genuine Hatco Replacement Parts when
service is required. Failure to use Genuine Hatco
Replacement Parts will void all warranties and may
subject operators of the equipment to hazardous
electrical voltage, resulting in electrical shock or burn.
Genuine Hatco Replacement Parts are specified to
operate safely in the environments in which they are
used. Some aftermarket or generic replacement parts
do not have the characteristics that will allow them to
operate safely in Hatco equipment.
EXPLOSION HAZARD: Do not store or use gasoline or
other flammable vapors or liquids in the vicinity of this or
any other appliance.
This unit has no “user-serviceable” parts. If service is
required on this unit, contact an Authorized Hatco Service
Agent or contact the Hatco Service Department at
800-558-0607 or 414-671-6350.
WARNING
Make sure all operators have been instructed on the safe
and proper use of the unit.
This unit is not intended for use by children or persons
with reduced physical, sensory, or mental capabilities.
Ensure proper supervision of children and keep them away
from the unit.
BURN HAZARD:
• Some exterior surfaces on unit will get hot. Use caution
when touching these areas.
• Drain water may reach temperatures in excess of 200°F
(93°C). Use appropriate plumbing materials when
installing drain.
Auto-Fill units must be installed with adequate backflow
protection and must conform with all federal, state, and
local codes.
All water and waste piping and connections shall comply
with the International Plumbing Code 2003, International
Code Council (ICC), or to the Uniform Plumbing Code 2003,
International Association of Plumbing and Mechanical
Officials (IAPMO).
Locate unit at the proper counter height in an area that is
convenient for use. The location should be level to prevent
the unit or its contents from falling accidentally and strong
enough to support the weight of the unit and contents.
Damage to any countertop material caused by heat
generated from Hatco equipment is not covered under the
Hatco warranty. Contact the manufacturer of the
countertop material for application information.
Do not use deionized water. Deionized water will shorten
the life of water reservoir and heating element.
Transport unit in upright position. If laid on its side, water
must be drained from unit.
Do not over-tighten plumbing connections. Overtightening
may cause leaks.
Incoming water in excess of 3.0 grains of hardness per
gallon (GPG) (0.75 grains of hardness per liter) must be
treated and softened before being supplied to an
Atmospheric Hot Water Dispenser. Water containing over
3.0 GPG (0.75 GPL) will decrease the efficiency and reduce
the operating life of the unit.
Incoming water supply must not exceed 140°F (60°C).
Water pressure must be at least 35 psi (241 kPa) and not
exceed 80 psi (552 kPa).
Use non-abrasive cleaners and cloths only. Abrasive
cleaners and cloths could scratch finish of unit, marring
its appearance and making it susceptible to soil
accumulation.
Clean unit daily to avoid malfunctions and maintain
sanitary operation.
WARNING
NOTICE
CAUTION
Read the following important safety information before using this equipment to avoid serious
injury or death and to avoid damage to equipment or property.

4
Form No. AWDM-1016
English
MODEL DESCRIPTION
All Models
Hatco Atmospheric Hot Water Dispensers are equipped with an
electronic temperature controller, a digital temperature display,
a POWER ON/OFF (I/O) switch, pre-measured dispensing
buttons, and a manual dispense button. The units are protected
with a high-temperature limit switch and low-water cut-off.
Atmospheric Hot Water Dispensers deliver premeasure
2, 3, or 4 quart (1.9, 2.8, 3.8 liter) quantities of hot water at
temperatures up to 195°F (91°C). This compact and durable
unit requires minimal counter space and a removable shelf
allows access to dispense water into large containers.
Standard equipment includes a stainless steel base, a powder
coated body, 4" (102 mm) legs, tank drain valve, and a
6' (1829 mm) electrical cord and plug.
A 12 gallon (45 liter) stainless steel tank provides up to 8 gallons
(30 liters) of continuous, temperature-controlled water ranging
from 75–195°F (24–91°C). The tank is drained easily with a
convenient bottom drain fitting.
NOTE: Refer to the OPTIONS AND ACCESSORIES section for
alternate dispensing volumes, wall mounting, and other
available options and accessories.
Model AWD-12
Control
Panel
Removable
Shelf
Drain Valve Handle
A W D - 12
Atmospheric
Water
Tank size in gallons
Dispenser
MODEL DESIGNATION
Plug Configurations
Units are supplied from the factory with an electrical cord and
plug installed. Plugs are supplied according to the applications.
ELECTRIC SHOCK HAZARD: Plug unit into a properly
grounded electrical receptacle of the correct voltage, size,
and plug configuration. If plug and receptacle do not
match, contact a qualified electrician to determine and
install the proper voltage and size electrical receptacle.
NOTE: Specification label located on the lower side of the unit.
See label for serial number and verification of unit
electrical information.
WARNING
Plug Configurations
NOTE: Receptacle not supplied by Hatco.
NEMA L6-30P
NEMA 6-30P
SPECIFICATIONS
Model Voltage Kilowatts Amps Plug Configuration Shipping Weight†
AWD-12 208 5 24.0 NEMA 6-30P* 80 lbs. (36 kg)
240 5 20.8 NEMA 6-30P* 80 lbs. (36 kg)
Electrical Rating Chart
* NEMA L6-30P is optional.
† Unit weight filled with water capacity (12 gallons [45 liters]) is 180 lbs. (82 kg).

Form No. AWDM-1016
5
English
Model kW
Degrees of Rise
60°F
(33°C)
90°F
(50°C)
140°F
(78°C)
AWD-12
5 15 Minutes* 22 Minutes* 35 Minutes*
Model kW
Degrees of Rise
60°F
(33°C)
70°F
(39°C)
80°F
(44°C)
90°F
(50°C)
100°F
(55°C)
110°F
(61°C)
120°F
(66°C)
130°F
(72°C)
140°F
(78°C)
150°F
(83°C)
160°F
(88°C)
AWD-12 5
33 gph
(125 lph)
29 gph
(110 lph)
25 gph
(95 lph)
22 gph
(83 lph)
20 gph
(75 lph)
18 gph
(68 lph)
17 gph
(64 lph)
15 gph
(57 lph)
14 gph
(53 lph)
13 gph
(49 lph)
12 gph
(45 lph)
Model kW
Degrees of Rise
60°F
(33°C)
90°F
(50°C)
140°F
(78°C)
AWD-12
5 22 Minutes 33 Minutes 52 Minutes
Model
Width
(A)
Depth
(B)
Height
(C)
Footprint
Width (D)
Footprint
Depth (E)
AWD-12
13-3/8″
(339 mm)
27-1/2″
(698 mm)
28-1/16″
(713 mm)
10-3/4″
(273 mm)
14-3/4″
(375 mm)
SPECIFICATIONS
A B
8"
(203 mm)
D E
C
4"
(101 mm)
Dimensions
Water Temperature Recovery Table
* Recovery times are after 10 gallons (37 liters) of water have been dispensed.
NOTE: gph is gallons per hour; lph is liters per hour.
Cold-Start Heat-Up Time
Water Temperature Recovery Time

6
Form No. AWDM-1016
English
INSTALLATION
General
Use the following information and procedures to install a
Atmospheric Hot Water Dispensers.
ELECTRIC SHOCK HAZARD:
• Plug unit into a properly grounded electrical receptacle
of the correct voltage, size, and plug configuration. If
plug and receptacle do not match, contact a qualified
electrician to determine and install the proper voltage
and size electrical receptacle.
• Unit is not weatherproof. Locate unit indoors where
ambient air temperature is a minimum of 70°F (21°C).
Auto-Fill units must be installed with adequate backflow
protection and must conform with all federal, state, and
local codes.
All water and waste piping and connections shall comply
with the International Plumbing Code 2003, International
Code Council (ICC), or to the Uniform Plumbing Code 2003,
International Association of Plumbing and Mechanical
Officials (IAPMO).
Locate unit at the proper counter height in an area that is
convenient for use. The location should be level to prevent
the unit or its contents from falling accidentally and strong
enough to support the weight of the unit and contents.
1. Remove the unit from the carton.
2. Remove tape and protective packaging from all surfaces
of unit.
NOTE: To prevent delay in obtaining warranty coverage,
complete online warranty registration. See the
IMPORTANT OWNER INFORMATION section for
details.
3. Place the unit in the desired location. Refer to the
OPTIONS ANDACCESSORIES section for wall mount
installation.
• Locate the unit in an area where the ambient air
temperature is constant and a minimum of 70°F (21°C).
Avoid areas that may be subject to active air movements
or currents (i.e., near exterior doors, exhaust
fans/hoods, air conditioning ducts, etc...).
• Make sure the unit is at the proper counter height in an
area convenient for use.
• Make sure the countertop is level and strong enough to
support the weight of the unit and the water inside.
NOTE: Unit weight filled with water capacity (12 gallons
[45 liters]) is 180 lbs. (82 kg).
• Make sure all the feet on the bottom of the unit are
positioned securely on the countertop.
WARNING
CAUTION
4. Connect a flexiblewater supply line to the water inlet on
the bottom of the unit using 1/4" NPTadapter with flare
connection (or by using the accessory 1/4" inlet tubing
supplied by Hatco).
NOTE: Water inlet and drain connections must be made with
flexible hose.
NOTE: If required, a ball valve or gate valve, line strainer,
union(s) and vacuum breaker or other anti-siphon
device must be supplied by plumber or installer.
Do not over-tighten plumbing connections. Over-tightening
may cause leaks.
Incoming water supply must not exceed 140°F (60°C).
Water pressure must be at least 35 psi (241 kPa) and not
exceed 80 psi (552 kPa).
AWD-12 Installation
5. Tighten connections securely.
6. Turn on water supply and check for leaks.
• A drain fitting is located under the unit for manually
draining the dispenser. A male hose connector is
included. See MAINTENANCE for draining information.
NOTE: A 3/4" (19 mm) flexible hose may be connected to the
heater drain and run to an open sight drain. The drain
should not be connected permanently to the sanitary
drain system. Check local plumbing code for proper
drain installation.
Water
Inlet
Drain
Valve
Handle
Drain Fitting
Drain Hose
(accessory)
NOTICE

Form No. AWDM-1016
7
English
OPERATION
General
Use the following procedures to operate an Atmospheric Hot
Water Dispenser.
Read all safety messages in the Important Safety
Information section before operating this equipment.
Hatco Corporation is not responsible for the actual food
product serving temperature. It is the responsibility of the
user to ensure that the food product is held and served at
a safe temperature.
Startup
NOTE: Make sure the drain valve handle is in the horizontal
(closed) position.
1. Plug unit into a properly grounded electrical receptacle of
the correct voltage, size and plug configuration. See the
SPECIFICATIONS section for details.
2. Move the POWER ON/OFF (I/O) switch to the ON (I)
position.
• The WATER TEMPERATURE display will light up to
indicate power is supplied to the unit.
BURN HAZARD: Some exterior surfaces on unit will get
hot. Use caution when touching these areas.
3. The unit is ready to dispense water when the display
shows the setpoint water temperature (the factory default
setpoint temperature is 195°F [91°C]).
• The WATER TEMPERATURE display will show “E3”
while the water begins to fill the tank.
• The WATER TEMPERATURE display will show the
current water temperature and a red light will glow in the
upper left-hand corner of the digital temperature display
when the heating elements are energized.
• The water fills the tank until it is full and the heating
elements heat the water until the water temperature
reaches the setpoint temperature.
NOTE: A temperature setting higher than 195°F (91°C) will
cause nuisance tripping of the high limit switch and is
not recommended. If temperature adjustments are
required see “Programming The Dispenser.” To reset
the high limit switch, see “Resetting The High
Temperature Limit Switch.”
Shutdown
1. Move the POWER ON/OFF (I/O) switch to the OFF (O)
position.
• The WATER TEMPERATURE display will turn off to
indicate power has been shut off to the unit.
WARNING
CAUTION
Dispensing Hot Water
1. Place the proper water container for holding hot water on
the shelf (or below the dispenser) before dispensing.
NOTE: The shelf can be removed to dispense water into larger
containers. To remove the shelf, lift the shelf up and off
the mounting screwheads.
2. Push the appropriate button on the electronic temperature
controller to fill a container. Dispensing is controlled by the
four dispensing buttons on the front of the unit.
• The three VOLUME SELECTION buttons underneath
the display dispense at pre-measured quantities of 2QT,
3QT, and 4QT as marked.
• 2QT = 2 quarts (1.9 liters)
• 3QT = 3 quarts (2.8 liters)
• 4QT = 4 quarts (3.8 liters)
• The red button dispenses and stops water manually.
• Press and hold to dispense water manually. Water
will continue to flow until the red button is released.
• Press once after pressing one of the programmed
dispense buttons to manually stop dispensing.
NOTE: The dispense amounts can be adjusted if required. See
“Programming The Dispenser.”
NOTE: Refer to the OPTIONS AND ACCESSORIES section for
alternate, premeasure dispensing volumes.
Control Panel
POWER ON/OFF
(I/O) Switch
WATER
TEMPERATURE
Display
VOLUME
SELECTION
Buttons
Manual
Dispense
Button

8
Form No. AWDM-1016
English
OPERATION
Programming the Dispenser
ELECTRIC SHOCK HAZARD: Turn OFF power switch,
unplug power cord, and allow unit to cool before
performing any cleaning, adjustments, or maintenance.
Dipswitch Panel
A dipswitch panel is located on the back of the control board
which is behind the front panel graphic overlay. The dip
switches have the following functions:
Dipswitch “1” is used to switch between operational mode
(RUN) and programming mode (PGM).
Dipswitch “2” is used to change the display from F° to C°.
Dipswitch “3” is used to select the type of operation and must
be switched to the AWD position for the dispenser to operate.
Dipswitch “4” is not used (can be in either position).
Changing Temperature Display from F° to C°
1. Turn the POWER ON/OFF (I/O) switch to the OFF (O)
position, and unplug the unit from the electrical receptacle.
2. Remove the two screws and slide off the top red panel.
3. Move dipswitch “2” to the C position to change the display
from Fahrenheit (F°) to Celsius (C°).
4. Re-install the top red panel.
5. Plug the unit into the proper electrical receptacle and turn
the POWER ON/OFF (I/O) switch to the ON (I) position.
Changing Temperature Setpoint
1. Turn the POWER ON/OFF (I/O) switch to the OFF (O)
position and unplug the unit from the electrical receptacle.
2. Remove the two screws and slide off the top red panel.
3. Move dipswitch “1” to the PGM position.
4. Place the top red panel on unit.
Never operate unit without cover installed.
5. Plug the unit into the proper electrical receptacle and turn
the POWER ON/OFF (I/O) switch to the ON (I) position.
• The display will show (temperature setpoint). This
indicates the beginning of the programming sequence.
• Press the red manual dispense button once and the
display will show the current temperature setpoint.
6. Use the 2QT and 3QT buttons to adjust the temperature
setpoint up or down.
7. When the desired setpoint is shown, press the red manual
dispense button to save the change to memory.
NOTE: If no buttons are pressed for a period of 15 seconds,
the program will automatically jump to the end of the
programming sequence, and the display will read END.
8. Turn the POWER ON/OFF (I/O) switch to the OFF (O)
position and unplug the unit from the electrical receptacle.
9. Remove the top red panel.
10. Move dipswitch “1” back to the RUN position.
11. Re-install the top red panel using the two screws.
12. Plug the unit into the proper electrical receptacle and turn
the POWER ON/OFF (I/O) switch to the ON (I) position.
WARNING
CAUTION
Di
p
s
wi
tc
h Control
s
Changing Dispens
e Tim
e (Water quanti
ty)
Use t
he f
ol
l
owi
ng pr
ocedur
e t
o m
odi
f
y t
he amount
of
wat
er
t
he
2QT,
3QT,
and/
or
4QT
but
t
ons
di
spense.
1. Tur
n
t
he
POW
ER
ON/
OFF
(
I
/
O)
swi
t
ch
t
o
t
he
OFF
(
O)
posi
t
i
on,
and unpl
ug t
he uni
t
f
r
om
t
he el
ect
r
i
cal
r
eceptacl
e.
2. Remove
t
he
t
wo
scr
ews
and
sl
i
de
off
t
he
t
op
r
ed
panel
.
3. Move
di
pswi
t
ch
“
1”
t
o
t
he
PGM
posi
t
i
on.
4. Pl
ace
t
he
t
op
r
ed
panel
on
uni
t
.
Never
oper
at
e
uni
t
wi
t
hout
cover
i
nstal
l
ed.
5. Pl
ug
t
he
uni
t
i
nt
o
t
he
pr
oper
el
ect
r
i
cal
r
ecept
acl
e
and
t
ur
n
t
he
POW
ER
ON/
OFF
(
I
/
O)
swi
t
ch
t
o
t
he
O
N
(
I
)
posi
t
i
on.
•
The di
spl
ay w
i
l
l
show
(t
em
perat
ure set
poi
nt
).
Thi
s
i
ndi
cat
es
t
he
begi
nni
ng
of
t
he
pr
ogr
am
m
i
ng
sequence.
6. Pr
ess
t
he
r
ed
m
anual
di
spense
but
t
on
t
o
scr
ol
l
t
o
t
he
d
e
s
ire
d
d
is
p
e
n
s
e
b
u
tto
n
to
b
e
p
ro
g
ra
mme
d
. T
h
e
d
isp
la
y
wi
l
l
i
dent
i
f
y
t
he
VOLUM
E
SELECTI
ON
but
t
on
by
number
:
“
1”
=
2QT
VOLUM
E
SELECTI
ON
But
t
on
“
2”
=
3QTVOLUM
E
SELECTI
ON
But
t
on
“3” = 4QT VOLUME SELECTION Button
7. Press the red manual dispense button again to display the
current dispense time for the specific VOLUME
SELECTION Button.
8. Use the 2QT and 3QT buttons to adjust the dispense time
up or down (displayed in seconds by half-second intervals).
9. When the desired dispense time is shown, press the red
manual dispense button to save the change to memory and
to scroll to the next desired VOLUME SELECTION button.
10. Repeat step 6 with the next desired dispense button or turn
the POWER ON/OFF (I/O) switch to the OFF (O) position,
and unplug the unit from the electrical receptacle.
11. Remove the top red panel.
12. Move dipswitch “1” back to the RUN position.
13. Re-install the top red panel using the two screws.
14. Plug the unit into the proper electrical receptacle and turn
the POWER ON/OFF (I/O) switch to the O
N (I) position.
R
e
a
r V
i
e
w
o
f B
o
a
rd
D
IP
S
w
i
tc
h
e
s
CAUTION

Form No. AWDM-1016
9
English
MAINTENANCE
General
Hatco Atmospheric Hot Water Dispensers are designed for
maximum durability and performance with minimum maintenance.
ELECTRIC SHOCK HAZARD:
• Turn OFF power switch, unplug power cord, and allow
unit to cool before performing any cleaning,
adjustments, or maintenance.
• DO NOT submerge or saturate with water. Unit is not
waterproof. Do not operate if unit has been submerged
or saturated with water.
• Do not steam clean or use excessive water on unit.
• This unit is not “jet-proof” construction. Do not use jet-
clean spray to clean this unit.
• Use only Genuine Hatco Replacement Parts when
service is required. Failure to use Genuine Hatco
Replacement Parts will void all warranties and may
subject operators of the equipment to hazardous
electrical voltage, resulting in electrical shock or burn.
Genuine Hatco Replacement Parts are specified to
operate safely in the environments in which they are
used. Some aftermarket or generic replacement parts
do not have the characteristics that will allow them to
operate safely in Hatco equipment.
This unit has no “user-serviceable” parts. If service is
required on this unit, contact an Authorized Hatco Service
Agent or contact the Hatco Service Department at
800-558-0607 or 414-671-6350.
Clean unit daily to avoid malfunctions and maintain
sanitary operation.
Daily Cleaning
To preserve the finish of the Atmospheric Hot Water Dispenser,
it is recommended that the exterior surfaces be wiped daily with
a clean, damp cloth.
Submerging or saturating unit with water will damage the
unit and void unit warranty.
Use non-abrasive cleaners and cloths only. Abrasive
cleaners and cloths could scratch finish of unit, marring
its appearance and making it susceptible to soil
accumulation.
1. Wipe the exterior surface of the unit with a damp cloth.
2. Stubborn stains may be removed with a good stainless
steel cleaner or a non-abrasive cleaner. Hard to reach
areas should be cleaned with a small brush and mild soap.
3. Wipe dry the entire unit using a dry, non-abrasive cloth.
WARNING
NOTICE
WARNING
NOTICE
Draining the Dispenser
It is recommended that the dispenser be drained prior to moving
the unit and after performing the “Deliming the Dispenser”
procedure.
ELECTRIC SHOCK HAZARD: Turn OFF power switch,
unplug power cord, and allow unit to cool before
performing any cleaning, adjustments, or maintenance.
1. Shut off the water supply to the unit.
2. Turn the POWER ON/OFF (I/O) switch to the OFF (O)
position and unplug the unit from the electrical receptacle.
3. Connect drain hose to the drain fitting on underside of unit.
4. Place open end of drain hose in a bucket or open site drain
in a manner acceptable to local plumbing codes.
5. Open the drain valve by placing the drain handle in the
vertical position.
6. After all of the water is drained, place the valve handle in
the horizontal position to close the valve.
7. Remove the drain hose from the drain fitting.
Draining the Water
WARNING
Drain Valve
Handle
(open position)
Drain Fitting

10
Form No. AWDM-1016
English
MAINTENANCE
Deliming the Dispenser
Use the following procedure for periodic cleaning and deliming
of the water tank.
NOTE: The lime and mineral content of the supply water will
determine how often this procedure must be performed.
NOTE: Perform this procedure when the dispenser will not be
used for a period of time, such as the end of the day.
1. Make sure the water tank is full.
2. Turn the POWER ON/OFF (I/O) switch to the OFF (O)
position.
3. Drain 3 gallons (11 liters) of water out of the 12 gallon (45 liter)
water tank (see “Draining the Dispenser” in this section).
4. Fill the water tank with 3 gallons (11 liters) of off-the-shelf
white vinegar (5% vinegar solution) by pouring it slowly into
the fill cup on the side of the unit.
Deliming the Dispenser
Fill Cup
5. Turn the POWER ON/OFF (I/O) switch to the ON (I)
position, and allow the unit to run at the operating
temperature for 1-2 hours.
• While the unit is at operating temperature, dispense
1/2 quart (0.4 liters) of the deliming solution through the
dispensing port. This exposes the port to the deliming
solution. (Safely discard dispensed solution.)
6. Turn the POWER ON/OFF (I/O) switch to the OFF (O)
position and allow the deliming solution to remain in the
unit for a minimum of 4 hours (preferably, over night.)
7. Drain the solution from the tank (see “Draining the
Dispenser” in this section).
8. Refill the unit with water by following the “Startup”
procedure in the OPERATION section.
• Dispense water out of the unit until the discharge is clear
and all deliming solution has been removed and rinsed.
NOTE: Steps 7 and 8 may need to be repeated until all de-
liming solution has been removed.

Form No. AWDM-1016
11
English
MAINTENANCE
Resetting the High Temperature Safety
Switch
The Atmospheric Water Dispenser is equipped with a manually-
resettable high limit safety switch that prevents the water
temperature from getting dangerously high.
If the water inside the unit exceeds 200°F (93°C), the safety
high limit switch will shut the unit off. Setting the setpoint
temperature over 195°F (91°C) will cause nuisance tripping of
this safety switch. Hatco does not recommend adjusting the
setpoint temperature above 195°F (91°C).
To reset the safety high limit switch after it activates, follow the
following procedure.
1. Turn the POWER ON/OFF (I/O) switch to the OFF (O)
position, unplug the unit from the power source, and allow
to cool.
• The high limit switch cannot be reset until the water
temperature drops below 150°F (66°C).
2. Remove the front shelf by lifting the shelf up and off of the
mounting screwheads.
3. Remove the front panel.
a. Remove the six screws that hold the front panel in place.
b. Pull the front panel down and off of the dispenser valve.
The rubber grommet should stay attached to the hole in
the front panel.
4. Press the small red button on the high limit safety switch
until it clicks. The high limit safety switch is located on the
water tank, near the left heating element and the bottom of
the tank.
• The high limit safety switch is now reset.
5. Reinstall the front panel.
a. Position the front panel back into place. The rubber
grommet should be positioned under the dispenser
valve.
b. Align the six screw holes on the front panel with the
screw holes on the side panels, and secure in position
using the six screws removed in step 3.
6. Reinstall the front shelf.
NOTE: If the high limit safety continues to trip, verify the
setpoint is 195°F (91°C) or lower. If the temperature
setpoint is above 195°F (91°C), adjust the setpoint
down to an acceptable level. See “Programming the
Dispenser” for adjustment instructions.
NOTE: Contact an Authorized Service Agent if the high limit
safety continues to trip and the temperature setpoint is
195°F (91°C) or below.
Resetting the High Temperature Safety Switch
Screw
F
ro
n
t
P
a
n
e
l
Front
Shelf

Symptom Probable Cause Corrective Action
Unit is not working at all. Unit not turned on. Move POWER ON/OFF (I/O) switch to the ON (I)
position.
Unit not plugged in. Plug unit into proper power supply.
Circuit breaker tripped. Reset circuit breaker. If circuit breaker continues to trip,
Contact Authorized Service Agent or Hatco for
assistance.
Low-water cut-off activated. Make sure the unit is supplied with water.
POWER ON/OFF (I/O) switch is defective. Contact Authorized Service Agent or Hatco for
assistance.
Unit does not dispense
water.
Drain valve handle is in the open (vertical) position. Make sure the drain valve handle is in the closed
(horizontal) position.
Water supply is shut off. Check to make sure the water supply is on.
Dipswitch settings are incorrect. See “Programming the Dispenser” in the OPERATION
section.
High temperature safety switch was activated. See “Resetting the High Temperature Safety Switch” in
the MAINTENANCE section.
Water not hot enough. Temperature setpoint is set too low. See the “Changing Temperature Setpoint” procedure in
the OPERATION section.
Heating element(s) are defective. Contact Authorized Service Agent or Hatco for
assistance.
Incorrect (low) voltage supplied. Contact Authorized Service Agent or Hatco for
assistance.
Water is not dispensed at
the designated preset
amount.
The unit is programmed to dispense the improper
amount of water.
See the “Changing Dispense Time” procedure in the
OPERATION section.
12
Form No. AWDM-1016
English
TROUBLESHOOTING GUIDE
This unit must be serviced by qualified personnel only.
Service by unqualified personnel may lead to electric
shock or burn.
WARNING
ELECTRIC SHOCK HAZARD: Turn OFF power switch,
unplug power cord, and allow unit to cool before
performing any cleaning, adjustments, or maintenance.
WARNING
Error Codes
There are four error codes that may show in the display:
E1: Indicates that the display temperature is out of range or
display temperature probe is malfunctioning. Contact
Authorized Service Agent or Hatco for assistance.
E2: Indicates that the control temperature is out of range or
control temperature probe is malfunctioning. Contact
Authorized Service Agent or Hatco for assistance.
E3: Indicates that the low water probe has not been satisfied.
The heating elements are not yet submersed. Check water
supply and water shut-off valve.
H2O: Indicates that the inlet water solenoid has been running
continuously for an excessive period of time. Check for
problems with the water supply or internal water leak.
Troubleshooting Questions?
If you continue to have problems resolving an issue, please
contact the nearest Authorized Hatco Service Agency or Hatco
for assistance. To locate the nearest Service Agency, log onto
the Hatco website at www.hatcocorp.com and click on
Find Service Agent, or contact the Hatco Parts and Service
Team at:
Telephone: 800-558-0607 or 414-671-6350
e-mail: p[email protected]

Form No. AWDM-1016
13
English
OPTIONS AND ACCESSORIES
Water Filtration System
The water filtration system is available for AWD units as an
accessory. The water filtration system helps eliminate sediment
buildup inside of the tank leading to a longer life of the unit.
Installing a Water Filtration System
Use the following procedure to install a water filtration system.
NOTE: Before beginning installation, verify that the incoming
water pressure is between 35–80 psi (241–552 kPa)
and the water temperature is less than 100°F (38°C).
1. Shut off the water supply to the unit.
2. Move the POWER ON/OFF (I/O) switch to the OFF (O)
position, and unplug the unit from the electrical receptacle.
3. Thread a push-on fitting (included) coated with thread
sealant into both the inlet and outlet ports on top of the
water filtration valve. Tighten securely.
NOTE: To minimize the effects of restricted flow rate, use the
least total amount of 1/4" (6 mm) tubing possible. The
total length of tubing from the water supply to the hot
water dispenser should not exceed 8’ (244 cm). One 10’
(305 cm) length of 1/4" (6 mm) tubing is supplied with
the water filtration system.
4. Mount the water filtration valve bracket to a solid structure
in a convenient location near the hot water dispenser
(mounting hardware not supplied).
5. Connect the water supply to the water filtration valve inlet
port using the supplied 1/4" (6 mm) tubing.
NOTE: To identify the inlet
port, refer to the
arrow on the
filtration valve
between the ports
that indicates the
water flow direction
through the valve.
a. Cut the 1/4" (6 mm)
tubing to the
appropriate length.
Make sure to make clean, straight cuts on the tubing for
proper connection to the push-on fittings.
b. Connect one end of the 1/4" (6 mm) tubing to the water
supply shut-off valve and the other to the water filtration
valve inlet port. An additional push-on fitting is included
for the connection between the water supply shut-off
valve and the tubing.
6. Connect the water filtration valve outlet port to the hot
water dispenser using the supplied 1/4" (6 mm) tubing.
a. Cut the 1/4" (6 mm) tubing to the appropriate length.
Make sure to make clean, straight cuts on the tubing for
proper connection to the push-on fittings.
b. Connect one end of the 1/4" (6 mm) tubing to the water
filtration valve outlet port and the other to the hot water
dispenser inlet fitting.
7. Install the water filter cartridge underneath the water
filtration valve.
a. Insert the filter up into the valve.
b. Twist the filter clockwise 1/4 turn until it locks into
position.
Inlet Port
Outlet
Port
“Flow”
Arrow
8. Move both the water supply shut-off valve and the water
filtration system shut-off valve to the open position, and
check for proper operation/leaks.
Installing a Water Filtration System
NOTE: The water filter cartridge should be replaced after every
15,000 gallons (56,000 liters) of use or at least once per
year. Order Hatco P/N 03.05.116.00 for a replacement
water filter cartridge.
Locking Plug
A locking NEMA L6-30P plug is available instead of the
standard NEMA 6-30 plug (not available for retrofit).
Plumbing Kit
An accessory plumbing kit is available that includes a 10′
(305 cm) long, 1/4" diameter water inlet tube and a 3′ (914 mm)
long drain hose. The water inlet tube connects to the water inlet
fitting on the bottom of the unit. The drain hose connects to the
drain fitting on the bottom of the unit.
Anti-Splash Tube
An anti-splash tube is available as a
factory-installed option. The anti-
splash tube lengthens the
dispensing nozzle and reduces the
splashing of hot water when filling
smaller containers.
F
r
o
m
W
a
t
e
r
Su
p
p
l
y
Sh
u
t
-
O
f
f
V
a
l
ve
T
o
H
o
t
W
a
t
e
r
D
i
s
p
e
n
s
e
r
Filter
Cartridge
Filtration
Valve
Bracket
Push-On
Fitting
Push-On
Fitting
Water Filtration System
Shut-Off Valve
(open position)
1/4″ (6 mm)
Tubing
Anti-Splash
Tube

14
Form No. AWDM-1016
English
OPTIONS AND ACCESSORIES
Alternate Dispensing Volumes
A unit option is available that has alternate, premeasure
dispensing volumes. These volumes are indicated on the
control panel label.
For the alternate version, the three Volume Selection buttons
underneath the display dispense at premeasure quantities of
1.5QT, 2QT, and 8QT.
• 1.5QT = 1.5 quarts (1.4 liters)
• 2QT = 2 quarts (1.9 liters)
• 8QT = 8 quarts (7.6 liters)
• The red button dispenses and stops water manually.
NOTE: The dispense amounts can be adjusted if required. See
“Programming The Dispenser” in the OPERATION
section.
Wall Mount Installation
A wall-mounted shelf is available for installations that require
the unit to be mounted on a wall. Mounting the unit on a wall
requires special considerations and procedures due to the
weight of the unit. Follow the guidelines below when
determining the location for wall mounting as well as during
installation.
NOTE: Unit weight filled with water capacity (12 gallons
[45 liters]) is 180 lbs. (82 kg).
• The wall shelf must be fastened to a wall with 16″
(406 mm) on center, solid wood 2x4 stud construction
covered by a minimum of 1/2″ (13 mm) thick sheathing.
• The wall shelf must be installed with six lag screws that are
a minimum of 3/8″ (9.5 mm) in diameter and 3″ (76 mm)
long. The screws must solidly hit the wood studs in the
wall.
• Make sure the unit is at the proper height in an area
convenient for use.
Power I/O
(on/off) Switch
Water
Temperature
Display
Volume
Selection
Buttons
Manual
Dispense
Button
Parts Included
The following parts are included with wall-mounted units.
Item
Quantity
Wall Shelf 1
Lag Screw, 3/8″ x 3″ (9.5 x 76 mm) 6
Flat Washer 6
Installation Procedure
Use the following procedure to install a wall-mounted unit.
1. Make sure the mounting location meets the requirements
listed previously in this procedure.
2. Determine the height for the unit installation.
• Mark the wall at the desired height for the top of the shelf.
3. Locate the wood stud positions in the wall.
• Determine which studs to use for installation. The studs
used must allow the wall shelf to be installed with the
mounting holes a distance of 16″ (406 mm) on center
from each other.
4. Install the wall shelf onto the wall.
a. Center and level the wall shelf on the desired studs.
Mark the locations for the six lag screws through the
holes in each side of the shelf.
b. Drill six 15/64″ (6 mm) pilot holes in the wall at each
marked location for the lag screws. The lag screws must
be a minimum of 3/8″ (9.5 mm) in diameter and 3″
(76 mm) long.
c. Insert six lag screws with flat washers through the wall
shelf and into the pre-drilled pilot holes in the wall.
d. Tighten each lag screw securely.
Attaching the Wall Shelf
5. Lift the unit and set it on the wall shelf with the rear legs
securely behind the rear leg retainer. This step may require
two people.
6. Refer to the INSTALLATION section in this manual to
complete the water connection to the unit
7. Plug the unit into a properly grounded electrical receptacle of
the correct voltage, size, and plug configuration. See the
SPECIFICATIONS section for details.
1/2″ (13 mm)
Sheathing
Lag
Screw
Lag
Screw
FlatFlat
WasherWasher
Flat
Washer
Cutout for power
cord/drain hose.
Cutout for power
cord/drain hose.
Rear Leg
Retainer
Rear Leg
Retainer
Wall ShelfWall Shelf
2x4
W
ood
Studs 16″
(406 mm)
On Center
2
x
4
W
o
o
d
S
t
u
d
s
1
6
″
(
4
0
6
m
m
)
O
n
C
e
n
t
e
r

Form No. AWDM-1016
15
English
LIMITED WARRANTY
1. PRODUCT WARRANTY
Hatco warrants the products that it manufactures (the
“Products”) to be free from defects in materials and
workmanship, under normal use and service, for a period of one
(1) year from the date of purchase when installed and
maintained in accordance with Hatco’s written instructions or
18 months from the date of shipment from Hatco. Buyer must
establish the Product’s purchase date by registering the Product
with Hatco or by other means satisfactory to Hatco in its sole
discretion.
Hatco warrants the following Product components to be free
from defects in materials and workmanship from the date of
purchase (subject to the foregoing conditions) for the period(s)
of time and on the conditions listed below:
a) One (1) Year Parts and Labor PLUS One (1) Additional
Year Parts-Only Warranty:
Conveyor Toaster Elements (metal sheathed)
Drawer Warmer Elements (metal sheathed)
Drawer Warmer Drawer Rollers and Slides
Strip Heater Elements (metal sheathed)
Display Warmer Elements (metal sheathed air heating)
Holding Cabinet Elements (metal sheathed air heating)
Heated Well Elements — HW and HWB Series
(metal sheathed)
b) Two (2) Year Parts and Labor Warranty:
Induction Ranges
c) One (1) Year Parts and Labor PLUS Four (4) Years
Parts-Only Warranty:
3CS and FR Tanks
d) One (1) Year Parts and Labor PLUS Nine (9) Years
Parts-Only Warranty on:
Electric Booster Heater Tanks
Gas Booster Heater Tanks
e) Ninety (90) Day Parts-Only Warranty:
Replacement Parts
THE FOREGOING WARRANTIES ARE EXCLUSIVE AND IN
LIEU OF ANY OTHER WARRANTY, EXPRESSED OR
IMPLIED, INCLUDING BUT NOT LIMITED TO ANY IMPLIED
WARRANTY OF MERCHANTABILITY OR FITNESS FOR A
PARTICULAR PURPOSE OR PATENT OR OTHER
INTELLECTUAL PROPERTY RIGHT INFRINGEMENT. Without
limiting the generality of the foregoing, SUCH WARRANTIES
DO NOT COVER: Coated incandescent light bulbs, fluorescent
lights, heat lamp bulbs, coated halogen light bulbs, halogen heat
lamp bulbs, xenon light bulbs, LED light tubes, glass
components, and fuses; Product failure in booster tank, fin tube
heat exchanger, or other water heating equipment caused by
liming, sediment buildup, chemical attack, or freezing; or
Product misuse, tampering or misapplication, improper
installation, or application of improper voltage.
2. LIMITATION OF REMEDIES AND DAMAGES
Hatco’s liability and Buyer’s exclusive remedy hereunder will be
limited solely, at Hatco’s option, to repair or replacement using
new or refurbished parts or Product by Hatco or a Hatco-
authorized service agency (other than where Buyer is located
outside of the United States, Canada, United Kingdom, or
Australia, in which case Hatco’s liability and Buyer’s exclusive
remedy hereunder will be limited solely to replacement of part
under warranty) with respect to any claim made within the
applicable warranty period referred to above. Hatco reserves
the right to accept or reject any such claim in whole or in part.
In the context of this Limited Warranty, “refurbished” means a
part or Product that has been returned to its original
specifications by Hatco or a Hatco-authorized service agency.
Hatco will not accept the return of any Product without prior
written approval from Hatco, and all such approved returns shall
be made at Buyer’s sole expense. HATCO WILL NOT BE
LIABLE, UNDER ANY CIRCUMSTANCES, FOR
CONSEQUENTIAL OR INCIDENTAL DAMAGES, INCLUDING
BUT NOT LIMITED TO LABOR COSTS OR LOST PROFITS
RESULTING FROM THE USE OF OR INABILITY TO USE THE
PRODUCTS OR FROM THE PRODUCTS BEING
INCORPORATED IN OR BECOMING A COMPONENT OF
ANY OTHER PRODUCT OR GOODS.

16
Formulaire n° AWDM-1016
Français
Informations Importantes pour le Propriétaire ................16
Introduction.........................................................................16
Consignes de Sécurité Importantes .................................17
Description du Modèle .......................................................18
Désignation du Modèle ......................................................18
Caractéristiques Techniques.............................................18
Configurations des fiches ..................................................18
Tableau des valeurs nominales électriques.......................18
Dimensions ........................................................................19
Installation...........................................................................20
Généralités.........................................................................20
Mode d'emploi.....................................................................21
Généralités.........................................................................21
Versement d'eau chaude ...................................................21
Programmation du distributeur ..........................................22
Maintenance ........................................................................23
Généralités.........................................................................23
Nettoyage quotidien...........................................................23
Vidange du distributeur......................................................24
Détartrage du distributeur ..................................................24
Réinitialisation de l'interrupteur haute
température de sécurité...................................................25
Guide de Dépannage..........................................................26
Codes d'erreur ..................................................................26
Options et accessoires ......................................................27
Garantie Limitée..................................................................30
Autorisés Distributeurs de Pièces........Couverture Arrière
INFORMATIONS IMPORTANTES POUR LE PROPRIÉTAIRE
Notez le numéro de modèle, le numéro de série, la tension et
la date d'achat de l'appareil dans les espaces ci-dessous
(l'étiquette des caractéristiques du produit se situe sur la partie
inférieure de l'appareil). Veuillez avoir cette information à portée
de la main si vous appelez Hatco pour assistance.
Modèle No. ______________________________________
Numéro de série __________________________________
Voltage __________________________________________
Date d’achat ______________________________________
Enregistrez votre appareil!
Remplissez la garantie en ligne pour éviter les retards pour
faire jouer la garantie. Accédez au site Web Hatco
www.hatcocorp.com, sélectionnez le menu déroulant Parts
& Service, puis cliquez sur Warranty Registration.
Horaires
ouvrables: 7h00 à 17h00
Heure du Centre des États-Unis (CST)
(Horaires d’été : juin à septembre—
7h00 à 17h00 CST du lundi au jeudi
7h00 à 16h00 CST le vendredi)
Téléphone: 800-558-0607; 414-671-6350
Courriel: part[email protected]
Des renseignements supplémentaires sont disponibles sur
notre site Web à www.hatcocorp.com.
Service d'assistance et de pièces de
rechange disponible 7j/7, 24h/24 aux
États-Unis et au Canada en composant
le 800-558-0607.
INTRODUCTION
Les distributeurs d'eau chaude atmosphérique Hatco fournissent
rapidement 1,9 ; 2,8 ou 3,8 litres (2, 3, ou 4 quarts) d'eau chaude
pour la préparation ou le nettoyage d'aliments. Un réservoir en
acier inoxydable de 45 litres (12 gallons) fournit jusqu'à 30 litres
(8 gallons) d'eau chaude en continu. Vous pouvez régler la
température nominale de 24 à 91 °C (75 à 195 °F). Le réglage
par défaut est de 91 °C (195 °F). Vous pouvez vider le réservoir
à l'aide du système de vidange qui se trouve sous l'appareil.
Voici quelques-unes des fonctionnalités des distributeurs d'eau
chaude atmosphérique Hatco : un contrôleur de température
électronique avec un affichage de température numérique, un
interrupteur d'alimentation marche/arrêt (I/O), des boutons de
versement avec quantités pré-mesurées et un bouton de
versement manuel pour éventuellement ajouter des volumes
d'eau supplémentaires.
L'équipement standard inclut une base en acier inoxydable, une
structure enduite de poudre, des pieds ajustables de 102 mm
(4″) et un cordon et une prise électriques de 1 829 mm (6″).
Tous les éléments chauffants électriques sont en métal et
contrôlés par une thermistance sous l'eau. Les appareils sont
protégés par un interrupteur de limite haute température et un
interrupteur de faible niveau d'eau.
Les raccords électriques et la plomberie de l'appareil sont
assemblés en usine et sont prêts à être installés.
Ce manuel contient des instructions relatives à l'installation, à
la sécurité et au fonctionnement des distributeurs d'eau chaude
atmosphérique.Hatco vous recommande de lire l’ensemble des
instructions d’installation, de sécurité et de fonctionnement
contenues dans ce manuel avant d’installer et d’utiliser l'appareil.
Les consignes de sécurité qui apparaissent dans ce manuel
sont identifiées par les mots indicateurs suivants :
AVERTISSEMENT indique une situation dangereuse qui, si
elle n’est pas évitée, peut provoquer la mort ou des
blessures graves.
ATTENTION indique une situation dangereuse qui, si elle
n’est pas évitée, peut provoquer des blessures légères ou
moyennes.
AVIS est utilisé pour des questions sans rapport avec des
blessures corporelles.
AVERTISSEMENT
ATTENTION
AVIS
SOMMAIRE

Formulaire n° AWDM-1016
17
Français
DANGER DE DÉCHARGE ÉLECTRIQUE:
• Brancher l’appareil sur une prise de courant avec terre de
tension, de format et de configuration des broches
corrects. Si la fiche et la prise ne se correspondent pas,
s’adresser à un électricien qualifié pour déterminer et
installer une prise de courant de format et de tension
corrects.
• L'appareil doit être installé par des installateurs
professionnels qualifiés. L'installation doit être conforme
à toutes les normes locales en matière d'électricité et de
plomberie. Une installation par un personnel non qualifié
aura pour conséquence une annulation de la garantie de
l'appareil et peut entraîner une décharge électrique ou une
brûlure, ainsi que des dommages pour l'appareil et/ou ses
alentours. Vérifiez les procédures et les normes à suivre
auprès de vos inspecteurs locaux en matière de plomberie
et d'électricité.
• Mettez hors tension en utilisant l'interrupteur, débranchez
le cordon d'alimentation et laissez l'unité refroidir avant
d'effectuer tout nettoyage, tout réglage ou tout entretien.
• NE PAS immerger l’appareil ni le saturer d’eau. L’appareil
n’est pas étanche à l’eau. Ne pas le faire fonctionner s’il a
été immergé ou saturé d’eau.
• L’appareil n’est pas à l’épreuve des intempéries. Placer
l’appareil à l’intérieur à une température ambiante de 21°C
minimum.
• Ne pas nettoyer l'appareil avec de la vapeur et de ne pas
utiliser trop d'eau.
• L'appareil ne SPLASHPROOF. Ne pas utiliser de nettoyage
des jets de pulvérisation pour nettoyer l'appareil.
• Ne tirez pas l'appareil par le cordon d'alimentation.
• Cessez d'utiliser l'appareil si le cordon d'alimentation est
effiloché ou usé.
• N'essayez jamais de réparer ou de remplacer un cordon
d'alimentation endommagé. Celui-ci devra être remplacé
par Hatco, un agent de service agréé par Hatco ou une
personne possédant des qualifications similaires.
• Cette unité doit être entretenue uniquement par des
personnes qualifiées. Un entretien réalisé par des
personnes non-qualifiées peut entraîner des décharges
électriques ou provoquer des brûlures.
• Utilisez uniquement des pièces de rechange d'origine
Hatco lorsque l'entretien est nécessaire. Utilisez des
pièces détachées Hatco authentiques sous peine
d'annuler toutes les garanties et d'exposer l’utilisateur à
des tensions électriques dangereuses pouvant entraîner
une électrocution ou des brûlures. Les pièces de rechange
authentiques Hatco sont spécifiées pour fonctionner en
toute sécurité dans les environnements dans lesquels
elles sont utilisées. Certaines pièces de rechange
génériques ou d'après-vente n'ont pas les caractéristiques
qui leur permettent d'opérer en toute sécurité dans les
équipements Hatco.
RISQUE D’EXPLOSION: Ne conservez pas ou n'utilisez pas
d'essence ou d'autres vapeurs ou liquides inflammables à
proximité de cet appareil ou de tout autre appareil.
Cet appareil ne contient aucune pièce réparable par l’utilisateur.
Si cet appareil doit être réparé, contacter un réparateur Hatco
agréé ou le Service après-vente Hatco au +1 800-558-0607 ou
+1 414-671-6350.
AVERTISSEMENT
Assurez-vous que tous les opérateurs ont été formés à
l'utilisation sûre et correcte de l'appareil.
Cet appareil ne doit pas être utilisé par des enfants ou des
personnes avec des capacités physiques, sensorielles ou
mentales diminuées. Assurez-vous que les enfants sont bien
surveillés et tenez-les à l'écart de l'appareil.
DANGER DE BRÛLURE:
• Certaines surfaces extérieures de l’appareil deviennent
chaudes. Toucher ces zones de l’appareil avec précaution.
• L'eau de vidange peut atteindre des températures
supérieures à 93 °C (200 °F). Utilisez les matériaux de
plomberie appropriés lors de l'installation du système de
vidange.
Les unités avec auto-remplissage doivent être installées avec
une protection anti-reflux adaptée et doivent être conformes
aux lois nationales en vigueur.
Tous les tuyaux et raccords d'eau et de vidange doivent
respecter l'International Plumbing Code 2003, l'International
Code Council (ICC), l'Uniform Plumbing Code 2003 et
l'International Association of Plumbing and Mechanical
Officials (IAPMO).
Placer l’appareil sur un plan de travail de hauteur correcte à un
endroit qui convient pour son utilisation. Le support doit être
de niveau pour éviter toute chute accidentelle du grille-pain
ou de son contenu et suffisamment solide pour résister au
poids de l’appareil et de son contenu.
Les dommages à toute partie du comptoir pouvant être causés
par la chaleur générée par l’équipement de Hatco ne sont pas
couverts par la garantie de Hatco. Contactez le fabricant du
comptoir pour obtenir des renseignements.
N'utilisez pas de l'eau désionisée. De l'eau désionisée
raccourcit la durée de vie du réservoir d'eau et des éléments
chauffants.
L'appareil doit rester droit durant son transport. Si vous le
placez sur le côté, vous devez faire évacuer l'eau de l'appareil.
Ne serrez pas les raccords de plomberie trop fort. Un serrage
excessif peut entraîner des fuites.
L'eau entrante qui dépasse 0,75 grain de dureté par litre (GPL)
(3,0 grains de dureté par gallon) doit être traitée et adoucie
avant d'être introduite dans le distributeur d'eau chaude
atmosphérique. L'eau contenant plus de 0,75 GPL (3,0 GPG)
diminue l'efficacité et réduit la durée de vie de l'appareil.
L'eau introduite ne doit pas dépasser 60 °C (140 °F). La
pression de l'eau doit être d'au moins 241 kPa (35 psi) et elle
ne doit pas dépasser 552 kPa (80 psi).
Utiliser seulement des nettoyants non abrasifs et des chiffons
doux. Les chiffons et nettoyant abrasifs pourraient érafler la
finition de l'unité, entachant son apparence et la rendant
susceptible à l'accumulation de saleté.
Nettoyez l'unité quotidiennement pour éviter les
dysfonctionnements et assurer un fonctionnement sain.
ATTENTION
AVIS
AVERTISSEMENT
Lisez l'information de securite importante suivante avant d'utiliser cet équipement pour éviter
des dommages ou la mort sérieux et pour éviter d'endommager l'équipement ou la propriété.
CONSIGNES DE SÉCURITÉ IMPORTANTES

Modèle Tension Kilowatts Amps Configuration de Fiches Poids de l’appareil†
AWD-12 208 5 24.0 NEMA 6-30P* 36 kg (80 lbs.)
240 5 20.8 NEMA 6-30P* 36 kg (80 lbs.)
18
Formulaire n° AWDM-1016
Français
Tous les Modèles
Les distributeurs d'eau chaude atmosphérique Hatco sont équipés
d'un contrôleur de température électronique, d'un affichage de
température numérique, d'un interrupteur d'alimentation
marche/arrêt (I/O), des boutons de versement avec quantités pré-
mesurées, et d'un bouton de versement manuel. Les unités sont
protégées par un interrupteur de limite haute température et un
interrupteur de faible niveau d'eau.
Les distributeurs d'eau chaude atmosphérique fournissent des
quantités pré-mesurées de 1,9 ; 2,8 ; 3,8 litres (2, 3, ou 4 quarts)
d'eau chaude à des températures pouvant atteindre jusqu'à
91 °C (195 °F). Cet appareil compact et durable nécessite un
espace minimal et l'étagère amovible permet de verser de l'eau
dans les grands récipients.
L'équipement standard inclut une base en acier inoxydable, une
structure enduite de poudre, des pieds ajustables de 102 mm
(4″), un robinet de vidange du réservoir et un cordon et une
prise électriques de 1 829 mm (6″).
Un réservoir en acier inoxydable de 45 litres (12 gallons) fournit
jusqu'à 30 litres (8 gallons) d'eau thermorégulée en continu,
avec des températures allant de 24 à 91 °C (75 à 195 °F). Il est
facile de vidanger le réservoir grâce au raccord de vidange situé
sur la partie inférieure de l'appareil.
NOTA: Reportez-vous à la rubrique OPTIONS ET ACCESSOIRES
pour en savoir plus sur d'autres volumes de versement,
sur la fixation sur le mur et sur d'autres options et
accessoires disponibles.
Modèle AWD-12
Panneau
de contrôle
Étagère
Amovible
Poignée du Robinet de Vidange
A W D - 12
Atmosphérique
Eau
Taille du réservoir en gallons
Distributeur
DÉSIGNATION DU MODÈLE
Configuration de Fiches
Les appareils sont fournis par l’usine avec un cordon
d’alimentation amovible et une fiche électrique. Les fiches
fournies correspondent à leur application.
DANGER DE DÉCHARGE ÉLECTRIQUE: Brancher
l’appareil sur une prise de courant avec terre de tension,
de format et de configuration des broches corrects. Si la
fiche et la prise ne se correspondent pas, s’adresser à un
électricien qualifié pour déterminer et installer une prise
de courant de format et de tension corrects.
NOTA: Prise non fournie par Hatco.
AVERTISSEMENT
Configuration de Fiches
NOTA: L'étiquette des caractéristiques du produit se situe sur
la partie inférieure de l'appareil. Veuillez vous reporter
à l'étiquette du numéro de série et des données
électriques de l'appareil.
NEMA L6-30P
NEMA 6-30P
CARACTÉRISTIQUES TECHNIQUES
Tableau des valeurs nominales électriques
* NEMA L6-30P en option.
† L'appareil rempli d'eau (45 litres [12 gallons]) pèse 82 kg (180 lb).
DESCRIPTION DU MODÈLE

Modèle kW
Degrés d'augmentation
33°C
(60°F)
50°C
(90°F)
78°C
(140°F)
AWD-12
5 15 Minutes* 22 Minutes* 35 Minutes*
Modèle kW
Degrés d'augmentation
33°C
(60°F)
50°C
(90°F)
78°C
(140°F)
AWD-12
5 22 Minutes 33 Minutes 52 Minutes
Modèle kW
Degrés d'augmentation
33°C
(60°F)
39°C
(70°F)
44°C
(80°F)
50°C
(90°F)
55°C
(100°F)
61°C
(110°F)
66°C
(120°F)
72°C
(130°F)
78°C
(140°F)
83°C
(150°F)
88°C
(160°F)
AWD-12 5
125 lph
(33 gph)
110 lph
(29 gph)
95 lph
(25 gph)
83 lph
(22 gph)
75 lph
(20 gph)
68 lph
(18 gph)
64 lph
(17 gph)
57 lph
(15 gph)
53 lph
(14 gph)
49 lph
(13 gph)
45 lph
(12 gph)
Modèle
Largeur
(A)
Profonduer
(B)
Hauteur
(C)
Largeur
d'encombrement (D)
Profondeur
d'encombrement (E)
AWD-12
339 mm
(13-3/8″)
698 mm
(27-1/2″)
713 mm
(28-1/16″)
273 mm
(10-3/4″)
375 mm
(14-3/4″)
Formulaire n° AWDM-1016
19
Français
A B
203 mm
(8")
D E
C
101 mm
(4")
Dimensions
Tableau de la récupération de température de l'eau
* Les temps de récupération sont calculés après avoir distribué 37 litres (10 gallons) d'eau.
NOTA: lph signifie litres par heure ; gph signifie gallons par heure.
Temps de chauffage du démarrage à froid
Temps de récupération de la température de l'eau
CARACTÉRISTIQUES TECHNIQUES

20
Formulaire n° AWDM-1016
Français
Généralités
Suivez les recommandations et procédures décrites ci-dessous
pour installer un distributeur d'eau chaude atmosphérique.
DANGER DE DÉCHARGE ÉLECTRIQUE:
• Brancher l’appareil sur une prise de courant avec terre
de tension, de format et de configuration des broches
corrects. Si la fiche et la prise ne se correspondent pas,
s’adresser à un électricien qualifié pour déterminer et
installer une prise de courant de format et de tension
corrects.
• L’appareil n’est pas à l’épreuve des intempéries. Placer
l’appareil à l’intérieur à une température ambiante de
21°C minimum.
Les unités avec auto-remplissage doivent être installées
avec une protection anti-reflux adaptée et doivent être
conformes aux lois nationales en vigueur.
Tous les tuyaux et raccords d'eau et de vidange doivent
respecter l'International Plumbing Code 2003,
l'International Code Council (ICC), l'Uniform Plumbing
Code 2003 et l'International Association of Plumbing and
Mechanical Officials (IAPMO).
Placer l’appareil sur un plan de travail de hauteur correcte
à un endroit qui convient pour son utilisation. Le support
doit être de niveau pour éviter toute chute accidentelle du
grille-pain ou de son contenu et suffisamment solide pour
résister au poids de l’appareil et de son contenu.
1. Retirez l'appareil du carton de livraison.
2. Retirez le ruban et l'emballage de protection de toutes les
surfaces de l'appareil.
NOTA: Pour éviter des retards dans l'obtention de la
couverture de la garantie, complétez l'enregistrement
en ligne de votre garantie. Lisez la section
INFORMATIONS IMPORTANTES POUR LE
PROPRIETAIRE pour plus de détails.
3. Placer l’appareil à l’endroit souhaité. Pour savoir comment
installer la fixation sur le mur, consultez la section
OPTIONS ET ACCESSOIRES.
• Placez l’appareil dans une zone dont la température
ambiante est constante (21 °C minimum). Évitez les
zones pouvant être soumises à des mouvements d’air
ou à des courants d’air actifs (comme à proximité de
ventilateurs d’échappement/de hottes d’aspiration, de
conduites de climatisation et de portes extérieures).
• Assurez-vous que l’appareil est placé à une hauteur
appropriée sur le comptoir/mur, dans une zone facilitant
son utilisation.
• Veillez à ce que le comptoir soit à plat et assez résistant
pour supporter le poids de l'appareil et de l'eau à l'intérieur.
NOTA: L'appareil rempli d'eau (12 gallons [45 liters]) pèse 82
kg (180 lb).
• Veuillez vous assurer que tous les pieds en-dessous de
l'appareil sont fermement positionnés sur le comptoir.
AVERTISSEMENT
ATTENTION
4. Raccordez une conduite d'alimentation en eau flexible à
l'arrivée d'eau sur la partie inférieure de l'appareil à l'aide
d'un adaptateur NPT de 1,9 cm (1/4″) avec un raccord (ou
à l'aide de la tubulure d'arrivée de 1,9 cm (1/4″) fournie par
Hatco).
NOTA: Le raccord de l'arrivée d'eau et de la vidange doit se
faire à l'aide d'un tuyau flexible.
NOTA: Si nécessaire, une vanne à bille ou un robinet valve, un
filtre à tamis, des jonctions et un casse-vide ou autres
dispositifs anti-siphonage doivent être fournis par le
plombier ou l'installateur.
Ne serrez pas les raccords de plomberie trop fort. Un
serrage excessif peut entraîner des fuites.
L'eau introduite ne doit pas dépasser 60 °C (140 °F). La
pression de l'eau doit être d'au moins 241 kPa (35 psi) et
elle ne doit pas dépasser 552 kPa (80 psi).
Installation AWD-12
5. Serrez les raccords bien fort.
6. Mettez l'alimentation en eau en route et recherchez les
fuites éventuelles.
• Un raccord de vidange est situé sous l'appareil et
permet de vidanger manuellement le distributeur. Un
connecteur de tuyau mâle est inclus. Consultez la
section ENTRETIEN pour obtenir des informations sur
la vidange.
NOTA: Il est possible de raccorder un tuyau flexible de 19 mm
(3/4″) à la vidange du chauffe-eau et de l'acheminer
vers une évacuation ouverte. La vidange ne doit pas
rester raccordée en permanence au système
d'évacuation des eaux usées. Pour installer le tuyau de
vidange de manière appropriée, consultez les
réglementations de plomberie locales.
Arrivée
d'eau
Poignée du
robinet de
vidange
Raccord de vidange
Tuyau de vidange
(accessoire)
AVIS
INSTALLATION
La page charge ...
La page charge ...
La page charge ...
La page charge ...
La page charge ...
La page charge ...
La page charge ...
La page charge ...
La page charge ...
La page charge ...
La page charge ...
La page charge ...
-
 1
1
-
 2
2
-
 3
3
-
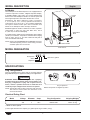 4
4
-
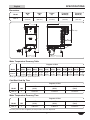 5
5
-
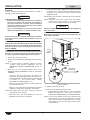 6
6
-
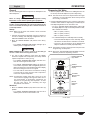 7
7
-
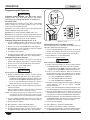 8
8
-
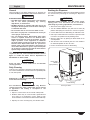 9
9
-
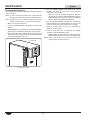 10
10
-
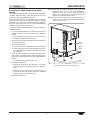 11
11
-
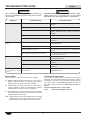 12
12
-
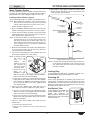 13
13
-
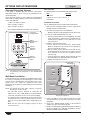 14
14
-
 15
15
-
 16
16
-
 17
17
-
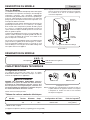 18
18
-
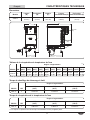 19
19
-
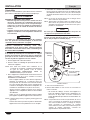 20
20
-
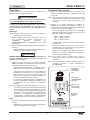 21
21
-
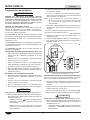 22
22
-
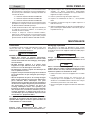 23
23
-
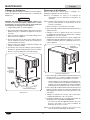 24
24
-
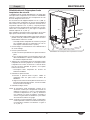 25
25
-
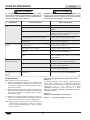 26
26
-
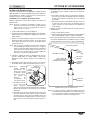 27
27
-
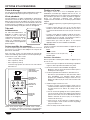 28
28
-
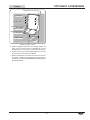 29
29
-
 30
30
-
 31
31
-
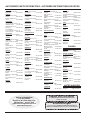 32
32


Hatco AWD Series Le manuel du propriétaire
- Taper
- Le manuel du propriétaire
dans d''autres langues
- English: Hatco AWD Series Owner's manual
Documents connexes
-
Hatco C-12-208-3 Manuel utilisateur
-
Hatco C-36-240-3 Manuel utilisateur
-
Hatco S, C, MC Series Le manuel du propriétaire
-
Hatco C-7-208-3 Manuel utilisateur
-
-
-
-
-
-
Hatco HWBI-1D Le manuel du propriétaire