Ohaus AX223 Guide de démarrage rapide

Taper
Guide de démarrage rapide
AdventurerTM Balances
User Guide
Please download the user manual from www.ohaus.com.
Scan QR Code with your WebCam for
downloading the user instruction manual.
English
Español
Français
Update history
Item
Date
Version
Updated content
1
2023.4.26
F
Update 7.Technical Data
EN-1
1. ASSEMBLY
1) Unpack the balance
1) Remove the binder
2) Take out the red cube
3) Take out the balance
For 1mg, 0.01mg and 0.1mg Models:
Wind Ring
Weighing pan (80mm) for 0.01mg model
Weighing pan (90mm) for 0.1mg model
 Weighing pan (130mm) for 1mg model
2) Install wind ring and weighing pan
1)
Remove the binder
2)
T
ake out the adaptor
box and weighing pan
3)
T
ake out the balance
EN-2
For 0.1g and 0.01g Models:
 Weighing pan (175x195mm) for 0.1g and 0.01g
balance
 Pan support, push the pan support to the end,
tightly connect with cone.
2. SAFETY INFORMATION
This manual contains installation, operation and maintenance instructions for AX
Series balance. Please read this manual completely before installation and
operation.
Definition of Signal Warnings and Symbols
WARNING For a hazardous situation with medium risk, possibly
resulting in injuries or death if not avoided.
CAUTION For a hazardous situation with low risk, resulting in
damage to the device or the property or in loss of data,
or injuries if not avoided.
Attention For important information about the product.
Note For useful information about the product.
Warning Symbols
General
hazard
Explosion
hazard
Electrical
Shock Hazard
Safety Precautions
CAUTION: Read all safety warnings before installing, making
connections, or servicing this equipment. Failure to comply with these
warnings could result in personal injury and/or property damage. Retain
all instructions for future reference.
x Before connecting power, verify that the AC adapter’s input voltage range
and plug type are compatible with the local AC mains power supply.
x Do not position the equipment such that it is difficult to reach the power
connection.
x Make sure that the power cord does not pose a potential obstacle or
tripping hazard.
x Operate the equipment only under ambient conditions specified in these
instructions.
EN-3
x This equipment is for indoor use only.
x Do not operate the equipment in wet, hazardous or unstable environments.
x Do not allow liguids to enter the equipment.
x Do not load the equipment above it's rated capacity.
x Do not drop loads on the platform.
x Do not place the equipment upside down on the platform.
x Use only approved accessories and peripherals.
x Disconnect the equipment from the power supply when cleaning.
x Service should only be performed by authorized personnel.
WARNING: Electrical shock hazards exist within the housing. The housing
should only be opened by authorized and qualified personnel. Remove all
power connections to the unit before opening.
WARNING: Never work in an environment subject to explosion hazards! The
housing of the instrument is not gas tight. (Explosion hazard due to spark
formation, corrosion caused by the ingress of gases).
Intended Use
This instrument is intended for use in laboratories, pharmacies, schools, businesses
and light industry. It must only be used for measuring the parameters described in
these operating instructions. Any other type of use and operation beyond the limits
of technical specifications, without written consent from OHAUS, is considered as
not intended.
This instrument complies with current industry standards and the recognized safety
regulations; however, it can constitute a hazard in use.
If the instrument is not used according to these operating instructions, the intended
protection provided by the instrument may be impaired.
EN-4
3. INSTALLATION
3.1 Selecting the location
The location must be sturdy, flat and level. Avoid locations with excessive air
current, vibrations, heat sources or rapid temperature changes. Allow sufficient
space around the instrument.
3.2 Connecting Power
Connect the AC adapter power cord to the instrument's power input connector, and
then connect the AC plug to a suitable electrical outlet.
Attention
: Only use an AC adapter specified by OHAUS.
Attention: For optimal weighing performance, allow the balance to
warm up for 60 minutes prior to use.
3.3 Connecting the Interface
Use the built-in RS-232 Port to connect either to a computer or a
printer with a standard (straight-through) serial cable.
Or connect using the scale’s USB port.
Interface connections on the rear of the balance:
USB connection on the front of the balance:
.
USB1: Used to connect to PC only
USB2: Used to connect a USB flash driver only
RS232: Used to connect to PC or Printer
USB1
RS232
EN-5
3.4 Leveling the Equipment
To level the instrument, adjust the feet/leveling wheel so the bubble is centered in
the circle of the level indicator. Be sure the equipment is level each time its location
is changed.
3.5 Initial Calibration
For best results, the instrument's calibration should be checked prior to first use. If
adjustment is needed, refer to the Calibration section of the instruction manual.
4. OPERATION
4.1 Overview of Display, Home Screen
This equipment utilizes a touch-sensitive display. Touch areas and Buttons to
control the equipment’s functions.
CONTROLS
EN-6
Button
Action
User logout button
Short Press (if powered Off): Turns on the scale
Long Press (if
powered On): Turns off the scale
Note: The balance will automatically power on when power
is connected.
Short Press: Prints the present data to a printer or a
computer.
Short Press: Perform Zero operation
Short Press: Perform
Calibration operation
Short Press: Perform Tare operation
Main Application Screen
Application
User logout button
Instructional Messages
Stability (*), Net (NET),
Gross (G) and/or center of
zero (>0<) indicators
Result Field: Information varies
by application
Touch gto change unit
Reference Fields
Application Buttons:
Functions vary by
application
Menu & Screen Navigation
Touch Menu to open the menu list.
Calibration:
Touch to view calibration options.
Balance Setup:
Touch to view and change balance settings.
Weighing Units:
Touch to view and change weighing units.
Data Maintenance:
Touch to view data maintenance settings.
Communication:
Touch to view COM
Device Settings and Print
Settings.
Factory Reset:
Touch to do a Factory reset of menu settings.
GLP and GMP Data:
Insert user data for traceability.
User Mangement:
Touch to enter the submenus:
User Profiles
(Edit the user),
Change Password and
Auto
Standby
EN-7
4.2 Using the Balance
Note: Before using any application, be sure the balance has been leveled and
calibrated.
Weighing Application
1. If required, place an empty container on the pan and press Tare.
2. Add sample to the pan or container. The display shows the weight of the
sample.
5. MAINTENANCE
5.1 Cleaning
WARNING: Electric Shock Hazard. Disconnect the equipment from
the power supply before cleaning.
Make sure that no liquid enters the interior of the instrument.
Attention: Do not use solvents, harsh chemicals, ammonia or
abrasive cleaning agents.
The housing may be cleaned with a damp cloth and mild detergent if necessary.
5.2 Service Information
For troubleshooting common problems, download the user manual from
www.Ohaus.com. If the issue persists, please visit our website for available support
and service centers at https://www.ohaus.com/en-us/support/service-centers.
6. LEGAL for TRADE
MEASUREMENT CANADA AND NTEP CERTIFIED BALANCES
LEGAL FOR TRADE SETTING AND SEALING
When the balance is used in trade or a legally controlled application, it must be set
up, verified and sealed in accordance with local weights and measures regulations.
It is the responsibility of the purchaser to ensure that all pertinent legal requirements
are met. As the requirements vary by jurisdiction, the purchaser is advised to
contact their local weights and measures office for instructions about putting the
balance into service.
6.1 Settings
Place the balance in the location of use, level the balance and perform the following
steps:
1. For models with selectable graduation size, set the desired value in the
Graduations menu.
a) Press Menu on the main screen.
b) Press Balance Setup on the Main Menu screen.
c) Press Graduations on the Balance Setup screen.
d) Press the desired graduation size.
EN-8
e) Press Back to return to the previous menu or Exit to return to the Main
screen.
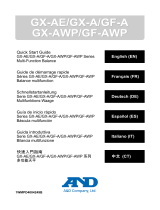
Attention: If the balance will be used for direct sales to the public, the larger
graduation size must be selected.
2. Enter the Weighing Units menu and set the units of measure, making sure
that they are permitted by the local weights and measures regulations.
a) Press Menu on the main screen.
b) Press Weighing Units on the Main Menu screen.
c) Press the desired weighing unit on the Weighing Units screen, and the
balance automatically return to the Main screen.
Attention:
x If the balance will be used for trade in Canada, pennyweights (dwt) must
be set Off.
x Only metric units and U.S. customary units that have been set On will be
available when the balance is set to Approved mode. All other units will be
automatically set Off.
3. Enter the Calibration menu and perform a calibration.
a) Press Menu on the main screen.
b) Press Calibration on the Main Menu screen.
c) If the balance is equipped with internal calibration, press Internal
Calibration on the Calibration screen. Then press Calibration to initiate
the internal calibration process.
d) If the balance is not equipped with internal calibration, press Span
Calibration. Then follow the prompts on the screen to complete the
calibration. Be sure to have the necessary calibration weights on hand.
e) When the calibration has been completed, the balance will return to the
Main screen.
4. Enter the Calibration menu and set the Internal Calibration and Automatic
Calibration settings, making sure that they meet the local weights and
measures regulations.
a) Press Menu on the main screen.
b) Press Calibration on the Main Menu screen.
c) Press Internal Calibration on the Calibration screen.
d) Press On or Off to select the Internal Calibration setting.
Attention: Internal Calibration must be set Off when the balance is used for
trade in Canada.
EN-9
e) Press Automatic Calibration to select On or Off.
Attention: Automatic Calibration must be set Off when the balance is used
for trade in Canada.
f) Press Back to return to the previous menu or Exit to return to the Main
screen.
5. Set the position of the security switch located at the back of the balance to the
locked position.
6. Enter the Balance Setup menu and set the Approved Mode setting to On.
a) Press Menu on the main screen.
b) Press Balance Setup on the Main Menu screen.
c) Press Approved Mode, and then press On.
d) Press Back to return to the previous menu or Exit to return to the Main
screen.
6.2 Verification
A weights and measures official must perform the verification procedure. Contact
the local weights and measures office for more information.
6.3 Sealing
After the balance has been verified, the weights and measures official or authorized
agent will install an official seal to prevent undetected access to the legally
controlled settings. Before sealing the device, ensure that the security switch is in
the locked position and the Approved Mode setting in the Balance Setup menu has
been set to On.
If using a wire seal, pass the sealing wire through the holes in the security switch
and Bottom Housing as shown.
If using a paper seal, place the seal over the security switch and Bottom Housing as
shown.
Un-Locked
Locked with Wire Seal
Locked with Paper
Seal
EN-10
7. TECHNICAL DATA
Equipment ratings:
x Indoor use only
x Altitude: Up to 2000 m
x Operating temperature range: 5đ to 40đ
x Specified temperature range: 10đ to 30đ
x Humidity: maximum relative humidity 80 % for temperatures up to 31đ,
decreasing linearly to 50% relative humidity at 40đ
x Electrical supply: 12VDC, 0.84A. (For use with certified or approved) power
source, which must have a limited-energy output.)
x Voltage fluctuations: Mains supply voltage fluctuations up to ±10% of the
nominal voltage.
x Overvoltage category (Installation category): II
x Pollution degree: 2
InCal Model
AX85
AX125D
AX225D
Maximum Capacity (g)
(Fine range/Full range)
82 82/120 102/220
Readability d, Fine Range (mg)
0.01
0.01
0.01
Readability d, Full Range (mg)
0.01
0.1
0.1
Repeatability (sd.) , 5% of Full Load (mg)
0.01
Repeatability (sd.), 5% of Full Load to Fine
Range Max (mg)
0.02
Repeatability (sd. ), Fine Range Max to Full
Range
0.02 0.1 0.1
Linearity Deviation, Typical (mg)
±0.06
Linearity Deviation (mg)
±0.1
Power supply
AC Adapter Input: 100-240 VAC 0.3A 50-60 Hz
Model
AX124
AX124/E
AX224
AX224/E
AX324
Capacity
120g
120g
220g
220g
320g
Readability d
0.0001g
Repeatability (sd.), 5% of Full Load
0.00008g
Repeatability (sd.), 5% of Full Load to Full
Range
0.0001g
Linearity Deviation, Typical
±0.00006g
Linearity Deviation
±0.0002g
Power supply
AC Adapter Input: 100-240 VAC 0.3A 50-60 Hz
AC Adapter Output: 12 VDC 0.84A
Model
AX223
AX223/E
AX423
AX423/E
AX523
AX523/E
AX623
AX623/E
Capacity
220g
220g
420g
420g
520g
520g
620
620
Readability d
0.001g
Repeatability (sd.),
5% of Full Load
0.0008g
Repeatability (sd.),
5% of Full Load to Full
Range
0.001g
Linearity Deviation,
Typical
±0.0006g
Linearity Deviation
±0.002g
Power supply
AC Adapter Input: 100-240 VAC 0.3 A 50-60 Hz
AC Adapter Output: 12 VDC 0.84 A
EN-11
Model
AX622
AX622/E
AX1502
AX1502/E
AX2202
AX2202/E
AX4202
AX4202/E
AX5202
AX6202
AX6202/E
Capacity
620g
1520g
2200g
4200g
5200g
6200g
Readability d
0.01g
Repeatability (sd.), 5%
of Full Load
0.008g
Repeatability (sd.), 5%
of Full Load to Full
Range
0.01g
Linearity Deviation,
Typical
±0.006g
Linearity Deviation
±0.02g
Power supply
AC Adapter Input: 100-240 VAC 0.3A 50-60 Hz
AC Adapter Output: 12 VDC 0.84A
Model:
AX4201
AX4201/E
AX8201
AX8201/E
AX12001
AX12001/E
Capacity
4200g
4200g
8200g
8200g
12000g
12000g
Readability d
0.1g
Repeatability (sd.),
5% of Full Load
0.08g
Repeatability (sd.), 5%
of Full Load to Full
Range
0.1g
Linearity Deviation,
Typical
±0.06g
Linearity Deviation
±0.2g
Power supply
AC Adapter Input: 100-240 VAC 0.3A 50-60 Hz
AC Adapter Output: 12 VDC 0.84A
Model
AX85M
AX125DM
AX225DM
AX124M
AX224M
AX324M
AX223M
AX423M
AX523M
AX623M
Max
82
82/120
102/
220
120g
220g
320g
220g
420g
520g
620g
Min
0.001g
0.001g
0.001g
0.01g
0.01g
0.01g
0.02g
0.02g
0.02g
0.02g
d=
0.00001
0.00001/
0.0001
0.00001/
0.0001
0.0001g 0.001g
e=
0.001g
0.001g
0.001g
0.001g
0.01g
Approval Class
I
I
I
I
II
Repeatability (sd.), 5%
of Full Load
0.00001g 0.00008g 0.0008g
Repeatability (sd.), 5% of
Full Load to Fine Range
Max
0.00002g - -
Repeatability (sd. ), Fine
Range Max to Full
Range
0.00002
0.000
1
0.000
1
0.0001g 0.001g
Linearity Deviation,
Typical
±0.00006g ±0.00006g ±0.0006g
Linearity Deviation
±0.0001g
±0.0002g
±0.002g
Power supply
AC Adapter Input: 100-240 VAC 0.3A 50-60 Hz
AC Adapter Output: 12 VDC 0.84A
MODEL
AX1502M
AX2202M
AX4202M
AX5202M
AX6202M
AX8201M
AX12001M
Max
1520g
2200g
4200g
5200g
6200g
8200g
12000g
Min
0.5g
0.5g
0.5g
0.5g
0.5g
5g
5g
d=
0.01g
0.1g
e=
0.1g
1g
Approval Class
II
Repeatability (sd.), 5% of
Full Load (g)
0.008g 0.08g
Repeatability (sd.), 5% of
Full Load to Full Range (g)
0.01g 0.1g
Linearity Deviation, Typical
(g)
±0.006g ±0.06g
Linearity Deviation (g)
±0.02g
±0.2g
Power supply
AC Adapter Input: 100-240 VAC 0.3A 50-60 Hz
AC Adapter Output: 12 VDC 0.84A
EN-12
Model
AX224N
AX223N/E
AX423N
AX423N/E
AX523N/E
AX623N/E
Max
220g
220g
420g
520g
620g
Min
0.01g
0.02g
0.02g
0.02g
0.02g
d=
0.0001g or 0.001g
0.001gor 0.01g
e=
0.001g
0.01g
Approval Class
I
II
Repeatability (sd.), 5% of Full
Load
0.00008g 0.0008g
Repeatability (sd.), 5% of Full
Load to Full Range
0.0001g 0.001g
Linearity Deviation, Typical
±0.00006g
±0.0006g
Linearity Deviation
±0.0002g
±0.002g
Power supply
AC Adapter Input: 100-240 VAC 0.3A 50-60 Hz
AC Adapter Output: 12 VDC 0.84A
Model
AX622N/E
AX1502N/E
AX2202N/E
AX4202N/E
AX4202N/GEN
AX5202N/GEN
AX6202N/E
AX8201N/E
AX120001N/E
Max
620g
1520g
2200g
4200g
4200g
5200g
6200g
8200g
12000g
Min
0.5g
0.5g
0.5g
0.5g
0.5g
0.5g
0.5g
5g
5g
d=
0.01g or 0.1g
0.1g or 1g
e=
0.1g
1g
Approval Class
II
Repeatability (sd.),
5% of Full Load
0.008g 0.08g
Repeatability (sd.),
5% of Full Load to
Full Range
0.01g 0.1g
Linearity Deviation,
Typical
±0.006g ±0.06g
Linearity Deviation
±0.02g
±0.2g
Power supply
AC Adapter Input: 100-240 VAC 0.3A 50-60 Hz
AC Adapter Output: 12 VDC 0.84A
EN-13
8. COMPLIANCE
Compliance to the following standards is indicated by the corresponding mark on
the product.
Mark
Standard
This product complies with the applicable harmonized standards
of EU Directives
2011/65/EU (RoHS), 2014/30/EU (EMC),
2014/35/EU (LVD) and 2014/31/EU (NAWI). The EU Declaration
of Conformity is available online at www.ohaus.com/ce.
This product complies with the EU Directive 2012/19/EU (WEEE).
Please dispose of this product in
accordance with local
regulations at the collecting point specified for electrical and
electronic equipment.
For disposal instructions in Europe, refer to www.ohaus.com/weee.
EN 61326
-1
CAN/CSA C22.2
No. 61010-1
UL 61010
-1
Important notice for AX..M.. verified weighing instruments in the EU and UK
When the instrument is used in trade or a legally controlled application it must be
set up, verified and sealed in accordance with local weights and measures
regulations. It is the responsibility of the purchaser to ensure that all pertinent legal
requirements are met.
Weighing Instruments verified at the place of manufacture must bear one of the
following supplementary metrology marking on the descriptive plate.
ISED Canada Compliance Statement˖
This Class A digital apparatus complies with Canadian ICES-003.
ISO 9001 Registration
The management system governing the production of this product is ISO 9001
certified.
EN-14
FCC SUPPLIER DECLARATION OF CONFORMITY
Unintentional Radiator per 47CFR Part B
Trade Name: OHAUS CORPORATION
Model: Adventurer AX
Party issuing Supplier’s Declaration of Conformity:
Ohaus Instruments (Changzhou) Co., Ltd.
2F, 22 Block, 538 West Hehai Road, Xinbei District, Changzhou,
Jiangsu 213022,
China
Phone: +86 519 85287270
Responsible Party U.S. Contact Information:
Ohaus Corporation
7 Campus Drive, Suite 310
Parsippany, NJ 07054
United States
Phone: +1 973 377 9000
Web: www.ohaus.com
FCC Compliance Statement:
Note: This equipment has been tested and found to comply with the limits for a
Class A digital device, pursuant to part 15 of the FCC Rules. These limits are
designed to provide reasonable protection against harmful interference when the
equipment is operated in a commercial environment. This equipment generates,
uses, and can radiate radio frequency energy and, if not installed and used in
accordance with the instruction manual, may cause harmful interference to radio
communications. Operation of this equipment in a residential area is likely to cause
harmful interference in which case the user will be required to correct the
interference at his own expense.
Changes or modifications not expressly approved by the party responsible for
compliance could void the user’s authority to operate the equipment.
ES-1
1. INSTALACIÓN
1) Desembale la balanza
1) Quitar la cinta
2) Saque el cubo rojo
3) Sacar la balanza
Para los modelos de 0.01mg, 0.1 mg y 1 mg:
Anillo corta viento
Platillo (80mm) para el modelo de 0,01 mg
Platillo (90mm) para el modelo de 0,1 mg
Platillo (130mm) para el modelo de 1 mg
2) Instale el anillo corta viento y platillo
1) Quitar la cinta
2)
Sacar la caja del
adaptador y platillo
3)
Sacar la balanza
ES-2
Para los modelos de 0,1g y 0,01g:
Plato (175x195mm) para mantener el
equilibrio 0,1g y 0,01g
Soporte plato, empuje el soporte hasta el
final,
ajustelo hasta que quede firme en el
cono.
2. INFORMACIÓN SOBRE SEGURIDAD
Este manual contiene instrucciones relativas a la instalación, operación y
mantenimiento de la balanza Aventurer. Por favor, lea el manual entero antes de
proceder a la instalación y operación del equipo.
Definición de las señales de advertencia
ADVERTENCIA A situaciones peligrosas de mediano riesgo, que
podrían ocasionar serias lesiones, o incluso hasta la muerte.
PRECAUCIÓN A situaciones peligrosas de bajo riesgo que podrían
ocasionar lesiones o daños materiales, así como a la pérdida de
información del dispositivo.
ATENCIÓN A la Información importante sobre el producto.
NOTA Para obtener útil información sobre el producto.
Señales de Advertencia
Peligro
Peligro de
explosión
Descarga
eléctrica
Medidas de Seguridad
ADVERTENCIA: Lea todas las instrucciones de seguridad antes de
instalar, hacer conexiones, o dar servicio a este equipo. El
incumplimiento de estas advertencias puede causar lesiones personales
y/o daños materiales. Conserve las instrucciones para futuras consultas.
x Antes de conectar a la electricidad, verifique que el rango de voltaje de
entrada del adaptador de CA y el tipo de enchufe sean compatibles con la
alimentación de CA utilizada.
x No coloque la balanza de forma que resulte difícil alcanzar la conexión de
corriente.
x Asegúrese de que el cable de corriente no represente un posible
obstáculo o peligro de tropiezo.
  • Page 1 1
  • Page 2 2
  • Page 3 3
  • Page 4 4
  • Page 5 5
  • Page 6 6
  • Page 7 7
  • Page 8 8
  • Page 9 9
  • Page 10 10
  • Page 11 11
  • Page 12 12
  • Page 13 13
  • Page 14 14
  • Page 15 15
  • Page 16 16
  • Page 17 17
  • Page 18 18
  • Page 19 19
  • Page 20 20
  • Page 21 21
  • Page 22 22
  • Page 23 23
  • Page 24 24
  • Page 25 25
  • Page 26 26
  • Page 27 27
  • Page 28 28
  • Page 29 29
  • Page 30 30
  • Page 31 31
  • Page 32 32
  • Page 33 33
  • Page 34 34
  • Page 35 35
  • Page 36 36
  • Page 37 37
  • Page 38 38
  • Page 39 39
  • Page 40 40
  • Page 41 41
  • Page 42 42
  • Page 43 43
  • Page 44 44
  • Page 45 45
  • Page 46 46
  • Page 47 47
  • Page 48 48

Ohaus AX223 Guide de démarrage rapide

Taper
Guide de démarrage rapide

dans d''autres langues