
Quick Start Guide Scout
TM
SJX Balances
Ohaus Corporation www.ohaus.com i Scout
TM
SJX Balances
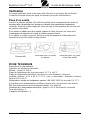
UNPACKING
Carefully remove your Scout balance and each of its components from the package.
Store the packaging material to ensure safe storage and future transport.
Included Components:
Balance
Pan
Quick Start Guide
Calibration Mass (only for SJX/E models with 64g capacity)
Warranty Card
Scoop (only for models with 64g capacity)
AC Adapter & Plug
Capacity label set (SJX323N/E and SJX1502N/E only)
SELECTING THE LOCATION
Place on a firm, steady surface with sufficient space. Avoid excessive air currents,
vibrations, heat sources, or rapid temperature changes.
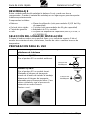
PREPARATION FOR USE
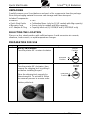
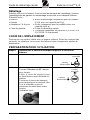
Step-1
Release the red Transportation Lock on subplatform of the balance
Non SJXN/E models:
Turn the pointer 90 counter-clockwise.
SJXN/E models:
Turn the pointer 90 clockwise, then
remove the shipping lock by pulling it
out before installing the pan.
Store the shipping lock properly for
future transport. To reinstall it, follow
the removal process in reverse order.
Pointer pulled out:
Unlocked
Position
Locked
Position
Locked
Position
Unlocked
Position

Scout
TM
SJX Balances Quick Start Guide
Scout
TM
SJX Balances ii Corporation www.ohaus.com
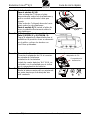
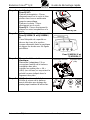
Step-2
Install the Pan
For SJX/E:
Rectangular pan: Place diagonally on
sub-platform and rotate counter-
clockwise until it locks.
Round pan: Set straight down on
subplatform.
For SJX: Install the stainless steel pan
directly on the subplatform.
Step-3
Attach Capacity Label
For SJX323N/E and SJX1502N/E:
Attach the capacity label above the
screen at the position as demonstrated
in the graphic, and align the edges with
the dotted lines.
Step-4
Connect Power
Connect the AC Adapter to the balance
input jack.
Battery Installation
Install the Four “AA” (LR6) batteries
(not included) with polarity as shown in
the battery compartment.
Step-5
Level the balance
Level the balance before using by
adjusting the feet until the air bubble is
centered
AC Adapter Jack
Battery
Compartment
For SJX/E
For SJX323N/E
and SJX1502N/E

Quick Start Guide Scout
TM
SJX Balances
Ohaus Corporation www.ohaus.com iii Scout
TM
SJX Balances
SAFETY PRECAUTIONS
CAUTION: Read all safety warnings before installing, making connections, or
servicing this equipment. Failure to comply with these warnings could result in
personal injury and/or property damage. Retain all instructions for future reference.
Verify that the local AC power supply voltage is within the input voltage
range printed on the AC adapter’s ratings label.
Only connect the AC adapter to a compatible grounded socket.
Position the instrument such that the AC adapter can be easily
disconnected from the socket.
Position the power cord so that it does not pose a potential obstacle or
tripping hazard.
Operate the equipment only under ambient conditions specified in the user
instructions.
This equipment is intended for indoor use and should only be operated in
dry locations.
Do not operate the equipment in hazardous or explosive environments.
Disconnect the equipment from mains power before cleaning or servicing.
Service should only be performed by authorized personnel.
Intended Use
This instrument is intended for use in laboratories, schools, businesses and light
industry. It must only be used for measuring the parameters described in these
operating instructions. Any other type of use and operation beyond the limits of
technical specifications, without written consent from OHAUS, is considered as not
intended. This instrument complies with current industry standards and the
recognized safety regulations; however, it can constitute a hazard in use. If the
instrument is not used according to these operating instructions, the intended
protection provided by the instrument may be impaired.

Scout
TM
SJX Balances Quick Start Guide
Scout
TM
SJX Balances iv Corporation www.ohaus.com
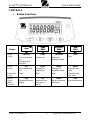
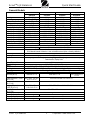
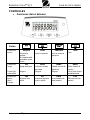
CONTROLS
Button Functions
Button
Short
Press
Zero/On
Turns the balance
on;
If balance is On,
sets Zero
Print
Initiates print
Function
Initiates an
application mode
Tare
Tare
Long
Press
Extended
Press
Off
Turns the balance
Off
None
Units
Changes the
weighing unit
None
Mode
Changes the
application mode
None
Menu
Enters the user
menu
View the preset
Tare value
Short
Press
(Menu
Function)
Yes
Accepts the current
setting
No
Advances to the
next menu or
setting
Back
Moves to previous
menu item
Exit
Exits the user menu

Quick Start Guide Scout
TM
SJX Balances
Ohaus Corporation www.ohaus.com v Scout
TM
SJX Balances
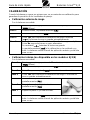
CALIBRATION
When the balance is operated for the first time, a calibration is recommended to
ensure accurate weighing results.
External Span Calibration
With balance turned on:
Step-1
Press and hold Menu until [mMeNU] (Menu) is displayed.
Step-2
Release the button, the display will show [C.A.L].
Step-3
Press Yes to accept. [SpaN] will then be shown.
Step-4
Press Yes to begin the span calibration. [--C--] will blink and the
Zero reading is stored automatically.
Step-5
The specified mass blinks on the display.
Place the specified span calibration mass on the pan or press
No to select an alternate weight.
[--C--] will blink while the reading is stored.
The display will show [done] if the calibration was successful. The
balance returns to the previous application mode and is ready for
use.
Internal Calibration (not available for SJX/E models)
With balance turned on:
Step-1
Press and hold Menu until [mMeNU] (Menu) is displayed.
Step-2
Release the button, the display will show [C.A.L].
Step-3
Press Yes to accept. [In.CAL] will then be shown.
Step-4
Press Yes to begin the Internal calibration. Zero reading is
stored automatically.
Step-5
Pull the InCal handle while the
display show [PULL].
Step-6
Push the InCal handle while the
display show [PUSH].
Step-7
Repeat the step-5, and step-6 one
more time.
Step-8
The display will show [done] if the calibration was successful.
The balance returns to the previous application mode and is
ready for use.

Scout
TM
SJX Balances Quick Start Guide
Scout
TM
SJX Balances vi Corporation www.ohaus.com
OPERATION & APPLICATIONS
The balance can be configured to operate in one or more Application modes.
Press and hold Mode key to select your Application mode.
The Scout SJX balance incorporates the following Applications:
[wWeIGH]
[Count]
[Percnt]
[CHeCK]
[total]
[SPEC.Gr]
[Hold]
Weighing
Parts
Counting
Percent
Weighing
Check
Weighing
Totalization
Density
Determination
Display
Hold
Weighing
Step-1
Press the Zero/On button to turn the balance on.
Step-2
Select Weighing (default application) by pressing & holding
Mode key.
Step-3
Press Tare or Zero if necessary to begin.
Step-4
Place objects on the pan to display the weight. When stable, the
* appears on the display. The display then shows the resulting
weight of the sample.
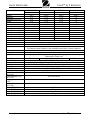
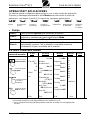
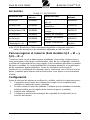
MENU STRUCTURE
Sub-Menus
C.a.l**
S.E.t.U.P
M.o.d.E
U.n.i.t**
E.n.d
User Menu Items:
In.CAL*
CAL.Adj*
-100
..
0
..
100
Span
Lin
Reset
Yes/No
Auxiliary
Graduation**
On/Off
Filter
Low/Med/High
AZT
0.5/1/3/Off
StableRange
0.5/1/2//5
Backlight
Off/On/Auto
Auto Tare
Off/On/On-acc
Auto Off
Off/1/5/10
Reset
Yes/No
Weighing
On/Off
Counting
On/Off
Percent
On/Off
Check
On/Off
Totalize
On/Off
Density
On/Off
Hold
Disp/Peak/Off
Reset
g
kg
ct
oz
ozt
dwt
lb
grn
hkt
sgt
twt
t
tola/tical
End
End
End
End
Note: Bold fonts are default settings in the menus.
* These sub-menus are not available in SJX/E models.
** Available Settings may vary by local regulations.
No/Back
Long press –
Enter menu
Short press -
Accept
Short press –
Go Next/Prev.
menu
Yes
Exit
Short press –
Exit menu

Quick Start Guide Scout
TM
SJX Balances
Ohaus Corporation www.ohaus.com vii Scout
TM
SJX Balances
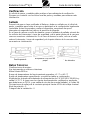
ADDITIONAL FEATURES
Connecting the Interface
Use an optional interface connectivity
kit to connect the balance either to a
computer, printer or OHAUS auxiliary
display.
Below Interface kit accessories are
available:
RS232, USB Host, USB Device,
Ethernet, Bluetooth
*
.
Interface connection on the rear of the
balance:
* Interface kits may vary according to local regulations
Weigh Below Hook
The weigh below hook on SJX/E models is located at the reverse
side of the battery cover as shown below (on SJX models it is located in
the weigh below protective cover). To use this feature, remove the red
protective cover underneath for the weigh below opening.
MAINTENANCE
Cleaning
WARNING: Electric Shock Hazard. Disconnect the equipment from the
power supply before cleaning.
The housing may be cleaned with a cloth dampened with a mild detergent if necessary.
Attention: Do not use solvents, chemicals, alcohol, ammonia or abrasives to
clean the housing or control panel.
Interface connection
AC Adapter Jack
Security slot
Weigh below protective cover
Weigh below
hook
(SJX/E)
0

Scout
TM
SJX Balances Quick Start Guide
Scout
TM
SJX Balances viii Corporation www.ohaus.com
Troubleshooting
The following table lists common problems and possible causes and remedies.
If the problem persists, contact OHAUS or your authorized dealer.
Symptom
Possible Cause
Cannot turn on
No power to balance
Poor accuracy
Improper calibration
Unstable environment
Cannot calibrate
Security switch in locked position
Err 8.1
Weight exceeds power on zero range.
Err 8.2
Weight below power on zero range.
Err 8.3
Over load (weight exceeds rated capacity)
Err 8.4
Under load (pan removed)
Err 8.5
Tare out of range
Err 8.6
Displayed value exceeds 999999 (possible in Totalization
mode)
Err 8.7
Unknown internal weight position
ref.err
Parts counting or percentage error – sample weight <1d.
Balance shows error then exits parts counting or goes to
[Clr.APU].
Lo.ref
Percent Reference weight or APW is too low for accurate
results
CAL E
Fail to do calibration.
USB.Err
Cannot find menu or app file in U-disk.
Service Information
If the troubleshooting section does not resolve or describe your problem, contact
your authorized OHAUS service agent. For service assistance or technical support
in the United States call toll-free 1-800-672-7722 ext. 7852 between 8:00 AM and
5:00 PM EST. An OHAUS product service specialist will be available to provide
assistance. Outside the USA, please visit our web site, www.ohaus.com to locate
the OHAUS office nearest you.
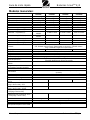
Accessories
DESCRIPTION
Item Number
DESCRIPTION
Item Number
RS232 kit
30268982
Stacking Kit, x1
30268988
USB Host kit
30268983
Specific Gravity kit
30269020
USB Device Kit
30268984
Auxiliary Display Kit
30269019
Bluetooth Kit*
30268985
Carrying Case
30269021
Ethernet Kit
30268986
In-Use Cover
30269022
Stacking Kit, x6
30268987
Printers and Cables
Contact
OHAUS
Note: * Bluetooth kit is only available in certain regions according to the local
regulations.

Quick Start Guide Scout
TM
SJX Balances
Ohaus Corporation www.ohaus.com ix Scout
TM
SJX Balances
LEGAL FOR TRADE (SJX...N/E models only)
When the balance is used in trade or a legally controlled application it must be set
up, verified and sealed in accordance with local weights and measures regulations.
It is the responsibility of the purchaser to ensure that all pertinent legal requirements
are met. As the requirements vary by jurisdiction, the purchaser is advised to
contact their local weights and measures office for instructions about putting the
balance into service.
Settings
Before verification and sealing, perform the following steps:
1. Verify that the menu settings meet the local weights and measures
regulations.
2. Units menu should be reviewed. Verify the units turned On are
permitted by the local weights and measures regulations.
3. Perform a calibration.
4. Set the position of the Security Switch to the locked position.
Verification
A weights and measures official must perform the verification procedure. Contact
the local weights and measures office for more information.
Sealing
After the Balance has been verified, it must be sealed by the weights and measures
official to prevent undetected access to the legally controlled settings. Before
sealing the device, ensure that the security switch is in the Locked position.
If using a wire seal, pass the sealing wire through the holes in the security switch
and Bottom Housing as shown.
If using a paper seal, place the seal over the security switch and Bottom Housing as
shown.
Unlocked
Locked with Paper Seal
Locked with Wire Seal
TECHNICAL DATA
Equipment Ratings:
Altitude: Up to 2000 m
Indoor use only
Operating temperature range: +5 °C to +40 °C
Specified temperature range: Refer to tables below
Relative humidity: 10% to 80% at 31°C , decreasing linearly to 50% at 40°C, non-
condensing
Power: AC power adaptor input 100-240V 50/60 Hz and output 5 V DC 1 A (For
use with certified or approved power supply, which must have a SELV and limited
energy circuit output.), or 4 AA batteries
Main supply voltage fluctuations: up to ± 10% of the nominal voltage
Pollution degree: 2
Installation category: II

Scout
TM
SJX Balances Quick Start Guide
Scout
TM
SJX Balances x Corporation www.ohaus.com
General Models
Model
SJX323
/
SJX622
SJX1502
SJX323/E
SJX322/E
SJX622/E
SJX1502/E
Capacity
320 ct (64 g)
320 g
620 g
1500 g
Readability
0.005 ct (0.001 g)
0.01 g
0.01 g
0.01 g
Repeatability (Std. Dev.)
0.002 g
0.01 g
0.01 g
0.02 g
Linearity
0.003 g
0.01 g
0.02 g
0.03 g
Span Calibration Mass*
50 g
200 g
300 g
1.5 kg
Linearity Calibration Mass
30, 60 g
200, 300 g
300, 600 g
1 kg, 1.5 kg
Capacity x Readability (kg)
/
/
/
1.5 x 0.00001
Capacity x Readability (ct)
320 x 0.005
1600 x 0.05
3100 x 0.05
7500 x 0.05
Capacity x Readability (oz)
2.25750 x 0.00005
11.2880 x 0.0005
21.8700 x 0.0005
52.9110 x 0.0005
Capacity x Readability (ozt)
2.05765 x 0.00005
10.2880 x 0.0005
19.9335 x 0.0005
48.2260 x 0.0005
Capacity x Readability (dwt)
41.153 x 0.001
205.76 x 0.01
398.67 x 0.01
964.52 x 0.01
Capacity x Readability (lb)
/
/
1.36690 x 0.00005
3.30690 x 0.00005
Capacity x Readability (grn)
987.66 x 0.02
4938.4 x 0.2
9568.0 x 0.2
23148.4 x 0.2
Stabilization Time (s)
1.5
1
1.5
Construction
ABS plastic housing with 304 stainless steel (SST) pan
Draftshield
Yes
No
Calibration
SJX/E: User-selectable external span or linearity calibration
SJX: Manual Internal Calibration / User-selectable external span or linearity calibration
Tare Range
Full Capacity by subtraction
Weighing Units**
g, kg, ct, oz, ozt, dwt, lb, grn, hkt, sgt, twt, tical, tola
Application Modes**
Weighing, Parts Counting, Percent Weighing, Check Weighing, Totalization, Density
Determination, Display Hold
Typical Battery Life
80 hours
Specified Temperature
Range
10° C (50° F) to 40° C (104° F)
Storage Conditions
-20° C (-4° F) to 55° C (131° F) at 10% to 90% relative humidity, non-condensing
Communication
RS232, USB Host, USB Device, Ethernet or Bluetooth*** (all available as accessory)
Display Type
Backlit LCD: 6-digit 7-segment with white LED backlight
Display Size
20 mm digits / 0.78 in
Pan Size (W x D)
Ø 93 mm / 3.7 in
Ø 120 mm / 4.7 in
170 x 140 mm / 6.7
x 5.5 in
Scale Dimensions - SJX/E
(W x D x H)
202 x 222 x 103 mm /
8 x 8.7 x 4.1 in
202 x 224 x 54 mm / 8 x 8.8 x 2.1 in
Scale Dimensions - SJX
(W x D x H)
202 x 230 x 114 mm
202 x 230 x 68 mm
Shipping Dimensions -
SJX/E (W x D x H)
300 x 250 x 129mm /
11.8 x 9.8 x 5.1 in
300 x 250 x 86 mm / 11.8 x 9.8 x 3.4 in
Shipping Dimensions - SJX
(W x D x H)
300 x 250 x 129mm
Net Weight (SJX/E)
1 kg / 2.2 lb
Net Weight (SJX)
1.1 kg
1.6 kg
Shipping Weight (SJX/E)
1.5 kg / 3.3 lb
Shipping Weight (SJX)
1.7 kg
2.2 kg

Quick Start Guide Scout
TM
SJX Balances
Ohaus Corporation www.ohaus.com xi Scout
TM
SJX Balances
Model
/
/
SJX6201
/
SJX621/E
SJX3201/E
SJX6201/E
SJX8200/E
Capacity
620 g
3200 g
6200 g
8200 g
Readability
0.1 g
0.1 g
0.1 g
1 g
Repeatability (Std. Dev.)
0.1 g
0.1 g
0.1 g
1 g
Linearity
0.1 g
0.1 g
0.2 g
1 g
Span Calibration Mass*
300 g
3 kg
5 kg
8 kg
Linearity Calibration Mass
300, 600 g
1.5 kg, 3 kg
3 kg, 6 kg
4 kg, 8 kg
Capacity x Readability (kg)
/
3.2 x 0.0001
6.2 x 0.0001
8.2 x 0.001
Capacity x Readability (ct)
3100 x 0.5
16000 x 0.5
31000 x 0.5
41000 x 5
Capacity x Readability (oz)
21.870 x 0.005
112.880 x 0.005
218.700 x 0.005
289.25 x 0.05
Capacity x Readability (ozt)
19.930 x 0.005
102.880 x 0.005
199.335 x 0.005
263.60 x 0.05
Capacity x Readability (dwt)
398.7 x 0.1
2057.6 x 0.1
3986.7 x 0.1
5270 x 1
Capacity x Readability (lb)
1.3670 x 0.0005
7.0550 x 0.0005
13.6685 x 0.0005
18.080 x 0.005
Capacity x Readability (grn)
9570 x 2
49380 x 2
95680 x 2
126540 x 20
Stabilization Time (s)
1
Construction
ABS plastic housing with 304 stainless steel (SST) pan
Draftshield
No
Calibration
SJX/E: User-selectable external span or linearity calibration
SJX: Manual Internal Calibration / User-selectable external span or linearity calibration
Tare Range
Full Capacity by subtraction
Weighing Units**
g, kg, ct, oz, ozt, dwt, lb, grn, hkt, sgt, twt, tical, tola
Application Modes**
Weighing, Parts Counting, Percent Weighing, Check Weighing, Totalization, Density
Determination, Display Hold
Typical Battery Life
120 hours
80 hours
120 hours
Specified Temperature
Range
10° C (50° F) to 40° C (104° F)
Storage Conditions
-20° C (-4° F) to 55° C (131° F) at 10% to 90% relative humidity, non-condensing
Communication
RS232, USB Host, USB Device, Ethernet or Bluetooth*** (all available as accessory)
Display Type
Backlit LCD: 6-digit 7-segment with white LED backlight
Display Size
20 mm digits / 0.78 in
Pan Size (W x D)
170 x 140 mm / 6.7 x 5.5 in
Scale Dimensions - SJX/E
(W x D x H)
202 x 224 x 54 mm / 8 x 8.8 x 2.1 in
Scale Dimensions - SJX
(W x D x H)
202 x 230 x 68 mm
Shipping Dimensions -
SJX/E
(W x D x H)
300 x 250 x 86 mm / 11.8 x 9.8 x 3.4 in
Shipping Dimensions - SJX
(W x D x H)
300 x 250 x 129mm
Net Weight (SJX/E)
1 kg / 2.2 lb
Net Weight (SJX)
1.6 kg
Shipping Weight (SJX/E)
1.5 kg / 3.3 lb
Shipping Weight (SJX)
2.2 kg

Scout
TM
SJX Balances Quick Start Guide
Scout
TM
SJX Balances xii Corporation www.ohaus.com
NTEP and Measurement Canada Approved models
Model
SJX323N/E
SJX622N/E
SJX1502N/E
SJX6201N/E
Capacity
320 ct (64 g)
620 g
1500 g
6200 g
Readability
0.01 ct (0.001 g)
or 0.1 ct (0.01 g)
0.1 g
0.01 g or 0.1 g
1 g
Verification Interval e
0.1 ct (0.01 g)
0.1 g
0.1 g
1 g
Class
II
III
II
III
Span Calibration Mass*
50 g
300 g
1.5 kg
5 kg
Linearity Calibration Mass
30, 60 g
300, 600 g
1 kg, 1.5 kg
3 kg, 6 kg
Capacity x Readability (kg)
/
/
1.5 x 0.00001 or
1.5 x 0.0001
6.2 x 0.001
Capacity x Readability (ct)
320 x 0.01 or 320
x 0.1
3100 x 0.5
7500 x 0.5
31000 x 5
Capacity x Readability (oz)
2.2575 x 0.0005
21.870 x 0.005
52.910 x 0.005
218.70 x 0.05
Capacity x Readability (ozt)
2.0575 x 0.0005
19.935 x 0.005
48.225 x 0.005
199.35 x 0.05
Capacity x Readability (dwt)
41.153 x 0.001 or
41.15 x 0.01
398.7 x 0.1
964.52 x 0.01 or
964.5 x 0.1
3987 x 1
Capacity x Readability (lb)
/
1.3670 x 0.0005
3.3070 x 0.0005
13.670 x 0.005
Capacity x Readability (grn)
987.6 x 0.2
9568 x 2
23148 x 2
95680 x 20
Stabilization Time (s)
1.5
1
1.5
1
Construction
ABS housing & Stainless steel pan
Draftshield
Yes
No
Calibration
User-selectable external span or linearity calibration
Tare Range
Full Capacity by subtraction
Weighing Units**
g, kg, ct, oz, ozt, dwt, lb, grn
Application Modes**
Weighing, Parts Counting, Percent Weighing, Check Weighing, Totalization, Density
Determination, Display Hold
Typical Battery Life
80 hours
Specified Temperature
Range
Class II: 10° C (50° F) to 30° C (86° F)
Class III: 10° C (50° F) to 40° C (104° F)
Storage Conditions
-20° C (-4° F) to 55° C (131° F) at 10% to 90% relative humidity, non-condensing
Communication
RS232, USB Host, USB Device, Ethernet or Bluetooth*** (all available as accessory)
Display Type
Backlit LCD: 6-digit 7-segment with white LED backlight
Display Size
0.78 in / 20 mm digits
Pan Size (W x D)
Ø 93 mm / 3.7 in
Ø 120 mm / 4.7 in
170 x 140 mm / 6.7 x 5.5 in
Scale Dimensions
(W x D x H)
202 x 222 x 103
mm /
8 x 8.7 x 4.1 in
202 x 224 x 54 mm / 8 x 8.8 x 2.1 in
Shipping Dimensions
(W x D x H)
300 x 250 x
129mm / 11.8 x
9.8 x 5.1 in
300 x 250 x 86 mm / 11.8 x 9.8 x 3.4 in
Net Weight
2.2 lb / 1 kg
Shipping Weight
3.3 lb / 1.5 kg

Quick Start Guide Scout
TM
SJX Balances
Ohaus Corporation www.ohaus.com xiii Scout
TM
SJX Balances
COMPLIANCE
Compliance to the following standards is indicated by the corresponding mark on
the product.
Mark
Standard
This product complies with the EU Directives 2011/65/EU (RoHS),
2014/30/EU (EMC), 2014/35/EU (LVD) and 2014/31/EU (NAWI). The
EU Declaration of Conformity is available online at
www.ohaus.com/ce.
This product complies with the EU Directive 2012/19/EU (WEEE) and
2006/66/EC (Batteries). Please dispose of this product in accordance
with local regulations at the collecting point specified for electrical and
electronic equipment. For disposal instructions in Europe, refer to
www.ohaus.com/weee.
AS/NZS 61000.6.1, AS/NZS 61000.6.3
CAN/CSA-C22.2 No. 61010-1
UL Std. No. 61010-1
FCC Compliance Statement:
Note:
This equipment has been tested and found to comply with the limits for a
Class B digital device, pursuant to Part 15 of the FCC Rules. These limits are
designed to provide reasonable protection against harmful interference in a
residential installation. This equipment generates, uses and can radiate radio
frequency energy and, if not installed and used in accordance with the instructions,
may cause harmful interference to radio communications. However, there is no
guarantee that interference will not occur in a particular installation. If this
equipment does cause harmful interference to radio or television reception, which
can be determined by turning the equipment off and on, the user is encouraged to
try to correct the interference by one or more of the following measures:
- Reorient or relocate the receiving antenna.
- Increase the separation between the equipment and receiver.
- Connect the equipment into an outlet on a circuit different from that to which the
receiver is connected.
- Consult the dealer or an experienced radio/TV technician for help.
Changes or modifications not expressly approved by the party responsible for
compliance could void the user’s authority to operate the equipment.
ISED Canada Compliance Statement:
This Class B digital apparatus complies with Canadian ICES-003.

Scout
TM
SJX Balances Quick Start Guide
Scout
TM
SJX Balances xiv Corporation www.ohaus.com
INSTRUCTION MANUAL
For more detailed information about the balance,
please refer to the product instruction manual. The
instruction manual can be obtained either by
scanning the QR code or by going to the Scout SJX
product page to download it.
Go to www.ohaus.com to register your product's
warranty.
Product Page:
http://www.ohaus.com
QR Code:

Guía de inicio rápido Balanzas Scout
TM
SJX
Ohaus Corporation www.ohaus.com i Balanzas Scout
TM
SJX
DESEMBALAJE
Retire cuidadosamente del embalaje la balanza Scout y cada uno de sus
componentes. Guarde el material de embalaje en un lugar seguro para transportar
la balanza posteriormente.
Componentes incluidos:
Balanza
Masa de calibración (solo para modelos SJX/E de 64 g
de capacidad)
Guía de inicio rápido
Cuchara (solo para modelos de 64 g de capacidad)
Tarjeta de garantía
Adaptador de CA y enchufe
Plato
Conjunto de etiquetas de capacidad (solo SJX323N / E
y SJX1502N / E)
SELECCIÓN DEL LUGAR DE INSTALACIÓN
Coloque la balanza sobre una superficie firme y con suficiente espacio. Evite el
exceso de corrientes de aire, vibraciones, fuentes de calor o cambios bruscos de
temperatura.
PREPARACIÓN PARA EL USO
Paso 1
Libere el bloqueo de transporte de color rojo ubicado en la sub-
plataforma de la balanza
Modelos no SJXN/E:
Gire el puntero 90 en sentido antihorari.
Modelos SJXN/E:
Gire el puntero 90 en sentido horari.
Eliminado el bloqueo de transporte
tirando de él antes de instalar la bandeja.
Almacenar el bloqueo de transporte
adecuada para el transporte futuro. Para
volver a instalarlo, siga el proceso de
extracción en orden inverso.
Puntero sacó:
Posición de
bloqueo
Posición de
desbloqueo
Posición de
bloqueo
Posición de
desbloqueo

Balanzas Scout
TM
SJX Guía de inicio rápido
Balanzas Scout
TM
SJX ii Ohaus Corporation www.ohaus.com
Paso 2
Instale el plato
Para el modelo SJX/E:
Plato rectangular: Coloque el plato
diagonalmente sobre la sub-plataforma y
gire en sentido antihorario hasta que
encaje.
Plato redondo: Colóquelo derecho hacia
abajo sobre la sub-plataforma.
Para el modelo SJX: Instale el plato de
acero inoxidable directamente sobre la
sub plataforma.
Paso 3
Adjuntar etiqueta de capacidad
Para SJX323N / E y SJX1502N / E:
Pegue la etiqueta de capacidad sobre el
pantalla en la posición como se demostró
en el gráfico y alinee los bordes con
Las líneas punteadas.
Para SJX323N / E y SJX1502N / E
Paso 4
Conecte la alimentación
Conecte el adaptador de CA al conector
de entrada de la balanza.
Instalación de las baterías
Instale las cuatro baterías "AA" (LR6, no
incluidas) con la polaridad que se indica
en el compartimento de baterías.
Paso 5
Nivele la balanza
Nivele la balanza antes del uso ajustando
las patas hasta que la burbuja de aire
esté centrada
Conector de entrada de
adaptador de CA
Compartimento
de baterías
Para el modelo
SJX/E

Guía de inicio rápido Balanzas Scout
TM
SJX
Ohaus Corporation www.ohaus.com iii Balanzas Scout
TM
SJX
PRECAUCIONES DE SEGURIDAD
PRECAUCIÓN: Lea todas las advertencias de seguridad antes de instalar, hacer
conexiones o efectuar reparaciones en este equipo. El incumplimiento de estas
advertencias puede causar lesiones personales y/o daños a la propiedad. Conserve
todas las instrucciones para referencia futura.
Compruebe que el voltaje de la alimentación de CA local esté dentro del rango de
entrada impreso en la etiqueta de especificaciones del adaptador de CA.
Solo conecte el adaptador de CA a una toma compatible con conexión de tierra.
Posicione el instrumento de tal forma que el adaptador de CA se pueda
desconectar fácilmente de la toma de alimentación.
Posicione el cable de alimentación de manera que no obstaculice el tránsito de
las personas o cree un peligro de tropiezos.
Utilice el equipo solo bajo las condiciones ambientales especificadas en las
instrucciones del usuario.
Este equipo está diseñado para uso en interiores y solo debe utilizarse en lugares
secos
No opere el equipo en entornos peligrosos o explosivos.
Desconecte el equipo de la red eléctrica antes de realizar una limpieza o un
mantenimiento.
La reparación del equipo solo debe ser realizada por personal autorizado.
Uso previsto
Este instrumento está diseñado para su uso en laboratorios, escuelas, empresas e
industria ligera. Solo debe usarse para medir los parámetros descritos en estas
instrucciones de funcionamiento. Cualquier otro tipo de uso y operación más allá de
los límites de las especificaciones técnicas, sin el consentimiento por escrito de
OHAUS, se considera no previsto.
Este instrumento cumple con los estándares actuales de la industria y las normas
de seguridad reconocidas; sin embargo, puede constituir un peligro en uso.
Si el instrumento no se utiliza de acuerdo con estas instrucciones de
funcionamiento, la protección prevista proporcionado por el instrumento puede
verse afectado.

Balanzas Scout
TM
SJX Guía de inicio rápido
Balanzas Scout
TM
SJX iv Ohaus Corporation www.ohaus.com
CONTROLES
Funciones de los botones
Botón
Pulsación
breve
Zero/On
Enciende la
balanza;
Si la balanza está
encendida, ajusta
el cero
Print
Inicia la impresió n
Function
Inicia un modo de
aplicació n
Tare
Tara
Pulsación
larga
Pulsación
extendida
Off
Apaga la balanza
Ninguna
Units
Cambia la unidad
de pesaje
Ninguna
Mode
Cambia el modo de
aplicació n
Ninguna
Menu
Entra al menú de
usuario
Ver el valor de tara
predeterminado
Pulsación
breve
Menú
Funció n
Yes
Acepta el valor
actual
No
Avanza al siguiente
menú o ajuste
Back
Va al elemento de
menú anterior
Exit
Sale del menú de
usuario

Guía de inicio rápido Balanzas Scout
TM
SJX
Ohaus Corporation www.ohaus.com v Balanzas Scout
TM
SJX
CALIBRACIÓN
Cuando la balanza se opera por primera vez, se recomienda una calibración para
garantizar la precisión de los resultados de pesaje.
Calibración externa de rango
Con la balanza encendida:
Paso 1
Presione y mantenga presionado Menu hasta que aparezca
[mMeNU] (Menu).
Paso 2
Suelte el botón, la pantalla mostrará [C.A.L].
Paso 3
Pulse Yes para aceptar. [SpaN] se mostrará a continuación.
Paso 4
Pulse Yes para comenzar la calibración de rango. Mostrará
[--C--], la lectura de cero se guarda automáticamente.
Paso 5
Coloque la masa especificada de calibración de rango en el plato.
Pulse No para seleccionar un peso alternativo.
Se mostrará [--C--] mientras la lectura se guarda.
La pantalla mostrará [done] si la calibración se ha realizado con
éxito. La balanza vuelve al modo de aplicación anterior y está lista
para su uso.
Calibración interna (no disponible en los modelos SJX/E)
Con la balanza encendida:
Paso 1
Presione y mantenga presionado Menu hasta que aparezca
[mMeNU] (Menu).
Paso 2
Suelte el botón, la pantalla mostrará [C.A.L].
Paso 3
Pulse Yes para aceptar. [In.CAL] se mostrará a continuación.
Paso 4
Pulse Yes para comenzar la calibración de rango. La lectura de
cero se guarda automáticamente.
Paso 5
Tire de la manija InCal mientras la
pantalla muestra [PULL].
Paso 6
Empuje la manija InCal mientras la
pantalla muestra [PUSH].
Paso 7
Repita los pasos 5 y 6 una vez más.
Paso 8
La pantalla mostrará [done] si la calibración se ha realizado con
éxito. La balanza vuelve al modo de aplicación anterior y está lista
para su uso.

Balanzas Scout
TM
SJX Guía de inicio rápido
Balanzas Scout
TM
SJX vi Ohaus Corporation www.ohaus.com
OPERACIÓN Y APLICACIONES
La balanza puede configurarse para operar en uno o más modos de aplicación.
Presione y mantenga presionada la tecla Mode para seleccionar el modo de
aplicación. La balanza Scout SJX incorpora las siguientes aplicaciones:
[wWeIGH]
[Count]
[Percnt]
[CHeCK]
[total]
[SPEC.Gr]
[Hold]
Pesaje
Recuento de
piezas
Pesaje en
porcentaje
Pesaje de
comprobación
Totalización
Determinación
de densidad
Retención
de valor
en display
Pesaje
Paso 1
Pulse el botón Zero/On para encender la balanza.
Paso 2
Seleccione la aplicación de pesaje (aplicación predeterminada)
pulsando y manteniendo presionada la tecla Mode.
Paso 3
Si fuera necesario, pulse Tare o Zero para comenzar.
Paso 4
Coloque objetos sobre el plato para ver el peso. Cuando la medición
está estable, aparece * en la pantalla. La pantalla muestra a
continuación el peso resultante de la muestra.
ESTRUCTURA DEL MENÚ
Elementos de
menú de usuario:
C.a.l**
S.E.t.U.P
M.o.d.E
U.n.i.t**
E.n.d
User Menu Items:
In.CAL*
CAL.Adj*
-100
..
0
..
100
Span
Lin
Reset
Yes/No
Auxiliar
Graduación**
On/Off
Filter
Low/Med/High
AZT
0.5/1/3/Off
StableRange
0.5/1/2//5
Backlight
Off/On/Auto
Auto Tare
Off/On/On-acc
Auto Off
Off/1/5/10
Reset
Yes/No
Weighing
On/Off
Counting
On/Off
Percent
On/Off
Check
On/Off
Totalize
On/Off
Density
On/Off
Hold
Disp/Peak/Off
Reset
g
kg
ct
oz
ozt
dwt
lb
grn
hkt
sgt
twt
t
tola/tical
End
End
End
End
Nota: Las letras en negrita son los valores predeterminados en los menús.
* Estos sub-menús no están disponibles en los modelos SJX/E.
** Las Configuraciónes disponibles pueden variar de acuerdo con los reglamentos
locales.
Pulsación larga:
Entrar a menú
Pulsación breve:
Aceptar
Pulsación breve:
Ir al menú
Next/Prev.
Pulsación breve:
Salir del menú
No/Back
Yes
Exit
La page charge ...
La page charge ...
La page charge ...
La page charge ...
La page charge ...
La page charge ...
La page charge ...
La page charge ...
La page charge ...
La page charge ...
La page charge ...
La page charge ...
La page charge ...
La page charge ...
La page charge ...
La page charge ...
La page charge ...
La page charge ...
La page charge ...
La page charge ...
La page charge ...
La page charge ...
La page charge ...
La page charge ...
-
 1
1
-
 2
2
-
 3
3
-
 4
4
-
 5
5
-
 6
6
-
 7
7
-
 8
8
-
 9
9
-
 10
10
-
 11
11
-
 12
12
-
 13
13
-
 14
14
-
 15
15
-
 16
16
-
 17
17
-
 18
18
-
 19
19
-
 20
20
-
 21
21
-
 22
22
-
 23
23
-
 24
24
-
 25
25
-
 26
26
-
 27
27
-
 28
28
-
 29
29
-
 30
30
-
 31
31
-
 32
32
-
 33
33
-
 34
34
-
 35
35
-
 36
36
-
 37
37
-
 38
38
-
 39
39
-
 40
40
-
 41
41
-
 42
42
-
 43
43
-
 44
44


Ohaus SJX323N/E Guide de démarrage rapide
- Taper
- Guide de démarrage rapide
- Ce manuel convient également à
dans d''autres langues
- English: Ohaus SJX323N/E Quick start guide
- español: Ohaus SJX323N/E Guía de inicio rápido
Documents connexes
-
Ohaus NV2201 Manuel utilisateur
-
-
Ohaus SPX2201 Guide de démarrage rapide
-
Ohaus cd-11 Manuel utilisateur
-
Ohaus STX422 Guide de démarrage rapide
-
-
-
Ohaus PR124 Guide de démarrage rapide
-
-
Autres documents
-
Vernier OHAUS Scout 420 g Manuel utilisateur
-
 Giropes Baxtran BAR Manuel utilisateur
-
Baxtran BAT300 Manuel utilisateur
-
 Giropes Baxtran BAR150I Manuel utilisateur
-
 AND AD-6121A Manuel utilisateur
-
 AND AD-6121ABT Manuel utilisateur
-
 Golmar R-3,SAR-90,S-8,S-4,RAV-4,SAV-90 User And Installer Manual
-
 JB ATLAS DS-250 Manuel utilisateur
-
Fellow Tally Pro Mode d'emploi


