
P
PR Series
Balances
Quick Start Guide
Please download the user manual from www.ohaus.com.
EN
ES
FR
Scan QR Code with your WebCam for
downloading the user i
nstruction manual.


EN-1
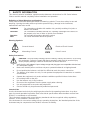
1. SAFETY INFORMATION
This manual contains installation, operation and maintenance instructions for PR Series balance.
Please read this manual completely before installation and operation.
Definition of Signal Warnings and Symbols
Safety notes are marked with signal words and warning symbols. These show safety issues and
warnings. Ignoring the safety notes may lead to personal injury, damage to the instrument,
malfunctions and false results.
WARNING
For a hazardous situation with medium risk, possibly resulting in injuries or
death if not avoided.
CAUTION
For a hazardous situation with low risk, resulting in damage to the device or
the property or in loss of data, or injuries if not avoided.
Attention
For important information about the product
Note
For useful information about the product
Warning Symbols
General Hazard
Electrical Shock Hazard
Alternating Current
Direct Current
Safety Precautions
CAUTION: Read all safety warnings before installing, making connections, or servicing
this equipment. Failure to comply with these warnings could result in personal injury
and/or property damage. Retain all instructions for future reference.
x Verify that the AC adapter’s input voltage range and plug type are compatible with the local
AC main power supply.
x Make sure that the power cord does not pose a potential obstacle or tripping hazard.
x Do not position the balance such that it is difficult to reach the power connection.
x The balance is for indoor use only. Do not operate the equipment in hazardous or unstable
environments.
x Operate the equipment only under ambient conditions specified in these instructions.
x Do not drop loads on the pan.
x Use the balance only in dry locations.
x Disconnect the equipment from the power supply when cleaning.
x Use only approved accessories and peripherals.
x Service should only be performed by authorized personnel.
Intended Use
Use the instrument exclusively for weighing as described in the operating instructions. Any other
type of use and operation beyond the limits of technical specifications without written consent from
OHAUS, is considered as not intended.
This instrument complies with current industry standards and the recognized safety regulations;
however, it can constitute a hazard in use.
If the instrument is not used according to these operating instructions, the intended protection of the
instrument may be compromised and OHAUS assumes no liability.

EN-2
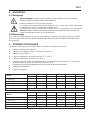
2. INSTALLATION
2.1 Select the Location
Avoid heat sources, rapid temperature changes, air current or excessive vibrations. Allow sufficient
space.
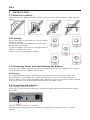
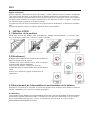
2.2 Leveling
Be sure the balance is level before it is used or after its
location is changed.
The PR balance has a level bubble in a small round
window beside the display.
To level the balance, adjust the 2 leveling feet until the
bubble is centered in the circle.
Please refer to the right figure for leveling.
2.3 Connecting Power and Acclimatising the Balance
Connect the DC output connector to the power receptacle on the rear of the balance. Then connect
the AC adapter plug to a suitable electrical outlet.
Acclimatising
It is suggested that the balance should not be used until it has been connected to power and
acclimatised to the environment for a certain period of time. In the case of a balance with the
precision above 0.1 mg, the acclimatisation time should be 1.5 hours; in the case of balance with the
precision of 0.01 mg, the acclimatisation time should be more than 4 hours.
2.4 Connecting the Interface
The PR balance has a RS232 port.
Use the RS-232 port to connect either to a computer or a printer with a standard (straight-through)
serial cable.
Interface connections on the rear of the balance
RS232漡Used to connect to PC or Printer
Note: See the Printing section for Connecting, Configuring and Testing the Printer / Computer
Interface.
RS232

EN-3
2.5 Initial Calibration
For best results, the instrument's calibration should be checked prior to first use. If adjustment is
needed, refer to the Calibration section of the instruction manual.
3. OPERATION
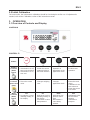
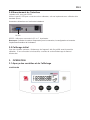
3.1 Overview of Controls and Display
CONTROLS
CONTROL FUNCTIONS
Button
Primary
Function
(Short
Press)
On / Zero
x If the balance is Off,
turns on the balance.
x If the balance is On,
sets zero.
Print
x Sends the current
displayed value to
the serial interface.
Function
x
Operation is
dependent on the
application mode.
Tare
x
Performs tare
operation.
Secondary
Function
(Press and
Hold)
Off
x Zeros the current
value.
Unit
x Changes weighing
units.
Mode
x
Changes
application mode.
Menu-Cal
x
Enters the main
menu.
Calibration is the
first sub-
menu.
x
Views the preset
Tare value.
Menu
Function
(Short
Press)
Yes
x Accepts the current
(blinking) setting on
the display.
No
x Rejects the current
(blinking) setting on
the display.
x Increments a value
being entered.
Back
x Reverts back to
previous menu
item.
x
Decrements a
value being
entered.
Exit
x
Immediately exits
the sub-
menu.
x
Aborts a
calibration in
progress.

EN-4
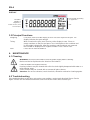
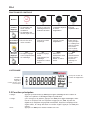
DISPLAY
3.2 Principal Functions
Weighing:
First press Zero to set the display to zero. Place an object on the pan. The
display indicates the gross weight.
Taring:
With no load on the pan, press Zero to set the display to zero. Place an
empty container on the pan and press Tare. Add objects to the container and
its net weight is displayed. After the container and the objects are removed,
the load will be displayed as a negative number. Press Tare to clear.
Zero:
Press Zero to zero the balance.
4. MAINTENANCE
4.1 Cleaning
WARNING: Disconnect the balance from the power supply before cleaning.
Make sure that no liquid enters the interior of the balance.
Clean the balance at regular intervals.
Housing surfaces may be cleaned with a lint
-free cloth slightly dampened with water or a
mild cleaning agent.
Glass surfaces may be cleaned with a commercial glass cleaner.
Attention: Do not use solvents, harsh chemicals, ammonia or abrasive cleaning agents.
4.2 Troubleshooting
If the troubleshooting section does not resolve your problem, contact an Authorized Ohaus Service
Agent. Please visit our website www.ohaus.com to locate the Ohaus office nearest you.
Net (NET)
Stability (*)
Negative (-)
Centre of zero (>0<)
Pre-tare (PT)
Result Field: depending
on application
Unit

EN-5
5. TECHNICAL DATA
The technical data is valid under the following conditions:
x Indoor use only
x Powered by external approved LPS AC/DC adaptor
x
Altitude: Up to 2000 m
x
Operating temperature range: 5 °C to 40 °C
x
Specified Temperature range: 10°C to 30°C
x
Humidity: maximum relative humidity 80% for temperatures up to 30°C, decreasing linearly to
50% relative humidity at 40°C
x Mains supply voltage fluctuations: up to ±10% of the nominal voltage
x Installation category II
x
Pollution degree: 2
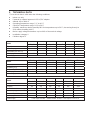
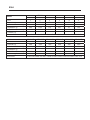
Model
PR124
PR224
PR223
PR423
PR523
PR64/E
PR124/E
PR224/E
PR223/E
PR423/E
PR523/E
Capacity
62
120
220
220
420
520
Readability d (g)
0.0001
0.0001
0.0001
0.001
0.001
0.001
Repeatability (std. dev.) (g)
0.0001
0.0001
0.0001
0.001
0.001
0.001
Linearity (g)
±0.0002
±0.0002
±0.0002
±0.002
±0.002
±0.002
Power Supply
Power input: 100-240V ~ 200mA 50-60Hz 12-18VA Power output: 12 VDC 0.5A
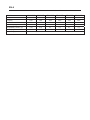
Model
PR1602
PR2202
PR4202
PR4201
PR6201
PR1602/E
PR2202/E
PR4202/E
PR2201/E
PR4201/E
PR6201/E
Capacity
1600
2200
4200
2200
4200
6200
Readability d (g)
0.01
0.01
0.01
0.1
0.1
0.1
Repeatability (std. dev.) (g)
0.01
0.01
0.01
0.1
0.1
0.1
Linearity (g)
±0.02
±0.02
±0.02
±0.2
±0.2
±0.2
Power Supply
Power input: 100-240V ~ 200mA 50-60Hz 12-18VA Power output: 12 VDC 0.5A
Model
PR523N
PR323N/E
PR523N/E
PR322N/E
PR522N/E
PR822N/E
PR2202N/E
Class
II
II
II
II
III
II
Capacity
320
520
320
520
820
2200
Verification scale interval e (g)
0.01
0.01
0.01
0.01
0.1
0.1
Readability d (g)
0.001
0.001
0.01
0.01
0.1
0.01
Repeatability (std.dev.) (g)
0.001
0.001
0.01
0.01
0.01
0.01
Linearity (g)
±0.002
±0.002
±0.02
±0.02
±0.02
±0.02
Power Supply
Power input: 100-240V ~ 200mA 50-60Hz 12-18VA Power output: 12 VDC 0.5A

EN-6
Model
PR4202N/E
PR5202N/E
PR2201N/E
PR4201N/E
PR5201N/E
PR6201N/E
Class
II
II
II
II
II
III
Capacity
4200
5200
2200
4200
5200
6200
Verification scale interval e (g)
0.1
0.1
0.1
0.1
0.1
1
Readability d (g)
0.01
0.01
0.1
0.1
0.1
1
Repeatability (std.dev.) (g)
0.01
0.01
0.1
0.1
0.1
0.1
Linearity (g)
±0.02
±0.02
±0.2
±0.2
±0.2
±0.2
Power Supply
Power input: 100-240V ~ 200mA 50-60Hz 12-18VA Power output: 12 VDC 0.5A

EN-7
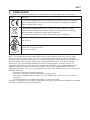
6. COMPLIANCE
Compliance to the following standards is indicated by the corresponding mark on the product.
Mark
Standard
This product complies with the EU Directives
2011/65/EU (RoHS),
2014/30/EU
(EMC)
and 2014/35/EU (LVD). The EU Declaration of Conformity is available
online at www.ohaus.com/ce.
This product complies with the EU Directive 2012/19/EU (WEEE). Please
dispose of this product in accordance with local regulations at the collecting
point specified for electrical and electronic equipment.
For disposal instructions in Europe, refer to www.ohaus.com/weee.
EN 61326
-1
CAN/CSA
-C22.2 No. 61010-1
UL Std. No. 61010
-1
Note: This equipment has been tested and found to comply with the limits for a Class B digital
device, pursuant to part 15 of the FCC Rules. These limits are designed to provide reasonable
protection against harmful interference in a residential installation. This equipment generates, uses
and can radiate radio frequency energy and, if not installed and used in accordance with the
instructions, may cause harmful interference to radio communications. However, there is no
guarantee that interference will not occur in a particular installation. If this equipment does cause
harmful interference to radio or television reception, which can be determined by turning the
equipment off and on, the user is encouraged to try to correct the interference by one or more of the
following measures:
- Reorient or relocate the receiving antenna.
- Increase the separation between the equipment and receiver.
- Connect the equipment into an outlet on a circuit different from that to which the receiver is
connected.
- Consult the dealer or an experienced radio/TV technician for help.
Changes or modifications not expressly approved by the party responsible for compliance could void
the user’s authority to operate the equipment.


ES-1
1. INFORMACIÓN SOBRE SEGURIDAD
Este manual contiene instrucciones relativas a la instalación, operación y mantenimiento de la
Básculas Serie PR. Por favor, lea el manual entero antes de proceder a la instalación y operación
del equipo.
Definición de las señales y símbolos de advertencia
Los consejos de seguridad están marcados con palabras y símbolos de advertencia. Estos
muestran advertencias y problemas de seguridad. Hacer caso omiso de las indicaciones de
seguridad puede llevar a lesiones personales, daños al dispositivo, fallos de funcionamiento y
resultados falsos.
ADVERTENCIA
Situaciones peligrosas con riesgo medio, que pueden provocar la
muerte o lesiones graves si no se evitan.
PRECAUCIÓN
Situaciones peligrosas con riesgo bajo, que pueden provocar daños en el
dispositivo o a la propiedad, perdida de datos, o lesiones graves si no
se evitan.
Atención
Información importante sobre el producto.
Nota
Información útil sobre el producto.
Símbolos de advertencia
Peligro general
Peligro descarga eléctrica
Corriente alterna
Corriente continua
Precauciones de seguridad
PRECAUCIÓN: lea todas las advertencias de seguridad antes de instalar, hacer
conexiones o realizar el mantenimiento de este equipo. El incumplimiento de las
instrucciones podría resultar en lesiones personales y/o daños materiales. Conserve
todas las instrucciones para futura referencia.
ș Compruebe que el rango de voltaje de entrada del adaptador de CA y el tipo de enchufe son
compatibles con la red eléctrica de corriente alterna local.
ș Asegúrese de que el cable de alimentación no represente un posible obstáculo o riesgo de
tropezarse.
ș No coloque la báscula de tal manera que sea difícil llegar a la conexión eléctrica.
ș Utilice la báscula solo en interiores. no utilice la unidad en entornos peligrosos o en lugares
inestables.
ș Opere la unidad solamente bajo las condiciones ambientales especificadas en estas instrucciones.
ș No deje caer cargas sobre el plato.
ș Utilice la báscula solo en lugares secos.
ș Desconecte el equipo de la fuente de alimentación durante su limpieza.
ș Utilice accesorios y periféricos aprobados.
ș Cualquier reparación y servicio debe ser realizado solo por personal autorizado.
Uso Apropiado
Utilice el equipo exclusivamente para los fines de pesaje descritos en el manual. Cualquier otro tipo
de uso y/o funcionamiento, que exceda los límites de las especificaciones técnicas sin el
consentimiento por escrito de OHAUS, se considera como Uso Inapropiado.
Este equipo cumple con los estándares de la industria y las normas actuales de seguridad
reconocidas;

ES-2
sin embargo, puede constituir un peligro en su uso.
Si el equipo no se utiliza de acuerdo al manual de instrucciones, su seguridad puede verse
afectada, por lo que OHAUS no asume ninguna responsabilidad.
2. INSTALACIÓN
2.1 Seleccionar la ubicación
Evite fuentes de calor, cambios rápidos de temperatura, corrientes de aire o vibraciones excesivas.
Deje espacio suficiente.
2.2 Nivelación
Asegúrese de que la balanza está nivelada antes de
su uso o después de cambiar su ubicación.
La balanza PR tiene un nivel de burbuja en una
pequeña ventana redonda junto a la pantalla.
Para nivelar la balanza, ajuste los 2 pies de
nivelación hasta que la burbuja esté centrada en el
círculo.
Consulte el dibujo de la derecha para ajustar la
nivelación.
2.3 Conexión de la alimentación y aclimatación de la báscula
Conecte el conector de salida de CC a la toma de corriente en la parte posterior de la
báscula. A continuación, conecte el enchufe del adaptador de CA a una toma de corriente
adecuada.
Aclimatación
Se recomienda no utilizar la balanza hasta que la unidad se haya aclimatado al entorno durante un
determinado período de tiempo. En el caso de balanza con precisión por encima de 0,1 mg, el
tiempo de pre-aclimatación debe ser de 1,5 horas; en el caso de balanza con una precisión de 1 mg,
el tiempo de aclimatación debe ser de un mínimo de 0,5 horas.
2.4 Conexión de la interfaz
La balanza PR balance tiene un puerto RS232.
Utilice el puerto RS-232 para conectar con un ordenador o una impresora mediante un cable serie
estándar (directo).

ES-3
Conexiones de interfaz en la parte posterior de la báscula
RS232
RS232: utilizado para conectar a ordenador o impresora
Nota: consulte la sección «Impresión» para la Conexión, Configuración y Prueba de la impresora /
interfaz del ordenador.
2.5 Calibración inicial
Para garantizar unos resultados de pesaje exactos, antes del primer uso de la balanza debe
calibrarse la misma. Si es necesario realizar ajustes, consulte la sección de "Calibración" del manual
de instrucciones.
3. FUNCIONAMIENTO
3.1 Descripción general de los controles y la pantalla
CONTROLES
FUNCIONES DE CONTROL
Botón
Función
primaria
(Pulsación
rápida)
On / Zero
x Si el indicador está
en Off (apagado), se
enciende el
indicador.
x Si el indicador está
en On (activado), se
ajusta en cero.
Print
x
Envía el valor
mostrado a la
interfaz serial.
Function
x
La operación
depende del modo
de aplicación.
Tare
x
Realiza la
operación de
tara.

ES-4
Botón
Función
secundaria
(Pulsar y
mantener)
Off
x Ajusta a cero el valor
actual.
Unit
x
Cambia las
unidades de
pesaje.
Mode
x Cambia el modo de
aplicación.
Menu-Cal
x
Entra en el menú
principal. La
calibración es el
primer submenú.
x
Muestra el valor
de tara
predeterminado.
Función de
menú
(Pulsación
rápida)
Yes
x
Acepta la
configuración actual
(intermitente) en la
pantalla.
No
x
Rechaza la
configuración actual
(intermitente) en la
pantalla.
x Incrementa un valor
introducido.
Back
x Vuelve a la opción
de menú anterior.
x Disminuye un valor
introducido.
Exit
x
Sale
inmediatamente
del submenú.
x
Aborta una
calibración en
curso.
PANTALLA
3.2 Funciones principales
Pesaje:
Pulse el botón Zero para ajustar la pantalla a cero. Coloque un objeto en el
plato. La pantalla indica el peso bruto.
Tarar:
Sin carga en el plato, pulse Zero para ajustar la pantalla a cero. Coloque un
recipiente vacío en el plato y pulse
Tare
. Añada objetos al recipiente para
ver su peso. Una vez retirados el recipiente y los objetos, la carga se
mostrará como un número negativo. Pulse Tare para borrar.
Cero:
Pulse Zero para ajustar la balanza a cero.
4. MANTENIMIENTO
4.1 Limpieza
ADVERTENCIA: desconecte el equipo de la fuente de alimentación antes de su limpieza.
Asegúrese de que no entre líquido en el interior de la báscula.
Limpie la báscula a intervalos regulares.
La superficie de la carcasa puede limpiarse con un paño sin pe
lusas ligeramente
humedecido con agua o un limpiador suave.
Las superficies de vidrio pueden limpiarse con un limpiacristales comercial.
Atención:
no utilice disolventes, amoniaco, ni productos químicos o de limpieza
abrasivos.
Neto (NETO)
Estabilidad (*)
Negativo (-)
Centro de cero (>0<)
Pre-tara (PT)
Campo de resultados:
dependiendo de la
aplicación
Unidad

ES-5
4.2 Solución de problemas
Si la sección de solución de problemas no resuelve su problema, póngase en contacto con su
agente de servicio autorizado de Ohaus. Visite nuestro sitio web www.ohaus.com para localizar la
oficina de Ohaus más cercana a usted.
5. DATOS TÉCNICOS
Los datos técnicos son válidos en las siguientes condiciones:
x Uso de interior solamente
x Alimentado por un adaptador externo LPS AC/DC aprobado
x
Altitud: Hasta 2,000 m
x
Rango de temperatura de funcionamiento: 5 °C a 40 °C
x
Rango de temperatura: 10 °C a 30 °C
x
Humedad:
máxima
humedad
relativa
80%
para
temperaturas
hasta
30
°C,
disminuyendo
linealmente
a
50
%
de
humedad
relativa
a
40
°C
x
Fluctuaciones
de
voltaje
del
suministro
eléctrico:
hasta
±10
%
el
voltaje
nominal
x
Categoría
de
instalación
II
x
Grado
de
contaminación:
2
Modelo
PR124
PR224
PR223
PR423
PR523
PR64/E
PR124/E
PR224/E
PR223/E
PR423/E
PR523/E
Capacidad
(g)
62
120
220
220
420
520
Legibilidad d
(g)
0.0001
0.0001
0.0001
0.001
0.001
0.001
Repetibilidad
(desv.est.)
(g)
0.0001
0.0001
0.0001
0.001
0.001
0.001
Linealidad
(g)
±0.0002
±0.0002
±0.0002
±0.002
±0.002
±0.002
Alimentación
Potencia de entrada: 100-240V ~ 200mA 50-60Hz 12-18VA Potencia de salida: 12 VDC 0.5A
Modelo
PR1602
PR2202
PR4202
PR4201
PR6201
PR1602/E
PR2202/E
PR4202/E
PR2201/E
PR4201/E
PR6201/E
Capacidad
(g)
1600
2200
4200
2200
4200
6200
Legibilidad d
(g)
0.01
0.01
0.01
0.1
0.1
0.1
Repetibilidad
(desv.est.)
(g)
0.01
0.01
0.01
0.1
0.1
0.1
Linealidad
(g)
±0.02
±0.02
±0.02
±0.2
±0.2
±0.2
Alimentación
Potencia de entrada: 100-240V ~ 200mA 50-60Hz 12-18VA Potencia de salida: 12 VDC 0.5A

ES-6
Modelo
PR523N
PR323N/E
PR523N/E
PR322N/E
PR522N/E
PR822N/E
PR2202N/E
Clase
II
II
II
II
III
II
Capacidad
(g)
320
520
320
520
820
2200
Intervalo de verificación e (g)
0.01
0.01
0.01
0.01
0.1
0.1
Legibilidad
d
(g)
0.001
0.001
0.01
0.01
0.1
0.01
Repetibilidad
(desv.est.)
(g)
0.001
0.001
0.01
0.01
0.01
0.01
Linealidad
(g)
±0.002
±0.002
±0.02
±0.02
±0.02
±0.02
Alimentación
Potencia de entrada: 100-240V ~ 200mA 50-60Hz 12-18VA Potencia de salida: 12 VDC 0.5A
Modelo
PR4202N/E
PR5202N/E
PR2201N/E
PR4201N/E
PR5201N/E
PR6201N/E
Clase
II
II
II
II
II
III
Capacidad
(g)
4200
5200
2200
4200
5200
6200
Intervalo de verificación e (g)
0.1
0.1
0.1
0.1
0.1
1
Legibilidad
d
(g)
0.01
0.01
0.1
0.1
0.1
1
Repetibilidad
(desv.est.)
(g)
0.01
0.01
0.1
0.1
0.1
0.1
Linealidad
(g)
±0.02
±0.02
±0.2
±0.2
±0.2
±0.2
Alimentación
Potencia de entrada: 100-240V ~ 200mA 50-60Hz 12-18VA Potencia de salida: 12 VDC 0.5A

ES-7
6. CONFORMIDAD
El cumplimiento con los siguientes estándares se indica por la marca correspondiente en el
producto.
Marca
Estándar
Este producto cumple con las directivas 2011
/65/UE (RoHS), 2014/30/UE
(EMC) y 2014/35/
UE (LVD). La declaración de conformidad de la UE está
disponible en línea en www.ohaus.com/ce.
Este producto cumple con la Directiva de la UE 2012/19/
UE
(WEEE). Elimine
este producto, según las
disposiciones locales, mediante el sistema de
recogida selectiva de aparatos eléctricos y electrónicos.
Para consultar las instrucciones de eliminación en Europa, visite
www.ohaus.com/weee
EN 61326
-1
CAN/CSA
-C22.2 No. 61010-1
UL Std. No. 61010
-1


FR-1
1. INFORMATIONS DE SECURITE
Ce manuel contient les instructions pour installer, faire fonctionner et assurer l'entretien d'une
balance PR. Lisez ce manuel intégralement avant l'installation et le démarrage.
Définition des symboles et signes d’avertissement
Les notes de sécurité sont marqués par des mots signaux et des symboles d’avertissement. Ils
présentent les problèmes et avertissements de sécurité. Le non-respect des notes de sécurité
pourrait déboucher sur des blessures personnelles, l’endommagement de l’appareil, les défaillances
et les résultats erronés.
AVERTISSEMENT
Pour une situation dangereuse avec risque moyen, débouchant
probablement sur des blessures ou la mort en cas de non évitement.
ATTENTION
Pour une situation dangereuse avec un faible risque, débouchant
sur un endommagement de l’appareil, des pertes matérielles ou des
données ou encore des blessures en cas de non évitement.
Attention
Pour des informations importantes concernant le produit.
Remarque
Pour des informations importantes concernant le produit.
Symboles d’avertissement
Risque général
Risque d’électrocution
Courant alternatif
Courant direct
Précautions de sécurité
ATTENTION: VEUILLEZ lire tous les avertissements de sécurité avant l’installation, le
branchement ou
l’entretien de l’appareil. Le non-
respect de ces avertissements
pourrait déboucher sur des blessures personnelles et/ou des dommages matériels.
Veuillez conserver toutes les instructions pour une référence ultérieure.
x Vérifier que la plage de tension d’entrée de l’adaptateur AC et le type de fiche sont compatibles
avec l’alimentation secteur AC locale.
x S’assurer que le cordon d’alimentation ne constitue pas un obstacle potentiel ou un risque de
trébuchement.
x Évitez de positionner la balance de telle enseigne qu’il soit difficile d’atteindre le câble
d’alimentation.
x La balance est CONÇUE pour une utilisation interne uniquement. Ne pas opérer l’équipement
dans des environnements dangereux ou dans des emplacements instables.
x Opérer l’équipement uniquement sous des conditions ambiantes spécifiées dans les présentes
instructions.
x Évitez de laisser des charges tomber sur la base.
x Utiliser la balance uniquement dans les emplacements secs.
x Déconnecter l’équipement de l’alimentation pendant le nettoyage.
x Utiliser uniquement les accessoires et périphériques approuvés.
x Le service doit uniquement être effectué par le personnel autorisé.

FR-2
Règles d'utilisation
Utiliser l'appareil uniquement à l'effet de pesage, comme déterminé dans le manuel d'utilisation.
Tout autre type d'utilisation ou de maniement au-delà des limites des caractéristiques techniques
déterminées sans le consentement écrit de la société OHAUS sera considéré comme non conforme.
Cet appareil est conforme aux normes industrielles et aux règles de sécurité en vigueur ; cependant,
son utilisation peut engendrer un risque de danger.
Si l'appareil n'est pas utilisé conformément au présent manuel d'utilisation, sa protection souhaitée
peut
s'en trouver altérée, auquel cas OHAUS déclinera toute responsabilité.
2. INSTALLATION
2.1 Sélection de la position
Évitez des sources de chaleur, des changements rapides de température, le courant d’air
ou les vibrations excessives. Laisser un espace suffisant.
2.2
Nivellement
S’assurer que la balance est nivelée avant d’utiliser ou
après le changement de position.
La balance PR a une bulle de niveau dans une fenêtre
en petit rond à côté de l’affichage.
Pour niveler la balance, régler les 2 pieds de
nivellement jusqu’à ce que la bulle soit centrée dans le
cercle.
Veuillez vous référer à la figure de droite pour le
nivellement.
2.3 Branchement de l’alimentation et acclimatation de la balance
Branchez le connecteur DC de sortie à la prise de courant située à l'arrière de la balance. Branchez
ensuite l'adaptateur AC à la prise électrique appropriée
Acclimatation
Il est suggéré que la balance ne soit pas utilisée tant qu’elle n’est pas acclimatée à l’environnement
pendant une certaine période de temps. Si la balance a une précision dépassant 0,1 mg, le temps
de pré acclimatation doit être de 1,5 heure, si la balance a une précision de 1 mg, le temps
d’acclimatation doit dépasser 0,5 heure.
La page est en cours de chargement...
La page est en cours de chargement...
La page est en cours de chargement...
La page est en cours de chargement...
La page est en cours de chargement...
La page est en cours de chargement...
La page est en cours de chargement...
-
 1
1
-
 2
2
-
 3
3
-
 4
4
-
 5
5
-
 6
6
-
 7
7
-
 8
8
-
 9
9
-
 10
10
-
 11
11
-
 12
12
-
 13
13
-
 14
14
-
 15
15
-
 16
16
-
 17
17
-
 18
18
-
 19
19
-
 20
20
-
 21
21
-
 22
22
-
 23
23
-
 24
24
-
 25
25
-
 26
26
-
 27
27


dans d''autres langues
- English: Ohaus PR124 Quick start guide
- español: Ohaus PR124 Guía de inicio rápido
Documents connexes
-
Ohaus PR4201/E Mode d'emploi
-
Ohaus PX4201 Guide de démarrage rapide
-
Ohaus CR621 Manuel utilisateur
-
Ohaus SKX422 Manuel utilisateur
-
-
Ohaus STX422 Manuel utilisateur
-
-
Ohaus NV2201 Manuel utilisateur
-
-
