
GUARANTEE
INSTRUCTION
MANUAL
FOR
Made in
America
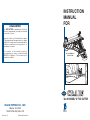
No. 001 MODEL "A" TILE CUTTER
1SJOUFECZ)' '03.'3FW
.JMQJUBT$"
5&-&1)0/&
CRAIN CUTTER CO., INC.
This TILE CUTTER is guaranteed to be free of
defects in workmanship or quality of materials
for a period of 1 year.
"OZ QBSUT PG UIJT UPPM GPVOE EFGFDUJWF TVCKFDU
to the guarantee will be replaced at no charge.
$SFEJUJOGVMMPSQBSUDBOOPUCFFYUFOEFECZUIF
distributor, nor will new tools be given as re-
placements or loaners.
5PPMT TVCKFDU UP UIJT XBSSBOUZ NVTU CF
accompanied by same, returned freight
13&1"*% UP .JMQJUBT $" BOE NVTU CF JO
assembled condition.
No. 001 MODEL "A"
TILE CUTTER
W
A
L
L

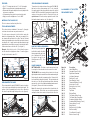
SELF-MEASURING FLOOR GUIDE:
To save time, the cutter also has a oor guide (P/N 1001-R)
that can be set for self-measuring cuts. To use, lower the
oor guide and set it directly against the edge of the last full
eld tile. NOTE: extend the oor guide far enough to lift the
casters out of any glue on the oor. Place the tile to be cut
upside down in the cutter, and up against the wall. Push
the handle down to make a cut. (See gure 3.)
HOW THE FLOOR GUIDE WORKS:
With the tile guide against the
last eld tile, and the tile slid all
the way against the wall, a cut
piece (dimension"A") should
be equal to the space to be
lled (dimension "B"). (See
gure 4.)
FEATURES:
r 5XP
3
/4CMBEFTUIBUXJMMDVUYUJMFTUSBJHIU
r #VJMUJOMPXQSPàMFCMBEFIFJHIUBEKVTUNFOULOPCT
r #FENPVOUFEUJMFHVJEFXJUIQSFDJTJPOTDBMFSVMFSJOCPUI
inches and centimeters.
r 4FMGNFBTVSJOHáPPSHVJEFGPSSFQFBUDVUTBUXBMMT
r )JHIMZBDDVSBUFTUSBJHIUOFTTPGDVU
MATERIALS THAT CAN BE CUT:
This tool cuts most resilient vinyl oor tiles.
TOP BLADE ADJUSTMENT:
This cutter is factory calibrated to "shear-cut". A properly
set shear-cut ensures an easy and accurate cut.
To set the proper shear-cut in the eld, rst, swing the
handle to an upward position. Next, place a sample tile to
be cut under the top blade of the cutter. Turn the left hand
CMBEFIFJHIUBEKVTUNFOULOPCVOUJMUIFUPQCMBEFJTBMNPTU
touching the tile. Lastly, turn the right hand blade height
BEKVTUNFOULOPCVOUJMUIFSFJTBHBQPOUIFSJHIUTJEFUIBUJT
UJNFTXJEFSUIBOPOUIFMFGUTJEF4FFàHVSF
Example: If the tile to be cut is
1
/8" thick, then the gap on
the left side will be slightly more than
1
/8", and the gap on
the right side should be about
1
/4".
BLADE CHANGING:
BOTTOM BLADE: This blade can be removed easily by
loosening the 4 hex-head bolts on the rear of the cutter.
TOP BLADE: Before removing the top blade, the left and
SJHIUBEKVTUNFOULOPCTNVTUCFUVSOFEGPSNBYJNVNIFJHIU
Next, swing the handle to upward position. Remove the 4
hex-head bolts holding the top blade. The top blade should
then be loose. Slide the top blade through either the blade
removal slot on the left or right hand standard, and remove it.
4FFàHVSF3FWFSTFUIJTPSEFSGPSJOTUBMMBUJPO
Note: Occasionally, the top blade will stick inside the slot
of the standards. If this is the case, use a at screw driver
and tap the blade at a screw hole to push it out of the slot.
Order No. Description
)BOEMF(SJQ0OMZ
4UBOEBSE4DSFX4FUY
3JHIU)BOE4UBOEBSE
-FGU)BOE4UBOEBSE
%JBM,OPCFBDI
$BN#FBSJOHFBDI
5ISFBEFE#VTIJOHFBDI
,OPC-BCFMFBDI
#VTIJOH4DSFXFBDI
#BTF$BTUJOH
1001-A Top Blade
1001-B Bottom Blade
$ 5JMF(VJEFX8JOH4DSFX
% 5JMF(VJEF8JOH4DSFX0OMZ
* $SBOLTIBGU)BOEMF(SJQ
, $SBOLTIBGU#BMM#FBSJOHFBDI
1001-M Return Spring (1 each)
/ #MBEF$BSSJFS
1 #BMM$BTUFS4FU(MVF
2 #BMM$BTUFS0OMZ
3 'MPPS(VJEF4DSFX
1001-S Blades Screw Set (8)
Figure 2
BED-MOUNTED TILE GUIDE:
5IFCFENPVOUFEUJMFHVJEF1/$DBOCFTFUSFMBUJWF
to the scale for repeat straight cuts at a desired length. The
portion of the tile remaining on the bed of the cutter after
UIFDVUXJMMFRVBMUIFMFOHUITFUUJOHPOUIFTDBMFàHVSF
26
23
25
27
24
20
26
23
25
27
24
20
21
12
20
20
22
30
R
B
Q
C
D
P (3X)
S (4X)
S (4X)
A
N
K
I
M
A
B
SUB-FLOOR
TOP BLADE
POSITION
FIELD TILE
EDGE
GUIDE
FILL
W
A
L
L
4$"-&
$655&3
#&%
#&%.06/5&%
5*-&(6*%&
#-"%&
REMOVAL
SLOT
Figure 5
501#-"%&
"%+645.&/5
,/0#4-004&/50
3&.07&#-"%&
LEFT
)"/%
45"/%"3%
3*()5
)"/%
45"/%"3%
W
A
L
L
FILL
TILE TO
BE CUT:
SLIDE
AGAINST
WALL
LAST FULL
FIELD TILE
FLOOR
GUIDE
EDGE OF
LAST FULL
FIELD TILE
CASTER
-&'54*%&
#-"%&("1
*44-*()5-:
"#07&5)&
5*-&5)*$,-
NESS
-&'5)"/%
#-"%&)&*()5
"%+645.&/5
,/0#
3*()5)"/%
#-"%&)&*()5
"%+645.&/5
,/0#
LEFT
)"/%
45"/%"3%
501#-"%&
618"3%
)"/%-&
POSITION
3*()5)"/%
45"/%"3%
3*()54*%&
5)&("14)06-%
#&5*.&4
8*%&35)"/0/
5)&-&'54*%&
5*-&5)*$,/&44
Figure 4
Figure 3
Figure 1
No. 001 MODEL "A" TILE CUTTER
REPLACEMENT PARTS:
-
 1
1
-
 2
2


dans d''autres langues
- English: Crain 001 Owner's manual
Autres documents
-
Yamaha PC406 Le manuel du propriétaire
-
LG DLEY1701V Le manuel du propriétaire
-
Saeco HD8944/06 Manuel utilisateur
-
Lifetime 90269 Mode d'emploi
-
-
 Budda 212 COMBO Manuel utilisateur
-
Reliable T1 Mode d'emploi
-
Haier DWL4035 Guide d'installation
-
Zoofari ZTSD 36 B1 Operating Instructions Manual
-
Kenwood DNX 9210 BT Guide de démarrage rapide
