Sharper Image LED Backyard ZipLine Le manuel du propriétaire
- Taper
- Le manuel du propriétaire

b4 Adventure 4010 Holly Street Unit 16 • Denver Colorado 80216 • 1-844-834-4334 QUESTIONS?
[email protected] · www.b4adventure.com 303-339-0482 - DC:080818
1
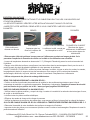
ZIP-LINE KIT WITH SEAT INSTRUCTIONS AND SAFETY RULES.
PLEASE READ CAREFULLY!
AGES: 8+
WEIGHT LIMIT: 250 Lbs
(113 Kg)
SLA.500SB
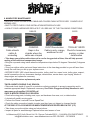
KIT CONTAINS:
(1) Trolley with sealed ball bearing pulleys. Non-slip
hand grips. Note: Actual trolley shape may vary.
(1)Main Cable length varies with model,1/5 in
galvanized steel cable,with looped eye on one end.
(1) Sling Cable 5ft. (1.5m), 1/5in steel cable w/looped eye.
(1) Turnbuckle 6in (15.24cm) Steel w/ 2 eye bolts & nuts.
(3) U-clamps 1/5in with thread cover caps.
(1) Seat and Rope Only included with kits with seats. Seat color varies.
(1) Instructions
(1) Turnbuckle backup cable with (3) U-Clamps 1/5in with thread cover caps.
(1) Assembly Socket Wrench Tightening Tool
(1) Zipline Registration Form
IMPORTANT: FILL IN YOUR DATE OF PURCHASE ON YOUR MAIN CABLE STICKER!
ITEMS REQUIRED
(NOT INCLUDED):
(1) Step Ladder
(6) 2 In nails
(1) Roll of duct tape
(1) Pair of safety glasses
(2) Adjustable wrenches
(1) Pair of work gloves
(1) 100 Ft. tape measure
(2) Helpers with brooms
BE SAFE! ALWAYS FOLLOW THESE RULES:
THIS PRODUCT IS INTENDED FOR USE BY CHILDREN 8+ YEARS
• To be setup and installed only by an Adult
• WARNING! Maximum weight 250 lbs (113 kg). This zipline is
designed for children to ride a few feet off ground.
• Wear suitable shoes and close fitting clothing. No jewelry, scarves
or other loose clothing.
• Make sure everything is installed correctly. Inspect and test the line
before each use
• If worn or damaged parts are found, contact b4Adventure for
replacement parts – DO NOT substitute with other, non-b4Adventure
parts or failure resulting in injury may result. To order parts:
1-844-834-4334.
• Remain seated for the entire ride, wait until you have stopped
COMPLETELY before letting go of the trolley or dismounting seat.
One zipline rider only at a time. Keep people and animals at least 25ft
(7.62 m) away from the zipline course.
• Never use the line when it is wet or if there is rain or lightning in the
area.
• Do not place fingers or hair inside of trolley or serious injury may
result.
• Do not reach up to grab cable while riding or as a spectator to slow
down rider or serious injury may result.
WARNING! ADULT
STRESS TEST REQUIRED
- This product should be
tested using 250 lbs (113
kg) at 5 ft. (152 cm) from
each end at the start and
finish points.
WARNING! ADULT
SUPERVISION
REQUIRED! SERIOUS
INJURY OR DEATH MAY
RESULT - Always exercise
extreme caution when
using the zipline. This
product should be
unpacked and assembled
by an adult, including site
and tree selection as well
as secure cable attachment
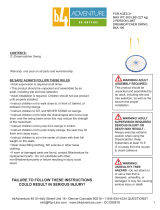
WARNING! MAINTENANCE REQUIREMENT - This
product has parts that can wear or loosen during use. Inspect and
tighten all hardware. Replace your cable after one year of use.

b4 Adventure 4010 Holly Street Unit 16 • Denver Colorado 80216 • 1-844-834-4334 QUESTIONS?
[email protected] · www.b4adventure.com 303-339-0482 - DC:080818
2
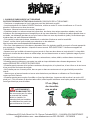
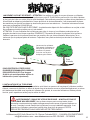
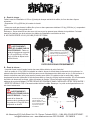
WARNING!
UNHEALTHY TREE
HAZARD - Do not attach
to or use a tree that is
diseased, unhealthy, or
damaged. It may fail,
causing serious injury or
death
38” +
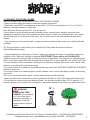
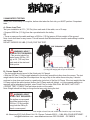
1. CHOOSING THE ZIPLINE COURSE
USE EXTREME CARE WHEN SELECTING YOUR ZIPLINE COURSE!
• Select a location where the whole course can be easily supervised
• Attachment trees MUST be healthy and at least 38 In. (97 Cm) in circumference or 12 In. (31 Cm) in
diameter. Use tape measure to check this.
Note: Measure the trees at least 6 Ft. from the ground.
• Never attach to a tree showing excessive decay, cracks, exposed roots, disease, excessive lean,
damage from weather or poor tree architecture. Select trees in stable, non-saturated soils (not in areas
with eroding soils or in a wet area of the yard). Do not select trees in an area that has recently been
cleared.
• If you are unsure of your trees’ health, contact an arborist and have them asses your trees’ health and
suitability.
Tip: One good place to start looking for an arborist Visit: http://www.isa-arbor.com/find an
arborist/findanarborist.aspx
• If you are attaching to other types of posts or poles, you must get the option of a qualified engineer as
suitability of the “side load” strength is required. QUESTIONS? Please call us at 1-844-834-4334
• Make sure you have enough cable to reach and secure to both trees! Your long course cable should be
able to touch both trees at the same time and have at least 5 Ft. of extra cable left over at the Finish Point.
• Course should be free of obstacles, including but not limited to: bushes, other trees, rocks, debris, hard
surfaces, or anything that could cause injury.
• Do not set course on a steep hill, as unsafe speeds may result. See SLOPING COURSE ADJUSTMENT
section for more info.
• Do not set course over swimming pools, ponds, streams, rivers or any other body of water, as drowning
may result.
• Do not set up in public lands, parks, or other areas that may prohibit ziplining
• Make sure there are no branches or other obstacles at the Start or Finish Point that could injure a rider.
• Do not select a course near power/electrical lines. Your course must be at least 100 Ft. away (or 1.5
times the height of your highest tree, whichever is the greater distance) from where any power line would

b4 Adventure 4010 Holly Street Unit 16 • Denver Colorado 80216 • 1-844-834-4334 QUESTIONS?
[email protected] · www.b4adventure.com 303-339-0482 - DC:080818
3
START POINT LAUNCHING - CAUTION The best and safest way to launch your riders, is to have them
first get on the zipline seat at the LOWEST part of your course (where the most dipping/sagging occurs)
and then town them back up to the starting point. This method helps eliminate the need for a platform and
ladder where falling accidents are most likely to occur. It is recommended that you place cushioning
materials in and around your course - see www.cpsc.gov/pagefiles/122149/325.pdf
IF YOU CHOOSE TO USE A PLATFORM - Your start point platform must be stable and strong enough to
stand on and must be placed on a flat, level surface.
CAUTION: If you decide to use a zipline without a rider seat, you increase the chance of a rider losing
their grip on the trolley and falling, resulting in possible injury. USE CAUTION in the height of your zipline
course. Your riders should be as low as possible so that if they do lose their grip, they only fall a few feet
to the ground. However, their feet should not drag on the ground as they ride the course.
TO PROTECT YOUR TREE BARK FROM
POSSIBLE DAMAGE-Tree Huggerz
SLA.814 are available from b4Adventure
(Sold Separately)
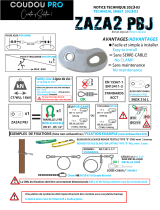
2. ZIPLINE COURSE SETUP
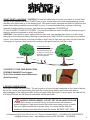
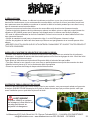
• ZIPLINE COURSE SETUP GOAL: The set up goal is to have the rider accelerate at first, then at the last
third of the course, start decelerating and finish the course going slightly uphill at the end (due to
dipping/sagging of the zipline and rider as they progress down the course. In most cases, the rider will roll
to a stop at the end, but will then roll backwards toward the middle.
WARNING! SPEED HAZARD - DO NOT SET UP AN UNSAFE ZIPLINE.
A steep zipline course or one that has too much line tension will create an
unsafe, dangerous, high-speed course that could cause serious injury or death.
See your zipline instructions for proper setup. It is critical that the rider will
already be slowing down before they finish the course. BE SAFE, NOT FAST!
Launching the rider
Have the rider mount the
seat at the lowest point
on the line. Then push or
pull them up to the Start
Point and release.
Start Point
Finish Point

b4 Adventure 4010 Holly Street Unit 16 • Denver Colorado 80216 • 1-844-834-4334 QUESTIONS?
[email protected] · www.b4adventure.com 303-339-0482 - DC:080818
4
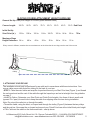
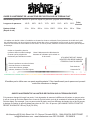
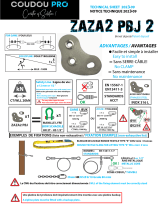
FLAT OR LEVEL COURSE ATTACHMENT HEIGHT GUIDELINE
General Set Up: Start point Height for Course (space between trees)
Course Length: 100 Ft. 90 Ft. 80 Ft. 70 Ft. 60 Ft. 50 Ft. 40 Ft. 30 Ft. End Point
Initial setting: 132 In. 126 In. 120 In. 114 In. 108 Ft. 102 In. 96 In. 90 In. 78 In.
(from ground)
*This table is meant to aid set up, showing minimum heights. Adjustments for rider height and weight as well as terrain
variations should be taken into consideration. At no time should the trolley hit the U-clamps at the finish point when testing. If
so, lower the start point attachment height and retest.
Note how the line sags/dips
as the rider goes down the
course, slowing them down.
TROLLEY SHOULD NOT
HIT FINISH POINT CLAMPS
Finish Point
Height - 78”
ACCELERATING >>>> PEAK SPEED >>>> START TO SLOW >>>> SLOW TO A STOP<<<<ROLL BACKWARDS
Do not add additional slope to the cable! It will not improve the ride and may create a danger to the rider.
SLOPING COURSE ADJUSTMENT ATTACHMENT HEIGHT GUIDELINE
If the course is sloping downhill, you need to measure how much to drop in inches at ground level it is
from your Start Point compared to Finish Point and then subtract that from your starting point height. For
example: Your course is 80 Ft., and you estimate the ground level drop is 24 In., you would need to set
your Start Point height at 96 In. (120 In. less 24 In.). See chart for the maximum you can REDUCE your
Start Point height. (NEVER HAVE YOUR START POINT LESS THAN 78 IN. FROM THE GROUND).
If possible, place your zipline in a shaded
location-not in direct sunlight, so the trolley
grips do not become hot to the touch.
Place your zipline at least 2m from any
structure or obstruction such as a
fence, garage, house, overhanging
branches or laundry lines.

b4 Adventure 4010 Holly Street Unit 16 • Denver Colorado 80216 • 1-844-834-4334 QUESTIONS?
[email protected] · www.b4adventure.com 303-339-0482 - DC:080818
5
3. ATTACHING YOUR ZIPLINE
The installation should only be performed by an adult and in accordance with these instructions. Your
course cable comes with protective tubing for the bark of your tree.
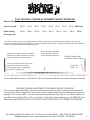
• STEP 1: Take the main cable and wrap the looped end around your Start Point tree (Figure 1) and thread
the un-looped end and the rest of the cable through the looped eye and set at a height from the guideline
on page 3.
• Install Tip Option: Determine your Start Point and Finish Point heights. Use three of the six small nails
(spaced 2 In. apart) for each tree to keep the cable from slipping down the tree during installation.
Note: Do not put the nails into or through the cable.
• Thread the cable, using the blunt, un-looped end through the trolley (Figure 2) between the two pulleys
and the grip bar. Now wrap the un-looped end around your Finish Point tree at the initial finish point height
of 78 In. and rest the cable on the three small nails - see tip above.
SLOPING COURSE ATTACHMENT HEIGHT GUIDELINE
General Set Up: Start point Height for Course (space between trees)
Course Length: 100 Ft. 90 Ft. 80 Ft. 70 Ft. 60 Ft. 50 Ft. 40 Ft. 30 Ft. End Point
Initial Set Up
Start Point (In.): 132 In. 126 In. 120 In. 114 In. 108 Ft. 102 In. 96 In. 90 In. 78 In.
Maximum Slope
Height Reduction: 54 in. 48 In. 42 In. 36 In. 30 In. 24 In. 18 In. 12 In.
*Every course is different, examine the course clearances so the riders feet do not drag near the end of the course
Start Point
Finish Point
24 inches
of drop

b4 Adventure 4010 Holly Street Unit 16 • Denver Colorado 80216 • 1-844-834-4334 QUESTIONS?
[email protected] · www.b4adventure.com 303-339-0482 - DC:080818
6
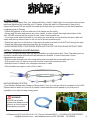
STEP 2: U-Clamp installation - Have your helping friends use their brooms to lift and support the trolley and
cable while you perform the installation. This will help you pull out the slack and attach your U-Clamps.
when you wrap your zipline around the Finish Point tree, you want to form a “tear drop” shape wrapped
around the tree - see Figure 3 on next page. DO NOT TIGHTEN UP AGAINST THE TREE!
• With two helpers supporting the trolley and cable, pull the wrapped cable as tight as you can with your
hands. While holding tight with one hand attach the first U-Clamp and tighten slightly (2 Ft. from tree)
• Repeat the above until you removed as much slack by hand as possible. Then tighten the first U-Clamp to
30 Lbs of torque, or as snug as you can with hand tools. DO NOT OVER-TIGHTEN.
• Tidy up your excess cable by simply coiling it up and securing and covering the coil with duct tape.
Starting Point
Finish Point
Trolley
Clamps
Three small
supporting
nails
Three small
supporting
nails
See instructions for proper mounting heights. Do not suspend cable
over any hard surface. Stable mounting platform required for safe and
proper use. Tools needed: Pliers & wrench.
WARNING! CHOKING HAZARD
This product contains small parts. Do not
allow children under 3 years of age near
the parts or assembly area.

b4 Adventure 4010 Holly Street Unit 16 • Denver Colorado 80216 • 1-844-834-4334 QUESTIONS?
[email protected] · www.b4adventure.com 303-339-0482 - DC:080818
7
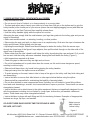
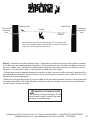
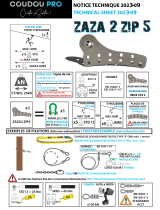
Figure 3
CORRECT CABLE WRAP - TEAR DROP
INCORRECT - TOO TIGHT!
TREE/
POLE
TREE/
POLE
{
U-Clamp Distance
1 1/2 times tree Diameter
Example: Tree Diameter = 14 In., closest U-Clamp
after final tightening should be 21 In. from the tree
U-shape
thread
U-Clamp
Washer
Thread cover
cap
Third installed
U-Clamp
First installed
U-Clamp
Second installed
U-Clamp
3 In. between bolts
Place thread cover caps on each exposed thread
Course end
of cable
on bottom
• Use your tightening tool to make sure everything is secure
4. TIGHTENING ZIPLINE
• Using the turnbuckle to tighten - inspect your initial installation work carefully and thoroughly. The
zipline cable can hold weight many times that of most riders. The loops, u-clamps and attachment trees
are the most likely to fail if not assembled correctly, and therefore should be inspected extra carefully
and often.
• Tune the zipline by twisting the center section of the turnbuckle to tighten.
• Tighten the line until it appears to be nearly level or straight. DO NOT OVER-TIGHTEN
•you can now remove your six small nails used to hold the cables in position during installation.

b4 Adventure 4010 Holly Street Unit 16 • Denver Colorado 80216 • 1-844-834-4334 QUESTIONS?
[email protected] · www.b4adventure.com 303-339-0482 - DC:080818
8
WARNING! ADULT
STRESS TEST REQUIRED
- This product should be
tested using 250 lbs (113
kg) at 5 ft. (152 cm) from
each end at the start and
finish points.
WARNING! ADULT
SPEED TEST REQUIRED -
The zipline course speed
should be tested using a
250 Lbs (113 Kg) weight
hung from the trolley to
check course speed.
5. MANDATORY TESTING
When your course setup is complete, before rider takes the first ride, you MUST perform 2 important
tests.
A - Stress Load Test:
Test your installation at 5 Ft. (152 Cm) from each end of the cable, one of 2 ways
• Suspend 250 Lbs (113 Kg) from the rope attached to the trolley
OR
• Throw a rope over the cable and have a 250 Lbs (113 Kg) person lift their weight off the ground.
Note: Look and listen for any issues. This will ensure that the attachment structure and cabling is stable
and secure.
DO NOT EXCEED 250 LBS (113 KG) FOR THE TEST.
B - Course Speed Test:
• The test weight should never hit the finish point U-Clamps!
• With the 250 Lbs (113 Kg) weight attached to the trolley, launch the trolley down the course. The test
weight should slow down past the midpoint as the sag or dip in the cable comes into play. It should
continue to slow down and come to a gentle stop just short of the first U-Clamp. If the test weight hits the
U-Clamp, adjust the cable tension (loosen the U-Clamp and pull tighter), or if more speed reduction is
required, adjust attachment heights: raise Finish Point or lower Start Point. BE SAFE, NOT FAST!
• REPEAT TEST 5 TIMES! This test helps stretch out the cable.
Note: Weight should not drag on the ground at any point during the test.
5 Ft.
5 Ft.
Test at 5 Ft. from each end by attaching 250 Lbs
(113 Kg) OR hanging with a rope as illustrated
TEST FREQUENTLY!
Start Point
Finish Point
Push weight to Start Point and release. Be Careful to stay out of the way

b4 Adventure 4010 Holly Street Unit 16 • Denver Colorado 80216 • 1-844-834-4334 QUESTIONS?
[email protected] · www.b4adventure.com 303-339-0482 - DC:080818
9
6. FINAL TUNING
• After the Course Speed Test, your zipline cable may “stretch” slightly (this is normal) and require some
additional tightening by loosening your U-Clamps, pulling the slack out (Remember to have your 2
helpers with brooms lift and support the cable and trolley while you are pulling out the slack) and then
re-tightening the U-Clamps
• Check the tightness of all nuts and bots of all clamps and the trolley.
• Always walk the area and remove any rocks, debris, or other objects that might cause harm to the
rider. NEVER assume that the course is clear, check it before each use.
• If you have extra cable at the end of your setup you must either coil up carefully the extra cable and
clamp and place a piece of tape on the cut end to prevent possible injury.
• Check the rope knot on the bottom of the seat and make sure the knot will NOT pull through the seat.
• Check the trolley grips and make sure they do not slip or twist.
• ALWAYS MAKE SURE YOUR RIDERS KNOW AND FOLLOW THE RULES AND INSTRUCTIONS!
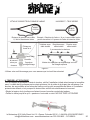
INSTALL TURNBUCKLE SAFETYBACKUP:
Install your turnbuckle safety back-up cable (available on certain zipline kits). Note: The safety back up
should be installed after all turnbuckle adjustments are finished. It must be removed if future
adjustments are required.
• Slide the cable through both of the sling cables eye loops and the course cable eye loop.
• Pull out slack until you have a snug fit around the turnbuckle connection points.
• Attach the three U-clamps onto overlapped sections of cable
• Place thread cover caps on each of the U-bolts.
BACKUP BRAKING SYSTEM
•Your Slackers Zipline may include our Spring brake, If not, you can go online to purchase our SLA.803
Zipline brake kit which is is over 5ft of powder coated steel that can be added to your line prior to
installation for a safe and easy ending point.
WARNING! -
NEVER use a brake
system that stakes into the
ground, as it can become
a dangerous projecttile.

b4 Adventure 4010 Holly Street Unit 16 • Denver Colorado 80216 • 1-844-834-4334 QUESTIONS?
[email protected] · www.b4adventure.com 303-339-0482 - DC:080818
10
7. RIDER INSTRUCTIONS - REVIEW WITH ALL RIDERS!
• Only one rider at a time
• Do not move in front of, behind, or in close proximity to a moving rider.
• The best and safest way to launch your riders is to have them first get on the zipline seat (or grip the
trolley handle) at the lowest part of your course (where the most dipping/sagging occurs) and then tow
them back up to the Start Point and then carefully release them.
• Hold the trolley handles tightly while the zipline is in motion.
•Mounting the seat, simply slide the seat between your legs then grab onto the trolley grips and you are
ready for launching!
• Rider must remain seated - no standing, kneeling, or other position.
• Dismounting the seat: wait until you have come to a complete stop. Grab onto the rope in-between the
trolley and the seat. While holding onto the rope.
• Adjusting the seat height: Riders head should always be below the trolley. Slide the excess rope
through the lower loop of the figure-8 rope adjuster, then pull the slack through on the other side of the
upper loop of the adjuster.
• Make certain that the rider’s head is well below the trolley by adjusting the rope and seat. Or if your kit
has no seat, hold the trolley with arms extended, keeping the head below the trolley (Figure 1).
• Adult supervision required at all times.
• Check the grips to make sure they are tight and not loose.
• Do not let bystanders pull or push riders down the course, as this could cause dangerous speed,
resulting in serious injury.
• Riders should have clean, dry hands before gripping the trolley handles.
• Keep pets away from the zipline course at all times
• To avoid spinning on the seat, instruct rider to keep a firm grip on the trolley until they finish riding and
are dismounting.
• Instruct children to remove their bike helmet or other sports helmet before using the zipline.
• Owners shall be responsible for maintaining the legibility of warning labels.
• Do not allow children to wear inappropriate items, including, but not limited to: loose fitting clothes,
hood and neck drawstrings, scarves, cord-connected items, capes or ponchos. These items can cause
strangulation hazard.
• Instruct children not to attach items to the zipline equipment that are not specifically designed for use
with the equipment, including, but not limited to: jump ropes, clothes line, pet leashes, cables and
chains. These items may cause strangulation hazard.
• Instruct children to dress with well-fitting and full-foot enclosing footwear. Examples of inappropriate
footwear are clogs, flip flops, and sandals.
GO OVER THESE RULES EVERY TIME THE ZIPLINE IS USED.
BE SAFE, NOT FAST!
Adjust rope so
rider’s head is
below trolley
Figure 1

b4 Adventure 4010 Holly Street Unit 16 • Denver Colorado 80216 • 1-844-834-4334 QUESTIONS?
[email protected] · www.b4adventure.com 303-339-0482 - DC:080818
11
QUESTIONS OR SET UP ISSUES?
Contact our support team at: [email protected]
IMPORTANT: FILL IN YOUR DATE OF PURCHASE ON YOUR CABLE STICKER!
REPLACE MAIN CABLE EACH YEAR
WARNING!
MAINTENANCE REQUIRED -
This product has parts that can
wear or loosen during use.
Tighten all hardware and inspect
all components for wear. Check
grips for loosening. Replace with
only b4adventure parts.
WARNING! WIRE
ROPE/CABLE WEAR - Wire
rope/cable will FAIL if misused,
abused, worn-out, or damaged.
DO NOT use rope-cable that is
damaged or worn out. Replace
with only b4adventure parts.

b4 Adventure 4010 Holly Street Unit 16 • Denver Colorado 80216 • 1-844-834-4334 QUESTIONS?
[email protected] · www.b4adventure.com 303-339-0482 - DC:080818
12
8. MANDATORY MAINTENANCE
• REPLACE YOUR ZIPLINE SLING CABLE AND COURSE CABLE AFTER EVERY 12 MONTHS OF
NORMAL USE!
• SAFETY FIRST! CHECK YOUR INSTALLATION BEFORE EACH USE.
• LOOK AT YOUR HARDWARE! REPLACE IF YOU SEE ANY OF THE FOLLOWING CONDITIONS:
CABLES GRIPS
FRAYED
Cable strands
visible &
unraveling
CRIMPED
Gaps in the
strands where the
cable was crimped
RUST/Discoloration
Cable is rusty, orange,
weathered or dull
TROLLEY GRIPS
Check for looseness,
peeling, or other
deterioration
• Take down your zipline cable when not in use for long periods of time, this will help prevent
rusting of the cable and unsupervised usage.
• Bring the rope and swing inside when the temperature drops below 32 degrees Fahrenheit (0 degrees
Celsius).
• Store your zipline cable, parts and these instructions in the clear bag provided so you will have them
handy the next time you set up your zipline course.
• BEFORE EVERY USE: check the anchor points, trolley, steel line, ropes, knots, trolley grips, support,
and all connections for any looseness, damage, deterioration, excess wear, rope fraying, breaks or
sharp edges and replace as necessary.
• Use only b4Adventure replacement parts.
TWICE A MONTH DURING PLAY SEASON:
• Rake and check depth of loose fill or protective surfacing materials to prevent compaction and to
maintain appropriate depth. Replace as necessary. See Public Playground Safety Handbook: visit
www.cpsc.gov//pagefiles/122149/325.pdf
ONCE A MONTH DURING PLAY SEASON:
• Check all moving parts, including seat, rope, and hardware fore wear, rust, or deterioration.
• Lubricate all metallic moving parts.
• Perform the Stress Load and Course Speed Test
• Check the cable connection heights to make sure they have not slipped or changed height.
AT THE END OF PLAY SEASON OR WHEN TEMPERATURE DROPS BELOW 32 F (0 C)
• Take down your entire zipline setup and store indoors.
• Inspect all parts for wear/damage. Replace before next season of use.

b4 Adventure 4010 Holly Street Unit 16 • Denver Colorado 80216 • 1-844-834-4334 QUESTIONS?
[email protected] · www.b4adventure.com 303-339-0482 - DC:080818
13
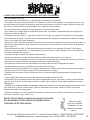
IMPORTANT PRODUCT DISCLAIMER AND NOTICE
Activities involving the installation and use of ziplines are inherently hazardous by their nature.
Poor installation, poor sight selection, inadequate rider instruction, poor adult supervision or
improper use can cause severe injury or death.
WARRANTY: 1 year from date of purchase for parts and workmanship. The buyer, installer and
user of the zipline MUST:
• Read, understand and follow the installation instructions and safety rules.
• Ensure proper oversight, supervision and instruction of others on the safe
use and operation of the zipline.
• Ensure that all equipment is properly installed, used, inspected and
maintained before each use.
• Before each use, check to see that obstructions and hazards are removed
from the zipline path and that all non-users are a safe distance from course.
• Avoid taking risks
The buyer, installer, and user of this product assume all risk and accept all responsibility for any
damage or injury, including death, that may arise from the use of the RIPLINE Zipline.
BE CAREFUL AND HAVE FUN OUTDOORS!
REPLACEMENT CABLE PARTS - TO ORDER
CALL 1-844-834-4334 OR VISIT B4ADVENTURE.COM
25% Cable Replacement Discount Code: b4replacement
Item Number Description
SLA.C005.....................................5 Ft. Sling Cable
SLA.C010.....................................10 Ft. Sling Cable
SLA.C012.....................................12 Ft. Sling Cable
SLA.C065.....................................65 Ft. Course Cable
SLA.C085.....................................85 Ft. Course Cable
SLA.C095.....................................95 Ft. Course Cable
CPSC and ASTM - The components in this product comply with U.S. CPSC and ASTM
safety standards for toys ages 8+

b4 Adventure 4010 Holly Street Unit 16 • Denver Colorado 80216 • 1-844-834-4334 QUESTIONS?
[email protected] · www.b4adventure.com 303-339-0482 - DC:080818
14
AGES: 8+
WEIGHT LIMIT: 250 Lbs
(113 Kg)
SLA.500SB
MODE D’EMPLOI ET RÈGLES DE SÉCURITÉ DE LA TYROLIENNE AVEC SIÈGE.
LISEZ CE MANUEL ATTENTIVEMENT!
CONTENU DU KIT :
(1) Chariot avec poulies à roulement à billes
scellées. Poignées antidérapantes.
(1) Câble principal de longueur variable selon
le modèle, en acier galvanisé de 0,48 cm (1/5
po) de diamètre, avec une extrémité.
(1) Câble d’attache de 2,13m(7 pi), en acier
galvanisé de 0,48 cm (1/5 po) de diamètre,
avec les extrémités.
(1) Tendeur de 15,25 cm(6 po) en acier
àmâchoires, écrous et oulons.
(3) Serre-câbles de 0,48 cm(1/5 po) à étrier
avec capuchons protège-filetage.
(1) Siège et corde inclus dans les ensembles
avec siège seulement. La couleur du siège
peut êtredifférente.
IMPORTANT : INSCRIVEZ LA DATE D’ACHAT SUR L’ÉTIQUETTE DU
CÂBLE PRINCIPAL DE LA TYROLIENNE !
ARTICLES REQUIS
(NON INCLUS) :
(1) Escabeau
(6) Clous de 2 pouces
(1) Rouleau de ruban adhésif
(1) Paire de lunettes de sécurité
(2) Clés à molette
(1) Paire de gants de travail
(1) Mètre ruban de 100 pieds
(2) Personnes vous assistant
avec des balais
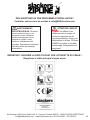
PRUDENCE ! SUIVRE LES RÈGLES EN TOUT TEMPS :
CE PRODUIT EST DESTINÉ À UN USAGE PAR DES ENFANTS AGÉS DE
PLUS DE 8 ANS
Assemblage et installation par un adulte seulement.
• La supervision d’un adulte est requise en touttemps.
• ADVERTISSEMENT!Poids maximal de 113 kg (250 lb). Cette
tyrolienne est conçue pour des descentes à quelques pieds du sol (plus ou
moins 1 m).
• Porter des chaussures adaptées et des vêtements bien ajustés. Pas de
bijoux, de foulard ni de vêtementsamples.
• Veiller à ce que tout soit installé correctement. Inspecter et faire un essai du
câble avant chaque utilization.
• En cas d’usure ou de dommages, demander des pièces de rechange à
b4Adventure – NE PAS remplacer par d’autres pièces que celles de
b4Adventure, au risque de provoquer une défaillance qui causerait des
blessures.
• POUR COMMANDER, COMPOSER LE 1-844-834-4334.
• Rester assis pendant toute la descente et attendre d’êtreCOMPLÈTEMENT
arrêté avant de lâcher le chariot ou de descendre du siège. Un seul utilisateur
à la fois. Pour éviter les collisions, ne laisser ni spectateurs ni animaux
s’approcher à moins de 8 m (25 pi) du trajet de la tyrolienne.
• Ne jamais utiliser la tyrolienne lorsqu’elle esthumide,
s’il pleut ou s’il y a des éclairs.
AVERTISSEMENT !
ESSAI DE CHARGE PAR
UN ADULTE REQUIS-
Faites un essai de charge
avec un poids de 113 kg
(250 lbs) à 152 cm (5 pieds)
du point de départ et du
point d’arrivée.
AVERTISSEMENT !
SUPERVISION PAR UN
ADULTE REQUISE !
RISQUE DE BLESSURES
GRAVES OU DE MORT
- Exercez toujours une
extrême prudence lors de
l’utilisation d’une tyrolienne.
Ce produit doit être déballé
et installé par un adulte, de
même pour le choix du site
et des arbres comme pour
la sécurité de la fixation du
câble.
AVERTISSEMENT ! ENTRETIEN REQUIS - Certaines
pièces peuvent s’user ou se relâcher à cause de l’utilisation de la
tyrolienne. Inspectez et ajustez correctement tout le matériel.
Remplacez le câble après une année d’utilisation.

b4 Adventure 4010 Holly Street Unit 16 • Denver Colorado 80216 • 1-844-834-4334 QUESTIONS?
[email protected] · www.b4adventure.com 303-339-0482 - DC:080818
15
97 cm (38po)
de circonfére
nce ou plus
1. CHOISIR LE PARCOURS DE LA TYROLIENNE
FAITES EXTREMEMENT ATTENTION AU CHOIX DU PARCOURS DE LA TYROLIENNE !
• Choisissez un emplacement où tout le parcours peut être facilement surveillé.
• Les arbres destinés à la fixation DOIVENT être sains, et faire au moins 97 cm de circonférence ou 31 cm de
diamètre. Vérifiez avec un ruban à mesurer.
Remarque : Mesurez les troncs à au moins 6 pieds du sol.
• N’attachez jamais à un arbre montrant de la pourriture, des fentes, des racines exposées malades, une forte
inclinaison, des dommages dus aux intempéries ou de trop rares branches. Choisissez des arbres plantés dans un
sol stable, non détrempé (pas dans un sol qui s’érode ni dans une zone trop humide du jardin). Ne choisissez pas
d‘arbres dans une zone récemment déboisée.
• Si la santé d’un arbre est douteuse, demandez à un arboriste d’évaluer sa santé et sa solidité.
Conseil : veuillez visiter le site suivant pour rechercher un bon arboriste:
http://www.isa-arbor.com/findanarborist/findanarborist.aspx
• Pour fixer à des poteaux ou à des barres, demandez l’avis d’un ingénieur qualifié pour savoir s’ils sont appropriés
pour soutenir la « charge latérale » à laquelle ils seront soumis. DES QUESTIONS ? Veuillez-nous appeler au
1-844-834-4334
• Assurez-vous que le câble soit assez long pour pouvoir le fixer aux deux arbres en toute sécurité ! Le long câble
doit pouvoir toucher les deux arbres en même temps, tout en laissant encore au moins 5 pieds de marge au point
d’arrivée.
• Le trajet doit être libre de tout obstacle : buissons, autres arbres, rochers, débris, surfaces dures et autres qui
pourraient causer des blessures.
• N’installez pas la tyrolienne sur une pente trop raide au risque d’atteindre des vitesses dangereuses. Voir la
section RÉGLAGE DE LA PENTE DU PARCOURS
• N’installez pas le parcours de la tyrolienne au-dessus d’une piscine, d’un plan d’eau, d’une rivière ou de tout cours
d’eau pour éviter les risques de noyade.
• Ne l’installez pas sur un terrain public, dans un parc ou dans une autre zone où ce type d’activité pourrait être
interdit.
• Assurez-vous qu’aucune branche ni aucun autre obstacle ne peut blesser un utilisateur au Point de départ
comme au Point d’arrivée.
• N’installez pas de parcours près d’un câble ou d’une ligne électrique. Le parcours doit se situer à au moins 100
pieds (ou 1,5 fois la hauteur du plus haut arbre utilisé, selon laquelle la distance sera la plus grande) de l’endroit où
toute ligne électrique pourrait tomber.
AVERTISSEMENT !
ARBRE EN MAUVAIS ÉTAT -
Ne vous servez pas d’un arbre
en mauvais état, malade,
abîmé ou instable. Un
mauvais choix peut entraîner
une défaillance du produit, de
graves blessures ou la mort.

b4 Adventure 4010 Holly Street Unit 16 • Denver Colorado 80216 • 1-844-834-4334 QUESTIONS?
[email protected] · www.b4adventure.com 303-339-0482 - DC:080818
16
LANCEMENT AU POINT DE DÉPART – ATTENTION ! Le meilleur et le plus sûr moyen de lancer un utilisateur,
c’est de le faire s’asseoir sur le siège de la tyrolienne au point LE PLUS BAS du parcours (là où le câble s’abaisse
le plus) puis de le tirer en arrière jusqu’au point de départ. Cette méthode permet de se passer d’une plateforme ou
d’une échelle au départ qui présenterait un risque plus élevé de chute accidentelle. Il est recommandé de placer
des matériaux pour amortir les chutes en dessous du parcours et aux alentours. – Consultez le document suivant
www.cpsc.gov/pagefiles/122149/325.pdf
EN CAS D’UTILISATION D’UNE PLATEFORME - La plateforme de départ doit être installée sur un sol plat, et doit
être suffisamment stable et solide pour s’y tenir debout.
ATTENTION : En cas d’utilisation de la tyrolienne sans siège, le risque qu’un utilisateur perde prise sur les
poignées du chariot et se blesse augmente. PRUDENCE ! Concernant la hauteur du parcours de la tyrolienne.
Installez le parcours de la tyrolienne aussi bas que possible, afin que si des utilisateurs lâchent prise, ils ne
tomberont que de quelques pieds de hauteurs. Cependant, leurs pieds ne doivent pas toucher le sol durant la
descente.
POUR PROTÉGER VOTRE ÉCORCE
D'ARBRE DES DOMMAGES POSSIBLES
PROCUREZ-VOUS LES Tree Huggerz
SLA.814 qui sont disponibles auprès de
b4Adventure (vendu séparément)
2. INSTALLATION DE LA TYROLIENNE
• BUT DE L’INSTALLATION : Le but de l’installation est d’obtenir un parcours le long duquel l’utilisateur accélère
d’abord, commence à décélérer au début du dernier tiers et termine sa course en remontant légèrement, en raison
de l’abaissement du câble sous le poids de l’utilisateur. En général, la course de l’utilisateur s’arrêtera près de
l’arrivée, puis il repartira en arrière jusqu’au milieu du câble.
AVERTISSEMENT ! RISQUE DE VITESSE EXCESSIVE – N’INSTALLEZ PAS DE
TYROLIENNE NON SECURISÉE. Une tyrolienne trop en pente ou trop tendue risque
d’entraîner une descente trop rapide et dangereuse pouvant causer de graves blessures ou
la mort. Consultez le mode d’emploi de la tyrolienne pour une installation appropriée. Il est
essentiel que l’utilisateur commence à ralentir bien avant la fin du parcours. FAITES
PREUVE DE PRUDENCE SANS CHERCHER À ÊTRE TRÈS RAPIDE !
Point de départ
Point
d’arrivée
Lancement d’un utilisateur
Faire asseoir l’utilisateur sur
leau point le plus bas de la
tyrolienne. Le pousser
ou le tirer vers le point
de départ, puis le lâcher.

b4 Adventure 4010 Holly Street Unit 16 • Denver Colorado 80216 • 1-844-834-4334 QUESTIONS?
[email protected] · www.b4adventure.com 303-339-0482 - DC:080818
17
GUIDE D’AJUSTEMENT DE LA HAUTEUR DE FIXATION SUR UN TERRAIN PLAT
Installation générale: Hauteur du point de départ du parcours (espace entre les arbres)
Longueur du parcours: 100 Ft. 90 Ft. 80 Ft. 70 Ft. 60 Ft. 50 Ft. 40 Ft. 30 Ft.
Hauteur initiale : 32 In. 126 In. 120 In. 114 In. 108 Ft. 102 In. 96 In. 90 In. 78 In.
(Depuis le sol)
*Ce tableau est destiné à aider à l’installation en donnant les hauteurs minimales. Des ajustements de la taille et du poids
des utilisateurs ainsi que des accidents de terrain doivent être pris en considération lors des essais. A aucun moment le
chariot ne doit heurter les serre-câbles lors des essais. Si cela se produit, abaissez la hauteur de fixation du point de départ
et réessayer.
Notez l’abaissement du câble durant la
descente de l’utilisateur qui le ralentit en
fin de course
LE CHARIOT NE DOIT JAMAIS
HEURTER LES SERRE-CABLES A
ÉTRIER DU POINT D’ARRIVÉE
Point d’arrivée
Hauteur de 78”
ACCÉLÉRATION>>>VITESSE MAX>>>DÉBUT DU RALENTISSEMENT>>>RALENTISSEMENT PRONONCÉ<<<ARRÊT ET LENT RETOUR EN ARRIERE
N’installez pas le câble avec une pente supplémentaire ! Cela n’améliorerait pas le parcours et pourrait
mettre les utilisateurs en danger.
GUIDE D’AJUSTEMENT DE LA HAUTEUR DE FIXATION SUR UN TERRAIN EN PENTE
Si le parcours descend le long d’une pente, il est nécessaire de mesurer la différence de hauteur en pouces entre
le sol au niveau du Point de départ et au niveau du Point d’arrivée, puis de la soustraire à la hauteur de fixation du
Point de départ. Par exemple : pour un parcours de 80 pieds, avec une différence de hauteur du sol de 24 pouces,
la hauteur de fixation du point de départ sera donc de 120 - 24 = 96 pouces. (NE JAMAIS FIXER LE POINT DE
DÉPART À MOINS DE 198 cm [78 po] DU SOL.)
Point
d’arrivée
chariot ne si possible, placer la
tyrolienne dans un endroit ombragé
de sorte que les poignées de
deviennent pas chaudes au toucher.
Placer la tyrolienne au moins 2 mètres
de toute structure ou obstruction
comme des clôtures, garages,
maisons, branches ou cordes à lignes.

GUIDE D’AJUSTEMENT DE LA HAUTEUR DE FIXATION SUR UN TERRAIN EN PENTE
Installation générale : Hauteur du point de départ du parcours (espace entre les arbres)
Longueur du parcours : 100 pi. 90 pi 80 pi. 70 pi. 60 pi. 50 pi. 40 pi. 30 pi.
Hauteur initiale de fixation
du point de départ (pouce): 132 po. 126 po. 120 po. 114 po. 108 po. 102 po. 96 po. 90 po. 78 po.
Réduction max de la
hauteur du câble autorisée: 54 po. 48 po. 42 po. 36 po. 30 po. 24 po. 18 po. 12 po.
*Tous les parcours sont différents, réglez la hauteur du câble pour que les pieds des utilisateurs ne touchent pas le
sol en fin de course.
b4 Adventure 4010 Holly Street Unit 16 • Denver Colorado 80216 • 1-844-834-4334 QUESTIONS?
[email protected] · www.b4adventure.com 303-339-0482 - DC:080818
18
3. TENDRE LA TYROLIENNE
L’installation doit être effectuée par un adulte seulement, et en respect du présent mode d’emploi. Le câble
de tyrolienne et le câble d’attache sont équipés d’une gaine de protection pour l’écorce des arbres.
• Étape 1 : Passer le câble d’attache autour de l’arbre de départ. * Le parcours peut être installé avec un
câble / tendeur à n’importe quelle extrémité. Si vous installez le kit de frein à ressort, nous vous
recommandons de terminer le parcours avec le tendeur.
Remarque : si le diamètre de l’arbre de départ est trop grand, inverser l’installation en mettant le câble
d’attache au point d’arrivée. Pour un plus long câble d’attache, appeler b4 Adventure au 1-844-834-4334
ou visiter le www.B4ADVENTURE.com/accessories.
Conseil facultatif pour l’installation : Déterminer la hauteur d’attache aux points de départ et d’arrivée, et
planter trois des six petits clous (espacés de 5 cm [2 po]) dans chaque arbre pour retenir le câble à la
bonne hauteur pendantl’installation.
Remarque : ne pas planter les clous dans ou à travers lecâble.
Allonger entièrement le tendeur et attacher les deux boucles du câble d’attache à une extrémité du
tendeurà l’aide du boulon et de l’écrou – voir le diagramme d’installation. Attacher l’extrémité à boucle du
câble principal à l’autre extrémité du tendeur (à l’aide du boulon et de l’écrou).
• Dérouler le long câble sur le trajet de la tyrolienne éliminant toutetorsion.
• Passer le câble dans le chariot, en dessous des deux poulies et au-dessus de l’axe des poignées.
• Passer l’extrémité sans boucle autour de l’arbred’arrivée (en posant le câble sur les 3 petits clous).
Point de départ
Point d’arrivée
0,61 m (24 po)
de différence

b4 Adventure 4010 Holly Street Unit 16 • Denver Colorado 80216 • 1-844-834-4334 QUESTIONS?
[email protected] · www.b4adventure.com 303-339-0482 - DC:080818
19
Étape 2 : Installation des serre-câbles à étrier – Demander aux aides de soulever et de soutenir le chariot
et le câble avec leurs balais pendant l’installation. Cela permettra de tirer l’excédent de câble et de monter
les serre- câbles. Avec l’extrémité du câble passant autour de l’arbre d’arrivée, faire une boucle en forme
de larme – voir illustration Figure 3. Ne pas serrer le câble autour de l’arbre!
• Pendant que les deux aides soutiennent le chariot et le câble, tirer sur le câble entourant l’arbre aussi fort
que possible avec les mains. Retenir la tension d’une main et poser un premier serre- câble à 0,61 m (2 pi)
de l’arbre et le serrer légèrement.
• Répéter le point précédent jusqu'à ce que le câble soit le plus tendu possible à la main. Serrer maintenant
le premier serre-câble à 40 joules (30 pieds- livres) de couple de serrage, ou aussi fort que possible avec
un outil à main. Ne pas trop serre
Starting Point
Finish Point
Trolley
Clamps
Three small
supporting
nails
Three small
supporting
nails
See instructions for proper mounting heights. Do not suspend cable
over any hard surface. Stable mounting platform required for safe and
proper use. Tools needed: Pliers & wrench.
WARNING! CHOKING HAZARD
This product contains small parts. Do not
allow children under 3 years of age near
the parts or assembly area.

b4 Adventure 4010 Holly Street Unit 16 • Denver Colorado 80216 • 1-844-834-4334 QUESTIONS?
[email protected] · www.b4adventure.com 303-339-0482 - DC:080818
20
•Utilisez votre outil de serrage pour vous assurer que tout soit bien sécurisé
4. TENDRE LA TYROLIENNE
Tout en tendant la tyrolienne à l’aide du tendeur, vérifier l’installation initiale attentivement et complète-
ment. Le câble de la tyrolienne peut soutenir plusieurs fois le poids de la plupart des utilisateurs. Les
boucles, les serre-câbles et les arbres de fixation sont les plus susceptibles de lâcher si l’installation
présente des défauts, c’est pourquoi ils doivent être vérifiés très attentivement et souvent.
• Régler la tension de la tyrolienne en faisant tourner la section centrale du tendeur.
• Tendre le câble jusqu’à ce qu’il « paraisse » horizontal ou droit. NE PAS TROP LE TENDRE!
Figure 3
ATTACHE CORRECTE EN FORME DE LARME
INCORRECT – TROP SERRE!
ARBRE/
POTEAU
{
Distance du premier serre-câble,
1 ;5 fois le diamètre de l’arbre
Exemple : Diamètre de l’arbre = 14 po, le serre-câble le plus
proche devra être à 21 pouces de l’arbre à la tension finale.
Filetage en
forme de U
Serre-câble
Rondelle
Capuchon
protège-filetage
Troisième serre-
câble installé
Premier serre-
câble installé
Deuxième serre-
câble installé
3 pouces entre les boulons
Mettez des capuchons protège-filetage sur tous
les filetages exposés
Câble arrivant
du second
arbre par
dessous
ARBRE/
POTEAU
La page est en cours de chargement...
La page est en cours de chargement...
La page est en cours de chargement...
La page est en cours de chargement...
La page est en cours de chargement...
La page est en cours de chargement...
-
 1
1
-
 2
2
-
 3
3
-
 4
4
-
 5
5
-
 6
6
-
 7
7
-
 8
8
-
 9
9
-
 10
10
-
 11
11
-
 12
12
-
 13
13
-
 14
14
-
 15
15
-
 16
16
-
 17
17
-
 18
18
-
 19
19
-
 20
20
-
 21
21
-
 22
22
-
 23
23
-
 24
24
-
 25
25
-
 26
26


Sharper Image LED Backyard ZipLine Le manuel du propriétaire
- Taper
- Le manuel du propriétaire
dans d''autres langues
Autres documents
-
Logan WC-4010 Le manuel du propriétaire
-
 b4Adventure Dreamcatcher Manuel utilisateur
-
 Kong ZAZA1 PLT Manuel utilisateur
-
 Portable Winch PCA-1213M2ESC Le manuel du propriétaire
-
 Kong ZAZA2 PBJ Manuel utilisateur
-
 Kong ZAZA2 PBJ2 Manuel utilisateur
-
Hasbro Clean Cut Mode d'emploi
-
 Kurgo Ridgeline Tie Out Mode d'emploi
-
 Kong ZAZA2 ZIP5 Manuel utilisateur
-
 Slackers SLA.497 Mode d'emploi


