
MDS86845 (GPI171)
Revised (A): 09/13/2013
User Guide
Guide de l’utilisateur
Guía del Usuario
MDS86845B
MDS86845S
MDS86845BLK
MDS86845BM
MDS86845BLKM
The Empower Rollator
Le Empower Rollator
El Rolator Empower
Supplying Hospitals
for Over 90 Years
Fournissant les hôpitaux
depuis plus de 90 ans
Sirviendo a Hospitales
desde hace más
de 90 años
Save these instructions for future reference.
Conserver ces directives pour vous y référer ultérieurement.
Guarde estas instrucciones para referencia futura.

2
MDS86845 (GPI171)
Revised (A): 09/13/2013
Table of Contents
Safety Instructions ......................................................................................................................... 3
Assembly Instructions ................................................................................................................ 4-5
Rear Wheel Assembly .................................................................................................................... 6
Front Wheel Assembly ...................................................................................................................7
Brake Handle Assembly ............................................................................................................8-10
Adjustment of Brakes ................................................................................................................... 11
Operating Instructions ................................................................................................................ 12
Maintenance ................................................................................................................................ 12
Table des matières
Directives de sécurité ..................................................................................................................13
Directives d’assemblage ........................................................................................................14-15
Assemblage des roues arrière ..................................................................................................... 16
Assemblage des roues avant ......................................................................................................17
Assemblage de la poignée de frein ........................................................................................18-20
Ajustement des freins ...................................................................................................................21
Directives d’utilisation ..................................................................................................................22
Entretien .......................................................................................................................................22
Tabla de contenidos
Instrucciones de seguridad ......................................................................................................... 23
Instrucciones de montaje .......................................................................................................24-25
Conjunto de rueda trasera ........................................................................................................... 26
Conjunto de rueda delantera ....................................................................................................... 27
Conjunto de manija de freno ..................................................................................................28-30
Ajuste de Frenos ..........................................................................................................................31
Instrucciones de operación ......................................................................................................... 32
Mantenimiento .............................................................................................................................. 32

3
MDS86845 (GPI171)
Revised (A): 09/13/2013
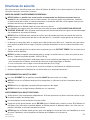
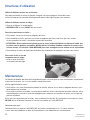
Safety Instructions
To ensure your safety in using the Medline rollator, the following safety information
and all instructions must be followed.
GENERAL WARNINGS AND CAUTIONS:
DO NOT use this product without first reading and understanding the instructions contained in
this manual. If you are unable to understand the warnings, cautions, or instructions, contact a healthcare
professional, dealer, or technician before use. Failure to do this may result in bodily injury or damage to
the device.
DO NOT self-propel the rollator while seated.
Rollators are intended for individual use only and are NOT TO BE USED AS A WHEELCHAIR. Serious
injury to the user and/or damage to the rollator’s frame or wheels may result from improper use.
DO NOT use the rollator to walk backwards, down gradients or to climb stairs, curbs, or to go over
obstacles. Serious risk of fall or injury may occur.
√ The backrest is intended to provide back support while seated. The backrest is not intended to support
full body weight. Avoid leaning while sitting as this may result in a fall.
√ All wheels must be in contact with the oor and/or ground at ALL TIMES. This will ensure the rollator is
properly balanced.
DO NOT exceed the maximum weight capacity (including bag contents) or serious injury could result:
Maximum weight capacity: 300 lbs (136 kg)
the rollator to tip, resulting in bodily injury or rollator damage.
√ Before each use make sure the rollator frame is fully and securely opened.
√ Periodically wipe down the rollator with a soft cloth and non abrasive cleaner.
SEAT WARNINGS:
The brakes MUST be in the locked position BEFORE sitting on the seat.
DO NOT sit on the rollator while it is being loaded into a vehicle or while it is being transported in a vehicle.
DO NOT use the seat to transport people or objects.
DO NOT sit on the seat when the rollator is on an incline.
BRAKE WARNINGS:
Check the brakes for proper operation. Make sure that all parts are secure and that the moving parts are in
good working order.
Wheels should roll easily and not wobble.
When rising from a lower position, DO NOT use the rollator to provide assistance to the user. If the rollator
is used to pull the user up to a standing position, the rollator may move even if the brakes are in the locked
position and this could result in a fall.
DO NOT push the rollator while brakes are enabled. Brakes are to be used to keep the wheels from rolling.
However, it may not prevent the rollator from moving if it is pushed.

MDS86845 (GPI171)
Revised (A): 09/13/2013
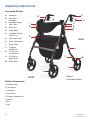
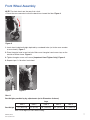
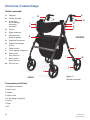
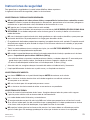
A. Handgrips
B. Adjustable
Handlebar
C. Handlebar Height
Adjust Lock
D. Back Rest
E. Padded Seat
F. Handlebar Folding
Mechanism
G. Adjustment Knob
H. Brake Handle/Lock
I. Brake Cable
J. Triangular
Knob Screw
K. 8" (203 mm)
Front Wheels
L. 8" (203 mm)
Rear Wheels
M. Brake Shoe
Rollator Components
2 Front Wheels
2 Handlebars
2 Rear Wheels
Assembly Instructions
Assembled Rollator
Figure 1
Assembled Rollator
A
B
C
D
I
E
J
G
F
H
FRONT
BACK
M
I
L
K

MDS86845 (GPI171)
Revised (A): 09/13/2013
BACK
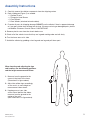
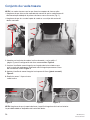
Assembly Instructions
1. Carefully remove the rollator components from the shipping carton.
2.
3. DO NOT use the rollator if there is apparent damage
or if any parts (other than the bag) are missing. If there are missing or damaged parts, please
4. Remove plastic cover from the wheels before use.
5. Check all of the wheels to see that they are in good working order and roll freely.
6. Turn the frame over on its side.
7. Unfold the rollator by grabbing a front leg and rear leg and pull them apart.
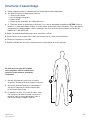
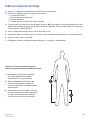
When inserting and adjusting the legs
and handles, use the following guidance
and the height measurements below.
1. Measure from the ground to the
crease in the back of the knee.
2. Adjust the rollator legs accordingly
so the seat is at same height as
measurement taken above.
3. Keeping arms at your side
with a natural bend at the elbow,
measure from the ground to the
center of the wrist.
B
A

6
MDS86845 (GPI171)
Revised (A): 09/13/2013
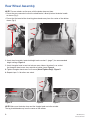
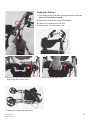
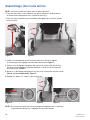
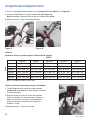
Rear Wheel Assembly
NOTE: The rear wheels are the ones with the brake shoes on them.
shown (Fig 2)
Figure 1 Figure 2
NOTE: Make sure the brake shoe and the triangle knob are to the outside.
The leg should bend away from the center of the rollator.
1.
height settings. Figure 3.
2. Insert triangular hand screw into hole on same side as the wheel is on so that
the triangular hand screw stays outside of walker frame. Figure 4.
3. Tighten triangular hand screw until secure (Hand Tighten Only!). Figure 5.
4.
Figure 3 Figure 4 Figure 5

MDS86845 (GPI171)
Revised (A): 09/13/2013
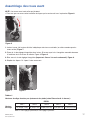
Front Wheel Assembly
NOTE: The front wheels are the ones that swivel.
Figure 6.
Figure 6
Seat Heights provided by leg adjustments (set to Dimension A above):
1. Insert wheel to desired height depicted by numbered holes (set to the same number
as rear wheels). Figure 7.
2. Place triangular hand screw into hole. Make sure triangular hand screw stays on the
outside of rollator frame. Figure 8.
3. Tighten triangular screw until secure (Important: Hand Tighten Only!). Figure 8.
4.
Figure 7 Figure 8
Legs
Seat Height
Chart 1
Note: 1 is the highest, 5 is the shortest setting.

8
MDS86845 (GPI171)
Revised (A): 09/13/2013
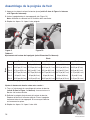
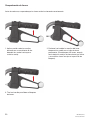
Brake Handle Assembly
1. Press and hold the yellow button in (item C in Figure 1 above and Figure 9 below).
2. Insert hand grip into appropriate hole (see Figure 10).
Note: Keep brake cable to the outside of the walker.
3.
Legs
Arms
Note: 1 is the highest, 5 is the shortest setting.
Handle Height adjustments (set to Dimension B above):
Figure 9 Figure 10
Adjust the backrest height for comfort:
1. Pull the Backrest Height Adjust Lock (item G in Figure 1 above).
Raise or lower the backrest to desired height.
2. Release the Backrest Height Adjustment Knob. Move backrest
3.
Chart 2

9
MDS86845 (GPI171)
Revised (A): 09/13/2013
5.
by pushing down on the seat.
6. Pick up on the large handle.
Folding the Rollator
1. Push down on the Handle Bar Folding Mechanism and hold
(Item F in Parts Guide, Page 4).
2. Rotate the handle to the center of the rollator.
3. Release the Handle Bar Swivel Lock.
4.
7. The Rollator should fold and lay at.

MDS86845 (GPI171)
Revised (A): 09/13/2013
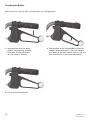
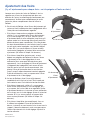
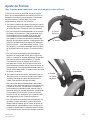
Checking the Brakes
Before each use, check to make sure the brakes are working properly.
1. Applying pressure on the brake
handles using a pulling up motion
the brakes will stop the wheels
until the handle is released.
2. Pushing down on the brake handles will lock the
wheels in place permanently. (To lock the brakes,
push down on the brake handles until you feel and
hear the brakes click into the locked position.)
3. Pull up to release brake lock.

MDS86845 (GPI171)
Revised (A): 09/13/2013
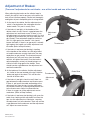
Adjustment of Brakes:
(There are 2 adjustments for each brake - one at the handle and one at the brake)
Adjustment
Thumbscrew
When adjusting the brakes on the rollator, keep in
mind if you adjust it too far one way or the other, the
lock will not function properly. Please test thoroughly
and tighten all parts completely prior to using rollator.
1.
which is located where the cable goes into the
brake handle. This part is usually silver.
rollator, check to see if there is a gap between the
adjustment nut and thumb screw. If there is, turn
the adjustment nut counter-clockwise until it is ush
up against the thumbscrew (You may need pliers to
get started). Then rotate both together clockwise
until it is tight against the handle... this should
loosen the brake. If there is no gap and it is already
tight against the handle, no further adjustment can
be made. (Refer to Step 3 below.)
at the handles of the rollator, turn the adjustment
nut and thumbscrew counter-clockwise (You may
need pliers to get started). The thumbscrew and
adjustment nut will push away from the handle
and this will tighten the brake. Once the brake is
adjusted properly, rotate just the adjustment nut
clockwise until snug against the handle. There
should now be a gap between the adjustment nut
and the thumbscrew.
2.
nut similar to the one located at the top. Hold the
brake pad against the wheel. This will take the
tension off of the cable.
gap between the adjustmentnut and thumb screw.
If there is, pull up on the cable,and looking at the
adjustment nut from the top, turn the adjustment
nut counter-clockwise, screwing theadjustment nut
to the thumb screw. Adjust to correcttension.
If there is no gap, no further adjustment can be
made here. (Refer to Step 3 below.)
cable, then, looking at the adjustment nut from the
top, turn the adjustment nut clockwise, screwing
the adjustment nut to the bracket. There will now be
a gap between the thumbscrew and the adjustment
nut. Adjust to correct tension.
Thumbscrew
Adjustment
Brake Shoe

MDS86845 (GPI171)
Revised (A): 09/13/2013
Operating Instructions
Using the rollator as a walker:
For proper positioning and use of the rollator, imagine a line drawn across the back of the rear wheels.
Part of one foot should be slightly ahead of that line as you walk.
Using the rollator as a seat:
LOCK the brakes BEFORE sitting.
To Operate the Brakes:
the locked position.
CAUTION: If the brakes have been adjusted but the rear wheels on the rollator move while the
brakes are in the locked position, DO NOT use the rollator. Please call our toll-free Customer
Service number at 1-800-MEDLINE fore turns or repairs.
To Access the Storage Bag under the Seat:
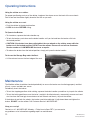
Maintenance
The Medline rollator should be checked periodically to ensure the brakes are functioning properly and that
all nuts, screws and bolts are secure.
Periodically check the brakes:
at a time from the hand grip to reach down to lock wheels and then try to push the rollator.
If the brakes do not lock the wheels, the brakes need to be adjusted. If adjustment does not tighten the
brakes, DO NOT
Keep your receipt!
any problems or for information regarding repairs or maintenance.

MDS86845 (GPI171)
Revised (A): 09/13/2013
Directives de sécurité
MISES EN GARDE ET AVERTISSEMENTS GÉNÉRAUX
NE PAS utiliser ce produit sans avant tout lire et comprendre les directives contenues dans ce
manuel.
entraîner des blessures ou endommager le produit.
NE PAS
NE DOIVENT PAS SERVIR DE
FAUTEUIL ROULANT. Une utilisation incorrecte pourrait entraîner des blessures graves ou des dommages
à la charpente ou aux roues du Rollator.
NE PAS utiliser le Rollator pour marcher en arrière, pour descendre des pentes ou monter des marches
blessures.
pour soutenir le poids total du corps. Éviter de se pencher en position assise car cela peut entraîner une
chute.
EN TOUT TEMPS.
NE PAS
peut faire basculer le Rollator, entraînant des blessures ou des dommages au Rollator.
AVERTISSEMENTS AU SUJET DU SIÈGE :
Les freins DOIVENTAVANT de vous assoir sur le siège.
NE PAS
NE PAS utiliser le siège pour transporter des personnes ou des objets.
NE PAS
AVERTISSEMENTS AU SUJET DES FREINS :
les pièces mobiles fonctionnent bien.
Les roues doivent rouler facilement et ne pas osciller.
NE PAS utiliser le Rollator pour s’aider à se lever. Si le Rollator est
NE PAS

MDS86845 (GPI171)
Revised (A): 09/13/2013
A.
B. Guidon ajustable
C. Ajustement
du verrouillage
de hauteur
du guidon
D.
E.
F.
pliage du guidon
G.
H.
du frein
I. Câble de frein
J.
K. Roues avant
8 po (203 mm)
L. Roues arrière
8 po (203 mm)
M. Patin de frein
Composants du Rollator
2 Roues avant
2 Guidons
2 Roues arrière
Directives d’assemblage
Rollator assemblé
Figure 1 :
A
B
C
D
I
E
J
G
F
H
AVANT
ARRIÈRE
M
I
L
K

MDS86845 (GPI171)
Revised (A): 09/13/2013
Directives d’assemblage
1.
2.
3. NE PAS utiliser le
4
5.
6.
7.
En insérant et en ajustant les pieds
et les poignées, utiliser les directives
suivantes et les mesures de hauteur
ci-dessous.
1.
2.
la mesure prise plus haut.
3.
une courbure naturelle du coude, mesurer du
B
A

MDS86845 (GPI171)
Revised (A): 09/13/2013
Assemblage des roues arrière
NOTE : Les roues arrière sont celles avec les patins de freins.
Figure 1 Figure 2
NOTE :
1.
Figure 3.
2.
de la marchette. Figure 4.
3.
(Serrer à la main seulement!). Figure 5.
4.
Figure 3 Figure 4 Figure 5

MDS86845 (GPI171)
Revised (A): 09/13/2013
Assemblage des roues avant
NOTE :
Figure 6.
Figure 6
Hauteurs du siège fournies par ajustement des pieds (selon Dimension A ci-dessus) :
1.
roues arrière). Figure 7.
2.
Figure 8.
3. (Important : Serrer à la main seulement!). Figure 8.
4.
Figure 7 Figure 8
PIEDS
Hauteur
du siège
Tableau 1
Note : 1 est le réglage le plus haut, 5 est le réglage le plus bas.

MDS86845 (GPI171)
Revised (A): 09/13/2013
Assemblage de la poignée de frein
1.(article C dans la Figure 1 ci-dessus
et la Figure 9 ci-dessous).
2.
Note :
3.
Pieds
Bras
Note : 1 est le réglage le plus haut, 5 est le réglage le plus bas.
Ajustements de hauteur de la poignée (selon Dimension B ci-dessus) :
Figure 9 Figure 10
Ajuster la hauteur du dossier selon votre confort :
1. Tirer sur l’ajustement de verrouillage de hauteur du dossier
(article G dans la Figure 1 ci-dessus). Lever ou baisser le
2.
est fermement en place.
3.
Tableau 2

MDS86845 (GPI171)
Revised (A): 09/13/2013
5.
appuyant vers le bas sur le siège.
6.
Préparer le Rollator
1.
maintenir (Article F du Guide de pièces, page 4).
2. Faire pivoter le guidon vers le centre du Rollator.
3. Relâcher le verrouillage de rotation du guidon.
4.
7. Le Rollator devrait se plier et reposer à plat.

20
MDS86845 (GPI171)
Revised (A): 09/13/2013
Vérifier les freins
1.
de freins à l’aide d’un mouvement vers
2.
pour verrouiller les roues de façon permanente.
(Pour verrouiller les freins, pousser vers le bas
verrouillent en place.)
3. Tirer vers le haut pour relâcher le
verrouillage des freins.
La page charge ...
La page charge ...
La page charge ...
La page charge ...
La page charge ...
La page charge ...
La page charge ...
La page charge ...
La page charge ...
La page charge ...
La page charge ...
La page charge ...
La page charge ...
La page charge ...
La page charge ...
La page charge ...
-
 1
1
-
 2
2
-
 3
3
-
 4
4
-
 5
5
-
 6
6
-
 7
7
-
 8
8
-
 9
9
-
 10
10
-
 11
11
-
 12
12
-
 13
13
-
 14
14
-
 15
15
-
 16
16
-
 17
17
-
 18
18
-
 19
19
-
 20
20
-
 21
21
-
 22
22
-
 23
23
-
 24
24
-
 25
25
-
 26
26
-
 27
27
-
 28
28
-
 29
29
-
 30
30
-
 31
31
-
 32
32
-
 33
33
-
 34
34
-
 35
35
-
 36
36


Medline MDS86845BLKM Manuel utilisateur
- Taper
- Manuel utilisateur
- Ce manuel convient également à
dans d''autres langues
- English: Medline MDS86845BLKM User manual
- español: Medline MDS86845BLKM Manual de usuario
Documents connexes
Autres documents
-
Drive Torro S Operating Instructions Manual
-
Vermeiren ECO-Plus Manuel utilisateur
-
-
-
-
Invacare 65851R Rollators Walker Manuel utilisateur
-
Drive DeVilbiss Rollator Nitro Mode d'emploi
-
Invacare Dolomite Maxi+ Manuel utilisateur
-
Guardian G2-202BX1 Mode d'emploi
-
Guardian G3-100KBX1 Manuel utilisateur