
Write the model and serial
numbers here:
Model # _________________
Serial # _________________
You can find them on the label
on the front of the frame.
GE is a trademark of the General Electric Company. Manufactured under trademark license.
OWNER’S MANUAL
TRASH
COMPACTORS
49-55111 03-17 GEA
ENGLISH/FRANÇAIS
UCG1680
UCG1650
UCG1600
SAFETY INFORMATION .........3
USING THE TRASH COMPACTOR
Getting Started ........................5
CARE AND CLEANING ...........8
TROUBLESHOOTING TIPS ......10
WARRANTY ...................... 11
CONSUMER SUPPORT ..........12

2 49-55111
THANK YOU FOR MAKING GE APPLIANCES A PART OF YOUR HOME.
Whether you grew up with GE Appliances, or this is your first, we’re happy to have you in the family.
We take pride in the craftsmanship, innovation and design that goes into every GE Appliances
product, and we think you will too. Among other things, registration of your appliance ensures that we
can deliver important product information and warranty details when you need them.
Register your GE appliance now online. Helpful websites and phone numbers are available in the
Consumer Support section of this Owner’s Manual. You may also mail in the pre-printed registration
card included in the packing material.

49-55111 3
READ AND SAVE THESE INSTRUCTIONS
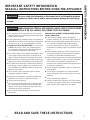
IMPORTANT SAFETY INFORMATION
READ ALL INSTRUCTIONS BEFORE USING THE APPLIANCE
SAFETY INFORMATION
WARNING
For your safety, the information in this manual must be followed to minimize
the risk of fire, explosion, electric shock, and to prevent property damage, personal injury,
or death.
WARNING
WHEN USING ELECTRICAL APPLIANCES, BASIC SAFETY PRECAUTIONS
SHOULD BE FOLLOWED, INCLUDING THE FOLLOWING:
Ŷ
This compactor is for household use only. Use this
appliance only for its intended purpose as described
in this Owner’s Manual.
Ŷ
Close supervision is necessary when any appliance is
operated near children. Do not allow the compactor to
be used as a toy, or to run unattended at any time.
Ŷ
CHILD LOCK-OUT INSTRUCTIONS: Turn the knob
to OFF and remove it when not compacting trash.
This will help prevent anyone from tampering with
the compactor or children from operating it.
Ŷ
Do not push trash into the drawer with hands or feet.
Trash might contain broken glass, sharp pieces of
metal, or other sharp objects that might cause injury.
Ŷ
When removing or carrying the trash bag, keep the bag
away from your body. Sharp objects may have pierced it.
Ŷ
Be careful when cleaning the inside of the cabinet or
trash drawer. Glass fragments may be stuck to the
ram, imbedded in the drawer surface or lying in the
bottom of the cabinet.
Ŷ
Do not install or store compactor where it will be
exposed to outside conditions.
Ŷ
Make sure the compactor is properly installed and
leveled on a floor that can support its weight.
Ŷ
Do not touch moving parts.
Ŷ
Do not compact food waste such as raw meat and
fish, rinds, personal hygiene items and disposable
diapers. These items create very strong odors and
should not go into the compactor.
Ŷ
Do not use as a freestanding unit. Use only as a
built-in unit.
PRECAUTIONS AGAINST UNREASONABLE USE OF
YOUR COMPACTOR:
Ŷ
Never compact shotgun shells, cartridges for
firearms, fireworks, etc., which are highly explosive.
Ŷ
Never compact flammable materials such as paint,
oil- or gasoline-saturated rags, engine starting
fluid cans, paint thinner cans, etc.—spontaneous
combustion or explosive vapor concentrations could
occur.
Ŷ
Never compact containers of toxic chemicals such
as strong insecticides or other poisonous materials—
compaction could release hazardous fumes.
Ŷ
Never compact aerosol cans containing explosive or
highly toxic chemicals. (If you are sure the aerosol
cans contain non-hazardous materials such as
shaving cream, cheese spread and whipped cream,
they may be compacted.)
Ŷ
Do not compact lit cigarettes, cigars, or other hot or
burning items.
Ŷ
Do not store or use gasoline or other flammable
vapors and liquids in the vicinity of this or any other
appliance.
Ŷ
Do not overload your appliance.
Ŷ
Handle a loaded trash bag with care. Sharp objects
can pierce the bag and cause injury. Do not overload
trash bag with heavy material such as glass.

4 49-55111
SAFETY INFORMATION
READ AND SAVE THESE INSTRUCTIONS
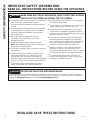
IMPORTANT SAFETY INFORMATION
READ ALL INSTRUCTIONS BEFORE USING THE APPLIANCE
WARNING
PROPER INSTALLATION AND MAINTENANCE
This compactor must be properly installed and located in accordance with the Installation Instructions before it is
used. If you did not receive an Installation Instructions with your compactor, you can receive one by visiting our
Website at GEAppliances.com. In Canada, visit www.GEAppliances.ca.
WARNING
WHEN USING ELECTRICAL APPLIANCES, BASIC SAFETY PRECAUTIONS
SHOULD BE FOLLOWED, INCLUDING THE FOLLOWING:
Ŷ
To prevent hazard of electrical shock, this compactor
must be properly installed and grounded in
accordance with the Installation Instructions before it
is used.
Ŷ
Do not operate with a damaged cord set, plug, motor,
or after damage in any manner. Have the appliance
examined, repaired, or adjusted by an authorized
service technician.
Ŷ
Do not take apart this appliance. Incorrect
reassembly can cause electric shock when
subsequently used.
Ŷ
Unplug the compactor before making any repairs.
NOTE: We strongly recommend that any servicing be
performed by a qualified person.
Ŷ
Do not use an adapter plug or an extension cord with
this appliance.
Ŷ
Follow National Electric Codes or prevailing local
codes and ordinances. This appliance must be
supplied with 120V, 60Hz and connected to an
individual, properly grounded branch circuit protected
by a 15 or 20 amp circuit breaker or time delay fuse.
Ŷ
If the electric supply provided does not meet the
above requirements, call a licensed electrician.
Ŷ
We recommend that a separate circuit serving only
this appliance be provided.
Ŷ
Do not, under any circumstances, cut or remove the
third grounding prong from the power cord.
Ŷ
This appliance must be grounded. In the event of
a malfunction or breakdown, grounding will reduce
the risk of electric shock by providing a path of least
resistance for electric current.
Ŷ
This appliance is equipped with a cord having an
equipment grounding conductor and a grounding
plug. The plug must be plugged into an appropriate
outlet that is properly installed and grounded in
accordance with local codes and ordinances.
Ŷ
Improper connection of the equipment grounding
conductor can result in a risk of electric shock.
Check with a qualified electrician if you are in doubt
as to whether the appliance is properly grounded.
Ŷ
Do not modify the plug with this appliance. If it
will not fit the outlet installed, have a proper outlet
installed by a qualified electrician.

49-55111 5
USING THE COMPACTOR
Getting started
B
A
C
D
E
F
H
G
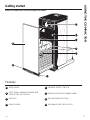
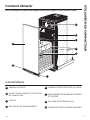
Features
DOOR PANEL
FOOT PEDAL DRAWER OPENER AND
COMPACTOR ACTIVATION
TOE KICK
ON/OFF KNOB
DRAWER SAFETY SWITCH
MODEL AND SERIAL NUMBER LABEL
BAG RETAINER BUTTONS
MOVEABLE SIDE DOOR LATCH
A
B
C
D
E
F
G
H
Features and appearance will vary throughout this manual

6 49-55111
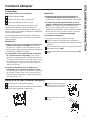
Getting started
USING THE COMPACTOR
What It Does and How It Works
ON/OFF Knob
The removable knob is provided for your protection as
a safety measure. When the knob switch is in the OFF
position, the compactor will not operate.
Child Lockout Instructions:
Lock the compactor when it is not in use, by removing
the knob. This will keep children from operating the
compactor and prevent anyone from tampering with it.
Your compactor reduces household trash to as little as one-fourth of its original volume.
It compacts most refuse, including paper, cans, bottles, jars, plastic containers, wrappings, sweepings and some
food wastes.
Drop trash into the disposable bag (designed for compactor use) that lines the compactor trash drawer and close the
drawer. When you start the compactor, an electrically-operated ram moves down into the drawer, compacts trash,
moves back up again—and the compactor shuts off automatically.
NOTE: The trash drawer must be at least 1/2 full before you will notice compaction because the ram does not travel all the
way down into the drawer. By adding trash, compaction is transferred to the items below until all trash is compacted.
Damage may occur if door is opened during cycle.
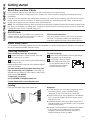
Trash Bag Installation
Before installing a new bag, be sure that:
1
The side door latch is securely locked. If the side
door is open, push to close it.
2
The container is clean and free of sharp debris that may
puncture the bag.
Reinforced plastic bags came with your compactor and are
ready to be installed.
You must use the specially designed heavy-duty trash
bags included with your compactor. These bags are
available from
your dealer or Factory Service Center. Ask for
catalog number WC60X5017.
To order bags, call toll-free:
US: 877.959.8688 or GEApplianceparts.com
Canada: 800.661.1616 or www.GEAppliances.ca
To install a new bag:
1
Place the bag into the drawer. Open the bag and pull
the top edges over the drawer top.
2
Lock the bag in place by pulling
the four prepunched holes over
the bag retainer buttons. Holes
will expand over the buttons
without harming the bag.
Loading
Press the foot pedal and pull the drawer out. Remember:
Ŷ
To help keep the ram clean when compacting messy
food waste, place a couple of folded sheets of
newspaper on top of the load to be compacted.
Ŷ
Items too bulky to go into the drawer can be folded to
fit. If it cannot be folded to fit into the drawer, do not
attempt to force it.
Ŷ
Folded newspaper is also helpful when compacting a
large glass bottle, or several bottles or jars, or any other
items that might shatter.
Ŷ
Although it is not necessary to compact until the drawer
is full or nearly full, we suggest that, for maximum
compaction, you start the compactor each time a
significant amount of trash is added.
Drawer Safety Switch
The compactor has two safety switches to ensure that the drawer is in its fully closed position for operation. The compactor
will not cycle without the drawer being fully closed.

49-55111 7
USING THE COMPACTOR
Getting started
Compacting
To start the compactor:
1
Turn the knob to ON.
2
Make sure the drawer is fully closed.
3
Lift the foot pedal up to start cycle.
The ram travels downward into the drawer, compacting
the trash. At the bottom of the stroke, the ram
automatically reverses direction, retracts out of the
drawer, returns to its starting position, and the compactor
shuts off automatically.
The cycle takes less than 30 seconds. As the trash
drawer fills with trash, cycle time gets progressively
shorter.
NOTES:
Ŷ<RXZLOOQRWVHHFRPSDFWLQJRIWUDVKWKHILUVW
few times you load. The compactor drawer should
be about 1/2 full before the compactor can begin to
compress the load.
Ŷ
Glass bottles can make a loud noise when they
break during compaction. This is normal. Also,
bottles in the trash drawer will not always break during
the first cycle. Breaking glass and associated noise
may occur several cycles later, depending on the type
and volume of the trash.
Ŷ
When bottles and cans are compacted, small tears
in the bag may occur. This is normal and in no way
affects the performance of the compactor. Keep the
bag away from your body to prevent injury from sharp
objects that may have pierced the bag.
IMPORTANT:
Ŷ
Do not apply too much force when turning the
knob. The knob should always rotate easily. Forcing
may break the knob and damage the switch.
Ŷ
When emptying waste baskets into the trash
drawer, some items may spill into the compactor
behind the drawer. Items behind the drawer could
prevent it from closing completely and prevent the
compactor from operating. To remove such items from
behind the drawer, open the drawer and remove it to
clean them out. See the Care and Cleaning section.
To stop the compactor:
The compactor may be stopped at any time.
1
Attempting to open the drawer while the ram is moving
will stop the ram. The safety switch will activate.
2
Close the drawer completely and the ram will travel
back to the UP position.
3
Open the drawer fully and turn the knob to OFF.
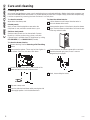
Removing a Full Trash Bag
1
Open the drawer by depressing the foot pedal.
2
Remove the top of the bag from the bag retainer
buttons. Pull up all four bag cuffs.
3
Push the side door latch down and tilt the drawer
side open.
4
Lift the bag out.

8 49-55111
Care and cleaning
CARE AND CLEANING
To clean the outside:
Wipe with a clean damp cloth.
Painted panels:
Apply a coat of kitchen/appliance wax when the
compactor is new, and then several times a year.
Stainless steel panels:
Stainless steel panels can be cleaned with Cerama
Bryte® or a similar product using a clean, soft cloth.
Cerama Bryte is available from GE Appliances by calling
877.959.8688 (US) or 800.661.1616 (Canada).
To clean the drawer interior:
1
Remove the bag. See the Removing a Full Trash Bag
section.
2
Wear protective gloves. There may be bits of glass in
the drawer. Press the side door latch down.
3
Hold the side door latch down and tilt the side of the
drawer until the latch clears the drawer front.
4
Wipe with a damp cloth.
5
Press the side door latch down while pressing the side
to the upright position. Lock the side door latch.
To clean the cabinet interior:
1
Pull the drawer out until it stops. Note the tracks in
which the drawer rollers move.
2
Wear protective gloves. Lift the front to clear the drawer
stops. Grab the drawer on both sides. Pull it out the rest
of the way and set it aside.
3
Vacuum inside of the cabinet. Liquid spills or wet trash
should be cleaned up by hand, or use a vacuum
designed to pick up liquid.
4
Wash, rinse and dry the inside.
Cleaning the Unit
As is true of most appliances, proper care is needed to give you continued satisfaction. Before cleaning the compactor, turn
the knob to the OFF position and remove it. If you will be away for more than a couple of days, remove the compactor bag.
Lock the compactor by removing the knob and store it in a safe place.

49-55111 9
Notes
NOTES

10 49-55111
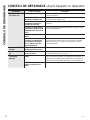
TROUBLESHOOTING TIPS
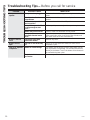
Troubleshooting Tips... Before you call for service
Problem Possible Causes What To Do
Compactor won’t
operate
Compactor is unplugged Make sure the cord is plugged securely into a working
outlet.
Circuit breaker/fuse is
tripped/blown
Check house circuit breakers /fuses. Replace fuses or reset
breaker.
Knob switch may not be in
the ON position
Make sure the switch is in the ON position.
Foot pedal may not be lifted
up long enough to start
cycle
Lift foot pedal up momentarily until compaction cycle starts.
Drawer may not be closed Check to make sure the drawer is firmly closed.
Compactor has an
automatic thermal motor
reset
If you have just compacted repeatedly, this protector may
have opened the motor circuit. Wait a few minutes and
the motor reset will reclose automatically.
Drawer is hard to
close
Trash may have fallen
behind the drawer
Remove any trash.
Drawer will not
open
The ram is not all the way
up
Lift up on the foot pedal and release to allow ram to
complete a cycle.
Little or no apparent
compaction
Drawer is not full enough The drawer must be at least 1/2 full of trash before you will
see any amount of compacting. The ram does not travel all
the way to the bottom. Trash in the bottom of the drawer will
be crushed during later cycles.
Trash is stuck between ram
and basket
Remove any trash.

49-55111 11
GEAppliances.com
All warranty service is provided by our Factory Service Centers, or an authorized Customer Care
®
technician. To schedule
service online, visit us at www.geappliances.com/service_and_support/, or call GE Appliances at 800.GE.CARES
(800.432.2737). Please have your serial number and your model number available when calling for service.
Servicing your appliance may require the use of the onboard data port for diagnostics. This gives a GE Appliances factory
service technician the ability to quickly diagnose any issues with your appliance and helps GE Appliances improve its
products by providing GE Appliances with information on your appliance. If you do not want your appliance data to be
sent to GE Appliances, please advise your technician not to submit the data to GE Appliances at the time of service.
What GE Appliances will not cover (for customers in the United States):
Ŷ Service trips to your home to teach you how to use
the product.
Ŷ Improper installation, delivery, or maintenance.
Ŷ Failure of the product if it is abused, misused or used for
other than the intended purpose or used commercially.
Ŷ Replacement of house fuses or resetting of circuit
breakers.
Ŷ Product not accessible to provide required service.
Ŷ Damage to the product caused by accident, fire,
floods, or acts of God.
Ŷ Incidental or consequential damage caused by
possible defects with this appliance.
Ŷ Damage caused after delivery.
Extended Warranties: Purchase a GE Appliances extended warranty and learn about special discounts that are
available while your warranty is still in effect. You can purchase it online anytime at
www.geappliances.com/service_and_support/shop-for-extended-service-plans.htm
or call 800.626.2224 during normal business hours. GE Appliances Service will still be there after your warranty expires.
WARRANTY
GE Appliances Compactor Warranty
For the period of GE Appliances will replace
One year
From the date
of the original
purchase
Any part of the compactor which fails due to a defect in materials or workmanship. During this
limited one-year warranty, GE Appliances will provide, free of charge, all labor and in-home
service to replace the defective part.
Staple your receipt here. Proof of the original purchase
date is needed to obtain service under the warranty.
What GE Appliances will not cover (for customers in Canada):
Ŷ Service trips to your home to teach you how to use
the product.
Ŷ Improper installation.
If you have an installation problem, contact your dealer
or installer. You
are responsible for providing adequate
electrical, exhausting and other connecting facilities.
Ŷ Failure of the product if it is abused, misused or used for
other than the intended purpose or used commercially.
Ŷ Replacement of house fuses or resetting of circuit
breakers.
Ŷ Damage to the product caused by accident, fire,
floods, or acts of God.
Ŷ Damage caused after delivery.
This warranty is extended to the original purchaser and any succeeding owner for products purchased for home use
within the USA. If the product is located in an area where service by a GE Appliances Authorized Servicer is not available,
you may be responsible for a trip charge or you may be required to bring the product to an Authorized GE Appliances
Service location for service. In Alaska, the warranty excludes the cost of shipping or service calls to your home.
Some states do not allow the exclusion or limitation of incidental or consequential damages. This warranty gives you
specific legal rights, and you may also have other rights which vary from state to state. To know what your legal rights
are, consult your local or state consumer affairs office or your state’s Attorney General.
Warrantor: GE Appliances, a Haier company
This warranty is extended to the original purchaser and any succeeding owner for products purchased in Canada for
home use within Canada. In home warranty service will be provided in areas where it is available and deemed reasonable
by Mabe to provide.
Warrantor: MC Commercial, Burlington, ON, L7R 5B6
WARRANTOR IS NOT RESPONSIBLE FOR CONSE QUEN TIAL DAMAGES.
EXCLUSION OF IMPLIED WARRANTIES
Your sole and exclusive remedy is product repair as provided in this Limited Warranty. Any implied warranties,
including the implied warranties of merchantability or fitness for a particular purpose, are limited to one year or the
shortest period allowed by law.

12 49-55111
Consumer Support
CONSUMER SUPPORT
GE Appliances Website
Have a question or need assistance with your appliance? Try the GE Appliances Website 24 hours a day, any day
of the year! You can also shop for more great GE Appliances products and take advantage of all our on-line support
services designed for your convenience. In the US: GEAppliances.com
Register Your Appliance
Register your new appliance on-line at your convenience! Timely product registration will allow for enhanced
communication and prompt service under the terms of your warranty, should the need arise. You may also mail in
the pre-printed registration card included in the packing material. In the US: GEAppliances.com/register
Schedule Service
Expert GE Appliances repair service is only one step away from your door. Get on-line and schedule your service at
your convenience any day of the year. In the US: GEAppliances.com/ge/service-and-support/service.htm
or call 800.432.2737 during normal business hours.
Extended Warranties
Purchase a GE Appliances extended warranty and learn about special discounts that are available while your
warranty is still in effect. You can purchase it on-line anytime. GE Appliances Services will still be there after your
warranty expires. In the US: GEAppliances.com/ge/service-and-support/shop-for-extended-service-plans.htm
or call 800.626.2224 during normal business hours.
Parts and Accessories
Individuals qualified to service their own appliances can have parts or accessories sent directly to their homes
(VISA, MasterCard and Discover cards are accepted). Order on-line today 24 hours every day.
In the US: GEApplianceparts.com or by phone at 877.959.8688 during normal business hours.
Instructions contained in this manual cover procedures to be performed by any user. Other servicing
generally should be referred to qualified service personnel. Caution must be exercised, since improper
servicing may cause unsafe operation.
Contact Us
If you are not satisfied with the service you receive from GE Appliances, contact us on our Website with all the
details including your phone number, or write to:
In the US: General Manager, Customer Relations | GE Appliances, Appliance Park | Louisville, KY 40225
GEAppliances.com/ge/service-and-support/contact.htm

Inscrivez ci-dessous les numéros
de modèle et de série
N° de modèle ____________
N° de série ______________
Vous les trouverez sur l’étiquette
apposée sur la partie avant du
cadre de l’appareil.
GE est une marque déposée de General Electric Company. Fabriqué sous licence de marque.
MANUEL
D’UTILISATION
COMPACTEURS
de déchets
CONSIGNES DE SÉCURITÉ .......3
UTILISATION DU COMPACTEUR
Comment démarrer ....................5
ENTRETIEN ET NETTOYAGE ....8
CONSEILS DE DÉPANNAGE .....10
GARANTIE ........................ 11
SERVICE À LA CLIENTÈLE ......12
49-55111 03-17 GEA
UCG1680
UCG1650
UCG1600

2 49-55111
NOUS VOUS REMERCIONS D’ACCUEILLIR GE APPLIANCES CHEZ VOUS
Que vous ayez grandi avec GE Appliances ou qu’il s’agisse de votre première acquisition, nous
sommes heureux de vous accueillir dans notre famille.
Nous sommes fiers du savoir-faire, de l’innovation et de l’esthétique qui composent chaque appareil
GE Appliances, et nous pensons que vous le serez aussi. Dans cette optique, nous vous rappelons
que l’enregistrement de votre électroménager vous assure la communication de renseignements
importants sur le produit et la garantie lorsque vous en avez besoin.
Enregistrez votre électroménager GE en ligne dès maintenant. Des sites Web et des numéros de
téléphone utiles figurent dans la section Soutien au consommateur de ce manuel d’utilisation. Vous
pouvez aussi poster la fiche de garantie préimprimée incluse dans l’emballage.

49-55111 3
INFORMATION DE SÉCURITÉ
CONSIGNES DE SÉCURITÉ IMPORTANTES
LIRE TOUTES LES CONSIGNES AVANT D’UTILISER L’APPAREIL
LIRE ET
CONSERVEZ CES DIRECTIVES
AVERTISSEMENT
Pour votre sécurité, veuillez suivre les directives données dans
le présent manuel afin de réduire au minimum les risques d’incendie, d’explosion et de
chocs électriques et prévenir tout dommage et blessure grave ou mortelle.
AVERTISSEMENT
EN UTILISANT DES APPAREILS ÉLECTRIQUES, IL FAUT
TOUJOURS SUIVRE LES PRÉCAUTIONS DE BASE, Y COMPRIS
CE QUI SUIT :
Ŷ &HFRPSDFWHXUHVWUpVHUYpjO¶XWLOLVDWLRQUpVLGHQWLHOOH
Utilisez cet appareil seulement pour l’usage auquel il
est destiné selon ce manuel du propriétaire.
Ŷ ,OIDXWXQHVXSHUYLVLRQpWURLWHORUVTXHO¶DSSDUHLOHVW
utilisé par ou près d’enfants. Ne laissez jamais le
compacteur être utilisé comme jouet ou fonctionner
sans supervision.
Ŷ VERROUILLAGE DES COMMANDES : Mettez
OHERXWRQjODSRVLWLRQOFF (arrêt) et retirez-le
lorsque vous ne faites pas de compactage d’ordures
ménagères. Cela empêchera toute mauvaise utilisation
du compacteur et empêchera les enfants de l’utiliser.
Ŷ 1HSRXVVH]SDVOHVGpFKHWVGDQVOHWLURLUDYHFOHV
mains ou les pieds. Les déchets pourraient contenir
du verre cassé, des pièces de métal tranchantes ou
d’autres objets coupants qui pourraient provoquer
des blessures.
Ŷ (QUHWLUDQWRXWUDQVSRUWDQWOHVDFG¶RUGXUHV
ménagères, gardez le sac loin de votre corps. Les
objets coupants peuvent l’avoir percé.
Ŷ $WWHQWLRQHQQHWWR\DQWO¶LQWpULHXUGHO¶DUPRLUHRXOH
WLURLUjRUGXUHVPpQDJqUHV/HVIUDJPHQWVGHYHUUH
pourraient être collés au coulisseau, incrustés dans
la surface du tiroir ou au bas de l’armoire.
Ŷ 1¶LQVWDOOH]SDVHWQHUDQJH]SDVOHFRPSDFWHXUjXQ
endroit où il sera exposé aux conditions extérieures.
Ŷ $VVXUH]YRXVTXHOHFRPSDFWHXUHVWELHQLQVWDOOpHW
jQLYHDXVXUXQVROTXLSHXWVXSSRUWHUVRQSRLGV
Ŷ 1HWRXFKH]SDVDX[SLqFHVPRELOHV
Ŷ 1HFRPSDFWH]SDVGHGpFKHWVDOLPHQWDLUHVFRPPH
de la viande crue et du poisson, des couennes,
des articles d’hygiène personnelle et des couches
jetables. Ces articles produisent de très fortes
odeurs et ne vont pas dans le compacteur.
Ŷ 1HO¶XWLOLVH]SDVFRPPHDSSDUHLODPRYLEOH8WLOLVH]
seulement comme appareil encastré.
PRÉCAUTIONS CONTRE L’UTILISATION
DÉRAISONNABLE DU COMPACTEUR :
Ŷ 1HFRPSDFWH]MDPDLVGHFDUWRXFKHVjSORPE
GHFDUWRXFKHVG¶DUPHVjIHXGHSLqFHVGHIHX
d’artifice, etc. qui sont très explosifs.
Ŷ 1HFRPSDFWH]MDPDLVGHPDWpULDX[LQIODPPDEOHV
comme peinture, chiffons saturés d’huile ou
d’essence, contenants de liquides de démarrage
jPRWHXUFRQWHQDQWVGHGLOXDQWGHSHLQWXUHHWF,O
pourrait y avoir une combustion spontanée ou des
concentrations de vapeurs explosives.
Ŷ 1HFRPSDFWH]MDPDLVOHVFRQWHQDQWVGHSURGXLWV
chimiques toxiques comme des insecticides forts ou
autres matériaux toxiques; le compactage pourrait
dégager des vapeurs dangereuses.
Ŷ 1HFRPSDFWH]MDPDLVG¶DpURVROVFRQWHQDQWGHV
produits chimiques explosifs ou très toxiques. (Si
vous êtes certains que les aérosols contiennent
des matériaux non dangereux comme la crème de
UDVDJHOHIURPDJHjWDUWLQHUHWODFUqPHIRXHWWpH
ils peuvent être compactés.)
Ŷ 1HFRPSDFWH]SDVOHVFLJDUHWWHVOHVFLJDUHV
allumés ou autres articles chauds ou en feu.
Ŷ 1HUDQJH]HWQ¶XWLOLVH]SDVG¶HVVHQFHRXDXWUHV
vapeurs et liquides inflammables près de cet
appareil ou de tout autre appareil électroménager.
Ŷ 1HVXUFKDUJH]SDVYRWUHDSSDUHLOpOHFWURPpQDJHU
Ŷ 0DQLSXOH]XQVDFjSRXEHOOHSOHLQDYHFVRLQ
Les objets pointus peuvent percer le sac et vous
EOHVVHU1HVXUFKDUJH]SDVOHVDFjSRXEHOOHGH
matières lourdes comme du verre.

4 49-55111
INFORMATION DE SÉCURITÉ
CONSIGNES DE SÉCURITÉ IMPORTANTES
LIRE TOUTES LES CONSIGNES AVANT D’UTILISER L’APPAREIL
LIRE ET CONSERVEZ CES DIRECTIVES
AVERTISSEMENT
INSTALLATION ET ENTRETIEN APPROPRIÉS
Ce compacteur doit être correctement installé, en conformité avec les directives d’installation fournies, avant
d’être utilisé. Si vous n’avez pas reçu les directives d’installation avec votre compacteur, vous pouvez vous les
SURFXUHUHQYLVLWDQWQRWUHVLWH:HEjO¶DGUHVVHwww.electromenagersge.ca.
AVERTISSEMENT
EN UTILISANT DES APPAREILS ÉLECTRIQUES, IL FAUT
TOUJOURS SUIVRE LES PRÉCAUTIONS DE BASE, Y COMPRIS
CE QUI SUIT :
Ŷ 3RXUpYLWHUWRXWGDQJHUGHFKRFpOHFWULTXHFH
FRPSDFWHXUGRLWrWUHELHQLQVWDOOpHWPLVjODWHUUH
conformément aux instructions d’installation avant
de l’utiliser.
Ŷ 1HIDLWHVSDVIRQFWLRQQHUDYHFXQFRUGRQXQHILFKH
ou un moteur endommagés ou après tout autre
dommage. Faites examiner, réparer ou ajuster
l’appareil par un technicien de service autorisé.
Ŷ 1HGpPRQWH]SDVFHWDSSDUHLO8QDSSDUHLOPDO
remonté pourrait provoquer un choc électrique lors
de son utilisation subséquente.
Ŷ 'pEUDQFKH]OHFRPSDFWHXUDYDQWWRXWHV
réparations. REMARQUE : Nous recommandons
fortement que toute réparation soit exécutée par
une personne qualifiée.
Ŷ 1¶XWLOLVH]SDVXQHILFKHG¶DGDSWDWLRQRXXQHUDOORQJH
électrique avec cet appareil.
Ŷ 6XLYH]OHVFRGHVQDWLRQDX[GHO¶pOHFWULFLWpRXOHV
codes et ordonnances en vigueur localement. Cet
appareil doit être alimenté d’un courant de 120 V,
+]HWEUDQFKpjXQFLUFXLWH[FOXVLIPLVjODWHUUH
correctement et protégé par un disjoncteur de 15 ou
20 ampères ou un fusible temporisé.
Ŷ 6LO¶DOLPHQWDWLRQpOHFWULTXHIRXUQLHQHUpSRQGSDVDX[
exigences précédentes, appelez un électricien agréé.
Ŷ 1RXVUHFRPPDQGRQVGHSUpYRLUXQFLUFXLWGLVWLQFW
pour cet appareil.
Ŷ 1HFRXSH]HWQHUHWLUH]GDQVDXFXQFDVODWURLVLqPH
EURFKHGHPLVHjODWHUUHGXFRUGRQ
Ŷ &HWDSSDUHLOGRLWrWUHPLVjODWHUUH'DQVOHFDV
de mauvais fonctionnement ou de panne, la mise
jODWHUUHUpGXLUDOHULVTXHGHFKRFpOHFWULTXHHQ
fournissant une voie de moindre résistance pour le
courant électrique.
Ŷ &HWDSSDUHLOHVWGRWpG¶XQFRUGRQHWG¶XQHILFKH
DYHFPLVHjODWHUUH/DILFKHGRLWrWUHEUDQFKpH
dans une prise appropriée correctement installée
HWPLVHjODWHUUHFRQIRUPpPHQWDX[FRGHVHW
règlements locaux.
Ŷ 7RXWHPDXYDLVHFRQQH[LRQGXFRQGXFWHXUGHPLVH
jODWHUUHGHO¶pTXLSHPHQWSRXUUDLWPHQHUjXQ
risque de choc électrique. Consultez un électricien
qualifié si vous n’êtes pas certain que l’appareil soit
ELHQPLVjODWHUUH
Ŷ 1HPRGLILH]SDVODILFKHGHFHWDSSDUHLO6LHOOH
n’entre pas complètement dans la prise, faites
installer une prise appropriée par un électricien
qualifié.

49-55111 5
UTILISATION DU COMPACTEUR
Comment démarrer
B
A
C
D
E
F
H
G
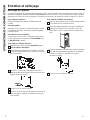
Caractéristiques
3$11($8'(3257(
2895(7,52,5¬3e'$/((7$&7,9$7,21
'8&203$&7(85
3/,17+(
%28721212))0$5&+($55Ç7
,17(55837(85'(6e&85,7e'87,52,5
(03/$&(0(17'(6180e526'(02'Ê/(
(7'(6e5,(
%287216'(5(7(18('86$&
9(5528'(3257(/$7e5$/($029,%/(
A
B
C
D
E
F
G
H
Les caractéristiques et l’apparence des appareils varient tout au long de ce manuel selon les modèles

6 49-55111
Comment démarrer
UTILISATION DU COMPACTEUR
Ce qu’il fait et comment il fonctionne
9RWUHFRPSDFWHXUUpGXLWOHVRUGXUHVPpQDJqUHVMXVTX¶jXQTXDUWGHOHXUYROXPHRULJLQDO
,OFRPSDFWHODSOXSDUWGHVGpFKHWV\FRPSULVOHSDSLHUOHVFDQQHWWHVOHVERXWHLOOHVOHVERFDX[OHVFRQWHQDQWVGH
plastique, les enveloppes, les restes de balayage et certains déchets alimentaires.
'pSRVH]OHVGpFKHWVGDQVOHVDFMHWDEOHFRQoXSRXUOHVFRPSDFWHXUVjO¶LQWpULHXUGXWLURLUG¶RUGXUHVPpQDJqUHVGX
compacteur et fermez le tiroir. Lorsque vous allumez le compacteur, un coulisseau électrique se déplace vers le bas
GDQVOHWLURLUFRPSDFWHOHVRUGXUHVPpQDJqUHVUHPRQWHjQRXYHDXHWOHFRPSDFWHXUV¶pWHLQWDXWRPDWLTXHPHQW
REMARQUE :/HWLURLUjRUGXUHVPpQDJqUHVGRLWrWUHDXPRLQVUHPSOLjPRLWLpDYDQWGHQRWHUOHFRPSDFWDJHFDUOH
coulisseau ne se déplace pas jusqu’au fond du tiroir. En ajoutant des ordures, la force de compression est transférée
DX[DUWLFOHVHQGHVVRXVMXVTX¶jFHTXHWRXWVRLWFRPSDFWp8QEULVSHXWVHSURGXLUHVLYRXVRXYUH]ODSRUWHSHQGDQWOHF\FOH
Bouton ON/OFF (marche/arrêt)
Le bouton amovible est fourni pour votre protection
comme mesure de sécurité. Lorsque l’interrupteur du
ERXWRQHVWjODSRVLWLRQOFF (arrêt), le compacteur ne
peut pas fonctionner
Verrouillage des commandes :
Verrouillez le compacteur lorsqu’il n’est pas utilisé en
retirant le bouton. Cela empêchera les enfants d’utiliser
le compacteur ainsi que toute autre utilisation abusive.
Interrupteur de sécurité du tiroir
Le compacteur a deux interrupteurs de sécurité pour faire en sorte que le tiroir soit complètement fermé lorsqu’il est
en marche. Le compacteur ne fonctionnera pas si le tiroir n’est pas complètement fermé.
Installation du sac d’ordures ménagères
Avant d’installer un nouveau sac, assurez-vous que :
1
Le verrou de porte latérale est fermement enclenché.
Si la porte latérale s’ouvre, poussez-la pour la refermer.
2
Le contenant est propre et libre de débris tranchants
qui pourraient percer le sac.
Des sacs de plastique renforcés sont fournis avec votre
FRPSDFWHXUHWVRQWSUrWVjrWUHLQVWDOOpV
Vous devez utiliser les sacs d’ordures ménagères
robustes spécialement conçus pour cet usage et inclus
avec le compacteur. Ces sacs sont disponibles chez
votre concessionnaire ou au centre de service de l’usine.
Demandez le numéro de catalogue WC60X5017.
Pour commander des sacs, appelez sans frais au :
EU: 877.959.8688 ou GEApplianceparts.com
Canada: 800.661.1616 ou www.GEAppliances.ca
Pour installer un nouveau sac :
1
3ODFH]OHVDFGDQVOHWLURLU2XYUH]OHVDFHWWLUH]OHV
bords supérieurs par dessus le dessus du tiroir.
2
Verrouillez le sac en place en
accrochant les quatre trous
prépercés sur les boutons de
retenue du sac. Les trous
s’élargiront sur les boutons
sans problème pour le sac.
Chargement
Enfoncez la pédale et sortez le tiroir.
Rappel :
Ŷ3RXUDLGHUjJDUGHUOHFRXOLVVHDXSURSUHHQ
compactant des ordures ménagères salissantes,
placez quelques feuilles de journaux pliées sur le
GHVVXVGHODFKDUJHjFRPSDFWHU
Ŷ/HVDUWLFOHVWURSJURVSRXUHQWUHUGDQVOHWLURLUVH
replient pour s’ajuster dans le tiroir. Si ce n’est pas
possible, n’essayez pas de les forcer.
Ŷ/HVMRXUQDX[UHSOLpVVRQWDXVVLXWLOHVSRXUFRPSDFWHU
une grosse bouteille de verre ou plusieurs bouteilles
ou bocaux ou autres articles qui pourraient éclater.
Ŷ%LHQTX¶LOQHVRLWSDVQpFHVVDLUHGHFRPSDFWHUMXVTX¶j
ce que le tiroir soit plein ou presque plein, nous
suggérons, pour un compactage maximum, d’utiliser
l’appareil chaque fois que vous ajoutez une quantité
importante de déchets.

49-55111 7
UTILISATION DU COMPACTEUR
Comment démarrer
Compactage
Pour mettre en marche le compacteur :
1
7RXUQH]OHERXWRQjON.
2
Assurez-vous que le tiroir est bien fermé.
3
Soulevez la pédale pour lancer le cycle.
Le coulisseau se déplace vers le bas dans le tiroir,
FRPSDFWDQWOHVGpFKHWV¬ODILQGHODFRXUVHOH
coulisseau change automatiquement de direction, sort
GXWLURLUUHYLHQWjVDSRVLWLRQGHGpSDUWHWOHFRPSDFWHXU
s’éteint automatiquement.
&HF\FOHSUHQGPRLQVGHVHFRQGHV7DQGLVTXHOH
tiroir se remplit de déchets, la durée du cycle diminue
progressivement.
REMARQUES :
Ŷ9RXVQHYHUUH]SDVOHFRPSDFWDJHGHVGpFKHWVOHV
premières fois que vous chargez. Les premières
fois que vous chargez. Le tiroir du compacteur doit
rWUHDXPRLQVUHPSOLjPRLWLpDYDQWTXHOHFRPSDFWHXU
FRPPHQFHjFRPSDFWHUODFKDUJH
Ŷ
Les bouteilles de verre peuvent faire un bruit fort
en se brisant lors du compactage. C’est normal.
'HPrPHOHVERXWHLOOHVGDQVOHWLURLUjRUGXUHVQHVH
briseront pas toujours durant le premier cycle. Le verre
qui se brise et le bruit qui y est associé peuvent se
produire plusieurs cycles plus tard selon le type et le
volume des déchets.
Ŷ
Lorsque les bouteilles et les cannettes sont
compactées, le sac pourrait se déchirer un peu.
Cela est normal et n’affecte aucunement le rendement
de l’appareil. Gardez le sac loin de votre corps pour
éviter toute blessure d’objets coupants qui pourraient
avoir transpercé le sac.
IMPORTANT:
Ŷ
Ne pressez pas trop en tournant le bouton. Le
bouton devrait toujours tourner facilement. Forcer
pourrait briser le bouton et endommager l’interrupteur.
Ŷ
En vidant les paniers de déchets dans le tiroir à
ordures, certains articles peuvent tomber derrière
le tiroir. Ces articles pourraient empêcher le tiroir
de se fermer complètement et ainsi empêcher le
FRPSDFWHXUGHIRQFWLRQQHU3RXUOHVUHWLUHUGHO¶DUULqUH
du tiroir, ouvrez le tiroir et retirez-le pour les enlever.
Consultez la section Entretien et nettoyage.
Pour arrêter le compacteur :
Le compacteur peut être arrêté en tout temps.
1
Essayer d’ouvrir le tiroir tandis que le coulisseau se
déplace arrêtera le coulisseau. L’interrupteur de sécurité
s’activera.
2
Fermez entièrement le tiroir et le coulisseau reviendra
jODSRVLWLRQYHUVOHHAUT.
3
2XYUH]HQWLqUHPHQWOHWLURLUHWWRXUQH]OHERXWRQjOFF
(arrêt).
Retrait d’un sac plein d’ordures ménagères
1
2XYUH]OHWLURLUHQHQIRQoDQWODSpGDOH
2
5HWLUH]OHGHVVXVGXVDFGHVERXWRQVGHUHWHQXHGX
VDF3RXVVH]OHVTXDWUHUHYHUVGXVDF
3
3RXVVH]OHYHUURXGHSRUWH
latérale vers le bas et ouvrez
le tiroir latéral en l’inclinant.
4
Sortez le sac avec le chariot
du sac.

8 49-55111
Entretien et nettoyage
UTILISATION DU COMPACTEUR
Pour nettoyer l’extérieur :
(VVX\H]OHVVXUIDFHVjO¶DLGHG¶XQFKLIIRQSURSUHHW
humide.
Panneaux peints :
Appliquez un peu de poli pour électroménagers lorsque
OHFRPSDFWHXUHVWQHXIHWHQVXLWHjSOXVLHXUVUHSULVHV
pendant l’année.
Panneaux en acier inoxydable :
Vous pouvez vous procurer le nettoyant Cerama Bryte
au GE Appliances en composant le 877.959.8688 (EU)
ou 800.661.1616 (Canada).
Pour nettoyer l’intérieur du tiroir :
1
5HWLUH]OHVDF9RLUjODVHFWLRQ Retrait d’un sac
plein d’ordures ménagères.
2
3RUWH]GHVJDQWVSURWHFWHXUV,OSRXUUDLW\DYRLUGHV
morceaux de verre dans le tiroir. Enfoncez le verrou
de porte latérale.
3
Maintenez le verrou de porte latérale enfoncé et
LQFOLQH]OHF{WpGXWLURLUMXVTX¶jFHTXHOHYHUURXVRLW
dégagé du devant du tiroir.
4
Essuyez avec un chiffon humide.
5
Enfoncez le verrou de la porte latérale en pressant le
F{WpjODSRVLWLRQYHUWLFDOH9HUURXLOOH]OHYHUURXGH
porte latérale.
Pour nettoyer l’intérieur de l’armoire :
1
6RUWH]OHWLURLUMXVTX¶jFHTX¶LOV¶DUUrWH1RWH]OHVUDLOV
où se déplacent les roulettes du tiroir.
2
3RUWH]GHVJDQWVSURWHFWHXUV6RXOHYH]O¶DYDQWSRXU
dégager les butées du tiroir. Agrippez le tiroir des
deux côtés. Sortez-le jusqu’au bout et mettez-le de
côté.
3
3DVVH]O¶DVSLUDWHXUjO¶LQWpULHXUGHO¶DUPRLUH1HWWR\H]
jODPDLQOHVGpYHUVHPHQWVOLTXLGHVRXOHVGpFKHWV
humides ou passez un aspirateur conçu pour
ramasser le liquide.
4
Lavez, rincez et asséchez l’intérieur.
Nettoyage de l’appareil
Comme pour la plupart des appareils électroménagers, il faut un bon entretien pour une satisfaction continue. Avant de
QHWWR\HUOHFRPSDFWHXUWRXUQH]OHERXWRQjODSRVLWLRQOFF (arrêt) et enlevez-le. Si vous prévoyez d’être absent pendant
quelques jours, retirez le sac du compacteur. Verrouillez le compacteur en retirant le bouton et rangez-le en lieu sûr.
La page est en cours de chargement...
La page est en cours de chargement...
La page est en cours de chargement...
La page est en cours de chargement...
-
 1
1
-
 2
2
-
 3
3
-
 4
4
-
 5
5
-
 6
6
-
 7
7
-
 8
8
-
 9
9
-
 10
10
-
 11
11
-
 12
12
-
 13
13
-
 14
14
-
 15
15
-
 16
16
-
 17
17
-
 18
18
-
 19
19
-
 20
20
-
 21
21
-
 22
22
-
 23
23
-
 24
24


dans d''autres langues
- English: GE Profile UCG1600LBB User guide
Documents connexes
Autres documents
-
GE Monogram ZCGP150 Manuel utilisateur
-
KitchenAid 4KUCS181T Manuel utilisateur
-
GE ZCGS150, ZCGP150 Manuel utilisateur
-
Whirlpool TU950QPXS Le manuel du propriétaire
-
-
Jenn Air TC707S0 Manuel utilisateur
-
-
Altrad PCX 450 Manuel utilisateur