
318201031 rev. A (04/13)
EN WARMER DRAWER USE AND CARE GUIDE

2
©2013 Electrolux Home Products, Inc. All rights reserved. Printed in China.
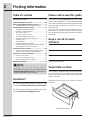
Finding Information
Thank you for choosing Electrolux, the new premium
brand in home appliances. This Use & Care Guide is
part of our commitment to customer satisfaction and
product quality throughout the service life of your
new appliance.
We view your purchase as the beginning of a
relationship. To ensure our ability to continue serving
you, please use this page to record important product
information.
Keep a record for quick
reference
Please read & save this guide
Questions?
Serial Plate Location
For toll-free telephone support in the U.S. and
Canada: 1-877-4ELECTROLUX (1-877-435-3287)
For online support and Internet production information
visit http://www.electroluxappliances.com
You will fi nd the model and serial number printed on
the serial plate. The serial plate is located along the
interior right side trim and visible when the warmer
drawer is opened.
Remember to record the serial number for future
reference.
Purchase date
Electrolux model number
Electrolux serial number
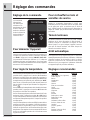
Table of contents
NOTE
Registering your product with Electrolux enhances
our ability to serve you. You can register online at
www.electroluxappliances.com or by dropping your
Product Registration Card in the mail.
Serial Plate Location
Serial Plate Location ..................................................2
Important Safety Instructions .................................3-4
Before Setting Warmer Drawer Control ....................5
• Arranging Warmer Drawer Rack Positions ............5
Setting Warmer Drawer Controls ...........................5-7
• To Operate the Warmer Drawer.............................5
• Humidity Controller Feature ...................................5
• To Set the Controls ................................................6
• To Power-Up the Controls .....................................6
• To Set the Target Temperature ..............................6
• To Warm Serving Bowls and Plates ......................6
• Indicator Light ........................................................6
• Auto-Shutdown ......................................................6
• Recommended Food Settings ...............................6
• Preparing Bread Dough for the Warmer Drawer ...7
• To Enable the Bread Proof Feature .......................7
General Care and Cleaning.....................................8-9
• To Remove and Replace the Warmer Drawer .......8
• Cleaning Various Parts of Your Appliance .............9
Solutions to Common Problems .............................10
• Drawer is not leveled ...........................................10
• Cannot move appliance easily .............................10
• Warmer drawer does not operate ........................10
Warranty information ...............................................12

3
• Remove all tape and packaging wrap before
using the appliance. Destroy the carton and
plastic bags after unpacking the appliance.
Never allow children to play with packaging
material. Do not remove the model/serial plate
attached to the cooktop.
• Proper Installation-Be sure your appliance
is properly installed and grounded by a
qualifi ed technician in accordance with
the National Electrical Code ANSI/NFPA
No. 70 - latest edition in the United States,
or CSA C22.1, Part 1 in Canada, and local
code requirements. Install and/or adjust only
per installation instructions provided in the
literature package for this appliance.
Ask your dealer to recommend a qualifi ed
technician and an authorized repair service.
Know how to disconnect the electrical power to
the drawer at the circuit breaker or fuse box in
case of an emergency.
• User servicing—Do not repair or replace
any part of the appliance unless specifi cally
recommended in the manuals. All other
servicing should be done only by a qualifi ed
technician, This may reduce the risk of personal
injury and damage to the appliance.
• Never modify or alter the construction of a
cooktop by removing panels, wire covers
or any other part of the product.
What you need to know about safety instructions
Warning and Important Instructions appearing in this guide are not meant to cover all possible
conditions and situations that may occur. Common sense, caution and care must be exercised
when installing, maintaining or operating a microwave.
ALWAYS contact your dealer, distributor, service agent or manufacturer about problems or condi-
tions you do not understand.
Recognize Safety Symbols, Words, Labels
WARNING — Hazards or unsafe practices
which COULD result in severe personal injury
or death.
• ALL WARMER DRAWERS CAN TIP.
• INJURY TO PERSONS COULD RESULT.
• INSTALL ANTI-TIP DEVICE PACKED WITH WARMER
DRAWER.
• SEE INSTALLATION INSTRUCTIONS.
TO REDUCE THE RISK OF TIPPING OF THE WARM-
ER DRAWER, THE DRAWER MUST BE SECURED BY
PROPERLY INSTALLED ANTI-TIP LOCKING PLATES
PROVIDED WITH THE DRAWER. TO CHECK IF THE
LOCKING PLATES ARE INSTALLED PROPERLY,
GRASP THE HANDLE OF THE OPEN DRAWER AND
SEE IF THE DRAWER WILL SLIDE OUT OF THE
OPENING OR TIP OUT. REFER TO THE INSTAL-
LATION INSTRUCTIONS FOR PROPER LOCKING
PLATE INSTALLATION.
To reduce the risk of fi re, electrical shock, or injury when using your appliance, follow
basic precaution including the following:
CAUTION — Hazards or unsafe practices
which COULD result in minor personal injury.
Important Safety Instructions
• Storage on Appliance—Flammable materials
should not be stored in the drawer. This
includes paper, plastic and cloth items, such
as cookbooks, plasticware and towels, as well
as fl ammable liquids. Do not store explosives,
such as aerosol cans, on or near the cooktop.
Flammable materials may explode and result
in fi re or property damage.

4
• Do not use the warmer drawer for
storage.
• Stepping, leaning or sitting on the door or
drawer can result in serious injuries and
may also cause damage to the warmer
drawer. Do not allow children to climb or
play around the drawer. An open drawer,
when hot, may cause burns.
• Never use your appliance for warming or
heating the room.
• Glazed Cooking Utensils—Only certain types
of glass, glass/ceramic, ceramic, earthenware,
or other glazed utensils are suitable for use
without breaking due to the sudden change
in temperature. Check the manufacturer’s
recommendations.
• Use Care When Opening Warmer Drawer—
Stand to the side of the unit when opening
the door of a hot drawer. Let hot air or steam
escape before you remove or replace food in
the warmer drawer.
• Placement of Warmer Drawer Racks—Always
place rack in desired location while drawer is
cool. If rack must be moved while hot, use
extreme caution. Use potholders and grasp the
rack with both hands to reposition. Do not let
potholders contact the hot element or interior
of the warmer drawer. Remove all utensils from
the rack before removing rack.
• Do Not Use Water on Grease Fires—Smother
the fi re or fl ame or use dry chemical or foam-
type extinguisher.
IMPORTANT INSTRUCTIONS FOR CLEANING
YOUR WARM & SERVE DRAWER
• Clean the drawer regularly to keep all parts
free of grease that could catch fi re. Do not
allow grease to accumulate. Greasy deposits
could catch fi re.
• Kitchen cleaners/aerosols—Always follow
the manufacturer’s recommended directions for
use. Be aware that excess residue from cleaners
and aerosols may ignite causing damage and/
or injury.
NOTE
Save these important safety instructions
for future reference.
IMPORTANT SAFETY NOTICE
The California Safe Drinking Water and Toxic
Enforcement Act requires the Governor of
California to publish a list of substances known
to the state to cause cancer, birth defects or other
reproductive harm, and requires businesses to
warn customers of potential exposure to such
substances.
Important Safety Instructions
• Do Not Leave Children Alone—Children
should not be left alone or unattended in the
area where appliance is in use. They should
never be allowed to sit or stand on any part of
the appliance.
• DO NOT TOUCH INTERIOR SURFACES OF
THE WARMER DRAWER. Surfaces may be
hot even though they are dark in color. During
and after use, do not touch, or let clothing or
other fl ammable materials touch these areas
until they have had suffi cient time to cool.
• Wear Proper Apparel—Loose-fitting or
hanging garments should never be worn
while using the appliance. Do not let clothing
or other flammable materials contact hot
surfaces.
• Use Only Dry Potholders—Moist or damp
potholders on hot surfaces may result in
burns from steam. Do not let the potholders
touch hot heating elements. Do not use a towel
or other bulky cloth instead of a potholder.
• Do Not Heat Unopened Food Containers—
Build-up of pressure may cause the container
to burst and result in injury.
• IMPORTANT—Do not attempt to operate the
warmer drawer during a power failure. If the
power fails, always turn the control off. If the
drawer is not turned off and the power resumes,
the drawer may begin to operate again. Food
left unattended could spoil.
• Protective Liners—Do not use aluminum
foil to line warmer drawer. Any other use of
protective liners or aluminum foil may result in
poor performance or damage to the appliance.
Only use aluminum foil as recommended for
baking if used as a cover placed on the food.

5
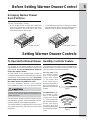
Before Setting Warmer Drawer Control
Setting Warmer Drawer Controls
Upright Position Downward Position
Figure 1
Figure 2
Arranging Warmer Drawer
Rack Positions
To Operate the Warmer Drawer Humidity Controller Feature
The rack can be used in 2 ways:
• In the upright position to allow low profi le food
items to be placed both under and on top of the
rack (for example, rolls or biscuits on top of the
rack and a casserole dish under).
The purpose of the warmer drawer is to keep hot
cooked foods at serving temperature. Always start
with hot food. It is not recommended to heat cold
food in the warmer drawer.
All food placed in the warmer drawer should be
covered with a lid or aluminum foil to maintain moisture
and softness. Do not cover crisp foods. Do not use
plastic wrap to cover food. Plastic may melt onto
the drawer and be very diffi cult to clean.
Use only dishware, utensils and cookware
recommended for oven use in the warmer drawer.
This feature may be used to control humidity in the
Warmer Drawer. The control knob is located on the
inner front panel of the Warmer Drawer.
• In the downward position to allow you to place
light weight food items and empty dishware (for
example, rolls or pastries and dinner plates).
Always use potholders or oven mitts when removing
food from the warmer drawer as cookware and
plates will be hot.
Use the warmer drawer to keep hot foods hot such
as: vegetables, gravies, meats, casseroles, biscuits
and rolls, pastries and heated dinner plates.
The warmer drawer is equipped with a catch which
may require extra force when opening and closing
the drawer.
For dry heat: Slide
the humidity control
knob in the direction
of less moist (Figure
1). This allows more
of the moist heat to
escape and provides a
dryer environment for
the food in the Warmer
Drawer.
For moist heat: Slide
the humidity control
knob in the direction
of more moist (Figure
2). This will help keep
the food in the Warmer
Drawer from drying
out. Both heat and
moisture will be applied
to the Warmer Drawer
cavity.

6
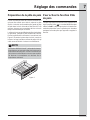
Setting Warmer Drawer Controls
The digital controls
are used to set the
temperature of the
warmer drawer. It is
located at the right
side of the warmer
drawer in the open
position.
On the fi rst power-up or after a power interruption,
the unit will fl ash “88:88°” in the display. Press
the ON-OFF pad twice. The display will show
“----”, prompting to press another pad. If no other
pad is touched, the unit will power off after a few
seconds.
The indicator light is located in the lower center
part of the front drawer glass. It turns on when the
control is set, and stays on until the unit is turned
off. Make sure indicator light is off when removing
food from the drawer.
This unit is programmed to automatically shutdown
after 4 hours it is left on. The element will stop
warming the drawer, the indicator light will turn off and
the electronic display will show an “OFF” message,
to remind the user that the unit auto-shutted off by
itself.
Heat bowls and plates on the 140°F setting. Place
empty dishes on the rack to raise them off drawer
bottom. To further heat dishes or to heat fi ne china,
check with the manufacturer for maximum heat
tolerance.
To select the lowest (90°F) warming temperature
available, press the -lo pad and wait for the a few
seconds for the acceptance delay. A second press
of -lo will lower the temperature to Bread Proof,
displayed by a “brPF” in the screen. The Bread
Proof function can also be accessed at any time by
pressing the pad.
To select the highest (210°F) warming temperature
available, press the +hi pad and wait for the few
seconds acceptance delay.
For any temperature between the lowest (90°F) and
the highest (210°F), press the +hi or -lo pads until
the desired temperature is displayed. The pads will
adjust the target temperature by 10°F steps each
time it is pressed.
When the desired temperature is set, wait a few
seconds for the controls to accept the input. The
display will show the temperature rising to the
target temperature and will sound a chime when it is
reached. It is recommended to let the unit pre-heat
for 10-15 minutes before placing meal in it.
To Set the Controls
To Power-Up the Controls
Indicator Light
Auto-Shutdown
Recommended Food Settings
To Warm Serving Bowls and
Plates
To Set the Target Temperature
Food Item Setting
Bacon 190°F
Biscuits 170°F
Casseroles 170°F
Eggs 170°F
Empty Dinner Plates 140°F
Fish, Seafood 170°F
Fried Foods 190°F
Gravies, creams, sauces 170°F
Ham 170°F
Hamburger Patties 190°F
Pancakes, Waffl es 190°F
Pastries 170°F
Pies 170°F
Pizza 190°F
Pork Chops 190°F
Potatoes (baked) 190°F
Potatoes (mashed) 170°F
Poultry 190°F
Roasts (Beef, Pork, Lamb) 170°F
Rolls, soft 140°F
Rolls, hard 170°F
Vegetables 170°F

7
At anytime when the unit is ON, press the pad
on the warmer drawer digital controls. The display
will show “brPF”, indicating that the warmer drawer
is in Bread Proof mode. Wait a few seconds for the
controls to accept the input.
The Warmer Drawer has a Bread Proof feature
that can be used to help prepare bread dough. The
recommended length of time to keep bread dough
in the Warmer Drawer is about 45-60 minutes. Be
sure however to follow the recipe’s recommended
times.
The unrisen bread dough should be placed in a
large bowl since the dough will nearly double in
volume. Place the Warmer Drawer Rack in the
downward position (see Figure 1). Before placing
in the Warmer Drawer, cover the bowl with a moist
cloth or use wax paper that has been coated with a
non-stick type cooking spray.
To Enable the Bread Proof
Feature
Preparing Bread Dough for
the Warmer Drawer
Setting Warmer Drawer Controls
Figure 1
NOTE
The bread proof function uses low warming tem-
perature which could happen to be lower than
your room temperature. The drawer will not work
as a cooling device and will not be able to lower
the temperature under the ambient temperature.

8
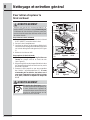
General Care & Cleaning
To Remove Warmer Drawer:
1. Turn power off before removing the warmer
drawer.
2. Open the drawer to the fully opened position.
3. Locate glide lever on each side of drawer, pull up
on the right glide lever and push down on the left
glide lever (See Figure 1).
4. Pull the drawer away from the range.
To Replace Warmer Drawer:
1. Pull the plastic slider to the front of the
glide slots on each side of the drawer cavity
(See Figure 2).
2. Align the glide on each side of the drawer with the
drawer cavity glide slot.
3. Push the drawer into the drawer cavity until glide
levers “click” (approximately 2”). If you do not
hear the glide levers “click” or the drawer does
not feel seated remove the drawer and repeat
steps 1 thru 3.
To Remove and Replace the
Warmer Drawer
Turn the warmer drawer to OFF before removing
the drawer. DO NOT touch the warmer drawer
element. The element may still be hot enough to
cause burns, even if it is dark in color.
Electrical Shock Hazard can occur
and result in serious injury or death.
Disconnect appliance from electric
power before cleaning and servicing
the warmer drawer.
Figure 2
Figure 1
Lever
Lever
Left glide
Right glide
Pull up lever
with fi nger
Pull down lever
with fi nger

9
General Care & Cleaning
Cleaning Various Parts of Your Appliance
Surfaces How to Clean
Plastic
Membrane Keypad
Clean with a cloth soaked in soapy water. Rinse with a clean water and
a dishcloth.
Note: Humidity controller knob can not be removed.
Stainless Steel
Door & Drawer Body
Cleaners made especially for stainless steel are recommended. Always
follow the manufacturer’s instructions. Be sure to rinse the cleaners. DO
NOT clean the door gasket. The door gasket is essential for a good seal.
Care should be taken not to rub, damage or remove the gasket.
Porcelain Enamel
Body Parts and Cavity
Gentle scouring with a soapy scouring pad will remove most spots. Rinse
with a 1:1 solution of clear water and ammonia. If necessary, cover dif-
fi cult spots with an ammonia-soaked paper towel for 30 to 40 minutes.
Rinse with clean water and a damp cloth, and then scrub with a soap-
fi lled scouring pad. Rinse and wipe dry with a clean cloth. Remove all
cleaners or the porcelain may become damaged during future heating.
DO NOT use spray oven cleaners.
Warmer Drawer Rack The rack may be removed for cleaning. Clean by using a mild, abrasive
cleaner following manufacturer’s instructions. Rinse with clean water
and dry
Before cleaning any part of the drawer, be sure control is turned OFF and the drawer is COOL.
REMOVE SPILLOVERS AND HEAVY SOILING AS SOON AS POSSIBLE. REGULAR CLEANINGS WILL
REDUCE THE NUMBER OF MAJOR CLEANINGS LATER.

10
Solutions to Common Problems
Before you call for service, review the following list. It may save you time & expense. The list includes
common occurrences that are not the result of defective workmanship or materials in this appliance.
Before you call
Problem Solution
Drawer is not
leveled
• Poor installation. Place a level on the cutout bottom. Make sure bottom is level.
• Be sure cutout bottom is strong and stable enough to adequately support drawer
(and wall oven, if applicable).
Cannot move
appliance easily
• Appliance must be accessible for service.
• Cabinets not square or are built in too tightly. Contact builder or installer to make
appliance accessible.
Warmer drawer
does not operate
• Make sure cord/plug is plugged tightly into outlet.
• Service wiring is not complete. Contact your dealer, installing agent or authorized
servicer.
• Power outage. Check house lights to be sure. Call your local electric company for
service.

11
Notes

12
Warranty
Your appliance is covered by a one year limited warranty. For one year from your original date of purchase, Electrolux will
repair or replace any parts of this appliance that prove to be defective in materials or workmanship when such appliance is
installed, used, and maintained in accordance with the provided instructions. In addition, the glass cooktop or radiant surface
element of your appliance (excluding built-in and free-standing range appliances) is covered by a two through fi ve year
limited warranty. During the 2nd through 5th years from your original date of purchase, Electrolux will provide a replacement
glass cooktop or radiant surface element for your appliance which has proven to be defective in materials or workmanship
when such appliance is installed, used, and maintained in accordance with the provided instructions.
Exclusions
This warranty does not cover the following:
1. Products with original serial numbers that have been removed, altered or cannot be readily determined.
2. Product that has been transferred from its original owner to another party or removed outside the USA or Canada.
3. Rust on the interior or exterior of the unit.
4. Products purchased “as-is” are not covered by this warranty.
5. Products used in a commercial setting.
6. Service calls which do not involve malfunction or defects in materials or workmanship, or for appliances not in
ordinary household use or used other than in accordance with the provided instructions.
7. Service calls to correct the installation of your appliance or to instruct you how to use your appliance.
8. Expenses for making the appliance accessible for servicing, such as removal of trim, cupboards, shelves, etc.,
which are not a part of the appliance when it is shipped from the factory.
9. Service calls to repair or replace appliance light bulbs, air fi lters, water fi lters, other consumables, or knobs,
handles, or other cosmetic parts.
10. Labor or in-home service costs during the additional limited warranty periods beyond the fi rst year from your
original date of purchase.
11. Pickup and delivery costs; your appliance is designed to be repaired in the home.
12. Surcharges including, but not limited to, any after hour, weekend, or holiday service calls, tolls, ferry trip charges,
or mileage expense for service calls to remote areas, including the state of Alaska.
13. Damages to the fi nish of appliance or home incurred during transportation or installation, including but not limited
to fl oors, cabinets, walls, etc.
14. Damages caused by: services performed by unauthorized service companies; use of parts other than genuine
Electrolux parts or parts obtained from persons other than authorized service companies; or external causes such
as abuse, misuse, inadequate power supply, accidents, fi res, or acts of God.
DISCLAIMER OF IMPLIED WARRANTIES; LIMITATION OF REMEDIES
CUSTOMER’S SOLE AND EXCLUSIVE REMEDY UNDER THIS LIMITED WARRANTY SHALL BE REPAIR OR REPLACEMENT
AS PROVIDED HEREIN. CLAIMS BASED ON IMPLIED WARRANTIES, INCLUDING WARRANTIES OF MERCHANTABILITY
OR FITNESS FOR A PARTICULAR PURPOSE, ARE LIMITED TO ONE YEAR OR THE SHORTEST PERIOD ALLOWED BY
LAW, BUT NOT LESS THAN ONE YEAR. ELECTROLUX SHALL NOT BE LIABLE FOR CONSEQUENTIAL OR INCIDENTAL
DAMAGES SUCH AS PROPERTY DAMAGE AND INCIDENTAL EXPENSES RESULTING FROM ANY BREACH OF THIS
WRITTEN LIMITED WARRANTY OR ANY IMPLIED WARRANTY. SOME STATES AND PROVINCES DO NOT ALLOW THE
EXCLUSION OR LIMITATION OF INCIDENTAL OR CONSEQUENTIAL DAMAGES, OR LIMITATIONS ON THE DURATION OF
IMPLIED WARRANTIES, SO THESE LIMITATIONS OR EXCLUSIONS MAY NOT APPLY TO YOU. THIS WRITTEN WARRANTY
GIVES YOU SPECIFIC LEGAL RIGHTS. YOU MAY ALSO HAVE OTHER RIGHTS THAT VARY FROM STATE TO STATE.
If You Need Service
Keep your receipt, delivery slip, or some other appropriate payment record to establish the warranty period should service be
required. If service is performed, it is in your best interest to obtain and keep all receipts. Service under this warranty must be
obtained by contacting Electrolux at the addresses or phone numbers below.
This warranty only applies in the USA, Puerto Rico and Canada. In the USA and Puerto Rico, your appliance is warranted by
Electrolux Major Appliances North America, a division of Electrolux Home Products, Inc. In Canada, your appliance is warranted
by Electrolux Canada Corp. Electrolux authorizes no person to change or add to any obligations under this warranty. Obligations
for service and parts under this warranty must be performed by Electrolux or an authorized service company. Product features
or specifi cations as described or illustrated are subject to change without notice.
Canada
1-800-265-8352
Electrolux Canada Corp.
5855 Terry Fox Way
Mississauga, Ontario, Canada L5V 3E4
USA
1.800.944.9044
Electrolux Home Products, Inc.,
10200 David Taylor Drive
Charlotte, NC 28262

318201031 rev. A (04/13)
FR TIROIR RÉCHAUD MANUEL D’UTILISATION ET D’ENTRETIEN

Veuillez lire et conserver ce guide
2
Emplacement de la plaque de
série
Vous trouverez les numéros de modèle et de série
sur la plaque de série. Cette dernière se trouve sur
la moulure latérale et est visible lorsque le tiroir est
ouvert.
N’oubliez pas d’inscrire le numéro de série pour
référence future.
Emplacement de la
plaque de série
Informations générales
Merci d’avoir choisi Electrolux, la nouvelle marque
de qualité en matière d’électroménager. Ce Guide
d’utilisation et d’entretien fait partie de notre
engagement à vous satisfaire et à vous fournir un
produit de qualité pendant toute la durée de vie de
votre nouvel appareil.
Nous considérons votre achat comme le début
d’une nouvelle relation. Pour que nous puissions
continuer à vous servir, veuillez utiliser cette page
pour enregistrer les renseignements importants
concernant ce produit.
Conservez ces renseignements
pour plus tard
Questions?
Pour une assistance téléphonique, composez sans
frais au États-Unis et au Canada:
1-877-4ELECTROLUX (1-877-435-3287)
Pour des informations au sujet de nos produits et/ou
du service en ligne, visitez notre site internet:
http://www.electroluxappliances.com
Date d’achat
No de modèle
No de série
Table des matières
NOTE
L’enregistrement de votre produit chez
Electrolux améliore notre capacité à vous servir.
Vous pouvez l’enregistrer en-ligne au www.
electroluxappliances.com ou en envoyant la carte
d’enregistrement par la poste.
©2013 Electrolux Home Products, Inc. Tous droits réservés. Imprimé en Chine
Emplacement de la plaque de série ..........................2
Mesures de Sécurité Importantes ..........................3-4
Avant le Réglage des Commandes ...........................5
• Disposition de la grille du tiroir-réchaud ................5
Réglage des commandes .......................................5-7
• Pour faire fonctionner le tiroir-réchaud ..................5
• Contrôleur d’humidité ............................................5
• Réglage de la commande ......................................6
• Pour démarrer l’appareil ........................................6
• Pour régler la température .....................................6
• Pour réchauffer les bols et assiettes de service ....6
• Témoin lumineux ...................................................6
• Arrêt automatique ..................................................6
• Réglages recommandés ........................................6
• Préparation de la pâte de pain ..............................7
• Pour activer la fonction Pâte de pain .....................7
Nettoyage et entretien général ...............................8-9
• Pour retirer et replacer le tiroir-réchaud .................8
• Nettoyage des composantes de l’appareil .............9
Solutions aux problèmes communs .......................10
• Le tiroir-réchaud n’est pas à niveau ....................10
• On ne peut pas déplacer l’appareil facilement ....10
• Le tiroir-réchaud ne fonctionne pas .....................10
Information sur la garantie ......................................12

Ce que vous devez savoir au sujet des consignes de sécurité
Les mises en garde et les importantes consignes de sécurité apparaissant dans ce guide ne couvrent
pas toutes les conditions et situations possibles. Il faut exercer son bon sens, de la prudence et
de l'attention en installant en entretenant et en utilisant cet appareil.
TOUJOURS communiquer avec le revendeur, l'agent de service ou le fabricant au sujet des
problèmes ou des conditions que vous ne comprenez pas.
AVERTISSEMENT — Risques ou
comportements non sécuritaires qui
POURRAIENT avoir pour conséquence de
sévères blessures ou la mort.
ATTENTION — Risques ou comportements
non sécuritaires qui POURRAIENT avoir pour
conséquence des blessures mineures ou des
dommages matériels.
Reconnaître les symboles, mots et étiquettes de sécurité
AVERTISSEMENT
ATTENTION
3
• Enlevez tout le ruban et le matériel
d’emballage avant d’utiliser le tiroir-
réchaud. Détruisez le cartonnage et les sacs
en plastique après le déballage de l’appareil.
Ne laissez jamais les enfants jouer avec le
matériel d’emballage.
• Installation: Assurez-vous que l’appareil
est correctement installé et mis à la terre
par un technicien qualifi é, conformément à
la dernière édition de la norme n° 70 ANSI/
NFPA du “National Electrical Code” aux
États Unis, ou au Canada, à la norme C22.1
de l’ACNOR, code canadien de l’électricité,
partie 1, ainsi qu’aux codes de la région.
N’installez l’appareil que selon les instructions
d’installation fournies dans la documenta-
tion.
Demandez à votre marchand de vous
recommander un technicien qualifi é ainsi qu’un
centre de réparation autorisé. Sachez comment
couper le courant électrique de l’appareil à la
boîte de fusibles ou au coupe-circuit en cas
d’urgence.
• Entretien par l’usager. Ne réparez pas ou
ne remplacez pas des pièces de l’appareil à
moins d’une recommandation précise dans
les guides. Toutes les réparations doivent
être faites par un technicien qualifi é, afi n de
réduire les risques de blessure et de dommage
à l’appareil.
• Ne modifi ez jamais l’appareil, que ce soit
en enlevant des panneaux, protège-fi ls, ou
toute autre pièce permanente.
AVERTISSEMENT
• TOUS LES TIROIR-RÉCHAUDS PEUVENT
SE RENVERSER.
• IL PEUT EN RÉSULTER DES BLESSURES.
• INSTALLEZ LES PLAQUES DE RETENUE
FOURNIES AVEC L’APPAREIL.
• VOYEZ LES INSTRUCTIONS
D’INSTALLATION.
POUR RÉDUIRE LE RISQUE DE
RENVERSEMENT DU TIROIR-RÉCHAUD,
CELUI-CI DOIT ÊTRE CORRECTEMENT FIXÉ
PAR DES PLAQUES DE RETENUE, FOURNIES
AVEC L’APPAREIL. POUR VÉRIFIER
SI L’APPAREIL EST CORRECTEMENT
INSTALLÉ, PRENEZ ET TIREZ SUR LA
POIGNÉE DU TIROIR EN ESSAYANT DE LE
FAIRE SORTIR DE L’OUVERTURE OU DE
LE FAIRE BASCULER. REPORTEZ-VOUS
AUX INSTRUCTIONS D’INSTALLATION
POUR SAVOIR COMMENT BIEN INSTALLER
L’APPAREIL.
Mesures de Sécurité Importantes
• Rangement sur ou dans l’appareil: ne rangez
pas des matériaux infl ammables près des
éléments de surface. Ceci inclut des papiers,
plastiques, tissus, livres de cuisine, objets en
plastique et torchons, ainsi que des liquides
infl ammables. N’y posez pas ou ne rangez
pas des produits explosifs comme une bombe
AVERTISSEMENT
Pour réduire le risque d’incendie, de choc électrique ou de blessures lors de l’utilisation
de votre appareil, suivez les précautions de bases dont les suivantes:

4
une baisse de performance ou endommager
l’appareil. Utilisez uniquement le papier
d’aluminium tel que recommandé pour la
cuisson; il sert à recouvrir les aliments.
• Ustensiles de cuisson en poterie: seuls
certains types d’ustensiles en verre/céramique,
céramique, poterie, peuvent être utilisés sans
se casser par suite d’un changement brusque
de température. Vérifi ez les recommandations
du fabricant.
• Soyez prudent en ouvrant le tiroir-
réchaud: tenez-vous sur le côté de l’appareil
pour ouvrir la porte d’un tiroir chaud. Laissez
la vapeur ou l’air chaud s’échapper avant de
placer ou d’enlever la nourriture.
• Emplacement des grilles du tiroir-réchaud.
Placez toujours les grilles à l’endroit voulu
lorsque le tiroir est froid. Si la grille doit être
déplacée alors que le tiroir est chaud, soyez
extrêmement prudent. Servez-vous de gants
isolants et saisissez la grille des deux mains pour
la remettre en place. Ne laissez pas les gants
entrer en contact avec l’élément ou l’intérieur
du tiroir-réchaud. Enlevez tous les ustensiles
déposés sur la grille avant de la déplacer.
• N’éteignez pas les feux de friture avec de
l’eau —Étouffez les feux avec un extincteur
à poudre sèche ou à mousse.
INSTRUCTIONS DE NETTOYAGE IMPORTANTES
• Nettoyez régulièrement le tiroir pour que
toutes ses pièces soient libres de graisse
risquant de s’enfl ammer. Maintenez propres
les fi ltres à graisse et les hottes d’évacuation
propres. Ne laissez pas la graisse s’y
accumuler. Les dépôts de graisse dans le
ventilateur pourraient s’enfl ammer.
• Produits de nettoyage/produits en aérosol—
Toujours suivre les recommandations du
fabricant. Ne pas oublier que tout dépôt laissé
par les produits de nettoyage ou les produits
en aérosol peuvent s’enfl ammer et causer des
dommages ou des blessures.
Mesures de Sécurité Importantes
aérosol. Les produits infl ammables pourraient
exploser et allumer un feu ou causer des
dommages matériels.
• Ne laissez pas les enfants seuls ou sans
surveillance dans un lieu où un appareil
fonctionne. Ne les laissez jamais s’asseoir ou
se tenir debout sur l’appareil.
• NE TOUCHEZ PAS LES SURFACES
INTÉRIEURES DU TIROIR-RÉCHAUD. Les
surfaces peuvent être suffi samment chaudes
même si leur couleur est foncée. Pendant et
après toute utilisation, ne touchez pas et ne
laissez pas les vêtements ou autres produits
infl ammables venir en contact avec ces zones,
à moins qu’elles aient eu le temps de se
refroidir.
• Portez des vêtements appropriés: ne portez
jamais de vêtements amples ou fl ottants
en utilisant cet appareil. Ne laissez pas les
matériaux infl ammables et les vêtements venir
en contact avec des surfaces chaudes.
• N’utilisez que des mitaines isolantes sèches:
des mitaines mouillées ou humides en
contact avec des surfaces chaudes peuvent
causer des brûlures par la vapeur. Ne laissez
pas les mitaines isolantes toucher les éléments
chauds. Ne vous servez pas d’un torchon ni
d’un chiffon à la place d’une mitaine.
• Ne réchauffez pas des contenants non
ouverts: l’accumulation de pression peut
faire exploser le contenant et causer des
blessures.
• IMPORTANT: n’essayez pas de faire
fonctionner le tiroir-réchaud lors d’une
panne de courant. En cas de panne, mettez
toujours les commandes du tiroir à arrêt.
Sinon, lorsque le courant reviendra, l’appareil se
mettra à fonctionner de nouveau et la nourriture
laissée sans surveillance pourrait se gâter.
• Revêtements protecteurs: n’utilisez pas de
papier d’aluminium pour recouvrir l’intérieur
du tiroir. Tout autre usage de recouvrement
protecteur ou de papier d’aluminium peut causer
AVERTISSEMENT
• Ne vous servez pas du tiroir-réchaud
comme espace de rangement.
• Il y a risque de blessures pour les
personnes ou de dommages pour le tiroir
de monter, de s’appuyer dessus ou de
s’asseoir sur la porte ou dans le tiroir.
Ne laissez pas les enfants grimper sur le
tiroir-réchaud ou jouer autour. Un tiroir
ouvert, s’il est chaud, peut causer des
brûlures.
• N’utilisez jamais votre appareil pour
réchauffer ou chauffer une pièce.
Avis de sécurité important
Le décret Californien de régulation des déchets
toxiques et de la qualité de l’eau potable demande
au Gouvernement de la Californie de rendre publique
l’énumération des substances causant le cancer, les
malformations congénitales ou autres dommages
de reproduction connues à l’état, et exige que les
entreprises avertissent leurs clients des risques
potentiels d’exposition à ces substances.
NOTE
Conservez ces instructions pour
référence future.

5
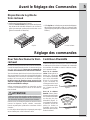
Avant le Réglage des Commandes
Réglage des commandes
À plat U vers le haut
Figure 1
Figure 2
Disposition de la grille du
tiroir-réchaud
Pour faire fonctionner le tiroir-
réchaud
Contrôleur d’humidité
La grille peut être utilisée de 2 façons:
• Grille en U vers le haut pour permettre de disposer
des aliments de moindre dimension sur et sous la
grille (par exemple, petits pains ou biscuits sur la
grille et casserole en dessous).
Le tiroir-réchaud a pour fonction de conserver les aliments
chauds à la température de service. Commencez toujours
avec des mets chauds. Il n’est pas recommandé de
chauffer des aliments froids dans le tiroir-réchaud.
Tous les aliments placés dans le tiroir-réchaud doivent
être recouverts d’un couvercle ou d’une feuille de papier
d’aluminium pour conserver leur humidité et les garder
tendres. Ne couvrez pas les aliments croustillants.
N’utilisez pas de plastique pour recouvrir les
aliments. Le plastique risque de fondre dans le tiroir
et d’être très diffi cile à nettoyer.
Utilisez seulement la vaisselle, les ustensiles et plats
à cuisiner recommandés pour cuisson au four dans le
tiroir-réchaud.
Cette caractéristique est utilisée pour contrôler l’humidité
à l’intérieur du tiroir réchaud. Le bouton de commande
du contrôleur d’humidité est situé à l’intérieur du tiroir,
sur le panneau avant.
• Grille à plat sur le fond pour permettre de disposer
des aliments de moindre poids et la vaisselle vide
(par exemple, petits pains ou pâtisseries et assiettes
à dîner).
Utilisez le tiroir-réchaud pour garder les aliments chauds
comme: les légumes, sauces, viandes, casseroles,
biscuits et petits pains, pâtisseries et assiettes à dîner
chaudes.
Le tiroir-réchaud est équipé d’un loquet qui peut exiger
assez d’effort pour ouvrir et fermer le tiroir.
Pour de la chaleur
sèche: Faites glisser le
bouton de commande
du contrôleur d’humidité
vers moins d’humidité
(Figure 1). Ceci permet
à plus d’humidité de
s’échapper et ainsi avoir
un environnement plus
sec à l’intérieur du tiroir
réchaud.
Pour de la chaleur
humide: Faites glisser
le bouton de commande
du contrôleur d’humidité
en direction de plus
d’humidité (Figure 2).
Ceci évite à la nourriture
à l’intérieur du tiroir de
sécher. La chaleur et
l’humidité seront alors
présentes dans la cavité
du tiroir-réchaud.
ATTENTION
Utilisez toujours des poignées ou des mitaines pour
four pour retirer les aliments du tiroir-réchaud car
les ustensiles et plats s’y trouvant sont chauds.

6
Réglage des commandes
La commande
électronique
est utilisée pour
sélectionner la
température du tiroir-
réchaud. Elle est
située du côté droit
du tiroir-réchaud et
devient visible en
ouvrant le tiroir.
Lorsque vous branchez l’appareil pour la première fois
ou après une panne de courant, l’affi cheur clignotera
un “88:88°”. Appuyez la touche ON-OFF deux fois.
La commande électronique affi chera “----”, indiquant
l’utilisateur d’entrer une température. Si aucune autre
touche n’est appuyée en dedans de 3 secondes, l’appareil
retournera à son mode dormant.
Le témoin lumineux est situé dans la partie centrale
inférieure de la vitre décorative du tiroir-réchaud. Il
s’allume lorsque la commande est réglée et reste
allumé jusqu’à ce qu’on éteigne l’appareil. Assurez-
vous que le témoin lumineux soit éteint lorsque les
aliments sont retirés du tiroir.
Cet appareil est programmé pour s’éteindre
automatiquement après 4 heures d’utilisation. L’élément
chauffant arrêtera de réchauffer le tiroir, le témoin
lumineux s’éteindra et la commande électronique
affi chera “End”, pour rappeler à l’utilisateur d’éteindre
son appareil après la prochaine utilisation.
Réglez la commande électronique à 140°F pour
réchauffer les bols et assiettes. Placez les plats vides
sur la grille pour qu’ils ne touchent pas le fond du
tiroir. Vérifi ez auprès du fabricant pour déterminer le
degré de chaleur que peuvent tolérer les articles en
porcelaine.
Pour sélectionner la température de réchaud la plus basse
possible (90°F), appuyez sur la touche -lo et attendez
quelques secondes pour que l’appareil enregistre la
donnée. Une deuxième pression de la touche -lo baissera
la température pour la pâte de pain, affi chée par “brPF”
dans l’écran. La fonction pour la pâte de pain peut aussi
être accédée à n’importe quel moment en appuyant la
touche
.
Pour sélectionner la température de réchaud la plus haute
possible (210°F), appuyez sur la touche +hi et attendez
les quelques secondes d’acceptation.
Pour tout autre température entre le minimum (90°F) et le
maximum (210°F), utilisez les touches -lo et +hi jusqu’à
ce que la température désirée soit affi chée. Ces touches
vont ajuster la température par 10°F chaque fois qu’elles
sont appuyées.
Lorsque la température voulue est affi chée, attendez les
quelques secondes d’acceptation. L’affi cheur montrera
la température augmentée jusqu’à la température
ciblée et un signal sonore se fera entendre lorsque cette
température sera atteinte. Il est recommandé de laisser
le tiroir se préchauffer pendant 10 à 15 minutes avant
d’y placer vos plats.
Réglage de la commande
Pour démarrer l’appareil
Témoin lumineux
Arrêt automatique
Réglages recommandés
Pour réchauffer les bols et
assiettes de service
Pour régler la température
Aliments Réglage
Rôtis (Boeuf, Porc, Agneau) 170°F
Côtes de porc 190°F
Bacon 190°F
Hamburger 190°F
Volaille 190°F
Sauces 170°F
Plats en casseroles 170°F
Oeufs 170°F
Aliments frits 190°F
Légumes 170°F
Pizza 190°F
Biscuits 170°F
Petits pains, mous 140°F
Petits pains, durs 170°F
Pâtisseries 170°F
Assiettes à dîner vides 140°F
Poisson, fruits de mer 170°F
Jambon 170°F
Crêpes, gaufres 190°F
Tartes 170°F
Patates (cuites au four) 190°F
Patates en purée 170°F

7
Lorsque l’appareil est en fonction (ON), appuyez sur la
touche portant l’icône . La commande électronique
affi chera “brPF”, indiquant que le tiroir-réchaud est en
mode de préparation pour la pâte de pain. Attendez
quelques secondes pour que l’appareil enregistre la
donnée.
Le tiroir réchaud est muni de la fonction Bread Proof
qui peut être utilisée pour aider à préparer la pâte
de pain. La durée recommandée pour garder la pâte
de pain dans le tiroir réchaud est d’environ 45 à 60
minutes. Assurez-vous cependant de bien suivre le
temps recommandé par la recette.
La pâte qui n’est pas gonfl ée devrait être placée dans
un grand bol, puisque la pâte doublera de volume.
Placez la grille du tiroir réchaud en U vers le haut (voir
Figure 1). Avant de le placer dans le tiroir, couvrez le
bol avec un linge humide ou utilisez du papier ciré qui
a été recouvert d’huile à cuisson non-adhérente.
Pour activer la fonction Pâte
de pain
Préparation de la pâte de pain
Réglage des commandes
Figure 1
NOTE
La fonction “BREAD PROOF” utilise de très basses
températures qui pourraient être plus basse que la
température de votre pièce. Le tiroir ne fonctionnera
pas comme un refroidisseur et ne sera pas capable
de diminuer la température en dessous de la
température ambiante.

8
Nettoyage et entretien général
Pour enlever le tiroir-réchaud:
1. Tournez le bouton de commande du tiroir-réchaud
à OFF (ARRÊT) avant de retirer le tiroir.
2. Ouvrez le tiroir complètement.
3. Localisez les leviers (un de chaque côté du tiroir)
soulevez le levier de la glissière de doite et poussez
sur le levier de la glissière de gauche (Voir Figure
1).
4. Retirez le tiroir de son bâti.
Pour replacer le tiroir-réchaud:
1. Tirez la partie de plastique de la glissière vers
l’avant sur chaque côté de la cavité du tiroir
(Voir Figure 2).
2. Alignez les glissières de chaque côté du tiroir dans
les réceptacles de glissières situés sur les parois
du bâti de l’appareil.
3. Poussez le tiroir jusqu’à ce que vous entendiez
des “déclics” (approximativement 2”). Si vous
n’entendez pas les déclics des leviers ou si
vous avez l’impression que le tiroir n’est pas
à sa place, retirez-le et répétez les étapes de
1 à 3.
Pour retirer et replacer le
tiroir-réchaud
AVERTISSEMENT
Risque de choc électrique pouvant
occasionner de blessures graves ou
la mort. Débranchez l’appareil du
courant électrique avant d’en faire le
service ou avant d’enlever ou de
replacer le tiroir-réchaud.
Figure 2
Figure 1
Glissière
de gauche
Soulevez le
levier
Levier
Levier
Glissière de
droite
Poussez sur
le levier
AVERTISSEMENT
Assurez-vous que le tiroir réchaud est éteint, à la
position ARRÊT avant de le retirer. Ne touchez pas
à l’élément du tiroir-réchaud. L’élément peut être
encore chaud et causer des brûlures même s’il est
de couleur foncée.
La page est en cours de chargement...
La page est en cours de chargement...
La page est en cours de chargement...
La page est en cours de chargement...
-
 1
1
-
 2
2
-
 3
3
-
 4
4
-
 5
5
-
 6
6
-
 7
7
-
 8
8
-
 9
9
-
 10
10
-
 11
11
-
 12
12
-
 13
13
-
 14
14
-
 15
15
-
 16
16
-
 17
17
-
 18
18
-
 19
19
-
 20
20
-
 21
21
-
 22
22
-
 23
23
-
 24
24


Electrolux EW30WD55QS Manuel utilisateur
- Taper
- Manuel utilisateur
- Ce manuel convient également à
dans d''autres langues
- English: Electrolux EW30WD55QS User manual
Documents connexes
Autres documents
-
Frigidaire FGWD3065PF Guide d'utilisation complet (Français)
-
 Frigidaire Professional FPWD3085PF Manuel utilisateur
-
-
Kenmore 790.4999 Manuel utilisateur
-
-
Sears Kenmore Elite 970 Mode d'emploi
-
-
-
-
