Frigidaire PLGC36S9ACA Le manuel du propriétaire
- Catégorie
- Cuisinières
- Taper
- Le manuel du propriétaire

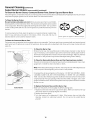
Gas
Cooktop
mFRIGIDAIRE
Owner's
Guide
CONTENTS Page
Versi6n enespaflol .....................................2
ProductRegistration ................................... 2
ImportantSafetyInstructions ................... 3-4
GroundingInstructions ............................... 4
Uquefied Petroleum(Propane)Gas
Conversion ................................................. 5
FlameSize .................................................. 5
ProperBurner Adjustment ......................... 5
SettingSurfaceControl
Venturi (open) BurnerModels ............... 6
SealedBurner Models ........................... 6
Electric Ignition ..................................... 6
SelectingSurfaceCooking Utensils............. 7
SpecialtyPans& Trivets ............................. 7
CanningTips & Information ........................ 8
GeneralCleaning
CleaningVariousParts of your Cooktop _. 9
Venturi (open) Burner Models ................ 10
SealedBurner Models ........................ 11-14
Avoid ServiceChecklist............................. 15
Warranty................................................... 16
the LOOK of better performance
318200657 (0010) Rev. A

Product Registration
Register Your Product
The PRODUCT REGISTRATION CARD
should be filled in completely, signed
and returned to Electrolux Home
Products North America,
/
Versibn en espaftol
Sidesea obtener una copia en espafiol de
este Manual det Usuario, sirvaseescribir a
la direcciOn que seincluye acontinuaciOn.
Solicite la P/N 318204005
Spanish Owner's Guides
EIectrolux Home Products North America
Consumer Relations
P,O, Box2t 2378
Augusta, Georgia
30917-2378
Thank you for choosing this appliance. The information contained within this
Owner's Guide will instruct you on how to properly operate and care for your
cooktop, Pleaseread through the information contained in your literature pack to
learn more about your new appliance,
Record Your Model and Serial Numbers
Recordinthe space provided beiowthe model and serialnumbers found underneath
or inside the cooktop,
Model Number:
Serial Number:
Date of Purchase:
This Owner's Guide contains general operating instructions for your cooktop and
feature information for severalmodels. Your cooktop may not have allthe described
features,
Note: Theinstructions appearing inthis Owner's Guideare not meant to cover every
possible condition and situation that may occur, Common senseand caution must
be practiced when installing, operating and maintaining any appliance.
'_ 2000 White Consolidated Industries
All rights reserved
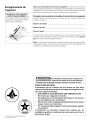
If the information in this manual is not
followed exactly, a fire or explosion may result causing
property damage, personal injury or death.
FOR YOUR SAFETY:
-- Do not store or use gasoline or other flammable vapors
and liquids in the vicinity of this or any other appliance.
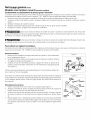
-- WHAT TO DO IF YOU SMELL GAS:
• Do not try to light any appliance.
• Do not touch any electrical switch; do not use any phone
in your building.
• Immediately call your gas supplier from a neighbor's
phone. Follow the gas supplier's instructions.
• If you cannot reach your gas supplier, call the fire
department.
-- Installation and service must be performed by a qualified
installer, servicer or the gas supplier.

IMPORTANT SAFETY INSTRUCTIONS
Read all instructions before using this appliance.
Save these instructions for future reference.
This guide contains important safety symbols and instructions. Pleasepay special attention to these symbols and follow all
instructions given. Here isa brief explanation of the use of these symbols,
This symbol will help alert you to situations that may cause serious bodily harm, death or property damage.
This symbol will help alert you to situations that
• Remove all tape and packaging wrap before using the
cooktop. Destroy the carton and plastic bags after unpacking
the cooktop. Never allow children to play with packaging material,
Do not remove the model/serial plate attached to the cooktop
• Proper Installation--Be sure your appliance is properly
installed and grounded by aqualified technician inaccordance
with the National Fuel Gas Code ANSI Z223.1 latest edition in
the United States, or in Canada CAN/CGA B149.1, and CAN/
CGA B149.2, and the National Electrical Code ANSI/NFPA No.
70--latest edition in United States, or in Canada CSA Standard
C22.1, Canadian Electrical Code, Part 1, and local code
requirements. Install and/or adjust only per installation
instructions provided in the literature package for this cooktop,
Ask your dealer to recommend a qualified technician and an
authorized repair service Know how to shut off gas supply at the
meter and disconnect the electrical power to the cooktop at the circuit
breaker or fuse box in case of an emergency
• User Servicing--Do not repair or replace any part of the
appliance unless specifically recommended in the manuals. All
other servicing should be done only by a qualified technician This
may reduce the risk of personal injury and damage to the cooktop,
• Never modify or alter the construction of a cooktop by
removing panels, wire covers, or any other part of the product.
_ Stepping or leaning on this cooktop can result
in serious injuries and may alsocause damage to the cooktop. D0
not allow children to climb or play around the cooktop
• Storage on Appliance--Flammable materials should not be
stored on the cooktop, near surface burners. This includes
paper, plastic and cloth items, such ascookbooks, plasticware and
towels, aswell asflammable liquids, Do not store explosives, such
asaerosol cans, on the cooktop Flammable materials may explode
and result in fire or property damage
Do not store items of interest to children in the
cabinets above the cooktop.
• Do not leave children alone--Children should not be left alone
or unattended in the area where an appliance is in use. They
should never beallowed to sit or stand on any part of tile appliance,
may cause bodily injury or property damage,
• DO NOT TOUCH SURFACE BURNERS, GRATES, OR AREAS
NEARTHESE BURNERS. Surface burners may be hot even though
the flames are not visible Areas near surface burners may become
hot enough to cause bums During and after use, do not touch or
let clothing or other flammable materials touch these areas until
they have had sufficient time to cool, Among these areas are the
cooktop and the surfaces facing the cooktop
• Wear Proper Apparel--Loose-fitting or hanging garments
should never be worn while using the appliance. Do not let
clothing or other flammable materials contact [lot surfaces,
Never use your appliance for warming or
heating the room.
• Do Not UseWater or Flour on Grease Fires--Smother the fire
with a pan lid, or use ba king soda, adrychemical or foam-type
extinguisher.
• When heating fat or grease, watch it closely. Fator grease may
catch fire if allowed to become too hot,
• Use Only Dry Pot holders--Moist or damp pot holders on hot
surfaces may result in burns from steam. Do not let the pot
holders touch the flame or burners, Do not use a towel or other
bulky cloth instead of a pot holder,
• Do Not Heat Unopened Food Containers--Buildup of pressure
may cause container to burst and result in injury.
• Knowwhich knobcontrols each surface burner. Alwaysturn the
knob to the LITEposition when igniting the burners, Visually check
that the burner has lit Then adjust the flame so it does not extend
beyond the edge of the utensil
Use Proper Flame Size--Adjust flame size so it
does not extend beyond the edge of the utensil. The use of
undersized utensils will expose aportion of the burner flame to direct
contact and may result in ignition of clothing Proper relationship of
utensil to flame will also improve efficiency
_Do not use stove top grills on your sealed gas
burners. If you use a stove top grill on a sealed gas burne_, it will
cause incomplete combustion and can result in exposure to carbon
monoxide levels above allowable current standards, This can be
hazardous to your health,

IMPORTANT SAFETY INSTRUCTIONS (continued)
• Use proper pan size--This appliance is equipped with one or
more surface burners of different sizes Selectutensils having flat
bottom large enough to cover the surface burner The use of
undersized utensils will expose a portion of the surface burner to
direct contact and may result in ignition of clothing Proper
relationship of utensil to the surface burner will also improve
efficiency,
• Do Not Use Decorative Surface Burner Covers. If a burner is
accidentally turned or], the decorative cover will become hot and
possibly melt You will not beable to seethat the burner ison, Burns
will occur if the hot covers are touched Damage may aBo be done
to the cooktop or burners because the covers may cause
overheating, Air will be blocked from the burner and cause
combustion problems,
• Utensil Handles Should Be Turned Inward and Not Extend
Over AdJacent Surface Burners--To reduce the risk of burns,
ignition of flammable materials, and spillage due to
unintentional contact with the utensil, the handle of the utensil
should be positioned so that it is turned inward, and does not
extend over adjacent surface burners
• Never Leave Surface Burners Unattended at High Heat
Settings--Boilovers cause smoking and greasy spillovers that
may ignite, or a pan that has boiled dry may melt,
GLASS COOKTOPS (somemodels):
• Do Not Operate or Clean a Broken Cooktop Glass--If glasstop
should break, cleaning solutions and spillovers may penetrate the
broken cooktop and create a risk of electric shock, Contact a
qualified technician immediately,
Clean Cooktop Glass with Caution--If a wet sponge or cloth is
usedtowipe spillson ahot cooking area, becarefulte avoid asteam
burn Some cleaners can produce harmful fumes if applied to a hot
surface,
• Protective Liners--Do not use aluminum foil to line surface
burner pans Protective liners or aluminum foil may interfere with
heat and air distribution, and combustion, Damage to the
cooktop or personal injury may result,
• Glazed Cooking Utensils--Only certain types of glass, glass/
ceramic, ceramic, earthenware, or other glazed utensils are
suitable for cooktop service without breaking due to the sudden
change in temperature, Check the manufacturer's
recommendations for cooktop use
• Do Not Place Hot Cookware on the Cooktop Glass. This could
cause glass to break
• Avoid scratching the cooktop glass with sharp objects.
SAVE THESE INSTRUCTIONS
Grounding Instructions (electric ignition models only)
IMPORTANT: READAND SAVE THESEINSTRUCTIONS.
Thisappliance isequipped with a 3 prong grounding plug for your
protection against shock hazard and should be plugged directly into a properly
grounded receptacle. DO NOT cut or remove the grounding prong from this plug.
Forpersonal safety,this cooktop must beproperly grounded. Formaximum safety,
the power cord must be plugged into a 120V--60 Hz, outlet that is correctly
polarized and properly grounded.
If a two-prong wall receptacle is the only available outlet, it is the personal
responsibility of the consumer to have it replaced with a properly grounded three-
prong wall receptacle installed by a qualified electrician.
DO NOT UNDERANY CIRCUMSTANCES CUT OR REMOVE THE THIRD ROUND
GROUNDING PRONG FROM THE POWERCORD PLUG. SEETHE INSTALLATION
INSTRUCTIONSPACKAGEDWITHTHISCOOKTOPFORCOMPLETEINSTALLATION
AND GROUNDING INSTRUCTIONS.DO NOT OPERATETHECOOKTOP USING A
TWO-PRONG ADAPTERORAN EXTENSIONCORD,
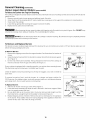
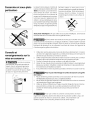
Avoid fire hazard or
electrical shock, Do not use an adaptor
plug, an extension cord, or remove
grounding prong from electrical power
cord. Failure to follow this warning can
cause serious injury, fire or death,
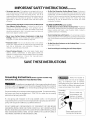
Grounding /ftype wall Do not, under any
receptacle circumstances, cut_
remove, or bypass |
the grounding prong.)
Power supply cord with
3-prong grounding plug

Liquefied Petroleum (Propane) Gas Conversion
Severe shock or damage to the cooktop may occur if the cooktop is not installed by a qualified installer or
electrician.
This appliance can be used with Natural Gas and Propane Gas. It isshipped from the factory for use with natural gas.
If you wish to convert your cooktop for use with Liquefied Petroleum (propane) gas:
- Models with Venturi (open} Burners. seethe installation instructions guide for the conversion instructions.
- Models with Sealed Burners:
- Forsome of them, you should order the conversion kit from your local dealer or from an authorized serviceagency (see
Warranty), Seethe installation instructions for the conversion kit number,
- Forothers, the conversion kit isincluded inthe packaging, if you wish to convert your cooktop for usewith propane gas,
usethe supplied fixed orifices located in the package containing the installation instruction, in a bag marked "FORLP/
PROPANEGAS CONVERSION". Follow the instructions packaged with the orifices (for models with sealed burners only),
Theconversion must be performed byaqualified servicetechnician in accordance with the manufacturer's instructions and all codes
and requirements of the authority having jurisdiction. Failure to follow the instructions could result in serious injury or property
damage. The qualified agency performing this work assumes responsibility for the conversion.
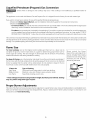
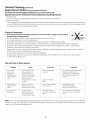
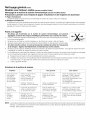
Flame Size
For most cooking, start on the highest control setting and then turn to a lower one to
complete the process. Usethe chart below asa guide for determining proper flame size for
various types of cooking, The size and type of utensil used and the amount of food being
cooked will influence the setting needed for cooking,
For deep fat frying, use a thermometer and adjust the surface control knob accordingly. If
the fat istoo cool, the food will absorb the fat and be greasy,If the fat istoo hot, the food will
brown so quickly that the center will be undercooked. Do not attempt to deep fat fry too
much food at once asthe food will neither brown nor cook properly.
*Flame size
High Flame
Medium Flame
Low Flame
Type of Cooking
Start most foods; bring water to a boil; pan broiling,
Maintain a slow boil; thicken sauces, gravies; steam.
Keep foods cooking; poach; stew.
* These settings are based on using medium-weight aluminum pans with lids. Settings
may vary when using other types of pans.
Never extend the flame
beyond the outer edge of the
utensil. A higher flame simply
wastes heat and energy, and
increases your risk of being
burned by the flame.
Proper Burner AdJustments
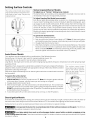
Thecolor of the flame isthe key to proper burner adjustment, A good flame isclear, blue and hardly visible in a well-lighted room,
Eachcone of flame should be steady and sharply defined. Adjust or clean burner if flame isyellow-orange. To clean burner, see
instructions under General Cleaning.

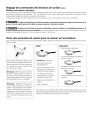
Setting Surface Controls
The sur_ce control knobs shown below
maynot look identicalto the SurfaceCon-
troB Knobson your range;They are only
representational
Venturi (opened) Burner Models
To Adjust Low or "Simmer" Setting (some models)
The burner flame, at low setting, carl be adjusted if it istoo high or too low; refer to
the installation instruction for adjustment procedure,
To Adjust Standing Pilot Model (some models)
Eachburner lights automatically either an electric or a standing pilot, depending
on your model, Standing pilots must be lit initially. Tolight the standing pilot, open
gas supply on pilot shutoff valves (screw), lift the cooktop from the front edge and
hold a match near the pilot, Standing pilots wilt remain lit when the burners are
turned off; because of that, the porcelain enamel cooktop can be hot even if
burners are not used; refer to Installation Instructions for proper pilot adjustment.
Models with electric ignitors light automatically each time a control knob isturned
to the LITEposition,
To operate the Surface Burner:
1, Placecooking utensil on burner.
2, Pushin and turn the Surface Control knob to LITE.Note: All electronic ignitors
will clickatthesametime. However, onlythe burneryou areturning on will ignite,
3, Visually check that the burner hastit,
4. After the burner lights, turn the control knob to the desired flamesize,Thecontrol
knobs do not have to be set at a particular mark, Use the guides and adjust the
flame asneeded, DO NOT cook with the control knob in the LtTEposition, (The
electronic ignitor will continue to click if left in the LtTEposition,)
Sealed Burner Models
Your appliance may be equipped with any combination of the following burners:
Simmer Burner, this burner is best used for simmering delicate sauces, etc.
Standard Burner, can be used for most attsurface cooking needs,
Large Burner, the larger burner is best used when bringing large quantities of liquid to temperature and when preparing larger
quantities of food,
Regard_ess_fslze_a_waysselectautensi_thatissuitab_ef_rtheam_untandtype_ff__dbeing The surface control knobs
prepared, Select a burner and flame sizeappropriate to the pan. Never allow flames to extend shownbelowmaynotlook iden-
beyond the outer edge of the pan, tical to the Surface Controls
Eachburner lights automatically from an electric ignitor each time a control knob isturned to Knobson your range; Theyare
the riteposition, only representational
To operate the surface burner:
1, Placecooking utensil on burner.
2, Push in and turn the Surface Control knob to LtTE.Note: All electronic ignitors will click
at the same time. However, only the burner you are turning on will ignite.
3, Visually check that the burner has lit,
4. After the burner lights, turn the control knob to the desired flame size. Thecontrol knobs
do not have to be set at a particular mark. Usethe guides and adjust the flame asneeded,
DO NOT cook with the control knob inthe LITEposition. (Theelectronic ignitor will continue
to click if left in the LtTEposition.)
5. To turn the burner off, turn the control knob asfar asit ill go, to the OFFposition.
Electric Ignition Models
Inthe event of an electrical power outage, the surface burners carl be lit manually. To light a surface burner, hold a lit match to
the burner head, then slowly turn the surface control knob to LITE.Usecaution when lighting surface burners manually.
Surface burner in usewhen an electrical power failure occurs will continue to operate normally.
Do not operate the burner for an extended period of time without cookware on the grate. Thefinish on
the grate may chip without cookware to absorb the heat.
Do not place plastic items such as salt and pepper shakers, spoon holders or plastic wrappings on top
of the cooktop when it isin use. These items could melt or ignite. Pot holders, towels or wood spoons could catch fire if placed
too close to a flame.
6

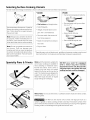
Selecting Surface Cooking Utensils
For best results and energy conservation, choose cooking utensils that have these characteristics:
Pansshould havefiat bottoms. Check for
flatness by rotating aruler acrossthe bob
tom. There should be no gaps between
the pan and ruler.
Note: Always usea utensil for its intend-
ed purpose. Follow manufacturer's in-
structions, Some utensils were not made
to be used inthe oven or on the cooktop.
Note: Do not usegriddle over more than
one burner, That can damage your
cooktop and that can result in exposure
to carbon monoxide levels above allow-
able current standards. That can hazard-
ous to your health.
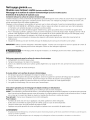
Specialty Pans & Trivets
*GOOD
• Flat bottom and straight sides.
• Tightfltting lids,
• Weight of handle does not tilt
pan. Pan is well balanced,
• Pansizes match the amount of
food to be prepared.
• Made of material that conducts
heat well.
• Easyto clean,
POOR
• Curved and warped pan bottoms.
u
• Pan overhangs unit by more than
2.5 cm (1 ").
...... u
• Heavy handle tilts pan,
• Flame extends beyond unit,
U
* Specialty pans such aslobster pots, griddles and pressure cookers may be used
but must conform to the above recommended cookware requirements.
Woks with fiat bottoms suitable for
use on your cooktop are available in
most cookshop or hardware stores.
Round-bottomed woks (with a
support ring that does not extend
beyond the burner unit) may also be
used, The metal ring was designed to
support the wok safely when it is
filled with large amounts of liquids
(soup making) or fat (frying),
DO NOT use a wok if it is equipped
with a metal ring that extends
beyond the burner unit. Because this
ring traps heat, the surface unit and
cooktop surface could be damaged.
Wire trivets: Do not usewire trivets. Cookware bottoms must be in direct contact
with the grates,
DO NOT use two burner units to heat one large pan such as a
roaster or griddle, or allow cooking utensils to boil dry. The bottom surface of the
pan in either of these situations could cause discoloring or crazing of the appliance
cooking surface, and damage to the grates and burner units,

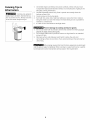
Canning Tips &
Information
Canning can generate
largeamounts of steam, Useextreme cau-
tion to prevent burns, Always raise the
lid to vent steam away from you.
1
1, Usetested recipes and follow instructions carefully, Check with your local
Cooperative Agricultural Extension Service or a manufacturer of glassjars for
the latest canning information.
2, Usefiat-bottomed canners only. Heat is spread more evenly when the
bottom surface isflat,
3, Center canner on the burner grate.
4, Start with hot water and a high heat setting to reduce the time it takes to
bring the water to a boil; then reduce the heat setting as low as possible to
maintain a constant boil.
5, It isbest to can small amounts and light loads,
Prevent damage to cooktop and burner grates:
1, Do not use water bath or pressure canners that extend more than one inch
beyond the edge of the burner grate.
2, Do not leave water bath or pressure canners on high heat for an extended
amount of time,
3, Alternate surface units between each batch to allow the units and
surrounding surfaces to cool down, Tryto avoid canning on the same burner
unit all day.
Safecanning requires that harmful micro-organisms are destroyed
and thejars are sealed completely, When canning in a water bath canner, a gentle
but steady boil must be maintained continuously for the required time,

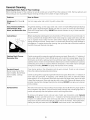
General Cleaning
Cleaning Various Parts of Your Cooktop
Before cleaning any part of the cooktop, be sure all controls are turned OFFand the cooktop isCOOL. Remove spillovers and
heavy soiling as soon as possible. Regular cleaning will reduce the number of major cleaning later.
Surfaces How to Clean
Aluminum (Trim Pieces) & Use hot, soapy water and a cloth. Dry with a clean cloth.
Vinyl
Glass, Painted and Plastic Forgeneral cleaning, use hot soapy water and a cloth, Formoredifficuttsoitsandbuilt-up
Control Knobs, Body grease, apply a liquid detergent directly onto the soil. Leave on soil for 30 to 60 minutes,
Pieces, and Decorative Trim Rinsewith a damp cloth and dry, DO NOT useabrasive cleaners on any of these materials;
they can scratch,
Control Panel
Stainless Steel, Chrome
Decorative Trim
Porcelain Enamel
Burner Grates, Burner Pans
(some models), Burner Rings
(some models), Cooktop
Surface
Surface Burners
Before deaning the controlpanel, turn all controls to OFFand remove the control knobs, To
remove, pull each knob straight off the shaft, Clean using hot, soapy water and a cloth, Be
sure to squeeze excess water from the cloth before wiping the panel; especially when
wiping around the controls, Excesswater in or around the controls may cause damage to
the appliance, Toreplace knobs after cleaning, line up the flat sides of both the knob and
the shaft; then push the knob into place.
Gentle scouring with asoapy nylon pad wilt remove most spots, Rinsewith a 1:1 solution of
clean water and ammonia, Cover difficult spots with an ammonia soaked paper towel for
30 minutes, scrub with a nylon pad and rinse with clean water. Cleaners made especiallyfor
stainless steel or chrome are recommended. Bluish stains on these materials are caused by
overheating and cannot be removed, Remove all cleaners or the finish may be damaged
during future heating, DO NOT usespray oven cleaners on the cooktop.
Clean burner grates in the dishwasher and dry upon removal. If soils are not removed,
follow the cooktop cleaning instructions below.
Gentle scouring with asoapy nylon pad will remove most spots, Rinsewith a 1:1 solution of
clean water and ammonia, IFnecessary, cover difficult spots with an ammonia-soaked
paper towel for 30 to 40 minutes, Rinsewith clean water and damp cloth, then scrub with
a soap-filled scoring pad, Rinseand wipe dry with a clean cloth. Remove all cleaners or the
_orcelain may become damaged during future heating. DO NOT use spray oven cleaners
on the cooktop.
The holes in the burners of your cooktop must be kept clean at all times for proper ignition
and a complete, even flame. Clean the burner holes routinely with a small gauge wire or
needle and especially after bad spillovers which could clog these holes,
To remove and replace burner units per your model, see instructions under General
Cleaning. Toclean, soak the burners in a 1:1 solution of ammonia and water for 30 to 40
minutes. For stubborn stains, scrub with soap and water or a mild abrasive cleanser and
damp cloth, Dry the burners thoroughly in a warm oven for 30 minutes. Then replace them,
making sure they are seated and level. DO NOT wash burner units in the dishwasher.
9

General Cleaning (continued)
Venturi (open) Burner Models (somemodels)
To Raise and Lower the Top for Cleaning
The cooktop ishinged and can be raisedto clean the area underneath. Besure ail cooktop controls are turned to OFFand burner
grates are cool,
1, Removecontrols knobs, burner grates and spillover bowls. Set aside.
2, Graspthe front of the cooktop and lift, Some models have a swing-up rod to support the cooktop in its raised position,
3, Clean under thecooktop.
4, Lower the top gently after lowering the support rod (some models),
5. Replace bowls, grates and control knobs.
When lowering the top, grasp the sides with fingertips only, Be careful not to pinch fingers, Also, DO BlOTdrop
or bend the cooktop when raising or lowering. This could damage the surface.
130 BlOTturn on the burners when the cooktop israised for cleaning. Besure that the top iscompletely lowered
and securely in place before turning on the burners.
To Remove and Replace Burners
The burners on your cooktop maybe removed for cleaning. Be sure ail controls areturned to OFFand burner grates are cool
before removing cooktop burner units.
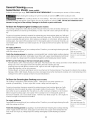
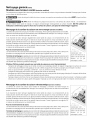
To Remove Burners
1. Removethe shipping screws from the support bracket. Seeillustrations for location of
screws,
2, Graspthe burner head and tilt it to the right to releasethe tab from the burner support
(A in Figure t),
3. Lift the end of the burner assembly, Then pull away from the front of the cooktop to
free the air shutter from the gas valve orifice (B in Figure 1).
If your cooktop isequipped with a standing gas pilot, usecaution when removing burner.
The flash tube may be hot because it is located near the pilot.
Check the lighter and burner ports (Figure 2). If they are clogged, usea wire or needle to
clear them.
Figure 1
Gas Valve
Burner Orifice
Su port
To remove burned-on food, soak the burners in a vinegar and water solution for
20-30 minutes. Forstubborn stains, scrub with soap and water or a mild abrasive cleanser
and a damp cloth, Do not wash burners in a dishwasher.
To Replace Burners
1, Slide the air shutter over the gas valve orifice (Figure 1),
2, Lower the burner assembly and hook the tab in the slots in the burner support. Make
sure it isproperly seated and level,
3. Be sure both tabs are in the correct slots, the burner sits level and straight, and the
flash tube forms a straight linefrom the igniter to the burner (Figure 2),
4. Replace shipping screwsif desired. These screws are not necessary for the operation
of the burner. They stabilize the burner during shipping of the appliance. Retain the
screws for later use in the event the range ismoved.
Figure 2
Ughter Fort
Burner Support Igniter
10

General Cleaning (continued)
Sealed Burner Models (somemodels)
Unlike the standard gasrange, THIS COOKTOP ISNOT REMOVABLE. Do not attempt to remove or lift the cooktop,
Before cleaning the cooktop, be sure the controls are turned to OFF and the cooktop isCOOL,
DO NOT use a cooktop cleaner on a hot cooktop, The fumes can be hazardous to your health, and can
chemically damage the ceramic- glass surface. Be sure the controls are turned to OFF. Do not use commercial oven
cleaners on any part of the cooktop. Damage to the finish or parts could result.
To Clean the Tempered-glass Cooktop (some models)
Thecooktop isdesigned to make cleaning easier. Becausethe four burners are seated,cleanups are
easywhen spillovers are cleaned up immediately. To clean, wipe with a clean, damp cloth and wipe
dry.
Correct and consistent cleaning isessential to maintaining your heat-resistant glasstop. Spills and
spatters should be wiped up using a clean paper towel and sudsy water. This should be done either
assoon as possible after spill occurs, after cooking is completed, or at the latest, before using the
cooktop again. Usecaution if the cooktop ishot, Forheavy spills, spatter or burned-on materials, use
razor blade scraper. Hold the razor blade scraper at a 30° angle and remove food spills or burned on
food residue,
For sugary spillovers:
Sugaryspills can cause pitting of your cooktop surface. Therefore, you must begin cleaning the spills
while the cooktop isstill hot,
Finish the cleaning process by applying a recommended heat- resistant glass cooktop cleaning
cream, Apply cleaner with clean, damp paper towel. Rinsewith apaper towel dampened with clean
water and wipe dry, Always wipe the cooktop dTorough_ to avoid heating any cleaner residue.
burned-0n
spillscanberemoved
cauLi0nto av0iddamaging
surface
Do NOT use the following on the heat-resistant glass cooktop:
Abrasive plastic, nylon, metal scouring or cloth pads, They may scratch the cooktop and make it more difficult to clean later.
Always use a new, clean paper towel when cleaning the heat-resistant glass top,
Anything that may melt (plastics, aluminum foil, sugar or food with ahigh sugar content),
Heavyduty cleansers, rust or stain removers,
Chlorine bleach, ammonia, hydrofluoric acid or any other kind of chemical cleaners, They may etch or discolor the cooktop.
Sponges, cloths or dishtowels. Always usea new, clean paper towel when cleaning the cooktop. Lint or soil remaining on the
cooktop from a cloth or sponge can burn and cause discoloration.
To Clean the Ceramic-glass Cooktop (some models)
The cooktop isdesigned to make cleaning easier. Cleanups are easy when spillovers are
cleaned up immediately. To clean, wipe with a clean, damp cloth and wipe dry.
Correct and consistent cleaning isessential to maintaining your heat-resistant glasstop, Spills
and spatters should be wiped up using a clean paper towel and sudsy water. This should be
done either as soon as possible after the spill occurs, after cooking iscompleted, or at the latest,
before using the cooktop again, Use caution if the cooktop is hot, For heavy spills, spatter or
burned-on materials, use a razor blade scraper. Hold the razor blade scraper at a 30° angle and
remove food spills or burned on food residue.
For sugary spillovers:
Sugaryspills can cause pitting of your cooktop surface. Therefore, you must begin cleaning the spills
while the cooktop isstill hot,
Finish the cleaning process by applying a recommended heat-resistant glass cooktop cleaning
cream. Apply cleaner with clean, damp paper towet. Rinse with a paper towet dampened with
clean water and wipe dry. Always wipe the cooktop thoroughly to avoid heating any cleaner
residue.
burned-0n
spillscanberemoved
cauLi0nto av0iddamaging
surface
11

General Cleaning (continued)
Sealed Burner Models (somemodels)(continued)
To Clean the Ceramic-glass Cooktop (somemodels)(continued)
Special Caution for Aluminum Foil and Aluminum Cooking Utensils
1) Aluminum foil
Use of aluminum foil will damage the cooktop. Do not use under any circumstances,
2) Aluminum utensils
The melting point of aluminum being much lower than that of other metals, care must be taken when aluminum pots or pans
are used, If allowed to boil dry, not only will the utensil be ruined, but also permanent damage in the form of breakage, fusing
or marking may affect the ceramic glass surface,
Things to Remember
1, Do not slide utensils across cooktop surface in any circumstance, doing somay scratch or
metalmark the cooktop surface.
2, Avoid using bleach and do not useammonia to clean the ceramic surface,
3, Do not put plastic items on warm cooking areas, m i
4, Never slide oven racks across cooktop surface, They may scratch or metalmark the cooktop.
5, If cooktop should break, do not usecooktop or attempt to clean it, Call your SearsService Center immediately.
6, Never use rivet or metal stand between the cooking utensil and the ceramic cooktop, The ceramic surface may be
scratched, metal marked or etched by such items.
7, Sugary spills can cause pitting of your cooktop surface, Therefore, you must begin cleaning the spills while the cooktop is
still hot, Usecaution when following the steps below.
a) Turn off ail surface units and remove all pans immediately,
b) Wearing an oven mitt, usea razor to scrape the hot spill out of the cooking zone to cooler area on the cooktop,
c) Allowthe cooktop to cool,
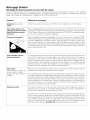
Use and Care of Glass Surface
Problem Cause To Remove
Fine "brown
lines" (tiny
scratches or
abrasions which
have collected
soil)
Coarse particles (salt,
sand, sugar or grit)
between bottom of
cookware and cooktop
that are not removed
before cooking.
Using incorrect cleaning
materials,
To Prevent
Clean cooktop a_er
every use
Tinyscratchesarenot removable
Theycanbe minimizedby
cQntinua] use of cleaner creme
Suchscratchesdo not affect
cooking,
Daily use of cleaner
creme,
Metal marking Sliding or scraping Do not slide cookware Apply cleaner creme
(mark or black metal utensils or oven across cooktop, with dampened paper
marks), shelves across cooktop towel to a cooled surface
Brown streaks Cleaning with a Use cleaner creme Use a small amount of cleaner
and specks, sponge or dishcloth with clean, damp paper creme with dean, damp paper
that has been used towel towel
for other kitchen tasks,
NOTE: Due to the high intensity of heat generated by the surface elements, the glass surface will turn green when the element
will be turned off. This phenomenon is normal and the glass will come back to its original white color after it has completely
cooled down, (White glass cooktops only).
12

General Cleaning (continued)
Sealed Burner Models (somemodels)(continued)
To Clean the Ceramic-glass Cooktop (somemodels)(continued)
Use and Care of Glass Surface (continued)
Cleaning Materials for Ceramic-Glass Cooktop
Some cleaning materials may contain an ingredient which can damage the cooktop. Userecommended cleaning products only
(seebelow). Cleaner cream should be used regularly, First use recommended products listed below, then use cleaner cream.
Use only recommended cleaning products and Follow these basic cleaning suggestions.
1, Before the cooktop is used,thoroughly clean and saturate the cooktop with cleaner cream.
a) Dampen clean paper towel and clean unit.
b) Wipe off with another clean, damp paper towel; then wipe dry.
2, For normal daily cleaning, apply a dab of cleaner cream in the center of each unit-area to be cleaned. Start with
approximately 1/8 teaspoon (apply more if needed). Then, proceed asstated above in a and b.
3, Make sure bottom of cookware and cooking area are clean and dry,
4, Select heat settings and cookware large enough Forfood and liquid.
5, Wipe up Foodspills and spatters before they burn into surface.
IMPORTANT: Regularly use cleaner cream. If you run out of cream, use one of the cleaners listed, Be sure to get a new supply
of cleaner cream,
Never mix cleaning products! Mixtures may interact, with damaging or hazardous results.
Do Use on Ceramic GlassCooktop
1, Baking soda,
2, Non-impregnated plastic and nylon pads,
3, For burned on material, scrape with single-edged razor blade, held at a 30° angle.
4, Ceramic glass cleaning cream.
Do not use on ceramic-glass cooktop
1, Avoid pads,that can leave marks and scratches,
2, Avoid heavy-duty cleaning powders; these can scratch, depending on their abrasiveness and cleaning pressure applied.
3, Avoid chemical oven cleaners, These can etch the cooktop surface and are caustic.
4, Avoid rust stain removers containing hydrofluoric acid.
5, Avoid using bleach and do not use ammonia.
Special Cleaning Instructions for Mineral Deposits and Discolorations
Problem: A gray brown stair] that is not removed when using cleaner creme,
Cause: Condensation, when cooking, often collects anddrips from cookware, The minerals found inwater supply and foods may
causea gray or brown film to develop on cooktop, This film issothin it cannot befelt and appearsto be under cooktop.
To Prevent: Daily and proper use of cleaner creme.
To Remove: - Wet surface with water and sprinkle on cleaner creme.
- Scrub with clean, damp paper towel until stain disappears,
- Clean remaining paste away with damp paper towel.
- Apply dab of cleaner creme and polish with a clean paper towel,
WARNING
- Do not usecleansers on a heated surface. Fumescould be hazardous. Wait Forarea to cool before cleaning,
- Do not use cleaner creme to clean porcelain, paint or atuminium
13

General Cleaning (continued)
Sealed Burner Models (somemodels)(continued)
To Clean the Burner Grates, Contoured Burner Pans, Burner Cap and Burner Base
Theburner grates,contoured burner pans, burner capsand burner baseshould be routinely cleaned. Keeping the burner ports clean
will prevent improper ignition and an uneven flame. Seeinstructions below.
To Clean the Burner Grates
Besure burners and grates are cool before you place your hand, a pot holder,
cleaning cloths or other material on them. Thecast iron burner grates canbe washed
in hot soapy water, Rinsethoroughly and dry the grates with acloth- don't putthem
on the cooktop while still wet. Be sure the grates are positioned securely over the
burners.
To remove burned on food, place the grates in acovered container or plastic bag.
Add 1/4 cup ammonia and soak for 30 minutes. Wash, rinse well and dry. An
abrasive cleaner can be used for stubborn stains.
To Clean the Contoured Burner Pans
The burner pans areattached to the cooktop and are not removable, The burner pan forms a recessedwell area located around
each burner unit. if spilt occurs in one of the well areas, blot up spill with an absorbent cloth, Rinsewith a clean, damp cloth and
wipe dry,
Burner Cap
Electrode
Sealed Burner
To Clean the Burner Cap
Remove burner cap, Usesoap=filled pad or mild abrasive cleanser to clean burner
caps, If necessary,cover stubborn spots with an ammonia-soaked paper towel for
30 minutes. Rubgently with a mixture of clean water and vinegar, Wipe dry. Remove
all cleaners or the porcelain may become damaged during future heating.
To Clean the Removable Burner Baseand Gas Opening (some models)
The ports (or slots) around the burner basemust be routinely cleaned. Usea small-
gauge wire or needle to clean small slots or holes,
Note: Ifthe electrode isdamaged or broken, the surface burner will not light because
it will not spark. Manual lighting with a match isstill possible.
For proper flow of gas and ignition of the burner - DO NOTALLOW SPILLS,FOOD,
CLEANING AGENTS OR ANY OTHER MATERIAL TO ENTERTHE GAS OPENING
TUBE,Gasmustflow freely through the small holein the brassorifice for the burners
to light properly. If the gasopening orifice becomes soiled or clogged, usea small-
gauge or needleto clean. ALWAYS keepthe burner capin place whenever a surface
burner isin use.
To Replace the Burner Base and the Burner Cap
Make sure the piecesare thoroughly dry before placing back.
1, Replace burner base and burner cap at there place. Make sure each burner cap
and burner base are properly aligned and leveled,
2, Replace the burner grate.
3, Turn the burner on to determine if it light, if the burner does not light after
cleaning, contact an authorized servicer. Do not service the sealed burner
yourself.
14

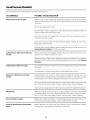
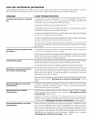
Avoid Service Checklist
Beforeyou call for service, review this list, it may saveyou time and expense. The list includes common occurrences that are not
the result of defective workmanship or materials in this appliance.
OCCURRENCE POSSIBLE CAUSE/SOLUTION
Surface burners do not light. Surface Control knob has not been completely turned to LITE,Pushin and turn the
Surface Control knob to LITEuntil burner ignites and then turn control to desired
flame size.
Be sure gas supply valve is open,
Gas-airmixture needs a straight line to travel. Besure burner isproperly seated in its
support (models with open burners only).
Burner ports or slots are clogged. With the burner off, use a small-gauge wire or
needle to clean ports or slots.
Power cord is disconnected from outlet (electric ignition models). Be sure cord is
plugged securely into outlet,
Electrical power outage (electric ignition models), Burners can be lit manually, See
Setting Surface Controls in this Owner's Guide.
Surface burner flame burns halfway
around.
Burner ports or slots are clogged, With the burner off, clean ports with a small-
gauge wire or needle to clean ports or slots.
Moisture ispresent after cleaning, Lightly fan the flame and allow burner to operate
until flame isfull. Drythe burners thoroughly following instructions under General
Cleaning.
Surface burner flame isorange. Dust particles in main line. Allow the burner to operate a few minutes until flame
turns blue.
In coastal areas, a slightly orange flame is unavoidable due to salt air.
Scratches or abrasion on cooktop
surface,
Coarse particles such as salt or sand between cooktop and utensil can cause
scratches. Besure cooktop surface and bottoms of utensils are clean before usage.
Small scratches do no affect cooking and will become lessvisible with time,
Cleaning materials not recommended for ceramic-glass cooktop have been used.
See r'ToClean the Ceramic-glass Cooktop'r section under General Cleaning.
Cookware with rough bottom hasbeen used. Usesmooth, fit-bottomed cookware.
Metalmarks.
Sliding or scraping of metal utensils on cooktop surface. Do not slide metai utensils
on cooktop surface, Useceramic-glasscooktop cleaning cream to remove the marks.
See r'ToClean the Ceramic-glass Cooktop'r section under General Cleaning.
Brown streaks or specks. Boilover are cooked onto surface. Use razor blade scraper to remove soil. See "To
Clean the Ceramic-glass Cooktop'r section under General Cleaning.
Areas of discoloration with metallic
sheen.
Mineral deposits from water and food. Remove using a ceramic-glass cooktop
cleaning cream. Use cookware with clean, dry bottoms.
15

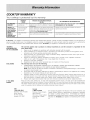
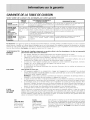
COOKTOP WARRANTY
Your cooktop is protected by this warranty
WARRANTY THROUGHOURAUTHORIZEDSERVICERS, THECONSUMERWILLBERESPONSIBLEFOR:
PERIOD WEWILL:
FULLONE-YEAR O_7eyearfrom original Payall costsfoi rep;_iri_7gor repladng anyl_artsof this Costs of service calls that are lis_ed under NORMAL
WARRANTY i_urchasedate applia_7cewhirl/ proveto be dc,tectiw, in materialsor RESPONSIBILITIESOFTHECONSUMER.*
wo_km_l_SI7ip
LIMITED2_D-5T" Second through fifth Provideareplacemel_tfor anydefecriveSLItfact,heath]g Diagnosticandanytransportationandlaborcost_whidt are
YEARWARRANTY yearsfromoriginal element,det@rJo£at@drubberizedsilico_7eseal(LIpswept reqLliredbecauseof selvice
(GlassSmoothtop, l_urchasedate modelso1_1%or glasssrnoothtopthatcracksdueto
Seal&Elements) thermalb_eat_Jge(notcustomer abL_e).
LIMITED Timepc,riodslisted Allot thep_ovisionsofthe fulla_7dlimitedwarranties Costsof thetechnicial7's_Tavelto theho_lleandanycostsfor pick
WARRANTY above aboveal_d{heexclusionslistedbelowapply t_pand deliveryofthr, apl_lial_cereQtlir e{J [IPCaUSPot seivice
(Applicableto the
Stateof Alaska)
In the U=S.A.ryour appliance is warranted by Electrolux Home Products North Amedcar a division of White Consolidated IndustdeSr Inc We authorize no
person to change or add to any of our obligaBons under this warranty Our obligations for service and parts under this warranty must be performed by
us or an authorized Electrolux Home Products North America servicer In Canada, your appliance is warranted by WCI Canada, ]nc
*NORMAL
RESPONSIBILITIES
OF THE CONSUMER
EXCLUSIONS
IF YOU NEED
SERVICE
This warranty applies only to products in ordinary household use, and the consumer is responsible for the
items listed below:
1 Proper use of the appliance in accordance with instructions provided with the product
2 Proper installation by an authorized servicer in accordance with instructions provided with the appliance and in
accordance with all local plumbing, electrical and/or gas codes
3 Proper connection to a grounded power supply of sufficient voltage, replacement of blown fuses, repair of loose
connections or defects in house wiring
4 Expenses for making the appliance accessible for servicing, such as removal of trim, cupboards, shelves,etc,
which are not a part of the appliance when it was shipped from the factory
5 Damages to finish after installation
6 Replacement of light bulbs and/or fluorescent tubes (on models with these features)
This warranty does not cover the following:
1 CONSEQUENTIAL OR INCIDENfAL DAMAGES SUCH AS PROPERTYDAMAGE AND INCIDENTAL EXPENSES
RESULTINGFROM ANY BREACH OF THIS WRITTEN OR ANY IMPLIED WARRANTY
NOTE: Some states do not allow the exclusion or limitation of incidental or consequential damages, so this limitation
or exclusion may not apply to you
2 Service calls which do not involve malfunction or defects in workmanship or material, or for appliances not in ordinary
household use The consumer shall pay for such service calls
3 Damages caused by services performed by servicers other than Electro[ux Home Products North America or its
authorized servicers; use of parts other than genuine Electrolux Home Products parts; obtained from persons other
than such servicers; or external causes such as abuse, misuse, inadequate power supply or acts of God.
4 Products with original serial numbers that have been removed or altered and cannot be readily determined
Keep your bill of sale, delivery slip, or some other appropriate payment record. The date on the bill establishes the
warranty period should service be required If service is performed, it is in your best interest to obtain and keep air receipts
This written warranty gives you specific legal rights You may also have other rights that vary from state to state Service
under this warranty must be obtained by contacting Electrolux Home Products:
USA
1.800o944.9044
ElectroJux Home Products
North America
RO Box 212378
Augusta, GA 30917
Canada
1,866,213,9397
ElectroJux Home Products
North America
802, boul UAnge Oardien
E'Assomption, Quebec
JSW 1T6
This warranty only applies in the 50 states of the USA, Puerto Rico, and
Canada Product features or specifications as described or illustrated
are subject to change without notice All warranties are made by
Electrolux Home Products North America, adivision of WhEe Consolidated
Industries, Inc In Canada, your appliance is warranted by WCI Canada,
Inc

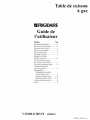
Table de cuisson
it gaz
mFRIGIDAIRE
Guide de
l'utilisateur
CONTENU Page
EnregistrementdeI'appareil ........................ 2
Mesuresdesdcuriteimportantes .............. 3-4
Instructions deraise_latorte ..................... 4
Conversionaugaz propane......................... 5
Dimensiondelaflamme ............................. 5
Benreglagedes brfJleurs............................ 5
Rdglagedescornmandes
desbrfJleursdesurface ............................ 6-7
Choixdes ustensilesdecuisine
pour lacuisson sur les bn:fleurs.................. 7
Casserolesetsous-plats particuliers _._.._.. 8
Conseilsetrenseignements
sur larniseenconserve............................... 8
Nettoyagegdndral
Nettoyagedesdiversesparties
devotre tabledecuisson ...................... 9
Modelesavecbr01eursouverts ............. 10
Modelesavecbrt31eursscellos ,_.._.. 11-14
Ustedesv_rifications preventives ............ 15
Garantie.................................................... 16
VISIBLEMENT micux
318200657 (0010) Rev. A

Enregistrement de
rappareil
Enregistrez votre appareil
LaCARTE D'ENREGISTREMENT dolt
_tre remplie avec soin, puis sign_e et
retournee _ la compagnie Produits
Electrolux Nord-Americains.
/
Nous vous remercions d'avoir choisi cet appareil. Lesinformations contenues
darts ceguide de t'utilisateur vous indiqueront comment utiliser correctement votre
appareil et comment en prendre soin, Veuillez tiretousles renseignements contenus
dans votre documentation pour mieux connaitre votre nouvel appareil.
Enregistrez les numeros de modele et de serie de votre a ppareil
Ecrivezci-dessous ces num_ros que vous trouverez sous la table de cuisson ou
I'interieur de celle-ci.
NumOro de module:
NumOro de sOrie:
Date de I'achat:
Ce guide contient des instructions generales pour votre table de cuisson et des
renseignements s'appliquant 8 plusieurs modetes. Votre table de cuisson peut ne
pas avoir routes lescaracteristiques decrites.
Note: Lesinstructions donnees dans ce guide necouvrent pasroutes lesconditions
et situations possibles, Usezde bon sens et de prudence Iors de I'installation, de
I'emptoi et de l'entretien de tout appareil menager.
,t_!2000 White Consobidated Industries
Tous droits reserves
[_r_TL"_'f_!_ Si I'information contenue dans ce guide n'est
pasexactement suivie, ilpourrait en resulter un feu ou une explosion
entrainant des dommages materiels, blessures ou meme la mort.
POUR VOTRE SI_CURITI_:
n'entreposez pas ou n'utilisez pas de I'essence ou tout autre
vapeur ou liquide inflammable au voisinage de cet appareil ou de
tout autre appareil menager.
-- QUE FAIRE SI VOUS DI_TECTEZ UNE ODEUR DE GAZ:
• Ne mettez pas d'appareil en marche.
• Ne touchez pas a un commutateur electrique; ne vous servez
pas du telephone dans le b_timent.
• Allez chez le voisin et appelez immediatement le fournisseur
de gaz. Suivez ses instructions.
• S'il n'est pas possible d'appeler le fournisseur de gaz, appelez
les pompiers
L'installation et I'entretien doivent Ctre realises par un
installateur qualifie, un technicien de service apres-vente ou le
fournisseur de gaz.

MESURES DE SI CURITI IMPORTANTES
Lisez ces instructions avant d'utiliser I'appareil.
Conserver ces directives pour r_f_rence future.
Ceguide contient des instructions et symboles de securite importants, Veuillez faire particulierement attention 8cessymboles et
suivre les instructions donnees. Void une breve explication de ces symboles,
Ce symbole vous previent des situations qui risquent d'entrainer de graves blessures, la mort ou des
dommages materiels,
Ce simbole vous previent dessituations pouvant entrainer des blessuresou dommages materiels,
• Enlevez tout le ruban et le materiau d'emballage avant
d'utiliser latable de cuisson. Detruisez lecartonnage et lessacs
en plastique apres le deballage de I'appareil. Ne laissezjamais
les enfantsjouer avec le materiau d'emballage
• Installation--Assurez-vous que I'appareil est correctement
installe et mis b la terre par un technicien qualifie,
conformement b la derniere edition de la norme ANSI Z223.1
du National Fuel Gaz Code aux I_tats Unis, ou au Canada,
conformement aux normes B149.1 et B149.2 CAN/ACG et
aussi conformement b la derniere edition de la norme n° 70
ANSI/NFPA du National Electrical Code aux letats Unis, ou au
Canada, b la norme C22.1 de I'ACNOR, code canadien de
I'electricite, partie 1,ainsi qu'aux codes de la region. NrinstaI]ez
I'appareil que selon les instructions d'installation fournies dans la
documentation
Demandez a votre mamhand de vous recommander un technicien
qualifie ainsi qu'un centre de reparation autorise, Sachez comment
couper le gaz au compteur et couper le courant electrique de latable
de cuisson ala boite de fusibles ou au coupe-circuit en casd'urgence,
• Entretien par I'usager--Ne reparez pas ou ne remplacez pas
despiecesde I'appareil a moins d'une recommandation precise
darts les guides. Toutes les reparations doivent etre faites par un
technicien qualifie, afin de reduire les risques de blessure et de
dommage a I'appareil,
• Ne modifiez jamais I'appareil, que ce soit en enlevant des
panneaux, protege-fils, ou toute autre pibce.
II peut etre dangereux pour les
personnes ou dommageable pour la table de cuisson de monter
ou de s'appuyer dessus. Ne laissez pas les enfants grimper sur
I'appareil ou jouer autour,
• Rangement sur I'appareiI--Ne rangez pas sur la table de
cuisson ou pres des brt_leurs de surface, des materiaux
inflammables. Ceci inclus des papiers, plastiques, tissus, livresde
cuisine, objets en plastique et torchons, ainsi que des Iiquides
inflammables, N'y posez pasdes produits explosifs comme bombes
aerosol, Les produits inflammables pourraient exploser et allumer
un feu ou causer des dommages materiels,
Ne rangez pasdes articles pouvant interesser
les enfants dans les armoires au-dessus de I'appareil.
• Ne laissez pas lesenfants sans surveillance darts un lieu off un
appareil fonctionne. Ne les laissezjamais s'asseoir ou se tenir
debout sur une piece quelconque de I'appareil,
• NE TOUCHEZ PASAUX BROLEURSDE SURFACE,AUX GRILLES
OU AUX ZONES A PROXIMITI_ DE CEUX-CI. Lesbr_leurs de
surface peuvent etre suffisamr_]ent chauds meme siles flammes ne
sont pas visibles Les zones pres des brQleurs peuvent devenir
suffisamment chaudes pour causer des brQlures, Pendant et apres
route utilisation, netouchez pas et ne laissezpas vosvetements ou
autres produits inflammables venir en contact avec ces zones a
moins qu'elles aient eu le temps de se refroidir, Ces zones
comprennent la surface de cuisson et lessurface orientees vers elle
• Portez des v_tements appropries--Ne portez jamais de
vetement amples ou flottants en utilisant cet appareil. Ne
laissez pas les materiaux inflammables et les vetements venir en
contact avec les surfaces chaudes,
N'utilisezjamais votre appareil pour
rechauffer ou chauffer une pibce.
• N'eteignez pas les feux de friture avec de I'eau ou de la
farine--letouffez les feux avec un couvercle ou du
bicarbonate de soude, ou avec un extincteur a poudre seche
ou a mousse.
• En chauffant de I'huile ou de la graisse, restez pres de
l'appareil. La graisse ou I'huile peuvent prendre feu si elles
devenaient trop chaudes,
• N'utilisez que des gants isolants secs--Des gants isolants
mouilles ou humides en contact avec des surfaces chaudes
peuvent causer des brt_lures par la vapeur. Ne laissez pas les
gants isola ntstoucher les brL]leursou laflamme. Nevous servez pas
de torchon ni de chiffon a la place d'un gant isolant
• Ne rechauffez pas des contenants non ouverts--
L'accumulation de pression peut faire exploser le contenant
et blesser.
• Vous devez savoir quel bouton commande chacun des
brQleurs de surface. Tournez le bouton a la position "LITE"
(ALLUMAGE) pour mettre les brOleurs en marche Verifiez que le
brOleur est allume puis reglez la flamme pour qurelle ne depasse
pas de I'ustensile
Bonne dimension de la flamme--
Reglez la flamme pour qu'elle ne depasse pas du bord de
I'ustensile. Avec desustensiles de dimension insuffisante, une partie
de laflamme du brOleur seraexposee et risquera de mettre la feu aux
vetements Un bon contact entre I'ustensile et la flamme ameliore
aussi I'efficacite,

MESURES DE SI CURITI IMPORTANTES<,u.e>
_L=J_q_ N'utilise z pas des grilles de rechaud sur
vos brt_leurs b gaz scelles. Sinon, la combustion serait incomplete
et il pourrait en resulter un degagement de monoxyde de carbone a
des doses superieures aux niveaux admis, ce qui serait dangereux
pour votre sante
• Utilisez la grosseur de casserole appropriee--Cet appareil est
equipe d'un ou plosieurs br01eors de surface de differentes
grosseurs, Choisissiez les ustensiles ayant un dessous plat, assez
large pour recouvnr le brOleur Si vous utilisez des ustensiles trop
petits, une pattie do brOleur sera a decouvert, et les vetements
entrant directement en contact avec le brOleor sont susceptibles de
prendre feu, Lrutilisation d'ustensiles d'une taille proportionnelle
au brOleur ameliore aussi le rendement,
• Les poignees d'ustensiles doivent etre tournees vers
I'interieur, sans surplomber les brt31eurs adjacents, afin de
reduire les risques de bralure, de combustion et de renversements
causes par le contact involontaire avec on ustensile,
• Ne laissezjamais les brt_leursde surface sans surveillance a des
reglages eleves--Les debordements causent de la fumee, les
eclaboussures de graisse sont susceptibles de prendre feu et les
ustensiles dont le contenu s'est evapore peuvent fondre
• Protecteurs--N'otilisez pas de papier d'aluminium pour recouvrir
les covettes des brOleors de surface ou route aotre pattie de
I'appareil Utilisez seulement le papier d'aluminium pour recouvrir
la nourritore dorant la cuisson ao four, Toute aotre otilisation de
protecteors ou de papier aluminiom est susceptible de causer un
choc electrique, on leo ou un court-circuit
Ustensile vitrifies--En raison de brusques changements de
temperature, on ne peut utiliser avec la surface de cuisson que
certains ustensiles en verre, en vitroceramique oo en terre cuite, ou
autres ostensiles vitrifies, sans risquer qu'ils se fendent Verifiez les
recommandations du fabricant qoant a leur otilisation sur one
surface de cuisson
N'utilisez pasde couverclede brt_leur decoratif. Siun braleur est
accidentellement allume, le couvercle risque de chauffer et
eventuellement de fondre Vous risquez de vous brOleren touchant
le couvercle Aussi, il y arisque d'endommagement de lasurface de
cuisson et desbrOleurss'il y asurcha uffe do couvercle L'air seraaussi
bloque, ce qui entrainera des problemes de combustion,
SURFACE EN VERRE (certainsmodeles):
• Ne nettoyez pas et ne faites pas fonctionner une table de
cuisson avec une vitre cassee--Si le verre de la surface est fissure,
lessolutions de nettoyage et produits renverses pourraient penetrer
a I'interieor de la surface de cuisson et entrainer un risque de
decharge electriqoe, Prenez contact immediatement avec un
technicien qualifie
Nettoyez prudemment le verre de la surface de cuisson--Si
vous utilisez un linge ou une eponge humide pour enlever les
produits renverses sur une surface de cuisson chaude, faites
attention a ne pas vous brOler par la vapeur Certains produits de
nettoyage peuvent degager des vapeurs dangereuses s'ils sont
appliques sur une surface chaude,
• Ne placez pas d'ustensiles de cuisine chauds sur le verre de la
table de cuisson. Ceci pourrait le casser,
• I-=viterde gratter leverre de latable de cuisson avec des objets
pointus.
CONSERVEZ CES INSTRUCTIONS
Instructions de mise b la terre
(modeles a allumage electrique seulement)
IMPORTANT: LIRE ET CONSERVER CESINSTRUCTIONS.
Cet appareil estequipe d'une fiche a trois broches avec
raisea la terre pour assurer votre protection contre leschocs etectriques. Cette
fiche doit etre branchee directement darts une prise correctement raisea laterre.
Ne coupez PAS, n'enlevez pas la broche de mise _ la terre de cette fiche.
Pour des raisons de securite personnelle, cette table de cuisson doit etre
correctement raise a la terre. La fiche dolt etre branchee dans un prise
correctement polarisee et raise a la terre, de 120 volts, 60 hertz,
Si une prise murale a deux alveoles est la seule prise a votre disposition, iIvous
revient de demander aun etectricien qualifie de laremptacer par une prisemurate
trois atveoles correctement raise a la terre,
ENAUCUN CAS, ILNE FAUTCOUPEROU ENLEVERLA BROCHEDE MISEA LA
TERREDE CETTE FICHE, CONSULTEZ LES INSTRUCTIONSD'INSTALLATION
EMBALLEESAVECCETAPPAREtLPOURYTROUVERTOUSLESRENSEIGNEMENTS
SUR L'INSTALLATION ETLA MISEA LA TERRE,VOUS NE DEVEZJAMAIS VOUS
SERVtRDE L'APPAREtLAVEC UN CORDON PROLONGATEUROU D'UNE FICHE
D'ADAPTATION A DEUX BROCHES,
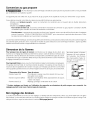
Eviter tout risque
de feu ou de choc electrique.Ne pasutiliser
de cordon prolongateur ni de fiche
d'adaptation Ne pas enlever la broche de
raisea la terre du cordon 61ectrique.Sicet
avertissementn'6tait passuivi,il pourrait en
r_sulter de graves blessures,la mort ou un
incendie
Prise murale
raise a la
terre
_Nejamais couper, "_
enlever ou mettre |
hors circuit la broche
de raise a la terre deJ
_ette fiche.
Cordon
d'alimentation
_nuni d'une fiche
a trois broches
avec raise a la
terre,
La page est en cours de chargement...
La page est en cours de chargement...
La page est en cours de chargement...
La page est en cours de chargement...
La page est en cours de chargement...
La page est en cours de chargement...
La page est en cours de chargement...
La page est en cours de chargement...
La page est en cours de chargement...
La page est en cours de chargement...
La page est en cours de chargement...
La page est en cours de chargement...
-
 1
1
-
 2
2
-
 3
3
-
 4
4
-
 5
5
-
 6
6
-
 7
7
-
 8
8
-
 9
9
-
 10
10
-
 11
11
-
 12
12
-
 13
13
-
 14
14
-
 15
15
-
 16
16
-
 17
17
-
 18
18
-
 19
19
-
 20
20
-
 21
21
-
 22
22
-
 23
23
-
 24
24
-
 25
25
-
 26
26
-
 27
27
-
 28
28
-
 29
29
-
 30
30
-
 31
31
-
 32
32


Frigidaire PLGC36S9ACA Le manuel du propriétaire
- Catégorie
- Cuisinières
- Taper
- Le manuel du propriétaire
dans d''autres langues
Documents connexes
-
Frigidaire 318200650 Manuel utilisateur
-
Frigidaire FGC30S8JSA Le manuel du propriétaire
-
-
-
-
-
-
-
-