
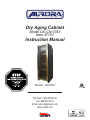
Dry Aging Cabinet
Model DA-CN-0353
Item 47101
Instruction Manual
Revised - 12/07/2021
Toll Free: 1-800-465-0234
Fax: 905-607-0234
Email: [email protected]
www.omcan.com

2
Page
-------------------------------------------------------------------------------------------- 3
--------------------------------------------------------------------------- 4 - 5
--------------------------------------------------------------------------- 5 - 8
-------------------------------------------------------------------------- 8
-------------------------------------------------------------------------------------- 8 - 12
------------------------------------------------------------------------------------- 12 - 17
----------------------------------------------------------------------------- 17 - 19
---------------------------------------------------------------------------- 20 - 21
---------------------------------------------------------------------------- 22
---------------------------------------------------------------------------- 23
Table of Contents
Section
Disclaimer
General Information
Safety and Warranty
Technical Specications
Installation
Operation
Troubleshooting
Parts Breakdown
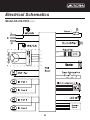
Electrical Schematics
Warranty Registration
Model DA-CN-0353

3
Disclaimer
OMCAN IS NOT RESPONSIBLE FOR
DIMINISHED COOLING OR ANY DAMAGES
DUE TO WATER LEAKS. WARRANTY IS VOID
IF THE AMBIENT ROOM TEMPERATURE
EXCEEDS 75°F AND 55% RELATIVE
HUMIDITY, AND THE APPLIANCE DRAIN IS
NOT CONNECTED DIRECTLY TO A FLOOR
DRAIN.

4
General Information
Omcan Manufacturing and Distributing Company Inc., Food Machinery of America, Inc. dba Omcan
and Omcan Inc. are not responsible for any harm or injury caused due to any person’s improper or
negligent use of this equipment. The product shall only be operated by someone over the age of 18, of
sound mind, and not under the inuence of any drugs or alcohol, who has been trained in the correct
operation of this machine, and is wearing authorized, proper safety clothing. Any modication to the
machine voids any warranty, and may cause harm to individuals using the machine or in the vicinity of
the machine while in operation.
CHECK PACKAGE UPON ARRIVAL
Upon receipt of an Omcan shipment please inspect for external damage. If no damage is evident on the
external packaging, open carton to ensure all ordered items are within the box, and there is no concealed
damage to the machine. If the package has suered rough handling, bumps or damage (visible or concealed),
please note it on the bill of lading before accepting the delivery and contact Omcan within 24 hours, so we may
initiate a claim with the carrier. A detailed report on the extent of the damage caused to the machine must be
lled out within three days, from the delivery date shown in the shipping documents. Omcan has no recourse
for damaged products that were shipped collect or third party.
Before operating any equipment, always read and familiarize yourself with all operation and safety
instructions.
Omcan would like to thank you for purchasing this machine. It’s of the utmost importance to save
these instructions for future reference. Also save the original box and packaging for shipping the
equipment if servicing or returning of the machine is required.
---------------------------------------------------------------------------------------------------------------------------------------------------
Omcan Fabrication et distribution Companie Limité et Food Machinery d’Amerique, dba Omcan et
Omcan Inc. ne sont pas responsables de tout dommage ou blessure causé du fait que toute personne
ait utilisé cet équipement de façon irrégulière. Le produit ne doit être exploité que par quelqu’un de
plus de 18 ans, saine d’esprit, et pas sous l’inuence d’une drogue ou d’acohol, qui a été formé pour
utiliser cette machine correctement, et est vêtu de vêtements de sécurité approprié. Toute modication
de la machine annule toute garantie, et peut causer un préjudice à des personnes utilisant la machine
ou des personnes à proximité de la machine pendant son fonctionnement.
VÉRIFIEZ LE COLIS DÈS RÉCEPTION
Dès réception d’une expédition d’Omcan veuillez inspecter pour dommages externes. Si aucun dommage
n’est visible sur l’emballage externe, ouvrez le carton an de s’assurer que tous les éléments commandés
sont dans la boîte, et il n’y a aucun dommage dissimulé à la machine. Si le colis n’a subi aucune mauvaises
manipulations, de bosses ou de dommages (visible ou cachée), notez-le sur le bond de livraison avant
d’accepter la livraison et contactez Omcan dans les 24 heures qui suivent, pour que nous puissions engager
une réclamation auprès du transporteur. Un rapport détaillé sur l’étendue des dommages causés à la machine
doit être rempli dans un délai de trois jours, à compter de la date de livraison indiquée dans les documents
d’expédition. Omcan n’a aucun droit de recours pour les produits endommagés qui ont été expédiées ou cueilli
par un tiers transporteur.

5
General Information
Safety and Warranty
Avant d’utiliser n’importe quel équipement, toujours lire et vous familiariser avec toutes les opérations
et les consignes de sécurité.
Omcan voudrais vous remercier d’avoir choisi cette machine. Il est primordial de conserver ces
instructions pour une référence ultérieure. Également conservez la boîte originale et l’emballage pour
l’expédition de l’équipement si l’entretien ou le retour de la machine est nécessaire.
---------------------------------------------------------------------------------------------------------------------------------------------------
Omcan Empresa De Fabricacion Y Distribucion Inc. Y Maquinaria De Alimentos De America, Inc. dba
Omcan y Omcan Inc. no son responsables de ningun daño o perjuicío causado por cualquier persona
inadecuada o el uso descuidado de este equipo. El producto solo podra ser operado por una persona
mayor de 18 años, en su sano juicio y no bajo alguna inuencia de droga o alcohol, y que este ha sido
entrenado en el correcto funcionamiento de esta máquina, y ésta usando ropa apropiada y autorizada.
Cualquier modicación a la máquina anúla la garantía y puede causar daños a las personas usando la
máquina mientras esta en el funcionamiento.
REVISE EL PAQUETE A SU LLEGADA
Tras la recepcion de un envio Omcan favor inspeccionar daños externos. Si no hay daños evidentes en el
empaque exterior, Habra el carton para asegurararse que todos los articulos solicitados ésten dentro de la
caja y no encuentre daños ocultos en la máquina. Si el paquete ha sufrido un manejo de poco cuidado, golpes
o daños (visible o oculto) por favor anote en la factura antes de aceptar la entrega y contacte Omcan dentro
de las 24 horas, de modo que podamos iniciar una reclamación con la compañia. Un informe detallado sobre
los daños causados a la máquina debe ser llenado en el plazo de tres días, desde la fecha de entrega que se
muestra en los documentos de envío. Omcan no tiene ningun recurso por productos dañados que se enviaron
a recoger por terceros.
Antes de utilizar cualquier equipo, siempre leer y familiarizarse con todas las instrucciones de
operación y seguridad.
Omcan quisiera darles las gracias por la compra de esta máquina. Es de la máxima importancia para
guardar estas instrucciones para referencias en el futuro. También guarde la caja original y el embalaje
para envío del equipo si el mantenimiento o la devolución de la máquina es necesaria.
WARNING
• The information in this document is subject to modication without any prior notice. Some models are
available in dedicated countries only.
• Oers no guarantee for our cabinet if it is being used for any purpose other than that for which it was
specically designed. We cannot be held responsible for any error in this manual. Is not responsible or
liable for any spoilage or damage to meat or any other contents incidental or consequential to possible

6
Safety and Warranty
defects of the cabinet. Warranty applies to the cabinet only and not to the content of the cabinet
• This appliance can be used by children aged from 8 years and above and persons with reduced physical,
sensory or mental capabilities or lack of experience and knowledge if they have been given supervision or
instruction concerning use of the appliance in a safe way and understand the hazards involved. Children
shall not play with the appliance. Cleaning and user maintenance shall not be made by children without
supervision.
• Children should be supervised to ensure that they do not play with the appliance.
• Do not give the packaging and its parts to children. Folding cardboard and plastic lm may pose a choking
hazard!
• Cabinet with door lock: keep the key out of the reach of children!
• All other types of use are not permitted. Any misuse of the appliance may result in damage to the stored
goods or spoilage. Furthermore, the appliance is not suitable for use in hazardous areas.
• Do not store explosive substances such as aerosol cans with a ammable propellant in this appliance.
This appliance is only suitable for the cooling of meat or food in commercial environment or similar.
NOTICES IN OPERATING
1. Children 3-8 years old are not allowed to take or place things from the cabinet.
2. Opening the door for a long time may cause the temperature of the cabinet to rise signicantly.
3. Clean regularly to keep the water tank system clean and avoid food contamination.
4. Before the cabinet is powered on, clean the water tank; it is recommended to clean the water tank every 5
days.
5. The cabinet is not suitable for storing frozen food.
6. If the cabinet is left empty for a long time, please close, defrost, clean, dry and keep the door open to
prevent the refrigerant from mold inside the equipment.
7. If there are two or more dierent kinds of meat, wrap the food in a bag before putting the food in the cabinet
to avoid contamination caused by contact between the two kinds of meat. This product is only suitable for
pork and beef, other meats are not allowed.
8. If there is liquid owing out of the meat, it needs to be packed in a bag to avoid the problem that the
product design structure is not easy to clean.
SAFETY INSTRUCTIONS AND WARNINGS
1. To avoid injury or damage to the cabinet, two or more people should unpack together.
2. If the product is damaged during transportation, please contact the supplier immediately before use.
3. All packaging must be removed before use to avoid poor grounding or increased noise. In order to ensure
the stability of the aging machine, please adjust the product feet according to the placement of the ground.
4. The product design is upright, and it needs to maintain adequate ventilation at the rear of the cabinet when
placed, so as to facilitate heat dissipation.
5. Built-in product to remove surrounding obstacles and maintain air circulation.
6. The four cabinet feet of the product are adjustable. It is recommended that you adjust the height of the
rear two cabinet feet to the maximum, and then adjust the front two cabinet feet to reach balance. When
adjusting the height, the product must be empty.
7. LED is only for product interior lighting, not for room lighting.
8. When product is built-in installation. Please keep the ventilation plinth open.
9. When the cabinet is not used for a long time, be sure to empty the contents and clean them with water to
keep the whole machine clean.

7
Safety and Warranty
10. In addition to the method recommended by the manufacturer, no mechanical equipment or other methods
should be used to accelerate the defrost process (such as blowing, shoveling, etc.).
11. Do not damage the refrigeration piping.
12. Except for the type recommended by the manufacturer, electrical appliances shall not be used in the food
pantry of the appliance.
13. Do not store explosives in cabinet, such as combustion-supporting sprays.
14. If the power cord is damaged, in order to avoid danger, non-original professional authorized personnel or
personnel with professional licenses may not repair and replace the product, please contact the supplier
immediately.
DANGER
1. Pay attention to the danger that children may be trapped in the box.
2. Do not let children operate the product alone.
3. Do not use electrical equipment (such as heater, electric ice maker, etc.) inside the product.
4. Do not place any electrical appliances or heavy objects on top of the product.
5. Do not move the product when it is not empty, as this may deform the product.
6. Please install the product in a place where the power socket is accessible, and the compressor can’t be
touched.
7. If the power cord or lamp is damaged, in order to avoid danger, it is forbidden to use electricity.
8. If any breakdown occurs, please disconnect the product from the main power supply, pull out the plug, do
not pull the cable, turn o or remove the fuse.
9. Prohibit the use of ammable sprays near the product.
10. Forbidden to damage the refrigeration pipeline. If the refrigerant in the pipeline splashes into the eyes, it
will cause serious injury.
11. Do not use ammable liquids to clean the product, ammable liquids and its steam will cause re hazard
and cause explosion.
12. WARNING — When positioning the appliance, ensure the supply cord is not trapped or damaged.
13. WARNING — Do not locate multiple portable socket-outlets or portable power supplies at the rear of the
appliance.
14. WARNING — The refrigerant and insulation blowing gas are ammable. When disposing of the appliance,
do so only at an authorized waste disposal centre. Do not expose to ame.
In order to avoid danger, non-original professional authorized personnel or personnel holding
professional licenses shall not repair or replace the product.
RESIDENTIAL USERS: Vendor assumes no liability for parts or labor coverage for component failure
or other damages resulting from installation in non-commercial or residential applications. The right
is reserved to deny shipment for residential usage; if this occurs, you will be notied as soon as
possible.
1 YEAR PARTS AND LABOUR BENCH WARRANTY
Within the warranty period, contact Omcan Inc. at 1-800-465-0234 to schedule a drop o to either
an Omcan authorized service depot in the area, or to an Omcan Service warehouse to repair the
equipment.

8
Technical Specications
Model DA-CN-0353
Capacity 352 L / 12.4 cu.ft.
Electrical 120V / 60Hz
Current 1.9A
Electric Shock
Protection Rating I
Lamp Power 0.8W
Max Ambient Temp
Rating 32°C / 90°F
Refrigerant R600a
Isolation Material Cyclopentane
Dimensions 23.4” x 28” x 67.7” / 595 x 710 x 1720mm
Item Number 47101
Installation
WASTE DISPOSAL TIPS
1. The packaging protects the product from damage during transportation. All materials used are
Safety and Warranty
Unauthorized maintenance will void the warranty. Warranty covers electrical and part failures, not
improper use.
Please see https://omcan.com/disclaimer for complete info.
WARNING:
The packaging components (cardboard, polyethylene, and others) are classied as normal solid urban waste
and can therefore be disposed of without diculty.
In any case, for suitable recycling, we suggest disposing of the products separately (dierentiated
waste) according to the current norms.
DO NOT DISCARD ANY PACKAGING MATERIALS IN THE ENVIRONMENT!

9
Installation
environmentally friendly and can be reused. Please assist: dispose of the packaging according to
environmental protection requirements.
2. To rst understand the current waste disposal channels, please consult your professional distributor or local
government agency.
3. If you want to dispose of the product, please do the following: remove the glass door, remove the shelf to
prevent children from climbing, remove the door seal, to avoid accidents when children enter into play.
4. Since this product uses ammable refrigerants and ammable thermal insulation foam materials, you
should avoid damaging the refrigeration pipeline when scrapping the product; keep it away from the re
and leave it to a qualied recycling company for disposal.
THE LOCATION YOU HAVE SELECTED FOR YOUR CABINET SHOULD:
1. Be unencumbered and well ventilated.
2. Be well away from any heat source and direct sunlight.
3. Not be too damp (laundry, pantry, bathroom etc.).
4. Have a at oor.
5. Have a standard and reliable electricity supply (standard socket to country standards, linked to the ground),
it is NOT recommended to use a multi-socket or extension lead.
6. Have a surge protector tted to the electrical outlet.
7. Away from the microwave oven. Certain microwave ovens do not have wave interference shield. When
placed within 1 meter vicinity of the cabinet, they may aect the operation of the cabinet.
GROUNDING INSTRUCTIONS:
When installing the product, must connect the grounding wire. Please use the grounding power socket
correctly to prevent the leakage of the wire and reduce the risk of electric shock. The cabinet is equipped
with a grounded power cord. Improper installation of grounding may cause electric shock. If you have any
questions about the grounding installation information, please consult a professional electrician or maintenance
personnel.
Note: If there is frequent lightning in the area, it is recommended to use a power protector.
R600A WARNING
For your safety observe the following recommendations.
1. This appliance contains a small quantity of R600a refrigerant which is environmentally friendly, but
ammable. It does not damage the ozone layer, nor does it increase the greenhouse eect.
2. During transportation and installation, do not damage the piping of the refrigerant system. The injected
refrigerant may cause eye damage or spontaneous combustion.
3. In the event of any accident, you should immediately cut o the power supply of the equipment and avoid
contact with open ames and items that can generate sparks.
4. The space for placing the product must ensure that every 8g of refrigerant requires more than 1m³ of
space, and the refrigerant content of the equipment is listed on the label.
5. If you have needs or suggestions, please inform customer service.
6. Warning: In order to avoid the danger caused by unstable appliances, repairs must be performed according
to the instructions.
7. The yellow symbol with ames is a warning that the refrigerant is ammable!

10
Installation
Warning: Risk of re or ammability!
ATTENTION:
When the cabinet is at “OFF” condition:
• Please take out all of goods from cabinet.
• Please keep cabinet clean.
Allow 24 hours before switching on the cabinet. During this time we recommend that you leave the
door open to clear any residual odors.
BEFORE LOADING & PLUGGING IN THE CABINET
RECOMMENDATIONS:
Cabinet should be install at suitable ambient temperature. If the temperature is higher or lower the ambient
temperature range, it will aect temperature uctuation and can’t reach cooling performance.
INSTALLING YOUR CABINET
Unpack and remove all of the protection and adhesive strips from the packaging around and inside the cabinet.
The cabinet must be positioned such that the plug is accessible. Release the power cord. Move your cabinet to
its nal location. The cabinet should be installed in a suitable place where the compressor will not be subject to
physical contact.
LEVELING YOUR CABINET:
Cabinet must be leveled BEFORE loading your cabinet.
Your cabinet is equipped with 4 adjustable feet to facilitate easy leveling. We recommend that you tighten the
back feet to the maximum and adjust the front feet to level the cabinet.
INSTALLATION INSTRUCTIONS FOR BUILT IN CABINET: FRONT VENTING CABINET ONLY.
INSTALLATION GUIDE
1. “Built in” cabinet are front venting but are not designed to be fully integrated behind a joinery door.
2. Please follow the installation diagram when installing built-in cabinet. No less than the minimum installation
dimension.
3. Built-in cabinet draw air from right of ventilation frame and expel through left of ventilation frame under the
front door.
4. “Built-in” cabinet have a power switch located on the control panel so power point location is not critical.
5. The cabinet requires a standard 240 volt/10 amp power point (or according to dierent countries
specications).
6. The power cord is 2.0m in length and is xed on the right side at the back when looking from front of
cabinet.
7. As with most appliances of today, the cabinet has sensitive electronic components which are susceptible to
damage through lightning and electricity supply faults. It is therefore advised to use a power surge protector

11
Installation
to avoid problems of this nature.
8. Air vent on door must be provided for built-in cabinet when a wood door installed.
In hot climate zone, an air vent or grid, with a minimum ventilation size of 200mm x 40mm MUST be cut out
at the rear top of the back partitioning or at the top of either side of the partitioning, allowing cool fresh air full
access to ow into the 30mm gap located at the rear of the cabinet.
This air vent or grid must not be opened on the same side as other appliances such as ovens or an area that
is sealed and without access to fresh cool air. Failing to comply with the above specications could result in
WARRANTY void.
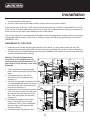
REVERSING OF THE DOOR
1. Depending on the model and the type of handle of the cabinet, you may need to rotate the door 180
degrees or symmetrically change the direction of the door (according to the product’s own conguration).
2. The door may be irreversible depending on the type of handles of the cabinet, or the door may need to be
opened and replaced when ordering.
Warning: To avoid accidents during
the process of changing the door, we
recommend that you get assistance. The
glass door is heavy and may cause injury
if dropped.
1. To put the cabinet on open operation
place, the door opened to the maximum
angle.
2. Use small knife (2) to take o the
decorative nail (1) on opposite side
(Drawing 1).
3. Use the inner six angle screwdriver (Tool
5) to disassemble the screws (4) of drop-
proof device (3), then remove the drop-
proof device (Drawing 1).
4. Hold the door, use six angle screwdriver
(Tool 5) to screw out the door shaft core
(6) from the two ends of the top of the
door. Take out the door and set aside
(Drawing 2).
5. Discharge the upper and lower door
hinge (7) (8) by M5 inner six angle
screwdriver (Tool 5), then to assemble
the door hinge on the opposite side
(Drawing 3 and 4).
6. Reverse the door 180 degrees, then

12
Installation
install the door on the opposite side of the cabinet (Drawing 5).
7. Finally, install the decorative nail and drop-proof device at the opposite side (Drawing 6).
HANDLE INSTALLATION METHOD
Note: Not all products need to install handles by themselves, please follow the
conguration of the actual purchased product.
1. Take out handle from cabinet, then take out 4 pcs 4x35 screws from accessory
bag.
2. Pull open door seal from the side of door, then insert screws into the 2 handle
holes on side of door, then put the screws alignment the hole of handle, tighten the
screws by Phillips screwdriver, then compress the door seal.
If the screws holes of the handle don’t match perfectly with the holes of the door,
please use the electric drill to drill the holes of the door a bit big (in surface side), in
order to install the handle perfectly.
INSTALLATION METHOD OF VENTILATION PLINTH
Note: Not all products need to install the ventilation plinth by themselves, please follow the
conguration of the actual purchased product.
1. Take the front ventilation plinth out of the product and
take out 4 screws from the accessory bag.
2. Open the door, align the ventilation plinth with the four
screw holes at the bottom of the cabinet, and tighten the
screws with a Phillips screwdriver.
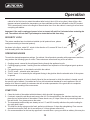
Operation
TURN ON YOUR CABINET
1. The allowable voltage and frequency are marked on the rating label, the socket must be properly grounded
and protected by a fuse.
2. The socket must not be directly behind the cabinet and must be easily accessible.
3. Do not use extension cables or extension sockets to connect cabinet.
4. Do not use stand-alone inverters or energy-saving plugs, otherwise the electronic control system will be at
risk of damage.
5. Do not look directly at the light line from close range, it will hurt your eyes.
6. Plug in and switch on the cellar by pressing on the power button for a few seconds. When you use the

13
Operation
cabinet for the rst time (or restart the cabinet after having it shut o for a long time), there will be a few
degrees variance between the temperature you have selected and the one indicated on the LED readout.
This is normal and it is due to the length of the activation time. Once the cabinet is running for a few hours
everything will stabilize.
Important: If the unit is unplugged, power is lost, or turned o, wait 3 to 5 minutes before restarting the
unit. The cabinet will not start if you attempt to restart before this time delay.
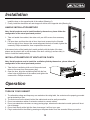
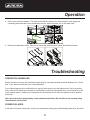
SECURITY LOCK
The mature machine has a lock device installed (not all products have, please
congure according to the actual product).
As shown in the gure, rotate 90°, unlock in the direction of 2, reverse 90° from 2, and
lock the safety lock in the direction of 1.
OPERATING NOISES
To reach the desired temperature settings, Our cabinet, like all products operating with compressors and fans,
may produce the following types of noises. These noises are normal and may occur as follows:
1. Gurgling sound - caused by the refrigerant owing through the appliance’s coils.
2. Cracking/popping sounds - resulting from the contraction and expansion of the refrigerant gas to produce
cold.
3. Fan operating sound - to circulate the air within the cabinet.
4. “Pa Pa” sound – solenoid valve start sound.
5. “Sizzle” sound - it is caused by the refrigerant owing in the pipeline after the solenoid valve of the system
is opened.
An individual’s perception of noise is directly linked to the environment in which the cabinet is located, as well
the specic type of models. Our cabinet are in line with international standards for such appliance. We will
always do its utmost to satisfy its customers but will not retake possession of the goods due to complaints
based on normal operating noise occurrences.
START TIPS
1. Clean the inside of the cabinet with disinfectant, which shouldn’t be aggressive.
2. If ordered: unpack the salt blocks and remove the foil. Put the salt blocks in the stainless steel tray and
place the tray at the bottom of the cabinet. Please check every 2-3 days if there is any remaining water on
the salt blocks, if so, please remove the water.
3. The temperature and humidity are already set on 1°C and 85% humidity which are the perfect setting for
dry aging beef & pork.
4. The meat for the dry aging must be fresh, perfect would be max. 5 days after slaughtering. Even vacuum
matured meat can be used, but for a maximum of 14 days (please remove foil).
5. Our recommendation for the best dry aged beef: use meat from a young cow with an ordinary fat cover plus

14
Operation
good marbling.
6. Hang the complete back on the hangers of your cabinet or put the individual cuts on the shelves.
7. Load capacity: max. 2x half strip loins on the bone with a length of 0.5m, therefore you will need 2 hangers.
8. Load capacity with shelves: max. 20kg individual pieces or cuts will t on shelves.
9. When maturing individual cuts on the shelves, pay attention on a protective fat layer which prevents too
much wastage and if possible let it mature on the bone. Ideal size approx. 2-4 kg / cut.
10. Please wear protective gloves at each contact with the meat, DON’T touch the meat without gloves!
11. The perfect maturing time is between 25-28 days, but more than 4 weeks is also possible.
TEMPERATURE SETTING
Important: The LED display is the actual temperature and humidity in the cabinet.
The temperature settings are pre-set at the factory as follows. In the event of a power interruption, all previous
temperature settings are automatically erased and it will revert to the preset temperature settings. The
electrical board of all models comes with memory function.
It is important to understand that there is a dierence between the temperature inside the cabinet and the
temperature shows on display panel: You will need to wait approximately 12 hours before noticing the eects of
temperature adjustment if the cabinet with full loading.
Once the temperature is set, please don’t adjust it frequently. The thermostat will maintain the temperature
inside the cabinet within a +/- 2ºC range. But the thermal inertia of the cabinet and the glass is such that within
this temperature range, the actual temperature of the cabinet will only uctuate 0.5ºC to 1ºC.
TEMPERATURE DISPLAY BOARD OPERATING INSTRUCTION
INSTRUCTIONS FOR LED PANEL OPERATION
1. Function switch button: press one time, the window 4 and window 5 to switch temperature and humidity
function, and press the button 6 or 7 to increase or decrease temperature and humidity.
2. ON/OFF the power button: press the button 3 seconds to power o. Remark: The other functions will turn
o except light switch when the power turns o. Press again (without delay), the power turns on.
3. UV system control instruction:
1. Automatic control: The cabinet is power on. If the UV light doesn’t be turned on by human, the UV light
will turn on for every 24 hours. The times will be 1 hour. It means every 24 hours, the UV light will be on 1
hour.

15
Operation
2. Manual control: The cabinet is power on. Please press this button 3 seconds, the UV light will be always
on. Please press light button 3 seconds again, and then the UV light will turn o.
3. When the UV light turn on, the UV light will be closed when door is open, and it will be on when door is
closed.
Note: The life of the UV lamp is 12 months. Exceeding the service life will greatly reduce the anti-
virus eect of the UV lamp.
4. Display Window: Display actual temperature.
5. Display Window: Display actual humidity.
6. Temperature/Humidity setting up button: Press one time, Temperature/Humidity will increase 1 degree
Celsius / 1%RH.
7. Temperature/Humidity setting down button: Press one time, Temperature/Humidity will decrease 1 degree
Celsius / 1%RH.
8. C/F display conversion function keys: Set the conversion degrees Celsius/Fahrenheit display, each press
this button, the display window will be into degrees Celsius or Fahrenheit.
DEFROST SYSTEM
The product has an automatic circulation defrosting system design. The cabinet can automatically defrost
when the compressor is stopped and timing. The frost water is automatically discharged from the storage area
of the ripening machine. The water condensed in the container is converted into heat or evaporation by the
compressor, The remaining water to maintain the humidity in the cabinet. All units are equipped with a double
layers Low-E glass door that has a third internal acrylic layer to minimize condensation on the glass door.
The cabinet is not totally sealed; fresh air admission is permitted through the drainpipe.
Notes: During the refrigerating cycle, heat is given o and disperses through the external surfaces of
the cabinet. Avoid touching the surfaces during those cycles.
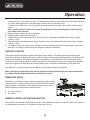
REMOVING SHELF
Shelf taking: according to below instruction drawing to press one side
of shelf limit pin 1, extract and remove the shelf from the other side of
support bracket 1, then take o the shelf following the arrow mark 2.
Shelf installation will be opposite with shelf taking.
1. ”A” is shelf limit pin.
2. ”B” is shelf.
HUMIDIFICATION SYSTEM DESCRIPTION
This product has automatic humidication function. The humidication system is inside the fan cover. If there is
no maintenance requirement, it is forbidden to open and pull out!

16
Operation
INSTRUCTIONS FOR ADDING WATER AND REPLACING ABSORBENT COTTON
Note: The unit has automatic water adding function.
VERY IMPORTANT NOTICE: There must be pure water near the unit’s
location. Before you use the cabinet, connect the water inlet pipe 3 rst
and then open the inlet valve 1 to conrm that there is water entering the
water tank.
1. Water inlet valve.
2. Water inlet.
3. Water inlet pipe.
This product has a water lling reminder function. When the water tank is
short of water, there will be a buzzer prompt. At the same time, the display
window will display “E5” to prompt a water shortage fault. When this fault occurs, the lighting lamp will ash.
At this time, it is necessary to add water manually. The display panel “E5” disappears automatically within 10
seconds after the water addition operation is completed, and the illumination lamp no longer blinks.
Note: The added water generally requires pure water, mineral water, distilled water and other water with
less impurities. Do not add some dirty water with more impurities and pollution, so as not to aect the
quality and taste of the meat in the cabinet!
AUTOMATIC WATER EXCHANGE AND REPLACEMENT OF ABSORBENT COTTON
STEPS
Note: The water source switch of the machine must be turned o before operation!
1. Place a 2L water box under the drain, then unscrew the drain cover to drain.

17
Troubleshooting
Operation
2. Drain cover operation diagram. The water tank bae according to the view operation, and unplug the
connecting wires and take-overs connected to the fan, water inlet pipe, etc. on the water tank.
3. Remove the absorbent cotton. Take out the water tank assembly and update the absorbent cotton.
OPERATION ANOMALIES
Ensure that there is power to the electrical supply plug by connecting another electrical appliance to it. Check
fuse, if any. Make sure that the door is closed properly.
If your cabinet appears to be malfunctioning, unplug it and contact your after sales service. Any intervention
on the cold circuit should be performed by a refrigeration technician who should carry out an inspection of the
circuit sealing system. Similarly, any intervention on the electrical circuit should be performed by a qualied
electrician.
Note: Any intervention performed by a non-authorized technician. We will lead to the warranty being
considered as null and void.
POWER FAILURES
In the event of a power interruption, all previous temperature settings are automatically preservation and it will

18
Troubleshooting
revert to a preset temperature setting.
Most power failures are corrected within a short period of time. An hour or two’s loss of power will not aect
cabinet’s temperatures. To avoid sudden change of temperature while the power is o, you should avoid
opening the door. For longer period of power failure, do take steps to protect your meat or food.
Irrespective of the cause, if you notice either abnormal temperature or humidity levels inside your
cabinet, be reassured that only long and frequent exposure to these abnormal conditions can cause a
detrimental eect on your meat or food.
Common problems may easily be solved, saving you the cost of a possible service call.
Please read carefully the instruction manual and revert to troubleshooting guide chart.
PROBLEM POSSIBLE CAUSE
Cabinet does not operate. Not plugged in.
The appliance is turned o.
The circuit breaker tripped or the fuse is broken.
Cabinet is not cold enough. Check the temperature control setting.
External environment may require a higher setting.
The door is opened too often.
The door is not closed completely.
The door gasket does not seal properly.
Turns on and o frequently. The temperature in the cabinet is higher than conventional.
The door is opened too often.
Storage overload in the cabinet
The door is not closed completely.
The temperature is not set correctly.
The door gasket does not seal properly.
The light does not work. Not plugged in.
The circuit breaker tripped or a blown fuse.
The light is damaged.
The light is “OFF”.
Vibrations. Please check whether the cabinet is on level ground.

19
Troubleshooting
The cabinet seems to make too much
noise.
The rattling noise may come from the ow of the refrigerant, which
is normal.
As each cycle ends, you may hear gurgling sounds caused by the
ow of refrigerant in your cabinet.
Contraction and expansion of the inside walls may cause popping
and crackling noises.
The cabinet is not level.
The door will not close properly. The cabinet is not level.
The door was reversed and not properly installed.
The gasket is faulty (magnet or rubber is spoiled).
The shelves are out of position.

20
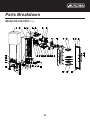
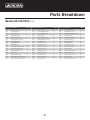
Parts Breakdown
Model DA-CN-0353 47101
La page charge ...
La page charge ...
La page charge ...
La page charge ...
-
 1
1
-
 2
2
-
 3
3
-
 4
4
-
 5
5
-
 6
6
-
 7
7
-
 8
8
-
 9
9
-
 10
10
-
 11
11
-
 12
12
-
 13
13
-
 14
14
-
 15
15
-
 16
16
-
 17
17
-
 18
18
-
 19
19
-
 20
20
-
 21
21
-
 22
22
-
 23
23
-
 24
24


dans d''autres langues
- English: Aurora DA-CN-0353 User manual
Autres documents
-
Omcan PT-CN-0390 Refrigerated Prep Tables Manuel utilisateur
-
Omcan BB-CN-0005-HC Manuel utilisateur
-
Omcan BB-CN-0005 Manuel utilisateur
-
Omcan RS-CN-0360 Manuel utilisateur
-
-
-
Omcan BE-CN-2083-CSS Manuel utilisateur
-
-
Omcan 43116 Manuel utilisateur
-