HART VOC812SW 3701 Le manuel du propriétaire
- Catégorie
- Aspirateurs
- Taper
- Le manuel du propriétaire

VOC812SW 3701
8 Gallon Wet/Dry Vacuum
Aspirateur Eau Et Poussière 8 Gallons
Aspiradora Para Mojado/Seco De 8 Galones
OPERATOR’S MANUAL
Safety Information 2-3
Symbols 4
Features 4
Assembly 4-7
Operation 8-11
Maintenance 12-14
Troubleshooting 14
Warranty 15
Exploded View 16
Parts List 17
Parts/Service
Back Page
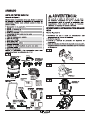
THIS INSTRUCTION BOOKLET CONTAINS
IMPORTANT SAFETY INFORMATION. PLEASE
READ AND KEEP FOR FUTURE REFERENCE.
WARNING: To reduce the risk of
injury, the user must read and understand the
operator’s manual before using this product.
LE PRÉSENT LIVRET D’INSTRUCTIONS CON-
TIENT DES CONSIGNES DE SÉCURITÉ IMPOR-
TANTES. VEUILLEZ LE LIRE ATTENTIVEMENT
ET LE CONSERVER AFIN DE POUVOIR VOUS
Y RÉFÉRER ULTÉRIEUREMENT.
AVERTISSEMENT: Afin de
réduire tous risques de blessures, l’utilisateur
doit lire et assimiler le contenu du manuel
d’utilisation avant de se servir de ce produit.
ESTE MANUAL DE INSTRUCCIONES CONTIENE
IMPORTANTE INFORMACIÓN DE SEGURIDAD.
POR FAVOR LEA Y CONSERVE PARA REFER-
ENCIA FUTURA.
ADVERTENCIA: Para reducir
el riesgo de lesiones, el usuario debe leer y
comprender el manual del operador antes de
usar este producto.
MANUEL D’UTILISATION
Consignes de sécurité 1-2
Symboles 3
Caractéristiques 3
Assemblage 3-6
Fonctionnement 7-10
Entretien 11-13
Dépannage 13
Garantie 14
Vue Éclatée 15
Liste Des Pièces 16
Pièces/Réparations
Dernière Page
MANUAL DEL OPERADOR
Información de seguridad 1-2
Símbolos 3
Características 3
Armado 3-6
Funcionamiento 7-10
Mantenimiento 11-13
ResoluciónDeProblemas 13
Garantía 14
Vista En Detalle 15
Lista De Piezas 16
PartesyServicio
Páginas Posteriores


6
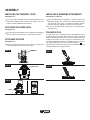
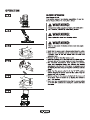
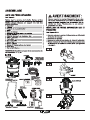
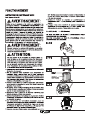
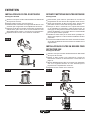
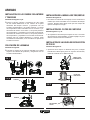
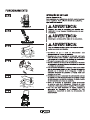
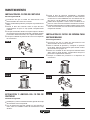
ATTACHING THE REAR WHEELS & CASTERS
See Figures 7 and 8.
•Turnthecollectiontankupsidedown.Insertthetwocaster
feet into the slots on the front of the collection tank and
tightenwithsuppliedscrews.Therearwheelsandthe
vacuumbasearemarkedwiththenumbers1and2.Insert
wheel1intoslot1onthebackofthevacuumandtighten
withsuppliedscrew.Insertwheel2intoslot2ontheback
of the vacuum and tighten with supplied screw. Verify
that the rear wheels and casters are mounted correctly
asshown.Donotover-tightenscrews.
ATTACHING THE HANDLE
See Figure 9.
•
Attach the handle into the slots located on the top of the
powerheadandsecurewithsuppliedscrews.
INSTALLING THE PULL/PUSH HANDLE
See Figure 10.
•Insert the pull/push handle into the handle sockets
mountedonthesidesofthecollectiontank.Pushdown
untilthelockpinsclickintoplace.
INSTALLING THE CARTRIDGE FILTER
See Figures 11 and 12.
•Yourvacuumcomesreadyfordryvacuumcleaning.If
the cartridge filter is not installed, refer to page 13 for
installationinstructions.
INSTALLING THE DUST COLLECTION BAG
See Figure 13.
•Optional: For improved dust filtration, fit the dust bag
flange onto the inlet port, taking care not to damage the
bag.
ASSEMBLY
FIG. 7
FIG. 8
FIG. 9
FIG.10
FIG.11
FIG.12
FIG.13
REAR WHEEL
CASTER
DUST BAG
CARTRIDGE
FILTER
PULL/PUSH
HANDLE

7
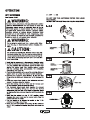
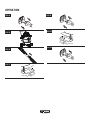
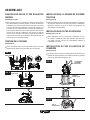
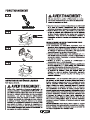
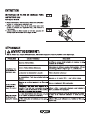
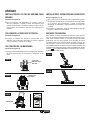
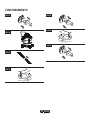
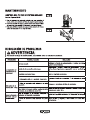
INSTALLING THE FOAM WET FILTER
See Figure 14.
•Forwetvacuumcleaning,removethecartridgefilter,and
installthesuppliedfoamwetfilter.Seepage13 for the
foamwetfilterinstallationinstructions.
ATTACHING THE POWER HEAD
See Figure 15.
• Place the power head back on the collection tank aligning
thetopsectionwiththelatches,andsnapintoplace.
ATTACHING THE HOSE
See Figure 16.
•Insertthelockingendofthehoseintothevacuumport
onthecollectiontankandlockintoplace.
ASSEMBLY
FIG.14
FIG.15
FIG.16
HOSE
POWER HEAD
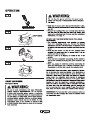
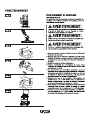
INSTALLING & REMOVING ATTACHMENTS
See Figures 17 and 18.
•Theseattachmentslocktogether to preventthemfrom
detachingduring use. Connectthedesiredattachment
onto the end of the hose or extension wand by aligning
thetabsandpushtogetheruntiltheylockintoplace.
•Toremovetheattachment,pressdownonthelockingtab
andslideitoff.
FOAM WET
FILTER FIG.17
FIG.18
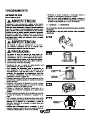
POLARIZED PLUG
To reduce the risk of electrical shock, this appliance has a
polarizedplug(onebladewiderthantheother).Thisplug
willfitinapolarizedoutletonlyoneway.Iftheplugdoesnot
fitfullyintheoutlet,reversetheplug.Ifitstilldoesnotfit,
contactaqualifiedelectriciantoinstalltheproperoutlet.Do
notchangethepluginanyway.Doubleinsulation
eliminates the need for the three wire grounded power cord
andgroundedpowersupplysystem.


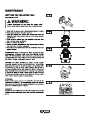
11
FIG.39
FIG.40
FIG.36
FIG.37
FIG.38
OPERATION
FIG.34
FIG.35


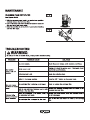
13
MAINTENANCE
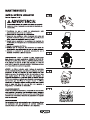
INSTALLING CARTRIDGE FILTER
See Figures 46-48.
•Verifythatthepowercordisdisconnectedfromtheoutlet.
•Removethepowerheadandplaceinanupsidedown
position.
•Installthecartridgefilteroverthefiltercagemakingsure
thecageiscompletelycovered.
• Place the filter retainer on the top of the cartridge filter
overtheraisedlipandtightendownbyturningtheretainer
clockwise;donotover-tighten.
•Placethepowerheadbackontothecollectiontank.
REMOVING & CLEANING CARTRIDGE FILTER
See Figure 49.
•Unlockandremovethefilterretainerbyturningtheretainer
handlecounterclockwise.
•Withtheremovedpowerheadinanupsidedownposition,
carefullyremovethecartridgefilterfromthefiltercage.
• Clean the cartridge filter by gently tapping or brushing dirt
off.Cleaningshouldnotbedoneindoorsinlivingareas.
Foroptimalperformanceanewfilterisrecommended.
•Install cleaned or new filters as above in steps 2-4 of
InstallingCartridgeFilter.
•Wetfiltersshouldberemovedandallowedtoairdryfor
24hoursbeforeinstallingontothefiltercage.
INSTALLING FOAM WET FILTER
See Figures 50-51.
•Verifythatthepowercordisdisconnectedfromtheoutlet.
•Removethepowerheadandplaceinanupsidedown
position.Followinstructionstoremovethecartridgefilter
onpage13.
•Carefullyslidethefoamwetfilterdownoverthefiltercage
makingsurethecageiscompletelycovered.
•Placethepowerheadontothecollectiontank.
FIG.46
FIG.49
FIG.47
FIG.50
FIG.48
FIG.51


15
WARRANTY
Wetakeprideinproducingahighquality,durableproduct.ThisHARTTMproductcarriesalimitedthree(3)yearwarranty
againstdefectsinworkmanshipandmaterialsfromdateofpurchaseundernormalhouseholduse.Ifproductistobeused
forcommercial,industrial,orrentaluse,a90daylimitedwarrantywillapply.Pleasekeepyourreceiptasproofofpurchase.
Thiswarrantygivesyouspecificlegalrights,andyoumayhaveotherrights,whichvaryfromstatetostate.Forproduct
servicecallCustomerServiceat1-866-384-8432.
NotCoveredbyWarranty:
•Anypartthathasbecomeinoperativeduetomisuse,negligence,direct/indirectabuse,accidents,impropermaintenance,
repairs, or alterations;
• Consumables such as filters and accessories;
•Normalwearandtearofpartsandattachments,suchashose,nozzles,orcasters;
•Normaldeteriorationoftheexteriorfinishduetouseorexposure;
•Anyproductwhereserialnumber/datalabelistamperedwithorremoved;
•Anyproductpurchasedfromanunauthorizedretailer.

16
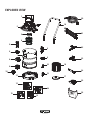
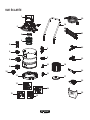
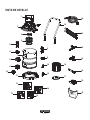
EXPLODED VIEW
1
2
3
4
5
5
19
20
21
22
23
25
24
26
6
6
7
8
9
10
11
12
13 13
14
15
16
17
18

17
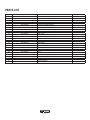
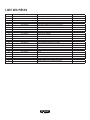
PARTS LIST
PART PART NUMBER DESCRIPTION QUANTITY
1 551058101 Handle Assembly 1
2 Power Head Assembly 1
3 551416106 Float 1
4 551437105 Filter Cage 1
5 551259109 Pull/Push Handle Socket 2
6 551152109 Latch Assembly 2
7 Collection Tank 1
8 551016105 Vacuum Port 1
9 551271102 Drain Assembly 1
10 551436104 Drain Cap 1
11 551150104 Vacuum Base 1
12 551059110 Rear Wheel 2 1
13 551437103 Caster Foot Assembly 2
14 551059108 Rear Wheel 1 1
15 551086112 Cord Hook 1
16 551021121 Grounding Chain 1
17 551437107 Filter Retainer 1
18 551030114 Cartridge Filter 1
19 551437104 Pull/Push Handle 1
20 551436107 Hose 1
21 551436108 Extension Wand 2
22 551436109 Floor Brush/ Squeegee Nozzle 1
23 551436110 Utility Nozzle 1
24 551436111 Crevice Tool 1
25 551002118 Foam Wet Filter 1
26 551188114 Dust Bag 1


La page charge ...
La page charge ...
La page charge ...
La page charge ...
La page charge ...
La page charge ...
La page charge ...
La page charge ...
La page charge ...
La page charge ...
La page charge ...
La page charge ...
La page charge ...
La page charge ...
La page charge ...
La page charge ...
La page charge ...
La page charge ...
La page charge ...
La page charge ...
La page charge ...
La page charge ...
La page charge ...
La page charge ...
La page charge ...
La page charge ...
La page charge ...
La page charge ...
La page charge ...
La page charge ...
-
 1
1
-
 2
2
-
 3
3
-
 4
4
-
 5
5
-
 6
6
-
 7
7
-
 8
8
-
 9
9
-
 10
10
-
 11
11
-
 12
12
-
 13
13
-
 14
14
-
 15
15
-
 16
16
-
 17
17
-
 18
18
-
 19
19
-
 20
20
-
 21
21
-
 22
22
-
 23
23
-
 24
24
-
 25
25
-
 26
26
-
 27
27
-
 28
28
-
 29
29
-
 30
30
-
 31
31
-
 32
32
-
 33
33
-
 34
34
-
 35
35
-
 36
36
-
 37
37
-
 38
38
-
 39
39
-
 40
40
-
 41
41
-
 42
42
-
 43
43
-
 44
44
-
 45
45
-
 46
46
-
 47
47
-
 48
48
-
 49
49
-
 50
50


HART VOC812SW 3701 Le manuel du propriétaire
- Catégorie
- Aspirateurs
- Taper
- Le manuel du propriétaire
dans d''autres langues
Autres documents
-
Craftsman CMXEVCVVFB511 Manuel utilisateur
-
-
-
Milwaukee PM 1738 Manuel utilisateur
-
-
-
Vacmaster AA155 Manuel utilisateur
-
ArmorAll AA255 Manuel utilisateur
-
-
Crafstman CMXEVBCV1660L Le manuel du propriétaire