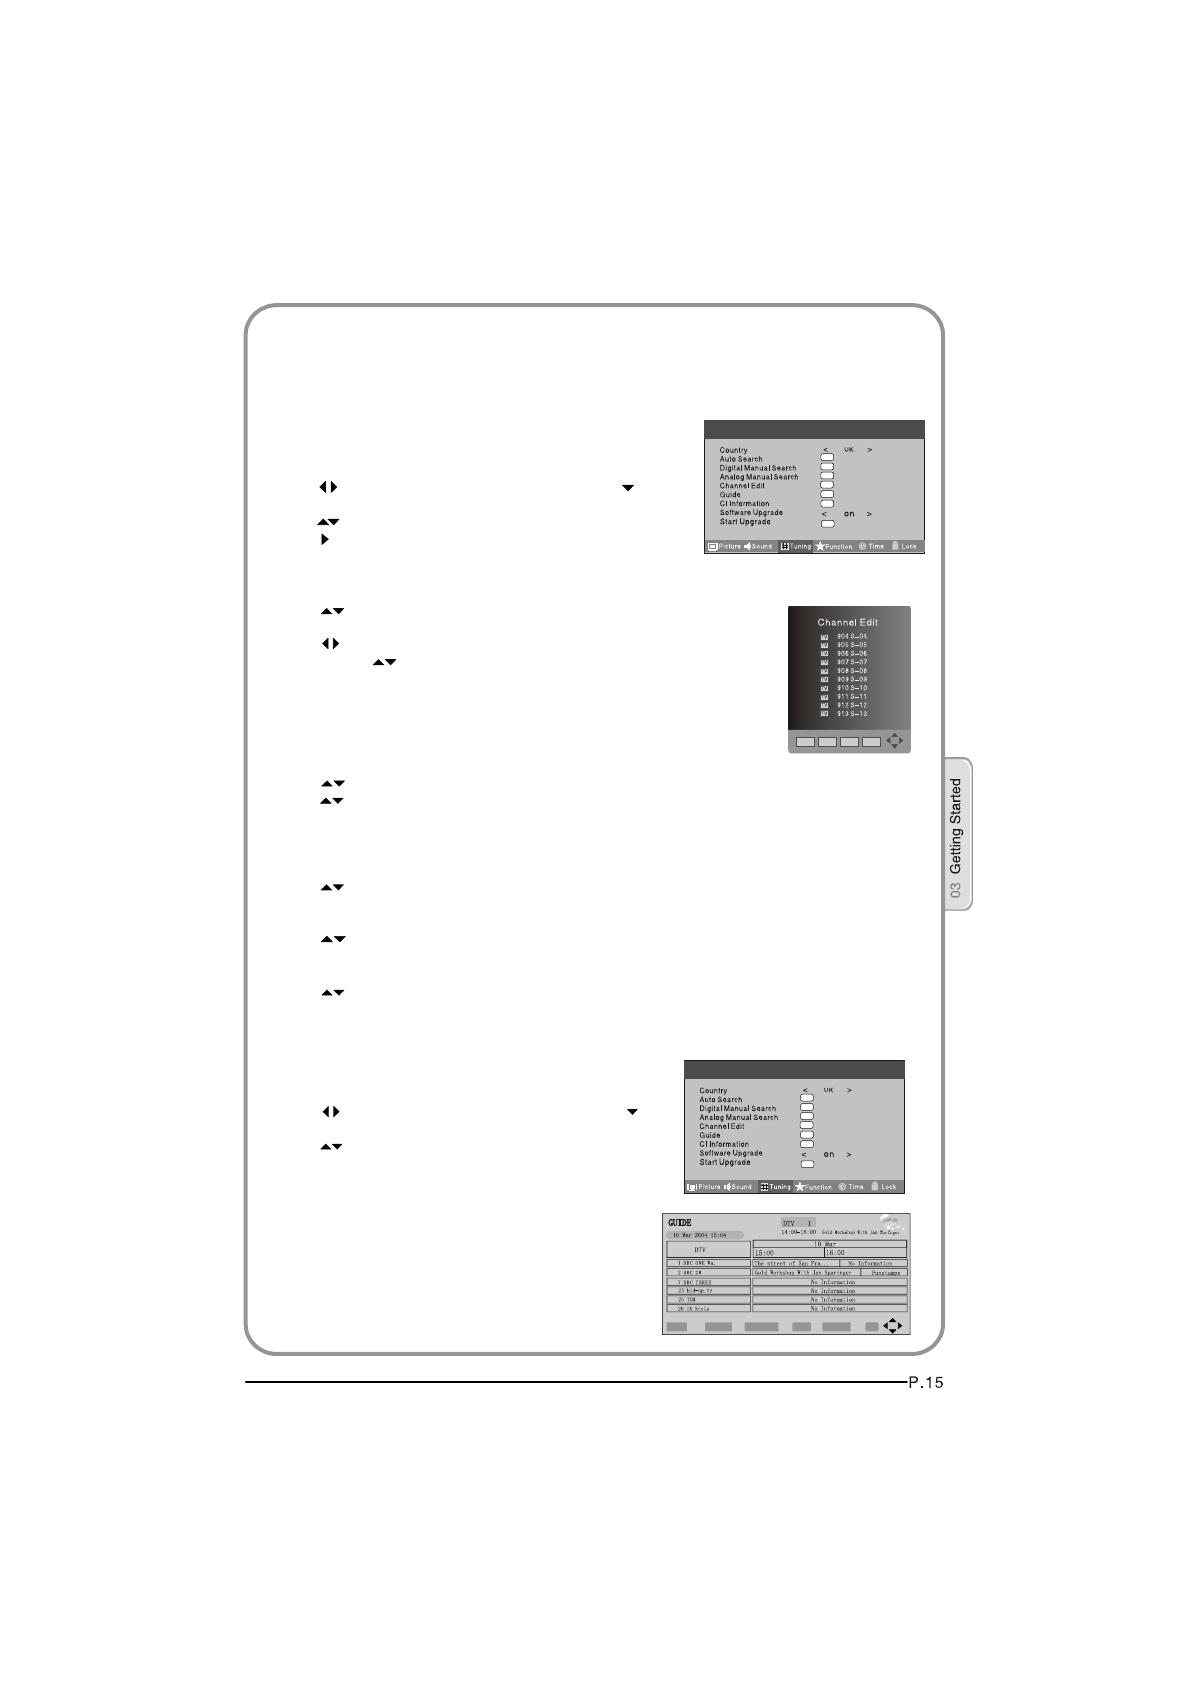
Haier LT26K3 Le manuel du propriétaire

Catégorie
Téléviseurs LCD
Taper
Le manuel du propriétaire
Please read this manual carefully before
operating the unit, and keep it for future reference.
DIGITAL LCD TELEVISION
INSTRUCTION MANUAL
MODEL:LT26K3/R3A
LY26K3/R3A
LTF32K3/R3A
LY32K3/R3A
LTF42K3/R3A
Contents
P.25
P. 3 8
P.
4
0
P. 4 4
P. 4 5
P.02
P.03
P.04
P.05
P.06
01 Safety Warnings
02 About your LCD TV
03 Getting Started
04 Using the features
05 Reference Sections
P.08
P.09
P.11
P.12
P.13
P.18
P.16
P.19
P.20
P.21
P.23
P.27
P.29
Welcome
Important information
Safety notice
Electrical connections
Get to know your TV
Get to know your remote control
Connecting your TV
Preparation of your remote control
Setting up
Tuning your TV
Common interface
Using your TV
Adjusting picture settings
Adjusting sound settings
Function settings
Time settings
Lock menu settings
Shortcut menu display
Teletext function
USB mode
Using External USB Disk For Recording
Using your DVD player(certain models only)
Troubleshooting
Specification
P.31
WELCOME
01 Safety Warnings
Thanks for buying this 26"/32"/42" HD Ready Digital LCD TV.
This guide will help you set up and begin using your TV.
First, check the contents of your box with the parts checklist below:
26"/32"/42"HD Ready Digital LCD TV
Remote control
AAA battery x2
Instruction Manual
Quick Start Guide
Now you can get started!
IMPORTANT INFORMATION
WARNING
*To avoid electric hazards, it is strongly suggested that the back cover not be opened, as
there is no any accessory inside the casing.
*If necessary, please contact authorized after-sales services.
*A lighting flash mark in a triangle: A potentially hazardous situation, which, if not avoided,
could result in serious injury by high voltage.
*An exclamation mark in a triangle: Major part or accessory of which technical specifications
must be followed if it is to be replaced.
Warning:
To avoid fire or electric hazards, never place your television receiver in an area
with heavy moisture. Attention should be paid to avoid accidental scratches or
impacts onto the screen.
WARNING
RISK OF ELECTRIC SHOCK
DO NOT OPEN
Caution:
Please read this manual carefully before using your television and keep this
manual in a good place for future reference.
To achieve the best performance of your television, read this User's Manual
carefully and properly store it for future reference.
Information of screen displays and figures in the User's Manual may vary due
to technical innovations.
Caution:
Unauthorized disassembly of this product is prohibited.
TO REDUCE THE RISK OF ELECTRIC SHOCK DO NOT REMOVE COVER (OR BACK). NO
USER SERVICEABLE PARTS INSIDE. REFER TO QUALIFIED SERVICE PERSONNEL.
The product should be tightly fixed to avoid
drop damages and even fire.
To avoid fire hazards, do not use this
product under direct sunlight or closely
to heat sources.
Do not locate the product close to water
or oil, which may cause fire hazards.
Unplug the power supply and antenna of
the product when there is a rainstorm,
especially
Thunderstorm.
Do not use damaged or worn electric plugs
and keep electric cord away from heat sources
to avoid electric shocks or fire hazards.
Do not connect excessive sockets in parallel
or share the same socket by multiple plugs
to avoid fire hazards.
The product must be placed on a solid and
stable surface to avoid collapse.
Unauthorized disassembly of the television
is prohibited to avoid electric shocks or fire
hazards. Contact
authorized after-sales
service if technical
service is needed.
Keep the product away from a transformer
or heat source to avoid fire hazards.
Disconnect the product from power supply
and contact authorized after-sales service
if abnormal sound is heard in the product.
Don't use or store inflammable materials
near the product to avoid explosion or fire
hazards.
Don't place the product in a humid area to
avoid fire hazards.
The antenna of the product should be away
from electric cable to avoid
electric shocks.
Never touch the plug when your hand is wet
as this might cause electric shocks.
Always make sure that the televisionis well
plugged as poor electric
connection might cause fire.
When antenna is used, measures should be
taken to prevent water
from flowing down
along the cable into
the television.
Unplug the television, use soft fabric, never
chemicals, if you are going to make
cleaning of the product.
Make sure that no
water drops in the
product.
The plug and electric cable must be kept
clean to avoid electric
shocks or fire
hazards.
Disconnect the television from power supply
and antenna when there is a
rainstorm or thunderstorm
to avoid electric shocks
or fire hazards.
Disconnect the television from power supply
to avoid electric shocks or fire
hazards in a long
vocation.
About your LCD TV
GET TO KNOW YOUR TV
USB
2
1REC
17.OPTICAL
Front control panel
Source button
Menu button
Volume up/down button
Program up/down button
Power button
1. YPbPr input
2. YPbPr AUDIO input
3. DVI AUDIO input
4. ANTENNA input
5. HDMI3 input
6. S-VIDEO input
7. EARPHONE output
8. HDMI1 input
9. HDMI2 input
10. AV-VIDEO input
11. Common Interface
12. SCART1 input
13. VGA AUDIO input
14. SCART2 input
15. VGA input
16. USB
COMPONENT IN
HDMI3
VGA IN
ANT IN
Rear Terminals Control
GET TO KNOW YOUR TV WITH DVD
17.OPTICAL
Front control panel
1. YPbPr input
2. YPbPr AUDIO input
3. DVI AUDIO input
4. ANTENNA input
5. HDMI3 input
6. S-VIDEO input
7. EARPHONE output
8. HDMI1 input
9. HDMI2 input
10.AV-VIDEO input
11. Common Interface
12.SCART1 input
13.VGA AUDIO input
14.SCART2 input
15.VGA input
16.USB
Source button
Menu button
Volume up/down
button
Program up/down
button
Power button
USB
2
1REC
COMPONENT IN
HDMI3
VGA IN
ANT IN
Rear Terminals Control
When using the remote control, aim it
towards the remote sensor on the TV
Stand By
DVD Menu / REC
DVD open / close
Picture Mode
Sound Mode
Call Screen Display
Sleep button
DTV Audio / NICAM / DVD Audio
Aspect Ratio Control button
Channel list button
Subtitle button
Program Number Channel selection
Source Exchange
Q.VIEW / Swap Channel
V+/V- : Volume selection
P+/P-: Channel selection
Mute
Menu button
GUIDE button (only for DTV)
Favourite list button
OK button
Cursor Mover button
Back button (only for USB)
Exit Screen Display
REPEAT
(only for DVD , USB , REC & Timeshift) /
CANCEL button
Zoom (only for DVD &USB)/
Teletext index(only for
TV) / REC index
Play / Pause button (only for DVD &USB) / Timeshift
Stop (only for DVD, USB, REC & Timeshift)
Fast Reverse (only for DVD, USB, REC & Timeshift)
Fast Forward (only for DVD, USB, REC & Timeshift)
Previous (only for DVD, USB, REC & Timeshift)
Next (only for DVD, USB, REC & Timeshift)
DVD Set up / Text
DVD Title / Teletext Mix
DVD Search / Teletext Subcode
DVD 10+ / Teletext Hold
DVD Program / Teletext Reveal
DVD A-B Repeat / Teletext Size
DVD Call / Teletext Mode
DVD Angle /Teletext Time
NOTE:RED button ,GREEN button
BLUE button and YELLOW button are fast
text button in analog signal .Function
button in DVBT (just reference the OSD)
SCREEN
SCREEN
STOP
.
GET TO KNOW YOUR REMOTE CONTROL
LR YPbPr
DVD
CONNECTING YOUR TV
ANTENNA CONNECTION
Connect your aerial to the side of the TV into the ANTENNA IN socket.
IMPROVE YOUR SIGNAL
To improve picture quality in a poor signal area, use a signal amplifier
(not supplied).
CONNECT YOUR PC TO THE TV
You can use your TV as a monitor for your personal computer by connecting it
with a VGA cable (not supplied).
1.Read your computer user guide and check it has a VGA connector.
2.Turn the power off on your TV and PC.
3.Connect a D type 15-pin VGA interface cable to the VGA video interface
connector on the PC. Connect the other end of the cable to the PC interface
connector on the TV. Tighten the screws on the VGA connectors and connect
the audio cable (not supplied) to the audio input socket on the back of the TV.
4.Turn on the power of the TV firstly and then the PC.
5.Press the button on the TV or TV remote control to set the video input mode
to VGA.
6. Once the image shows, if there is noise present, change the VGA mode to
another resolution, change the refresh rate to another rate or adjust the
brightness and contrast on the menu until the picture is clear.
CONNECT A DVD PLAYER TO YOUR TV
Connect the DVD video outputs (Y, Pb, Pr) to the
COMPONENT (Y, Pb, Pr)
IN socket on your TV.
1 . Turn on the DVD player and insert a DVD.
2 . Press the button to select .
3 . Refer to the DVD player user guide for operating
instructions.
CONNECT A DVD PLAYER OR VCR TO YOUR TV
There are two ways in which you can connect a DVD player or VCR to your TV.
Make sure that both the TV and DVD player or VCR are switched off before you
connect them.
Connection Option 1
1.Connect the audio and S-VIDEO cables from the VCR output jacks to the TV
input jacks.
2.Insert a video tape into the VCR and press PLAY on the VCR.
3.Turn on the power of the TV first, then the VCR.
4.Press the SOURCE button on the TV to set the video input mode to S-VIDEO.
Connection Option 2
1.Connect the AV DVD/VCR outputs to the AV IN socket on your TV.
2.Press the SOURCE button on the TV to set the video input mode to AV.
SCART INPUT
1.Connect the scart lead from the external device (DVD player, Set-top box
or games console) to the TV scart socket.
2.Press the SOURCE button to select SCART mode.
3.Press the PLAY button on the external device.
HDMI INPUT
1.Connect the cable from the HDMI device to the TV HDMI socket.
2.Press the SOURCE button to select HDMI mode.
3.Refer to the HDMI device user guide for how to operate.
MOUNT YOUR TV ONTO THE WALL
You can mount your TV onto the wall by using a wall bracket (not supplied).
Use M4/M6 machine screws (4 pcs) to screw the TV onto the bracket (not
supplied).
BATTERY INSTALLATION
1.Place the remote control face down, then open
the cover of the battery compartment.
2.Install two AAA batteries. (The + and- symbol
of the battery must match with the marks on the
remote).
3.Close the cover of the battery compartment.
BATTERY CAUTION
Confirm there is no object between the remote
control and the remote sensor of the TV set.
Sunshine or other strong light will interfere with
the signal sent by the remote control. In this
situation turn the TV set to avoid the direct light
source.
Do not put the remote control in direct heat or in
a damp place as you may damage the remote.
Please use two AAA 1.5V batteries. Do not mix
battery types. Install the batteries at the correct
polarities. Do not use rechargeable batteries.
If your TV is to be stored for a period of time,
remove the batteries from the remote control.
PREPARATION OF YOUR REMOTE CONTROL
03 Getting Started
LOCATION
You will need to place your TV near your plug socket (so the power cable can comfortably
reach) and within reach of your aerial socket or extension lead.
CONNECTION
1. Insert your TV aerial lead into the Antenna input at the side of the TV.
2. Insert the batteries into the remote control. Make sure they are inserted the right
way around, matching the polarity as indicated inside the battery compartment.
SWITCHING YOUR TV ON
1.Press the STANDBY button on the right side of the TV once. A red flashing light will
appear in the corner of the screen.
2.Press STANDBY on the remote control. The TV will turn on and the red light will turn
blue. This may take a few moments.
3.Select your chosen language when prompted from the list that will appear on
screen. Use the button to scroll to the language you want and press to confirm.
Setting up
1. Press MENU button.
2. Press button to select Tuning menu, press button to enter.
3. Press button to select Country item.
Press button to select you needed.
4. Press button to select Auto Search item, press OK button to
enter.
Press button to select the OK option, and press OK button
to start searching.
Press the MENU button ,you can choose to skip the TV /DTV
Search or not.
5. Press EXIT button to stop auto search during searching.
Note: It may take a few moments to complete the Auto
Search.
1. Press MENU button.
2. Press button to select Tuning menu, press button to enter.
3. Press button to select Digital Manual Search item,
press button to enter.
4. Press button to select the Channel.
Press OK button to start searching.
5. Once a channel is located, you can press OK button to save it.
Press EXIT button to exit.
DIGITAL MANUAL SEARCH
If you have attached a DVD player or similar external device
to the TV, you will need to tell the TV to display the content
from it. Simply press SOURCE which will bring up the source
menu in the left corner of the screen, Use the and button
to highlight the required source and press OK select.
For details of how to plug in other equipment see GET TO KNOW
YOUR TV on page 6.
AUTO SEARCH
TUNING YOUR TV
SWITCHING TO AN EXTERNAL SOURCE OTHER THAT TV
Input Source
TV
AV
SCART1
SCART2
S-Video
Component1
Component2
PC
HDMI1
HDMI2
HDMI3
USB
TV
AV
SCART1
SCART2
S-Video
Component1
Component2
PC
HDMI1
HDMI2
HDMI3
USB
Input Source
TV
AV
SCART1
SCART2
S-Video
DVD
Component
PC
HDMI1
HDMI2
HDMI3
USB
TV
AV
SCART1
SCART2
S-Video
DVD
Component
PC
HDMI1
HDMI2
HDMI3
USB
OK
OK
OK
OK
OK
OK
Menu
OK
EXIT
OK
MENU
OK
OK
OK
OK
OK
OK
CANCEL
OK
OK
OK
OK
OK
OK
Menu
OK
UHF CH 26
OK
OK
OK
OK
OK
OK
Menu
OK
EXIT
SAVE
Sound System
Current CH
Press button to select the channel number to edit.
Storage To
Press button to select the program number you
want to storage to.
Fine tune
Press button to select "Sound System", then press
button to select the correct sound system.
1 Repeat above steps 1-3, then press button to select
the Fine Tune item.
2 Press button repeatedly to carry out fine tune, till the
best picture and sound are obtained, then loosen the button.
If the picture and/or sound are poor, try using the FINE
TUNE feature. Do not use this feature unless reception
is poor.
Analog Manual Search
Follow the below steps when you need to have a manual search.
1. Press MENU button.
2. Press button to select Tuning menu, press button to enter.
3. Press button to select Analog Manual Search item,
Press button to enter.
4. Press button to select Search item, press button is used
to select the higher frequency channel.
Press button is used to select the lower frequency channel.
5. And then select Storage To, press button to select the position
number you want the channel on. Once a channel is located,
you can press red button to save it. Press EXIT button to exit.
TUNING YOUR TV
OK
OK
OK
OK
OK
OK
Menu
OK
NAME
MOVE
SKIP
FAV
Channel Edit
Using this function ,you can rename, move, set favorite
channel and skip the channel in the analogue mode.
1.Press MENU button.
2.Press button to select TUNING menu, press button
to enter.
3.Press button to select CHANNEL EDIT item,
Press button to enter the sub-menu.You can press red,
green , yellow or blue button to enter the menu you need.
RENAME
1.Press button to select the channel , and press green
button to rename.
2.Press button to select the number position of channel
name, Press button to select number.
3.You can press the EXIT button to cancel the changes
at anytime.
NOTES:The RENAME function is only available in ATV program.
MOVE
1.Press button to select the channel any press yellow button to select the position.
2.Press button to select the number position you want to remove to, press
yellow button to confirm.
3.You can press the EXIT button to cancel the changes at anytime.
Setting favourite channel
1.Press button to select the channel ,press Red button to set your favourite channel.
2.You can press the Red button to cancel the changes at anytime.
3.Press FAV button on the remote control and Favourite List will be displayed.
4.Press button to select the channel , and press OK button to enter.
SKIP
1.Press button to select the channel and press blue button to skip the current channel.
2.You can press the blue button to cancel the changes at anytime.
GUIDE (Electronic Program Guide)
Using this function ,you can access the DTV program
information
1.Press MENU button.
2.Press button to select TUNING menu. press
button to enter.
3.Press button to select the guide item.
Press OK button to enter the submenu, the electronic
program guide is displayed.
You can quickly call up Guide menu by GUIDE
button on the remote control.
Notes: Only DTV mode.
TUNING YOUR TV
BBC ONE Wales
INFO
Record
Schedule
DATE REMIND
OK
OK
OK
OK
OK
OK
OK
Menu
OK
OK
OK
OK
OK
OK
OK
Menu
OK
COMMON INTERFACE
The common interface (CI) slot is designed to
accept the Conditional Access (CA) Module and
Smart card in order to view the pay TV programmes
and additional services. Contact your Common
Interface service provider to get more information
about the modules and subscription. Please noted
that CA modules and smart cards are neither
supplied nor optional accessories from us.
Warning: switch off your TV before any module is inserted in the
Common Interface slot.
1 Insert the CAM correctly, then Smart Card to the
CI slot that is located at the side of the TV.
2 Turn on the TV and it will display the below
message if the CA module is detected. Wait
for few moments until the card is activated.
3 Press the MENUbutton to display the Main
Menu and use the and button to highlight
the "Common Interface" line and press
the "OK" button.
4 Detailed information on the CI card in use is displayed.
5 Press OK button to access the card menu. Refer to the module
instruction manual for setting details
6 When module is removed, the following message will appear on
the screen.
OK
OK
OK
OK
OK
OK
Menu
OK
CI module removed
Main Menu
Module information
Smart card information
Language
Software Download
Press OK to select,or Exit toquit
CI Module Insert
OK
OK
OK
OK
OK
OK
Menu
OK
OK
OK
OK
OK
OK
OK
Menu
OK
Software Update function
When you get the updating news from the TV shop's web,
you can update the operating software using the Download
menu. The data for various units are transferred consecutively
on a special receiving channel.
You need to search the channel with updating code stream.
Note: You can get information from the TV shop or internet.
1 Press MENU button.
2 Press button to select TUNING menu,
press button to enter.
3 Press button to select Software Upgrade item.
4 Press button to set it as On. The default is Off
5 If the updating code stream of the channel is suitable for
your set, Do System Update option can be selected. Otherwise
the Do System Update option is grey and cannot be selected.
6 Press button to select the System Update option and
use OK button to enter. Then the TV will restart and search
the upgrade information.
NOTES: If the upgrade information is received, the TV will begin
to upgrade. Or else, the TV will be back the DTV source.
7
you can press EXIT button to cancel the download
and your TV set will be standby.
8 After the download has finished, your TV set will enter burning
state and the indicator light is shining. The menu 4 of right appears.
The set will be standby when the update is completed.
Load the receiver identification. This process may also take
several minutes.
Operation
Are you sure?
USING YOUR TV
How to select the TV program
1.Using Program number button Enter the channel number with the number keypad on
the remote control.
2.Using P+/P- button
Press the P+/P- button to select a channel number.
HOW to adjust volume
Press V+/V- button on the remote control or the side of the TV to adjust the volume level.
CH.LIST function
Press CH.LIST button on the remote control will display Channel List menu, and then
press button to enter.
Press button to select the channel, and then press OK button to enter.
  • Page 1 1
  • Page 2 2
  • Page 3 3
  • Page 4 4
  • Page 5 5
  • Page 6 6
  • Page 7 7
  • Page 8 8
  • Page 9 9
  • Page 10 10
  • Page 11 11
  • Page 12 12
  • Page 13 13
  • Page 14 14
  • Page 15 15
  • Page 16 16
  • Page 17 17
  • Page 18 18
  • Page 19 19
  • Page 20 20
  • Page 21 21
  • Page 22 22
  • Page 23 23
  • Page 24 24
  • Page 25 25
  • Page 26 26
  • Page 27 27
  • Page 28 28
  • Page 29 29
  • Page 30 30
  • Page 31 31
  • Page 32 32
  • Page 33 33
  • Page 34 34
  • Page 35 35
  • Page 36 36
  • Page 37 37
  • Page 38 38
  • Page 39 39
  • Page 40 40
  • Page 41 41
  • Page 42 42
  • Page 43 43
  • Page 44 44
  • Page 45 45
  • Page 46 46
  • Page 47 47
  • Page 48 48
  • Page 49 49
  • Page 50 50
  • Page 51 51
  • Page 52 52
  • Page 53 53
  • Page 54 54
  • Page 55 55
  • Page 56 56
  • Page 57 57
  • Page 58 58
  • Page 59 59
  • Page 60 60
  • Page 61 61
  • Page 62 62
  • Page 63 63
  • Page 64 64
  • Page 65 65
  • Page 66 66
  • Page 67 67
  • Page 68 68
  • Page 69 69
  • Page 70 70
  • Page 71 71
  • Page 72 72
  • Page 73 73
  • Page 74 74
  • Page 75 75
  • Page 76 76
  • Page 77 77
  • Page 78 78
  • Page 79 79
  • Page 80 80
  • Page 81 81
  • Page 82 82
  • Page 83 83
  • Page 84 84
  • Page 85 85
  • Page 86 86
  • Page 87 87
  • Page 88 88
  • Page 89 89
  • Page 90 90
  • Page 91 91
  • Page 92 92
  • Page 93 93
  • Page 94 94
  • Page 95 95
  • Page 96 96
  • Page 97 97
  • Page 98 98
  • Page 99 99
  • Page 100 100
  • Page 101 101
  • Page 102 102
  • Page 103 103
  • Page 104 104
  • Page 105 105
  • Page 106 106
  • Page 107 107
  • Page 108 108
  • Page 109 109
  • Page 110 110
  • Page 111 111
  • Page 112 112
  • Page 113 113
  • Page 114 114
  • Page 115 115
  • Page 116 116
  • Page 117 117
  • Page 118 118
  • Page 119 119
  • Page 120 120
  • Page 121 121
  • Page 122 122
  • Page 123 123
  • Page 124 124
  • Page 125 125
  • Page 126 126
  • Page 127 127
  • Page 128 128
  • Page 129 129
  • Page 130 130
  • Page 131 131
  • Page 132 132
  • Page 133 133
  • Page 134 134
  • Page 135 135
  • Page 136 136
  • Page 137 137
  • Page 138 138
  • Page 139 139
  • Page 140 140
  • Page 141 141
  • Page 142 142
  • Page 143 143
  • Page 144 144
  • Page 145 145
  • Page 146 146
  • Page 147 147
  • Page 148 148
  • Page 149 149
  • Page 150 150
  • Page 151 151
  • Page 152 152
  • Page 153 153
  • Page 154 154
  • Page 155 155
  • Page 156 156
  • Page 157 157
  • Page 158 158
  • Page 159 159
  • Page 160 160
  • Page 161 161
  • Page 162 162
  • Page 163 163
  • Page 164 164
  • Page 165 165
  • Page 166 166
  • Page 167 167
  • Page 168 168
  • Page 169 169
  • Page 170 170
  • Page 171 171
  • Page 172 172
  • Page 173 173
  • Page 174 174
  • Page 175 175
  • Page 176 176
  • Page 177 177
  • Page 178 178
  • Page 179 179
  • Page 180 180
  • Page 181 181
  • Page 182 182
  • Page 183 183
  • Page 184 184
  • Page 185 185
  • Page 186 186
  • Page 187 187
  • Page 188 188
  • Page 189 189
  • Page 190 190
  • Page 191 191
  • Page 192 192
  • Page 193 193
  • Page 194 194
  • Page 195 195
  • Page 196 196
  • Page 197 197
  • Page 198 198
  • Page 199 199
  • Page 200 200
  • Page 201 201
  • Page 202 202
  • Page 203 203
  • Page 204 204
  • Page 205 205
  • Page 206 206
  • Page 207 207
  • Page 208 208
  • Page 209 209
  • Page 210 210
  • Page 211 211
  • Page 212 212
  • Page 213 213
  • Page 214 214
  • Page 215 215
  • Page 216 216
  • Page 217 217
  • Page 218 218
  • Page 219 219
  • Page 220 220
  • Page 221 221
  • Page 222 222
  • Page 223 223
  • Page 224 224
  • Page 225 225
  • Page 226 226
  • Page 227 227
  • Page 228 228
  • Page 229 229
  • Page 230 230
  • Page 231 231
  • Page 232 232
  • Page 233 233
  • Page 234 234
  • Page 235 235
  • Page 236 236
  • Page 237 237
  • Page 238 238
  • Page 239 239
  • Page 240 240

Haier LT26K3 Le manuel du propriétaire

Catégorie
Téléviseurs LCD
Taper
Le manuel du propriétaire