Panasonic UT-MB5 Mode d'emploi
- Catégorie
- Des cahiers
- Taper
- Mode d'emploi

Contents
OPERATING INSTRUCTIONS
Personal Computer
Model No.
UT-MB5000
series
Introduction .................................................................
8
Description of Parts ....................................................
9
First-time Operation ..................................................
11
Turning On / Turning Off ...........................................
14
Useful Information
Handling and Maintenance .......................................
15
Installing Software ....................................................
19
Troubleshooting
Troubleshooting (Basic) ............................................
23
Appendix
LIMITED USE LICENSE AGREEMENT ...................
26
Specications ...........................................................
28
LIMITED WARRANTY ..............................................
31
Please read these instructions carefully before using this product, and save this manual for future use.
Getting Started
Useful Information
TroubleshootingAppendix Read Me First
Getting Started
Safety Precautions .....................................................
2
Regulatory Information ...............................................
5
Read Me First
DFQW5829ZA_UT-MB_8_OI_M.indb 1 2013/11/14 11:41:58

2
Read Me First
Safety Precautions
To reduce the risk of injury, loss of life, electric shock,
re, malfunction, and damage to equipment or property,
always observe the following safety precautions.
Explanation of symbol word panels
The following symbol word panels are used to classify
and describe the level of hazard, injury, and property
damage caused when the denotation is disregarded and
improper use is performed.
DANGER
Denotes a potential hazard that will result in serious
injury or death.
WARNING
Denotes a potential hazard that could result in seri-
ous injury or death.
CAUTION
Denotes a hazard that could result in minor injury.
NOTICE
Denotes a hazard that could result in property dam-
age.
The following symbols are used to classify and describe
the type of instructions to be observed.
This symbol is used to alert users to a specic
operating procedure that must not be performed.
This symbol is used to alert users to a specic
operating procedure that must be followed in
order to operate the unit safety.
DANGER
Precautions on the Built-in Battery
(for disposal)
When disposing the battery, generation of heat, igni-
tion or rupture of the Built-in Battery may result.
Handling This Computer
Do Not Disassemble the Computer Except
When Disposing
Handling the Built-in Battery
Do Not Short the Positive (+) and Negative
(-) Contacts
Do Not Throw the Battery into a Fire or
Expose It to Excessive Heat
Do Not Apply Shocks to the Built-in Bat-
tery by Dropping It, Applying Strong Pres-
sure to It, etc.
Do Not Charge
Do Not Use with Any Other Product
Do Not Insert Sharp Objects Into the Bat-
tery, Disassemble, or Modify It
Avoid Extreme Heat (Near the Fire, in Direct
Sunlight, for Example)
WARNING
Generation of heat, ignition or rupture of the Built-in
Battery may result.
Do Not Throw This Product Into a Fire or
Expose It to Excessive Heat
Do Not Insert Sharp Objects Into This
Product, Disassemble, or Modify It
Do Not Apply Shocks to the Product by
Dropping It, Applying Strong Pressure to
It, etc.
Do Not Charge the Battery Using Methods
Other Than Those Specified
Avoid Extreme Heat (Near the Fire, in Di-
rect Sunlight, for Example)
When the Battery Has Deteriorated, Con-
tact Your Technical Support Office to Re-
place the Battery
DFQW5829ZA_UT-MB_8_OI_M.indb 2 2013/11/11 11:15:57

3
Read Me First
WARNING
Fire or electric shock may result.
Do Not Do Anything That May Damage the
AC Cord, the AC Plug, or the AC Adaptor
Do not damage or modify the cord, place it
near hot tools, bend, twist, or pull it force-
fully, place heavy objects on it, or bundle it
tightly.
Ö
Do not continue to use a damaged AC cord,
AC plug and AC adaptor.
• Contact your technical support ofce for
repair.
Do Not Connect the AC Adaptor to a Power
Source Other Than a Standard Household
AC Outlet
Ö
Connecting to a DC/AC converter (inverter)
may damage the AC adaptor. On an air-
plane, only connect the AC adaptor/charger
to an AC outlet specically approved for
such use.
Do Not Pull or Insert the AC Plug If Your
Hands Are Wet
Do Not Disassemble This Product
Do Not Touch This Product In a Thunder-
storm If Connected with the AC Cable or
Any Other Cables
Do Not Place Containers of Liquid or Metal
Objects on Top of This Product
Ö
If foreign matter has found its way inside,
immediately turn the power off and unplug
the AC plug and remove the battery pack.
Then contact your technical support ofce.
If a Malfunction or Trouble Occurs, Imme-
diately Stop Use
If the Following Malfunction Occurs, Imme-
diately Unplug the AC Plug
• This product is damaged
• Foreign object inside this product
• Smoke emitted
• Unusual smell emitted
• Unusually hot
Ö
After the above procedure, contact your
technical support ofce for repair.
Clean Dust and Other Debris of the AC
Plug Regularly
• If dust or other debris accumulates on the
plug, humidity, etc. may cause a defect in the
insulation.
Insert the AC Plug Completely
Ö
Do not use a damaged plug or loose AC
outlet.
Burns or low-temperature burns may result.
Do Not Use This Product in Close Contact
With Your Body For a Long Period of Time
• Do not use this product with its heat-emitting
parts in close contact with your body for long
periods of time.
• Low-temperature burns may result.
Do Not Touch The Surface of The AC Adap-
tor Continuously While Using/Charging
• Burns may result.
Do Not Expose Yourself or Other Persons
to the Hot Wind from the Ventilation Hole
(Exhaust) For a Long Period of Time
• Depending on the direction of the computer
or the way you hold the computer, your
hands and body will be more exposed to the
hot wind.
• Covering the ventilation hole (exhaust) with
your hand or other object can cause heat to
build up inside, possibly resulting in burns.
Detrimental health effects on your body may result.
Do Not Turn the Volume Up To Loud When
Using Headphones
• Listening at high volumes that overstimulate
the ear for long periods of time may result in
loss of hearing.
CAUTION
Fire or electric shock may result.
Do Not Move This Product While the AC
Plug Is Connected
Ö
If the AC cord is damaged, unplug the AC
plug immediately.
Do Not Subject the AC Adaptor To Any
Strong Impact
Ö
Do not continue to use the AC adaptor after
a strong impact such as being dropped.
Ö
Contact your technical support ofce for
repair.
Do Not Leave This Product in High Tem-
perature Environment for a Long Period of
Time
• Leaving this product where it will be exposed
to extremely high temperatures such as near
re or in direct sunlight may deform the cabi-
net and/or cause trouble in the internal parts.
Do Not Block the Ventilation Hole (Exhaust/
Intake)
Ö
Do not use this product wrapped in cloth or
on top of bedding or a blanket.
Do Not Keep This Product Wherever There
is a Lot of Water, Moisture, Steam, Dust,
Oily Vapors, etc.
Fire or electric shock may result.
Hold the Plug When Unplugging the AC
Plug
Use Only the Specified AC Adaptor With
This Product
Ö
Do not use an AC adaptor other than the
one supplied (supplied with the unit or one
sold separately as an accessory).
DFQW5829ZA_UT-MB_8_OI_M.indb 3 2013/11/11 11:15:57

4
Read Me First
Safety Precautions
This product may fall over or drop, resulting in an
injury.
Do Not Place This Product on Unstable
Surfaces
Avoid Stacking
Detrimental health effects on your body may result.
Take a Break Of 10-15 Minutes Every Hour
• Using this product for long periods of time
may have detrimental health effects on the
eyes or hands.
NOTICE
l
Do not place the computer near a television or radio
receiver.
l
Keep the computer away from magnets. Data stored
on the ash memory may be lost.
l
This computer is not intended for the display of images
for use in medical diagnosis.
l
This computer is not intended for a use with connec-
tion of medical equipment for the purpose of medical
diagnosis.
l
Panasonic shall not be liable for loss of data or other
incidental or consequential damages resulting from
the use of this product.
l
If this computer will not be used for a long period of
time (a month or more), charge or discharge (use) the
battery until the remaining battery level becomes 30%
to 40% and store the product in a cool, dry place.
l
This computer prevents overcharging of the battery by
recharging only when the remaining power is less than
approx. 95% (when Economy Mode (ECO) is enabled:
75%) of capacity.
l
The battery is not charged when this computer is rst
purchased. Be sure to charge it before using it for the
rst time. When the AC adaptor is connected to this
computer, charging begins automatically.
l
Should the battery leak and the uid get into your
eyes, do not rub your eyes. Immediately ush your
eyes with clear water and see a doctor for medical
treatment as soon as possible.
NOTE
l
The battery may become warm during recharging or
normal use. This is completely normal.
l
Recharging will not commence if internal temperature
of the battery is outside of the allowable temperature
range (0 °C to 50 °C). (
è
Reference Manual “Bat-
tery Power”) Once the allowable range requirement is
satised, charging begins automatically. Note that the
recharging time varies based on the usage conditions.
(Recharging takes longer than usual when the tem-
perature is 10 °C or below.)
l
If the temperature is low, the operating time is short-
ened. Only use the computer within the allowable
temperature range.
l
The battery is a consumable item. If the amount of
time the computer can be run by using a particular
battery becomes dramatically shorter and repeated
recharging does not restore its performance, the bat-
tery should be replaced with a new one. Contact your
technical support ofce.
l
Always power off the computer when it is not in use.
Leaving the computer on when the AC adaptor is not
connected will exhaust the remaining battery capacity.
THIS PRODUCT IS NOT INTENDED FOR USE AS, OR
AS PART OF, NUCLEAR EQUIPMENT/SYSTEMS, AIR
TRAFFIC CONTROL EQUIPMENT/SYSTEMS, AIR-
CRAFT COCKPIT EQUIPMENT/SYSTEMS
*1
, MEDICAL
DEVICES OR ACCESSORIES
*2
, LIFE SUPPORT SYS-
TEMS OR OTHER EQUIPMENTS/DEVICES/SYSTEMS
THAT ARE INVOLVED WITH ENSURING HUMAN
LIFE OR SAFETY. PANASONIC WILL NOT BE RE-
SPONSIBLE FOR ANY LIABILITY RESULTING FROM
THE USE OF THIS PRODUCT ARISING OUT OF THE
FOREGOING USES.
*1
AIRCRAFT COCKPIT EQUIPMENT/SYSTEMS include
Class2 Electronic Flight Bag (EFB) Systems and Class1 EFB
Systems when used during critical phases of ight (e.g., dur-
ing take-off and landing) and/or mounted on to the aircraft.
Class1 EFB Systems and 2 EFB Systems are dened by
FAA: AC (Advisory Circular) 120-76A or JAA: JAA TGL (Tem-
porary Guidance Leaets) No.36.
*2
As dened by the European Medical Device Directive (MDD)
93/42/EEC.
Panasonic cannot guarantee any specications, tech-
nologies, reliability, safety (e.g. Flammability/Smoke/
Toxicity/Radio Frequency Emission, etc) requirements
related to aviation standards that exceed the specica-
tions of our COTS (Commercial-Off-The-Shelf) products.
This computer is not intended for use in medical equip-
ment including life-support systems, air trafc control
systems, or other equipment, devices or systems that are
involved with ensuring human life or safety. Panasonic
cannot be held responsible in any way for any damages
or loss resulting from the use of this unit in these types of
equipment, devices or systems, etc.
This computer has been designed so as to minimize
shock to the LCD, the leakage of liquid (e.g., water) on
to the buttons, etc., but no warranty is provided against
such trouble. Therefore, as a precision instrument, be
extremely careful in the handling.
DFQW5829ZA_UT-MB_8_OI_M.indb 4 2013/11/11 11:15:57

5
Read Me First
Information to the User / Informations destinées aux utilisateurs
<Only for model with wireless LAN/Bluetooth>
This product and your Health
This product, like other radio devices, emits radio fre-
quency electromagnetic energy. The level of energy
emitted by this product however is far much less than the
electromagnetic energy emitted by wireless devices like
for example mobile phones.
Because this product operates within the guidelines found
in radio frequency safety standards and recommenda-
tions, we believe this product is safe for use by consum-
ers. These standards and recommendations reect the
consensus of the scientic community and result from
deliberations of panels and committees of scientists who
continually review and interpret the extensive research
literature.
In some situations or environments, the use of this prod-
uct may be restricted by the proprietor of the building or
responsible representatives of the organization. These
situations may for example include:
l
Using this product on board of airplanes, or
l
In any other environment where the risk of interference
to other devices or services is perceived or identied
as harmful.
If you are uncertain of the policy that applies on the use
of wireless devices in a specic organization or environ-
ment (e.g. airports), you are encouraged to ask for autho-
rization to use this product prior to turning on the product.
Regulatory Information
We are not responsible for any radio or television interfer-
ence caused by unauthorized modication of this product.
The correction of interference caused by such unauthor-
ized modication will be the responsibility of the user. We
and its authorized resellers or distributors are not liable
for damage or violation of government regulations that
may arise from failing to comply with these guidelines.
26-M-1
<Uniquement pour les modèles avec réseau local sans l
et/ou Bluetooth>
Ce produit et votre santé
Ce produit, comme tout autre appareil radio, émet de
l’énergie radioélectrique. Toutefois, la quantité d’énergie
émise par ce produit est beaucoup moins importante que
l’énergie radioélectrique émise par des appareils sans
l tels que les téléphones portables. L’utilisation de ce
produit ne comporte aucun risque pour le consommateur
du fait que cet appareil opère dans les limites des direc-
tives concernant les normes et les recommendations de
sécurité sur les fréquences radio. Ces normes et recom-
mandations reètent le consensus de la communauté
scientique et résultent de délibérations de jurys et comi-
tés de scientiques qui examinent et interprètent conti-
nuellement les nouveautés de la vaste littérature sur les
recherches effectuées. Dans certaines situations ou envi-
ronnements, l’utilisation de ce produit peut être restreinte
par le propriétaire du bâtiment ou par les représentants
responsables de l’organisation. Ces situations peuvent
être les suivantes par exemple :
l
A bord d’un avion, ou
l
Dans tout autre environnement où les risques d’inter-
férence sur d’autres appareils ou services sont perçus
ou identiables comme dangereux.
Si vous n’êtes pas sûr de la réglementation applicable à
l’utilisation d’appareils sans l dans une organization
ou un environnement spécique, (par exemple dans un
aéroport) nous vous invitons à demander l’autorisation
d’utiliser ce produit avant sa mise en marche.
Informations concernant la réglementation
Nous déclinons toute responsabilité pour toute interfé-
rence radio ou télévision causée par des modications
non autorisées apportées à ce produit. La correction
d’interférences causées par de telles modications non
autorisées sera la seule responsabilité de son utilisateur.
Nousmêmes, les revendeurs ofciels et les distributeurs
ne sommes pas responsable de tout dégât ou de toute
violation des règlements de l’État pouvant découler du
non-respect de ces directives.
26-F-1
Regulatory Information
Lithium Battery / Pile au lithium
Lithium Battery!
This computer contains a lithium battery to enable the
date, time, and other data to be stored. The battery should
only be exchanged by authorized service personnel.
Warning!
A risk of explosion from incorrect installation or misappli-
cation may possibly occur.
15-E-1
Pile au lithium!
Le micro-ordinateur renferme une pile au lithium qui
permet de sauvegarder certaines données, notamment la
date et l’heure. La pile ne doit être remplacée que par un
technicien qualié.
Danger ! Risque d’explosion en cas de non respect de
cette mise en garde!
15-F-1
Information for Users on Collection and Disposal of Old Equipment and used Batteries
These symbols are only valid in the European Union.
If you wish to discard this product, please contact your local authorities or dealer and ask
for the correct method of disposal.
53-M-1
DFQW5829ZA_UT-MB_8_OI_M.indb 5 2013/11/11 11:15:57

6
Read Me First
Regulatory Information
For U.S.A.
Federal Communications Commission Radio Fre-
quency Interference Statement
Note: This equipment has been tested and found to com-
ply with the limits for a Class B digital device, pursuant
to Part 15 of the FCC Rules. These limits are designed
to provide reasonable protection against harmful interfer-
ence in a residential installation. This equipment gener-
ates, uses and can radiate radio frequency energy and, if
not installed and used in accordance with the instructions,
may cause harmful interference to radio communications.
However, there is no guarantee that interference will not
occur in a particular installation. If this equipment does
cause harmful interference to radio or television recep-
tion, which can be determined by turning the equipment
off and on, the user is encouraged to try to correct the
interference by one or more of the following measures:
l
Reorient or relocate the receiving antenna.
l
Increase the separation between the equipment and receiver.
l
Connect the equipment into an outlet on a circuit dif-
ferent from that to which the receiver is connected.
l
Consult the Panasonic Service Center or an experi-
enced radio/TV technician for help.
Warning
To assure continued compliance, use only shielded inter-
face cables when connecting to a computer or peripheral.
Also, any changes or modications not expressly ap-
proved by the party responsible for compliance could void
the user’s authority to operate this equipment.
FCC RF Exposure Warning:
l
This equipment is provided with PC Card slot that could
be used with wireless transmitters, which will be speci-
cally recommended when they become available.
Other third-party wireless transmitters have not been
RF exposure evaluated for use with this computer and
may not comply with FCC RF exposure requirements.
<Only for model with wireless LAN/Bluetooth>
l
This equipment complies with FCC radiation exposure
limits set forth for an uncontrolled environment.
l
This equipment may not be co-located or operated
with any other antenna or transmitter.
l
This device meets the government’s requirements for
exposure to radio waves.
This device is designed and manufactured not to
exceed the emission limits for exposure to radio fre-
quency (RF) energy set by the Federal Communica-
tions Commission of the U.S. Government.
l
The exposure standard for wireless device employs a
unit of measurement known as the Specic Absorption
Rate, or SAR. The SAR limit set by the FCC is
1.6 W/kg.
* Tests for SAR are conducted using standard operat-
ing positions accepted by the FCC with the device
transmitting at its highest certied power level in all
tested frequency bands.
Although the SAR is determined at the highest certi-
ed power level, the actual SAR level of the device
while operating can be well below the maximum
value. This is because the device is designed to op-
erate at multiple power levels so as to use only the
poser required to reach the network. In general, the
closer you are to a wireless base station antenna,
the lower the power output.
<Only for model with wireless LAN>
This product is restricted to indoor use due to its operation
in the 5.15 to 5.25
GHz
frequency range. FCC requires this
product to be used indoors for the frequency range 5.15 to
5.25
GHz
to reduce the potential for harmful interference
to co-channel Mobile Satellite systems. High power radars
are allocated as primary users of the 5.25 to 5.35
GHz
and
5.65 to 5.85
GHz
bands. These radar stations can cause
interference with and/or damage this product.
25-M-W-1
This device complies with Part 15 of the FCC Rules.
Operation is subject to the following two conditions:
(1) This device may not cause harmful interference, and
(2)
This device must accept any interference received, in-
cluding interference that may cause undesired operation.
Responsible Party: Panasonic Corporation of North America
Two Riverfront Plaza,
Newark NJ 07102
Tel No:1-800-LAPTOP5 (1-800-527-
8675)
6-M-1
CAUTION:
Risk of Explosion if Battery is replaced by an Incorrect Type. Dispose of Used Batteries According to the Instructions.
58-E-1
ATTENTION:
Il y a risque d’explosion si la batterie est remplacée par une batterie de type incorrect.
Mettre au rebut les batteries usagées conformément aux instructions.
58-F-1
DFQW5829ZA_UT-MB_8_OI_M.indb 6 2013/11/11 11:15:57

7
Read Me First
For Canada / Pour le Canada
Canadian ICES-003
CAN ICES-003(B) / NMB-003(B)
7-M-3
<Only for model with wireless LAN/Bluetooth>
Industry Canada
This product complies with RSS210 Industry Canada.
Operation is subject to the following two conditions;
(1) this device may not cause interference, and
(2) this device must accept any interference, including in-
terference that may cause undesired operation of the
device.
<Ne s’applique qu’aux modèles avec technologie Blue-
tooth/LAN sans l>
Industrie Canada
Cet équipement est conforme à la norme CNR-210
d’Industrie Canada. Son fonctionnement est soumis aux
deux conditions suivantes :
(1) ce dispositif ne peut produire de brouillage, et
(2) ce dispositif doit accepter le brouillage, y compris le
brouillage pouvant entraîner le fonctionnement non
désiré de l’appareil.
30-Ca-1-1
<Only for model with wireless LAN>
This product (local network devices) for the band 5150-
5250
MHz
is only indoor usage to reduce potential for
harmful interference to co-channel Mobile Satellite systems.
High power radars are allocated as primary users (mean-
ing they have priority) of 5250-5350
MHz
and 5650-
5850
MHz
and these radars could cause interference
and/or damage to LELAN devices.
<Ne s’applique qu’aux modèles avec technologie LAN
sans l>
Cet appareil (pour réseaux locaux radioélectriques) dans
les bandes de fréquences 5150-5250
MHz
est réservé à
une utilization à l’intérieur an de réduire le risque d’inter-
férence avec les systèmes satellites mobiles bicanaux.
Les radars forte puissance sont désignés comme étant
les premiers utilisateurs (c’est-à-dire qu’ils ont la priorité)
des bandes de fréquences 5250-5350
MHz
et 5650-
5850
MHz
. Ces stations radars peuvent provoquer des
interférences et/ou des dommages à ce périphérique.
30-Ca-2-1
<Only for model with wireless LAN/Bluetooth>
l
This computer complies with Industry Canada radia-
tion exposure limits set forth for an uncontrolled envi-
ronment.
l
This PC with WLAN and/or Bluetooth transmitters in-
stalled, has been approved for portable operation and
does not require any minimum spacing be provided
between antennas and all person’s body.
<Ne s’applique qu’aux modèles avec technologie Blue-
tooth/LAN sans l>
l
Cet équipement est conforme aux limites d’exposition
aux rayonnements d’Industrie Canada établies pour
un environnement non contrôlé.
l
Ce PC avec émetteurs WLAN et/ou Bluetooth a été
approuvé à des ns d’opération mobile; aucun espace
minimum entre les antennes et le corps de l’utilisateur
n’est requis.
FOR USE WITH MODEL NO. : CF-AA5713A
POUR UTILISER AVEC MODÈLE : CF-AA5713A
20-Ca-1
For India
For the purpose of recycling to facilitate effective utilization of resources, please return this product to a
nearby authorized collection center, registered dismantler or recycler, or Panasonic service center when dis-
posing of this product.
Please see the Panasonic website for further information on collection centers, etc.
http://www.panasonic.co.in/wps/portal/home
68-M-1
USA Only: Disposal may be regulated in your community
due to environmental considerations. For disposal or re-
cycling information, please visit Panasonic website: http://
www.panasonic.com/environmental or call 1-888-769-0149
65-M-2
<For USA-California Only>
This product contains a CR Coin Cell Lithium Battery which
contains Perchlorate Material - special handling may apply.
See www.dtsc.ca.gov/hazardouswaste/perchlorate/
38-M-1
<For USA and Canada>
A lithium ion battery that is recy-
clable powers the product you
have purchased.
Please call 1-800-8-BATTERY for
information on how to recycle this
battery.
L’appareil que vous vous êtes pro-
curé est alimenté par une batterie
au lithium-ion.
Pour des renseignements sur le
recyclage de la batterie, veuillez
composer le
1-800-8-BATTERY.
48-M-1
DFQW5829ZA_UT-MB_8_OI_M.indb 7 2013/11/11 11:15:57

8
Getting Started
Thank you for purchasing this Panasonic product. For optimum performance and safety, please read these instructions
carefully.
Terms and illustrations in these instructions
CAUTION
: Conditions that may result in minor or moderate injury.
NOTE
: Useful and helpful information.
è
: Page in these Operating Instructions or in the Reference Manual.
: Reference to the on-screen manuals.
Display “Charm” Flick from right side to inside of the screen.
Touch
: Touch (Settings) in the Charm menu.
l
Some illustrations are simplied to help your understanding and may look different from the actual unit.
l
If you do not log on as an administrator, you cannot use some functions or cannot display some screens.
l
Refer for the latest information about optional products to the catalogs, etc.
l
In these instructions, the names and terms are referred as follows.
“Windows
®
8.1 Pro 64-bit” as “Windows” or “Windows 8.1”
DVD MULTI drive as “DVD drive”
l
Screen messages are explained in [English (United States)].
(Depending on the language preference, some screen messages in these instructions are different from the actual
screen messages. For example, [Flight mode] may be displayed instead of [Airplane mode] in some language pref-
erence)
Disclaimer
Computer specications and manuals are subject to change without notice. Panasonic Corporation assumes no li-
ability for damage incurred directly or indirectly from errors, omissions or discrepancies between the computer and the
manuals.
Trademarks
Microsoft
®
, Windows
®
, and the Windows logo are registered trademarks of Microsoft Corporation of the United States
and/or other countries.
Intel, Core, Centrino and PROSet are either registered trademarks or trademarks of Intel Corporation.
SDXC Logo is a trademark of SD-3C, LLC.
Bluetooth
®
is a registered trademark owned by Bluetooth SIG, Inc., U.S.A. and licensed to Panasonic Corporation.
NVIDIA, the NVIDIA logo and GeForce are trademarks and/or registered trademarks of NVIDIA Corporation in the U.S.
and/or other countries.
Names of products, brands, etc., appearing in this manual are trademarks or registered trademarks of their respective
own companies.
On-screen Manual
For further information about the computer, you can refer to the on-screen manual.
l
Reference Manual
The Reference Manual contains the practical information to help you fully enjoy the computer’s performance.
l
Important Battery Tips
The Important Battery Tips will provide you with the battery information so that you can use the built-in battery in the
optimum condition to obtain longer operation time.
To access the on-screen manuals, follow the steps below.
On the Start screen, touch the [Manual Selector] tile, and select the on-screen manual.
Introduction
DFQW5829ZA_UT-MB_8_OI_M.indb 8 2013/11/11 11:15:57

9
Getting Started
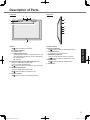
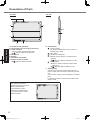
Description of Parts
Camera
è
Reference Manual “Camera”
A: Camera Indicator
B: Camera Lens
C: Ambient Light Sensor
The ambient light sensor is equipped with an auto-
matic brightness adjustment function that adjusts
the display screen.
(
è
page 16)
D: Wireless LAN Antenna / Bluetooth Antenna
<Only for model with wireless LAN>
<Only for model with Bluetooth>
è
Reference Manual “Wireless LAN” “Bluetooth”
E: Wireless LAN Antenna
<Only for model with wireless LAN>
è
Reference Manual “Wireless LAN”
F: Windows Button
è
Reference Manual “Hardware Buttons”
G: Power Switch
H: Hardware Buttons
è
Reference Manual “Hardware Buttons”
I: Headphone Jack
A headphone can be connected.
J: SD Memory Card Slot
<Only for model with SD memory card slot>
è
Reference Manual “SD Memory Card”
K: USB3.0 Port
è
Reference Manual “USB Devices”
L: DC-IN jack
Front side Right side
㪙
㪘㪚
㪝
㪛
㪜
㪞
㪠
㪡
㪢
㪣
㪟
DFQW5829ZA_UT-MB_8_OI_M.indb 9 2013/11/13 13:23:24

10
Getting Started
Description of Parts
A: Ventilation Hole (Exhaust)
B: Reset Button (For servicing by Panasonic)
C: Smart Card Slot
<Only for model with Smart Card Slot>
è
Reference Manual “Smart Card”
D: Microphone
E: Speaker
F: Ventilation Hole (Intake)
G: Expansion Bus Connector
è
Reference Manual “Cradle”
H: LED Indicator
: Power Indicator
Off: Power off/Hibernation, Green: Power on,
Blinking green: Sleep
: Drive status
: SD Memory Card status
(Blinking: During access or a password is re-
quested)
è
Reference Manual “SD Memory Card”
: Battery status
è
page 15 “When the battery indicator does
not light on”
è
Reference Manual “Battery Power”
I: Security Hook
Pull out the security hook when passing through a
security cable. Store the security hook during normal
use.
(The insulation coating has been applied to the metal
part.)
For further information, read the manual that comes
with the cable.
Rear side Left side
㪘
㪝㪞
㪜
㪙
㪚
㪛
㪟
㪠
This computer contains a
magnet and magnetic products
at the locations circled
in the illustration at right.
Avoid leaving metallic object
or magnetic media in contact
with these areas.
DFQW5829ZA_UT-MB_8_OI_M.indb 10 2013/11/11 11:15:58

11
Getting Started
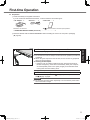
Preparation
A
Check and identify the supplied accessories.
If you do not nd the described accessories, contact Panasonic Technical Support.
•ACAdaptor .. 1
Model No: CF-AA5713A
•ACCord .... 1
•SoftCloth ... 1
è
Reference Manual “Screen Input Operation”
•OPERATINGINSTRUCTIONS(Thisbook) ................... 1
B
Read the LIMITED USE LICENSE AGREEMENT before breaking the seal on the computer’s packaging
(
è
page 26).
1 Connect your computer to a power outlet.
The battery charging starts automatically.
CAUTION
l
Do not disconnect the AC adaptor until the rst-time operation procedure is
completed.
l
When using the computer for the rst time, do not connect any peripheral
device except AC adaptor.
l
Handling the AC adaptor
Problems such as sudden voltage drops may arise during periods of
thunder and lightning. Since this could adversely affect your computer,
an uninterruptible power source (UPS) is highly recommended unless
running from the built-in battery alone.
2 Turn on the computer.
Press and hold the power switch (
è
page 9) until the power indica-
tor
(
è
page 10) lights.
CAUTION
l
Do not press the power switch repeatedly or do not hold the power switch
for four seconds or longer.
First-time Operation
1
DFQW5829ZA_UT-MB_8_OI_M.indb 11 2013/11/13 13:23:25

12
Getting Started
First-time Operation
3 Select language.
Select language and click [Next].
Follow the on-screen instructions.
4 Setup Windows.
Follow the on-screen instructions.
l
The computer restarts several times. Wait until the drive indicator
has turned off.
l
After the computer is turned on, the screen remains black or unchanged
for a while, but this is not a malfunction. Wait for a moment until the
Windows setup screen appears.
l
Setup of Windows will take approximately 5 minutes.
Go to the next step, conrming each message on the display.
l
If “Get online” is displayed, select “Skip this step”. You can set the Wire-
less Network after the setup of Windows is complete.
CAUTION
l
You can change the user name, password, image and security setting after
setup of Windows.
l
Remember your password. If you forget the password, you cannot use
Windows. Creating a password reset disk beforehand is recommended.
l
Do not use the following words for user name: CON, PRN, AUX, CLOCK$,
NUL, COM1 to COM9, LPT1 to LPT9, @, &, space. In particular, if you cre-
ate a user name (account name) that includes the “@” mark, a password
will be requested at the log-on screen, even if no password has been set.
If you try to log on without entering a password, “The user name or pass-
word is incorrect.” may be displayed and you will not be able to sign in (
è
page 24).
5 Set the time zone, and then set the date and time.
A
Flick from the middle of the Start screen to the top, and then touch
[Control Panel] under “Windows System”.
B
Touch [Clock, Language, and Region] - [Date and Time].
C
Touch [Change time zone…].
D
Select the time zone, then touch [OK].
E
Touch [Change date and time…], then set the date and time.
6 Create the recovery disc.
A recovery disc allows you to install OS and restore its factory default
condition, in case, for example, the recovery partition of the ash memory
is damaged. We recommend creating a recovery disc before you begin
using the computer.
Refer to
è
Reference Manual “Recovery Disc Creation Utility” about
creating the disc.
NOTE
l
PC Information Viewer
This computer periodically records the management information of the ash memory, etc. The maximum data vol-
ume for each record is 1024 bytes.
This information is only used for estimating the cause when the ash memory goes down by any possibility. They
are never sent to outside via network nor used for any other purpose except for the purpose described the above.
To disable the function, add the check mark for [Disable the automatic save function for management information
history] in [Hard Disk Status] of PC Information Viewer, and touch [OK].
(
è
Reference Manual “Checking the Computer’s Usage Status”)
In the default settings, a shortcut icon for Korean language is on the Desktop screen. You may delete the icon if not necessary.
l
Note that the computer consumes electricity even when the computer power is off. If the built-in battery is fully
charged, the battery will fully discharge in the following period of time:
Status Discharge period
When power is off Approx. 4 weeks
In sleep Approx. 3 days
In hibernation Approx. 4 weeks
DFQW5829ZA_UT-MB_8_OI_M.indb 12 2013/11/13 13:23:25

13
Getting Started
Before using wireless function
A
Display “Charm” and touch
- [Change PC Settings] - [Network] - [Airplane mode
*1
].
Set [Airplane mode
*1
] to [Off], and then;
set [Wi-Fi] to [On] (for wireless LAN).
set [Bluetooth] to [On] (for Bluetooth).
*1
: Screen messages are explained in [English (United States)].
(Depending on the language preference, some screen messages in these instructions are different from the
actual screen messages. For example, [Flight mode] may be displayed instead of [Airplane mode] in some
language preference.)
To change the partition structure
You can shrink a part of an existing partition to create unallocated disk space, from which you can create a new parti-
tion. In the default setting, you can use a single partition.
A
Proceed as follows on the Start screen.
1. Flick from the middle of the screen to the top, and then long touch [This PC] under “Windows System”.
2. Touch [Manage] on app bar.
B
Touch [Disk Management].
C
Long touch the partition for Windows (“c” drive in the default setting), and touch [Shrink Volume].
l
The partition size depends on the computer specications.
D
Input the size in [Enter the amount of space to shrink in MB] and touch [Shrink].
l
You cannot input a larger number than the displayed size.
l
To select [Reinstall to the OS related partitions.] in installing OS (
è
page 21), 70
GB
or more is necessary
for [Total size after shrink in MB].
E
Long touch [Unallocated] (the shrunk space in the step
D
) and touch [New Simple Volume].
F
Follow the on-screen instructions to make the settings, and touch [Finish].
Wait until formatting is completed.
NOTE
l
You can create an additional partition using remaining unallocated space or newly creating unallocated space.
l
To delete a partition, long touch the partition and touch [Delete Volume] in the step
C
.
To select language
To select a language other than the one you have selected during the rst-time operation, follow the steps below.
A
Flick from the middle of the Start screen to the top, and then touch [Control Panel] under “Windows System”.
B
Touch [Clock, Language, and Region] - [Language] - [Add a language].
C
Select a language, and then touch [Add].
Depending on the region, two or more languages are selectable. Touch [Open] and select the desired language,
and then touch [Add].
D
Touch [Option] for the language you want to use.
E
Touch [Make this the primary language].
F
Touch [Log off now].
G
Sign in to the Windows.
DFQW5829ZA_UT-MB_8_OI_M.indb 13 2013/11/13 13:23:25

14
Getting Started
Turning On / Turning Off
Turning On
Press and hold the power switch (
è
page 9) until the power indicator (
è
page 10) lights.
NOTE
l
Do not press the power switch repeatedly.
l
The computer will forcibly be turned off if you press and hold the power switch for four seconds or longer.
l
Once you turn off the computer, wait for ten seconds or more before you turn on the computer again.
l
Do not perform the following operation until the drive indicator
turns off.
Connecting or disconnecting the AC adaptor
Pressing the power switch
Touching the screen or external mouse/keyboard
Turning Off
A
Shut down the computer.
1. Display “Charm” and touch
.
2. Touch [Power] - [Shut down].
NOTE
l
To turn off the computer completely, proceed as follows.
A
Display “Charm” and touch
- [Change PC settings] - [Update and recovery] - [Recovery].
B
Touch [Restart now] under “Advanced startup”.
C
Touch [Turn off your PC].
Precaution against Starting Up/Shutting Down
l
Do not do the following
Connecting or disconnecting the AC adaptor
Pressing the power switch
Touching the screen or external mouse/keyboard
NOTE
l
To conserve power, the following power saving methods are set at the time of purchase.
The screen automatically turns off after:
10 minutes (when AC adaptor is connected) of inactivity
5 minutes (when operating on battery power) of inactivity
The computer automatically enters sleep
*1
after:
20 minutes (when AC adaptor is connected) of inactivity
15 minutes (when operating on battery power) of inactivity
*1
Refer to Reference Manual “Sleep or Hibernation Functions” about resuming from sleep.
DFQW5829ZA_UT-MB_8_OI_M.indb 14 2013/11/11 11:15:58

15
Useful Information
Operation environment
l
Place the computer on a at stable surface not subject to shock, vibration, and danger of dropping. Do not place
the computer upright or turn it over. If the computer is exposed to an extremely strong impact, it may become dam-
aged.
l
Operating environment
Temperature: Operation : 5
°C
to 35
°C
{41
°F
to 95
°F
}
Storage : -20
°C
to 60
°C
{-4
°F
to 140
°F
}
Humidity: Operation : 30
%
to 80
%
RH (No condensation)
Storage : 30
%
to 90
%
RH (No condensation)
Even within the above temperature/humidity ranges, operation for a long time in extreme environments, smoking
nearby, or operation in places where oil is used or where there is a lot of dust will result in the product deterioration
and will shorten the product life.
l
Do not place the computer in the following areas, otherwise the computer may be damaged.
Near electronic equipment. Image distortion or noise may occur.
In extremely high or low temperature.
l
As the computer can become hot during operation, keep it away from items that are sensitive to heat.
Handling cautions
This computer is designed to minimize shock to parts such as the LCD and the ash memory drive, but no warranty is
provided against any trouble caused by shock. Be extremely careful when handling the computer.
l
When carrying the computer:
Turn off the computer.
Remove all external devices, cables, Smart Cards and other protruding objects.
Do not drop or hit the computer against solid objects.
Do not grip the display part.
l
When you board an airplane, take the computer with you and never put it in your checked luggage. When using the
computer on airplane, follow the airline’s instructions.
To use airplane mode
*1
:
1. Display “Charm” and touch
- [Change PC Settings] - [Network] - [Airplane mode
*1
].
2. Set [Airplane mode
*1
] to [On].
3. Conrm that all wireless devices are set to [Off].
*1
: Screen messages are explained in [English (United States)].
(Depending on the language preference, some screen messages in these instructions are different from the
actual screen messages. For example, [Flight mode] may be displayed instead of [Airplane mode] in some
language preference.)
l
Avoid any harmful substances such as oil from getting into the touchscreen. The pointer may not work correctly.
l
Be careful not to get injured by dropping or getting hit when carrying the computer.
When the battery indicator does not light on
The battery indicator may not light on even if the AC adaptor is correctly connected to the computer, due to the follow-
ing reasons.
l
The AC adaptor’s protection function may be working. In this case, pull out the AC cord and wait for more than
1 minute before reconnecting the AC cord.
When using peripheral devices
Follow these instructions and the Reference Manual to avoid any damage to the devices. Carefully read the instruction
manuals of the peripheral devices.
l
Use the peripheral devices conforming to the computer’s specications.
l
Connect to the connectors in the correct direction.
l
If it is hard to insert, do not try forcibly but check the connector’s shape, direction, alignment of pins, etc.
l
If screws are included, fasten them securely.
l
Remove the cables when you carry the computer. Do not pull the cables forcibly.
Preventing your computer from unauthorized use via wireless LAN/Bluetooth
<Only for model with wireless LAN/Bluetooth>
l
Before using wireless LAN/Bluetooth, make the appropriate security settings such as data encryption.
Handling and Maintenance
DFQW5829ZA_UT-MB_8_OI_M.indb 15 2013/11/11 11:15:58

16
Useful Information
Handling and Maintenance
Battery Recalibration
l
The battery recalibration may take a long time due to the large battery capacity. This is not a malfunction.
<When performing “Battery Recalibration” after shutting down Windows>
Full charge: Approximately 2 hours
Complete discharge: Approximately 1 hour
When performing “Battery Recalibration” without shutting down Windows, it may take more time to charge / discharge.
Sensors
This computer is equipped with four sensors (acceleration sensor, gyro sensor, magnetic sensor, ambient light sensor),
and you can use these sensors with any software that is compatible.
As the accuracy of each sensor output is dependent on the operating environment and other conditions, the results
should only be used as a reference.
The acceleration sensor, gyro sensor, and magnetic sensor are located at the bottom left of the LCD. The detection results of
each sensor may vary depending on how you are holding the computer, the application software you are using, and other factors.
l
Automatic brightness adjustment
The computer is equipped with an automatic brightness adjustment function that adjusts the display screen based
on the ambient light sensor. You can congure the automatic adjustment function as follows.
Display “Charm” and touch
- [Change PC Settings] - [PC and devices] - [Power and sleep], then set [Adjust
my screen brightness automatically] to [On].
The ambient light sensor is located at the top of LCD.
The ambient light cannot be detected properly if this area is obstructed or dirty.
l
Magnetic sensor
The magnetic sensor on the computer operates by detecting geomagnetism. Therefore, the magnetic sensor may
not function properly and it readings may be inaccurate, especially in the following environments.
Inside or near steel structures such as buildings or bridges
Inside or near automobiles, or near train power lines
Near metallic furniture or appliances
When the AC adaptor or other peripheral devices are brought closer to the computer
Near magnets, speakers, or other objects with strong magnetic elds
The magnetic directions indicated by the magnetic sensor may not be accurate immediately after purchase or in
environments with poor magnetic elds.
In such cases, turn on the computer and move it as follows.
A
Hold the computer so that its screen side is facing upward and level.
B
While keeping the computer level, rotate it 90 degrees or more clockwise.
C
Return the computer to position
A
, and rotate it 90 degrees or more counterclockwise.
D
Return the computer to position
A
.
E
Tilt the computer 90 degrees or more to the left so that the left side of the computer tilts down.
F
Return the computer to position
A
, and tilt it 90 degrees or more to the right so that the right side of the computer tilts down.
CAUTION
● Hold the computer rmly when moving it. Strong shocks from dropping the computer may result in damage.
Maintenance
If drops of water or other stains get on the surface of the LCD panel, wipe them off immediately. Failure to do so may result in staining.
To clean the LCD panel
Use the soft cloth included with the computer. (For further information, refer to “Suggestions About Cleaning the LCD
Surface”
è
Reference Manual “Screen Input Operation”.)
To clean areas other than the LCD panel
Wipe with a soft dry cloth such as gauze. When using detergent, dip a soft cloth in water-diluted detergent and wring it thoroughly.
CAUTION
l
Do not use benzene, thinner, or rubbing alcohol since it may adversely affect the surface causing discoloration, etc.
Do not use commercially-available household cleaners and cosmetics, as they may contain components harmful to the surface.
l
Do not apply water or detergent directly to the computer, since liquid may enter inside of the computer and cause
malfunction or damage.
DFQW5829ZA_UT-MB_8_OI_M.indb 16 2013/11/11 11:15:58

17
Useful Information
Dispose of Computer
<For Europe and U.S.A./Canada>
Attention Customers
Don't remove the battery by yourself. The battery must be removed by qualied professionals.
When disposing of this product, be sure to contact qualied professionals to remove the battery.
Attention Qualied professionals to remove the battery
Dispose of this product correctly in accordance with the local regulations after removing the battery as shown in the
following procedure.
Preparation
l
Remove all peripherals (SD memory card, etc.).
l
Erase the stored data. (
è
Reference Manual “Erasing Flash Memory Data”)
CAUTION
l
Never disassemble the computer except before disposal.
l
Refer to “Safety Precautions and Regulatory Information” for precautions when disposing of the computer.
1. Turn off the computer completely. (
è
page 14)
l
Do not use sleep/hibernation.
2. While connecting the AC adaptor, press both volume buttons (
and ) at the same time for more than
ten seconds.
The built-in battery’s power output stops.
l
Disconnect the AC adaptor, and press the power button for 1 second or longer and conrm the computer does
not start up.
3. Turn over the computer, and remove the screws (10).
4. Unhook the claws on the upper part of the cover (
A
), and open the cover
from the right side (
B
).
l
The left side of the cover is connected to the computer with the cord. Do
not pull the cord.
A
B
DFQW5829ZA_UT-MB_8_OI_M.indb 17 2013/11/11 11:15:58

18
Useful Information
Handling and Maintenance
5. Remove the screws (4) that secures the built-in battery (A), and move the
built-in battery (A) as shown in the illustration.
6. Disconnect the connector, and remove the built-in battery.
Insulate the connectors on the built-in battery by covering them with plastic
tape, for example.
A
DFQW5829ZA_UT-MB_8_OI_M.indb 18 2013/11/11 11:15:58

19
Useful Information
Installing software will return the computer to the default condition. When you install the software, the ash memory
data will be erased.
Back up important data to other media or an external hard disk before installation.
CAUTION
l
Do not delete the Recovery Partition on the ash memory. The Recovery Partition is not available to store data.
To check the Recovery Partition, perform the following methods.
A
Flick from the middle of the Start screen to the top, and then long touch [This PC] under “Windows System”.
B
Touch [Manage] on app bar.
C
Touch [Disk Management].
NOTE
l
You can use the following buttons instead of the keyboard.
: ↓ key
: ↑ key
: Enter key
: F2 key (Default setting)
l
Connect the AC adaptor and do not remove it until installation is complete.
Remove everything and reinstall Windows
You can reinstall the OS that was pre-installed at the time of purchase (Windows 8.1).
Preparation
l
<Only for model with TPM> Connect the external keyboard.
l
Remove all peripherals.
1 Perform “Remove everything and reinstall Windows”.
A
Display “Charm” and touch
- [Change PC settings] - [Update and recovery] - [Recovery].
B
Touch [Get Started] under “Remove everything and reinstall Windows”.
C
Touch [Next].
D
Select the option.
• Just remove my les
Perform the reinstallation of the Windows in a few moments (Approximately 20 minutes).
• Fully clean the drive
By fully cleaning, the deleted les can not be recovered easily and the security level will be increased. The
processing time will be longer (Approximately 140 minutes).
Follow the on-screen instructions.
After the reinstallation, the computer will restart.
l
Do not interrupt installation, for example by turning off the computer or performing other operation.
Otherwise installation may become unavailable as Windows may not start up or the data may be corrupted.
2 Perform the “First-time Operation” (
è
page 12).
NOTE
l
The date and time, and the time zone may not be correct. Be sure to set them correctly.
3 Perform Windows Update.
4 <Only for model with TPM> Clear TPM.
A
Flick from the middle of the Start screen to the top.
B
Touch [Run] under “Windows System”, input [tpm.msc] and touch [OK].
C
Touch [Clear TPM ...] under “Actions” on the right of the “TPM Manager on Local Computer” screen.
D
Touch [Restart] of the “Manage the TPM security hardware” screen.
The computer will restart.
E
When “TPM conguration change was requested to ...” is displayed, press
F12
.
F
Touch the Desktop tile, and when “TPM is ready” appears, touch [Close].
Installing Software
DFQW5829ZA_UT-MB_8_OI_M.indb 19 2013/11/11 11:15:58

20
Useful Information
Installing Software
Flash memory Recovery
If the problem persists after performing “Remove everything and reinstall Windows”, follow the instructions below.
Preparation
l
<Only for model with TPM> Connect the external keyboard.
l
Remove all peripherals.
1 Start the Setup Utility.
A
Display “Charm” and touch - [Change PC settings] - [Update and recovery] - [Recovery].
B
Touch [Restart now] under “Advanced startup”.
C
Touch [Troubleshoot] - [Advanced options] - [UEFI Firmware Settings] - [Restart].
l
If the password is requested, enter the Supervisor Password.
2 Write down all of the contents of the Setup Utility and touch [Exit] and double-touch
[Load Default Values]
.
At the conrmation message, touch [Yes].
3 Check the [UEFI Boot] setting of the Setup Utility.
When installing Windows 8.1: [Enabled]
4 Touch [Exit] and double-touch [Save Values and Reboot].
At the conrmation message, touch [Yes].
The computer will restart.
5 Press (Rotation lock) button while [Panasonic] boot screen is displayed.
The Setup Utility starts up.
l
If the password is requested, enter the Supervisor Password.
6
Touch [Exit] and double-touch [Recovery Partition].
7 Touch [Next].
8 Touch [YES].
9 At the License Agreement screen, touch [Yes, I agree to the provisions above and wish
to continue!] and touch [Next].
10 Touch [Next].
If the option is displayed, select the setting and touch [Next].
[Reinstall Windows to the whole Disk to factory default.]
Select this option when you want to install Windows to the factory default. After installation, you can create a
new partition. For how to create a new partition, refer to “To change the partition structure” (
è
page 13).
11 At the conrmation message, touch [YES].
Installation starts according to the instructions on the screen. (It will take approximately 20 minutes.)
l
Do not interrupt installation, for example by turning off the computer or other operation.
Otherwise installation may become unavailable as Windows may not start up or the data may be corrupted.
12 When Ending process screen is displayed, touch [OK] to turn off the computer.
13 Turn on the computer.
l
If the password is requested, enter the Supervisor Password.
14 Perform the “First-time Operation” (
è
page 12).
NOTE
l
The date and time, and the time zone may not be correct. Be sure to set them correctly.
15 Start the Setup Utility and change the settings as necessary.
16 Perform Windows Update.
17 <Only for model with TPM> Clear TPM (
è
page 19).
DFQW5829ZA_UT-MB_8_OI_M.indb 20 2013/11/11 11:15:58
La page est en cours de chargement...
La page est en cours de chargement...
La page est en cours de chargement...
La page est en cours de chargement...
La page est en cours de chargement...
La page est en cours de chargement...
La page est en cours de chargement...
La page est en cours de chargement...
La page est en cours de chargement...
La page est en cours de chargement...
La page est en cours de chargement...
La page est en cours de chargement...
La page est en cours de chargement...
La page est en cours de chargement...
La page est en cours de chargement...
La page est en cours de chargement...
-
 1
1
-
 2
2
-
 3
3
-
 4
4
-
 5
5
-
 6
6
-
 7
7
-
 8
8
-
 9
9
-
 10
10
-
 11
11
-
 12
12
-
 13
13
-
 14
14
-
 15
15
-
 16
16
-
 17
17
-
 18
18
-
 19
19
-
 20
20
-
 21
21
-
 22
22
-
 23
23
-
 24
24
-
 25
25
-
 26
26
-
 27
27
-
 28
28
-
 29
29
-
 30
30
-
 31
31
-
 32
32
-
 33
33
-
 34
34
-
 35
35
-
 36
36


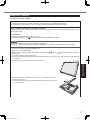
Panasonic UT-MB5 Mode d'emploi
- Catégorie
- Des cahiers
- Taper
- Mode d'emploi
dans d''autres langues
- italiano: Panasonic UT-MB5 Guida utente
- English: Panasonic UT-MB5 User guide
Documents connexes
-
Panasonic FZ-G1 Windows 8 Mode d'emploi
-
Panasonic FZ-B2 Le manuel du propriétaire
-
Panasonic CF-53JU8ZX1M Manuel utilisateur
-
-
-
-
-
-
-
Autres documents
-
Samsung EI-AN920 Galaxy Gear Charm Manuel utilisateur
-
Samsung NP400B2YI Manuel utilisateur
-
-
Samsung NP300V5ZH Manuel utilisateur
-
Samsung NP305V4ZD Manuel utilisateur
-
Janam XM75 Plus Mode d'emploi
-
Contec FXA3000 Le manuel du propriétaire
-
 Kumoh Gear S2 Guide d'installation
-
Topcon WT-100 Manuel utilisateur
-
Gamber-Johnson Panasonic Toughbook S1/L1 Tablet Cradle, No electronics- Thick Model Guide d'installation
