Audiovox GPS Receiver NPC5400 Manuel utilisateur
- Catégorie
- Systèmes de navigation automobile
- Taper
- Manuel utilisateur

V0520000000
06/2004
Printed in USA
NPD 5500
NPC 5400
User Manual
Mode d' emploi
Instrucciones de manejo
English
Français
Español

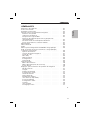
3
Operating instructions . . . . . . . . . . . Page 5
English
Mode d’emploi . . . . . . . . . . . . . . . . Page 39
Français
Instrucciones de manejo. . . . . . . Página 77
Español

4

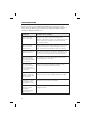
GENERAL INFORMATION
Explanation of symbols · · · · · · · · · · · · · · · · · · · · · · · · 7
For your safety! · · · · · · · · · · · · · · · · · · · · · · · · · · · · 7
Maintenance and care · · · · · · · · · · · · · · · · · · · · · · · · · 8
Functions of your navigation system · · · · · · · · · · · · · · · · · 8
System expansion · · · · · · · · · · · · · · · · · · · · · · · · · · 8
Distance indications · · · · · · · · · · · · · · · · · · · · · · · · · 9
GPS reception · · · · · · · · · · · · · · · · · · · · · · · · · · · · 9
Start-up characteristics · · · · · · · · · · · · · · · · · · · · · · · 9
Automatic route re-calculation · · · · · · · · · · · · · · · · · · · 9
Areas with limited road information · · · · · · · · · · · · · · · · 9
Switching on / off · · · · · · · · · · · · · · · · · · · · · · · · · · · 9
Remote control · · · · · · · · · · · · · · · · · · · · · · · · · · · · 10
Stand-by· · · · · · · · · · · · · · · · · · · · · · · · · · · · · · · · 11
Inserting/changing the map DVD/CD · · · · · · · · · · · · · · · · 11
C-IQ - Your key to map and travel information · · · · · · · · · · · 12
Activation options · · · · · · · · · · · · · · · · · · · · · · · · · 12
Reading the Navi ID · · · · · · · · · · · · · · · · · · · · · · · · 12
Entering the activation code· · · · · · · · · · · · · · · · · · · · 13
My C-IQ · · · · · · · · · · · · · · · · · · · · · · · · · · · · · · · 13
Preview · · · · · · · · · · · · · · · · · · · · · · · · · · · · · · · 14
Configuration· · · · · · · · · · · · · · · · · · · · · · · · · · · · 14
C-IQ Service · · · · · · · · · · · · · · · · · · · · · · · · · · · · · 14
Screen menu types · · · · · · · · · · · · · · · · · · · · · · · · · · 14
Pop-up menu · · · · · · · · · · · · · · · · · · · · · · · · · · · · 15
Pull-down menu (functions list) · · · · · · · · · · · · · · · · · · 15
List screen· · · · · · · · · · · · · · · · · · · · · · · · · · · · · · 15
Settings – adjusting the navigation system · · · · · · · · · · · · · 16
Day / night colors · · · · · · · · · · · · · · · · · · · · · · · · · · 16
Language · · · · · · · · · · · · · · · · · · · · · · · · · · · · · · 16
Route criterion · · · · · · · · · · · · · · · · · · · · · · · · · · · 17
Screen configuration · · · · · · · · · · · · · · · · · · · · · · · · 17
Measuring units · · · · · · · · · · · · · · · · · · · · · · · · · · 18
Remote control · · · · · · · · · · · · · · · · · · · · · · · · · · · 19
Dynamic route · · · · · · · · · · · · · · · · · · · · · · · · · · · 19
Traffic information (where available) · · · · · · · · · · · · · · · 19
Favourite function · · · · · · · · · · · · · · · · · · · · · · · · · 19
Video configuration · · · · · · · · · · · · · · · · · · · · · · · · 19
Volume · · · · · · · · · · · · · · · · · · · · · · · · · · · · · · · 20
System information · · · · · · · · · · · · · · · · · · · · · · · · 20
Default settings· · · · · · · · · · · · · · · · · · · · · · · · · · · 21
k
5
English
TABLE OF CONTENTS

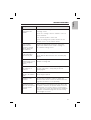
NAVIGATION
Destination input · · · · · · · · · · · · · · · · · · · · · · · · · · · 23
Direct address input · · · · · · · · · · · · · · · · · · · · · · · · 23
”List” function · · · · · · · · · · · · · · · · · · · · · · · · · · · 24
Special destinations · · · · · · · · · · · · · · · · · · · · · · · · 24
Points of interest:· · · · · · · · · · · · · · · · · · · · · · · · · · 24
Intersection · · · · · · · · · · · · · · · · · · · · · · · · · · · · · 25
All streets (Quick access) · · · · · · · · · · · · · · · · · · · · · · 25
Travel icons · · · · · · · · · · · · · · · · · · · · · · · · · · · · · 25
Address book (see also Address book chapter) · · · · · · · · · · 27
Destination entry via map · · · · · · · · · · · · · · · · · · · · · 27
Via points (Stops) · · · · · · · · · · · · · · · · · · · · · · · · · · 28
Stopping guidance · · · · · · · · · · · · · · · · · · · · · · · · · 29
Screen displays · · · · · · · · · · · · · · · · · · · · · · · · · · · · 29
Guidance display · · · · · · · · · · · · · · · · · · · · · · · · · · 29
Map display· · · · · · · · · · · · · · · · · · · · · · · · · · · · · 30
Split display · · · · · · · · · · · · · · · · · · · · · · · · · · · · · 30
Guidance close to the destination · · · · · · · · · · · · · · · · · 30
Guidance in partially digitized areas · · · · · · · · · · · · · · · 30
Voice messages · · · · · · · · · · · · · · · · · · · · · · · · · · · 31
Planning an alternate route · · · · · · · · · · · · · · · · · · · · 31
”Info” menu · · · · · · · · · · · · · · · · · · · · · · · · · · · · · 31
Address book · · · · · · · · · · · · · · · · · · · · · · · · · · · · · 32
Storing addresses · · · · · · · · · · · · · · · · · · · · · · · · · · 32
Deleting addresses · · · · · · · · · · · · · · · · · · · · · · · · · 32
Storing the vehicle position in the address book · · · · · · · · · 32
Retrieving a previous address from memory · · · · · · · · · · · 33
Deleting previous destinations from memory · · · · · · · · · · 33
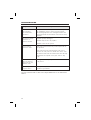
USEFUL EXTRAS
Trip computer· · · · · · · · · · · · · · · · · · · · · · · · · · · · · 34
Speed warning · · · · · · · · · · · · · · · · · · · · · · · · · · · 34
Emergency · · · · · · · · · · · · · · · · · · · · · · · · · · · · · · 35
Entering a roadside assistance number · · · · · · · · · · · · · · 35
TROUBLESHOOTING
TROUBLESHOOTING · · · · · · · · · · · · · · · · · · · · · · · · 36
6
TABLE OF CONTENTS

Explanation of symbols
The following symbols are used in this user manual:
!
This symbol denotes safety and warning notes. They contain
important information about the safe use of your device. Failure
to observe this information may result in damage or injury. There
-
fore, please observe this information with particular care.
u
Denotes an action to be taken.
t
Here, you receive useful tips and information about the use of the
system.
“
Terms in quotation marks refer to screen menu options
For your safety!
!
The use of the navigation system by no means relieves the driver of
his/her responsibilities. Traffic regulations and current traffic conditions
must always be observed. They will always have precedence over the
advice from the navigation system if the current traffic situation
contradicts the navigation system instructions.
!
The system does not take into account the relative safety of the
suggested routes. Closed roads, construction sites, height or weight
restrictions, traffic or weather conditions or other factors influencing
the safety or travel time of the route will not be considered for the
suggested routes. Check the suitability of the suggested routes yourself.
Use the ”Alternate route” function to receive better route suggestions
or simply take the preferred route and leave the planning of the new
route to automatic route re-calculation.
!
For reasons of traffic safety, make any entries to the navigation system
before you depart or when the vehicle is standing.
!
In certain areas, one-way streets, turning and entry prohibitions
(e.g. pedestrian zones) are not recorded. The navigation system issues
a warning in such areas. Pay particular attention to one-way streets,
turning and entry restrictions.
!
Please ensure that any person who may use your multimedia system
has access to this user’s manual and reads the guidelines and
recommendations for the use of the system prior to first use.
7
English
GENERAL INFORMATION

!
If your monitor is mounted on a flexible mount, adjust it in such a
manner that you can glance at the screen quickly and simply and avoid
reflections and glare. Stop at a suitable place before making any
adjustments.
!
If your monitor is mounted on a fixed mount, check if your dealer
installed it according to the recommendations above. The monitor
should not be installed in any location where it might impede the view
of elements required for the safe operation of the vehicle (e.g. road,
mirror, instrumentation, vehicle surroundings). Also, the monitor must
not be installed within the airbag inflation zone.
!
Only glance at the screen if this is possible without danger. If you
need to look at the screen for an extended time, please pull over at
a suitable location.
!
Always store the remote control at a safe location.
!
The values for current speed, travel time and distance traveled displayed
by the on-board computer are calculated. Precision cannot be guaranteed
in all cases. For the current speed, the vehicle speedometer is considered
accurate.
!
If you are looking for emergency services (police, fire department, etc.),
do not rely solely on the navigation system. There is no guarantee that
all available emergency services in your vicinity are stored in the data-
base. In such a situation, you must rely on your own judgment and
capabilities to secure help.
Maintenance and care
To clean the system, do not use cleaning gasoline, alcohol or other
solvents. A moistened cloth would be best suited.
Functions of your navigation system
The Multi Media System you purchased is a high-performance instrument
for the support of the driver in daily traffic. Simply enter your destination
before your departure, activate ”Guidance” and then drive off. The
navigation system provides you with visual and acoustic driving
information. The system is easy to operate, with few control elements and
a clearly structured menu.
System expansion
In connection with a TMC expansion (where available), the system will
show you the current traffic situation on your route and will guide you
around traffic problems. Numerous system expansions permit extending
the system into an information and entertainment system.
8
GENERAL INFORMATION

Distance indications
On main highways, the system’s distance indications to exits may deviate
from the indications on the road signs. The signs on main highways measure
the distance to the beginning of the exit while the system always calculates
the distance to the end of the deceleration lane. This is equivalent to the
point where the lanes separate.
GPS reception
The system is capable of functioning even with poor GPS reception, but
the accuracy of the positioning may be limited.
Start-up characteristics
While a vehicle is parked for longer periods of time, the satellites continue
their orbit. Therefore, after turning on the ignition, it may take several
minutes until enough satellites can be received and evaluated. Satisfactory
reception (three-dimensional position) is indicated by the green satellite icon
on the screen. If GPS reception is insufficient, the satellite icon remains red.
During the start-up sequence, it is possible that the navigation system
will announce: ”Please proceed to the planned route”. The navigation
system assumes that the vehicle is located away from a digitized road. If
other roads exist in this area, the navigation system may issue incorrect
messages. The navigation system assumes that the vehicle is located on
another road.
Automatic route re-calculation
If you ignore the system’s announcements, the system will automatically
plan a new route.
Areas with limited road information
In some areas, not all of the information about a road is available on the
map DVD/CD. Thus, for example, turning prohibitions, information on the
direction of travel in a one-way street or prohibited entry into a pedestrian
zone may be missing. The navigation system will display a warning if you
drive into such an area.
Switching on / off
The multimedia system is turned on and off with the ignition. If the system
was not switched to stand-by, a title screen will appear first. A message
about the use of the system follows. Confirm your selection by pressing the
OK key. After several seconds, the system will be functioning.
All adjustments to the system setting will be saved upon switching it off.
9
English
GENERAL INFORMATION

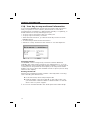
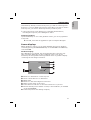
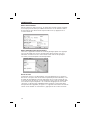
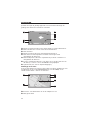
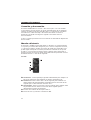
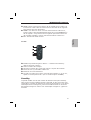
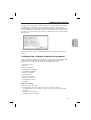
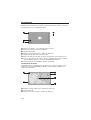
Remote control
It will be necessary to change the remote control batteries when you use
the remote control away from its holder and the navigation system no
longer reacts to the push of keys or if the battery symbol appears on the
screen status line. To continue the use of the system, push the remote
control into the holder, as the batteries are not needed there.
Some keys on the remote control have a double function which can be
activated by pressing the key briefly under one second or more than a
second.
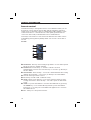
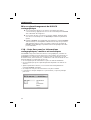
RC 5400
➊
FAVOURITE - The key can be freely programed to accomomate specific
functions (see also chapter settings).
➋
ENTERTAIN - Press the key < 1 second to switch to the last
ertertainment source in use. Press the key > 1 second to go directly to
the Info Menu.
➌
NAVIGATION - Press the key < 1 second to switch between the routing
displays. Press the key > 1 second to go directly to the Start Menu.
➍
Acoustic message volume control.
➎
Curser keys as well as OK confirmation key.
➏
VOICE / ALT-R - Press the key < 1 second to retrieve current acoustic
routing information. Press the key > 1 second to plan an alternative
route.
➐
HOME - If your home address is stored in the address book, pressing
the HOME key < 1 second will directly retrieve your home address.
Pressing it > 1 second your work address will appear if it is stored in
the address bood.
➑
ESC - takes you to the previous menu.
10
GENERAL INFORMATION

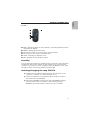
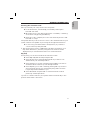
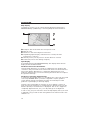
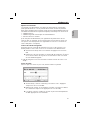
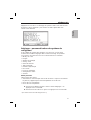
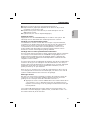
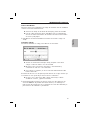
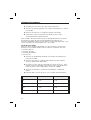
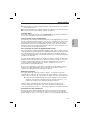
RC 5000
➊
MAP - Changing guidance screen displays or switching between menus
and guidance displays.
➋
MENU - Calling up the start menu.
➌
Setting the volume of voice messages. Volume setting.
➍
Cursor keys as well as OK confirmation key.
➎
ALT-R - Planning an alternate route
➏
REP - Request current guidance advice
Stand-by
You can switch the system into stand-by from the start menu. Select Stand-by
and press OK. The screen is turned off, the navigation voice messages will
continue. If you wish to first stop navigation, press the OK key on one of the
navigation screens. Select ”Stop guidance” and press OK.
Inserting/changing the map DVD/CD
u
If the blue power LED is illuminated, press the eject key on the
navigation computer once (with the ignition on).
u
If the power LED does not illuminate, press the eject key twice.
The system ejects the DVD/CD.
u
Remove the DVD/CD and insert the new map DVD/CD carefully,
printed side up, until it is pulled in. After exchanging map
DVDs/CDs, the system requires several seconds to initialize.
11
GENERAL INFORMATION
English

C-IQ - Your key to map and travel information
You received a DVD/CD with current map and other travel information
with your system. In some countries, the information on the CD is
encrypted and is activated for a defined time, partially or completely, on
demand with an access key. Advantages for you:
•
You pay only for information that you actually use.
•
You pay only for the time you need it.
•
After the initial activation, you will automatically receive successive
DVD/CD releases.
•
You will always have the latest information.
•
Activation is easily obtained via the internet or over the telephone.
Activation options
The DVD/CD contains all regionally collected road data. Wherever
available, they offer travel information such as Destinations +. You can
have individual states and individual guides activated for a certain period
of time (see also the preview in this chapter). Your C-IQ service will be
happy to inform you about the available activation options (see also C-IQ
Service in this chapter).
Reading the Navi ID
Please have your Navi ID and the software code ready when contacting
service. Reading the identification:
u
In the start menu, select ”C-IQ” and press OK.
u
Read the 8-digit code next to Navi ID. To the right of this code,
you will find the software number. It will be useful to note both
these codes on a piece of paper.
t
You can also find the Navi ID in the ”Code Input” menu under ”C-IQ”.
12
GENERAL INFORMATION

Entering the activation code
Once you receive your code, enter it into the system.
u
In the Start menu, activate ”C-IQ”, followed by ”Code input”.
Press OK each time.
u
Move the cursor to the desired characters or numbers, confirming
each selection by pressing the OK key.
u
Once the code is complete, the cursor automatically moves to OK.
Press OK to accept.
The system will let you know if an incorrect code is entered and/or if your
system software is incapable of processing the encrypted information.
u
In such cases, press either ”OK” or ”C-IQ Service”, if you wish to
contact someone, then press OK.
t
The system can be used on a 500 miles scale without activation. You
may enter destinations, however, navigation information will be
displayed only in activated areas and/or for activated services.
My C-IQ
At any time, you can find out about the activation status.
u
Select ”My C-IQ” below ”C-IQ” and press OK.
u
Select ”Active” and confirm by pressing OK if you want to see
details about your selected products.
u
Select ”Starting soon” and confirm by pressing OK if you want to
see details about software you’ve already received.
u
Select ”Expiring soon” and confirm by pressing OK if you want to
find out which services you are presently using and how much
longer they will be available to you.
u
Select ”Returned” and press OK to receive information about
previously activated products.
If you do not make a selection, the system returns automatically to the
previous menu after a short time.
13
GENERAL INFORMATION
English

Preview
Your map and travel information software allows you to preview
different products free of charge before ordering. You can display the
status of this preview:
u
Select ”Preview” under ”C-IQ” and press OK. You will be shown
the status of your preview choices. It will contain a number of map
and travel information products that you still can view free of
charge.
u
Select ”Proceed” and press OK to scroll to the next page.
u
Select ”C-IQ Service” and press OK if you wish to establish contact.
u
Pressing ESC or OK at ”Back” will take you to the ”C-IQ” main
menu again.
Configuration
Set your system to inform you automatically and in a timely fashion about
the status of your activated products.
u
Select ”Configuration” in the ”C-IQ” menu and press OK.
u
Activate or deactivate ”Expiring soon” and ”Starting soon” by
pressing OK. ”Hide” indicates that there will be no automatic
announcements. If you select ”Show” you will always be kept
current.
u
Set the number of days to be notified in advance to between
1 and 10. Select ”… days ” and press OK. Press the and keys
to set the number of days (default is 10 days). Press OK.
u
Press ESC or OK at “Return” to get to the previous menu.
C-IQ Service
This is where you will find the contact information for your C-IQ service.
u
Select ”C-IQ Service” in the ”C-IQ” menu. Press OK.
u
Press ESC or OK at “OK” to return to the previous menu.
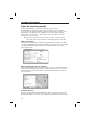
Screen menu types
The system uses three types of menus, the pop-up, pull-down and the list
menu. You can determine the current cursor position by the arrows to the
left and right of the function to be selected. Basically, selectable functions
are shown in bold print. Any non-selectable functions are grayed out and
will be skipped by the cursor.
u
To select a function, move the cursor to the desired
option/function using cursor keys , and press OK.
14
GENERAL INFORMATION

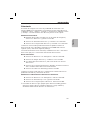
Pop-up menu
Once a function is selected, a pop-up menu with additional selections may
appear. Press cursor key to leave the pop-up menu without selecting an
option or function (return).
Pull-down menu (functions list)
In guidance mode, ”Function” appears on the display. If you press OK,
the available functions are displayed. If you do not select a function, the
menu will be closed again after several seconds.
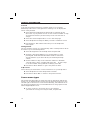
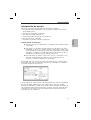
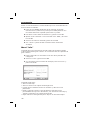
List screen
With certain selections, a list appears in the right side of the display. If
not all list entries can be displayed, you can scroll through them with the
cursor, e.g. by continuing to press cursor key after reaching the bottom
of the list. Scroll up by continuing to press cursor key once you reach
”Quit”. If additional information is available for an item in the list, a ” ”
appears to the right of the item. To view this information, press cursor
key . To make a selection, move curser to the entry and press OK.
Press cursor key or ESC to leave the menu without selecting an option.
15
GENERAL INFORMATION
English

Settings – adjusting the navigation system
You can customize the navigation system to your specifications by
changing many settings. The following functions are available in the
”Settings” menu which is accessible from the Start menu.
•
Day / night color
•
Language
•
Route criterion
•
Screen config.
•
Measuring units
•
Remote control
•
Dynamic route
•
Traffic inform.
•
Favourite function
•
Video configuration
•
Volume
Day / night colors
Selecting the options:
•
Automatic switching between day and night colors. The night color is
selected when the vehicle’s headlights are turned on.
•
Always day colors
•
Always night colors
u
Select ”Day / Night Color” in the ”Settings” menu and press OK.
u
Choose one of the three options and press OK.
(see also the ”Screen” function)
Language
Selection of language for voice messages and menu texts on the screen.
Currently, the system software CD contains the following languages with
a selection of male and female speakers:
•
British English
•
US English
•
French
•
German
•
Dutch
•
Italian
•
Spanish
•
Danish
•
Swedish
16
GENERAL INFORMATION

Two languages can be selected simultaneously for the system. If
necessary, other languages can be loaded from the CD/DVD.
u
In the ”Settings” menu, select ”Language.” Press OK.
u
Select ”Other language” in the displayed list and press OK.
u
Select the desired language and press OK.
u
Select “Load” and press OK.
u
Press ESC or OK at “Quit” to return to the previous menu if you do
not want to change the language.
Route criterion
You can choose from several criteria for the route calculation:
•
Fast: suitable for all situations
•
Short: recommended for city travel
•
Main roads: recommended, if you prefer to travel via highways
•
No main roads: recommended, if you prefer to avoid highways
•
Minimize toll roads
The symbol for the selected route criterion appears in the status line.
To set/change Route criterion:
u
Select ”Route criterion” in the ”Settings” menu and press OK.
The Route criterion list appears.
u
Select the desired route criterion and confirm with the OK key.
The symbol for the new route criterion appears in the status line.
u
Select “Return” and press OK.
Activate option ”Minimize tolls”, if you wish to avoid toll roads as much
as possible. The option ”Minimize tolls” is only supported by related
information on the map DVD/CD. Therefore, the calculated route may
still contain toll roads, even with this option activated. When the option
t
The Route criterion can also be changed in ”Route criterion” in the
”Navigation” menu.
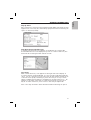
Screen configuration
Here, you can select various color combinations for the screen display and
configure the status line:
•
”Day color”: This setting is active when the headlights are off. In bright
daylight, blue, red and green offer the best contrast.
•
”Night color”: is active when the headlights are on. At night, dark blue,
dark red and dark green provide optimal readability.
•
”Map color”: offers various color combinations.
•
”Statusline left” and ”Statusline right”: To select the information to be
displayed in the bottom corners of the screen:
17
GENERAL INFORMATION
English

–
None
–
Clock
–
Date
–
Remaining travel time: The calculated remaining travel time to
arrival at the next via point or the destination.
–
Remaining dynamic travel time (where TMC is available).
–
Estimated time of arrival.
–
Estimated dynamic time of arrival (where TMC is available).
–
Entire delay on route (where TMC is available).
–
Distance to the destination.
–
Geographical hight.
–
Current speed
You can select one value for each statusline to be displayed:
u
In the ”Settings” menu, select ”Screen config”. Press OK.
u
Select the function to be set and press OK.
u
Select your choice and press OK. The cursor will automatically
return to the previous menu.
The navigation system uses an average travel speed for the calculation of
the remaining travel time and the estimated time of arrival. If necessary,
you can adjust this speed to your actual average speed using the option
”System information/Speed correction”.
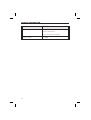
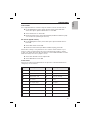
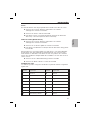
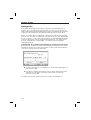
Measuring units
Selection of units of measurement for displaying and announcing
distances and speeds. The following options are available:
•
Time format
•
Date format
•
Measuring units
•
Time zone
•
In the ”Settings” menu, select ”Measuring units”. Press OK.
•
Select the function to be set. Pressing OK will toggle between the
available alternatives.
•
At time zone press OK and curser keys to set the value up and
down in half hour intervals. Press OK again (time is relative to GMT).
•
Select “Return” and press OK to confirm the setting.
•
Pressing ESC or curser key will take you to the previous menu.
18
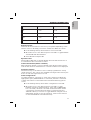
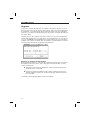
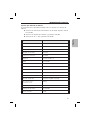
GENERAL INFORMATION

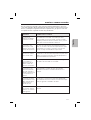
Time zone Winter time Summer time
EST - 5:00 - 4:00
CST - 6:00 - 5:00
MST - 7:00 - 6:00
PST - 8:00 -7:00
Remote control
There will be various remote controls for your system. Depending on the
remote control to be used, you need to activate it in ”Remote control”.
u
In the ”Settings” menu, select ”Remote control”. Press OK.
u
Move the cursor to the desired option. Press OK to toggle between
activated þ and deactivated ¨.
u
Select ”Return” and press OK.
Dynamic route
Pressing OK at “Dynamic route” will display the note that this function is
not activated in the route criterion menu.
Traffic information (where available)
Only relevant if dynamic route is activated in the “Route criterion” menu.
It allows the selection and deselection of traffic incidents to be displayed.
Favourite function
The function key on the remote control can be programmed to call up
certain functions. Two options are available. Pressing the function key less
than a second and longer than a second.
Video configuration
If a multi-media box, a TV tuner or a rear view camera is installed, the
appropriate option, ”Multimedia box connected”, ”TV tuner connected”
or ”Rear view camera connected” must be activated. Switching options
on/off:
u
In the ”Settings” menu, select ”Video configuration”. Press OK.
u
Move the cursor to the desired option. Press OK to toggle
between activation and deactivation. If the option ”Multimedia
box connected”, ”TV tuner connected” and/or ”Rear view camera
connected” is activated, the Start menu contains the function
”TV/Video” which you can use to toggle between navigation and
multimedia operation. (For the operation, see the user’s manual
for the multimedia box and the TV tuner)
19
GENERAL INFORMATION
English

u
Select ”Return” and press OK.
If the rear view camera is correctly connected and the setting ”Rear view
camera connected” is selected, the image from the rear view camera is
automatically displayed when the transmission is shifted into reverse.
Volume
The following options may be selected in the ”Volume” menu.
•
SDVC: To select a value for the speed-dependent volume increase. Find
the SDVC value best suited for your vehicle by experimenting.
•
Volume
•
Audible info. On or OFF switches the volume off and on.
u
In the ”Settings” menu, select ”Volume”. Press OK.
u
Select the function to be set and press OK.
u
Select the desired value or the function to be set and press OK.
The ”Volume” is set using cursor keys and on the remote
control and pressing OK.
u
Pressing OK at Audible info On or OFF will toggle between on
and off.
u
Select “Return” and press OK to confirm the selections.
System information
The ”System information” menu offers the following functions:
•
”Diagnosis”: For diagnosing hardware and software problems
(code-protected – only for authorized service personnel).
•
”Default settings”: Resetting the parameters of the ”Settings” menu to
the factory presets (see the next paragraph).
•
”Configuration”: Software and hardware data for service purposes.
•
Speed correction: for setting the average speed used as the base for
calculating the estimated time of arrival and the remaining travel time.
u
In the ”Settings” menu, select ”System information”. Press OK.
u
Select ”Speed correction” and press OK.
u
Press cursor keys and to correct the speed and press OK.
u
Select “Return” and press OK to confirm the settings.
20
GENERAL INFORMATION

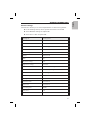
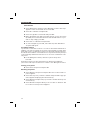
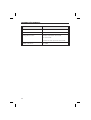
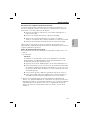
Default settings
This function allows you to reset all parameters to their factory presets.
u
In the ”Settings” menu, select ”System information”. Press OK.
u
Select ”Default settings” and press OK.
u
Select ”Yes” or ”No” and press OK.
Settings for Factory preset
Time zone 0
Clock format 12-hour format
Date format month/day/year
Units of measurement miles/feet
Voice messages On
Volume mid level = 0
SDVC Off
Day color setting Blue
Night color setting Dark blue
Map color Automatic switching
Map mode Northwards, rolling activated
Status line left Remaining travel time
Status line right Estimated time of arrival
Road type (route criterion) Fastest
Avoid toll roads Deactivated
Traffic info Deactivated
Re-routing level Middle
Delay time Low
Speed correction 100%
21
GENERAL INFORMATION
English
La page charge ...
La page charge ...
La page charge ...
La page charge ...
La page charge ...
La page charge ...
La page charge ...
La page charge ...
La page charge ...
La page charge ...
La page charge ...
La page charge ...
La page charge ...
La page charge ...
La page charge ...
La page charge ...
La page charge ...
La page charge ...
La page charge ...
La page charge ...
La page charge ...
La page charge ...
La page charge ...
La page charge ...
La page charge ...
La page charge ...
La page charge ...
La page charge ...
La page charge ...
La page charge ...
La page charge ...
La page charge ...
La page charge ...
La page charge ...
La page charge ...
La page charge ...
La page charge ...
La page charge ...
La page charge ...
La page charge ...
La page charge ...
La page charge ...
La page charge ...
La page charge ...
La page charge ...
La page charge ...
La page charge ...
La page charge ...
La page charge ...
La page charge ...
La page charge ...
La page charge ...
La page charge ...
La page charge ...
La page charge ...
La page charge ...
La page charge ...
La page charge ...
La page charge ...
La page charge ...
La page charge ...
La page charge ...
La page charge ...
La page charge ...
La page charge ...
La page charge ...
La page charge ...
La page charge ...
La page charge ...
La page charge ...
La page charge ...
La page charge ...
La page charge ...
La page charge ...
La page charge ...
La page charge ...
La page charge ...
La page charge ...
La page charge ...
La page charge ...
La page charge ...
La page charge ...
La page charge ...
La page charge ...
La page charge ...
La page charge ...
La page charge ...
La page charge ...
La page charge ...
La page charge ...
La page charge ...
La page charge ...
La page charge ...
-
 1
1
-
 2
2
-
 3
3
-
 4
4
-
 5
5
-
 6
6
-
 7
7
-
 8
8
-
 9
9
-
 10
10
-
 11
11
-
 12
12
-
 13
13
-
 14
14
-
 15
15
-
 16
16
-
 17
17
-
 18
18
-
 19
19
-
 20
20
-
 21
21
-
 22
22
-
 23
23
-
 24
24
-
 25
25
-
 26
26
-
 27
27
-
 28
28
-
 29
29
-
 30
30
-
 31
31
-
 32
32
-
 33
33
-
 34
34
-
 35
35
-
 36
36
-
 37
37
-
 38
38
-
 39
39
-
 40
40
-
 41
41
-
 42
42
-
 43
43
-
 44
44
-
 45
45
-
 46
46
-
 47
47
-
 48
48
-
 49
49
-
 50
50
-
 51
51
-
 52
52
-
 53
53
-
 54
54
-
 55
55
-
 56
56
-
 57
57
-
 58
58
-
 59
59
-
 60
60
-
 61
61
-
 62
62
-
 63
63
-
 64
64
-
 65
65
-
 66
66
-
 67
67
-
 68
68
-
 69
69
-
 70
70
-
 71
71
-
 72
72
-
 73
73
-
 74
74
-
 75
75
-
 76
76
-
 77
77
-
 78
78
-
 79
79
-
 80
80
-
 81
81
-
 82
82
-
 83
83
-
 84
84
-
 85
85
-
 86
86
-
 87
87
-
 88
88
-
 89
89
-
 90
90
-
 91
91
-
 92
92
-
 93
93
-
 94
94
-
 95
95
-
 96
96
-
 97
97
-
 98
98
-
 99
99
-
 100
100
-
 101
101
-
 102
102
-
 103
103
-
 104
104
-
 105
105
-
 106
106
-
 107
107
-
 108
108
-
 109
109
-
 110
110
-
 111
111
-
 112
112
-
 113
113


Audiovox GPS Receiver NPC5400 Manuel utilisateur
- Catégorie
- Systèmes de navigation automobile
- Taper
- Manuel utilisateur
dans d''autres langues
Documents connexes
Autres documents
-
VDO MS 5000 Mode d'emploi
-
-
Clarion NX700 Manuel utilisateur
-
Eclipse AVN2210p mk II Le manuel du propriétaire
-
JVC KW-NX7000BT Le manuel du propriétaire
-
Volvo 2021 Late Manuel utilisateur
-
Volvo V90 Cross Country Manuel utilisateur
-
-
-