ACEBIKES SteadyStand Assembly Instruction
- Taper
- Assembly Instruction

ENG: Please understand, that AceBikes cannot be held responsible for any consequential loss or damage due to an improper assembly or use of the product.
DE: Bitte, haben Sie Verstndnis dafr, dass AceBikes keine Haftung fr Folgeschaden bernimmt, die durch eine unsachgemsze beziehungsweise
mangelhafte Montage entstehen.
FR: Veuillez comprendre que AceBikes ne peut tre tenu pour responsable des dommages conscutifs un montage ou une utilisation incorrecte.
www.acebikes.com
INNOVATIVE
EQUIPMENT
ACEBIKES
250
SteadyStand
R

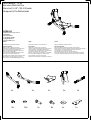
1x 1x 1x 1x
8x 16x 2x2x
1x
8x
Netto weight : 7,2 kg
Box size: 60x22x20 cm
Rim size 15-19" / 90-130 wide
Designed in The Netherlands
1x
ACEBIKES
Handelsstraat 19 NL-7772 TS
Hardenberg
The Netherlands
T +31 (0)523-745060
E info@acebikes.nl
I www.acebikes.com
Francais
Manuel d'installation pour Bquille avant
Informations gnrales
Avant le montage et l'utilisation du produit, veuillez regarder
soigneusement ce manuel d'installation. Veuillez comprendre que AceBikes
ne peut tre tenu pour responsable des dommages conscutifs
un montage ou une utilisation incorrecte.
Avertissement: Dans certains cas il est invitable que le
pneu adhre lgrement la bquille. Nous recommandons de dcoller
le pneu par mouvements lgers sur le ct avant de sortir de la bquille.
English
Assembly instruction for Front Wheel Stand
General advice
Please have a careful look at this assembly
instruction before assembling and applying the product.
Please understand, that AceBikes cannot be held
responsible for any consequential loss or damage due to
an improper assembly or use of the product.
Warning: Under certain circumstances it is unavoidable,
that the tire adheres slightly to the paddock stand.
We recommend to loosen the tire by slight
sidewards movements before pulling out the motocycle.
Deutsch
Montageanleitung fr Vorderradstnder
Allgemeine Hinweise
Bitte, lesen Sie vor Montage und ersten
Gebrauch die Montageanleitung aufmerksam durch.
Bitte, haben Sie Verstndnis dafr, dass Ace
Bikes keine Haftung fr Folgeschaden bernimmt,
die durch eine unsachgeme
beziehungsweise mangelhafte Montage entstehen.
Warnung: Es ist unter Umstnden nicht
vermeidbar, dass der Reifen leicht im Stnder "klebt".
Wir empfehlen, den Reifen ggf. vor dem Heraus
fahren durch leichte Seitwrtsbewegungen zu lsen.

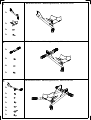
1
2
3
1x
1x
2x
1x
2x
1x
1x
1x
1x
2x
4x
2x
4x
1x
1x
DE Handfest anziehen UK Hand tightened only FR Serrez la main
DE Handfest anziehen UK Hand tightened only FR Serrez la main
DE Handfest anziehen UK Hand tightened only FR Serrez la main

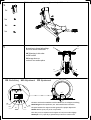
4
8x
4x
4x
1x
DE Handfest anziehen UK Hand tightened only FR Serrez la main
D Anziehen in dieser Reihenfolge
auf einer ebenen Oberflache
UK Tightening in this order
on flat surface
FR Serrage dans cet
ordre sur une surface plane
A
B
C
D
5
A* Raum zwischen dem Behlter und dem Boden fr ein richtigen Einstellung.
Bemerkung Wenn kein Spielraum, Pos. 8 eine Stufe kleiner einstellen
A* Space between the support and the ground for a proper adjustment
Remark With no space, set pos. 8 a step smaller
A* il doit y avoir un espace entre le support et le sol pour un bon rglage
Remarque si il n'y a pas de jeu, positionner pos.8 sur un cran de moins
19''
18''
17''
16''
15''
A*
DE Einstellung UK Adjustment FR Ajustement

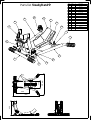
Description
Qty
Item
Bearing21
M8 x 2522
Washer large
23
Frame R14
Frame L1
5
Frame back
16
Grip
47
Wheel support front18
Nut M889
Washer1610
M8 x 16811
Sticker212
Handle113
Wheel support114
Shaft 15115
Plate116
Parts list SteadyStand
7
2
3
11
10
6
4
16
8
13
14
15
1
5
9
12
5
1
5
m
m
642
1
7
2
305
11
3
5
5
R
-
 1
1
-
 2
2
-
 3
3
-
 4
4
-
 5
5


ACEBIKES SteadyStand Assembly Instruction
- Taper
- Assembly Instruction
dans d''autres langues
- English: ACEBIKES SteadyStand
- Deutsch: ACEBIKES SteadyStand


