ACEBIKES SteadyStand Multi Manuel utilisateur
- Taper
- Manuel utilisateur

www.acebikes.com
INNOVATIVE
EQUIPMENT
ACEBIKES
180
SteadyStand Multi
R
DE: Bitte, haben Sie Verstndnis dafr, dass AceBikes keine Haftung fr Folgeschaden bernimmt, die durch eine unsachgemsze beziehungsweise
mangelhafte Montage entstehen.
ENG: Please understand, that AceBikes cannot be held responsible for any consequential loss or damage due to an improper assembly or use of the product.
FR: Veuillez comprendre que AceBikes ne peut tre tenu pour responsable des dommages conscutifs un montage ou une utilisation incorrecte.

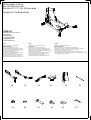
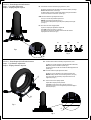
1x 1x 1x 1x
4x
8x 2x2x
1x 4x
Netto weight : 10.5 kg
Box size: 60x22x20 cm
Rim size 15"-21" / 90-200 mm wide
Designed in The Netherlands
1x
ACEBIKES
Handelsstraat 19 NL-7772 TS
Hardenberg
The Netherlands
T +31 (0)523-745060
E info@acebikes.nl
I www.acebikes.com
1x
Deutsch
Montageanleitung fr Vorderradstnder
Allgemeine Hinweise
Bitte, lesen Sie vor Montage und ersten
Gebrauch die Montageanleitung aufmerksam durch.
Bitte, haben Sie Verstndnis dafr, dass AceBikes ke
ine Haftung fr Folgeschaden bernimmt,
die durch eine unsachgeme
beziehungsweise mangelhafte Montage entstehen.
Warnung: Es ist unter Umstnden nicht
vermeidbar, dass der Reifen leicht im Stnder "klebt".
Wir empfehlen, den Reifen ggf. vor dem Herausf
ahren durch leichte Seitwrtsbewegungen zu lsen.
English
Assembly instruction for Front Wheel Stand
General advice
Please have a careful look at this assembly
instruction before assembling and applying the product.
Please understand, that AceBikes cannot be held resp
onsible for any consequential loss or damage due to an improp
er assembly or use of the product.
Warning: Under certain circumstances it is unavoidable,
that the tire adheres slightly to the paddock stand.
We recommend to loosen the tire by slight
sidewards movements before pulling out the motocycle.
Francais
Manuel d'installation pour Bquille avant
Informations gnrales
Avant le montage et l'utilisation du produit, veuillez regarder
soigneusement ce manuel d'installation. Veuillez comprendre que AceBikes
ne peut tre tenu pour responsable des dommages conscutifs
un montage ou une utilisation incorrecte.
Avertissement: Dans certains cas il est invitable que le pneu adhre lg
rement la bquille. Nous recommandons de dcoller le pneu par mouvements lgers
sur le ct avant de sortir de la bquille.

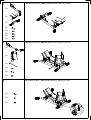
1
2
3
1x
1x
2x
1x
1x
1x
1x
2x
4x
DE Handfest anziehen ENG Hand tightened only FR Serrez la main
1x
2x
2x
4x
1x
1x
1x
1x
DE Handfest anziehen ENG Hand tightened only FR Serrez la main
DE Handfest anziehen ENG Hand tightened only FR Serrez la main

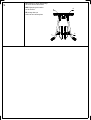
4
DE Anziehen in dieser Reihenfolge
auf einer ebenen Oberflache
ENG Tightening in this order
on flat surface
FR Serrage dans cet
ordre sur une surface plane
A
B
C
D

1e
2e
3e
DE Sie haben die korrekte Einstellung vorgenommen, wenn:
Der Reifen mglichst nahe als mglich an Teil A anschliet, allerdings
ohne Teil A zu berhren. (siehe fig.1)
Sie knnen dies erreichen, indem Sie die beiden Teile gleichermaen
nach rechts und links verschieben. (Siehe fig.2)
ENG You have made the right adjustment when:
The tyre is as close as possible to part A but
without contacting this part A.(see fig.1)
You can achieve this by shifting the two parts equally left and right.
(see fig. 2)
FR Vous avez fait le bon rglage quand:
le pneu est le plus prs possible de la pice A
mais sans toucher cette pice ( voir fig.1)
Vous pouvez y parvenir en dcalant les deux cts de manire
gale gauche et droite (voir fig.2)
Schritt 1 - Einstellung an die Reifenbreite
Step 1 - Tyre width adjustment
Etape 1 - Rglage largeur du pneu
DE Sie haben die korrekte Einstellung vorgenommen, wenn:
Teil B sich so nah wie mglich an der Montageflche befindet,
ohne diese jedoch zu berhren (Siehe fig.4)
Sie knnen dies durch das Verschieben der Montageposition C
(Siehe fig.3)
ENG You have made the right adjustment when:
Part B is as close as possible to the mounting surface but
without making contact to the mounting surface (see fig 4)
You can achieve this by shifting the position of the front
support C (see fig 3)
FR Vous avez fait le bon rglage quand:
la pice B est au plus prs du plancher
mais sans venir au contact de ce dernier (voir fig.4)
Vous pouvez y parvenir en changeant la position du support
avant C (voir fig.3)
fig. 1
fig. 2
fig. 3
fig. 4
Schritt 2 - Einstellung an die Reifendurchmesser
Step 2 - Tyre diameter adjustment
Etape 2 - Rglage diamtre du pneu
C
B
A
C

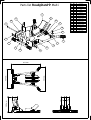
Description
Qty
Item
Side frame left11
Support front
22
Frame back13
Shaft14
Grip
45
Washer 886
Bearing2
7
Adjustment bar18
Adjustment rod19
Spring cotter110
Sticker
211
Support back
112
Side frame right113
Washer 8 large214
Bolt M8x35215
Spring216
Bolt M8x16417
Hex Nut M8418
Parts list SteadyStand Multi
R
3
17
6
18
12
9
13
14
15
2
8
16
4
7
1
11
10
5
5
9
3
m
m
677 mm
3
8
0
m
m
4
6
4
m
m
-
 1
1
-
 2
2
-
 3
3
-
 4
4
-
 5
5
-
 6
6


