Intermec MaxiScan 2100 Mounting & Installation
- Catégorie
- Kits de voiture
- Taper
- Mounting & Installation
Ce manuel convient également à

MobileLAN
™
access
WA21/2100
Rotating Mounting
Bracket Kit
Instructions

Intermec Technologies Corporation
6001 36th Avenue West
Everett, WA 98203
U.S. service and technical support: 1-800-755-5505
U.S. media supplies ordering information: 1-800-227-9947
Canadian service and technical support: 1-800-668-7043
Canadian media supplies ordering information: 1-800-268-6936
Outside U.S.A. and Canada: Contact your local Intermec service supplier.
The information contained herein is proprietary and is provided solely for the purpose of allowing
customers to operate and/or service Intermec manufactured equipment and is not to be released,
reproduced, or used for any other purpose without written permission of Intermec.
Information and specifications in this manual are subject to change without notice.
2002 by Intermec Technologies Corporation
All Rights Reserved
The word Intermec, the Intermec logo, INCA (under license), MobileLAN, JANUS, IRL, Trakker
Antares, EZBuilder, TE 2000, Data Collection Browser, dcBrowser, Universal Access Point, UAP,
Duratherm, EasyCoder, Precision Print, PrintSet, Virtual Wedge, and CrossBar are either
trademarks or registered trademarks of Intermec.
Throughout this manual, trademarked names may be used. Rather than put a trademark ( or )
symbol in every occurrence of a trademarked name, we state that we are using the names only in an
editorial fashion, and to the benefit of the trademark owner, with no intention of infringement.
There are U.S. and foreign patents pending.

MobileLAN access WA21/2100 Rotating Mounting Bracket Kit Instructions 3
About the Rotating Mounting Bracket Kit
This instruction sheet explains how to mount the rotating mounting
bracket and then how to install the MobileLANaccess WA21 or the
MobileLANaccess 2100 in the bracket. After you install the access point
in the bracket, you can secure it with a lock to prevent unauthorized
access. Using the bracket also lets you access the access point without
having to completely remove the access point from its mounting location.
Your kit (P/N 068751) contains these parts:
• Rotating mounting bracket
• Lanyard assembly (1 lanyard, 2 thread-forming screws)
• ¼-20 hex bolts (2)
• Shoulder washers (2)
• ¼-20 Phillips screws (2)
• Split lock washers (2)
• Flat washers (2)
Mounting the Bracket
You can mount the bracket to a wall or beam. Be sure you mount the
bracket in accordance with local building codes. The bracket must be
mounted to a sturdy surface such as:
• a wood surface at least 9.52 mm (3/8 in) thick.
• a 14-gauge steel surface at least 2 mm (.075 in) thick.
• a drywall surface at least 12.7 mm (1/2 in) thick, with appropriate
drywall reinforcement such as drywall anchors.
You need the following tools and materials to mount the bracket:
• Four to eight screws that are up to 6 mm (1/4 in) in diameter. The
screws should be appropriate for the surface on which you are mounting
the bracket.
• Small padlock (optional)
• Drill and drill bit appropriate for the mounting screws you are using
• Straight-slot screwdriver, small Phillips screwdriver, large Phillips
screwdriver
You may need additional common hand tools and mounting hardware,
depending upon your installation.
Note: To maintain the IP 54 environmental rating, you must mount the
access point with the antenna connector pointing up.

4 MobileLAN access WA21/2100 Rotating Mounting Bracket Kit Instructions
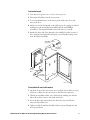
To mount the bracket
1 Open the bracket so the mounting holes in the bracket support are
visible.
2 Use the bracket support as a template to mark the location of at least
four mounting holes on the mounting surface. If you are mounting the
bracket to a drywall surface, you should use all eight mounting holes.
3 Drill the mounting holes at the marked locations.
4 Insert screws through the bracket support into the mounting holes and
tighten securely.
21XXIS001.eps
Mounting screw
(8 places)
Bracket
support
UP
5 If needed, use additional hardware to secure the bracket to the
mounting surface.
Installing the Access Point in the Bracket
To install the access point in the bracket, you must perform these tasks:
• Attach the lanyard to the bracket and to the cable access door.
• Install the bolts and shoulder washers on the access point.
• Secure the access point to the bracket.
The instructions for each task are described in this section.

MobileLAN access WA21/2100 Rotating Mounting Bracket Kit Instructions 5
To attach the lanyard
1 Turn the access point over so it rests on its top cover.
2 Disconnect all cables from the access point.
3 Loosen the thumbscrews on the access point cable access door and
remove the door.
4 Attach one end of the lanyard to the cable access door using one thread-
forming screw from the lanyard assembly and the small Phillips
screwdriver. The lanyard should rotate freely after it is secured.
5 Attach the other end of the lanyard to the small hole in the bottom of
the rotating mounting bracket using the second thread-forming screw
from the lanyard assembly.
21XXIS002.eps
Lanyard
assembly
Cable
access
door
Shoulder washer
(2 places)
Hex bolt
(2 places)
To install the bolts and shoulder washers
1 On the bottom of the access point, use a straight-slot screwdriver to pry
off the two rubber feet that are closest to the antenna connectors.
2 Thread one shoulder washer onto each hex bolt, making sure the flat
side of the washer is next to the head of the bolt.
3 Screw the hex bolts with washers into the holes uncovered by the
removal of the rubber feet.
4 Tighten each bolt until the shoulder washer is pressed firmly into the
access point chassis.

6 MobileLAN access WA21/2100 Rotating Mounting Bracket Kit Instructions
To secure the access point to the bracket
1 Use the straight-slot screwdriver to pry the two remaining rubber feet
off the access point.
2 Rotate the bracket closed.
3 Lift the access point so the antenna connectors are pointing up.
4 Insert the hex bolts that you just installed on the access point into the
keyhole slots on the bracket.
5 Slide the access point down until the hex bolts are firmly seated in the
bottom of the keyhole slots.
6 Rotate the bracket open.
7 Thread one split lock washer and one flat washer, in that order, onto
each Phillips screw.
21XXIS003.eps
Phillips screw
(2 places)
Flat washer
(2 places)
Split lock
washer
(2 places)
8 Insert each screw through the hole in the bracket and into the hole
uncovered by the removal of the rubber feet.
9 Use the large Phillips screwdriver to tighten the screws.
10 Reattach all cables to the access point.
11 Reinstall the cable access door.
12 Rotate the bracket closed.

MobileLAN access WA21/2100 Rotating Mounting Bracket Kit Instructions 7
13 Tighten the captive screws to secure the bracket to the bracket support.
21XXIS004.eps
Rotating
mounting
bracket
Lock
(optional)
Captive screw
(2 places)
For additional security, you can supply a padlock and insert it through the
bracket and bracket support.
You have completed the installation. For more information about your
access point, see the MobileLAN access System Manual (P/N 067150).
According to Part I, Rule 4-010 of the Canadian Electrical Code, the
suitability of the use of flexible cord is to be determined by the local
inspection authority having jurisdiction.
Attention: Conformément à la Section 1 du Règlement 4-010 du Code
canadien sur l'électricité, l'aptitude à utiliser un cordon flexible doit
être déterminée par les services d'inspection locale ayant autorité dans
ce domaine.

Corporate Headquarters
6001 36th Avenue West
Everett, Washington 98203
U.S.A.
tel 425.348.2600
fax 425.355.9551
MobileLAN™access WA21/2100 Rotating Mounting Bracket Kit Instructions
*069616-003*
*069616-003*
-
 1
1
-
 2
2
-
 3
3
-
 4
4
-
 5
5
-
 6
6
-
 7
7
-
 8
8


Intermec MaxiScan 2100 Mounting & Installation
- Catégorie
- Kits de voiture
- Taper
- Mounting & Installation
- Ce manuel convient également à
dans d''autres langues
- English: Intermec MaxiScan 2100
Documents connexes
-
Intermec MobileLAN access WA21 Guide de démarrage rapide
-
-
Intermec MaxiScan 2100 Guide de démarrage rapide
-
Intermec MobileLAN access WA22 Mode d'emploi
-
-
-
Intermec MobileLAN access 2102 Guide de démarrage rapide
-
-
-