
1
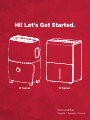
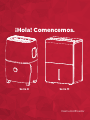
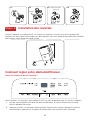
Hi! Let’s Get Started.
Dehumidifier
English / Spanish / French
D Series M Series

2
Table of Contents
English
Register and Protect Your Purchase ................................................................................................. 3
Important Safety Instructions .............................................................................................................. 4
What’s in the Box: D Series ................................................................................................................. 5
Let’s Get Started! ...................................................................................................................................... 6
How to Control Your Dehumidifier ..................................................................................................... 7
What’s in the Box: M Series .................................................................................................................. 9
Let’s Get Started! ...................................................................................................................................... 10
How to Control Your Dehumidifier (All Models) ........................................................................... 11
Troubleshooting ........................................................................................................................................ 16
Warranty Information .............................................................................................................................. 17
Spanish
Registre y proteja su compra ............................................................................................................... 19
Instrucciones Importantes De Seguridad ........................................................................................ 20
Contenidos de la Caja: Serie D ............................................................................................................ 21
¡Comencemos! ............................................................................................................................................ 22
Cómo Manejar su deshumidificador .................................................................................................. 23
Contenidos de la Caja: Serie M............................................................................................................ 25
¡Comencemos! ............................................................................................................................................ 26
Cómo Manejar su deshumidificador (Todos los modelos) ....................................................... 27
Solución de Problemas ........................................................................................................................... 30
Instrucciones de la aplicación WiFi (Solo modelos con WiFi) ................................................ 31
Información de garantía ........................................................................................................................ 34
French
Enregistrez et prot gez votre achat .................................................................................................. 36
Consignes De Sécurité Importantes .................................................................................................. 37
Contenu de la boîte: Série D ................................................................................................................ 38
C’est parti! .................................................................................................................................................... 39
Comment régler votre déshumidificateur ....................................................................................... 40
Contenu de la boîte: Série M ................................................................................................................ 43
C’est parti! .................................................................................................................................................... 44
Comment régler votre déshumidificateur (Tous les modèles) ................................................ 45
Conseils de dépannage .......................................................................................................................... 47
Installation de l’application WiFi (Modèles WiFi seulement) .................................................. 48
Informations de garantie ........................................................................................................................ 51

3
Product Replacement
Free 1-time replacement if product cannot be fixed.
TCL Parts & Service
Genuine TCL parts & factory certified service.
No Deductible
$0 out of pocket expense.
Priority Service
Free shipping and rapid turn-around time.
Extended Manufacturer Coverage
Extended parts & labor coverage for manufacturer defects.
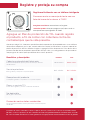
PROTECT PLUS
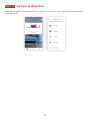
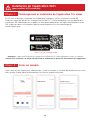
Thank you for choosing TCL. We want your ownership experience to bring you as much joy as
the product you purchased does, so we’re oering you a special price on TCL Protection Plans
when you purchase during registration. Add a TCL Protection Plan within your first 30 days of
ownership to receive the best value and we’ll make sure nothing gets in the way of you enjoying
your new product.
Add a TCL Protection Plan when you register your
product and be covered from life’s mishaps
Benefits & Description
Up To 4 Years
3-5 Days3-5 Days
Up To 4 Years
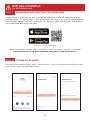
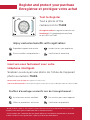
Scan or text a photo of
the camera icon to 71403
Register easily with your smartphone
Or register online at www.tclusa.com/register
Need help? Visit photoregister.com/help or text HELP to 71403
Register and protect your purchase
Accidental Damage Protection
Coverage for drops, breaks and spills starts after 30 days.
ENGLISH
*Extended service plans (i.e., “Protect” and “Plus” plans) are only oered in the United States (US). All TCL
products continue to oer a limited consumer warranty in both the US and Canada. Please refer to the warranty
section in this guide for additional details on warranty information.
TCL-DHM

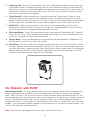
IMPORTANT SAFETY INSTRUCTIONS
Before installing and using your dehumidifier, please read this owner’s manual carefully. Store this manual
in a safe place for future reference. Your safety and the safety of others is very important to us. Please pay
attention to all safety messages outlined in this owner’s manual.
WARNING: To reduce the risk of fire, electrical shock or injury when using your dehumidifier, follow the
following basic precautions:
ELECTRICAL REQUIREMENTS
The electrical ratings for your dehumidifier are listed on the model and serial number label located on the on
the back side (when facing the front).
REGISTER YOUR APPLIANCE
You can register your appliance online by going to register.tcl.com
Be sure to retain your original sales receipt. A valid proof of purchase is required for all warranty claims.
Document your model and serial numbers here:
Model #___________________________________ Serial #___________________________________
You can locate your 20 digit serial number underneath the bar code (on the back side)
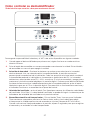
WARNING Specific electrical requirements are shown in the diagram
below. Follow the requirements below for the type of plug on
the power supply cord.
Electrical Shock Hazard
Plug into a grounded 3 prong outlet.
Do not remove the ground prong.
Do not use an adapter.
Do not use an extension cord.
Failure to follow these instructions can result in
death, fire, or electrical shock.
Wiring Requirements Power Supply Cord
60Hz, 115V AC outlet protected
by a 15 amp time delay fuse
or circuit breaker.
RECOMMENDED GROUND METHOD
For your personal safety, this air conditioner must be grounded. This dehumidifer is equipped with a 3 prong
power supply cord with a grounded plug. To minimize the possibility of electrical shock, the cord must be
plugged into a 3 prong outlet and grounded in accordance with all local codes and ordinances. If a 3 prong
outlet is not available, it is the customer’s responsibility to have a properly grounded 3 prong outlet installed
by a qualified electrician.
PREFERRED
GROUNDING METHO D
Ensure prope r
ground exist s
before use.
DO NOT RETURN TO STORE
TCL SUPPORT:
support.tcl.com
1-800-825-6747
contact us first
with any questions
WE ARE
READY TO
HELP
TAKE CARE WHEN REMOVING
THE DEHUMIDIFIER UNIT

5
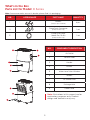
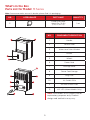
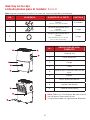
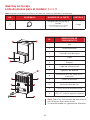
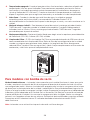
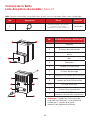
What’s in the Box
Parts List for Model: D Series
Note: Some accessories are not in bucket, please find it in packaging.
NO. APPEARANCE PART NAME QUANTITY
1Wheels
(may be pre-installed) 4 pcs
2Pump Drain Connector
(pump model only) 1 set
3Pump Drain Hose
(about 5m, 16.4ft)
(pump model only)
1 set
2
3
7
8
9
6
5
4
1
NO. COMPONENT DESCRIPTION
1Air Outlet
2Control Panel
3Handle
4Bucket
5Water Level View Window
6Wheels
7Air Intake Grille
8Drainage Hole
9Power Cord
Note: Illustrations in this manual are for
explanatory purposes only. Product
design and aesthetics may vary.

6
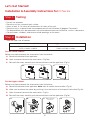
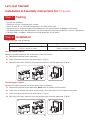
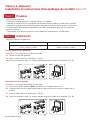
Let’s Get Started!
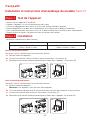
Installation & Assembly Instructions for: D Series
Step 1: Testing
• Do not use outdoors.
• Place the unit on a smooth level surface.
• Allow at least 12 -18 inches of clearance on all sides of the unit.
• Place the unit in a space where the temperature will not fall below 41 degrees Fahrenheit.
• The dehumidifier must be operated in an enclosed area to be most eective, such as a basement.
• Close all doors, windows, and other outside openings to the room.
Step 2: Installation
There are two sizes of cabinet
Smaller cabinet size (WxHxD) Bigger cabinet size (WxHxD)
370mm x 505mm x 270mm
14.57in x 19.88in x 10.63in
382mm x 640mm x 305mm
15.04in x 25.20in x 12.01in
For the smaller cabinet:
Before use, please remove the accessories from the bucket
1a. Remove the bucket from appliance.
1b. Open the cover, take out the accessories. (Fig 1ab).
1c. Reinstall the cover, correctly put the bucket back into the appliance (Fig 1c).
1ab. 1c.
1a. 1b. 1c. 1d.
Wheels and other
accessories
Wheels
Latches
For the bigger cabinet:
Before use, please remove the accessories from the bucket
1a. Remove the bucket from appliance. Note: Not all models have handles (Fig 1a).
1b. Make sure to release the cover by pushing in the two latches at the top of the bucket(Fig 1b).
1c. Open the cover, take out the accessories. (Fig 1c).
1d. Reinstall the cover, correctly put the bucket back into the appliance (Fig 1d).
1a. 1b.
1a. 1b. 1c. 1d.
Wheels and other
accessories
Wheels
Latches

7
Step 3: Install the Wheels
Tilt the unit no more than 45° and forcibly insert the wheels. Make sure the plate of the wheels
is flush against the bottom of the unit. If the appliance has pre-installed wheels, this step can
be skipped.
1a. 1b.
1a. 1b. 1c. 1d.
Wheels and other
accessories
Wheels
Latches
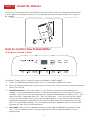
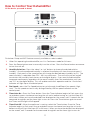
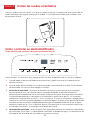
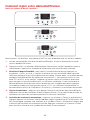
How to Control Your Dehumidifier
All the basics you need to know!
Disclaimer: Pump and WiFi features are only available on select models.
1. When first operating the dehumidifier, run it in Continuous mode for 24 hours.
2. Press the Power button once to manually turn the unit on. Press the Power button once more
to turn the unit o.
3. Humidity Selection – Press the “down” or “up” buttons to choose the desired relative
humidity. Once the preferred humidity is selected, the display will show the actual room %
humidity. Each press of the same button will change the desired room humidity by 5%. The
room humidity is selectable from 35% - 80%, or continuous. The until will cycle on and o
to maintain the humidity level chosen on the digital display. If you want the dehumidifier
to operate continuously regardless of the room humidity, press the mode button until you
see “CO” on the digital display. This will enable continuous operation and the “Continuous”
indicator will light up on the control panel.
4. Fan Speed – press the Fan Speed button to cycle through the dierent fan speeds (High,
Low). The fan speed can be visually distinguished by the fan speed indicators on the
control panel.

8
5. Timer Auto On – Press the Timer button. Once the Timer indicator begins to flash, press the
up and down arrows to choose how long the unit waits before turning on (set time from 0.5
to 24 hours).When you have the desired time displayed on the screen, wait 5 seconds for the
command to register and the timer light to turn on. Press the Timer button again to cancel
the Timer, and the light will disappear
6. Timer Shut O – When the appliance is running, select the Timer button. Once the Timer
indicator begins to flash, press the up and down arrows to choose how long the unit waits
before turning o (set time from 0.5 to 24 hours). When you have the desired time displayed
on the screen, wait 5 seconds for the command to register and the timer light to turn on.
7. Bucket Full – When the water bucket is full, the unit will automatically shut o, make a
beeping noise and the bucket full indicator will light up. The dehumidifier will not function
until the water bucket is emptied and placed back in the unit.
8. Child Lock Mode – To lock the control panel, press and hold the Timer button for 3 seconds
when the unit is ON. When locked, the lock indicator will light up. Press and hold the Timer
button for 3 seconds to unlock the control panel.
9. Pre-Set Mode – Press the Mode button to choose from the preset options of Bedroom (55%
RH), Basement (45% RH), or Continuous Mode.
10. Clean Filter - The Clean Filter LED will light up after 250 hours of use as a reminder to clean
the filter. Remove the filter from the back of the unit by using your thumbs to press down on
the filter tabs directly above the filter. Clean the filter with warm, soapy water. Dry thoroughly
before replacing the filter. Once the filter is completely dry, place the filter back in the unit
and press the Filter button to reset the filter indicators.
1a. 1b.
1a. 1b. 1c. 1d.
Wheels and other
accessories
Wheels
Latches
For Model(s) with PUMP
Internal Pump Mode – The internal pump allows the unit to operate without having to empty the
bucket and requires the installation of the included pump drain hose kit (do not use a garden
hose). While the unit is O, to install the hose, remove the drain cap on the back of the unit. The
pump mode operation will pump water up to 16 feet lengthwise using the hose included. Force the
hose on to the pump adapter and turn the adapter clockwise on to the threaded connection on
the back of the unit. Once securely installed, lead the drain hose to a nearby drain, sink, or out of a
window. Turn on the dehumidifier and press the Pump button to activate the internal pump. The
“Pump” LED indicator should illuminate.
Note: The pump will not engage until the bucket is almost full of water.

9
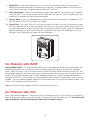
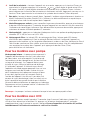
What’s in the Box
Parts List for Model: M Series
Note: Some accessories are not in bucket, please find it in packaging.
NO. APPEARANCE PART NAME QUANTITY
3Pump Drain Hose
(about 5m, 16.4ft)
(pump model only)
1 set
11
9
8
7
5
10
12
21
6
4
3
11
9
8
7
5
10
12
21
6
4
3
NO. COMPONENT DESCRIPTION
1Handle
2Control Panel
3Water Level View Window
4Bucket
5Wheels
6Power Cord
7Drainage Holes
8Power Cord Storage
9Plug Fixer
10 Air Outlet Grille
11 Air Inlet Grille & Filter
12 UVC LED (Select Models Only)
Note: Illustrations in this manual are for
explanatory purposes only. Product
design and aesthetics may vary.

10
Let’s Get Started!
Installation & Assembly Instructions for: M Series
Step 1: Testing
• Do not use outdoors.
• Place the unit on a smooth level surface.
• Allow at least 12 -18 inches of clearance on all sides of the unit.
• Place the unit in a space where the temperature will not fall below 41 degrees Fahrenheit.
• The dehumidifier must be operated in an enclosed area to be most eective, such as a basement.
• Close all doors, windows, and other outside openings to the room.
Step 2: Installation
There are two sizes of cabinet
Smaller cabinet size (WxHxD) Bigger cabinet size (WxHxD)
365mm x 500mm x 250mm
14.37in x 19.69in x 9.84in
383mm x 610mm x 280mm
15.08in x 24.02in x 11.02in
For the smaller cabinet:
Before use, please remove the accessories from the bucket
1a. Remove the bucket from appliance.
1b. Open the cover, take out the accessories. (Fig 1a).
1c. Reinstall the cover, correctly put the bucket back into the appliance (Fig 1b).
1a. 1b.
For the bigger cabinet:
Before use, please remove the accessories from the bucket
1a. Remove the bucket from appliance. Note: Not all models have handles.
1b. Make sure to release the cover by pushing in the two latches at the top of the bucket.
1c. Open the cover, take out the accessories. (Fig 1a).
1d. Reinstall the cover, correctly put the bucket back into the appliance (Fig 1b).
1a. 1b.

11
How to Control Your Dehumidifier
All the basics you need to know!
Disclaimer: Pump and WiFi features are only available on select models.
1. When first operating the dehumidifier, run it in Continuous mode for 24 hours.
2. Press the Power button once to manually turn the unit on. Press the Power button once more
to turn the unit o.
3. Humidity Selection – Press the “down” or “up” buttons to choose the desired relative
humidity. Once the preferred humidity is selected, the display will show the actual room %
humidity. Each press of the same button will change the desired room humidity by 5%. The
room humidity is selectable from 35% - 80%, or continuous. The until will cycle on and o
to maintain the humidity level chosen on the digital display. If you want the dehumidifier
to operate continuously regardless of the room humidity, press the mode button until you
see “CO” on the digital display. This will enable continuous operation and the “Continuous”
indicator will light up on the control panel.
4. Fan Speed – press the Fan Speed button to cycle through the dierent fan speeds (High,
Low). The fan speed can be visually distinguished by the fan speed indicators on the
control panel.
5. Timer Auto On – Press the Timer button. Once the Timer indicator begins to flash, press the
up and down arrows to choose how long the unit waits before turning on (set time from 0.5
to 24 hours).When you have the desired time displayed on the screen, wait 5 seconds for the
command to register and the timer light to turn on. Press the Timer button again to cancel
the Timer, and the light will disappear
6. Timer Shut O – When the appliance is running, select the Timer button. Once the Timer
indicator begins to flash, press the up and down arrows to choose how long the unit waits
before turning o (set time from 0.5 to 24 hours). When you have the desired time displayed
on the screen, wait 5 seconds for the command to register and the timer light to turn on.

12
7. Bucket Full – When the water bucket is full, the unit will automatically shut o, make a
beeping noise and the bucket full indicator will light up. The dehumidifier will not function
until the water bucket is emptied and placed back in the unit.
8. Child Lock Mode – To lock the control panel, press and hold the Timer button for 3 seconds
when the unit is ON. When locked, the lock indicator will light up. Press and hold the Timer
button for 3 seconds to unlock the control panel.
9. Pre-Set Mode – Press the Mode button to choose from the preset options of Bedroom (55%
RH), Basement (45% RH), or Continuous Mode.
10. Clean Filter - The Clean Filter LED will light up after 250 hours of use as a reminder to clean
the filter. Remove the filter from the back of the unit by using your thumbs to press down on
the filter tabs directly above the filter. Clean the filter with warm, soapy water. Dry thoroughly
before replacing the filter. Once the filter is completely dry, place the filter back in the unit
and press the Filter button to reset the filter indicators.
For Model(s) with PUMP
Internal Pump Mode – The internal pump allows the unit to operate without having to empty the
bucket and requires the installation of the included pump drain hose kit (do not use a garden
hose). While the unit is O, to install the hose, remove the drain cap on the back of the unit. The
pump mode operation will pump water up to 16 feet lengthwise using the hose included. Force the
hose on to the pump adapter and turn the adapter clockwise on to the threaded connection on
the back of the unit. Once securely installed, lead the drain hose to a nearby drain, sink, or out of a
window. Turn on the dehumidifier and press the Pump button to activate the internal pump. The
“Pump” LED indicator should illuminate.
Note: the pump will not engage until the water tank is almost full.
For Model(s) with UVC
Press and hold the mode for 3 second until the UV indicator turns on. To turn the UV function o,
press and hold the mode button for another 3 seconds until the indicator turns o. Should any UV
light be exposed, stop use immediately and contact customer service.

13
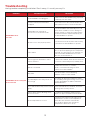
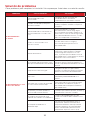
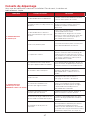
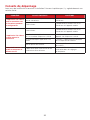
Troubleshooting
Having trouble completing installation? Don’t worry, it’s usually an easy fix.
PROBLEM POSSIBLE CAUSES SOLUTIONS
Dehumidifier does
not start
The dehumidifier is unplugged. • Make sure the dehumidifier plug is pushed
completely into the outlet.
The fuse is blown/circuit breaker
is tripped
• Check the house fuse/circuit breaker box
and replace the fuse or reset the breaker.
Dehumidifier has reached its
pre-set level or the bucket is full
• The dehumidifier automatically turns o
when either condition occurs. Change to
a lower setting or empty the water bucket.
The bucket must be replaced properly for
the dehumidifier to operate.
Bucket is not in the proper position • The bucket must be in place and securely
inserted for the dehumidifier to operate.
Power failure
• There is a protective time delay (up to 3
min.) to prevent tripping of the compressor
overload. For this reason, the unit may not
start normal dehumidification for 3 min.
after it is powered back on.
Dehumidifier does not dry the
air as it should
Not enough time allowed for unit to
remove moisture
• When first installed, allow at least 24 hours
to reach the desired dryness/humidity level.
Airflow is restricted
• Make sure there are no curtains,
blinds , or furniture blocking the front
or back of the dehumidifier.
Dirty filter • Clean the filter. See the Cleaning
and Care Section of the manual.
The Humidity Control may not be set
low enough
• For drier air, press the v button to lower
the humidity setting percentage in the room
set the dehumidifier to CO for maximum
dehumidification.
Doors and windows may not be closed
tightly
• Check that all doors, windows, and other
openings are securely closed.
Clothes dryer may be blowing moist
air into the room
• Install the dehumidifier away from the
dryer. The dryer should be vented outside.
Room temperature is too low
• Moisture removal is best at higher room
temperatures. Lower room temperatures
will reduce the moisture removal rate.
This model is designed to operate at
temperatures above 41° F (5°C).

14
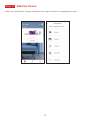
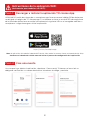
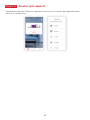
WiFi App Installation
(for WiFi models only)
Step 1: Download and Install the TCL Home App
Using the camera function on your smartphone, please scan the QR code below to be
directed to the TCL Home page. If your phone does not have a QR scanner, download one
from the app store or manually type in the URL below in your smartphone’s web browser.
Then, download and launch the app.
https://tcl.link/homeplusapp
Note: The App only supports the 2.4 GHz WiFi channel (all routers have a 2.4 GHz band).
Please connect to the 2.4 GHz band before you begin the app setup process.
Step 2: Create an Account
Once you have opened the app, select “Create account.” You will then be sent a verification code
to your email. Input the code and continue.

15
Step 3: Add Your Device
Select the “Add Devices” button and follow the in-app instructions to complete the setup.

16
Troubleshooting
Having trouble completing installation? Don’t worry, it’s usually an easy fix.
PROBLEM POSSIBLE CAUSES SOLUTIONS
TCL Home App
loses connectivity to AC
during setup
Wireless router may be too far
from AC • Relocate wireless router closer to AC.
Network error • Restart wireless router, AC, and mobile device
TCL Home App cannot
find AC
Network error • Restart wireless router, AC, and mobile device
App & AC are not on the same 2.4GHz
channel
• Confirm your device is connected to the
2.4GHz channel.
Router blocking TCL Home App • Verify App is not being blocked by the
router’s firewall.
Incorrect WiFi Password • Reinput and verify WiFi password.
Unable to find or connect
to Wireless Network App may need permission to location • Give TCL Home App permission to Location
in phone settings.

17
TCL North America
LLIIMMIITTEEDD PPRROODDUUCCTT WWAARRRRAANNTTYY
What your warranty covers: Defects in materials or workmanship to the original owner of this TCL product when purchased as new from an Authorized
Dealer of TCL brand products and packaged with this warranty statement.
WARRANTY PERIOD (NON-COMMERCIAL USE):
Labor: Twelve (12) Months from the original date of purchase.
Parts: Twelve (12) Months from the original date of purchase.
WARRANTY PERIOD (COMMERCIAL USE):
Labor: Six (6) Months from the original date of purchase.
Parts: Six (6) Months from the original date of purchase.
Commercial Use includes, but is not limited to, the use of this product in a commercial or business environment, the use of this product in an institution or
for institutional purposes, or for other commercial purposes including rental purposes.
Should your TCL device prove to be defective in material or workmanship under normal use during the warranty period listed above, effective from the
date of original consumer purchase of the product, TCL North America at its sole discretion will, (1) pay an Authorized TCL Service Center for both labor
charges and parts to repair your device, or (2) replace your device with a new or refurbished/recertified equivalent product. If repaired at an Authorized
TCL Service Center, TCL is not responsible for the transportation costs to the Authorized TCL Service Center. However, TCL will pay for the return
shipping. TCL will provide instructions for the packaging and shipping of the unit. Units that are improperly packed and damaged during shipping are not
covered under this limited product warranty. This limited product warranty is good only to the original purchaser of the product and effective only when
used in North America. You must have your original purchase receipt or proof of purchase (bill of sale or receipted invoice) which states the condition of
the unit (new, used), the unit’s date of purchase, place of purchase, and model/serial number.
HOW SERVICE IS HANDLED: Call 1-800-825-6747 and choose the appropriate prompt. Please have product type, model number, serial number, and ZIP
code ready. Troubleshooting and prior approval from a TCL representative MUST occur before sending in your product for repair.
Product Registration Information
You can find the model number and serial number on a label on the back or side of the product.
RReeggiisstteerr yyoouurr pprroodduucctt oonnlliinnee aatt rreeggiisstteerr..ttccll..ccoomm..
NO OTHER WARRANTY IS APPLICABLE TO THIS PRODUCT. THIS LIMITED WARRANTY IS IN LIEU OF ANY OTHER WARRANTY, EXPRESS OR IMPLIED,
INCLUDING WITHOUT LIMITATION, ANY WARRANTY OF MERCHANTABILITY OR FITNESS FOR A PARTICULAR PURPOSE. TO THE EXTENT ANY
IMPLIED WARRANTY IS REQUIRED BY LAW, IT IS LIMITED IN DURATION TO THE EXPRESS WARRANTY PERIOD ABOVE. NEITHER THE
MANUFACTURER NOR ITS DISTRIBUTOR SHALL BE LIABLE FOR ANY INCIDENTAL, CONSEQUENTIAL, INDIRECT, SPECIAL, OR PUNITIVE DAMAGES OF
ANY NATURE, INCLUDING WITHOUT LIMITATION, LOST REVENUES OR PROFITS, OR ANY OTHER DAMAGE WHETHER BASED IN CONTRACT, TORT,
OR OTHERWISE. SOME STATES AND/OR TERRITORIES DO NOT ALLOW THE EXCLUSION OR LIMITATION OF INCIDENTAL OR CONSEQUENTIAL
DAMAGES OR LIMITATIONS ON THE LENGTH OF TIME AN IMPLIED WARRANTY LASTS, SO THE ABOVE EXCLUSION OR LIMITATION MAY NOT APPLY
TO YOU. THIS LIMITED WARRANTY GIVES YOU, THE ORIGINAL PURCHASER, SPECIFIC LEGAL RIGHTS AND YOU MAY ALSO HAVE OTHER RIGHTS
THAT VARY FROM STATE TO STATE OR TERRITORY TO TERRITORY. THIS WARRANTY IS SUBJECT TO CHANGE WITHOUT NOTICE. PLEASE VISIT
WWW.TCL.COM/EN TO VIEW THE MOST CURRENT VERSION.
TTHHIISS LLIIMMIITTEEDD WWAARRRRAANNTTYY DDOOEESS NNOOTT AAPPPPLLYY TTOO::
1. Service calls to your home for delivery or pick-up, installation,
instruction, replacement of house fuses, connection of house
wiring or plumbing, or to correct unauthorized repairs.
2. Failure of the product to perform due to signal reception
problems not caused by your unit, or due to power failures or
interruptions or inadequate electrical service.
3. Damage caused by transportation or handling, including
damage during shipment from a Retailer (please contact your
Retailer for assistance).
4. Damage caused to the product by accident, vermin, lightning,
wind(s), fire, flood(s), or act(s) of God.
5. Damage caused by operating the product in a corrosive or wet
atmosphere.
6. Repairs when your TCL product is used in other-than-normal,
single-family household use, or contrary to the instructions
described in the product User’s Guide.
7. Damage resulting from accident, alteration, misuse, abuse,
neglect, insects, normal wear-and-tear, cosmetic damage,
mishandling, power line surges, improper or faulty installation,
or improper repair or maintenance. Improper repair includes
the use of parts not approved or specified by TCL.
8. Markings or images on the product’s LCD/LED panel resulting
from viewing fixed images (including but not limited to certain
4:3 images on wide screen televisions, and/or data or images
in fixed screen locations from banners, video games, or certain
broadcast networks).
9. Normal maintenance as described in the User’s Guide
(including but not limited to cleaning or replacing filters,
cleaning coils, or other normal maintenance).
10. Use of accessories or components that are not compatible
with this product.
11. Products with altered, missing, defaced, unreadable, or
removed serial numbers.
12. Changes in the appearance of the product that do not affect
product performance.
13. Increases in utility costs and/or additional utility expenses.
14. Products purchased from non-authorized TCL resellers.
15. Products sold in any condition other than new from the
original manufacturer, or sold outside of North America.
The cost of repair or replacement under these excluded circumstances
shall be borne by the consumer.
CCOONNTTAACCTT IINNFFOORRMMAATTIIOONN::
TCL North America
1860 Compton Ave Corona, California 92881
1- 800-825-6747
www.tcl.com/en

18
¡Hola! Comencemos.
Deshumidificador
Serie D Serie M

19
Reemplazo del producto
1 reemplazo gratuito si el producto no se puede reparar.
Piezas y servicio TCL
Piezas TCL originales y servicio certificado de fábrica.
No deducible
$0 de gastos de bolsillo.
Servicio prioritario
Envío gratuito y tiempo de respuesta rápido.
Cobertura extendida del fabricante
Cobertura ampliada de piezas y mano de obra por defectos
de fabricación.
PROTECT PLUS
Gracias por elegir TCL. Queremos que disfrute de la experiencia de propiedad tanto como disfruta
del producto adquirido, por lo que, cuando realice la compra, le ofreceremos un precio especial en
planes de protección de TCL durante el registro. Agregue un Plan de protección TCL dentro de los
primeros 30días de ser propietario para recibir el mejor valor y nos aseguraremos de que nada se
interponga en el camino para que disfrute de su nuevo producto.
Agregue un Plan de protección de TCL cuando registre
el producto, a fin de contar con cobertura contra los
contratiempos que la vida presenta.
Beneficios y descripción
Hasta 4años
De 3 a 5días De 3 a 5días
Hasta 4años
Escanee o envíe un mensaje de texto con una
foto del icono de la cámara al 71403
Regístrese fácilmente con su teléfono inteligente
O regístrese en línea en www.tclusa.com/register
¿Necesita ayuda? Visite photoregister.com/help o envíe un
mensaje de texto que diga HELP al 71403
Registre y proteja su compra
Protección contra daños accidentales
La cobertura para caídas, roturas y derrames comienza después
de 30días.
*Los planes de servicio extendido (es decir, los planes “Protect" y “Plus") solo se ofrecen en los Estados Unidos
(EE. UU.). " Todos los productos de TCL continúan ofreciendo una garantía limitada al consumidor tanto en los EE.
UU. como en Canadá. Consulte la sección de garantía de esta guía para obtener más información sobre la garantía.
TCL-DHM

20
INSTRUCCIONES IMPORTANTES DE SEGURIDAD
Antes de instalar y usar su deshumidificador, lea atentamente este manual del usuario. Guarde este manual
en un lugar seguro para futuras consultas. Su seguridad y la seguridad de los demás es muy importante para
nosotros. Preste atención a todos los mensajes de seguridad que se describen en este manual del usuario.
ADVERTENCIA: Para reducir el riesgo de incendio, descarga eléctrica o lesiones al usar el deshumidificador,
siga las siguientes precauciones básicas:
REQUERIMIENTOS ELÉCTRICOS
Las clasificaciones eléctricas de su deshumidificador se encuentran en la etiqueta del modelo y del número
de serie que se encuentra en la parte posterior (cuando está mirando hacia el frente).
REGISTRE SU APARATO
Puede registrar su aparato en línea yendo a register.tcl.com
Asegúrese de conservar su recibo de venta original. Se requiere una prueba de compra válida para todas las
reclamaciones de garantía.
Documente aquí sus números de modelo y de serie:
N° de modelo______________________________ N° de serie ______________________________
Puede localizar su número de serie de 20 dígitos debajo del código de barras (en la parte posterior)
ADVERTENCIA Los requisitos eléctricos específicos se muestran en el siguiente
diagrama. Siga los siguientes requisitos para el tipo de enchufe
del cable de alimentación.
Enchufe de Peligro de Choque Eléctrico en un
tomacorriente de 3 control remoto de conexión a tierra.
No retire la clavija de tierra.
No utilice un adaptador.
No utilice un cable de extensión.
El incumplimiento de estas instrucciones puede acarrear la
muerte, un incendio o una descarga eléctrica.
Requisitos de cableado Cable de alimentación
Salida de 5=60 Hz, 115 V AC
protegida por un fusible o
disyuntor de 12 amperios de retardo.
MÉTODO RECOMENDADO DE CONEXIÓN A TIERRA
Para su seguridad personal, este aire acondicionado debe estar conectado a tierra. Este acondicionador de
aire está equipado con un cable de alimentación de 3 puntas con un enchufe con conexión a tierra. Para
minimizar la posibilidad de una descarga eléctrica, el cable debe conectarse a una toma de corriente de 3
control remoto y conectarse a tierra de acuerdo con todos los códigos y requerimientos legales locales. Si
no hay disponible un tomacorriente de 3 puntas, es responsabilidad del cliente que un electricista calificado
instale un tomacorriente de 3 espigas debidamente conectado a tierra.
NO LO DEVUELVA A LA TIENDA
ASISTENCIA TCL:
support.tcl.com/us
1-800-825-6747
Contáctenos primero
con cualquier pregunta
ESTAMOS
LISTOS PARA
AYUDAR
CUIDADO CUANDO RETIRE
LA UNIDAD DEL DESHUMIDIFICADOR
La page est en cours de chargement...
La page est en cours de chargement...
La page est en cours de chargement...
La page est en cours de chargement...
La page est en cours de chargement...
La page est en cours de chargement...
La page est en cours de chargement...
La page est en cours de chargement...
La page est en cours de chargement...
La page est en cours de chargement...
La page est en cours de chargement...
La page est en cours de chargement...
La page est en cours de chargement...
La page est en cours de chargement...
La page est en cours de chargement...
La page est en cours de chargement...
La page est en cours de chargement...
La page est en cours de chargement...
La page est en cours de chargement...
La page est en cours de chargement...
La page est en cours de chargement...
La page est en cours de chargement...
La page est en cours de chargement...
La page est en cours de chargement...
La page est en cours de chargement...
La page est en cours de chargement...
La page est en cours de chargement...
La page est en cours de chargement...
La page est en cours de chargement...
La page est en cours de chargement...
La page est en cours de chargement...
La page est en cours de chargement...
-
 1
1
-
 2
2
-
 3
3
-
 4
4
-
 5
5
-
 6
6
-
 7
7
-
 8
8
-
 9
9
-
 10
10
-
 11
11
-
 12
12
-
 13
13
-
 14
14
-
 15
15
-
 16
16
-
 17
17
-
 18
18
-
 19
19
-
 20
20
-
 21
21
-
 22
22
-
 23
23
-
 24
24
-
 25
25
-
 26
26
-
 27
27
-
 28
28
-
 29
29
-
 30
30
-
 31
31
-
 32
32
-
 33
33
-
 34
34
-
 35
35
-
 36
36
-
 37
37
-
 38
38
-
 39
39
-
 40
40
-
 41
41
-
 42
42
-
 43
43
-
 44
44
-
 45
45
-
 46
46
-
 47
47
-
 48
48
-
 49
49
-
 50
50
-
 51
51
-
 52
52


dans d''autres langues
- English: TCL 30D91 User manual
- español: TCL 30D91 Manual de usuario
Documents connexes
Autres documents
-
Royal Sovereign RDH-230 Le manuel du propriétaire
-
Impecca IDM50-SE22-50 Pints Dehumidifier Mode d'emploi
-
LG UD501KOJ5 Manuel utilisateur
-
-
BLACK+DECKER BDT30WTB Manuel utilisateur
-
Danby DDR070EAPWDB Le manuel du propriétaire
-
NOMA 50 Pint 2-Speed LED Le manuel du propriétaire
-
-
TCL Communication B123 Manuel utilisateur