
TRIO & TRIO MAX
Portable Laptop Monitor
USER GUIDE • MODE D’EMPLOI
Para la versión en español,
escanee aquí:
Per la versione italiana,
scansiona qui:
Para a versão em
português, digitalize aqui:
Für die deutsche Version
scannen Sie hier:
Scan hier voor de
Nederlandse versie:
TRIOseries_IM2240_V05.indd 1 9/6/2020 1:45 PM

SAFETY INSTRUCTIONS
WARNING: THIS PRODUCT IS NOT A TOY, ADULT SUPERVISION IS REQUIRED.
1. Read these instructions.
2. Keep these instructions.
3. Heed all warnings.
4. Follow all instructions.
5. Do not use the product on your lap for more than 30 minutes, without a 5-minute break at least.
6. Do not use this unit near water.
7. Clean only with a dry cloth.
8. Do not block any ventilation openings. Install in accordance with manufacturer’s instructions.
9. To avoid overheating, do not leave the product in a non-ventilated space (e.g. a schoolbag) when it is turned on.
10. Do not install near any heat sources such as radiators, heat registers, stoves or other apparatus (including amplifiers) that produce heat.
11. Protect the power cord from being walked on or pinched particularly at plugs, convenience receptacles, and the point where they exit
from the unit.
12. Only use atachments/accessories specified by the manufacturer.
13. Unplug this unit during lightning storms or when unused for long periods of time.
14. Refer all servicing to qualified service personnel. Servicing is required when the unit has been damaged in any way, such as the follow-
ing: the power-supply cord or plug has been damaged; liquid has been spilled or objects have fallen into the unit; and/or the unit has
been exposed to rain or moisture, does not operate normally, has changed its performance or has been dropped.
15. Do not overload wall outlet. Use only power source as indicated.
16. Use replacement parts as specified by the manufacturer.
1 7. Upon completion of any service or repairs to this product, ask the service technician to perform safety checks.
18. Keep the device away from metallic objects (coins, keys…). Do not leave it near magnetic fields that could cause data loss or damage
the device.
19. Do not drop the device. Do not expose it to mechanical shock, friction or impact. When transporting the device, put it in a protective cover.
20. Protect the device from humidity and rain. If it gets wet, wipe it immediately.
21. Do not touch the power cord when your hand are wet and do not pull on the charger to unplug it.
22. In order to prevent data loss, remember to keep a backup (data or paper) of the information recorded on the device.
23. To prevent interference, do not use the device next to other electronic devices, artificial pacemaker or near medical equipment.
24. Shut of the device in locations that are susceptible to explosions and when travelling by airplane.
25. Do not use the product near inflammable or explosive sources.
26. Keep the device out of direct sunlight and away from other sources of extreme heat or cold.
2 7. Do not atempt to disassemble the device; it would no longer be covered by the warranty.
28. Do not place sharp objects directly in contact with the surface and do not spray cleaning products directly on the screen.
29. Do not push hard on the screen and do not place objects on top of it. This can cause tears in the screen.
30. The socket-outlet shall be installed near the equipment and must be easily accessible.
31. Keep a minimum distance around the device for suficient ventilation.
32. The ventilation should not be impeded by covering the ventilation openings with items, such as newspapers, table-cloths, curtains, etc.
33. No naked flame sources, such as lighted candles, should be placed on the apparatus.
34. This used is intended to be used in tropical and/or moderate climates.
35. Bateries should be disposed properly. Take them to the collection container in order to protect the environment.
WARNING: All packaging materials, such as tape, plastic sheets, wire ties and tags are not part of this product and should be discarded.
WARNING: Significant electromagnetic interference or electrostatic discharges may cause the device to malfunction or lose data. If the
device is not functioning correctly, switch it of and then on again, or unplug the USB cable.
EPILEPSY WARNING
Please read prior to any use of a video game by yourself or by your child.
Some people are susceptible to epileptic seizures or loss of consciousness when exposed to certain kinds of flashing lights or elements
common in our everyday environment. These individuals may sufer a seizure when they watch certain televised images or when they play
certain video games. These phenomena can occur even if the person has no previous medical history or has never sufered an epileptic
seizure. If you or a family member has ever displayed symptoms related to epilepsy (seizure or loss of consciousness) in the presence of
stimulation in the form of light, please consult your physician before using. We advise parents to be atentive to their children while they play
video games. If you or your child experience the followingsymptoms: dizziness, altered vision, eye or muscle twitches, loss of conscious-
ness, disorientation, involuntary movements or convulsions, immediately stop playing and consult a physician.
General precautions when using video games:
• Do not stand too close to the screen.
• It is preferable to play video games on a small screen. Avoid playing when tired or when needing sleep.
• Make sure to play in a well lit room.
• When in use, take breaks of 10 to 15 minutes every hour.
WARNING: Prolonged use of the tablet may be harmful to the health of the user.
TRIOseries_IM2240_V05.indd 1 9/6/2020 1:45 PM

INSTRUCTIONS RELATIVES À LA SÉCURITÉ
AVERTISSEMENT : CE PRODUIT N’EST PAS UN JOUET, LA SUPERVISION D’UN ADULTE EST RECOMMANDÉE.
1. Lisez ces instructions.
2. Conservez ces instructions.
3. Suivez toutes les instructions.
4. Prenez en compte les avertissements.
5. N’utilisez pas ce produit sur vos genoux pendant plus de 30 minutes sans faire au moins 5 minutes de pause.
6. N’utilisez pas cet appareil près de l’eau.
7. Netoyez-le seulement avec un chifon doux.
8. Ne bloquez aucune ouverture de ventilation. Procédez à l’installation selon les instructions.
9. Pour éviter toute surchaufe, lorsque l’appareil est branché ou allumé, ne le laissez pas à l’intérieur d’un espace non ventilé comme par exemple un sac.
10. Ne placez pas cet appareil près de sources de chaleur telles que des plinthes électriques, cuisinières ou autres (même les amplificateurs).
11. Le câble d’alimentation doit être mis en place de sorte qu’on ne marche pas dessus ou qu’il ne soit pas écrasé particulièrement à l’endroit de la
prise, à l’endroit où il est branché et à l’endroit d’où il sort de l’appareil.
12. Utilisez uniquement les pièces détachées / accessoires spécifiés par le fabricant.
13. Débranchez cet appareil durant les orages ou lorsqu’il n’est pas utilisé durant une longue période.
14. Référez-vous à un personnel qualifié pour toute réparation. Une réparation sera nécessaire si l’appareil était endommagé d’une manière ou d’une autre, si
le câble d’alimentation ou la prise était endommagé(e), si un liquide s’est déversé ou si des objets sont tombés dans l’appareil, si l’appareil a été exposé à la
pluie ou à l’humidité, ou s’il a subi une chute.
15. Ne surchargez pas la prise électrique. Utilisez uniquement la source d’alimentation comme indiqué.
16. Utilisez les pièces de rechange spécifiées par le fabricant.
1 7. Après toute révision ou réparation efectuée sur ce produit, demandez au technicien de procéder à une vérification de sécurité.
18. Tenez l’appareil éloigné de tout objet métallique (pièces, clés…). Ne le laissez pas à proximité de champs magnétiques qui pourraient engendrer une perte
de données ou endommager l’appareil.
19. Ne laissez pas tomber l’appareil. Ne l’exposez pas aux chocs, frictions et impacts. Lorsque vous transportez l’appareil, metez-le dans une housse de
protection.
20. Protégez l’appareil de l’humidité et de la pluie. S’il est mouillé, essuyez-le immédiatement.
21. Ne touchez pas le cordon d’alimentation lorsque vos mains sont mouillées et ne tirez pas sur le chargeur pour le débrancher.
22. Afin d’éviter les pertes de données, pensez à faire une sauvegarde (informatique ou papier) des informations enregistrées dans l’appareil.
23. Pour éviter toute interférence, n’utilisez pas l’appareil à côté d’autres appareils électroniques, d’un stimulateur cardiaque ou à proximité d’équipements
médicaux.
24. Éteignez l’appareil dans les lieux présentant des risques d’explosion et lorsque vous voyagez en avion.
25. N’utilisez pas l’appareil à proximité de sources inflammables ou explosives.
26. N’exposez pas l’appareil à la lumière directe du soleil ni à toute autre source extrême de chaleur ou de froid.
2 7. Ne tentez pas de démonter l’appareil, il ne serait plus couvert par la garantie.
28. Ne metez pas d’objets pointus directement en contact avec la surface et ne vaporisez pas de produit netoyant directement sur l’écran.
29. N’exercez pas de fortes pressions sur l’écran et ne posez pas d’objets dessus. Cela pourrait endommager l’écran.
30. Le socle de prise de courant doit être installé à proximité du matériel et doit être aisément accessible.
31. Garder une distance minimale autour de l’appareil pour une aération sufisante.
32. Il convient de ne pas obstruer les ouvertures d’aération par des objets tels que journaux, nappes, rideaux, etc.
33. Il convient de ne pas placer sur l’appareil des sources de flammes nues, telles que des bougies allumées.
34. L’appareil est destiné à être utilisé sous un climat tempéré et/ou tropical.
35. Les piles doivent être jetées de façon conforme. Les déposer dans des bacs de collecte prévus à cet efet afin de protéger l’environnement.
AVERTISSEMENT: Tous les matériaux d’emballage, comme le scotch, les feuilles en plastique, les ficelles et les étiquetes ne font pas partie du produit et
doivent être jetés.
AVERTISSEMENT: D’importantes interférences électromagnétiques ou des décharges électrostatiques peuvent provoquer un dysfonctionnement ou une
perte de données. Si l’appareil ne fonctionne pas correctement, éteignez-le puis rallumez-le ou débranchez le câble USB.
AVERTISSEMENT SUR L’ÉPILEPSIE
A lire avant toute utilisation d’un jeu vidéo par vous-même ou par votre enfant.
I. - Précautions à prendre dans tous les cas pour l’utilisation d’un jeu vidéo.
Evitez de jouer si vous êtes fatigué ou si vous manquez de sommeil.
Assurez-vous que vous jouez dans une pièce bien éclairée en modérant la luminosité de votre écran.
Lorsque vous utilisez un jeu vidéo susceptible d’être connecté à un écran, jouez à bonne distance de cet écran de télévision et aussi loin que le permet le cordon de
raccordement.
En cours d’utilisation, faites des pauses de dix à quinze minutes toutes les heures.
II. - Avertissement sur l’épilepsie.
Certaines personnes sont susceptibles de faire des crises d’épilepsie comportant, le cas échéant, des pertes de conscience à la vue, notamment, de certains
types de stimulations lumineuses fortes :
succession rapide d’images ou répétition de figures géométriques simples, d’éclairs ou d’explosions. Ces personnes s’exposent à des crises lorsqu’elles
jouent à certains jeux vidéo comportant de telles stimulations, alors même qu’elles n’ont pas d’antécédent médical ou n’ont jamais été sujetes elles-mêmes à
des crises d’épilepsie.
Si vous-même ou un membre de votre famille avez déjà présenté des symptômes liés à l’épilepsie (crise ou perte de conscience) en présence de stimulations
lumineuses, consultez votre médecin avant toute utilisation. Les parents se doivent également d’être particulièrement atentifs à leurs enfants lorsqu’ils jouent avec des
jeux vidéo. Si vous-même ou votre enfant présentez un des symptômes suivants : vertige, trouble de la vision, contraction des yeux ou des muscles, trouble de l’orien-
tation, mouvement involontaire ou convulsion, perte momentanée de conscience, il faut cesser immédiatement de jouer et consulter un médecin.
Précautions à prendre dans tous les cas pour l’utilisation d’un jeu vidéo :
• Ne vous tenez pas trop près de l’écran.
• Jouez de préférence aux jeux vidéos sur un écran de petite taille.
• Évitez de jouer si vous êtes fatigué ou si vous manquez de sommeil.
• Assurez-vous que vous jouez dans une pièce bien éclairée.
• En cours d’utilisation, faites des pauses de 10 à 15 minutes toutes les heures.
ATTENTION : L’utilisation prolongée de la tablete pourrait nuire à la santé de l’utilisateur.
TRIOseries_IM2240_V05.indd 1 9/6/2020 1:45 PM

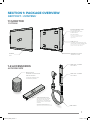
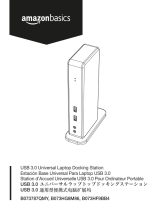
MAGNETIC PLATES
USB TYPE-C
TO CONNECT YOUR SCREEN WITH YOUR
LAPTOP USING THE USB CABLE PROVIDED
SCREEN
MAGNETIC PLATES
Écran
BACKCHARGING PORT
MUST USE ORIGINAL USB
CHARGER FROM YOUR LAPTOP
OR MOBILE DEVICE
METAL PLATE
12 METAL PLATES TOTAL
FOR 3 LAPTOPS
12 plaques métalliques pour
3 ordinateurs portables
USB CABLE
USB TYPE-C CABLE
TO TYPE A
USB TYPE-C CABLE
TO TYPE C
TRIO/TRIO MAX CLIP
EACH TRIO/TRIO MAX WILL INCLUDE
ONE TRIO CLIP. THUS, ONCE TWO
TRIOS/TRIO MAX'S ARE PURCHASED,
YOU WILL HAVE A SET TO CLIP THEM
TOGETHER
Port de recharge :
doit utiliser le chargeur USB original de
votre ordinateur portable ou de votre
appareil mobile
Pour connecter votre écran à votre ordinateur
portable en utilisant le câble USB fourni
Chaque TRIO / TRIOMAX comprendra 1 clip. Si
vous achetez 2x TRIO / TRIOMAX, vous
disposerez de 2 clips pour les attacher ensemble.
1.1 MONITOR
1.1 ÉCRAN
SECTION : PACKAGE OVERVIEW
SECTION : CONTENU
1.2 ACCESSORIES
ACCESSSOIRES
1
TRIOseries_IM2240_V05.indd 1 9/6/2020 1:45 PM

Windows
version
Version
&
Release date
*sample of download page.
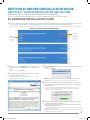
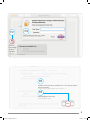
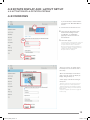
Select the latest driver version that matches your operating system and download driver. The most updated driver is likely on
top of the page. Confirm driver is correct by checking the version, release date and supported Window version.
1.
Please go to https://support.displaylink.com/
Version de
Windows
Version & date
de sortie
4.
Allez sur la page https://support.displaylink.com et selectionnez la dernière version qui correspond à votre système d'exploitation. Téléchargez-là.
Double-cliquez sur Setup.exe.
Cliquez sur Oui. La fenêtre du contrat de licence utilisateur
du logiciel DisplayLink s'ouvre.
Cliquez sur J'accepte.
Remarque: L'écran peut clignoter ou s'éteindre durant l'installation.
Connectez votre écran TRIO/TRIOMAX via le câble USB à votre PC. Un
message s'affichera indiquant que le logiciel DisplayLink se configure
lui-même pour la première utilisation.
L'écran devrait clignoter et votre écran TRIO/TRIOMAX devrait commencer
à étendre le bureau Windows.
Remarque: vous devrez peut-être redémarrer l'ordinateur avant d'utiliser le
périphérique compatible Displaylink.
6.
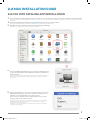
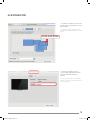
Note: The screen may flash or go black during the installation.
Double click on
Setup.exe.
The windows user
account control window opens (is enabled in the
OS).
Click
Yes.
The displaylink software end user license
agreement windows opens.
Click
I accept.
Displaylink core software and Displaylink Graphics
installs.
Connect your Displaylink device via the USB cable to your PC. A
message will be shown that Displaylink software is configuring
5.
itself for first use.
The screen should flash and the Displaylink device should start
to extend the Windows desktop.
note: You may need to reboot the computer before you use the
Displaylink enabled device.
2.
3.
2.1 WINDOWS INSTALLATION GUIDE
SECTION : DRIVER INSTALLATION GUIDE
SECTION : GUIDE D’INSTALLATION DES PILOTES
When using USB C to connect, driver installation is not necessary.
Lorsque vous utilisez le mode USB-C pour vous connecter, l’installation des pilotes n’est pas nécessaire.
2
TRIOseries_IM2240_V05.indd 2 9/6/2020 1:45 PM

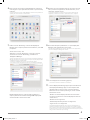
Download the DisplayLink macOS app on displaylink.com and install it from the ZIP file
2.
First, uninstall the classic DisplayLink driver if you have it on your computer. Simply run the driver installer and select Uninstall.
1.
Click on the DisplayLink Manager app icon from the notification area
to open the app window. This confirms the software is installed and
running properly
4.
Click on the preference “cog” icon in the bottom right corner of the
DisplayLink Manager app, then select “Launch on startup” for the
software to start automatically every time you log-in.
Note: this is not compulsory but recommended to save you from
repeating step 5.3 each time you login.
5.
3.
Navigate in Finder to Applications and then open DisplayLink Manager
Tout d'abord, désinstallez le pilote DisplayLink classique si vous l'avez sur votre ordinateur. Exécutez simplement le programme d'installation du pilote et sélectionnez
Désinstaller.
Téléchargez l'application DisplayLink macOS sur displaylink.com et installez-la à partir du fichier ZIP.
Allez dans le menu Applications, puis ouvrez DisplayLink Manager
Cliquez sur l'icône de l'application DisplayLink Manager dans la zone de notification pour
ouvrir la fenêtre de l'application. Cela confirme que le logiciel est installé et fonctionne
correctement.
Cliquez sur l'icône de préférence «rouage» dans le coin inférieur droit de l'application
DisplayLink Manager, puis sélectionnez «Lancer au démarrage» pour le démarrer
automatiquement à chaque connexion.
Remarque: ce n'est pas obligatoire mais recommandé pour vous éviter de répéter les
étapes à chaque démarrage.
2.2.1 OS . CATALINA APP INSTALLATION
. MAC INSTALLATION GUIDE
3
TRIOseries_IM2240_V05.indd 3 9/6/2020 1:45 PM

Now connect the peripheral with DisplayLink technology
and navigate to your System Preferences to open Security
& Privacy
6.
Enable “Screen Recording” to allow the DisplayLink
Manager app to capture pixels and send them to your USB
peripheral:
7.
• Select the “Privacy” tab
• Navigate to “Screen Recording” in the list on the left
• Then tick the “Screen Recording” permission for
DisplayLink Manager.
• Number of external display limitation of 2 lifted with
the beta, now back to 4 external displays like with the
classic driver,
• Rotation is not supported,
• Clamshell (Closed lid) mode is not supported,
• Login screen it not supported.
NOTE: DisplayLink driver requires that permission to
capture pixels and send them through USB. DisplayLink
driver does NOT record screen data.
Because the new permission will only be active the next
time you start the application, macOS will invite you to
“Quit Now”. Please accept.
8.
Now it has adequate permissions, re-open DisplayLink
Manager from Applications in the Finder.
9.
Your displays are now working properly.
Current DisplayLink Manager app scope and limitations
The DisplayLink Manager app is in development and
distributed as an early preview. It has the following
limitations we are currently working on, some of them
with the OS vendor.
11.
10.
Connectez maintenant l'écran TRIO/TRIOMAX et accédez à vos préférences
système pour ouvrir Sécurité et confidentialité.
La nouvelle autorisation ne sera active qu'au prochain démarrage de
l'application, macOS vous invitera à «Quitter maintenant». Acceptez.
Activez «Enregistrement d'écran» pour permettre à l'application DisplayLink
Manager de capturer des pixels et de les envoyer à votre périphérique USB :
• Sélectionnez l'onglet «Confidentialité».
• Accédez à «Enregistrement d'écran» dans la liste de gauche.
• Puis cochez la case «Enregistrement d'écran» pour DisplayLink Manager.
Les autorisations adéquates sont actives. Allez dans le menu Applications,
puis ouvrez DisplayLink Manager de nouveau.
Vos écrans fonctionnent maintenant correctement.
L'application DisplayLink Manager est en cours de développement et
présente les limitations suivantes sur lesquelles nous travaillons actuelle-
ment, certaines d'entre elles avec le fournisseur du système d'exploitation :
rotation non prise en charge, mode Clamshell (couvercle fermé) non prise en
charge, écran d'acceuil non pris en charge.
4
TRIOseries_IM2240_V05.indd 4 9/6/2020 1:45 PM

2.2.2 OS . MOJAVE DRIVER INSTALLATION
#1
#2
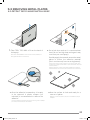
Go to Security and
Privacy
Click on “System preferences”.
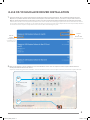
Click on the dmg file to begin installation. Once the installation of the driver is completed, follow steps as shown below to
modify and authorize driver to be active.
2.
Version
&
Release date
Select the latest driver version that matches your Mac OS version and download driver. We recommend updating the OS to
Mojave if it is possible. Newest driver which runs on Mojave is the most stable version. If you have to stay at older version of
Mac OS, please download the corresponding version of the driver as stated and follow additional set up instruction as needed.
1.
Mac OS
Version
Compatibility
Compatibilité avec les
versions de Mac OS
Cliquez sur l’icône
"Sécurité et Confidentialité"
Cliquez sur l’icône "Préférences Système"
Version & date de sortie
Cliquez sur le fichier dmg pour lancer l'installation. Une fois l'installation terminée, suivez les étapes ci-dessous pour autoriser le pilote à être actif.
Sélectionnez la dernière version du pilote correspondant à votre version de Mac OS et téléchargez le pilote. Nous vous recommandons de mettre à
jour le système d'exploitation vers Mojave si c'est possible (le pilote le plus récent qui fonctionne sur Mojave étant la version la plus stable). Sélection-
nez la dernière version du pilote correspondant à votre version de Mac OS et téléchargez le pilote.
5
TRIOseries_IM2240_V05.indd 5 9/6/2020 1:45 PM

#5
Allow DisplayLink to load
#6
System will restart after modification. If not, please restart
system manually.
Allow
#4
Enter password and user name
#3
Click on
lock image
to allow
changes
Cliquez sur le
cadenas pour autoriser les changements.
Entrez votre nom d'utilisateur et mot de passe.
Le système rédemarera après modification. Si non, rédémarrez-le.
Autorisez DisplayLink à charger.
6
TRIOseries_IM2240_V05.indd 6 9/6/2020 1:45 PM

Front of
the laptop
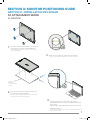
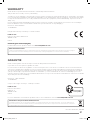
Once the metal plates are all placed, close your
laptop and align TRIO/TRIO MAX.
3.
Place the metal plates (included in the box) over
the magnets in the back of TRIO/TRIO MAX.
1.
For a proper install try to match the right edge of
TRIO/TRIO MAX with one screw exposed past the edge
of the laptop.
Align bottom of TRIO/TRIO MAX to bottom of the laptop.
4.
Make sure round plate is centered on the magnet
2.
*USB Cable omitted
36
Placez les plaques métalliques incluses sur les aimants à l'arrière
de votre TRIO/TRIOMAX.
Une fois les plaques métalliques installées, fermez votre ordinateur
portable et placez votre écran TRIO/TRIO MAX.
Avant de l'ordinateur
portable
Assurez-vous que les plaques métalliques sont centrées sur les aimants.
Pour une installation parfaite, gardez la vis du coin droit visible au delà de votre
écran d'ordinateur portable.
. ATTACHMENT MODE
3.1 FIXATION
SECTION : MONITOR POSITIONING GUIDE
SECTION : INSTALLATION DE L’ÉCRAN
7
TRIOseries_IM2240_V05.indd 7 9/6/2020 1:45 PM

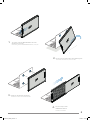
To use it on the other side, rotate 180 degrees.
2.
You are ready to work.
4.
To remove it, slide TRIO/TRIO MAX off of the
magnets, do not pull.
1.
Snap into the back of the laptop.
3.
*USB Cable omitted
Pour le retirer, glissez le TRIO/TRIOMAX latéralement, ne tirez pas.
Aimantez-le au dos de votre ordinateur portable.
Pour l'utiliser dans l'autre sens, tournez-le à 180°.
Vous êtes prêt à travailler.
8
TRIOseries_IM2240_V05.indd 8 9/6/2020 1:45 PM

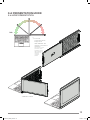
1.
Slide Trio
2.
Rotate around 110° degrees
3.
Connect Trio to the Pc and use it in portrait mode
4.
Go to Display settings to rotate display
See section 4.2
*USB Cable omitted
Tournez le à 110°.
Faites glisser l'écran
TRIO/TRIOMAX.
Connectez votre écran TRIO/TRIOMAX à votre PC et utilisez-le en mode portrait.
Allez dans la section Paramètres d'affichage (4.2) pour
tourner l'affichage.
3.2 PORTRAIT MODE
3.2 MODE PORTRAIT
9
TRIOseries_IM2240_V05.indd 9 9/6/2020 1:45 PM

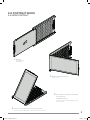
1.
To access
presentation mode,
simply swivel
TRIO/TRIO MAX 180
degrees to the back of
the laptop.
*USB Cable omitted
180º
Pour accéder au mode
présentation, faites
simplement pivoter le
TRIO / TRIO MAX de
180 degrés vers
l'arrière de
l'ordinateur
portable.
3.4 PRESENTATION MODE
3.4 MODE PRESENTATION
10
TRIOseries_IM2240_V05.indd 10 9/6/2020 1:45 PM

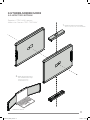
1.
Attach the clips to Trio/Trio Max
2.
Attach the second unit of
Trio/ Trio Max to the clips
*USB Cable omitted
Attachez les clips au premier écran TRIO/TRIOMAX.
Attachez le second écran
TRIO/TRIOMAX aux clips.
3.5 THREE-SCREEN MODE
3.5 MODE TRIPLE ÉCRAN
Requires 2 TRIO/MAX screens
Nécessite 2 écrans TRIO/TRIO MAX
11
TRIOseries_IM2240_V05.indd 11 9/6/2020 1:45 PM

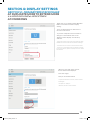
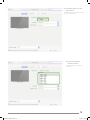
-Right click on your desktop while TRIO/TRIO
MAX Is connected and choose “Display
Setting”
-Then you should either see this screen or
the one at next Section
-If you have a duplicate screen and want to
change it to extend mode, click on the
“Duplicate these displays” from the drop
down box
-When the drop down box is opened,
choose “Extend these displays”
-Then click “Apply”
-Now you are in Extend Mode
- Cliquez avec le bouton droit sur votre bureau pendant que TRIO /
TRIO MAX est connecté et allez dans les paramètres d'affichage.
- Vous devriez alors voir cet écran ou celui de la section suivante.
- Si vous avez un écran dupliqué et que vous souhaitez le changer
pour le mode extension, cliquez sur «Dupliquer ces écrans» dans la
liste déroulante.
- Lorsque la liste déroulante est ouverte, choisissez «Étendre
ces affichages».
- Puis cliquez sur «Appliquer».
- Maintenant, vous êtes en mode d'extension.
4.1.1 WINDOWS
. DUPLICATE MODE TO EXTEND MODE
4.4 MODE DUPLIQUÉ et MODE ÉTENDU
SECTION : DISPLAY SETTINGS
SECTION : PARAMÈTRES D’AFFICHAGE
12
TRIOseries_IM2240_V05.indd 12 9/6/2020 1:45 PM

- Click on system preference and go to
Displays
- Checking the “Mirror Displays” box
will switch between duplicate and
extend mode for Duex Pro.
- Allez dans "Préférences Système" et dans "Moniteurs".
- Cochez la case «Mirror Displays» pour basculer entre le
mode dupliqué et le mode étendu.
.. MAC OS
13
TRIOseries_IM2240_V05.indd 13 9/6/2020 1:45 PM

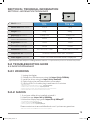
If you are already in “Extend mode”
and want to use TRIO/TRIO MAX on
the left
First click on the 2nd screen icon
Then open the Orientation drop
down box and change it from
“Landscape” to “Landscape
(flipped)”; Choose "Portrait" for
Portrait Mode".
Then click “Apply”
#1
#2
#3
1.
2.
3.
-Now your screen is upside down
and ready to be use on the left with 1
extra step.
-Move the 2nd display icon from the
right to the left of the 1st display by
simply “Drag and Drop” it.
-Click “Apply” to finish the setting of
the lay out.
Si vous êtes déjà en «mode d'extension» et que vous
souhaitez utiliser TRIO / TRIO MAX sur la gauche
1. Cliquez d'abord sur l'icône du 2ème écran
2. Ouvrez ensuite la liste déroulante Orientation et
changez-la de «Paysage» à «Paysage (retourné)»;
Choisissez "Portrait" pour Mode Portrait .
3. Cliquez ensuite sur «Appliquer»
- Maintenant, votre écran est à l'envers et prêt à être
utilisé sur la gauche avec 1 étape supplémentaire.
- Déplacez la deuxième icône d'affichage de droite à
gauche du premier affichage en la faisant simplement
glisser-déposer.
- Cliquez sur «Appliquer» pour terminer le réglage de
la mise en page.
4.2.1 WINDOWS
. ROTATE DISPLAY AND LAYOUT SET UP
4.2 ACTIVATION DE LA ROTATION D’ÉCRAN
14
TRIOseries_IM2240_V05.indd 14 9/6/2020 1:45 PM

- To position the display on either left
or right, simply drag and drop it to the
side you want.
DRAG AND DROP
- To rotate the display, go to the
“Trio/Trio Max” display window and
choose the suitable “Rotation”
options.
TRIO/TRIO MAX
- Pour positionner l'affichage à gauche ou à droite,
faites-le simplement glisser et déposez-le sur le côté
souhaité.
- Pour faire pivoter l'affichage, allez dans la fenêtre
d'affichage «Trio / Trio Max» et choisissez les options
«Rotation» appropriées.
4.2.2 MAC OS
15
TRIOseries_IM2240_V05.indd 15 9/6/2020 1:45 PM

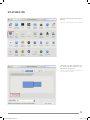
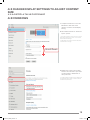
. CHANGE DISPLAY SETTINGS TO ADJUST CONTENT
SIZE
4.3 AJUSTER LA TAILLE D’AFFICHAGE
.. WINDOWS
To adjust content size on Trio/Trio
Max monitor, first click on the
number “2” monitor under Display
setting.
Scroll down and look for “scale and
layout” options
Scroll Down
Default size of text is set at 125%
and user can increase it up to 175%
or reduce back to 100% base on
user preference.
1.
2.
3.
1. Pour ajuster la taille du contenu sur l'écran Trio/Trio
Max, cliquez d'abord sur le numéro «2» du moniteur
sous Paramètres d'affichage.
2. Faites défiler vers le bas et recherchez les options
d'échelle et de mis en page.
3. La taille par défaut du texte est fixée à 125% et peut
être augmentée jusqu'à 175% ou réduite à 100% en
fonction de vos préférences.
16
TRIOseries_IM2240_V05.indd 16 9/6/2020 1:45 PM

Click System Preferences
1.
Click Displays
2.
(When USB-C DP/HDMI Alternate Mode is used)
(Lorsque le mode alternatif USB-C DP / HDMI est utilisé)
1. Allez dans Préférences Système.
2. Allez dans Moniteurs.
.. MAC OS
17
TRIOseries_IM2240_V05.indd 17 9/6/2020 1:45 PM
La page charge ...
La page charge ...
La page charge ...
La page charge ...
-
 1
1
-
 2
2
-
 3
3
-
 4
4
-
 5
5
-
 6
6
-
 7
7
-
 8
8
-
 9
9
-
 10
10
-
 11
11
-
 12
12
-
 13
13
-
 14
14
-
 15
15
-
 16
16
-
 17
17
-
 18
18
-
 19
19
-
 20
20
-
 21
21
-
 22
22
-
 23
23
-
 24
24


dans d''autres langues
- English: Lexibook TRIOMAX User manual
Autres documents
-
Dell USB 3.0 to HDMI/VGA/Ethernet/USB 2.0 Guide de démarrage rapide
-
 AmazonBasics B073787QMY Manuel utilisateur
-
Targus USB 2.0 LATPOP DOCKING STATION Le manuel du propriétaire
-
Asus USB3.0_HZ-1 Manuel utilisateur
-
Philips 221S3UCS/00 Manuel utilisateur
-
HP UHD USB Graphics Adapter Guide d'installation
-
Philips 231P4QUPES/00 Manuel utilisateur
-
Philips 241B7QUPEB/01 Manuel utilisateur
-
Diamond Multimedia WPCTVPRO Manuel utilisateur
-
