
MALONE
R
J-ProJ-Pro
TM
J-STYLE KAYAK CARRIER
12’ Safety LinesJawz Universal Adapters Mounting BoltsKayak Carriers 12’ Load Straps T-Knobs
Rubber Plugs
60mm
70mm
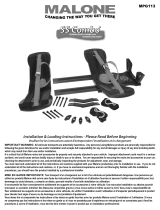
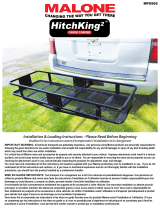
Installation & Loading Instructions - Please Read Before Beginning
Veuillez lire les instructions avant d’entreprendre l’installation et le chargement
2
1
3
. Insert Mounting Bolt through one hole of a Jawz
Adapter and loosely apply a T-knob. See image 2.
. Faites passer le boulon de fixation dans l’un des trous
d’un adaptateur Jawz puis vissez légèrement un bouton
en ‘‘T’’ à la base du boulon. (Figure 2)
. Insert a Mounting Bolt into one of the top side hex holes.
See image 1.
. Insérez un boulon de fixation dans l’un des trous hexagonaux
situés sur le côté supérieur du support.
(Figure 1)
. Place the carrier onto the front cross bar with the forward
section (with small foam pads) facing out. Swing the Jawz
under the cross bar as shown. See image 3.
. Placez le support sur la barre transversale avant, en vous
assurant que la partie cousinée soit vers l’extérieur. Faites
passer l’adaptateur Jawz sous la barre transversale, tel
qu’indiqué. (Figure 3)
MALONE
R
J-LoaderJ-Loader
TM
J-STYLE KAYAK CARRIER
12’ Safety LinesJawz Universal Adapters Mounting BoltsKayak Carriers 12’ Load Straps T-Knobs
Rubber Plugs
60mm
70mm
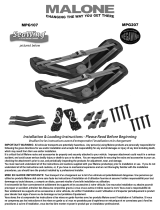
Installation & Loading Instructions - Please Read Before Beginning
Veuillez lire les instructions avant d’entreprendre l’installation et le chargement
1
3
2
. Insert Mounting Bolt through one hole of a Jawz
Adapter and loosely apply a T-knob. See image 2.
. Faites passer le boulon de fixation dans l’un des trous
d’un adaptateur Jawz puis vissez légèrement un bouton
en ‘‘T’’ à la base du boulon. (Figure 2)
. Insert a Mounting Bolt into one of the top side hex holes.
See image 1.
. Insérez un boulon de fixation dans l’un des trous hexagonaux
situés sur le côté supérieur du support.
(Figure 1)
. Place the carrier onto the front cross bar with the boarding
ramp facing out. Swing the Jawz under the cross bar as
shown. See image 3.
. Placez le support sur la barre transversale avant, la rampe
de chargement vers l’extérieur. Faites passer l’adaptateur
Jawz sous la barre transversale, tel qu’indiqué. (Figure 3)
MALONE
R
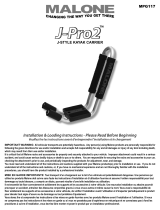
J-Pro2J-Pro2TM
J-STYLE KAYAK CARRIER
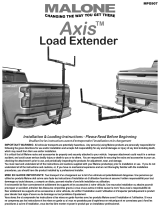
Installation & Loading Instructions - Please Read Before Beginning
Veuillez lire les instructions avant d’entreprendre l’installation et le chargement
2
1
3
. Insert Mounting Bolt through one hole of a Jawz adapter.
Apply washer and loosely apply a T-knob. See image 2.
. Faites passer le boulon de fixation dans l’un des trous
d’un adaptateur Jawz puis vissez légèrement un bouton
en ‘‘T’’ à la base du boulon. (Figure 2)
. Insert a Mounting Bolt into one of the top side hex holes.
See image 1.
. Insérez un boulon de fixation dans l’un des trous hexagonaux
situés sur le côté supérieur du support.
(Figure 1)
. Place the carrier onto the front cross bar with the forward
section (with small foam pads) facing out. Swing the Jawz
under the cross bar as shown. See image 3.
. Placez le support sur la barre transversale avant, en vous
assurant que la partie cousinée soit vers l’extérieur. Faites
passer l’adaptateur Jawz sous la barre transversale, tel
qu’indiqué. (Figure 3)
12’ Safety LinesJawz Universal Adapters Mounting BoltsKayak Carriers 12’ Load Straps T-Knobs
Rubber Plugs
60mm
70mm
Mounting Bolt Washers
MALONE
R
J-ProJ-Pro
TM
J-STYLE KAYAK CARRIER
12’ Safety LinesJawz Universal Adapters Mounting BoltsKayak Carriers 12’ Load Straps T-Knobs
Rubber Plugs
60mm
70mm
Installation & Loading Instructions - Please Read Before Beginning
Veuillez lire les instructions avant d’entreprendre l’installation et le chargement
2
1
3
. Insert Mounting Bolt through one hole of a Jawz
Adapter and loosely apply a T-knob. See image 2.
. Faites passer le boulon de fixation dans l’un des trous
d’un adaptateur Jawz puis vissez légèrement un bouton
en ‘‘T’’ à la base du boulon. (Figure 2)
. Insert a Mounting Bolt into one of the top side hex holes.
See image 1.
. Insérez un boulon de fixation dans l’un des trous hexagonaux
situés sur le côté supérieur du support.
(Figure 1)
. Place the carrier onto the front cross bar with the forward
section (with small foam pads) facing out. Swing the Jawz
under the cross bar as shown. See image 3.
. Placez le support sur la barre transversale avant, en vous
assurant que la partie cousinée soit vers l’extérieur. Faites
passer l’adaptateur Jawz sous la barre transversale, tel
qu’indiqué. (Figure 3)
J-STYLE KAYAK CARRIERS
MPG116 MPG118 MPG117
MALONE
R
J-Pro2J-Pro2TM
J-STYLE KAYAK CARRIER
Installation & Loading Instructions - Please Read Before Beginning
Veuillez lire les instructions avant d’entreprendre l’installation et le chargement
2
1
3
. Insert Mounting Bolt through one hole of a Jawz adapter.
Apply washer and loosely apply a T-knob. See image 2.
. Faites passer le boulon de fixation dans l’un des trous
d’un adaptateur Jawz puis vissez légèrement un bouton
en ‘‘T’’ à la base du boulon. (Figure 2)
. Insert a Mounting Bolt into one of the top side hex holes.
See image 1.
. Insérez un boulon de fixation dans l’un des trous hexagonaux
situés sur le côté supérieur du support.
(Figure 1)
. Place the carrier onto the front cross bar with the forward
section (with small foam pads) facing out. Swing the Jawz
under the cross bar as shown. See image 3.
. Placez le support sur la barre transversale avant, en vous
assurant que la partie cousinée soit vers l’extérieur. Faites
passer l’adaptateur Jawz sous la barre transversale, tel
qu’indiqué. (Figure 3)
12’ Safety LinesJawz Universal Adapters Mounting BoltsKayak Carriers 12’ Load Straps T-Knobs
Rubber Plugs
60mm
70mm
Mounting Bolt Washers
MALONE
R
J-Pro2J-Pro2TM
J-STYLE KAYAK CARRIER
Installation & Loading Instructions - Please Read Before Beginning
Veuillez lire les instructions avant d’entreprendre l’installation et le chargement
2
1
3
. Insert Mounting Bolt through one hole of a Jawz adapter.
Apply washer and loosely apply a T-knob. See image 2.
. Faites passer le boulon de fixation dans l’un des trous
d’un adaptateur Jawz puis vissez légèrement un bouton
en ‘‘T’’ à la base du boulon. (Figure 2)
. Insert a Mounting Bolt into one of the top side hex holes.
See image 1.
. Insérez un boulon de fixation dans l’un des trous hexagonaux
situés sur le côté supérieur du support.
(Figure 1)
. Place the carrier onto the front cross bar with the forward
section (with small foam pads) facing out. Swing the Jawz
under the cross bar as shown. See image 3.
. Placez le support sur la barre transversale avant, en vous
assurant que la partie cousinée soit vers l’extérieur. Faites
passer l’adaptateur Jawz sous la barre transversale, tel
qu’indiqué. (Figure 3)
12’ Safety LinesJawz Universal Adapters Mounting BoltsKayak Carriers 12’ Load Straps
T-Knobs
Rubber Plugs
60mm
70mm
Mounting Bolt Washers
MALONE
R
J-Pro2J-Pro2TM
J-STYLE KAYAK CARRIER
Installation & Loading Instructions - Please Read Before Beginning
Veuillez lire les instructions avant d’entreprendre l’installation et le chargement
2
1
3
. Insert Mounting Bolt through one hole of a Jawz adapter.
Apply washer and loosely apply a T-knob. See image 2.
. Faites passer le boulon de fixation dans l’un des trous
d’un adaptateur Jawz puis vissez légèrement un bouton
en ‘‘T’’ à la base du boulon. (Figure 2)
. Insert a Mounting Bolt into one of the top side hex holes.
See image 1.
. Insérez un boulon de fixation dans l’un des trous hexagonaux
situés sur le côté supérieur du support.
(Figure 1)
. Place the carrier onto the front cross bar with the forward
section (with small foam pads) facing out. Swing the Jawz
under the cross bar as shown. See image 3.
. Placez le support sur la barre transversale avant, en vous
assurant que la partie cousinée soit vers l’extérieur. Faites
passer l’adaptateur Jawz sous la barre transversale, tel
qu’indiqué. (Figure 3)
12’ Safety LinesJawz Universal Adapters Mounting BoltsKayak Carriers 12’ Load Straps T-Knobs
Rubber Plugs
60mm
70mm
Mounting Bolt Washers
Jawz Universal Adapters
Mounting Bolts Red Load Straps
12’ Safety Tie-Downs
REV 11/15
MALONE
R
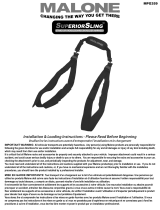
DownLoaderDownLoaderTM
J-STYLE FOLDING KAYAK CARRIER
12’ Safety LinesJawz Universal Adapters Mounting BoltsKayak Carriers Load Straps T-Knobs
60mm
70mm
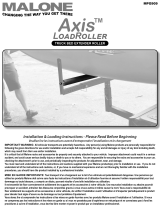
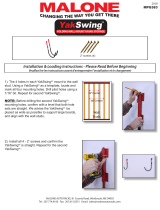
Installation & Loading Instructions - Please Read Before Beginning
Veuillez lire les instructions avant d’entreprendre l’installation et le chargement
1
3
2
. Insert Mounting Bolt through one hole of a Jawz adapter.
Insert washer and loosely apply a T-knob. See image 2.
. Faites passer le boulon de fixation dans l’un des trous
d’un adaptateur Jawz puis vissez légèrement un bouton
en ‘‘T’’ à la base du boulon. (Figure 2)
. Prior to installation, insert a bolt into the mounting holes in
the bottom of the carriers. Push upward to open the two
mounting hole covers located in the Base pads.
. Insert a Mounting Bolt into one mounting hole from the top
side. Rotate and close the mounting hole cover.
See image 1.
. Insérez un boulon de fixation dans l’un des trous hexagonaux
situés sur le côté supérieur du support.
(Figure 1)
. Place the carrier onto the front cross bar with the boarding
ramp facing out. Swing the Jawz under the cross bar as
shown. See image 3.
. Placez le support sur la barre transversale avant, la rampe
de chargement vers l’extérieur. Faites passer l’adaptateur
Jawz sous la barre transversale, tel qu’indiqué. (Figure 3)
1
Mounting Bolt Washers
Base Pad
Covers
1
MALONE
R
DownLoaderDownLoaderTM
J-STYLE FOLDING KAYAK CARRIER
12’ Safety LinesJawz Universal Adapters Mounting BoltsKayak Carriers Load Straps T-Knobs
60mm
70mm
Installation & Loading Instructions - Please Read Before Beginning
Veuillez lire les instructions avant d’entreprendre l’installation et le chargement
1
3
2
. Insert Mounting Bolt through one hole of a Jawz adapter.
Insert washer and loosely apply a T-knob. See image 2.
. Faites passer le boulon de fixation dans l’un des trous
d’un adaptateur Jawz puis vissez légèrement un bouton
en ‘‘T’’ à la base du boulon. (Figure 2)
. Prior to installation, insert a bolt into the mounting holes in
the bottom of the carriers. Push upward to open the two
mounting hole covers located in the Base pads.
. Insert a Mounting Bolt into one mounting hole from the top
side. Rotate and close the mounting hole cover.
See image 1.
. Insérez un boulon de fixation dans l’un des trous hexagonaux
situés sur le côté supérieur du support.
(Figure 1)
. Place the carrier onto the front cross bar with the boarding
ramp facing out. Swing the Jawz under the cross bar as
shown. See image 3.
. Placez le support sur la barre transversale avant, la rampe
de chargement vers l’extérieur. Faites passer l’adaptateur
Jawz sous la barre transversale, tel qu’indiqué. (Figure 3)
1
Mounting Bolt Washers
Base Pad
Covers
2
Insert Mounting Bolt through one hole of a Jawz adapter
and loosely apply a T-knob. See image 2.
Insérez Boulon de montage à travers un trou d’un
adaptateur Jawz et appliquer de manière lâche un
T-bouton. (Figure 2)
MALONE
R
DownLoaderDownLoaderTM
J-STYLE FOLDING KAYAK CARRIER
12’ Safety LinesJawz Universal Adapters Mounting BoltsKayak Carriers Load Straps T-Knobs
60mm
70mm
Installation & Loading Instructions - Please Read Before Beginning
Veuillez lire les instructions avant d’entreprendre l’installation et le chargement
1
3
2
. Insert Mounting Bolt through one hole of a Jawz adapter.
Insert washer and loosely apply a T-knob. See image 2.
. Faites passer le boulon de fixation dans l’un des trous
d’un adaptateur Jawz puis vissez légèrement un bouton
en ‘‘T’’ à la base du boulon. (Figure 2)
. Prior to installation, insert a bolt into the mounting holes in
the bottom of the carriers. Push upward to open the two
mounting hole covers located in the Base pads.
. Insert a Mounting Bolt into one mounting hole from the top
side. Rotate and close the mounting hole cover.
See image 1.
. Insérez un boulon de fixation dans l’un des trous hexagonaux
situés sur le côté supérieur du support.
(Figure 1)
. Place the carrier onto the front cross bar with the boarding
ramp facing out. Swing the Jawz under the cross bar as
shown. See image 3.
. Placez le support sur la barre transversale avant, la rampe
de chargement vers l’extérieur. Faites passer l’adaptateur
Jawz sous la barre transversale, tel qu’indiqué. (Figure 3)
1
Mounting Bolt Washers
Base Pad
Covers
MALONE
R
MPG391
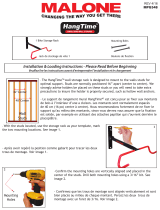
1). Align the mounting holes of the FS Bike
Holder with mounting holes in the uprights
of the FS-Rack system. Insert a bolt, and
secure fully with the nylock nuts.
2). With both bike holders fully secured hang the rst bike by siding the holders through the spokes of the
wheels. For the best t, hang the remaining bikes and rotate each bike so the handle bars are at opposite
ends.
3). Bikes can also be held vertically, allowing even more capacity if space allows.
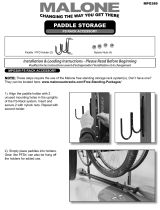
BIKE STORAGE
FS RACK ACCESSORY
MPG391 FS RACK ACCESSORY
NOTE: These steps require the use of the Malone free standing storage rack system(s). Don’t have one?
They can be located here: www.maloneautoracks.com/Free-Standing-Packages/
Bike Holder Arms (2)
Mounting Hardware

MALONE AUTO RACKS 81 County Rd. Ste 1, Westbrook, ME 04092
P: 207.774.9100 F: 207.615.0551
E: support@maloneautoracks.com W: www.maloneautoracks.com
Limited Lifetime Warranty
The Malone Auto Racks (Malone) Limited Lifetime Warranty covers certain Malone-brand products that have been specically
identied for inclusion in the program and is effective for as long as the original retail purchaser owns the product. This warranty is
terminated when the original retail purchaser sells or otherwise transfers the product to any other person or entity.
Subject to the limitations and exclusions described in this warranty, Malone will remedy defects in materials and/or workmanship
by repairing or replacing, at its option, a defective product without charge for parts or labor. Malone may elect, at its option, not to
repair or replace a defective product but rather issue to the original retail purchaser a refund equal to the purchase price paid for the
product, or credit to be used toward the purchase of a replacement Malone product.
This warranty does not cover, and no warranty is given for defects or problems caused by normal wear and tear, which includes,
but is not limited to, surface (aesthetic) metal corrosion, scratches, dents, deformities, accidents, unlawful vehicle operation, or any
modication of a product not performed or authorized in writing by Malone.
In addition, this warranty does not cover problems resulting from conditions beyond Malone’s control including, but not limited to,
theft, misuse, overloading, or failure to assemble, mount or use the product in accordance with Malone’s written instructions or
guidelines included with the product provided to the original retail purchaser.
No warranty is given for Malone products purchased outside of the continental United States, Canada and Mexico.
If the product is believed to be defective, the original retail purchaser should contact the Malone dealer from whom it was purchased,
who will give the original retail purchaser instructions on how to proceed. If the original retail purchaser is unable to contact the
Malone dealer, or the dealer is not able to remedy the defect, the original retail purchaser should contact Malone by email at
In the event that the product must be returned to Malone, a technician at the email address above will provide the original purchaser
with return shipping instructions. The original purchaser will be responsible for the cost of mailing the product to Malone. In order
to be eligible to receive any remedy under this warranty, a copy of the original purchase receipt, a description of the defect and a
return address must be provided.
Disclaimer of Liability
Repair or replacement of a defective product, or the issue of a refund or credit (as determined by Malone) is the original retail
purchaser’s sole and exclusive remedy under this warranty. Damage to original purchaser’s vehicle, cargo, or property, and/ or to
any other person or property is not covered by this warranty.
This warranty is expressly made in lieu of any and all other warranties, express or implied, including the warranties of merchantability
and tness of a particular purpose
Malone’s sole liability to any purchaser is limited to the remedy set forth above. In no event will Malone be liable for any direct,
indirect, consequential, incidental, special, exemplary, or punitive damages , or, for any other damages of any kind or nature
(including but not limited to, lost prots, lost income or lost sales).
Some states do not allow the exclusion or limitation of incidental or consequential damages, so the above limitations may not be
applicable.
In addition, all vehicular transports are potentially hazardous. Any person(s) using Malone products are personally responsible for
following the given directions for use and/or installation and accepts full responsibility for any and all damages or injury of any kind
including death, which may result from their use and/or installation.
MALONE
R
-
 1
1
-
 2
2


Malone MPG388 Manuel utilisateur
- Taper
- Manuel utilisateur
dans d''autres langues
- English: Malone MPG388 User manual
Documents connexes
-
 Malone MPG389 Manuel utilisateur
-
 Malone HangTime Installation & Loading Instructions
-
 Malone MPG117MD Manuel utilisateur
-
 Malone MPG359 Manuel utilisateur
-
 Malone MPG113MD Manuel utilisateur
-
 Malone MPG207 Manuel utilisateur
-
 Malone MPG907 Manuel utilisateur
-
 Malone MPG909 Manuel utilisateur
-
 Malone MPG905 Manuel utilisateur
-
 Malone MPG383 Manuel utilisateur


