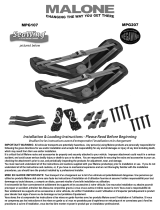
Malone HangTime Installation & Loading Instructions
- Taper
- Installation & Loading Instructions

. Locate the wall studs. Using one Coupling as
a template, mark the three mounting locations
(#1, #2 and #3) for both Couplings. See image 2.
NOTE: Confirm that the mounting holes are
vertically aligned and placed at the center of
the studs.
Mounting Bolts (6)
Installation & Loading Instructions - Please Read Before Beginning
1
2
. Drill all four mounting holes using a 3/16” bit. See
image 3.
. The Coupling & Holders are designed to be bolted
to the wall studs. Studs are normally positioned
16” apart (center to center). We advise the
Holders be placed 32” or 48” apart depending
upon the length of the kayak. See image 1.
3
32” Center
48” Center
Wall
Studs
Mounting
Holes
Revision 1
Date: 05/23/2013
M
M
A
A
L
L
O
O
N
N
E
E
R
Wall Couplings (2)
#1
#2
#3
SUP-Style Holders (2)
WALL MOUNT STORAGE
SUP-STYLE HOLDERS
. Locate the wall studs. Using one Coupling as
a template, mark the three mounting locations
(#1, #2 and #3) for both Couplings. See image 2.
NOTE: Confirm that the mounting holes are
vertically aligned and placed at the center of
the studs.
Mounting Bolts (6)
Installation & Loading Instructions - Please Read Before Beginning
1
2
. Drill all three mounting holes using a 3/16” bit. See
image 3.
. The Coupling & Holders are designed to be bolted
to the wall studs. Studs are normally positioned
16” apart (center to center). We advise the
Holders be placed 32” or 48” apart depending
upon the length of the kayak. See image 1.
3
32” Center
48” Center
Wall
Studs
Mounting
Holes
Revision 1
Date: 12.8.15
M
M
A
A
L
L
O
O
N
N
E
E
R
Wall Couplings (2)
#1
#2
#3
SUP-Style Holders (2)
WALL MOUNT STORAGE
SUP-STYLE HOLDERS
REV2
12.8.15
MALONE
R
TM
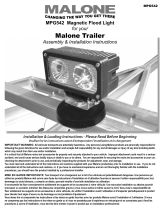
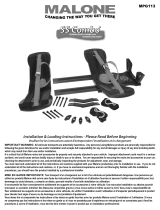
SINGLE BIKE WALL STORAGE
HangTime
REV 4/16
MPG348
MALONE
R
J-ProJ-Pro
TM
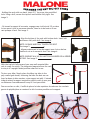
J-STYLE KAYAK CARRIER
12’ Safety LinesJawz Universal Adapters Mounting BoltsKayak Carriers 12’ Load Straps T-Knobs
Rubber Plugs
60mm
70mm
Installation & Loading Instructions - Please Read Before Beginning
Veuillez lire les instructions avant d’entreprendre l’installation et le chargement
2
1
3
. Insert Mounting Bolt through one hole of a Jawz
Adapter and loosely apply a T-knob. See image 2.
. Faites passer le boulon de fixation dans l’un des trous
d’un adaptateur Jawz puis vissez légèrement un bouton
en ‘‘T’’ à la base du boulon. (Figure 2)
. Insert a Mounting Bolt into one of the top side hex holes.
See image 1.
. Insérez un boulon de fixation dans l’un des trous hexagonaux
situés sur le côté supérieur du support.
(Figure 1)
. Place the carrier onto the front cross bar with the forward
section (with small foam pads) facing out. Swing the Jawz
under the cross bar as shown. See image 3.
. Placez le support sur la barre transversale avant, en vous
assurant que la partie cousinée soit vers l’extérieur. Faites
passer l’adaptateur Jawz sous la barre transversale, tel
qu’indiqué. (Figure 3)
MALONE
R
J-LoaderJ-Loader
TM
J-STYLE KAYAK CARRIER
12’ Safety LinesJawz Universal Adapters Mounting BoltsKayak Carriers 12’ Load Straps T-Knobs
Rubber Plugs
60mm
70mm
Installation & Loading Instructions - Please Read Before Beginning
Veuillez lire les instructions avant d’entreprendre l’installation et le chargement
1
3
2
. Insert Mounting Bolt through one hole of a Jawz
Adapter and loosely apply a T-knob. See image 2.
. Faites passer le boulon de fixation dans l’un des trous
d’un adaptateur Jawz puis vissez légèrement un bouton
en ‘‘T’’ à la base du boulon. (Figure 2)
. Insert a Mounting Bolt into one of the top side hex holes.
See image 1.
. Insérez un boulon de fixation dans l’un des trous hexagonaux
situés sur le côté supérieur du support.
(Figure 1)
. Place the carrier onto the front cross bar with the boarding
ramp facing out. Swing the Jawz under the cross bar as
shown. See image 3.
. Placez le support sur la barre transversale avant, la rampe
de chargement vers l’extérieur. Faites passer l’adaptateur
Jawz sous la barre transversale, tel qu’indiqué. (Figure 3)
MALONE
R
J-Pro2J-Pro2
TM
J-STYLE KAYAK CARRIER
Installation & Loading Instructions - Please Read Before Beginning
Veuillez lire les instructions avant d’entreprendre l’installation et le chargement
2
1
3
. Insert Mounting Bolt through one hole of a Jawz adapter.
Apply washer and loosely apply a T-knob. See image 2.
. Faites passer le boulon de fixation dans l’un des trous
d’un adaptateur Jawz puis vissez légèrement un bouton
en ‘‘T’’ à la base du boulon. (Figure 2)
. Insert a Mounting Bolt into one of the top side hex holes.
See image 1.
. Insérez un boulon de fixation dans l’un des trous hexagonaux
situés sur le côté supérieur du support.
(Figure 1)
. Place the carrier onto the front cross bar with the forward
section (with small foam pads) facing out. Swing the Jawz
under the cross bar as shown. See image 3.
. Placez le support sur la barre transversale avant, en vous
assurant que la partie cousinée soit vers l’extérieur. Faites
passer l’adaptateur Jawz sous la barre transversale, tel
qu’indiqué. (Figure 3)
12’ Safety LinesJawz Universal Adapters Mounting BoltsKayak Carriers 12’ Load Straps T-Knobs
Rubber Plugs
60mm
70mm
Mounting Bolt Washers
MALONE
R
J-ProJ-Pro
TM
J-STYLE KAYAK CARRIER
12’ Safety LinesJawz Universal Adapters Mounting BoltsKayak Carriers 12’ Load Straps T-Knobs
Rubber Plugs
60mm
70mm
Installation & Loading Instructions - Please Read Before Beginning
Veuillez lire les instructions avant d’entreprendre l’installation et le chargement
2
1
3
. Insert Mounting Bolt through one hole of a Jawz
Adapter and loosely apply a T-knob. See image 2.
. Faites passer le boulon de fixation dans l’un des trous
d’un adaptateur Jawz puis vissez légèrement un bouton
en ‘‘T’’ à la base du boulon. (Figure 2)
. Insert a Mounting Bolt into one of the top side hex holes.
See image 1.
. Insérez un boulon de fixation dans l’un des trous hexagonaux
situés sur le côté supérieur du support.
(Figure 1)
. Place the carrier onto the front cross bar with the forward
section (with small foam pads) facing out. Swing the Jawz
under the cross bar as shown. See image 3.
. Placez le support sur la barre transversale avant, en vous
assurant que la partie cousinée soit vers l’extérieur. Faites
passer l’adaptateur Jawz sous la barre transversale, tel
qu’indiqué. (Figure 3)
J-STYLE KAYAK CARRIERS
MPG116 MPG118 MPG117
MALONE
R
J-Pro2J-Pro2
TM
J-STYLE KAYAK CARRIER
Installation & Loading Instructions - Please Read Before Beginning
Veuillez lire les instructions avant d’entreprendre l’installation et le chargement
2
1
3
. Insert Mounting Bolt through one hole of a Jawz adapter.
Apply washer and loosely apply a T-knob. See image 2.
. Faites passer le boulon de fixation dans l’un des trous
d’un adaptateur Jawz puis vissez légèrement un bouton
en ‘‘T’’ à la base du boulon. (Figure 2)
. Insert a Mounting Bolt into one of the top side hex holes.
See image 1.
. Insérez un boulon de fixation dans l’un des trous hexagonaux
situés sur le côté supérieur du support.
(Figure 1)
. Place the carrier onto the front cross bar with the forward
section (with small foam pads) facing out. Swing the Jawz
under the cross bar as shown. See image 3.
. Placez le support sur la barre transversale avant, en vous
assurant que la partie cousinée soit vers l’extérieur. Faites
passer l’adaptateur Jawz sous la barre transversale, tel
qu’indiqué. (Figure 3)
12’ Safety LinesJawz Universal Adapters Mounting BoltsKayak Carriers 12’ Load Straps T-Knobs
Rubber Plugs
60mm
70mm
Mounting Bolt Washers
MALONE
R
J-Pro2J-Pro2
TM
J-STYLE KAYAK CARRIER
Installation & Loading Instructions - Please Read Before Beginning
Veuillez lire les instructions avant d’entreprendre l’installation et le chargement
2
1
3
. Insert Mounting Bolt through one hole of a Jawz adapter.
Apply washer and loosely apply a T-knob. See image 2.
. Faites passer le boulon de fixation dans l’un des trous
d’un adaptateur Jawz puis vissez légèrement un bouton
en ‘‘T’’ à la base du boulon. (Figure 2)
. Insert a Mounting Bolt into one of the top side hex holes.
See image 1.
. Insérez un boulon de fixation dans l’un des trous hexagonaux
situés sur le côté supérieur du support.
(Figure 1)
. Place the carrier onto the front cross bar with the forward
section (with small foam pads) facing out. Swing the Jawz
under the cross bar as shown. See image 3.
. Placez le support sur la barre transversale avant, en vous
assurant que la partie cousinée soit vers l’extérieur. Faites
passer l’adaptateur Jawz sous la barre transversale, tel
qu’indiqué. (Figure 3)
12’ Safety LinesJawz Universal Adapters Mounting BoltsKayak Carriers 12’ Load Straps
T-Knobs
Rubber Plugs
60mm
70mm
Mounting Bolt Washers
MALONE
R
J-Pro2J-Pro2
TM
J-STYLE KAYAK CARRIER
Installation & Loading Instructions - Please Read Before Beginning
Veuillez lire les instructions avant d’entreprendre l’installation et le chargement
2
1
3
. Insert Mounting Bolt through one hole of a Jawz adapter.
Apply washer and loosely apply a T-knob. See image 2.
. Faites passer le boulon de fixation dans l’un des trous
d’un adaptateur Jawz puis vissez légèrement un bouton
en ‘‘T’’ à la base du boulon. (Figure 2)
. Insert a Mounting Bolt into one of the top side hex holes.
See image 1.
. Insérez un boulon de fixation dans l’un des trous hexagonaux
situés sur le côté supérieur du support.
(Figure 1)
. Place the carrier onto the front cross bar with the forward
section (with small foam pads) facing out. Swing the Jawz
under the cross bar as shown. See image 3.
. Placez le support sur la barre transversale avant, en vous
assurant que la partie cousinée soit vers l’extérieur. Faites
passer l’adaptateur Jawz sous la barre transversale, tel
qu’indiqué. (Figure 3)
12’ Safety LinesJawz Universal Adapters Mounting BoltsKayak Carriers 12’ Load Straps T-Knobs
Rubber Plugs
60mm
70mm
Mounting Bolt Washers
Jawz Universal Adapters
Mounting Bolts
Red Load Straps
12’ Safety Tie-Downs
REV 11/15
MALONE
R
D ownLoaderD ownLoader
TM
J-STYLE FOLDING KAYAK CARRIER
12’ Safety LinesJawz Universal Adapters Mounting BoltsKayak Carriers Load Straps T-Knobs
60mm
70mm
Installation & Loading Instructions - Please Read Before Beginning
Veuillez lire les instructions avant d’entreprendre l’installation et le chargement
1
3
2
. Insert Mounting Bolt through one hole of a Jawz adapter.
Insert washer and loosely apply a T-knob. See image 2.
. Faites passer le boulon de fixation dans l’un des trous
d’un adaptateur Jawz puis vissez légèrement un bouton
en ‘‘T’’ à la base du boulon. (Figure 2)
. Prior to installation, insert a bolt into the mounting holes in
the bottom of the carriers. Push upward to open the two
mounting hole covers located in the Base pads.
. Insert a Mounting Bolt into one mounting hole from the top
side. Rotate and close the mounting hole cover.
See image 1.
. Insérez un boulon de fixation dans l’un des trous hexagonaux
situés sur le côté supérieur du support.
(Figure 1)
. Place the carrier onto the front cross bar with the boarding
ramp facing out. Swing the Jawz under the cross bar as
shown. See image 3.
. Placez le support sur la barre transversale avant, la rampe
de chargement vers l’extérieur. Faites passer l’adaptateur
Jawz sous la barre transversale, tel qu’indiqué. (Figure 3)
1
Mounting Bolt Washers
Base Pad
Covers
1
MALONE
R
D ownLoaderD ownLoader
TM
J-STYLE FOLDING KAYAK CARRIER
12’ Safety LinesJawz Universal Adapters Mounting BoltsKayak Carriers Load Straps T-Knobs
60mm
70mm
Installation & Loading Instructions - Please Read Before Beginning
Veuillez lire les instructions avant d’entreprendre l’installation et le chargement
1
3
2
. Insert Mounting Bolt through one hole of a Jawz adapter.
Insert washer and loosely apply a T-knob. See image 2.
. Faites passer le boulon de fixation dans l’un des trous
d’un adaptateur Jawz puis vissez légèrement un bouton
en ‘‘T’’ à la base du boulon. (Figure 2)
. Prior to installation, insert a bolt into the mounting holes in
the bottom of the carriers. Push upward to open the two
mounting hole covers located in the Base pads.
. Insert a Mounting Bolt into one mounting hole from the top
side. Rotate and close the mounting hole cover.
See image 1.
. Insérez un boulon de fixation dans l’un des trous hexagonaux
situés sur le côté supérieur du support.
(Figure 1)
. Place the carrier onto the front cross bar with the boarding
ramp facing out. Swing the Jawz under the cross bar as
shown. See image 3.
. Placez le support sur la barre transversale avant, la rampe
de chargement vers l’extérieur. Faites passer l’adaptateur
Jawz sous la barre transversale, tel qu’indiqué. (Figure 3)
1
Mounting Bolt Washers
Base Pad
Covers
2
Insert Mounting Bolt through one hole of a Jawz adapter
and loosely apply a T-knob. See image 2.
Insérez Boulon de montage à travers un trou d’un
adaptateur Jawz et appliquer de manière lâche un
T-bouton. (
Figure 2)
MALONE
R
D ownLoaderD ownLoader
TM
J-STYLE FOLDING KAYAK CARRIER
12’ Safety LinesJawz Universal Adapters Mounting BoltsKayak Carriers Load Straps T-Knobs
60mm
70mm
Installation & Loading Instructions - Please Read Before Beginning
Veuillez lire les instructions avant d’entreprendre l’installation et le chargement
1
3
2
. Insert Mounting Bolt through one hole of a Jawz adapter.
Insert washer and loosely apply a T-knob. See image 2.
. Faites passer le boulon de fixation dans l’un des trous
d’un adaptateur Jawz puis vissez légèrement un bouton
en ‘‘T’’ à la base du boulon. (Figure 2)
. Prior to installation, insert a bolt into the mounting holes in
the bottom of the carriers. Push upward to open the two
mounting hole covers located in the Base pads.
. Insert a Mounting Bolt into one mounting hole from the top
side. Rotate and close the mounting hole cover.
See image 1.
. Insérez un boulon de fixation dans l’un des trous hexagonaux
situés sur le côté supérieur du support.
(Figure 1)
. Place the carrier onto the front cross bar with the boarding
ramp facing out. Swing the Jawz under the cross bar as
shown. See image 3.
. Placez le support sur la barre transversale avant, la rampe
de chargement vers l’extérieur. Faites passer l’adaptateur
Jawz sous la barre transversale, tel qu’indiqué. (Figure 3)
1
Mounting Bolt Washers
Base Pad
Covers
. Locate the wall studs. Using one Coupling as
a template, mark the three mounting locations
(#1, #2 and #3) for both Couplings. See image 2.
NOTE: Confirm that the mounting holes are
vertically aligned and placed at the center of
the studs.
Mounting Bolts (6)
Installation & Loading Instructions - Please Read Before Beginning
1
2
. Drill all four mounting holes using a 3/16” bit. See
image 3.
. The Coupling & Holders are designed to be bolted
to the wall studs. Studs are normally positioned
16” apart (center to center). We advise the
Holders be placed 32” or 48” apart depending
upon the length of the kayak. See image 1.
3
32” Center
48” Center
Wall
Studs
Mounting
Holes
Revision 1
Date: 05/23/2013
M
M
A
A
L
L
O
O
N
N
E
E
R
Wall Couplings (2)
#1
#2
#3
SUP-Style Holders (2)
WALL MOUNT STORAGE
SUP-STYLE HOLDERS
. Locate the wall studs. Using one Coupling as
a template, mark the three mounting locations
(#1, #2 and #3) for both Couplings. See image 2.
NOTE: Confirm that the mounting holes are
vertically aligned and placed at the center of
the studs.
Mounting Bolts (6)
Installation & Loading Instructions - Please Read Before Beginning
1
2
. Drill all three mounting holes using a 3/16” bit. See
image 3.
. The Coupling & Holders are designed to be bolted
to the wall studs. Studs are normally positioned
16” apart (center to center). We advise the
Holders be placed 32” or 48” apart depending
upon the length of the kayak. See image 1.
3
32” Center
48” Center
Wall
Studs
Mounting
Holes
Revision 1
Date: 12.8.15
M
M
A
A
L
L
O
O
N
N
E
E
R
Wall Couplings (2)
#1
#2
#3
SUP-Style Holders (2)
WALL MOUNT STORAGE
SUP-STYLE HOLDERS
REV2
12.8.15
. Locate the wall studs. Using one Coupling as
a template, mark the three mounting locations
(#1, #2 and #3) for both Couplings. See image 2.
NOTE: Confirm that the mounting holes are
vertically aligned and placed at the center of
the studs.
Mounting Bolts (6)
Installation & Loading Instructions - Please Read Before Beginning
1
2
. Drill all four mounting holes using a 3/16” bit. See
image 3.
. The Coupling & Holders are designed to be bolted
to the wall studs. Studs are normally positioned
16” apart (center to center). We advise the
Holders be placed 32” or 48” apart depending
upon the length of the kayak. See image 1.
3
32” Center
48” Center
Wall
Studs
Mounting
Holes
Revision 1
Date: 05/23/2013
M
M
A
A
L
L
O
O
N
N
E
E
R
Wall Couplings (2)
#1
#2
#3
SUP-Style Holders (2)
WALL MOUNT STORAGE
SUP-STYLE HOLDERS
. Locate the wall studs. Using one Coupling as
a template, mark the three mounting locations
(#1, #2 and #3) for both Couplings. See image 2.
NOTE: Confirm that the mounting holes are
vertically aligned and placed at the center of
the studs.
Mounting Bolts (6)
Installation & Loading Instructions - Please Read Before Beginning
1
2
. Drill all three mounting holes using a 3/16” bit. See
image 3.
. The Coupling & Holders are designed to be bolted
to the wall studs. Studs are normally positioned
16” apart (center to center). We advise the
Holders be placed 32” or 48” apart depending
upon the length of the kayak. See image 1.
3
32” Center
48” Center
Wall
Studs
Mounting
Holes
Revision 1
Date: 12.8.15
M
M
A
A
L
L
O
O
N
N
E
E
R
Wall Couplings (2)
#1
#2
#3
SUP-Style Holders (2)
WALL MOUNT STORAGE
SUP-STYLE HOLDERS
REV2
12.8.15
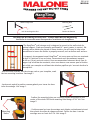
1 Bike Storage Rack
Mounting Bolts
· The HangTime
TM
wall storage rack is designed to mount to the walls studs for
optimal support. Studs are normally positioned 16” apart (center to center). We
strongly advise holders be placed on these studs or you will need to take extra
precautions to insure the holder is properly secured, such as hollow wall anchors.
· Le support de rangement mural HangTime
MC
est conçu pour se fixer aux montants
de bois à l’intérieur d’une a cloison. Les montants sont normalement espacés
de 40 cm (16 po) centre à centre). Nous recommandons fortement de ne fixer le
support qu’au milieu des montants, sinon vous devrez vous assurer que la fixation
est solide, par exemple en utilisant des attaches papillon qui s’ouvrent derrière le
placoplâtre.
· With the studs located, use the storage rack as your template, mark
the two mounting locations. See image 1.
· Après avoir repéré la position comme gabarit pour tracer les deux
trous de montage. Voir image 1.
· Conrm the mounting holes are vertically aligned and placed in the
center of the studs. Drill both mounting holes using a 3/16” bit. See
image 2.
· Confirmez que les trous de montage sont alignés verticalement et sont
bien placés au milieu de chaque montant. Percez les deux trous de
montage avec un foret de 3/16. Voir image 2.
1
2
rack de stockage de vélo 1 Boulons de xation

MALONE
R
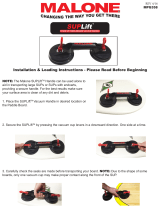
· Holding the rack with one hand, insert 2.5” lag screw into predrilled
hole. Using a drill, secure the top bolt until almost fully tight. See
image 3.
· En tenant le support d’une main, engagez une vis à bois de 2,5 po dans
le trou percé. Avec la perceuse-visseuse, fixez la vis du haut en la ser-
rant presque à fond. Voir image 3.
· Align the bottom of the rack with bottom hole. Insert bolt
and secure fully with drill. See image 4.
NOTE: GO BACK AND FULLY TIGHTEN TOP BOLT.
See image 5.
· Alignez maintenant le bas du support avec le trou du bas.
Insérez la vis en la serrant à fond. Voir image 4.
NOTE: REVENEZ À LA VIS DU HAUT POUR ACHEVER DE LA SERRER
À FOND. Voir image 5.
3
4 5
With the top bolt fully secured your new wall mounted bike
rack is ready for action. The integrated magnet allows the rack
to stay in it’s upright folded position when not in use.
To store your bike: Simply place the bikes top tube in the
poly-coated grab hooks, centering the bike the best we can.
Avec les deux vis bien serrées, votre support est prêt. L’aimant
intégré retient le support en position replié contre le mur pour
un minimum d’encombrement lorsqu’il n’est pas utilisé.
Pour accrocher un vélo, il suft de placer le tube supérieur du cadre sur les crochets
garnis de polyéthylène en centrant le vélo le mieux possible sur le support.

MALONE
R
Limited Lifetime Warranty
MALONE AUTO RACKS, 81 County Road, Westbrook, Maine 04092
Phone: 207-774-9100 Fax: 207-615-0551
Website: www.maloneautoracks.com Email: sales@maloneautoracks.com
Repair or replacement of a defective product, or the issue of a refund or credit (as determined by Malone) is the original
retail purchaser’s exclusive remedy under this warranty. Damage to original purchaser’s vehicle, cargo, or property, and/
or to any other person or property is not covered by this warranty.
This warranty is expressly made in lieu of any and all other warranties, express or implied, including the warranties of
merchantability and tness for a particular purpose.
Malone’s sole liability is limited to the remedy set forth above. In no event will Malone be liable for any direct, indirect,
consequential, incidental, special, exemplary, or punitive damages , or, for any other damages of any kind or nature
(including but not limited to, lost prots, lost income or lost sales).
Some states do not allow the exclusion or limitation of incidental or consequential damages, so the above limitations
may not be applicable. This warranty gives you specic legal rights and you may also have other rights which vary from
state to state.
In addition, all vehicular transports are potentially hazardous. Any person using MALONE products are personally
responsible for following the given directions for use, installation and accepts full responsibility for any and all damages
or injury of any kind including death, which may result from their use.
The Malone Auto Racks (Malone) Limited Lifetime Warranty covers certain Malone-brand products that have been specically
identied for inclusion in the program and is eective for as long as the original retail purchaser owns the product. This
warranty is terminated when the original retail purchaser sells or otherwise transfers the product to any other person or entity.
Subject to the limitations and exclusions described in this warranty, Malone will remedy defects in materials and/or
workmanship by repairing or replacing, at its option, a defective product without charge for parts or labor. Malone may
elect, at its option, not to repair or replace a defective product but rather issue to the original retail purchaser a refund
equal to the purchase price paid for the product, or credit to be used toward the purchase of a replacement Malone
product.
This warranty does not cover, and no warranty is given for defects or problems caused by normal wear and tear which
includes but is not limited to surface (aesthetic) metal corrosion, scratches, dents, deformities, accidents, unlawful
vehicle operation, or any modication of a product not performed or authorized in writing by Malone.
In addition, this warranty does not cover problems resulting from conditions beyond Malone’s control including, but not
limited to, theft, misuse, overloading, or failure to assemble, mount or use the product in accordance with Malone’s
written instructions or guidelines included with the product available to the original retail purchaser.
No warranty is given for Malone products purchased outside of the United States, Canada and Mexico.
If the product is believed to be defective, the original retail purchaser should contact the Malone dealer from whom it
was purchased, who will give the original retail purchaser instructions on how to proceed. If the original retail purchaser
is unable to contact the Malone dealer, or the dealer is not able to remedy the defect, the original retail purchaser should
contact Malone by email at technical@maloneautoracks.com.
In the event that the product must be returned to Malone, a technician at the email address above will provide the
original purchaser with return shipping instructions. The original purchaser will be responsible for the cost of mailing
the product to Malone. In order to receive any remedy under this warranty, a copy of the original purchase receipt,
a description of the defect and a return address must be provided.
Disclaimer of Liability

Garantie à vie limitée
La garantie à vie limitée de Malone Auto Racks (Malone) couvre certains produits de marque Malone expressément
désignés pour être inclus dans ce programme et est valide tant que l’acheteur original est propriétaire du produit. Cette
garantie prend fin lorsque l’acheteur original vend ou cède le produit à une autre personne ou entité.
Sous réserve des restrictions et exclusions prévues dans la garantie, Malone corrigera toute défectuosité matérielle et/ou
tout défaut de fabrication en réparant ou en remplaçant, à sa discrétion, un produit défectueux sans frais pour ce qui est
des pièces et de la main-d’œuvre. Malone peut décider, à son choix, de ne pas réparer ou remplacer un produit
défectueux, mais plutôt d’accorder à l’acheteur original un remboursement d’un montant égal au prix d’achat pour le
produit ou encore un crédit pour l’achat d’un produit de remplacement de marque Malone.
La présente garantie ne couvre pas les défauts et les problèmes résultant d’une usure normale et aucune garantie n’est
offerte à cet égard, notamment en cas de corrosion du métal en surface (esthétique), d’égratignures, de bosses, de
déformations, d’accident, d’une utilisation illégale du véhicule ou de toute modification du produit qui n’est pas effectuée
ou autorisée par écrit par Malone.
En outre, la garantie ne couvre pas les problèmes résultant de circonstances échappant au contrôle de Malone, y compris,
notamment, résultant d’un vol, d’un usage abusif ou d’une surcharge ou encore d’un assemblage, d’une installation ou
d’une utilisation du produit ne respectant pas les instructions écrites de Malone fournies à l’achat à l’acheteur original.
Aucune garantie n’est offerte pour des produits Malone achetés à l’extérieur du territoire continental des États-Unis, du
Canada ou du Mexique.
Si le produit semble défectueux, l’acheteur original doit contacter le détaillant Malone où il a fait son achat et celui-ci lui
fournira des renseignements sur la démarche à suivre. Si l’acheteur original ne réussit pas à contacter le détaillant Malone
ou encore si le détaillant est incapable de remédier à la défectuosité, l’acheteur original doit communiquer directement
avec Malone par courriel à l’adresse suivante : technical@maloneautoracks.com.
Dans le cas où le produit doit être retourné à Malone, un technicien contacté à l’adresse courriel ci-dessus fournira à
l’acheteur original les instructions à suivre pour l’expédition du produit. L’acheteur original devra assumer les frais
d’expédition à Malone. Pour qu’une demande soit admissible aux termes de la présente garantie, il faut envoyer à Malone
une copie du reçu de l’acheteur original, une description de la défectuosité et une adresse de retour.
Exonération de responsabilité
La réparation ou le remplacement du produit défectueux ou encore la remise d’un remboursement ou d’un crédit (tel que
déterminé par Malone) constitue le seul et exclusif dédommagement offert à l’acheteur original aux termes de la présente
garantie. Les dommages causés au véhicule de l’acheteur original, à un chargement, à ses biens et/ou à toute autre
personne ou tout autre bien ne sont pas couverts par cette garantie.
Cette garantie est octroyée expressément afin de remplacer toute autre garantie expresse ou implicite, y compris toute
garantie de qualité marchande ou de conformité pour un usage particulier.
L’unique responsabilité de Malone envers l’acheteur se limite aux dédommagements indiqués ci-dessus. Malone ne pourra
en aucun cas être tenu responsable des dommages directs, indirects, consécutifs, spéciaux, exemplaires ou punitifs ou de
tout autre dommage de quelque nature que ce soit (y compris notamment une perte de profits, de revenus ou de ventes).
L’exclusion ou la limitation des dommages indirects ou consécutifs n’étant pas permise à certains endroits, les limitations
indiquées ci-dessus peuvent ne pas s’appliquer.
En outre, tous les transports par véhicule comportent des risques potentiels. Toute personne utilisant un produit Malone
est donc personnellement responsable de suivre les instructions fournies pour son utilisation et/ou son installation et
accepte l’entière responsabilité pour tout dommage ou toute blessure de quelque nature que ce soit, y compris un décès,
pouvant résulter de son utilisation et/ou son installation.
MALONE AUTO RACKS, 81 County Road, Westbrook, Maine 04092
Téléphone : 207-774-9100 Télécopieur : 207-615-0551
Site Web : www.maloneautoracks.com Courriel : [email protected]
-
 1
1
-
 2
2
-
 3
3
-
 4
4


Malone HangTime Installation & Loading Instructions
- Taper
- Installation & Loading Instructions
dans d''autres langues
- English: Malone HangTime
Documents connexes
-
 Malone MPG388 Manuel utilisateur
-
 Malone MPG389 Manuel utilisateur
-
 Malone MPG117MD Manuel utilisateur
-
 Malone MPG359 Manuel utilisateur
-
 Malone MPG906 Manuel utilisateur
-
 Malone MPG207 Manuel utilisateur
-
 Malone MPG542 Manuel utilisateur
-
 Malone MPG358 Manuel utilisateur
-
 Malone MPG544 Manuel utilisateur
-
 Malone MPG113MD Manuel utilisateur


