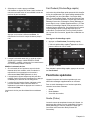
Bosch HDI8056C/01 Le manuel du propriétaire
- Catégorie
- Cuisine
- Taper
- Le manuel du propriétaire

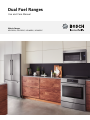
Use and Care Manual
Dual Fuel Ranges
Slide-In Ranges
HDIP056U, HDIP056C, HDI8056U, HDI8056C


Table of Contents
Questions?
1-800-944-2904
www.bosch-home.com/us
We look forward to hearing from you!
This Bosch Appliance is made by
BSH Home Appliances Corporation
1901 Main Street, Suite 600
Irvine, CA 92614
About This Manual . . . . . . . . . . . . . . . . . . . . . . . . . . . . . 1
Safety Definitions . . . . . . . . . . . . . . . . . . . . . . . . . . . . . . 1
WHAT TO DO IF YOU SMELL GAS . . . . . . . . . . . . . . . 1
Safety . . . . . . . . . . . . . . . . . . . . . . . . . . . . . . . . . . . . . . 2
Getting Started . . . . . . . . . . . . . . . . . . . . . . . . . . . . . . . 6
Parts and Accessories . . . . . . . . . . . . . . . . . . . . . . . . . ..6
Burner Caps . . . . . . . . . . . . . . . . . . . . . . . . . . . . . . . . . 7
Burner Grates . . . . . . . . . . . . . . . . . . . . . . . . . . . . . . . . 8
Control Knobs . . . . . . . . . . . . . . . . . . . . . . . . . . . . . . . . 9
Burner Control Knob Removal . . . . . . . . . . . . . . . . . . . . 9
Accessories . . . . . . . . . . . . . . . . . . . . . . . . . . . . . . . . . 10
Before Using the Appliance for the First Time . . . . . . . 11
Operation - Cooktop. . . . . . . . . . . . . . . . . . . . . . . . . . 12
About the Cooktop . . . . . . . . . . . . . . . . . . . . . . . . . . . . 12
Normal Operation (Electronic Ignition/Reignition) . . . . 12
Typical Flame Characteristics . . . . . . . . . . . . . . . . . . . 12
Operation - Oven . . . . . . . . . . . . . . . . . . . . . . . . . . . . 13
Oven Control Panel . . . . . . . . . . . . . . . . . . . . . . . . . . . 13
Before Using the Oven for the First Time . . . . . . . . . . 14
Operation . . . . . . . . . . . . . . . . . . . . . . . . . . . . . . . . . . . 14
Setting the Clock . . . . . . . . . . . . . . . . . . . . . . . . . . . . . 14
Setting the Cooking Mode and Temperature . . . . . . . . 15
Heating time limitation . . . . . . . . . . . . . . . . . . . . . . . . . 16
Timer . . . . . . . . . . . . . . . . . . . . . . . . . . . . . . . . . . . . . . 16
Probe . . . . . . . . . . . . . . . . . . . . . . . . . . . . . . . . . . . . . . 17
Sabbath Mode . . . . . . . . . . . . . . . . . . . . . . . . . . . . . . . 18
Panel Lock . . . . . . . . . . . . . . . . . . . . . . . . . . . . . . . . . . 19
Settings . . . . . . . . . . . . . . . . . . . . . . . . . . . . . . . . . . . . 19
Settings Menu Options . . . . . . . . . . . . . . . . . . . . . . . . 20
Operation - Warming Drawer . . . . . . . . . . . . . . . . . . 21
About the Warming Drawer . . . . . . . . . . . . . . . . . . . . 21
Operation . . . . . . . . . . . . . . . . . . . . . . . . . . . . . . . . . . . 21
Getting the Most Out of Your Cooktop . . . . . . . . . . 22
Getting the Most Out of Your Oven . . . . . . . . . . . . . 23
Cooking modes . . . . . . . . . . . . . . . . . . . . . . . . . . . . . . 25
Getting the Most Out of Your Warming Drawer . . . 28
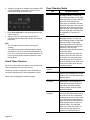
Cleaning and Maintenance . . . . . . . . . . . . . . . . . . . . 30
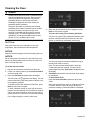
Cleaning the Cooktop . . . . . . . . . . . . . . . . . . . . . . . . . 30
Cooktop Cleaning Chart . . . . . . . . . . . . . . . . . . . . . . . 30
Cleaning the Oven . . . . . . . . . . . . . . . . . . . . . . . . . . . 32
Self Clean . . . . . . . . . . . . . . . . . . . . . . . . . . . . . . . . . . 32
Avoid These Cleaners . . . . . . . . . . . . . . . . . . . . . . . . . 33
Oven Cleaning Guide . . . . . . . . . . . . . . . . . . . . . . . . . 33
Cleaning the Warming Drawer . . . . . . . . . . . . . . . . . . 34
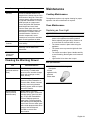
Oven Maintenance . . . . . . . . . . . . . . . . . . . . . . . . . . . 34
Replacing an Oven Light . . . . . . . . . . . . . . . . . . . . . . . 34
Removing the Oven Door . . . . . . . . . . . . . . . . . . . . . . 35
Removing the Drawer . . . . . . . . . . . . . . . . . . . . . . . . . 37
Replacing the Drawer . . . . . . . . . . . . . . . . . . . . . . . . . 37
Service . . . . . . . . . . . . . . . . . . . . . . . . . . . . . . . . . . . . 40
How to obtain Service or parts . . . . . . . . . . . . . . . . . . 40
Self Help . . . . . . . . . . . . . . . . . . . . . . . . . . . . . . . . . . . 40
Use these suggestions before calling for service
to avoid service charges. . . . . . . . . . . . . . . . . . . . . . . 40
Statement of Limited Product Warranty . . . . . . . . . 43
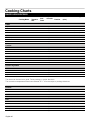
Cooking Charts . . . . . . . . . . . . . . . . . . . . . . . . . . . . . 45

English 1
About This Manual
How This Manual Is Organized
This manual contains several sections:
• The Safety section describes important procedures
that can ensure your safety while using the appliance.
• The Getting Started section describes the features and
functionality of the appliance, including a description of
how to set it up and operate it.
• The Operation section describes how to operate and
get the best performance out of each component.
• The Cleaning and Maintenance section describes how
to clean and maintain the appliance.
• The Service section includes troubleshooting tips and
your warranty.
• Before using your appliance, be sure to read this
manual. Pay special attention to the Important Safety
Instructions located at the beginning of the manual.
Safety Definitions
NOTICE: This indicates that damage to the appliance or
property may occur as a result of non-compliance with this
advisory.
Note: This alerts you to important information and/or tips.
9 WARNING
This indicates that death or serious injuries may
occur as a result of non-observance of this warning.
9 CAUTION
This indicates that minor or moderate injuries may
occur as a result of non-observance of this warning.
WARNING:
If the information in this manual is not followed exactly, a
fire or explosion may result causing property damage,
personal injury or death.
-- Do not store or use combustible materials,
gasoline or other flammable vapors and liquids
in the vicinity of this or any other appliance.
-- WHAT TO DO IF YOU SMELL GAS
• Do not try to light any appliance.
• Do not touch any electrical switch.
• Do not use any phone in your building.
• Immediately call your gas supplier from a
neighbor’s phone. Follow the gas supplier’s
instructions.
• If you cannot reach your gas supplier, call
the fire department.
-- Installation and service must be performed by a
qualified installer, authorized service agency or
the gas supplier.

9 IMPORTANT SAFETY INSTRUCTIONS
READ AND SAVE THESE INSTRUCTIONS
English 2
Safety
Proper Installation and Maintenance
• WARNING: When properly cared for, your new
appliance has been designed to be safe and reliable.
Read all instructions carefully before use. These
precautions will reduce the risk of burns, electric shock,
fire, and injury to persons. When using kitchen
appliances, basic safety precautions must be followed,
including those in the following pages.
• Have the installer show you the location of the circuit
breaker or fuse. Mark it for easy reference.
• This appliance must be properly installed and
grounded by a qualified technician. Connect only to a
properly grounded outlet. Refer to Installation
Instructions for details.
• This appliance is intended for normal family household
use only. It is not approved for outdoor use. See the
“Statement of Limited Product Warranty”. If you have
any questions, contact the manufacturer.
• Do not store or use corrosive chemicals, vapors,
flammables or nonfood products in or near this
appliance. It is specifically designed for use when
heating or cooking food. The use of corrosive
chemicals in heating or cleaning will damage the
appliance and could result in injury.
• Do not operate this appliance if it is not working
properly, or if it has been damaged. Contact an
authorized servicer.
• Do not cook on a broken cooktop. Cleaning solutions
and spillovers may create a risk of electric shock.
• Do not obstruct oven vents.
• Do not repair or replace any part of the appliance
unless specifically recommended in this manual. Refer
all servicing to a factory authorized service center.
• In the event of an error the display flashes and beeps
continuously. If this happens during self-clean,
disconnect appliance from the power supply and call a
qualified technician.
• In the event of an error the display flashes and beeps
continuously. Disconnect appliance from the power
supply and call a qualified technician.
• In order to keep control knobs from becoming
excessively hot, the cooktop must be used in
conjunction with a suitable ventilation system.
Gas Safety
• To prevent carbon monoxide build-up, do not block
appliance air vents.
• Have the installer show you where the gas shut-off
valve is located.
• If a burner goes out and does not reignite, call service.
• If you smell gas, your installer has not done a proper
job of checking for leaks. If the connections are not per-
fectly tight, you can have a small leak and, therefore, a
faint smell. Finding a gas leak is not a "do-it-yourself"
procedure. Some leaks can only be found with the
burner control in the ON position and this must be done
by a qualified service technician. See “WHAT TO DO IF
YOU SMELL GAS” on page 1.
For proper burner performance, keep igniters clean
and dry.
Fire Safety
• Do not use aluminum foil or protective liners to line any
part of an appliance, especially the oven bottom.
Installation of these liners may result in a risk of electric
shock or fire.
• If materials inside an oven or warming drawer should
ignite, keep door closed. Turn off the appliance and
disconnect the circuit at the circuit breaker box.
9 WARNING
TIP OVER HAZARD!
A child or adult can tip the
range over and be killed.
Verify that the anti-tip
bracket is securely installed.
Ensure the anti-tip bracket
is engaged whenever the
range is moved to a new
location.
Do not operate the range without the anti-tip bracket
in place. Failure to follow the instructions in this
manual can result in death or serious burns to
children and adults.
Check for proper installation and use of the anti-
tip bracket. Carefully tip the range forward pulling
from the back to ensure that the anti-tip bracket
engages the range leg and prevents tip-over. The
range should not move more than 1” (2.5 cm).

9 IMPORTANT SAFETY INSTRUCTIONS
READ AND SAVE THESE INSTRUCTIONS
English 3
• Use this appliance only for its intended use as
described in this manual. For example, never use the
appliance for warming or heating the room. Never use
the appliance for storage.
• Set the burner control so that the flame does not
extend beyond the bottom of the pan.
• Do not allow aluminum foil, plastic, paper or cloth to
come in contact with a hot burner or grate. Do not allow
pans to boil dry.
• If the cooktop is near a window, forced air vent, or fan,
be certain that flammable materials such as window
coverings do not blow over or near the burners or
elements. They could catch on fire.
• Always have a working smoke detector near the
kitchen.
• Never leave the cooktop unattended when in use.
Boilovers cause smoking and greasy spillovers may
ignite.
• WARNING—TO REDUCE THE RISK OF A RANGE
TOP GREASE FIRE:
a) Never leave surface units unattended at high
settings. Boilovers cause smoking and greasy
spillovers that may ignite. Heat oils slowly on low or
medium settings.
b) Always turn hood ON when cooking at high heat or
when flambéing food (i.e. Crepes Suzette, Cherries
Jubilee, Peppercorn Beef Flambe').
c) Clean ventilating fans frequently. Grease should
not be allowed to accumulate on fan or filter.
d) Use proper pan size. Always use cookware
appropriate for the size of the burner.
• In the event that personal clothing or hair catches fire,
drop and roll immediately to extinguish flames.
• Take care that drafts like those from fans or forced air
vents do not push the flames so that they extend
beyond the edges of the pan.
• Whenever possible, do not operate the ventilation
system during a cooktop fire. However, do not reach
through fire to turn it off.
• Have an appropriate fire extinguisher available, nearby,
highly visible and easily accessible near the oven.
• Smother flames from food fires other than grease fires
with baking soda. Never use water on cooking fires.
CAUTION:
All igniters spark when any single burner is turned on. Do
not touch any of the burners when the cooktop is in use. In
the event that personal clothing or hair catches fire, drop
and roll immediately to extinguish flames.
Burn Prevention
• DO NOT TOUCH COOKTOP GRATES OR AREAS
NEAR COOKTOP BURNERS - Areas near cooktop
burners may become hot enough to cause burns.
During and after use, do not touch, or let clothing,
potholders, or other flammable materials contact
cooktop burners or areas near them until they have
had sufficient time to cool. Among these areas are the
cooktop and areas facing the cooktop.
• DO NOT TOUCH HEATING ELEMENTS OR
INTERIOR SURFACES OF OVEN - Heating elements
may be hot even though they are dark in color. Interior
surfaces of an oven become hot enough to cause
burns. During and after use, do not touch, or let
clothing, potholders, or other flammable materials
contact heating elements or interior surfaces of oven
until they have had sufficient time to cool. Other
surfaces of the appliance may become hot enough to
cause burns. Among these surfaces are oven vent
openings, surfaces near these openings and oven
doors.
9 WARNING
TO REDUCE THE RISK OF PERSONAL INJURY
IN THE EVENT OF A GREASE FIRE, OBSERVE
THE FOLLOWING:
• SMOTHER FLAMES with a close-fitting lid,
cookie sheet, or metal tray, then turn off the
burner. EXERCISE CAUTION TO PREVENT
BURNS. If the flames do not go out immediately,
EVACUATE AND CALL THE FIRE
DEPARTMENT.
• NEVER PICK UP A FLAMING PAN—You may
be burned.
• DO NOT USE WATER, including wet rags or
towels—a violent steam explosion will result.
• Use an extinguisher ONLY if:
1) You know you have a CLASS ABC
extinguisher and you already know how to
operate it.
2) The fire is small and contained in the area
where it started.
3) The fire department is being called.
4) You can fight the fire with your back to an
exit.

9 IMPORTANT SAFETY INSTRUCTIONS
READ AND SAVE THESE INSTRUCTIONS
English 4
• Exercise caution when opening the appliance.
Standing to the side, open the door (or drawer) slowly
and slightly to let hot air and/or steam escape. Keep
your face clear of the opening and make sure there are
no children or pets near the unit. After the release of
hot air and/or steam, proceed with your cooking. Keep
doors shut unless necessary for cooking or cleaning
purposes. Do not leave open doors unattended.
• Do not heat or warm unopened food containers. Build-
up of pressure may cause the container to burst and
cause injury.
• Always place oven racks in desired location while oven
is cool. If a rack must be moved while oven is hot, do
not let potholder contact the heating elements.
• Always use dry potholders. Moist or damp potholders
on hot surfaces may result in burns from steam. Do not
let potholder touch hot heating elements. Do not use a
towel or other bulky cloth.
• Always turn hood ON when cooking at high heat or
when flambéing food (i.e. Crepes Suzette, Cherries
Jubilee, Peppercorn Beef Flambe’).
• Use high heat settings on the cooktop only when
necessary. To avoid bubbling and splattering, heat oil
slowly on no more than a low-medium setting. Hot oil is
capable of causing extreme burns and injury.
• Never move a pan of hot oil, especially a deep fat fryer.
Wait until it is cool.
• Secure all loose garments, etc. before beginning. Tie
long hair so that it does not hang loose, and do not
wear loose fitting clothing or hanging garments, such
as ties, scarves, jewelry, or dangling sleeves.
• Avoid reaching or leaning over the appliance. Be aware
that certain clothing and hair sprays may contain
flammable chemicals that could be ignited if brought in
contact with hot surface units or heating elements and
may cause severe burns.
• Do not touch interior surface of the drawer while it is in
use. The interior of the drawer could become hot
enough to cause burns. Allow drawer and rack (if
equipped) to cool before handling.
• WARNING: To prevent burns, do not remove drawer
while hot. Be sure drawer is empty before removing.
• Use caution when cooking foods with high alcohol
content (e.g. rum, brandy, bourbon) in the oven.
Alcohol evaporates at high temperatures. There is a
risk of burning as the alcohol vapors may catch fire in
the oven. Use only small quantities of alcohol in foods,
and open the oven door carefully.
Child Safety
• When children become old enough to use the
appliance, it is the responsibility of the parents or legal
guardians to ensure that they are instructed in safe
practices by qualified persons.
• Do not allow anyone to climb, stand, lean, sit, or hang
on any part of an appliance, especially a door, warming
drawer, or storage drawer. This can damage the
appliance, and the unit may tip over, potentially causing
severe injury.
• Do not allow children to use this appliance unless
closely supervised by an adult. Children and pets
should not be left alone or unattended in the area
where the appliance is in use. They should never be
allowed to play in its vicinity, whether or not the
appliance is in use.
9 WARNING
Use this appliance only for its intended use as
described in this manual. NEVER use this appliance
as a space heater to heat or warm the room. Doing
so may result in carbon monoxide poisoning and
overheating the appliance. Never use the appliance
for storage.
9 WARNING
NEVER cover any slots, holes or passages in the
oven bottom or cover an entire rack with materials
such as aluminum foil. Doing so blocks air flow
through the oven and may cause carbon monoxide
poisoning. Aluminum foil linings may also trap heat,
causing a fire hazard.
Conversion to Liquified Petroleum Gas
The LP Gas Conversion kit should be installed by a
qualified service technician. When installing the kit be sure
to follow the LP Gas Conversion Installation Instructions
carefully.
9 WARNING
Personal injury or death from electrical shock may
occur if the range is not installed by a qualified
installer or electrician.
Any additions, changes or conversions required in
order for this appliance to satisfactorily meet the
application needs must be made by a qualified
technician.

9 IMPORTANT SAFETY INSTRUCTIONS
READ AND SAVE THESE INSTRUCTIONS
English 5
• IMPORTANT SAFETY NOTICE: The California Safe
Drinking and Toxic Enforcement Act requires the
Governor of California to publish a list of substances
known to the state to cause cancer, birth defects or
other reproductive harm, and requires businesses to
warn customers of potential exposure to such
substances. The burning of gas cooking fuel and the
elimination of soil during self-cleaning can generate
small amounts of carbon monoxide.The fiberglass
insulation in self-clean ovens gives off very small
amounts of formaldehyde during the first several
cleaning cycles. California lists formaldehyde as a
potential cause of cancer. Carbon monoxide is a
potential cause of reproductive toxicity. Exposure to
these substances can be minimized by:
1) Providing good ventilation when cooking with gas.
2) Providing good ventilation during and immediately
after self-cleaning the oven.
3) Operating the unit according to the instructions in
this manual.
• Do not clean the appliance while it is still hot. Some
cleaners produce noxious fumes when applied to a hot
surface. Wet cloths or sponges can cause burns from
steam.
Cookware Safety
• Do not place food directly on oven bottom.
• Follow the manufacturer’s directions when using
cooking or roasting bags.
• Hold the handle of the pan when stirring or turning
food. This helps prevent spills and movement of the
pan.
• Use Proper Pan Size. The use of undersized cookware
will expose a portion of the heating element or burner
to direct contact and may result in ignition of clothing.
Select cookware having flat bottoms large enough to
cover the surface heating unit. This appliance is
equipped with one or more surface units of different
size. Proper relationship of cookware to heating
element or burner will also improve efficiency.
• Always position handles of utensils inward so they do
not extend over adjacent work areas, burners, or the
edge of the cooktop. This reduces the risk of fires,
spills and burns.
• CAUTION: Plastic containers or plastic wrap can melt
if in direct contact with the drawer or a hot utensil. If it
melts onto the drawer, it may not be removable.
Food Safety
• CAUTION: To maintain food safety, follow these
guidelines:
1) DO NOT use a warming drawer to heat cold food
(exception: it is safe to use the drawer to crisp
crackers, chips or dry cereal and to warm plates.)
2) Be sure to maintain proper food temperature. The
USDA recommends holding hot food at 140°F or
warmer.
3) DO NOT warm food for longer than one hour.
9 CAUTION
Items of interest to children should not be stored in
an appliance, in cabinets above an appliance or on
the backsplash. Children climbing on an appliance
to reach items could be seriously injured.
• When self-cleaning, confirm that the door locks and
will not open. If the door does not lock, do not run
Self-Clean. Contact service.
• Birds have very sensitive respiratory systems. Keep
pet birds out of the kitchen or other rooms where
kitchen fumes could reach them. During self-clean,
fumes are released that may be harmful to birds.
Other kitchen fumes such as overheating margarines
and cooking oils may also be harmful.
• Keep oven free from grease build up.
Proposition 65 Warning:
This product may contain a chemical known to the
State of California, which can cause cancer or
reproductive harm. Therefore, the packaging of your
product may bear the following label as required by
California:
67$7(2)&$/,)251,$352326,7,21:$51,1*
:$51,1*
&DQFHUDQG5HSURGXFWLYH+DUPZZZ3:DUQLQJVFDJRY
Cleaning Safety

English 6
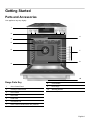
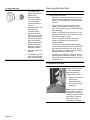
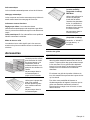
Getting Started
Parts and Accessories
Your appliance may vary slightly.
Range Parts Key
1 Oven Control Panel
2 Cooktop Control Knobs
3 Door Gasket
4 Door Latch
5 Probe Jack
6 Convection Fan
7 Rack Position Guides with 6 rack positions
8 Oven Bottom
9 Door Hinge
10 Warming Drawer
1
8
7
4
9
6
5
3
2
10

English 7
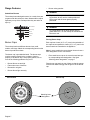
Range Features
Sealed Gas Burners
The cooktop has sealed gas burners. As a result, there are
no parts under the cooktop to clean, disassemble or adjust.
Spills stay on top of the cooktop where they are easier to
wipe up.
Burner Caps
The cooktop has three different burner sizes; small,
medium, and large. Match the corresponding letters on the
burner cap and burner base.
The burner cap is porcelainized steel. The burner caps
must be properly placed for the cooktop to function
properly. If the burner cap is not properly placed, one or
more of the following problems may occur:
• Burner flames are too high.
• Flames shoot out of burners.
• Burners do not ignite.
• Burner flames light unevenly.
• Burner emits gas odor.
Placing Burner Caps
Each cap has a letter (A, D, or F) cast in the underside of
the cap that corresponds to a letter (A, D, or F) cast in the
burner base that is attached to the appliance.
Note: In some models the center burner does not have a
letter designation on the burner base.
• Place each burner cap on its correct burner base per
its corresponding letter designation. See figure
“Matching letter designation.” on page 7.
Place burner cap gently on top of base so that the prongs
of the burner base fit snugly into the groove of the burner
cap.
Burner Grate
Burner Cap
Burner
Cooktop
Ignitor
9 WARNING
To prevent flare-ups and avoid creation of harmful
by-products, do not use the cooktop without all
burner caps and all burner grates properly
positioned.
9 WARNING
To prevent burns, do not touch burner caps or
grates while hot. Turn the cooktop off and allow the
burners to cool.
'
'
B
urner
B
ase
Burner Cap
Matching letter
designation.

English 8
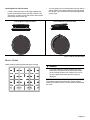
Checking Burner Cap Placement
• Check to make sure there is not a gap between the
burner cap and burner base. See figure “Burner Cap
Placement” on page 8 to see the correct and incorrect
placements of the burner cap.
• You may gently try to move the burner cap from side to
side to check if it is properly placed. If properly placed,
the cap will click from side to side as the prongs hit the
groove ridge.
.
Burner Grates
Grates must be properly positioned before cooking.
To purchase replacement rubber feet: Part # 416438,
contact your dealer or call the service number listed inside
the cover.
Figure 1: Burner Cap Placement
Correct Burner Cap Placement Incorrect Burner Cap Placement
9 WARNING
To prevent flare-ups, properly support pots, and
avoid spills, all grates must be properly positioned
on the cooktop whenever the cooktop is in use. Do
not use a grate if the rubber feet are missing or
damaged.

English 9
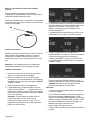
Control Knobs
The cooktop has one control knob for each burner.
The cooktop has standard burner controls and rubber
grommets.
The standard burner controls have an infinite number of
heat settings. These settings are located on the burner
knob.
To operate: Select the appropriate control knob, push down
and turn to the left to the ignition symbol until the burner
ignites. Turn the knob to the desired setting. Turn burner off
by turning the control knob clockwise to OFF.
Burner Control Knob Removal
To remove knob and grommet: With burner in the OFF
position, gently lift knob up and off. Gently pull the grommet
from the sides and lift out.
To replace grommet and knob: Carefully insert the
grommet into the opening, ensuring that the maintop is
seated in the track around the entire perimeter of the
grommet. Replace control knob by placing indicator line at
the 12 o’clock position. Press down firmly.
Oven Features
Cooling Fan
The cooling fan runs during all cooking modes. The fan can
be heard when it is running, and warm air may be felt as it
is released from the oven vent. The fan may also run after
the oven is off.
Convection Fan
The convection fan operates during any convection mode.
When the oven is operating in the convection mode, the fan
will turn off automatically when the door is opened. The
convection fan does run during self-clean, although not at
the beginning of the mode.
Note: On some models, the convection fan also runs
during preheat for the bake mode.
Oven Bottom
The oven bottom conceals the lower heating element. As a
result the element is protected from damage and spills.
Note:
Do not place food directly on the oven bottom.
Oven Vent
The oven vent is located at the back of the range. Warm air
may be released from the vent before, during and after
cooking. It is normal to see steam escaping from the vent
and condensation may collect in this area. This area may
be hot when the oven is in use. Do not block the vent as it
is important for air circulation.
Automatic Shutoff
The oven will automatically shut off after 24 hours.
Self-Cleaning
The oven features a self-cleaning function that eliminates
the manual labor involved with cleaning your oven.
9 CAUTION
Failure to operate knobs properly may result in
personal injury and damage to the appliance.
Figure 2: Standard Burner Control Knob
9 WARNING
To avoid possible electric shock, do not reach
through control opening into rough-in box located
under the cooktop.
9 CAUTION
Do not use aluminum foil or protective liners to line
any part of an appliance, especially oven bottom.
Installation of these liners may result in a risk of
electric shock or fire.

English 10
Indicators and Other Features
Default Settings - The cooking modes automatically select
the default temperature. These can be changed when a
different one is needed.
E Number Codes -These codes display when there is a
problem with the range.
Stand By Mode
Stand by mode means that the oven has power but no
cooking mode or timer is running.
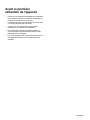
Accessories
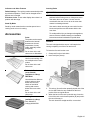
Inserting Racks
Flat Rack
The rack is designed with a stop so it will stop before
coming completely out of the oven and not tilt.
To insert the flat rack into the oven:
1. Grasp rack firmly on both sides.
2. Insert rack (see picture).
3. Tilt rack up (A) to allow the upwardly sloped rear of the
rack to slide under the stop molded into the front
portion of the rack guide above.
4. When the back of the rack is past this stop, lower the
front of the rack to a horizontal position (B) and push it
the rest of the way in.
The rack should be straight and flat, not crooked.
Probe
The probe can be used to
determine the internal
doneness or the end
temperature of many
foods, especially meats
and poultry.
Do not clean in the self-
clean oven or dishwasher.
Flat Rack
Use for most cooking. Can
use multiple racks in some
modes.
Do not clean in the self-
clean oven.
Telescopic Rack
(some models)
(available via eShop)
HEZTR301
Use with heavier dishes to
make it easier to place
dishes into the oven,
check on food while
cooking and remove
dishes from oven when
done.
Do not clean in the self-
clean oven.
Broiling Pan
(available via eShop)
Pan: #00449757
Grill (top): #00449756
9 CAUTION
To avoid burns, place oven racks in desired
positions before turning oven on. Always use oven
mitts when the oven is warm. If a rack must be
moved while the oven is hot, do not let oven mitts
contact hot heating elements.
Use caution when removing an oven rack from the
lowest rack position to avoid contact with the hot
oven door.
To avoid possible injury or damage to the appliance,
ensure racks are installed exactly per installation
instructions and not backwards or upside down.

English 11
To remove the flat rack from the oven:
1. Grasp rack firmly on both sides and pull rack toward
you.
2. When the stop is reached, tilt rack up so that the
upwardly sloped back of the rack can pass under the
stop. Pull the rack the rest of the way out.
Telescopic Rack
To insert the telescopic rack into the oven:
1. Slide the rack in evenly until the rear of the rack is
about 2 inches from the back of the oven.
2. Tilt the front of the rack up about 3/4’s of an inch (A)
and finish pushing the rack all the way back (B).
Note: Avoid striking the oven light cover glass when
pushing the rack into position.
3. The back of the telescopic rack drops into place.
4. Pull the rack forward to engage the bottom of the rack
onto the rear of the rack position guide.
5. Lower the front of the rack to finish seating it on the
rack guide. The rack should feel stable when properly
seated.
6. Slide the movable part of the telescopic rack in and out
a few times to make sure it is able to move freely and
that the non-moving part of the telescopic rack is
securely anchored.
To remove the telescopic rack from the oven:
1. Lift the front of the telescopic rack assembly about 1/2
inch and push the rack to the rear about 3/4 inch. This
allows the rack to disengage from the rack position
guide.
2. Lift the rear of the telescopic rack assembly so it clears
the rack position guide and gently pull the rack from the
oven.
Note: Take care to avoid pulling the rack unevenly
which will cause it to bind during removal, catching on
the oven walls.
Before Using the Appliance
for the First Time
• Remove all packing materials and labels from range.
Remove packing materials from inside the oven and
inside the drawer.
• While cool, wipe with a clean, damp sponge and dry.
• There may be a slight odor during first uses; this is
normal and will disappear.
• Optimum cooking results depend on proper cookware
and bakeware being used.
• Read and understand all safety precautions and Use
and Care Manual information prior to operating.
9 CAUTION
To avoid possible injury or damage to the appliance,
ensure the telescopic rack is installed exactly per
installation instructions and not backwards or upside
down.

English 12
Operation - Cooktop
This section explains how to operate the cooktop. See
“Getting the Most Out of Your Cooktop” for guidelines to
improve cooktop results.
About the Cooktop
Use the cooktop for surface cooking applications such as
boiling, frying, simmering, steaming and sautéing.
When using the cooktop and the oven is set to self-clean,
"Turn Off Cooktop" is shown in the display. The self-clean
cycle does not come on. Turn off the cooktop to use self-
clean.
The cooktop cannot be used when self-clean is running in
the oven.
The cooktop has one control knob for each burner. Push
down and turn to the desired heat setting.
Normal Operation
(Electronic Ignition/Reignition)
The cooktop uses electronic igniters to light the burners.
There is no pilot light. Each burner has its own igniter. If a
burner flame blows out during use, the burner will
automatically reignite.
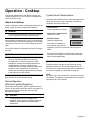
Typical Flame Characteristics
The burner flame should be blue in color and stable with no
yellow tips, excessive noise or fluttering. It should burn
completely around the burner cap.
Foreign particles in the gas line may cause an orange
flame during initial use. This should disappear with use.
Check burner to make sure port holes are not obstructed. If
the ports are clogged, see “Self Help” on page 38.
NOTE:
An audible “pop” may be heard when the burner is turned
off manually. The “popping” may be louder with LP gas than
with natural gas. This is normal.
9 WARNING
To avoid risk of personal injury, while the self-clean
cycle is operating, the cooktop will not operate.
9 WARNING
The burning of gas cooking fuel can create small
amounts of Carbon Monoxide, Benzene and
Formaldehyde. To minimize exposure to these
substances, the burners should be adjusted by a
certified installer or agency to ensure proper
combustion. Ensure proper ventilation with an open
window or use a ventilation fan or hood when
cooking with Gas. Always operate the unit according
to the instructions in this manual.
9 CAUTION
To avoid possible injury or damage to the
appliance, ensure grates are installed exactly per
installation instructions and not backwards or
upside down.
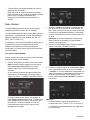
Figure 3: Checking Flame Characteristics
Yellow Flames:
Further adjustment is required.
Yellow Tips on Outer Cones:
Normal for LP Gas.
Soft Blue Flames:
Normal for Natural Gas.
If the flame is completely or
mostly yellow, verify that the
regulator is set for the correct fuel. After adjustment,
retest.
Some yellow streaking is normal during the initial start-
up. Allow unit to operate 4-5 minutes and re-evaluate
before making adjustments.

English 13
Operation - Oven
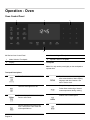
Oven Control Panel
800 Series Oven Control Panel
Touchpads
Note: You only need to press lightly on the touchpads to
operate them.
Touchpad Descriptions
2
3
4
1
1 Mode Selection Touchpads
2 Display
3 Numeric Keypad Touchpads
4 Special Function Touchpads
Turns Panel Lock mode on and off.
Turns the oven lights on or off.
Starts and stops the kitchen timer(s).
Press to edit a timer.
Press to edit the oven timer for the
oven. Turns off the oven at the end
of the specified time.
Provides access to user settings to
allow customization of basic display,
language and other features. Use
also to set the clock.
Sets probe target temperature.
Probe allows monitoring of internal
meat temperatures during cooking.
Enables Fast Preheat option.
Activates Self Clean mode.

English 14
More Modes
Additional modes are available by pressing the More
Modes touchpad. These modes include Convection Broil,
Warm, Pizza, Proof and Roast. These are discussed in the
Getting the Most Out of Your Appliance section later in this
manual.
Display Symbols
Before Using the Oven for
the First Time
• Oven must be properly installed by a qualified
technician before use.
• Remove all packing materials from inside and outside
the oven.
• While cool, wipe with a clean, damp cloth and dry.
• There may be a slight odor during first uses; this is
normal and will disappear.
• Optimum cooking results depend on proper bakeware
being used.
• Read and understand all safety precautions and Use
and Care Manual information prior to operating.
Operation
About the Appliance
Your new oven combines premium cooking results and
simple operation.
The oven design has been optimized to improve heat
distribution in the oven cavity. The result is even browning,
shorter cooking times and lower energy consumption.
Thanks to the Self-Clean mode, hours of scrubbing into the
darkest corners of the oven is a thing of the past. The oven
burns off soil simply and easily. All that is left to do is to
remove a few ashes from the oven when Self-Clean is
done and the oven is cool enough to touch.
Clear labeling of the touch pads makes operating the oven
very easy. This manual includes all instructions for
operating the oven.
Please call us if you ever have any questions. Our
telephone number is located at the beginning of this
manual. We welcome your comments and suggestions!
Basic Features
Setting the Clock
The oven includes time functions that require the current
time to be set. It is therefore important to set the clock
before beginning to use the oven. The oven cannot be in a
cooking mode to access the clock set mode.
To set the clock:
1. The oven must be in Stand-By mode (oven is powered
on, but no cooking mode or timer in operation).
2. To access the clock set mode:
Press the Settings touchpad. The display shows “SET
CLOCK”. Press Enter to edit the clock.
Allows access to cooking/heating
modes that do not have a direct
access touchpad.
Turns the warming drawer on or off.
Door Lock - Is displayed when the
oven door is locked.
Fast Preheat Symbol - Is displayed
when Fast Preheat is active.
Probe Symbol - Appears when a
probe is detected.
Panel Lock - Is displayed when the
control panel is locked.
Self Clean - Is displayed when Self
Clean is active.

English 15
3. Use the numeric keypad to enter the desired time.
Each number pressed is entered at the right and
moving previously entered digits to the left. To set
“12:45 pm”, press 1, 2, 4, 5.
4. When the desired time is entered, set the time by
pressing Enter.
The clock is now set and running.
Setting the Cooking Mode and
Temperature
There are two alternate methods to set cooking mode and
temperature.
To set the Cooking Mode first, then the temperature:
1. Press the desired Cooking Mode Touchpad. The
cooking mode and default temperature are displayed.
The temperature flashes to show it can be edited.
2. Press Enter to start the mode using the default
temperature.
3. To change the temperature, enter the new temperature
using the numeric touchpads. 375° is used for this
example. Press Enter to set the updated temperature.
Note: The new temperature is automatically set after
10 seconds if Enter is not pressed.
4. Preheating starts.
Note: If a temperature is entered that is not within the
allowed range for the mode, an error tone will sound and
the lower part of the screen will display “TEMP NOT
ALLOWED”.
To set the Temperature first and then the Cooking
Mode: (not for Broil or Convection Broil)
1. Press the numeric keys to enter the desired
temperature setting. The temperature entered is
displayed beside the current time.
2. Select a cooking mode that is compatible with the
temperature entered. If no cooking mode is selected
within 5 seconds of setting the temperature, an error
tone sounds and a SELECT MODE message is
displayed and blinks.
3. Press a Mode Selection Touchpad to select a cooking
mode.
The new mode and temperature set automatically after
10 seconds if Enter is not pressed.
Note: If a temperature is entered that is not within the
allowed range for the mode selected, an error tone will
sound and the lower part of the screen will display “TEMP
NOT ALLOWED”.
To change the Oven Temperature
1. Press the Cooking Mode Touchpad.
2. The current temperature flashes. Use the numeric
touchpads to enter a new temperature. Press Enter.

English 16
Heating Time Limitation
The maximum heating time is limited. If you forget to turn
off the oven, it turns off automatically after a set period of
time.
The maximum time for Sabbath mode is 74 hours; for all
other cooking modes the maximum allowed time is 24
hours.
Timer
Your new oven is equipped with two types of timers.
Kitchen Timer - is a countdown timer that has no affect on
oven heating. The kitchen timer is used for general kitchen
timing needs.
Oven Timer - is a countdown timer which upon reaching
00:00 turns the oven off, stopping the current mode. The
oven timer is used to set how long a mode will run (not
available for Broil, Convection Broil).
To set a kitchen timer:
(for general kitchen timer needs)
1. Press the Kitchen Timer On/Off.
0:00 is displayed and blinks in the display. Enter the
desired timer value in H/MM format using the numeric
touchpads.
2. Press Enter.
The kitchen timer starts.
3. When the kitchen timer has counted down to zero an
alarm tone sounds every 10 seconds for 2 minutes and
the message “TIMER END” is displayed.
Cancel the kitchen timer - by pressing the Kitchen
Timer On/Off button.
Note
• The timer does not change when other settings are
changed.
To edit an kitchen timer:
1. Press the Kitchen Timer On/Off button.
2. The current time value blinks and can be edited.
To set an oven timer:
(for setting a timer to turn the oven off)
Note: An oven timer cannot be run during Self Clean.
1. Press the Oven Timer touchpad.
2. Select mode, press Enter.
0:00 is displayed and blinks in the display. Enter the
desired timer value in H/MM format using the numeric
keypad.
Press the Enter touchpad. The oven timer counts
down to 0:00.
3. When the timer reaches :00 the cooking mode ends
and the message “OVEN TIMER FINISHED” is
displayed. The oven alarm tone sounds every 10
seconds for 2 minutes.
Editing the oven timer
1. If the oven timer is running and the time remaining
needs to be changed, enter the oven timer mode by
pressing the Oven Timer touchpad.
2. The temperature blinks, indicating it can be edited.
Input a new temperature or press Enter for no change.
Temperature in
ºF
Temperature in
ºC
Max. time
allowed without
activity
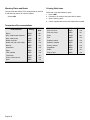
100–200 30–120 24 hours
201–550 121–300 12 hours

English 17
3. The timer value blinks, indicating it can be edited. Input
the new time and restart the timer by pressing the
Enter touchpad.
The oven timer may be cleared by entering 0:00.
Fast Preheat
Fast Preheat heats the oven quicker than standard
preheat. It is available for Bake, Convection Multi Rack,
Convection Bake, Convection Roast, Roast, and Pizza
(Roast is found in the “More Modes” menu). If Fast Preheat
is not allowed for the selected cooking mode an error tone
sounds. Fast Preheat is not available for Broil, Convection
Broil, Proof or Warm.
To set Fast Preheat:
1. Press Fast Preheat.
The fast preheat icon
&appears in the display just
above the mode name.
2. Press Start.
Fast Preheat can be turned off by pressing Fast Preheat
again.
Special Features
The special features provide you with additional
conveniences when cooking.
Learn more about these special features in the following
sections:
• Probe
• Sabbath Mode
• Panel Lock
Probe
The probe measures the internal temperature of the food.
The probe is available for Bake, Roast and all convection
cooking modes except Convection Broil.
Remove Safety Cap before Using Probe
Some models include a temperature probe used to sense
internal tempererature of meats during cooking.
The probe ships with a black plastic safety cap over the
pointed metal end of the probe. The cap must be removed
prior to use.
.
Inserting the probe:
Insert the tip of the probe in the middle and thickest part of
the meat or breast for poultry. Make sure the probe is not
touching fat, bone, or parts of the oven or the pan.
Note: Food must be completely thawed before inserting
the probe into the meat.
To use the probe:
1. Insert the probe into the meat as described above. The
probe symbol is displayed.
2. Connect the probe to the oven. If the probe is not
connected to the oven prior to starting Probe mode, an
error tone sounds and the message “INSERT PROBE”
is displayed.
3. Set the cooking mode and temperature.
4. The Set Probe Temp screen is displayed. A three digit
input prompt “- - -” blinks in the lower right corner. Use
the numeric keypad to enter the desired probe
temperature and press Enter on the numeric keypad.
Note: The minimum probe temperature that can be set
is 100° F (40° C) and the maximum is 200° F (100° C).
If the probe temperature entered is outside this range,
an error is displayed.
La page charge ...
La page charge ...
La page charge ...
La page charge ...
La page charge ...
La page charge ...
La page charge ...
La page charge ...
La page charge ...
La page charge ...
La page charge ...
La page charge ...
La page charge ...
La page charge ...
La page charge ...
La page charge ...
La page charge ...
La page charge ...
La page charge ...
La page charge ...
La page charge ...
La page charge ...
La page charge ...
La page charge ...
La page charge ...
La page charge ...
La page charge ...
La page charge ...
La page charge ...
La page charge ...
La page charge ...
La page charge ...
La page charge ...
La page charge ...
La page charge ...
La page charge ...
La page charge ...
La page charge ...
La page charge ...
La page charge ...
La page charge ...
La page charge ...
La page charge ...
La page charge ...
La page charge ...
La page charge ...
La page charge ...
La page charge ...
La page charge ...
La page charge ...
La page charge ...
La page charge ...
La page charge ...
La page charge ...
La page charge ...
La page charge ...
La page charge ...
La page charge ...
La page charge ...
La page charge ...
La page charge ...
La page charge ...
La page charge ...
La page charge ...
La page charge ...
La page charge ...
La page charge ...
La page charge ...
La page charge ...
La page charge ...
La page charge ...
La page charge ...
La page charge ...
La page charge ...
La page charge ...
La page charge ...
La page charge ...
La page charge ...
La page charge ...
La page charge ...
La page charge ...
La page charge ...
La page charge ...
La page charge ...
La page charge ...
La page charge ...
La page charge ...
La page charge ...
-
 1
1
-
 2
2
-
 3
3
-
 4
4
-
 5
5
-
 6
6
-
 7
7
-
 8
8
-
 9
9
-
 10
10
-
 11
11
-
 12
12
-
 13
13
-
 14
14
-
 15
15
-
 16
16
-
 17
17
-
 18
18
-
 19
19
-
 20
20
-
 21
21
-
 22
22
-
 23
23
-
 24
24
-
 25
25
-
 26
26
-
 27
27
-
 28
28
-
 29
29
-
 30
30
-
 31
31
-
 32
32
-
 33
33
-
 34
34
-
 35
35
-
 36
36
-
 37
37
-
 38
38
-
 39
39
-
 40
40
-
 41
41
-
 42
42
-
 43
43
-
 44
44
-
 45
45
-
 46
46
-
 47
47
-
 48
48
-
 49
49
-
 50
50
-
 51
51
-
 52
52
-
 53
53
-
 54
54
-
 55
55
-
 56
56
-
 57
57
-
 58
58
-
 59
59
-
 60
60
-
 61
61
-
 62
62
-
 63
63
-
 64
64
-
 65
65
-
 66
66
-
 67
67
-
 68
68
-
 69
69
-
 70
70
-
 71
71
-
 72
72
-
 73
73
-
 74
74
-
 75
75
-
 76
76
-
 77
77
-
 78
78
-
 79
79
-
 80
80
-
 81
81
-
 82
82
-
 83
83
-
 84
84
-
 85
85
-
 86
86
-
 87
87
-
 88
88
-
 89
89
-
 90
90
-
 91
91
-
 92
92
-
 93
93
-
 94
94
-
 95
95
-
 96
96
-
 97
97
-
 98
98
-
 99
99
-
 100
100
-
 101
101
-
 102
102
-
 103
103
-
 104
104
-
 105
105
-
 106
106
-
 107
107
-
 108
108


Bosch HDI8056C/01 Le manuel du propriétaire
- Catégorie
- Cuisine
- Taper
- Le manuel du propriétaire
dans d''autres langues
- English: Bosch HDI8056C/01 Owner's manual
Documents connexes
-
Bosch HGI8054UC Mode d'emploi
-
Bosch 1051535 Manuel utilisateur
-
Bosch HDIP054C Le manuel du propriétaire
-
Bosch Benchmark HGI8056UC Le manuel du propriétaire
-
Bosch HGIP054UC/06 Le manuel du propriétaire
-
Bosch Appliances HGS3063UC Manuel utilisateur
-
Bosch HGS3053UC/11 Manuel utilisateur
-
-
Bosch HBL8651UC Manuel utilisateur
-
Bosch HDS8045U Manuel utilisateur
Autres documents
-
Bosch Benchmark HGIP054UC Mode d'emploi
-
-
-
Frigidaire 318200858 Manuel utilisateur
-
Thermador M271E Manuel utilisateur
-
-
Bosch Benchmark HBLP651LUC Manuel utilisateur
-
-
Baxter OV500G1(G2)-EE Rack Oven Mode d'emploi
-