
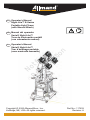
Operator’s Manual
Night-Lite™ E-Series
Portable Light Tower
(with Manual Winch)
Copyright © 2020 Allmand Bros., Inc.
Holdrege, NE, USA. All rights reserved.
Part No.: 117633
Revision: A
en
fr
es
Manual del operador
Serie E Night-Lite™
Torre de iluminación portátil
(con cabrestante manual)
Operator’s Manual
Série E Night-Lite™
Tour d’éclairage portable
(avec manivelle manuelle)
Not for
Reproduction

2
www.allmand.com
Record Important
Information
Recording the equipment information
will help when placing an order for
replacement parts and/or decals.
Unit Model No:___________________
Unit Serial No:___________________
Manual Contents:
Introduction .....................................2
Safety ................................................2
Features and Controls ....................8
Preparing The Por table Light Tower
For Use .............................................9
Transporting ..................................... 9
Operation .......................................11
Maintenance ..................................17
Specifications ................................ 18
Troubleshooting ............................19
FCC and IC Compliance
Statement ....................................... 19
Introduction
About This Manual
TAKE TIME TO READ THIS MANUAL
THOROUGHLY
This instruction manual provides nec-
essary instructions for the Allmand
®
Night-Lite™ E-Series portable light
tower.
The information found in this manual is
in effect at the time of printing. Allmand
Bros Inc. may change contents without
notice and without incurring obligation.
Any reference in this manual to left or
right shall be determined by looking at
the unit from the control box end.
If uncertain about any of the information
in the manual, contact Allmand service
department at 1-800-562-1373, or con-
tact us through the Allmand website,
www.allmand.com.
Save these original instructions for
future reference.
Products Covered by This
Manual
The following products are covered by
this manual:
Night-Lite™ E-Series (with Manual
Winch)
Safety
Safety Definitions
For your safety, the safety of others,
and to protect the performance of
equipment, follow the precautions listed
throughout the manual before opera-
tion, during operation and during peri-
odic maintenance procedures.
Indicates a potential personal
injury hazard.
DANGER
Indicates a hazardous situation which,
if not avoided, will result in death or
serious injury.
WARNING
Indicates a hazardous situation which,
if not avoided, could result in death or
serious injury.
Not for
Reproduction

3
en
CAUTION
Indicates a hazardous situation which,
if not avoided, could result in minor or
moderate injury.
NOTICE
Information considered important but
not hazard related.
Safety Precautions
The following section contains general
safety precautions and guidelines that
must be followed to reduce risk to per-
sonal safety. Special safety precautions
are listed in specific procedures. Read
and understand all of the safety precau-
tions before operating or performing
repairs or maintenance.
DANGER
Electrocution Hazard
• Always check overhead wires and
obstructions before raising or lower-
ing the light tower.
• Always follow the rules or instruc-
tions for your work site and state,
province and national electric code
for maintaining a safe distance from
overhead wires.
• Do not operate the portable light
tower if the insulation on the electri-
cal cord or other electrical wiring
is cut or worn or if bare wires are
exposed. Repair or replace dam-
aged wiring before operating the
unit.
WARNING
Unsafe Operation Hazard
• Never permit anyone to install or
operate the equipment without prop-
er training.
• Read and understand this
Operator’s Manual before operating
or servicing the portable light tower
to ensure that safe operating prac-
tices and maintenance procedures
are followed.
• Safety signs and decals are addi-
tional reminders for safe operating
and maintenance techniques.
WARNING
Fall Hazard
• Never carry riders on the equipment.
WARNING
Modification Hazard
• Never modify the equipment without
written consent of the manufacturer.
Any modification can effect the safe
operation of the equipment.
WARNING
Exposure Hazard
• Always wear personal protective
equipment, including appropriate
clothing, gloves, work shoes, and
eye and hearing protection, as
required by the task at hand.
WARNING
Tipover Hazard
• Do not raise, lower or use the light
tower unless all outriggers and jacks
are positioned on firm ground.
• Never move or reposition the por-
table light tower while the light tower
mast is extended in the vertical posi-
tion.
Not for
Reproduction

4
www.allmand.com
WARNING
Alcohol And Drug Hazard
• Never operate the portable light
tower while under the influence of
alcohol or drugs, or when ill.
WARNING
Flying Object Hazard
• Always wear eye protection when
cleaning the equipment with com-
pressed air or high pressure water.
Dust, flying debris, compressed air,
pressurized water or steam may
injure your eyes.
NOTICE
• Any part which is found defective as a
result of inspection or any part whose
measured value does not satisfy the
standard or limit MUST be replaced.
• Always tighten components to the
specified torque. Loose parts can
cause equipment damage or cause it
to operate improperly.
• The use of authorized replacement
Allmand parts is encouraged. The
warranty does not cover damage or
performance problems caused by the
use of parts that are not authorized
replacement parts.
• Clean all accumulated dirt and debris
away from the body of the equip-
ment and its components before you
inspect the equipment or perform
preventative maintenance procedures
or repairs. Operating equipment
with accumulated dirt and debris will
cause premature wear of equipment
components.
• Retrieve any tools or parts that may
have dropped inside of the equipment
to avoid improper equipment opera-
tion.
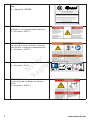
Safety Decals
Before operating your unit, read and
understand the following safety decals.
The cautions, warnings, and instruc-
tions are for your safety. To avoid
personal injury or damage to the unit,
understand and follow all the decals.
Keep the decals from becoming dirty or
torn, and replace them if they are lost
or damaged. Also, if a part needs to be
replaced that has a decal attached to
it, make sure to order the new part and
decal at the same time.
WARNING
If any safety or instructional decals
become worn or damaged, and can-
not be read, order replacement decals
from your dealer.
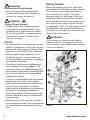
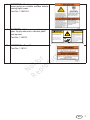
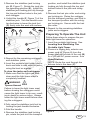
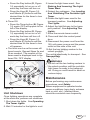
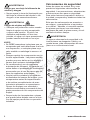
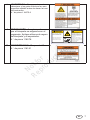
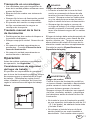
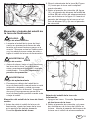
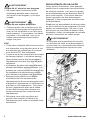
Figure 1
A
H
D
E
F
J
I
K
C
G
B
Not for
Reproduction

5
en
A DANGER - Unplug equipment before
entering electrical compartment.
Part No. 118074
B WARNING - Keep bystanders away
from light tower during lowering and
raising operations.
Part No. 118076-1
B WARNING - Do not look directly at
illuminated light fixtures.
Part No. 118076-2
C Light Tower Transport Alignment
Part No. 107459
D Electrical Specs
Part No. 118134
118134
60Hz
120V
8.5A
E Power Outlet
Part No. 112154
112154
Not for
Reproduction

6
www.allmand.com
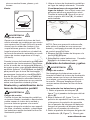
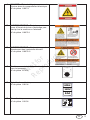
F CSA / Suitable for wet locations.
Part No. 118080
118080
CSA File Number: 204930
CAN ICES-3(B)/NMB-3(B)
C US
Suitable for wet locations.
Convient aux emplacements mouillés.
This device complies with part 15 of the FCC Rules. Operation is
subject to the following two conditions: (1) This device may not cause
harmful interference, and (2) this device must accept any interference
received, including interference that may cause undesired operation.
Ce dispositif se conforme à la section 15 du règlement de la FCC. Le
fonctionnement est assujetti aux conditions suivantes: (1) Ce
dispositif ne doit pas générer d’interférences nuisibles, et (2) ce
dispositif doit accepter toute interférence, y compris celles qui
porraient entraîner un fonctionnement non désiré.
G DANGER - Unplug equipment before
entering electrical compartment.
Part No. 118077-1
G WARNING - Read and follow opera-
tor’s manual before operating or ser-
vicing this equipment.
Part No. 118077-2
H Setup Instructions
Part No. 112171
50mph (80km/h) max
112171
I DANGER - Keep light tower far away
from power lines.
Part No. 118075-1
Not for
Reproduction

7
en
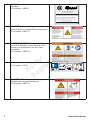
I WARNING - Position outriggers and
lower jacks on a stable surface before
raising light tower.
Part No. 118075-2
J CAUTION - Make sure pawl engages
gear. Apply silicone to ratchet pawl
and spacer.
Part No. 118078
Snow and ice could cause
an uncontrolled condition in
winch that could result in
minor to moderate injury.
Make sure pawl engages
gear. Apply silicone to
ratchet pawl and spacer.
CAUTION
ATTENTION
La neige et la glace
pourraient causer une
condition incontrôlée du
treuil qui pourrait entraîner
une blessure mineure à
moyenne.
S’assurer que le cliquet
embraye dans l’engrenage.
Appliquer du silicone sur le
cliquet et la butée
d’espacement.
118078
K WARNING - Prop 65
Part No. 118161
Not for
Reproduction

8
www.allmand.com
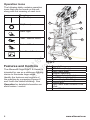
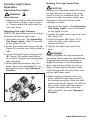
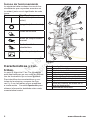
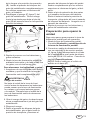
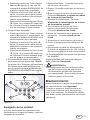
Figure 2
EF
D
C
B
A
I
H
G
Ref Description
A LED Fixture (4 qty)
B Light Tower Mast
C Bumper Assembly
D Outrigger & Jack (4 qty)
E Forklift Pocket (8 qty)
F Caster (4 qty, 2 locking)
G Control Box
H Light Tower Mast Rotation Lock
Knob
I Tower Winch
Features and Controls
The Allmand
®
Night-Lite™ E-Series is
intended for use as a stationary lighting
device to illuminate large areas.
Identify the features and controls of
the machine by comparing Figures 2
and 3 with the tables following. See
Operation for detailed information on
each feature / control.
Icon Meaning
On (Power)
Off (Power)
Tower Light
Timer / Manual Mode
Photocell Mode
Main Circuit Breaker
Operation Icons
The following table contains operation
icons that may be found on the unit,
along with the meaning of each icon.
Not for
Reproduction

9
en
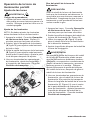
Figure 3
M
J
K
N
O
P
Q
L
Ref Description
J Photocell
K Level
L Control Panel Door / Latch
M Tower Light Switches (4 qty)
N Light Operation Mode Switch
O Main Circuit Breaker
P Timer Module
Q 120-Volt Power Inlet
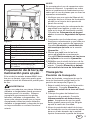
Preparing The Portable
Light Tower For Use
If the unit has been stored or idle for
a period of time, follow these steps to
prepare the portable light tower for use.
WARNING
Operating a machine with worn, dam-
aged or missing parts can result in
death or serious injury. Always replace
worn, damaged or missing parts
promptly. Do not operate this machine
until all worn, damaged or missing
parts have been replaced, and proper
operation of the machine has been
verified.
NOTICE
The use of authorized replacement
Allmand parts is encouraged. The war-
ranty does not cover damage or perfor-
mance problems caused by the use of
parts that are not authorized replace-
ment parts.
1. Check that a copy of the Operator’s
Manual is with the portable light tower
(on the inside of the control panel
door).
2. Check that all safety decals are leg-
ible and in place on the portable light
tower. See Safety Decals in the
Operator Safety section.
3. Check that the outriggers and jacks
operate properly, and that each one
is secured in the transport position.
See Leveling and Stabilizing the
Light Tower in the Operation sec-
tion.
4. Check that each of the light fixtures
illuminates properly. See Operating
The Tower Lights in the Operation
section.
5. Check that the light tower mast raises
and lowers properly. See Raising
and Lowering the Light Tower
Mast.
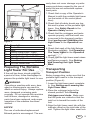
Transporting
Transport Position
Before transporting, make sure that the
portable light tower is in the transport
position (Figure 4):
1. Lower the light tower mast complete-
ly. See Raising and Lowering the
Light Tower Mast.
2. Place the outrigger jacks in the
stowed position. See Stowing
Outriggers and Jacks. Make sure
that the jacks are rotated so that the
jack foot is toward the center of the
unit.
3. Align the light tower mast tab with the
indicator decal on the right side of the
unit. Tighten the light tower mast lock
Not for
Reproduction

10
www.allmand.com
knob securely. See Rotating the
Light Tower Mast.
4. Pull the light arm pin, and rotate the
light arm until the light fixtures are as
shown in Figure 4. Make sure that
the locking pin engages one of the
holes arfter adjusting. Repeat for the
other light arm. See Adjusting the
Light Fixtures.
Figure 4
Lifting The Light Tower
WARNING
Attempting to lift the portable light
tower with a lifting device that is
underrated or damaged could result in
death or serious injury. Always make
sure the lifting device is rated to lift
the weight of the portable light tower.
Make sure the lifting device is not
damaged and is in operable condition
before beginning the lift.
WARNING
Standing or walking under elevated
equipment could result in death or
serious injury. When elevating or lifting
the portable light tower, always keep
clear of the area around and under the
light tower, and do not allow others in
the area.
General Lifting Guidelines
• Before lifting, turn off the lights, lower
the light tower mast and disconnect
the power cord.
• Always be sure the lifting device
you are using is in good condi-
tion and rated to exceed the weight
of the portable light tower. See
Specifications.
• Always acquire assistance when
using a forklift and when unloading.
• Do not stand or walk under the unit
when lifted. Keep others away.
Lifting The Portable Light Tower
With A Forklift
The portable light tower is equipped
with two sets of forklift pockets: one on
either side of the unit (A, Figure 5), and
one on the front and back of the unit
(B).
Use a forklift with a rated lifting capacity
greater than the weight of the portable
light tower trailer. See Specifications.
Figure 5
B
A
Not for
Reproduction

11
en
Transporting On A Trailer
• The forklift pockets on the unit base
can be used as tie-down points.
• Set the two locking casters to the lock
position.
• Always secure the portable light tower
with appropriate chains or straps.
• The truck operator is responsible
for securing the load properly to his
transporting trailer.
Moving the Light Tower by
Hand
• Set the two locking casters to the
unlock position.
• Always push the unit. Never pull the
unit.
• Do not move the unit by hand on
inclines. See Lifting the Light
Tower.
• Do not move the unit by hand on soft
or broken ground.
Operation
Before performing any operation proce-
dures, read Safety.
Work Site Safety Considerations
It is the operator’s responsibility to
ensure that the portable light tower is
properly and safely positioned at the
work site. Follow state, province and
federal rules, as well as rules or instruc-
tions for the work site.
Height
50mph (80km/h) max
DANGER
Electrocution Hazard
• Raising the light tower mast in the
presence of electrical power lines
will result in death or serious injury.
Always check for overhead wires
and obstructions before raising or
lowering the light tower mast.
• Always follow the rules or regula-
tions for your worksite, and state,
province and national electric code
for maintaining a safe distance from
overhead wires.
The work site must be clear of over-
head obstructions such as power lines,
trees, etc. Keep in mind the maximum
height of the light tower mast when fully
raised. See Specifications.
Ground Surface
50mph (80km/h) max
WARNING
Tipover Hazard
Positioning the portable light tower on
soft, unstable or unlevel ground could
cause the unit to tip over, resulting in
death or serious injury. Always posi-
tion the unit on a firm, level and stable
surface and deploy the outriggers
before raising the light tower.
• Do not set up the portable light tower
on an incline of more than 2.8° (5%
grade) front-to-back and side-to-side.
• Do not position or set up the portable
light tower on unlevel or unstable
Not for
Reproduction

12
www.allmand.com
ground. Set up on smooth, flat and
firm ground surfaces only.
Wind
50mph (80km/h) max
WARNING
Tipover Hazard
Operating with the light tower mast
raised in winds exceeding 50 mph (80
km/h) could cause the unit to tip over,
resulting in death or serious injury. Do
not operate with the light tower mast
raised in winds exceeding 50 mph (80
km/h).
When the portable light tower is in the
operating position it is located in the
middle of a four-point outrigger system
for optimum balance and stability. This
system was engineered to allow the
light tower to remain operational in sus-
tained winds of 50 mph (80 km/h) with
the light tower mast extended to full
height and the outriggers in position on
a firm, level surface.
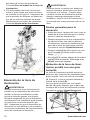
Leveling and Stabilizing the
Portable Light Tower
WARNING
Tipover Hazard
Positioning the portable light tower on
soft, unstable or unlevel ground could
cause the unit to tip over, resulting in
death or serious injury. Always posi-
tion the unit on a firm, level and stable
surface and deploy the outriggers
before raising the portable light tower.
1. Position the portable light tower on
an adequate work site. See Work
Site Safety Considerations. Use
the level as a guide to locate a level
surface: When the bubble (B, Figure
6) is in the top center of the level (A),
the unit is level.
Figure 6
B
A
NOTE: For most consistent operation,
avoid locating the unit in a shadowed
area, and orient the unit so the control
box faces north.
2. Set the two locking casters to the lock
position.
3. Deploy all four outriggers. See
Deploying the Outriggers and
Jacks.
Deploying the Outriggers and
Jacks
WARNING
Tipover Hazard
Failure to deploy the outriggers before
raising the light tower mast could
cause the light tower to tip over, result-
ing in death or serious injury. Always
deploy the outriggers before raising
the light tower.
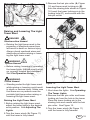
To deploy the outriggers and jacks:
1. Remove the hair pin cotter (A, Figure
7) and outrigger locking pin (B).
2. Lower the outrigger (C, Figure 7) into
the operating position as shown, and
lock in the operating position with
the outrigger locking pin. Secure the
outrigger locking pin with the hair pin
cotter.
Not for
Reproduction

13
en
3. Remove the stabilizer jack locking
pin (D, Figure 7). Rotate the jack into
the operating position (E). Install the
stabilizer jack locking pin fully through
the top and bottom holes in the jack
and outrigger.
4. Unfold the handle (F, Figure 7) of the
stabilizer jack. Turn the handle coun-
ter-clockwise to lower the jack foot
(G) firmly onto the work site surface.
Figure 7
C
B
A
D
F
G
E
5. Repeat for the remaining outriggers
and stabilizer jacks.
6. Level the portable light tower front to
back and side to side with the jacks,
using the level as a guide.
To stow the jacks and outriggers:
1. Make sure that the lights are shut
down and the light tower mast is
completely lowered.
WARNING
Tipover Hazard
Failure to lower the light tower mast
before stowing the outriggers could
cause the light tower to tip over, result-
ing in death or serious injury. Always
lower the light tower mast before stow-
ing the outriggers.
2 Fully raise the stabilizer jack foot by
turning the jack handle clockwise.
3. Fold the handle.
4. Remove the stabilizer jack locking
pin, rotate the jack into the transport
position, and install the stabilizer jack
locking pin fully through the top and
bottom holes in the jack and outrig-
ger.
5. Remove the hair pin cotter and outrig-
ger locking pin. Raise the outrigger
into the transport position, and lock in
the transport position with the outrig-
ger locking pin. Secure with the hair
pin cotter.
6. Repeat for the remaining stabilizer
jacks and outriggers.
Preparing To Operate The Unit
Follow these steps to prepare the por-
table light tower for operation:
1. Level the portable light tower. See
Leveling And Stabilizing The
Portable Light Tower.
2. Connect a heavy-duty, exterior-use
power cord (A, Figure 8) from the
power inlet on the side of the unit (B)
to a 120-volt AC power source. See
Specifications.
NOTE: Route the cord through the
access hole in the base (C).
Figure 8
A
B
C
Not for
Reproduction

14
www.allmand.com
Portable Light Tower
Operation
Adjusting The Lights
WARNING
Burn Hazard
• Adjusting the lights while illuminated
could result in death or serious inju-
ry. Always adjust the lights with the
unit shut down.
Adjusting The Light Fixtures
NOTE: The light fixtures must be adjust-
ed before raising the light tower.
1. Shut down the unit. See Operating
The Tower Lights. Wait 10 minutes
for the lights to cool.
2. Grasp and swivel the fixture yoke (A,
Figure 9) to adjust each fixture side to
side.
3. Loosen the light fixture locking knob
(B, Figure 9) to adjust each fixture
up or down. Tighten the locking knob
after adjusting.
4. When lighting operations are com-
plete, adjust the light fixtures to the
transport position. See Transport
Position.
Figure 9
A
B
Rotating The Light Tower Mast
CAUTION
Rotating the light tower mast will cause
the light fixtures to swing, and could
result in minor to moderate injury. Be
careful to rotate the tower slowly, and
be aware of the light fixtures while
rotating the tower.
1. Shut down the lights. See Operating
The Tower Lights. Wait 10 minutes
for the lights to cool.
2. Loosen the light tower mast lock knob
(A, Figure 10).
3. Use the handles (B, Figure 10) to
rotate the light tower mast in the
desired direction.
4. Tighten the light tower mast lock
knob.
WARNING
Failure to tighten the light tower mast
lock knob could cause the light fixtures
to swing inadvertently, especially in
windy conditions or during transport,
and could result in death or serious
injury. Always tighten the light tower
mast locking knob securely after rotat-
ing the light tower mast.
5. When lighting operations are com-
plete, rotate the light tower mast to
the transport position: Align the light
tower mast tab (C, Figure 10) with the
front center of the light tower base.
Tighten the light tower mast lock
knob securely. See also Transport
Position.
Not for
Reproduction

15
en
Figure 10
A
B
C
Raising and Lowering The Light
Tower Mast
DANGER
Electrocution Hazard
• Raising the light tower mast in the
presence of electrical power lines
will result in death or serious injury.
Always check overhead wires and
obstructions before raising or lower-
ing the light tower mast.
WARNING
Tipover Hazard
• Before raising, lowering or operating
the tower lights, the unit must be set
up, properly leveled and stabilized.
See Pre-Operation Setup.
WARNING
Crush Hazard
• Standing under the light tower mast
while raising or lowering could result
in death or serious injury. Make sure
that there are no persons near the
portable light tower when raising or
lowering the light tower mast.
Raising the Light Tower Mast
1. Before raising the light tower mast,
adjust the tower lights to the desired
work position. See Adjusting The
Lights.
2. Turn the tower winch (A, Figure 11)
until the tower is fully raised.
3. Remove the hair pin cotter (A, Figure
12) and tower mast locking pin (B)
from the stowing hole shown in Figure
12. Insert the tower locking pin in the
locking hole (C), and secure with the
hair pin cotter.
Figure 11
A
Figure 12
B
A
C
Lowering the Light Tower Mast
1. Shut down the lights. See Operating
The Tower Lights.
2. Remove the hair pin cotter and tower
locking pin from the hole in the tower.
Place the tower locking pin in the
stowing hole and secure with the hair
pin cotter. See Figure 12.
3. Turn the tower winch (A, Figure 11)
until the tower is fully lowered.
Not for
Reproduction

16
www.allmand.com
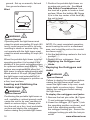
Operating The Tower Lights
WARNING
Looking at illuminated light fixtures
could result in serious injury. Never
look directly at illuminated light fixtures.
Turning The Lights On
1. Unlatch and open the control panel
door.
2. Turn the main circuit breaker (A,
Figure 13) to the ON position.
3. Select the preferred mode of opera-
tion: Timer / Manual or Photocell.
See Light Operation Mode.
4. Turn the Tower / Light switch (B,
Figure 13) to the LIGHT position.
5. Turn the individual light switches
(C, Figure 13) (1 - 4) to ON (if set to
OFF).
NOTE: If the mode of operation is set
to Photocell or Timer, the lights will
not come on until dark (photocell) or
until the time selected (timer).
Turning The Lights Off
• If in Manual Mode, turn manual mode
off. See Light Operation Mode.
• If in Photocell or Timer mode, the
lights will turn off automatically in
ambient light (photocell) or at the time
selected (timer).
Figure 13
C
A
B
Light Operation Mode
The tower lights can be controlled man-
ually, by photocell, or by timer.
Manual Operation
1. Turn the Photocell / Timer switch (B,
Figure 13) to the TIMER position.
2. Press the OVR button (G, Figure
14) on the timer module to turn on
Manual mode. Press again to turn off.
Photocell Operation
Turn the Photocell / Timer switch (B,
Figure 13) to the PHOTOCELL position.
The lights will automatically come on in
the absence of ambient light.
NOTE: For most consistent operation,
avoid locating the unit in a shadowed
area, and orient the unit so the control
box faces north.
Timer Operation
Turn the Photocell / Timer switch (B,
Figure 13) to the TIMER position.
To set the timer:
1. Reset the timer module (first time
use):
a. With a blunt object press and
release the Reset button (I, Figure
14). The timer screen (C) will flash.
b. Press the Clock (A, Figure 14) and
Hour (E) buttons simultaneously.
The time will reset to 12:00am.
2. Set the clock:
a. If currently in Daylight Savings
Time, press the +1h button (H,
Figure 14). (If not, bypass this step.)
b. Press and hold the Clock button
(A, Figure 14) while simultaneously
pressing the Day (D), Hour (E) and/
or Minute (F) buttons until the cor-
rect day and time appears.
3. Set the Timer
a. Timer On:
• Press the Timer button (B, Figure
14) once. ON will appear to the
left of the display.
Not for
Reproduction

17
en
• Press the Day button (D, Figure
14) repeatedly to turn on or off
each day the timer will turn on.
• Press the Hour (E, Figure 14)
and Minute (F) buttons until the
desired time for the timer to turn
on appears.
b. Timer Off:
• Press the Timer button (B, Figure
14) again. OFF will appear to the
left of the display.
• Press the Day button (D, Figure
14) repeatedly to turn on or off
each day the timer will turn off.
• Press the Hour (E, Figure 14)
and Minute (F) buttons until the
desired time for the timer to turn
off appears.
c. The timer can be set for seven dif-
ferent events. Repeat Steps 3a and
3b as needed. The number of the
timer event is displayed next to the
timer ON / OFF display.
Figure 14
A
B
C
I
D
GH
E
F
Uni t Shutdown
Once lighting operations are complete
at the work site, perform unit shutdown:
1. Shut down the lights. See Operating
The Tower Lights.
2. Wait 10 minutes for the lights to cool.
3. Lower the light tower mast. See
Raising And Lowering The Light
Tower Mast.
4. Retract the outriggers. See Leveling
And Stabilizing The Portable Light
Tower.
5. Rotate the light tower mast to the
transport position. See Adjusting
The Lights.
6. Adjust the light fixtures to the trans-
port position. See Adjusting The
Lights.
7. Store the remote tower control.
8. Close and latch the control panel
door.
9. Disconnect the power cord from the
120-volt power source and the power
outlet on the side of the unit.
10. Set the two locking casters to the
unlock position.
The unit is now ready for transport. See
Transporting.
WARNING
• Do not set the two locking casters to
the unlock position until the portable
light tower is ready to be transport-
ed. Doing so could result in death or
serious injury.
Maintenance
Before performing any maintenance
procedures, read Safety.
Where equipment is operated under
severe conditions (very dusty, extreme
heat or cold, etc.), affected items
should be serviced more frequently.
Not for
Reproduction

18
www.allmand.com
WARNING
Operating a machine with worn, dam-
aged or missing parts can result in
death or serious injury. Always replace
worn, damaged or missing parts
promptly. Do not operate this machine
until all worn, damaged or missing
parts have been replaced, and proper
operation of the machine has been
verified.
General Maintenance
1. Inspect the light tower mast, cables,
light fixtures, frame, and all compo-
nents for wear, damage or corrosion.
Repair or replace as needed.
2. Check to be sure all hardware is
securely tightened.
3. Inspect the wheels for wear or dam-
age. Replace as needed.
4. Inspect the outrigger bars, stabilizer
jacks and locking pins for proper
operation, and for wear, damage or
corrosion. Replace as needed.
Cleaning
WARNING
Burn Hazard
• Shut down the lights and allow
ample time for components to cool
before cleaning the unit. Failure to
do so could result in serious burns.
NOTICE
Use caution when using compressed
air or water / steam pressure washers.
Do not pressure–clean electrical com-
ponents, as this may cause damage.
• Clean the portable light tower to
remove all dust, dirt or other foreign
material.
• Clean the light fixture assemblies with
a damp cloth or sponge.
• Clean all electrical wiring and com-
ponents by hand using non-corrosive
cleaner.
• Open the control panel door and
clean the control panel.
Model And Serial Number
Model and serial number information is
required for product support and repair
parts. The serial number plate for the
portable light tower is located on the
unit base.
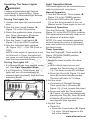
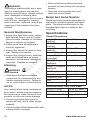
Specifications
Overall Dimensions
Length (Transport
position)
45 in (114,3 cm)
Width (Transport
position)
32 in (81,3 cm)
Height (Transport
position)
87.5 in (222 cm)
Ground Clearance 6 in (15,2 cm)
Height (Tower
Extended)
265 in (674 cm)
Width (Outriggers
deployed)
64 in (162,6 cm)
Length (Outriggers
deployed)
70 in (177,8 cm)
Unit Weight 670 lbs (304 kg)
Wind Speed 50 mph (80 km/h)
Frequency (Hz) 60
Volts 120
Amps 8.5
Minimum Heavy Duty Cord Sizes
0-50 ft (0-15 m) 14 ga (2,10mm
2
)
51-100 ft (15-30 m) 12 ga (3,31mm
2
)
101-200 ft (30-60 m) 10 ga (5,26mm
2
)
Not for
Reproduction

19
en
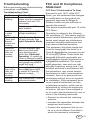
Troubleshooting
Before performing any troubleshooting
procedures, read Safety.
Troubleshooting Chart
Problem Possible Cause
Lights not
working
No power. Make sure
power cord is connected
between unit and 120-
volt supply.
Main breaker off. Turn on
main breaker.
No light (one
or more
lights)
Light switch(es) off. Turn
on light switch(es).
Photocell /
Timer and
Manual
control not
working
Light Operation Mode
not set correctly. See
Light Operation Mode.
Photocell
stays on or
does not
function
properly
Too little ambient light.
Make sure that noth-
ing is blocking pho-
tocell. See Photocell
Operation. Or switch to
Timer or Manual control.
Low voltage. Power
cord gauge too small or
length too long.
Photocell
stays off or
does not
function
properly
Too much ambient light.
Move away from light,
or switch to Timer or
Manual control.
Unit not
working
Unit malfunction. Contact
authorized dealer.
FCC and IC Compliance
Statement
FCC Part 15 Information To User
Pursuant to part 15.21 of the FCC
Rules, you are cautioned that changes
or modifications to the product not
expressly approved by Briggs &
Stratton could void your authority to
operate the product.
This device complies with part 15 of the
FCC Rules.
Operation is subject to the following
two conditions: (1) This device may not
cause harmful interference, and (2) this
device must accept any interference
received, including interference that
may cause undesired operation.
This equipment has been tested and
found to comply with the limits for a
Class B digital device, pursuant to part
15 of the FCC Rules. These limits are
designed to provide reasonable pro-
tection against harmful interference in
a residential installation. This equip-
ment generates, uses and can radi-
ate radio frequency energy and, if not
installed and used in accordance with
the instructions, may cause harmful
interference to radio communications.
However, there is no guarantee that
interference will not occur in a particu-
lar installation. If this equipment does
cause harmful interference to radio
or television reception, which can be
determined by turning the equipment
off and on, the user is encouraged to
try to correct the interference by one or
more of the following measures:
• Reorient or relocate the receiving
antenna.
• Increase the separation between the
equipment and receiver.
• Connect the equipment into an out-
let on a circuit different from that to
which the receiver is connected.
Not for
Reproduction

20
www.allmand.com
• Consult the dealer or an experienced
radio/TV technician for help.
IC Information to User
This device complies with Industry
Canada’s license-exempt RSSs.
Operation is subject to the following two
conditions:
1. This device may not cause interfer-
ence; and
2. This device must accept any interfer-
ence, including interference that may
cause undesired operation of the
device.
The system complies with the Canadian
standard CAN ICES-3(B)/NMB-3(B).
Not for
Reproduction
La page est en cours de chargement...
La page est en cours de chargement...
La page est en cours de chargement...
La page est en cours de chargement...
La page est en cours de chargement...
La page est en cours de chargement...
La page est en cours de chargement...
La page est en cours de chargement...
La page est en cours de chargement...
La page est en cours de chargement...
La page est en cours de chargement...
La page est en cours de chargement...
La page est en cours de chargement...
La page est en cours de chargement...
La page est en cours de chargement...
La page est en cours de chargement...
La page est en cours de chargement...
La page est en cours de chargement...
La page est en cours de chargement...
La page est en cours de chargement...
La page est en cours de chargement...
La page est en cours de chargement...
La page est en cours de chargement...
La page est en cours de chargement...
La page est en cours de chargement...
La page est en cours de chargement...
La page est en cours de chargement...
La page est en cours de chargement...
La page est en cours de chargement...
La page est en cours de chargement...
La page est en cours de chargement...
La page est en cours de chargement...
La page est en cours de chargement...
La page est en cours de chargement...
La page est en cours de chargement...
La page est en cours de chargement...
La page est en cours de chargement...
La page est en cours de chargement...
La page est en cours de chargement...
La page est en cours de chargement...
La page est en cours de chargement...
La page est en cours de chargement...
La page est en cours de chargement...
La page est en cours de chargement...
-
 1
1
-
 2
2
-
 3
3
-
 4
4
-
 5
5
-
 6
6
-
 7
7
-
 8
8
-
 9
9
-
 10
10
-
 11
11
-
 12
12
-
 13
13
-
 14
14
-
 15
15
-
 16
16
-
 17
17
-
 18
18
-
 19
19
-
 20
20
-
 21
21
-
 22
22
-
 23
23
-
 24
24
-
 25
25
-
 26
26
-
 27
27
-
 28
28
-
 29
29
-
 30
30
-
 31
31
-
 32
32
-
 33
33
-
 34
34
-
 35
35
-
 36
36
-
 37
37
-
 38
38
-
 39
39
-
 40
40
-
 41
41
-
 42
42
-
 43
43
-
 44
44
-
 45
45
-
 46
46
-
 47
47
-
 48
48
-
 49
49
-
 50
50
-
 51
51
-
 52
52
-
 53
53
-
 54
54
-
 55
55
-
 56
56
-
 57
57
-
 58
58
-
 59
59
-
 60
60
-
 61
61
-
 62
62
-
 63
63
-
 64
64


Allmand Night-Lite E-Serie Manuel utilisateur
- Taper
- Manuel utilisateur
- Ce manuel convient également à
dans d''autres langues
Documents connexes
Autres documents
-
Simplicity LIGHT TOWER, NIGHT-LITE PRO II, CE Manuel utilisateur
-
Generac MLT3080 Manuel utilisateur
-
Wacker Neuson LTV4K Manuel utilisateur
-
-
Wacker Neuson LTV8K Manuel utilisateur
-
Wacker Neuson LTW6K Manuel utilisateur
-
OTC 1819 Mode d'emploi
-
Bahco 2504 Manuel utilisateur
-
Toro Metal Mushroom Light (52609) and 80 Watt Power Box Guide d'installation
-