
UPHOLSTERY & CARPET CLEANER
POLSTER- UND TEPPICHREINIGER
APPAREIL DE NETTOYAGE POUR MEUBLES
REMBOURRÉS ET TAPIS SPR 330 A1
IAN 402449_2204
APPAREIL DE NETTOYAGE POUR
MEUBLES REMBOURRÉS ET TAPIS
Mode d’emploi
UPHOLSTERY & CARPET CLEANER
Operating instructions
BEKLEDING- EN TAPIJTREINIGER
Gebruiksaanwijzing
ČISTIČ ČALOUNĚNÍ A KOBERCŮ
Návod k obsluze
MØBEL- OG TÆPPERENSER
Betjeningsvejledning
STROJ NA ČISTENIE
ČALÚNENÍ A KOBERCOV
Návod na obsluhu
KÁRPIT ÉS SZŐNYEGTISZTÍTÓ
Használati utasítás
POLSTER- UND TEPPICHREINIGER
Bedienungsanleitung
URZĄDZENIE DO CZYSZCZENIA
TAPICERKI I DYWANÓW
Instrukcja obsługi
ASPIRADOR PARA TAPICERÍAS
Y ALFOMBRAS
Instrucciones de uso
ČISTILNIK ZA OBLAZINJENO
POHIŠTVO IN PREPROGE
Navodila za uporabo
APPARECCHIO DI PULIZIA PER
IMBOTTITURE E TAPPETI
Istruzioni per l'uso
МАШИНА ЗА ПОЧИСТВАНЕ
НА ТАПИЦЕРИИ И КИЛИМИ
Ръководство за експлоатация
MAŞINĂ DE CURĂŢAT
COVOARE ŞI TAPIŢERII
Instrucţiuni de utilizare
ΣΥΣΚΕΥΗ ΚΑΘΑΡΙΣΜΟΥ
ΤΑΠΕΤΣΑΡΙΩΝ ΚΑΙ ΧΑΛΙΩΝ
Οδηүίες χρήσης
SREDSTVO ZA ČIŠĆENJE
PRESVLAKA I TEPIHA
Upute za upotrebu

GB / IE Operating instructions Page 1
DE / AT / CH Bedienungsanleitung Seite 23
FR / BE Mode d’emploi Page 45
NL / BE Gebruiksaanwijzing Pagina 69
CZ Návod k obsluze Strana 91
PL Instrukcja obsługi Strona 113
SK Návod na obsluhu Strana 135
ES Instrucciones de uso Página 157
DK Betjeningsvejledning Side 179
IT Istruzioni per l'uso Pagina 201
HU Használati utasítás Oldal 223
SI Navodila za uporabo Stran 245
HR Upute za upotrebu Stranica 265
RO Instrucţiuni de utilizare Pagina 287
BG Ръководство за експлоатация Cтраница 309
GR Οδηүίες χρήσης Σελίδα 331


GB│IE │ 1 ■
SPR 330 A1
Contents
Introduction ...................................................2
Information about these operating instructions .................................. 2
Copyright ............................................................... 2
Proper use .............................................................. 2
Safety information .............................................3
Appliance description ...........................................6
Package contents and transport inspection .........................7
Using the appliance ............................................7
Assembling the appliance .................................................. 7
Filling the fresh water tank .................................................. 8
Handling and operation ........................................10
Cleaning and maintenance .....................................11
Cleaning the waste water tank ............................................. 12
Cleaning the handle and cleaning attachment .................................15
Storage .....................................................16
Technical specifications .........................................17
Ordering replacement parts ....................................17
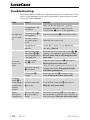
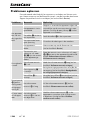
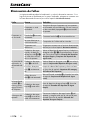
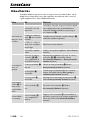
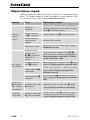
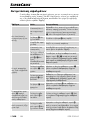
Troubleshooting ..............................................18
Disposal .....................................................19
Disposal of the appliance ................................................. 19
Disposal of the packaging ................................................. 19
Kompernass Handels GmbH warranty ............................20
Service ................................................................ 21
Importer ............................................................... 21

■ 2 │ GB│IE SPR 330 A1
Introduction
Information about these operating instructions
Congratulations on the purchase of your new appliance.
You have selected a high-quality product.
The operating instructions are part of this product. They contain important
information about safety, usage and disposal.
Before using the product, please familiarise yourself with all operating and safety
instructions. Use the product only as described and for the range of applications
specified. Please also pass these operating instructions on to any future owner.
Copyright
This documentation is protected by copyright. Any copying or reproduction, in-
cluding in the form of extracts, or any reproduction of images (even in a modified
state), is permitted only with the written authorisation of the manufacturer.
Proper use
This appliance is designed exclusively for cleaning indoor upholstery and carpets.
It is not intended for any other purpose nor for use beyond the scope described.
The appliance is not intended for use in commercial or industrial environments.
The manufacturer accepts no responsibility for damage caused by failure to
observe these instructions, improper use or repairs, unauthorised modifications or
the use of unapproved replacement parts. The operator bears sole liability.

GB│IE │ 3 ■
SPR 330 A1
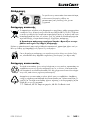
Safety information
RISK OF ELECTRIC SHOCK!
► Connect the appliance only to a correctly installed mains
socket supplying a mains voltage of 220–240V∼, 50Hz.
► Always pull on the plug to disconnect the appliance from
the mains. Do not pull on the cable itself.
► Do not kink or crush the power cable, and route the cable
so that it cannot be stepped on or tripped over.
► To prevent accidents, have defective plugs and/or power
cables replaced immediately by an authorised specialist,
our Customer Service or a similarly qualified person.
► Ensure that the power cable does not become wet or damp
during use. Route the cable in such a way that it cannot be
caught or damaged.
► In case of a malfunction, remove the power plug from the
mains socket.
► Remove the power plug from the mains socket before filling
the appliance with water, changing accessories or cleaning
it.
► To prevent risks, stop using the appliance immediately if it is
damaged.
► Operate the appliance only with dry hands and never with-
out shoes (i.e. not barefoot). This will help reduce the effect
of an electric shock in the event of a malfunction.
Use the appliance only in indoor areas, not outdoors.

■ 4 │ GB│IE SPR 330 A1
RISK OF ELECTRIC SHOCK!
► Never immerse the appliance in water or other liquids.
► Never aim the appliance at moisture-sensitive objects, floors
or surfaces.
► This appliance may be used by children aged 8 years and
above and by persons with limited physical, sensory or mental
capabilities or lack of experience and knowledge, provided
that they are under supervision or have been told how to
use the tool safely and are aware of the potential risks. Do
not allow children to use the appliance as a toy.
► Cleaning and user maintenance tasks may not be carried
out by children unless they are supervised.
WARNING! RISK OF INJURY!
► Use only the original accessory parts recommended by the
manufacturer for this appliance.
► Only use the appliance when it is properly and completely
assembled.
► The appliance may not be used if it has been dropped, if
there are any obvious signs of physical damage or if it is
leaking.
► Always pull the power plug out of the mains socket during
each break in use, as well as after use and before any
cleaning.
► Be particularly careful while using the appliance on steps
or stairs.
► Do not use the appliance to vacuum up chemicals, poisonous
materials or inflammable liquids.

GB│IE │ 5 ■
SPR 330 A1
ATTENTION! PROPERTY DAMAGE!
► Always comply with the cleaning instructions of the uphol-
stery / carpet manufacturer. Before cleaning, check also
whether the upholstery / carpet is suitable for cleaning with
the appliance.
► Do not leave the appliance standing on wooden floors for
any length of time when it is switched on. The wood could
swell.
► Do not operate the appliance with an empty water tank.
Otherwise, the pump could run empty and overheat.
► Do not insert any objects into the openings of the appliance.
► Do not use the appliance if the openings are blocked. Keep
the openings free of dirt, fluff, hairs or anything that could
impede the air circulation.
► Make sure that you do not vacuum up hard, pointed or
sharp objects (e.g. glass, nails, screws, coins, etc.) with the
appliance.
► Ensure that the appliance, the power cable and the plug do
not come into contact with heat sources such as hotplates
or naked flames.
► Use only the type and quantity of liquids listed in these
operating instructions when operating the appliance.
► Never leave the appliance unattended during operation.

■ 6 │ GB│IE SPR 330 A1
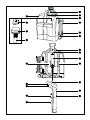
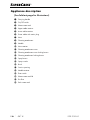
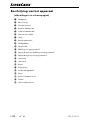
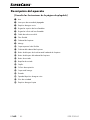
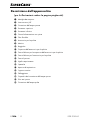
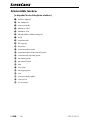
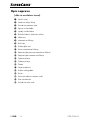
Appliance description
(See fold-out page for illustrations)
1 Carrying handle
2 On/Off switch
3 Waste water tank
4 Upper cable retainer
5 Lower cable retainer
6 Power cable with mains plug
7 Hose
8 Cleaning attachment
9 Handle
0 Hose retainer
q Cleaning attachment cover
w Cleaning attachment cover locking button
e Cleaning attachment locking button
r Spray button
t Spray nozzle
z Brush
u Suction opening
i Handle retainer
o Float switch
p Waste water tank lid
a Dirt filter
s Fresh water tank

GB│IE │ 7 ■
SPR 330 A1
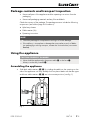
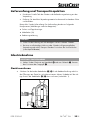
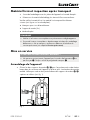
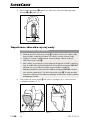
Package contents and transport inspection
ƇRemove all parts of the appliance and the operating instructions from the
packaging.
ƇRemove all packaging materials and any films and labels.
Check the contents of the package. The package contents include the following
components (see fold-out page for illustrations):
▯ Upholstery cleaner
▯ Cable retainer (2x)
▯ Operating instructions
NOTE
► Check the package for completeness and signs of visible damage.
► If the delivery is incomplete or damage has occurred as a result of defec-
tive packaging or during transport, contact the Service hotline (see section
Service).
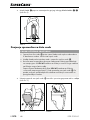
Using the appliance
CAUTION! PROPERTY DAMAGE!
► Never hold the appliance by the power cable 6 or the hose 7.
Always use the carry handle 1.
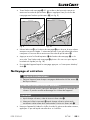
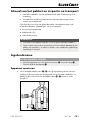
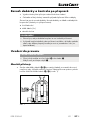
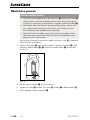
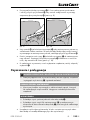
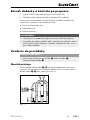
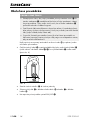
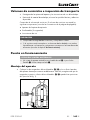
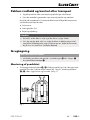
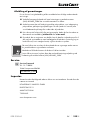
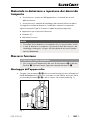
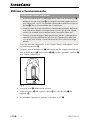
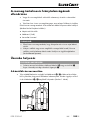
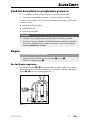
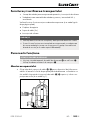
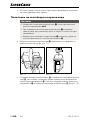
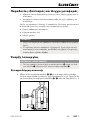
Assembling the appliance
ƇSlide both cable retainers 4/5 for winding the cable into the openings on the
side of the appliance until they audibly click into place. Make sure that the upper
and lower cable retainers 4/5 are in the correct positions (see Fig. 1).
Fig. 1

■ 8 │ GB│IE SPR 330 A1
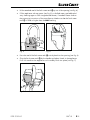
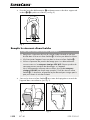
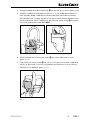
ƇWind the power cable 6 completely around the upper and lower cable
retainers 4/5 (see Fig. 2).
Fig. 2
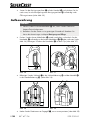
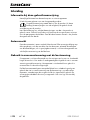
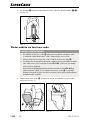
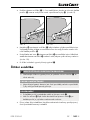
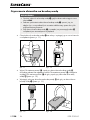
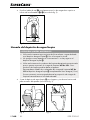
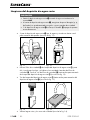
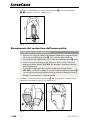
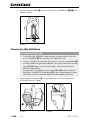
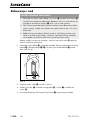
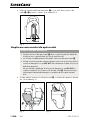
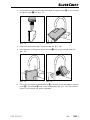
Filling the fresh water tank
CAUTION! PROPERTY DAMAGE!
► Fill the fresh water tank s only with cold to warm tap water or distilled
water. Do not use boiling water.
► Never operate the appliance without water in the fresh water tank s.
► Use only standard commercial, non-foaming upholstery cleaning agents or
LIDL W5 vinegar-based cleaner. Other cleaning agents can damage
the appliance.
We recommend adding two tablespoons of LIDL W5 vinegar-based
cleaner to a full (1 litre) fresh water tank s. If necessary, add additional
vinegar-based cleaner in small steps until obtaining the desired result.
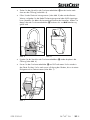
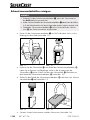
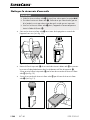
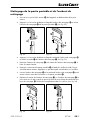
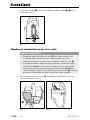
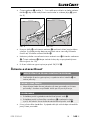
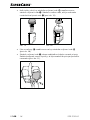
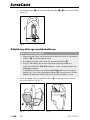
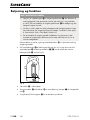
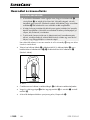
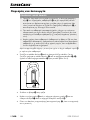
ƇHold the fresh water tank s by gripping the handle and pull it towards you out
of the appliance (see Fig. 3).
Fig. 3 Fig. 4

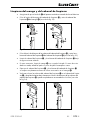
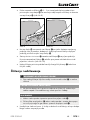
GB│IE │ 9 ■
SPR 330 A1
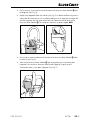
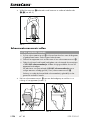
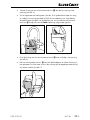
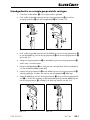
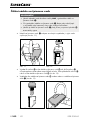
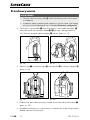
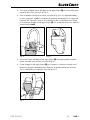
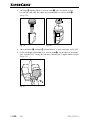
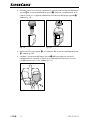
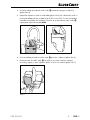
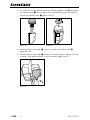
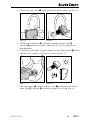
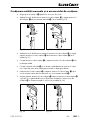
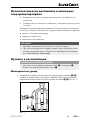
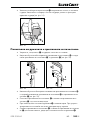
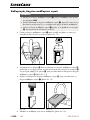
ƇLift the attached seal of the fresh water tank s up out of the opening (see Fig. 4).
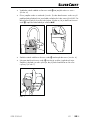
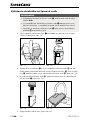
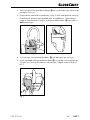
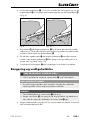
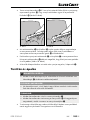
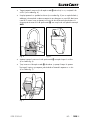
ƇFill the appliance with tap water (see Fig. 5) or distilled water, and add uphol-
stery cleaning agent or W5 vinegar-based cleaner, if needed. Please observe
the processing instructions of the manufacturer. Make sure that the fresh water
tank s is filled no higher than the MAX marking.
Fig. 5 Fig. 6
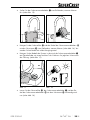
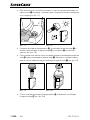
ƇPress the seal of the fresh water tank s entirely back into the opening (see Fig. 6).
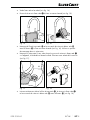
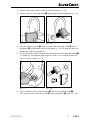
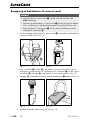
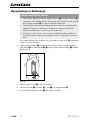
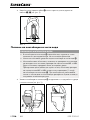
ƇGrip the fresh water tank s by the handle and place it back in the appliance.
Push it forward into the appliance until it audibly clicks into place (see Fig. 7).
1
2
Fig. 7

■ 10 │ GB│IE SPR 330 A1
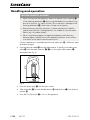
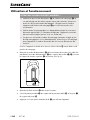
Handling and operation
CAUTION! PROPERTY DAMAGE!
► While working with the appliance, make sure that the suction opening u
of the cleaning attachment 8 does not get blocked by loose objects lying
around on the floor, lint, hair or the like. This could result in damage to the
cleaning attachment 8, which may no longer work properly.
► Before cleaning, check the upholstery / carpet manufacturer's label for
special care instructions. The appliance is not suitable for sensitive textile
fabrics (e.g. silk, leather, flokati).
► When using cleaning agents (vinegar-based cleaners and upholstery
cleaning agents), always test how the appliance performs on an unobtru-
sive spot to ensure that no discolouration occurs.
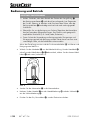
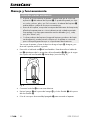
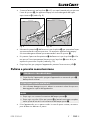
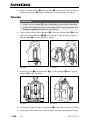
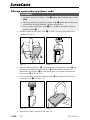
Once the appliance is assembled and the fresh water tank s is filled with water
and cleaning agent:
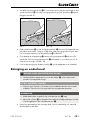
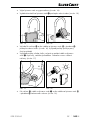
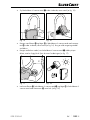
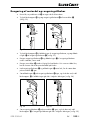
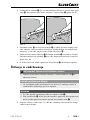
ƇUnwind the power cable 6 from the cable retainer. To quickly unwind the power
cable 6 from the cable retainers 4/5, turn the upper cable retainer 4
downward (see Fig. 8).
Fig. 8
ƇInsert the power plug 6 into the mains socket.
ƇTake the handle 9 from the handle retainer i and the hose 7 from the hose
retainer 0.
ƇPress the On/Off switch 2 to turn on the appliance.

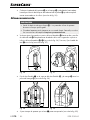
GB│IE │ 11 ■
SPR 330 A1
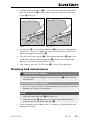
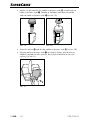
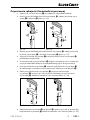
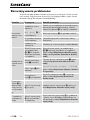
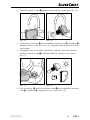
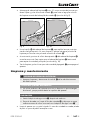
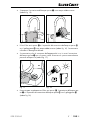
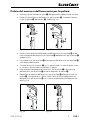
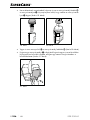
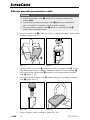
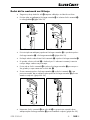
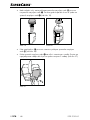
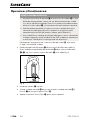
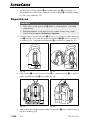
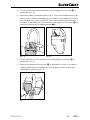
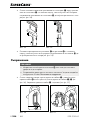
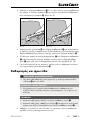
ƇHold the cleaning attachment 8 2–3 cm above the area to be cleaned and
press the spray button r to apply water / cleaning solution from the spray
nozzle t (see Fig. 9).
Fig. 9 Fig. 10
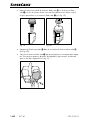
ƇUse the brush z on the cleaning attachment 8 to brush the soiled area with
light pressure. If necessary, add more water / cleaning solution to the soiled
area by pressing the spray button r.
ƇThen press the suction opening u of the cleaning attachment 8 against the
soiled area. Drag the cleaning attachment 8 multiple times in the desired
direction to suck up dirt and liquid (see Fig. 10).
ƇAfter cleaning, press the On/Off switch 2 to switch off the appliance.
Cleaning and maintenance
RISK OF ELECTRIC SHOCK!
► Switch the appliance off and pull out the power plug 6 before cleaning
the appliance!
CAUTION! PROPERTY DAMAGE!
► Do not use caustic, abrasive or solvent-based cleaning materials. These can
damage the surfaces of the appliance.
NOTE
► Empty the waste water tank 3 after every use.
► Clean the dirt filter a after each use and let it dry completely before
putting it back into the waste water tank 3.
ƇClean the appliance with a damp cloth. For stubborn soiling, add a little mild
detergent to the cloth.

■ 12 │ GB│IE SPR 330 A1
Cleaning the waste water tank
NOTE
► Empty the waste water tank 3 as soon as the dirty water has reached the
MAX marking.
► When emptying the waste water tank 3 make sure that the drain (e.g. the
wash basin) is not blocked by hair or coarse dirt.
► Once the waste water tank 3 is full, the appliance is automatically
switched off by the float switch o.
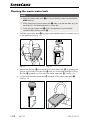
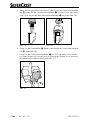
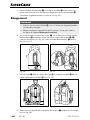
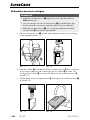
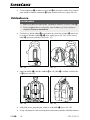
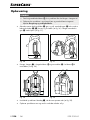
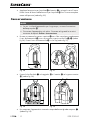
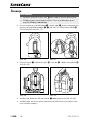
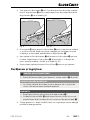
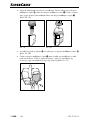
ƇHold the waste water tank 3 by gripping the handle and pull it towards you out
of the appliance (see Fig. 11).
Fig. 11 Fig. 12
ƇRemove the dirt filter a from the lid of the waste water tank p by gripping the
grooves on the sides of the dirt filter a with your thumb and forefinger. Pull the
dirt filter a upwards out of the lid of the waste water tank p (see Fig. 12).
ƇPull the lid of the waste water tank p upwards off the waste water tank 3
(see Fig. 13).
Fig. 13 Fig. 14

GB│IE │ 13 ■
SPR 330 A1
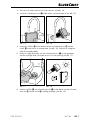
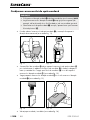
ƇTip out the dirty water and dirt (see Fig. 14).
ƇRinse the waste water tank 3 in warm running water (see Fig. 15).
Fig. 15 Fig. 16
ƇClean the dirt filter a and the lid of the waste water tank p with the float
switch o under warm running water (see Fig. 16). If necessary, use a mild
detergent.
ƇIf necessary, clean the recess for the waste water tank 3 in the appliance with
a damp cloth. Remove all dirt from the opening (See Fig. 17).
Fig. 17 Fig. 18
ƇLet the dirt filter a, the waste water tank 3 and the lid of the waste water
tank p, including float switch o, dry completely (see Fig. 18).

■ 14 │ GB│IE SPR 330 A1
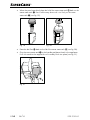
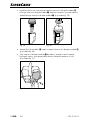
ƇWhen the parts have dried, place the lid of the waste water tank p back on the
waste water tank 3. Press it all the way down until it sits firmly on the waste
water tank 3 (see Fig. 19).
Fig. 19 Fig. 20
ƇPlace the dirt filter a back on the lid of the waste water tank p (see Fig. 20).
ƇGrip the waste water tank 3 by the handle and place it back in the appliance.
Push it forward into the appliance until it audibly clicks into place (see Fig. 21).
1
2
Fig. 21

GB│IE │ 15 ■
SPR 330 A1
Cleaning the handle and cleaning attachment
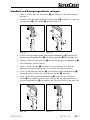
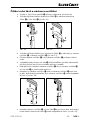
ƇMake sure that the power plug 6 of the appliance is not plugged in.
ƇPress the cleaning attachment locking button e and pull the cleaning attach-
ment 8 off the handle 9 (see Fig. 22).
1
2
1
2
Fig. 22 Fig. 23
ƇPress the cleaning attachment cover locking button w and pull the cleaning
attachment cover q off the cleaning attachment 8 (see Fig. 23).
ƇClean the cleaning attachment 8 and the cleaning attachment cover q in
warm running water.
ƇClean the handle 9 with a damp cloth, if necessary. For stubborn soiling, add
a little mild detergent to the cloth.
ƇAllow the cleaning attachment 8 and the cleaning attachment cover q to dry
completely before attaching them to the handle 9 again.
ƇPlace the cleaning attachment cover q back on the cleaning attachment 8
and slide it down until the cleaning attachment cover locking button w
completely engages with the opening (see Fig. 24).
Fig. 24 Fig. 25
ƇPlace the cleaning attachment 8 on the handle 9 and slide it down until the clean-
ing attachment locking button e completely engages with the opening (See Fig. 25).

■ 16 │ GB│IE SPR 330 A1
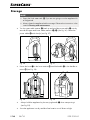
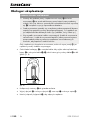
Storage
NOTE
► Empty the fresh water tank s if you are not going to use the appliance for
a long period.
► Always clean the appliance before storage. Observe the instructions in the
section Cleaning and maintenance.
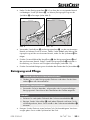
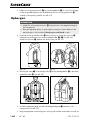
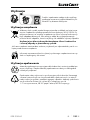
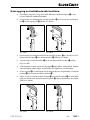
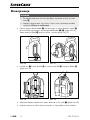
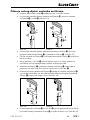
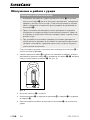
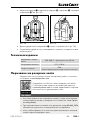
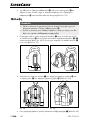
ƇTurn the upper cable retainer 4 back up and wind the power cable 6 entirely
around the upper and lower cable retainers 4/5 (see Fig. 26). Fasten the
power cable 6 with the clip (see Fig. 27).
Fig. 26 Fig. 27
ƇFasten the hose 7 in the hose retainer 0 and the handle 9 in the handle re-
tainer i (see Fig. 28).
Fig. 28 Fig. 29
Ƈ Always hold the appliance by the carrying handle 1 when transporting it
(seeFig. 29).
ƇStore the appliance in a dry and dust-free location out of direct sunlight.

GB│IE │ 17 ■
SPR 330 A1
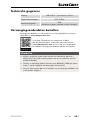
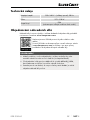
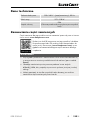
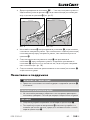
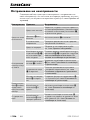
Technical specifications
Power supply 220–240 V ∼ (AC), 50 Hz
Power consumption 275–330 W
Protection type IPX4
(Protection against water splashes from
any direction)
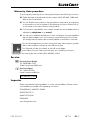
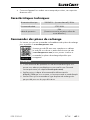
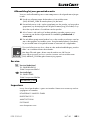
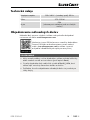
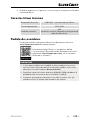
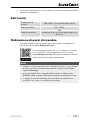
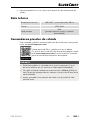
Ordering replacement parts
You can order replacement parts for this product on the internet at
www.kompernass.com.
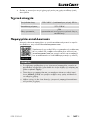
Scan this QR code with your smartphone or tablet.
You can use this QR code to navigate directly to our website
(www.kompernass.com), where you can view and order
spare parts available for this appliance.
NOTE
►If you have problems with your online order, you can contact our customer
service centre by phone or e-mail (see section Service).
►Please always quote the article number 402449_2204. You can find it on
the title page of these operating instructions.
►Please note that online ordering of replacement parts is not possible for all
countries.
La page est en cours de chargement...
La page est en cours de chargement...
La page est en cours de chargement...
La page est en cours de chargement...
La page est en cours de chargement...
La page est en cours de chargement...
La page est en cours de chargement...
La page est en cours de chargement...
La page est en cours de chargement...
La page est en cours de chargement...
La page est en cours de chargement...
La page est en cours de chargement...
La page est en cours de chargement...
La page est en cours de chargement...
La page est en cours de chargement...
La page est en cours de chargement...
La page est en cours de chargement...
La page est en cours de chargement...
La page est en cours de chargement...
La page est en cours de chargement...
La page est en cours de chargement...
La page est en cours de chargement...
La page est en cours de chargement...
La page est en cours de chargement...
La page est en cours de chargement...
La page est en cours de chargement...
La page est en cours de chargement...
La page est en cours de chargement...
La page est en cours de chargement...
La page est en cours de chargement...
La page est en cours de chargement...
La page est en cours de chargement...
La page est en cours de chargement...
La page est en cours de chargement...
La page est en cours de chargement...
La page est en cours de chargement...
La page est en cours de chargement...
La page est en cours de chargement...
La page est en cours de chargement...
La page est en cours de chargement...
La page est en cours de chargement...
La page est en cours de chargement...
La page est en cours de chargement...
La page est en cours de chargement...
La page est en cours de chargement...
La page est en cours de chargement...
La page est en cours de chargement...
La page est en cours de chargement...
La page est en cours de chargement...
La page est en cours de chargement...
La page est en cours de chargement...
La page est en cours de chargement...
La page est en cours de chargement...
La page est en cours de chargement...
La page est en cours de chargement...
La page est en cours de chargement...
La page est en cours de chargement...
La page est en cours de chargement...
La page est en cours de chargement...
La page est en cours de chargement...
La page est en cours de chargement...
La page est en cours de chargement...
La page est en cours de chargement...
La page est en cours de chargement...
La page est en cours de chargement...
La page est en cours de chargement...
La page est en cours de chargement...
La page est en cours de chargement...
La page est en cours de chargement...
La page est en cours de chargement...
La page est en cours de chargement...
La page est en cours de chargement...
La page est en cours de chargement...
La page est en cours de chargement...
La page est en cours de chargement...
La page est en cours de chargement...
La page est en cours de chargement...
La page est en cours de chargement...
La page est en cours de chargement...
La page est en cours de chargement...
La page est en cours de chargement...
La page est en cours de chargement...
La page est en cours de chargement...
La page est en cours de chargement...
La page est en cours de chargement...
La page est en cours de chargement...
La page est en cours de chargement...
La page est en cours de chargement...
La page est en cours de chargement...
La page est en cours de chargement...
La page est en cours de chargement...
La page est en cours de chargement...
La page est en cours de chargement...
La page est en cours de chargement...
La page est en cours de chargement...
La page est en cours de chargement...
La page est en cours de chargement...
La page est en cours de chargement...
La page est en cours de chargement...
La page est en cours de chargement...
La page est en cours de chargement...
La page est en cours de chargement...
La page est en cours de chargement...
La page est en cours de chargement...
La page est en cours de chargement...
La page est en cours de chargement...
La page est en cours de chargement...
La page est en cours de chargement...
La page est en cours de chargement...
La page est en cours de chargement...
La page est en cours de chargement...
La page est en cours de chargement...
La page est en cours de chargement...
La page est en cours de chargement...
La page est en cours de chargement...
La page est en cours de chargement...
La page est en cours de chargement...
La page est en cours de chargement...
La page est en cours de chargement...
La page est en cours de chargement...
La page est en cours de chargement...
La page est en cours de chargement...
La page est en cours de chargement...
La page est en cours de chargement...
La page est en cours de chargement...
La page est en cours de chargement...
La page est en cours de chargement...
La page est en cours de chargement...
La page est en cours de chargement...
La page est en cours de chargement...
La page est en cours de chargement...
La page est en cours de chargement...
La page est en cours de chargement...
La page est en cours de chargement...
La page est en cours de chargement...
La page est en cours de chargement...
La page est en cours de chargement...
La page est en cours de chargement...
La page est en cours de chargement...
La page est en cours de chargement...
La page est en cours de chargement...
La page est en cours de chargement...
La page est en cours de chargement...
La page est en cours de chargement...
La page est en cours de chargement...
La page est en cours de chargement...
La page est en cours de chargement...
La page est en cours de chargement...
La page est en cours de chargement...
La page est en cours de chargement...
La page est en cours de chargement...
La page est en cours de chargement...
La page est en cours de chargement...
La page est en cours de chargement...
La page est en cours de chargement...
La page est en cours de chargement...
La page est en cours de chargement...
La page est en cours de chargement...
La page est en cours de chargement...
La page est en cours de chargement...
La page est en cours de chargement...
La page est en cours de chargement...
La page est en cours de chargement...
La page est en cours de chargement...
La page est en cours de chargement...
La page est en cours de chargement...
La page est en cours de chargement...
La page est en cours de chargement...
La page est en cours de chargement...
La page est en cours de chargement...
La page est en cours de chargement...
La page est en cours de chargement...
La page est en cours de chargement...
La page est en cours de chargement...
La page est en cours de chargement...
La page est en cours de chargement...
La page est en cours de chargement...
La page est en cours de chargement...
La page est en cours de chargement...
La page est en cours de chargement...
La page est en cours de chargement...
La page est en cours de chargement...
La page est en cours de chargement...
La page est en cours de chargement...
La page est en cours de chargement...
La page est en cours de chargement...
La page est en cours de chargement...
La page est en cours de chargement...
La page est en cours de chargement...
La page est en cours de chargement...
La page est en cours de chargement...
La page est en cours de chargement...
La page est en cours de chargement...
La page est en cours de chargement...
La page est en cours de chargement...
La page est en cours de chargement...
La page est en cours de chargement...
La page est en cours de chargement...
La page est en cours de chargement...
La page est en cours de chargement...
La page est en cours de chargement...
La page est en cours de chargement...
La page est en cours de chargement...
La page est en cours de chargement...
La page est en cours de chargement...
La page est en cours de chargement...
La page est en cours de chargement...
La page est en cours de chargement...
La page est en cours de chargement...
La page est en cours de chargement...
La page est en cours de chargement...
La page est en cours de chargement...
La page est en cours de chargement...
La page est en cours de chargement...
La page est en cours de chargement...
La page est en cours de chargement...
La page est en cours de chargement...
La page est en cours de chargement...
La page est en cours de chargement...
La page est en cours de chargement...
La page est en cours de chargement...
La page est en cours de chargement...
La page est en cours de chargement...
La page est en cours de chargement...
La page est en cours de chargement...
La page est en cours de chargement...
La page est en cours de chargement...
La page est en cours de chargement...
La page est en cours de chargement...
La page est en cours de chargement...
La page est en cours de chargement...
La page est en cours de chargement...
La page est en cours de chargement...
La page est en cours de chargement...
La page est en cours de chargement...
La page est en cours de chargement...
La page est en cours de chargement...
La page est en cours de chargement...
La page est en cours de chargement...
La page est en cours de chargement...
La page est en cours de chargement...
La page est en cours de chargement...
La page est en cours de chargement...
La page est en cours de chargement...
La page est en cours de chargement...
La page est en cours de chargement...
La page est en cours de chargement...
La page est en cours de chargement...
La page est en cours de chargement...
La page est en cours de chargement...
La page est en cours de chargement...
La page est en cours de chargement...
La page est en cours de chargement...
La page est en cours de chargement...
La page est en cours de chargement...
La page est en cours de chargement...
La page est en cours de chargement...
La page est en cours de chargement...
La page est en cours de chargement...
La page est en cours de chargement...
La page est en cours de chargement...
La page est en cours de chargement...
La page est en cours de chargement...
La page est en cours de chargement...
La page est en cours de chargement...
La page est en cours de chargement...
La page est en cours de chargement...
La page est en cours de chargement...
La page est en cours de chargement...
La page est en cours de chargement...
La page est en cours de chargement...
La page est en cours de chargement...
La page est en cours de chargement...
La page est en cours de chargement...
La page est en cours de chargement...
La page est en cours de chargement...
La page est en cours de chargement...
La page est en cours de chargement...
La page est en cours de chargement...
La page est en cours de chargement...
La page est en cours de chargement...
La page est en cours de chargement...
La page est en cours de chargement...
La page est en cours de chargement...
La page est en cours de chargement...
La page est en cours de chargement...
La page est en cours de chargement...
La page est en cours de chargement...
La page est en cours de chargement...
La page est en cours de chargement...
La page est en cours de chargement...
La page est en cours de chargement...
La page est en cours de chargement...
La page est en cours de chargement...
La page est en cours de chargement...
La page est en cours de chargement...
La page est en cours de chargement...
La page est en cours de chargement...
La page est en cours de chargement...
La page est en cours de chargement...
La page est en cours de chargement...
La page est en cours de chargement...
La page est en cours de chargement...
La page est en cours de chargement...
La page est en cours de chargement...
La page est en cours de chargement...
La page est en cours de chargement...
La page est en cours de chargement...
La page est en cours de chargement...
La page est en cours de chargement...
La page est en cours de chargement...
La page est en cours de chargement...
La page est en cours de chargement...
La page est en cours de chargement...
La page est en cours de chargement...
La page est en cours de chargement...
La page est en cours de chargement...
La page est en cours de chargement...
La page est en cours de chargement...
La page est en cours de chargement...
La page est en cours de chargement...
La page est en cours de chargement...
La page est en cours de chargement...
La page est en cours de chargement...
La page est en cours de chargement...
La page est en cours de chargement...
La page est en cours de chargement...
La page est en cours de chargement...
La page est en cours de chargement...
La page est en cours de chargement...
La page est en cours de chargement...
La page est en cours de chargement...
La page est en cours de chargement...
La page est en cours de chargement...
La page est en cours de chargement...
La page est en cours de chargement...
-
 1
1
-
 2
2
-
 3
3
-
 4
4
-
 5
5
-
 6
6
-
 7
7
-
 8
8
-
 9
9
-
 10
10
-
 11
11
-
 12
12
-
 13
13
-
 14
14
-
 15
15
-
 16
16
-
 17
17
-
 18
18
-
 19
19
-
 20
20
-
 21
21
-
 22
22
-
 23
23
-
 24
24
-
 25
25
-
 26
26
-
 27
27
-
 28
28
-
 29
29
-
 30
30
-
 31
31
-
 32
32
-
 33
33
-
 34
34
-
 35
35
-
 36
36
-
 37
37
-
 38
38
-
 39
39
-
 40
40
-
 41
41
-
 42
42
-
 43
43
-
 44
44
-
 45
45
-
 46
46
-
 47
47
-
 48
48
-
 49
49
-
 50
50
-
 51
51
-
 52
52
-
 53
53
-
 54
54
-
 55
55
-
 56
56
-
 57
57
-
 58
58
-
 59
59
-
 60
60
-
 61
61
-
 62
62
-
 63
63
-
 64
64
-
 65
65
-
 66
66
-
 67
67
-
 68
68
-
 69
69
-
 70
70
-
 71
71
-
 72
72
-
 73
73
-
 74
74
-
 75
75
-
 76
76
-
 77
77
-
 78
78
-
 79
79
-
 80
80
-
 81
81
-
 82
82
-
 83
83
-
 84
84
-
 85
85
-
 86
86
-
 87
87
-
 88
88
-
 89
89
-
 90
90
-
 91
91
-
 92
92
-
 93
93
-
 94
94
-
 95
95
-
 96
96
-
 97
97
-
 98
98
-
 99
99
-
 100
100
-
 101
101
-
 102
102
-
 103
103
-
 104
104
-
 105
105
-
 106
106
-
 107
107
-
 108
108
-
 109
109
-
 110
110
-
 111
111
-
 112
112
-
 113
113
-
 114
114
-
 115
115
-
 116
116
-
 117
117
-
 118
118
-
 119
119
-
 120
120
-
 121
121
-
 122
122
-
 123
123
-
 124
124
-
 125
125
-
 126
126
-
 127
127
-
 128
128
-
 129
129
-
 130
130
-
 131
131
-
 132
132
-
 133
133
-
 134
134
-
 135
135
-
 136
136
-
 137
137
-
 138
138
-
 139
139
-
 140
140
-
 141
141
-
 142
142
-
 143
143
-
 144
144
-
 145
145
-
 146
146
-
 147
147
-
 148
148
-
 149
149
-
 150
150
-
 151
151
-
 152
152
-
 153
153
-
 154
154
-
 155
155
-
 156
156
-
 157
157
-
 158
158
-
 159
159
-
 160
160
-
 161
161
-
 162
162
-
 163
163
-
 164
164
-
 165
165
-
 166
166
-
 167
167
-
 168
168
-
 169
169
-
 170
170
-
 171
171
-
 172
172
-
 173
173
-
 174
174
-
 175
175
-
 176
176
-
 177
177
-
 178
178
-
 179
179
-
 180
180
-
 181
181
-
 182
182
-
 183
183
-
 184
184
-
 185
185
-
 186
186
-
 187
187
-
 188
188
-
 189
189
-
 190
190
-
 191
191
-
 192
192
-
 193
193
-
 194
194
-
 195
195
-
 196
196
-
 197
197
-
 198
198
-
 199
199
-
 200
200
-
 201
201
-
 202
202
-
 203
203
-
 204
204
-
 205
205
-
 206
206
-
 207
207
-
 208
208
-
 209
209
-
 210
210
-
 211
211
-
 212
212
-
 213
213
-
 214
214
-
 215
215
-
 216
216
-
 217
217
-
 218
218
-
 219
219
-
 220
220
-
 221
221
-
 222
222
-
 223
223
-
 224
224
-
 225
225
-
 226
226
-
 227
227
-
 228
228
-
 229
229
-
 230
230
-
 231
231
-
 232
232
-
 233
233
-
 234
234
-
 235
235
-
 236
236
-
 237
237
-
 238
238
-
 239
239
-
 240
240
-
 241
241
-
 242
242
-
 243
243
-
 244
244
-
 245
245
-
 246
246
-
 247
247
-
 248
248
-
 249
249
-
 250
250
-
 251
251
-
 252
252
-
 253
253
-
 254
254
-
 255
255
-
 256
256
-
 257
257
-
 258
258
-
 259
259
-
 260
260
-
 261
261
-
 262
262
-
 263
263
-
 264
264
-
 265
265
-
 266
266
-
 267
267
-
 268
268
-
 269
269
-
 270
270
-
 271
271
-
 272
272
-
 273
273
-
 274
274
-
 275
275
-
 276
276
-
 277
277
-
 278
278
-
 279
279
-
 280
280
-
 281
281
-
 282
282
-
 283
283
-
 284
284
-
 285
285
-
 286
286
-
 287
287
-
 288
288
-
 289
289
-
 290
290
-
 291
291
-
 292
292
-
 293
293
-
 294
294
-
 295
295
-
 296
296
-
 297
297
-
 298
298
-
 299
299
-
 300
300
-
 301
301
-
 302
302
-
 303
303
-
 304
304
-
 305
305
-
 306
306
-
 307
307
-
 308
308
-
 309
309
-
 310
310
-
 311
311
-
 312
312
-
 313
313
-
 314
314
-
 315
315
-
 316
316
-
 317
317
-
 318
318
-
 319
319
-
 320
320
-
 321
321
-
 322
322
-
 323
323
-
 324
324
-
 325
325
-
 326
326
-
 327
327
-
 328
328
-
 329
329
-
 330
330
-
 331
331
-
 332
332
-
 333
333
-
 334
334
-
 335
335
-
 336
336
-
 337
337
-
 338
338
-
 339
339
-
 340
340
-
 341
341
-
 342
342
-
 343
343
-
 344
344
-
 345
345
-
 346
346
-
 347
347
-
 348
348
-
 349
349
-
 350
350
-
 351
351
-
 352
352
-
 353
353
-
 354
354
-
 355
355
-
 356
356


dans d''autres langues
Documents connexes
Autres documents
-
Windsor BDS 43/Duo C Le manuel du propriétaire
-
FLORABEST 273489 Mode d'emploi
-
-
-
-
Hoover F5905-900 Le manuel du propriétaire
-
Hoover SteamVac Bagless Vacuum Cleaner Manuel utilisateur
-
-
Tineco Floor One S5 Series Manuel utilisateur