Vacmaster VOC809pf Manuel utilisateur
- Catégorie
- Aspirateurs
- Taper
- Manuel utilisateur

Distributed by/ Distribuido por/ Distribue par:
Cleva North America, Inc.
601 Regent Park Court, Greenville, SC 29607
Replacement Filters &
Accessories available at:
Vacmaster.com
Filtros de repuesto y
accesorios disponibles en:
Vacmaster.com
Filtres de rechange et
Accessoires disponibles à l’adresse suivante:
Vacmaster.com
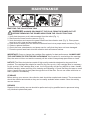
FOR YOUR SAFETY
Read and understand this manual before use. Keep this manual for future reference.
POR SU SEGURIDAD
Lea y comprenda este manual antes de usar el producto. Conserve este manual para futura referencia.
POUR GARANTIR VOTRE SÉCURITÉ
Lisez et comprenez ce manuel avant toute utilisation de l’appareil. Conservez le présent manuel an de pouvoir
vous y référer ultérieurement.
Operator’s Manual
Manual del usuario
Manuel d’utilisation
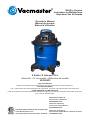
Wet/Dry Vacuum
Aspiradora en Mojado/Seco
Aspirateur Sec et Humide
8 Gallon / 8 Galones / 30 L
Model No. • N° de modelo • Référence de modèle
VOC809PF

2
TABLE OF CONTENTS
WARRANTY
Warranty………………………………………………………………………………….........………….
Important Safety Instructions…………………………………….......…………….........……………..
Double Insulation Instructions....………………………………………………........….………………
Extension Cords………………………………………………………………........……...….………….
Symbols………….……………………...............................................................……….……………
Unpacking & Checking Carton Contents………….…………………….........……….…....…………
General Assembly Instructions……………………………………………….........…………………...
Dry Vacuum Operation…………………………………………………….......…………….………….
Liquid Vacuum Operation…………………………………………………........………….……………
Blower Operation……………………………………………………….........…………….…………...
Maintenance……………………………………………………………….........………………………..
Installing & Cleaning Cartridge Filter……………………………...……........….……..….…………..
Installing & Cleaning Foam Wet Filter………………………...……...........………….…...….……..
Troubleshooting………………………………………………………….........…………………………
Exploded View………………………………………………………........…..….......................……...
Parts List………………………………………………………........…..................................………...
2
3
4
5
5
6
7
8
9
11
12
13
14
15
16
17
SECTION PAGE
Thank you for purchasing this Vacmaster
® wet/dry vacuum cleaner. Feel condent that with
Vacmaster
® you are obtaining a high-quality product engineered for optimal performance.
This vacuum is capable of picking up liquids and dry materials.
FOR YOUR SAFETY: CAREFULLY READ AND UNDERSTAND ALL INSTRUCTIONS.
We take pride in producing a high-quality, durable product. This Vacmaster® product carries a
limited two (2) year warranty against defects in workmanship and materials from date of purchase
under normal household use. If product is to be used for commercial, industrial, or rental use, a 90-
day limited warranty will apply. Please keep your receipt as proof of purchase. This warranty gives
you specic legal rights, which may vary from state to state. For product service call Customer
Service at 1-866-384-8432.
Not Covered by Warranty:
• Any part that has become inoperative due to misuse, negligence, direct/indirect abuse, accidents,
improper maintenance, repairs, or alterations;
• Consumables such as lters and accessories;
• Normal wear and tear of parts and attachments, such as hose, nozzles, or casters;
• Normal deterioration of the exterior nish due to use or exposure;
• Any product where serial number/data label is tampered with or removed;
• Any product purchased from an unauthorized retailer.

3
IMPORTANT SAFETY INSTRUCTIONS
READ AND UNDERSTAND ALL INSTRUCTIONS BEFORE USING THIS VACUUM.
Read and understand this operator’s manual and all labels on the vacuum cleaner before
operating. Safety is a combination of common sense, staying alert and knowing how your vacuum
works. Use this vacuum only as described in this manual. To reduce the risk of personal injury or
damage to your vacuum, use only manufacturer recommended accessories.
When using a vacuum, basic precautions should always be followed including
the following. Failure to follow the warnings and instructions may result in
explosion, re and/or serious injury.
• Do not run vacuum unattended.
• Do not use to pick up ammable or combustible liquids, such as gasoline, or use in areas where
they may be present.
• Do not vacuum, or use this vacuum near ammable liquids, gases, or explosive vapors like
gasoline or other fuels, lighter uids, cleaners, oil-based paints, natural gas, hydrogen, or
explosive dusts like coal dust, magnesium dust, grain dust, or gun powder. Sparks inside the
motor can ignite ammable vapors or dust.
• To reduce the risk of health hazards from vapors or dusts, do not vacuum toxic materials.
• Do not use or store near hazardous materials.
• Do not pick up anything that is burning or smoking, such as cigarettes, matches, or hot ashes.
• Do not expose to rain. Store indoors.
• If vacuum is not working as it should, has been dropped, damaged, left outdoors, or dropped into
water, return it to a service center.
• Do not unplug by pulling on cord. To unplug, grasp the plug, not the cord.
• Do not use with damaged cord or plug.
• Do not pull or carry by cord, use cord as a handle, close a door on cord, or pull cord around
sharp edges or corners.
• Keep cord away from heated surfaces.
• Do not run the vacuum over cord.
• Do not handle plug or vacuum with wet hands.
• Do not use without dust bag and/or lters in place.
• Do not allow to be used as a toy. Close attention is necessary when used by or near children.
• To reduce the risk of injury from accidental starting, unplug power cord before changing or
cleaning lter.
• Do not leave vacuum when plugged in. Unplug from outlet when not in use and before servicing.
• Turn off all controls before unplugging.
• Unplug before connecting or disconnecting hose, or any other accessories.
• Do not put any object into openings. Do not use with any opening blocked; keep free of dust, lint,
hair, and anything that may reduce air ow.
• Keep hair, loose clothing, ngers, and all parts of body away from openings and moving parts.
• Use extra care when cleaning on stairs.
• Use only as described in this manual. Use only manufacturer’s recommended attachments.
• This vacuum is provided with double insulation. Use only identical replacement parts. See
DOUBLE INSULATION INSTRUCTIONS.
SAVE THIS MANUAL FOR FUTURE
REFERENCE
WARNING:
TO REDUCE THE RISK OF FIRE, ELECTRIC SHOCK, OR
INJURY:
CAUTION: To reduce the risk of injury from moving parts - Unplug before servicing.
WARNING: To reduce the risk of electric shock - Unplug before cleaning or
servicing.

4
When using as blower:
• Direct air discharge only at work area.
• Do not use Wet/Dry Vacuum as a sprayer.
• Do not direct air at bystanders.
• Keep children away when blowing.
• Wear safety goggles.
SAVE THESE INSTRUCTIONS
For Household Use Only
DOUBLE INSULATED - GROUNDING NOT REQUIRED - WHEN SERVICING USE ONLY
IDENTICAL REPLACEMENT PARTS.
DOUBLE INSULATION INSTRUCTIONS
This Wet/Dry Vacuum is double insulated, eliminating the need for a separate grounding system.
Use only identical replacement parts. Read the instructions for Servicing Double-Insulated Wet/Dry
Vacuums before servicing. Use this vacuum as described in this manual.
Observe the following warnings that appear on the motor housing of your vacuum.
WARNING: TO REDUCE THE RISK OF ELECTRIC SHOCK - DO NOT EXPOSE TO
RAIN. STORE INDOORS.
WARNING: FOR YOUR OWN SAFETY, READ AND UNDERSTAND THE OPERATOR’S
MANUAL. DO NOT RUN UNATTENDED. DO NOT PICK UP HOT ASHES, COALS,
TOXIC, FLAMMABLE OR OTHER HAZARDOUS MATERIALS. DO NOT USE AROUND
EXPLOSIVE LIQUIDS OR VAPORS.
CAUTION: DO NOT VACUUM DRYWALL DUST OR FIREPLACE SOOT OR ASH
WITH STANDARD WET/DRY FILTER. THIS TYPE OF DUST IS VERY FINE WHICH
MAY NOT BE CAPTURED BY THE FILTER AND CAUSE DAMAGE TO MOTOR. WHEN
VACUUMING FINE DUST USE A FINE DUST FILTER.
WARNING: SERVICING OF DOUBLE-INSULATED WET/DRY VACUUM
WITH A DOUBLE-INSULATED WET/DRY VACUUM, TWO SYSTEMS OF INSULATION
ARE PROVIDED INSTEAD OF GROUNDING. NO GROUNDING MEANS IS PROVIDED
ON A DOUBLE-INSULATED APPLIANCE, NOR SHOULD A MEANS FOR GROUNDING
BE ADDED. SERVICING A DOUBLE INSULATED WET/DRY VACUUM REQUIRES
EXTREME CARE AND KNOWLEDGE OF THE SYSTEM AND SHOULD BE DONE
ONLY BY QUALIFIED SERVICE PERSONNEL. REPLACEMENT PARTS FOR A
DOUBLE-INSULATED WET/DRY VACUUM MUST BE IDENTICAL TO THE PARTS
THEY REPLACE. YOUR DOUBLE-INSULATED WET/DRY VAC IS MARKED WITH THE
WORDS ‘DOUBLE INSULATED’ AND THE SYMBOL (SQUARE WITHIN A SQUARE)
MAY ALSO BE MARKED ON THE APPLIANCE.

5
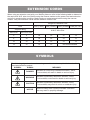
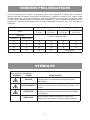
EXTENSION CORDS
When using an extension cord with your Wet/Dry Vacuum refer to the following table to determine
the required A.W.G. wire size. Before using the cleaner make sure the power cord and extension
cord are in good working condition. Make repairs or replacements before using the vacuum
cleaner. Only use extension cords that are rated for outdoor use.
Length of Extension Cord
120V 25ft (7.62m) 50ft (15.24m) 100ft (30.48m) 150ft (45.72m)
Ampere rating A.W.G. Wire Size
More than Not more than
0 6 18 16 16 14
6 10 18 16 14 12
10 12 16 16 14 12
12 16 14 12 Not recommended
SYMBOLS
SYMBOLS
The following signal words and meanings are intended to explain the levels of risk
associated with this product.
SYMBOL SIGNAL MEANING
DANGER Indicates an imminently hazardous situation, which,
if not avoided, will result in death or serious injury.
WARNING Indicates a potentially hazardous situation, which,
if not avoided, could result in death or serious injury.
CAUTION Indicates a potentially hazardous situation, which,
if not avoided, may result in minor or moderate injury.
NOTICE (Without Safety Alert Symbol) Indicates a situation
that may result in property damage.

6
G
D E
A B
H
F
L
I J
K
C
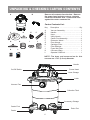
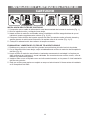
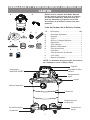
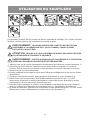
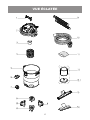
UNPACKING & CHECKING CARTON CONTENTS
Remove all contents from the box. Remove
the power head and take out any contents
inside the collection tank. Check each item
against the carton contents list.
Carton Contents List:
Key Description ..…………....……….….... Qty.
NOTE: The hose and accessories for this
vacuum are 1-7/8'' (3.8 cm) diameter.
1
1
1
1
4
2
1
1
1
1
1
1
A
B
C
D
E
F
G
H
I
J
K
L
Vacuum Assembly………………..……..
Handle…………...............……………...
Hose……………………………………...
Utility Nozzle………………………..…...
Caster Foot Assembly...........................
Extension Wand..……………………….
Floor Nozzle.………..…................…….
Cartridge Filter………………..…………
Filter Retainer…………………………...
Foam Wet Filter.………….…….…....
6 Screws (Bag)…………….……………
Operator’s Manual…..………………….
Handle
On/Off Switch
Vacuum Port
Caster Foot
Caster
Power Head
Hose Storage
Latch
Collection Tank
Accessory Storage
Drain Port

7
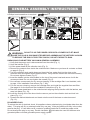
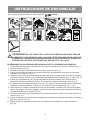
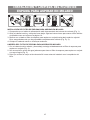
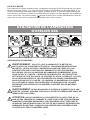
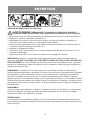
GENERAL ASSEMBLY INSTRUCTIONS
A Philips head screwdriver is required.
2
2
1
5
4
7
11
9
8
6
12
3
10
UNPACKING YOUR WET/DRY VACUUM & GENERAL ASSEMBLY
1. Verify that the power cord is disconnected from the outlet (Fig. 1).
2. Undo the latches (Fig. 2).
3. Lift the power head off the collection tank (Fig. 3).
4. Remove the contents from inside the collection tank. Make sure you have all contents as listed
on page 6 (Fig. 4).
5. Turn the collection tank upside down and insert the four caster feet into the slots on the
collection tank and tighten with supplied screws. Verify that the casters are mounted correctly.
Do not over-tighten screws (Fig. 5).
6. Insert the handle into the slots located on the top of the power head and secure it with the
screws provided. Do not over-tighten the screws (Fig. 6).
7. Your vacuum comes ready for dry vacuum cleaning. If the cartridge lter is not installed, refer
to page 13 for installation instructions (Fig. 7 & 8).
8. For wet vacuum cleaning, remove the cartridge lter, and install the supplied foam wet lter.
See page 14 for the foam wet lter installation instructions (Fig. 9).
9. Place the power head back on the collection tank aligning the top section with the latches, and
snap into place (Fig. 10).
10. Insert the locking end of the hose into the vacuum port on the collection tank and lock into
place (Fig. 11).
11. Choose the desired attachment and insert onto the end of the hose or extension wand
(Fig. 12).
WARNING: DO NOT PLUG THE POWER CORD INTO A POWER OUTLET. MAKE
SURE THE PLUG IS DISCONNECTED BEFORE ASSEMBLING THE WET/DRY VACUUM.
TO REDUCE THE RISK OF ELECTRIC SHOCK, DO NOT EXPOSE TO RAIN.
POLARIZED PLUG
To reduce the risk of electrical shock, this appliance has a polarized plug (one blade wider than the
other). This plug will t in a polarized outlet only one way. If the plug does not t fully in the outlet,
reverse the plug. If it still does not t, contact a qualied electrician to install the proper outlet.
Do not change the plug in any way. Double insulation eliminates the need for the three-wire
grounded power cord and grounded power supply system.

8
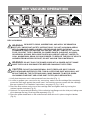
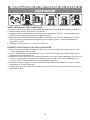
DRY VACUUM OPERATION
6
5
10
4
9
2
7
3
8
DRY VACUUMING
1. Verify that the power cord is disconnected from the outlet (Fig. 1).
2. In order to prepare your vacuum for dry vacuuming, make sure the cartridge lter completely
covers the lter cage against the power head. Your wet/dry vacuum comes with the cartridge
lter pre-installed. For installation instructions, see page 13 (Fig. 2 & 3).
3. Place the lter retainer on the top of the cartridge lter and tighten down by turning the
retainer handle clockwise (Fig. 4).
4. Optional: For improved dust ltering, t the collection bag ange onto the inlet port, taking care
not to damage the bag. Dust bag sold separately (Fig. 5).
5. Place the power head back on the collection tank and secure it in place using the latches
(Fig. 6).
WARNING: BE SURE TO READ, UNDERSTAND, AND APPLY INFORMATION
ENTITLED “IMPORTANT SAFETY INSTRUCTIONS”. DO NOT VACUUM IN AREAS
WITH FLAMMABLE GASES, VAPORS, OR EXPLOSIVE DUSTS IN THE AIR.
FLAMMABLE GASES OR VAPORS INCLUDE BUT ARE NOT LIMITED TO: LIGHTER
FLUID, SOLVENT TYPE CLEANERS, OIL-BASED PAINTS, GASOLINE, ALCOHOL,
OR AEROSOL SPRAYS. EXPLOSIVE DUSTS INCLUDE BUT ARE NOT LIMITED TO:
COAL, MAGNESIUM, GRAIN, OR GUN POWDER. TO REDUCE THE RISK OF HEALTH
HAZARDS FROM VAPORS OR DUST, DO NOT VACUUM TOXIC MATERIALS.
WARNING: DO NOT PLUG THE POWER CORD INTO A POWER OUTLET. MAKE
SURE THE PLUG IS DISCONNECTED BEFORE CHANGING THE FILTERS.
CAUTION: DO NOT VACUUM DRYWALL DUST, FIREPLACE SOOT, OR ASH
WITH STANDARD WET/DRY FILTER. THIS IS A VERY FINE DUST WHICH WILL NOT
BE CAPTURED BY THE FILTER AND MAY CAUSE DAMAGE TO MOTOR. WHEN
VACUUMING FINE DUST USE A FINE DUST FILTER (SOLD SEPARATELY).

9
OPERATING INSTRUCTIONS: DRY VACUUMING
6. Insert the locking end of the hose into the vacuum port on the power head and turn to lock into
place.
7. Choose the required attachment and insert onto the end of the hose or extension wand (Fig. 7).
8. Verify that the switch is in the ‘O’ OFF position before plugging the power cord into the outlet.
Plug the power cord into the outlet (Fig. 8 & 9).
9. Turn the motor on by ipping the on/off switch to the ‘I’ ON position and begin vacuuming
(Fig. 10).
10. Once you have completed vacuuming, ip the on/off switch to the ‘O’ OFF position and unplug
the power cord from the outlet.
O = OFF I = ON
DO NOT USE THE CARTRIDGE FILTER FOR LIQUID VACUUMING.
DO NOT USE THE COLLECTION BAG FOR LIQUID VACUUMING.
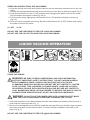
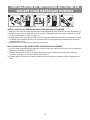
LIQUID VACUUM OPERATION
LIQUID VACUUMING
56
7
3
4
1
2
2
WARNING: BE SURE TO READ, UNDERSTAND, AND APPLY INFORMATION
ENTITLED “IMPORTANT SAFETY INSTRUCTIONS”. DO NOT VACUUM IN AREAS
WITH FLAMMABLE GASES, VAPORS, OR EXPLOSIVE DUSTS IN THE AIR.
FLAMMABLE GASES OR VAPORS INCLUDE BUT ARE NOT LIMITED TO: LIGHTER
FLUID, SOLVENT TYPE CLEANERS, OIL-BASED PAINTS, GASOLINE, ALCOHOL,
OR AEROSOL SPRAYS. EXPLOSIVE DUSTS INCLUDE BUT ARE NOT LIMITED TO:
COAL, MAGNESIUM, GRAIN, OR GUN POWDER. TO REDUCE THE RISK OF HEALTH
HAZARDS FROM VAPORS OR DUST, DO NOT VACUUM TOXIC MATERIALS.
WARNING: DO NOT PLUG THE POWER CORD INTO A POWER OUTLET. MAKE
SURE THE PLUG IS DISCONNECTED BEFORE CHANGING THE FILTERS.
1. Verify that the power cord is disconnected from the outlet. Make sure that the collection tank is
clean and free of dust and dirt (Fig. 1).
2. Remove the cartridge lter, then carefully install the foam wet lter over the lter cage and place
the power head back on the collection tank. For foam wet lter installation instructions, see
page 14 (Fig. 2).
DO NOT USE THE CARTRIDGE FILTER FOR LIQUID VACUUMING.

10
OPERATING INSTRUCTIONS: WET VACUUMING
3. Push the required attachment onto the free end of the hose or extension wand (Fig. 3).
4. Verify that the on/off switch is in the ‘O’ OFF position before plugging the power cord into the
power outlet. Plug the power cord into the outlet (Fig. 4 & 5).
5. Turn the motor on by ipping the switch to the ‘I’ ON position (Fig. 6).
6. Once you have completed vacuuming, ip the on/off switch to the 'O' OFF position and unplug
the power cord from the outlet.
7. After use, empty the collection tank by unscrewing the drain cap. Drain liquids into a suitable
receptacle or drain. Remember to ret the drain cap to the collection tank (Fig. 7).
IMPORTANT! When vacuuming large quantities of liquids, do not immerse the nozzle completely
in the liquid; leave a gap at the tip of the nozzle opening to allow air inow. The machine is tted
with a oat valve that stops the suction action when the collection tank reaches its maximum
capacity. You will notice an increase in motor speed. When this happens, turn off the machine,
disconnect from power supply, and drain the liquid into a suitable receptacle or drain. To continue
vacuuming, ret the collection tank with the drain cap. After wet vacuuming, turn the machine
off and remove plug from power supply. Empty the collection tank, clean, and dry the inside and
outside before storage.
REMEMBER! The foam wet lter must be removed after wet vacuuming and the cartridge lter
must be installed before dry vacuuming again.

11
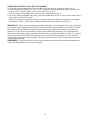
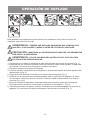
BLOWER OPERATION
6
2
3
5
2
7
4
This Wet/Dry Vacuum has blowing capabilities. To use the blower feature, follow the instructions
listed.
1. Verify that the power cord is disconnected from the outlet (Fig. 1).
2. Make sure the collection tank is empty before using as a blower. Clear all dirt and debris from
the hose and collection tank.
3. Remove the hose from the vacuum port.
4. Insert the larger end of the hose into the blower port on the back of the power head and lock
into place (Fig. 2).
5. Choose the desired attachment and insert onto the end of the hose (Fig. 3).
6. Verify that the on/off switch is in the ‘O’ OFF position before plugging the power cord into the
outlet. Plug the power cord into the outlet (Fig. 4 & 5).
7. Before turning on the vacuum, rmly hold loose end of the hose. Turn the motor on by ipping
the switch to the ‘I’ ON position (Fig. 6).
8. Once you have completed blowing, ip the on/off switch to the ‘O’ OFF position and unplug the
power cord from the outlet (Fig. 7).
WARNING: ALWAYS WEAR SAFETY GOGGLES COMPLYING WITH ANSI Z87.1 (OR
IN CANADA, CSAZ94.3) BEFORE USING BLOWER.
CAUTION: KEEP BYSTANDERS CLEAR FROM BLOWING DEBRIS.
WARNING: WEAR A DUST MASK IF BLOWING CREATES DUST THAT MIGHT BE
INHALED.

12
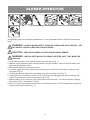
MAINTENANCE
EMPTYING THE COLLECTION TANK
1. Verify that the power cord is disconnected from the outlet (Fig. 1).
2. Disconnect the hose from the vacuum (Fig. 2).
3. Undo the latches and remove the power head from the collection tank (Fig. 3). Place power
head on a soft, clean surface upside down.
4. Clear all dirt or debris from the collection tank and hose into a proper waste container (Fig. 4).
5. Clean or replace the lters.
6. Check the hose, attachments, and power cord to verify that they have not been damaged.
7. Place the power head back onto the collection tank and secure latches.
2
4
3
IMPORTANT! Clean or change the cartridge lter regularly for best performance. ALWAYS USE
THE CARTRIDGE FILTER FOR DRY VACUUMING. If the machine is used without the cartridge
lter, the motor will burn out and the warranty will be voided. Always keep spare lters on hand.
NOTICE! The lters included are made of high-quality materials designed to stop small dust
particles. The cartridge lter should be used for dry pick-up only. A dry cartridge lter is necessary
to pick up dust. If the cartridge lter is wet, it will clog quickly and be very difcult to clean. Handle
the lter carefully when removing it for cleaning and replacing it. Check the lters for tears or small
holes. A small hole can let dust pass through and out of the lter. Do not use a lter with holes or
tears; replace it immediately.
STORAGE
Before storing your vacuum, the collection tank should be emptied and cleaned. The accessories
should be cleaned and stored so they can be readily available when needed. Store the wet/dry
vacuum indoors.
REPAIRS
Repairs for this wet/dry vacuum should be performed only by qualied service personnel using
only identical replacement parts.
WARNING: ALWAYS DISCONNECT THE PLUG FROM THE POWER OUTLET
BEFORE REMOVING THE POWER HEAD FROM THE COLLECTION TANK.

13
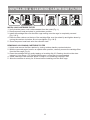
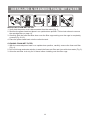
INSTALLING CARTRIDGE FILTER
1. Verify that the power cord is disconnected from the outlet (Fig. 1).
2. Remove power head and place in upside-down position.
3. Install the cartridge lter over the lter cage making sure the cage is completely covered
(Fig. 2 & 3).
4. Place the lter retainer on the top of the cartridge lter over the raised lip and tighten down by
turning the retainer clockwise; do not over-tighten (Fig. 4 & 5).
5. Place the power head back onto the collection tank.
REMOVING & CLEANING CARTRIDGE FILTER
1. Unlock and remove the lter retainer by turning retainer handle counterclockwise.
2. With the removed power head in an upside-down position, carefully remove the cartridge lter
from the lter cage (Fig. 6).
3. Clean the cartridge lter by gently tapping or brushing dirt off. Cleaning should not be done
indoors in living areas. For optimal performance, a new lter is recommended.
4. Install cleaned or new lters as above in steps 2-4 of Installing Cartridge Filter.
5. Allow the wet lter to air dry for 24 hours before installing onto the lter cage.
INSTALLING & CLEANING CARTRIDGE FILTER
1 2 346
5

14
INSTALLING FOAM WET FILTER
1. Verify that the power cord is disconnected from the outlet (Fig.1).
2. Remove the power head and place in an upside-down position. Follow instructions to remove
the cartridge lter on page 13.
3. Carefully slide the foam wet lter down over the lter cage making sure the cage is completely
covered (Fig. 2 & 3).
4. Place the power head back onto the collection tank.
CLEANING FOAM WET FILTER
1. With the removed power head in an upside-down position, carefully remove the foam wet lter
(Fig. 4).
2. Use a mild soap and water solution to wash the foam wet lter and rinse with clean water (Fig. 5).
3. Allow the wet lter to air dry for 24 hours before installing onto the lter cage.
INSTALLING & CLEANING FOAM WET FILTER
5
4
23

15
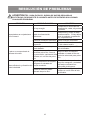
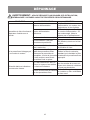
TROUBLESHOOTING
PROBLEM POSSIBLE CAUSE SOLUTION
The wet/dry vacuum will not
operate.
No power supply. Check the power supply, cord,
breakers, and fuses.
Faulty power cord.
Unplug and check the power
cord. If damaged, have it
repaired by a professional.
Collection tank is full. Empty the collection tank.
Switch in the wrong position. Press the ON ‘I’ button on the
power head.
The dust comes out from the
motor cover.
The cartridge lter is missing or
damaged.
Attach or replace the cartridge
lter.
Vacuum has been used to
collect ne dust, such as dry
wall dust, replace soot, or ash,
without a ne dust lter.
Remove the standard cartridge
lter and install the appropriate
ne dust cartridge lter.
Reduced efciency and motor/
speed vibration.
There are blockages in the
nozzle, or hose, or the collection
tank inlet.
Unplug and check nozzle, hose,
and collection tank inlets for
blockages.
The cartridge lter is clogged by
ne dust.
Take off the lter and clean it or
install a new cartridge lter.
WARNING: TO REDUCE THE RISK OF ELECTRIC SHOCK, UNPLUG BEFORE
TROUBLESHOOTING.

16
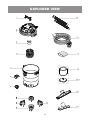
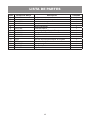
EXPLODED VIEW

17
PARTS LIST
PART DRAWING NUMBER DESCRIPTION QUANTITY
1 551246001 Handle Assembly 1
2 Power Head Assembly 1
3 551416106 Float 1
4 551005104 Filter Cage 1
5 Collection Tank 1
6 551011106 Vacuum Port Assembly 1
7 551002110 Drain Cap Assembly 1
8 551058106 Caster Foot Assembly 4
9 551264103 Extension Wand 2
10 551016112 Hose 1
11 VFF51 Foam Wet Filter 1
12 VCFS Cartridge Filter 1
12.1 551437107 Filter Retainer 1
13 551011110 Floor Nozzle 1
14 551011109 Utility Nozzle 1

2
TABLA DE CONTENIDOS
GARANTÍA
Garantía………………………………………………………………………………….........………….
Instrucciones de seguridad importantes…………………………………….......…….......…………..
Instrucciones sobre el aislamiento doble....………………………………..…........….………………
Cables de extensión………………………....………………………………........……...….………….
Símbolos………….……………..……...............................................................……….……………
Desempaque y revisión del contenido de la caja………….…….…….........……….…....…………
Instrucciones generales de ensamblaje………………………………………………..........………...
Operación de aspirado en seco…………….…………………………….......…………….………….
Operación de aspirado en mojado…………………………………………......………….……………
Operación de soplado………………………………………………………..............…….…………...
Mantenimiento…………………………………………….……………….........………………………..
Instalación y limpieza del ltro de tela reutilizable…………………..............….……..….…………..
Instalación y limpieza del ltro de espuma para aspirar en mojado………………….........….……..
Resolución de problemas…………………………………....………….........…………………………
Vista expandida………………………………………..........………........…..….......................……...
Lista de partes…………………………………..........………........…..................................………...
2
3
5
6
6
7
8
9
10
12
13
14
15
16
17
18
SECCIÓN PÁGINA
Gracias por comprar esta aspiradora en mojado/seco Vacmaster®. Confíe en que con
Vacmaster® obtendrá un producto de alta calidad diseñado para un rendimiento óptimo.
Esta aspiradora es capaz de recoger materiales líquidos y secos.
POR SU SEGURIDAD: LEA DETENIDAMENTE Y ASEGÚRESE DE QUE COMPRENDE
TODAS LAS INSTRUCCIONES.
Nos sentimos orgullosos de ofrecer a usted un producto de alta calidad y durabilidad. Este
producto de Vacmaster® tiene una garantía limitada de dos (2) años contra defectos de mano
de obra y materiales a partir de la fecha de compra en uso doméstico normal. Si el producto
se llegase a utilizar de manera comercial, industrial o para su alquiler, se aplicará una garantía
limitada de 90 días. Guarde su boleta como prueba de su compra. Esta garantía le concede
derechos legales especícos, los cuales podrían variar según el estado en que se encuentre.
Para servicio al producto, llame al Servicio al Cliente al 1-866-384-8432.
No cubierto por la garantía:
• Cualquier parte que no esté operativa debido al mal uso, negligencia, abuso directo/indirecto,
accidentes, mantenimiento inadecuado, reparaciones o alteraciones;
• Piezas consumibles tales como ltros y accesorios;
• Desgaste y rotura normal de piezas y accesorios tales como boquillas, mangueras o ruedecillas;
• Deterioro normal del acabado interior debido al uso o exposición del producto;
• Cualquier producto cuya etiqueta de datos/número de serie esté alterada o ausente;
• Cualquier producto comprado en un lugar no autorizado.

3
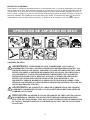
INSTRUCCIONES DE SEGURIDAD
IMPORTANTES
ANTES DE USAR ESTA ASPIRADORA, LEA Y COMPRENDA TODAS LAS
INSTRUCCIONES.
Lea y comprenda este manual del usuario y todas las etiquetas de la aspiradora antes de
utilizarla. La seguridad es una combinación sentido común, permanecer alerta y saber cómo
funciona su aspiradora. Use esta aspiradora solo como se describe en este manual. Para reducir
el riesgo de lesiones personales o daños a su aspiradora, use solo los accesorios recomendados
por el fabricante.
Al usar una aspiradora es necesario seguir precauciones básicas, incluidas
las siguientes. No seguir las advertencias e instrucciones puede provocar
explosiones, incendios o lesiones graves.
• No deje la aspiradora funcionando sin supervisión.
• No use el producto para aspirar líquidos combustibles o inamables, como gasolina, ni lo use en
zonas donde puedan existir tales elementos.
• No aspire ni use esta aspiradora cerca de líquidos, gases o vapores inamables como gasolina
u otros combustibles, líquido de encendedores, limpiadores, pinturas de base oleosa, gas
natural, hidrógeno o polvos explosivos como aquellos de carbón, magnesio, granos o pólvora.
Las chispas en el interior del motor pueden encender a los vapores o polvos inamables.
• No aspire materiales tóxicos, a n de reducir el riesgo de peligros provocados por vapores o
polvo.
• No la use ni almacene cerca de materiales peligrosos.
• No aspire elementos que estén en llamas o humeando, tales como cigarrillos, fósforos o cenizas
calientes.
• No exponer a la lluvia. Almacenar en interiores.
• Si la aspiradora no funciona como debería, si se ha caído, dañado, dejado en exteriores o si se
ha caído al agua, entréguela en un centro de servicio.
• No desconecte tirando del cable. Para desconectarlo tire de la clavija, no del cable.
• No la utilice si la clavija o el cable están dañados.
• No tire o transporte el aparato utilizando el cable como a modo de empuñadura, no apriete el
cable al cerrar puertas ni pase el cable cerca de bordes alados o esquinas.
• Mantenga el cable alejado de supercies calientes.
• No use la aspiradora sobre su cable.
• No sujete el enchufe ni aspire con las manos mojadas.
• No utilice sin la bolsa para el polvo y/o los ltros puestos.
• No permita que se utilice como un juguete. Se debe prestar estricta atención cuando el aparato
lo usen niños o cuando se use cerca de ellos.
• Para reducir el riesgo de lesiones provocadas por un encendido accidental, desconecte el cable
antes de cambiar o limpiar el ltro.
• No deje la aspiradora desatendida cuando esté enchufada. Desenchúfela de la toma de corriente
cuando no esté en uso y antes de realizar el mantenimiento.
• Apague todos los controles antes de desconectar el dispositivo.
• Desconéctela antes de colocar o quitar la manguera o cualquier otro accesorio.
• No ponga ningún objeto sobre las aberturas. No lo utilice si las aberturas están bloqueadas;
tenga cuidado que no haya polvo, cabellos, pelusas en las aberturas o cualquier cosa que pueda
reducir el ujo de aire.
• Mantenga su cabello, ropas holgadas, dedos y partes de su cuerpo lejos de las aberturas y
piezas móviles del producto.
CONSERVE ESTE MANUAL PARA FUTURA
REFERENCIA.
ADVERTENCIA:
PARA REDUCIR EL RIESGO DE INCENDIO,
DESCARGA ELÉCTRICA O LESIONES:

4
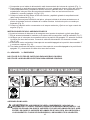
Al usar como sopladora:
• Descargue aire directamente solo sobre la zona de trabajo.
• No use la aspiradora en mojado/seco como pulverizador.
• No dirija el aire hacia personas.
• Mantenga a los niños alejados mientras utilice la aspiradora como sopladora.
• Use gafas de seguridad.
GUARDE ESTAS INSTRUCCIONES
Solo para uso doméstico
• Tenga precaución adicional al limpiar en escaleras.
• Utilice el producto solo como se describe en este manual. Utilice solo los accesorios
recomendados por el fabricante.
• Esta aspiradora está provista de doble aislamiento. Utilice solo piezas de repuesto idénticas.
Consulte INSTRUCCIONES SOBRE EL AISLAMIENTO DOBLE.
PRECAUCIÓN: Para reducir el riesgo de lesiones provocadas por las piezas
móviles, desconecte el producto antes de realizarle mantenimiento.
ADVERTENCIA: Para evitar el riesgo de sufrir descargas eléctricas, desconecte la
aspiradora antes de limpiarla o realizarle mantenimiento.
La page est en cours de chargement...
La page est en cours de chargement...
La page est en cours de chargement...
La page est en cours de chargement...
La page est en cours de chargement...
La page est en cours de chargement...
La page est en cours de chargement...
La page est en cours de chargement...
La page est en cours de chargement...
La page est en cours de chargement...
La page est en cours de chargement...
La page est en cours de chargement...
La page est en cours de chargement...
La page est en cours de chargement...
La page est en cours de chargement...
La page est en cours de chargement...
La page est en cours de chargement...
La page est en cours de chargement...
La page est en cours de chargement...
La page est en cours de chargement...
La page est en cours de chargement...
La page est en cours de chargement...
La page est en cours de chargement...
La page est en cours de chargement...
La page est en cours de chargement...
La page est en cours de chargement...
La page est en cours de chargement...
La page est en cours de chargement...
La page est en cours de chargement...
La page est en cours de chargement...
La page est en cours de chargement...
-
 1
1
-
 2
2
-
 3
3
-
 4
4
-
 5
5
-
 6
6
-
 7
7
-
 8
8
-
 9
9
-
 10
10
-
 11
11
-
 12
12
-
 13
13
-
 14
14
-
 15
15
-
 16
16
-
 17
17
-
 18
18
-
 19
19
-
 20
20
-
 21
21
-
 22
22
-
 23
23
-
 24
24
-
 25
25
-
 26
26
-
 27
27
-
 28
28
-
 29
29
-
 30
30
-
 31
31
-
 32
32
-
 33
33
-
 34
34
-
 35
35
-
 36
36
-
 37
37
-
 38
38
-
 39
39
-
 40
40
-
 41
41
-
 42
42
-
 43
43
-
 44
44
-
 45
45
-
 46
46
-
 47
47
-
 48
48
-
 49
49
-
 50
50
-
 51
51


Vacmaster VOC809pf Manuel utilisateur
- Catégorie
- Aspirateurs
- Taper
- Manuel utilisateur
dans d''autres langues
- English: Vacmaster VOC809pf User manual
- español: Vacmaster VOC809pf Manual de usuario
Documents connexes
Autres documents
-
Craftsman CMXEVCVVJC809 Manuel utilisateur
-
-
-
 Dura Vac VWMB508 0401 Manuel utilisateur
-
Milwaukee PM 1738 Manuel utilisateur
-
-
Intec 8940-20 Manuel utilisateur
-
-
Crafstman CMXEVBCV1260L Le manuel du propriétaire
-
ArmorAll AA256 Manuel utilisateur
