Wincor Nixdorf KA17 Compact Cash Drawer Mode d'emploi
- Taper
- Mode d'emploi

KA 17
Compact Cash Drawer
Product Manual
Edition January 2000

BEETLE® is a registered trademark of Wincor Nixdorf GmbH &Co. KG
Copyright © Wincor Nixdorf GmbH &Co. KG, 2000
The reproduction, transmission or use of this document or its contents is not permitted
without express authority.
Offenders will be liable for damages.
All rights, including rights created by patent grant or registration of a utility model or design, are reserved.
Delivery subject to availability; technical modifications possible.

Contents
Manufacturer’s Declaration and Approval................................. 1
FCC-Class A Declaration ..........................................................................1
Important Note...........................................................................................1
The KA17 Compact Cash Drawer ............................................... 3
General......................................................................................................3
Summary of features.................................................................................4
Available variants ......................................................................................5
Setting up the Compact Cash Drawer.......................................................6
The money compartments.........................................................................6
Replacing the top bank note tray...........................................................8
Replacing the pressure plates and adjusting the bank note partitions..8
Removing the cash drawer from the housing ...........................................9
Installing the cash drawer in the housing................................................10
Security cover..........................................................................................11
Removing the security cover ...............................................................11
Locking the cover with the cash drawer ..............................................12
Installing the security cover in the housing..........................................12
Activating the Compact Cash Drawer.....................................................13
Connection system ..............................................................................13
Technical data.........................................................................................14
Appendix..................................................................................................15
Installation............................................................................................15

Manufacturer’s Declaration and Approval
This device fulfills the requirements of the EEC directives
89/336/EEC “Electromagnetic Compatibility” and
73/23/EEC “Low Voltage Directive”. Therefore, you will
find the CE mark on the back of the device or packaging.
FCC-Class A Declaration
This equipment has been tested and found to comply with the limits for a
Class A digital device, pursuant to part 15 of the FCC Rules.These limits are
designed to provide reasonable protection against harmful interference when
the equipment is operated in a commercial environment.
This equipment generates, uses, and can radiate radio frequency energy
and, if not installed and used in accordance with the instruction manual,
may cause harmful interference to radio communications.
Operation of this equipment in a residential area is likely to cause harmful
interference in which case the user will be required to correct the interfe-
rence at his own expense.
Le présent appareil numérique n’émet pas de bruits radioélectriques
dépassant les limites applicables aux appareils numériques de la “Classe
A” prescrites dans le Règlement sur le brouillage radioélectrique édicté
par le ministère des Communications du Canada.
Important Note
First connect the signal cable with the cash drawer. Then connect it to the
host system (BEETLE or printer).
GB - 1

GB - 2

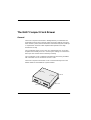
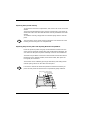
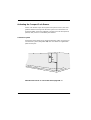
The KA17 Compact Cash Drawer
General
The KA17 Compact Cash Drawer is distinguished by a combination of a
small footprint and a large capacity.It thus harmonizes with the new gene-
ration of POS systems, which are likewise characterized by their small spa-
ce requirement.The KA17 offers sophisticated operation and a high
standard of security.
The cash drawer opens as far as the coin compartment area. It can then
be pulled out manually as far as is necessary for working. It is mounted on
telescopic rails and thus moves extremely smoothly.
The cash drawer can be completely removed from the housing and fitted
with a lockable cover.It can then be used as a safe.
The KA17 Compact Cash Drawer can be connected directly to the cash
drawer interfaces of the BEETLE system families.
340 mm
366,5 mm
118 mm
GB - 3

Summary of features
➜ Drawer opens forwards
➜ Small space requirement
➜ Large capacity
➜ Adjustable money compartments
➜ Two separate cheque slots
➜ Drawercanalsobeusedasasafe
➜ Security lock (optional)
➜ Security cover (optional)
GB - 4

Available variants
The following variants are available:
Standard version
The standard version is supplied without the lock and without a cover for
the trays. The cash drawer is opened via the user software.
Version with lock
The cash drawer can be opened either via the user software or via a me-
chanical lock with one tumbler arrangement. This variant is supplied with a
lockable security cover.
Version with lock (30 tumbler arrangements)
The drawer of this model can be opened either via the user software or via
a mechanical lock with up to 30 tumbler arrangements. The variant is
supplied with a lockable security cover.
In the versions with a lock, the security cover can be accommodated insi-
de the housing of the cash drawer to save space.
GB - 5

Setting up the Compact Cash Drawer
The cash drawer must be bolted tightly to the checkout desk beforehand,
to prevent it from falling over when it is opened.The cashier table must be
on a flat level surface.
Emergency opening: If absolutely necessary (e.g.in the event of a power
fault), you can open the cash drawer by inserting a screwdriver in a small
opening in the base plate from below. For this feature to be used, there
must be an opening in the desktop through which a tool can be inserted
for releasing the cash drawer.The necessary openings are shown on the
drawing in the Appendix.You can then position the POS system on the
cash drawer.The optimized design allows the complete POS workstation
to be used in situations where space is limited.
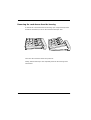
The money compartments
The money compartments are arranged in two layers.There are eight coin
compartments at the front of the top layer. Behind these is a tray with four
adjustable bank note compartments.
GB - 6

This tray can be moved backwards if necessary, to allow access to the bot-
tom layer, which is also subdivided into two sections. In the back half of the
bottom layer are two additional bank note compartments and one compart-
ment for rolls of coins.
The front half of the bottom layer contains two compartments for cheques,
correct receipts and incorrect receipts. Since there are two slots in the
front of the cash drawer, the cheques, correct receipts and incorrect re-
ceipts can be deposited in the compartments easily, without having to
open the drawer.
GB - 7

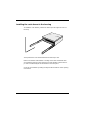
Replacing the top bank note tray
To replace the bank note compartment, slide it out as far as the end of the
drawer.
Then grasp underneath the spring catches on both sides, press them up-
wards and at the same time slide the bank note tray backwards out of the
drawer.
To install the new tray, simply slide it in until the spring catches click into
place.
This procedure can be made easier by taking the cash drawer out of the
housing and removing the coin compartments.
Replacing the pressure plates and adjusting the bank note partitions
Raise the pressure plates and grasp underneath the bracket.Press the
spring catches upwards on both sides and pull the bracket forwards.You
cannowmovethepressureplatessidewaystoremoveandinstallthem.
The bank note partitions can then be released and removed from above.
Move them to the desired position; insert the back first, then press the
front gently to lock them in.
The bracket can be refitted by pressing it down firmly and sliding it back
until the spring catches on the sides click into place.
It is easier to remove the bank note partitions and fit the bracket if you
press the side panels of the bank note compartment gently outwards.
Spring catch for bank note tray
Bank note partition
Pressure plate
Spring catch
Bracket
GB - 8

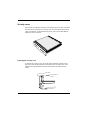
Removing the cash drawer from the housing
To remove the cash drawer from the housing, open it right out beyond the
resistance mechanism, as far as the end of the telescopic rails.
Then raise the end of the drawer and pull it out.
Finally, slide the telescopic rails completely back into the housing of the
cash drawer.
GB - 9

Installing the cash drawer in the housing
To install the cash drawer, pull the two telescopic rails right out as far as
the stop.
Then position the cash drawer between the telescopic rails.
Make sure that the entire drawer is resting on the rails and that the rails
are positioned exactly on the support pins of the drawer.Pull the telesco-
pic rails out sufficiently far for the drawer to click into place.
Close the cash drawer by sliding it in beyond the resistance of the opening
mechanism.
GB - 10

Security cover
Some of the cash drawer variants can be locked with a security cover after
they have been removed.The security cover is located inside the housing
of the cash drawer, underneath the top panel, and is accessible after the
drawer has been removed.
Removing the security cover
To remove the security cover, press the spring shackles inwards on the
two sides of the housing panels on which the cover is resting.The cover
will then be released at the front and can be taken out of the housing
easily.
GB - 11

Locking the cover with the cash drawer
You can then position the security cover on the cash drawer and lock it.
Make sure that the lock catch of the cover is facing forwards towards
the lock and that the cover is guided under the lugs at the back of the cash
drawer.
Turn the key clockwise to unlock the cover.
Installing the security cover in the housing
You can install the cover in the housing after you have removed it from the
cash drawer. Hold the cover with the lock catch facing backwards and
downwards towards the back panel.Then slide the cover into the housing
of the cash drawer as far as it will go and press it upwards until it clicks
into place at the two side panels.
Make sure that the cover is correctly positioned on the spring shackles, or
it may prevent the cash drawer from being opened properly.
GB - 12

Activating the Compact Cash Drawer
For the cash drawer of your POS system to be put into service, the confi-
guration software must log it into the POS system.The cash drawer can
be opened either via the user software or via the lock in the front panel (if
present). This process is controlled by the software.
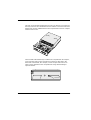
Connection system
On the back of the drawer is one 6-pin mini-DIN jack, which is used to con-
nect the POS system (designation: IN).The cash drawer is supplied with
power via this jack.
Mind the note on how to connect the cable at page GB-1 !
IN
OUT
GB - 13

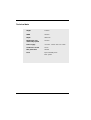
Technical data
Height 118 mm
Width 340 mm
Depth 366.5 mm
Depth when cash 245 mm
drawer fully opened
Power supply +12VDC-10%to+24VDC+10%
Continuous current 25 mA
Max. peak value 300 mA
Ports 6-pin mini-DIN jack to
POS system
GB - 14

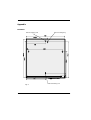
Appendix
Installation
Fig.A
Hole for locking unit
Bolt and locking nut
Hole for emergency
GB - 15

For safety reasons, the KA17 cash drawer must be secured to the chek-
kout desk as otherwise there is a danger of drawer tipping over when the
drawer is open.The checkout desk must be level and horizontal.The secu-
ring screws must not be exceed the specified lenght in order to
ensure trouble-free operation of the cash drawer!
The drawer is secured at bore holes 1, 2 and 3 (see Fig. A) Bore hole 4 is
used exchanging the locking unit in the case of repair.Bore hole 5 is used
for emergency opening, e.g.in the case of a power failure.
The bore 5 hole must only be used if emergency opening of the KA17 with
a screwdriver is allowed!
1) Mark the requiered bore hole points on the checkout desk.
2) Use a drill bit of diameter 6 mm for the bore holes through the checkout
desk positions 1, 2 and 3 (see Fig. A). Use a drill bit of diameter 12 mm for
the bore holes at positions 4 and 5 (see Fig.A).Make sure beforehand
that the emergency opening function is allowed.
3) The cash drawer is secured from below and through the checkout desk.
M4 screws of lenght L are requiered for the bore holes at positions 1 and
2, whereby L = desk thickness (T) + 8 mm (see Fig. B).Treads for these
screws can be found in the cash drawer.For the bore hole at position 3,
and M4 screw (L = desk thickness + 5 mm) and a hexagon securing nut
(M4 x 2. 2 high, DIN139 low form), which is provided, are used (see
Fig. C).When screwed in, the screws must not protrude, so that they do
not scrape on the cash insert.If necessary, use washers to prevent the
screws protruding
T
L
8
5L
Fig. B
Fig. C
GB - 16
-
 1
1
-
 2
2
-
 3
3
-
 4
4
-
 5
5
-
 6
6
-
 7
7
-
 8
8
-
 9
9
-
 10
10
-
 11
11
-
 12
12
-
 13
13
-
 14
14
-
 15
15
-
 16
16
-
 17
17
-
 18
18
-
 19
19


Wincor Nixdorf KA17 Compact Cash Drawer Mode d'emploi
- Taper
- Mode d'emploi
dans d''autres langues
Documents connexes
Autres documents
-
Casio CE-2300 Operator's Instruction Manual
-
Olivetti Nettun@ 7000open Le manuel du propriétaire
-
NCR Quantum QR1000 Manuel utilisateur
-
BIXOLON BGT-100Pt Manuel utilisateur
-
Citizen CT-S651II Manuel utilisateur
-
Diebold Nixdorf TH210-VI Guide de référence
-
Citizen CT-S601II Manuel utilisateur
-
Citizen CT-S310II Manuel utilisateur
-
Weider XE-A101 Manuel utilisateur
-