
Instruction Manual
Bedienungsanleitung
Manuel d’utilisation
Manuale di Istruzioni
S1200 DC Smart Charger (1
×
200W)

WARNING: Read the ENTIRE instruction manual to become familiar
with the features of the product before operating. Failure to operate
the product correctly can result in damage to the product, personal property
and cause serious injury.
This is a sophisticated hobby product. It must be operated with caution
and common sense and requires some basic mechanical ability. Failure to
operate this product in a safe and responsible manner could result in injury
or damage to the product or other property. This product is not intended for
use by children without direct adult supervision. Do not attempt disassembly,
use with incompatible components or alter product in any way without
the approval of Horizon Hobby, LLC. This manual contains instructions for
safety, operation and maintenance. It is essential to read and follow all the
instructions and warnings in the manual, prior to assembly, setup or use, in
order to operate correctly and avoid damage or serious injury.
WARRANTY REGISTRATION
Visit www.community.spektrumrc.com today to register your product.
The following terms are used throughout the product literature to indicate
various levels of potential harm when operating this product:
WARNING: Procedures, which if not properly followed, create the probability
of property damage, collateral damage, and serious injury OR create a high
probability of supercial injury.
CAUTION: Procedures, which if not properly followed, create the probability
of physical property damage AND a possibility of serious injury.
NOTICE: Procedures, which if not properly followed, create a possibility of
physical property damage AND little or no possibility of injury.
NOTICE
All instructions, warranties and other collateral documents are subject to change
at the sole discretion of Horizon Hobby, LLC. For up-to-date product literature, visit
horizonhobby.com and click on the support tab for this product.
Meaning of Special Language
Age Recommendation: Not for children under 14 years. This is not a toy.
2
EN

WARNING: Read the ENTIRE instruction manual to become familiar
with the features of the product before operating. Failure to operate
the product correctly can result in damage to the product, personal property
and cause serious injury.
This is a sophisticated hobby product. It must be operated with caution
and common sense and requires some basic mechanical ability. Failure to
operate this product in a safe and responsible manner could result in injury
or damage to the product or other property. This product is not intended for
use by children without direct adult supervision. Do not attempt disassembly,
use with incompatible components or alter product in any way without
the approval of Horizon Hobby, LLC. This manual contains instructions for
safety, operation and maintenance. It is essential to read and follow all the
instructions and warnings in the manual, prior to assembly, setup or use, in
order to operate correctly and avoid damage or serious injury.
WARRANTY REGISTRATION
Visit www.community.spektrumrc.com today to register your product.
Meaning of Special Language
3
EN

Table of Contents
S1200 Warnings and Safety Tips ..................................................................5
Specications ..............................................................................................6
Layout .........................................................................................................7
General Charging Warnings ..........................................................................8
Navigating the Charger ...............................................................................10
Operating the Charger ................................................................................11
Charge Screen ...........................................................................................14
System Setting Menu .................................................................................15
Charger Errors ...........................................................................................16
Optional Parts ............................................................................................17
Limited Warranty ........................................................................................17
Warranty and Service Contact Information ...................................................21
Compliance Information for the European Union ...........................................22
4
EN
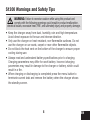
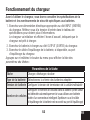
WARNING: Failure to exercise caution while using this product and
comply with the following warnings could result in product malfunction,
electrical issues, excessive heat, FIRE, and ultimately injury and property damage.
• Keep the charger away from dust, humidity, rain and high temperature.
Avoid direct exposure to the sun and intense vibration.
• Only use the charger on heat-resistant, non-ammable surfaces. Do not
use the charger on car seats, carpet or near other ammable objects.
• Do not block the heat vent on the bottom of the charger to ensure proper
cooling during use.
• Always read and understand battery specications prior to charging.
Charging parameters may differ for each battery. Incorrect charging
parameters may result in damage to the charger or battery, which could
result in a re.
• When charging or discharging is completed press the menu button to
terminate current task and remove the battery when the charger shows
the standby screen.
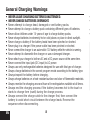
S1200 Warnings and Safety Tips

Table of Contents
S1200 Warnings and Safety Tips ..................................................................5
Specications ..............................................................................................6
Layout .........................................................................................................7
General Charging Warnings ..........................................................................8
Navigating the Charger ...............................................................................10
Operating the Charger ................................................................................11
Charge Screen ...........................................................................................14
System Setting Menu .................................................................................15
Charger Errors ...........................................................................................16
Optional Parts ............................................................................................17
Limited Warranty ........................................................................................17
Warranty and Service Contact Information ...................................................21
Compliance Information for the European Union ...........................................22
5
EN
WARNING: Failure to exercise caution while using this product and
comply with the following warnings could result in product malfunction,
electrical issues, excessive heat, FIRE, and ultimately injury and property damage.
• Keep the charger away from dust, humidity, rain and high temperature.
Avoid direct exposure to the sun and intense vibration.
• Only use the charger on heat-resistant, non-ammable surfaces. Do not
use the charger on car seats, carpet or near other ammable objects.
• Do not block the heat vent on the bottom of the charger to ensure proper
cooling during use.
• Always read and understand battery specications prior to charging.
Charging parameters may differ for each battery. Incorrect charging
parameters may result in damage to the charger or battery, which could
result in a re.
• When charging or discharging is completed press the menu button to
terminate current task and remove the battery when the charger shows
the standby screen.
S1200 Warnings and Safety Tips

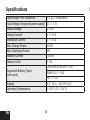
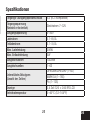
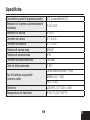
Specifications
6
EN
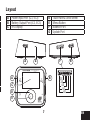
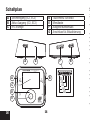
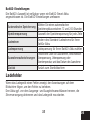
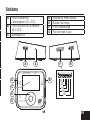
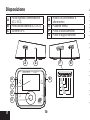
Layout
A Power Input Port (iC3, EC3)
B Battery Output Port (iC3, EC3)
C IPS Display
Input/Output Port Connector iC3 (EC3 compatible)
Input Voltage (required power supply) DC 7–32V
Output Voltage 0–30V
Charge Current 0.1–8.0A
Discharge Current 0.1–3.0A
Max. Charge Power 200W
Max. Discharge Power 5W
Balance Current 1A/cell
Balance Cells 1–6S
Supported Battery Types
(cell count)
LiFe/LiIon/LiPo/LiHv (1–6S)
NiMH/Cd (1–16S)
Pb (1–12S)
Display 2.4” 320 × 240 IPS LCD
Operating Temperature 0–40°C (32–104°F)

B
2S
3S
4S
5S
6S
D
C
E
F
G
H
D
A B
A G F B
C
E
Specifications
7
EN
Layout
A Power Input Port (iC3, EC3)
B Battery Output Port (iC3, EC3)
C IPS Display
D Touch Menu Scroll Wheel
E Menu Button
F Balance Port
G Update Port
Input/Output Port Connector iC3 (EC3 compatible)
Input Voltage (required power supply) DC 7–32V
Output Voltage 0–30V
Charge Current 0.1–8.0A
Discharge Current 0.1–3.0A
Max. Charge Power 200W
Max. Discharge Power 5W
Balance Current 1A/cell
Balance Cells 1–6S
Supported Battery Types
(cell count)
LiFe/LiIon/LiPo/LiHv (1–6S)
NiMH/Cd (1–16S)
Pb (1–12S)
Display 2.4” 320 × 240 IPS LCD
Operating Temperature 0–40°C (32–104°F)

• Always connect the positive red leads (+) and negative black leads (–) correctly.
• Always disconnect the battery after charging, and let the charger cool
between charges.
• Always charge in a well-ventilated area.
• Always terminate all processes and contact Horizon Hobby if the product
malfunctions.
WARNING: Never leave charger unattended, exceed maximum charge
rate, charge with non-approved batteries or charge batteries in the wrong
mode. Failure to comply may result in excessive heat, re and serious injury.
WARNING: Always check charging parameters before initiating the
charge process. Charging any battery with improper settings, including
charging a battery in the wrong mode, can result in property damage and re.
CAUTION: Always ensure the battery you are charging meets the
specications of this charger and that the charger settings are correct.
Not doing so can result in excessive heat and other related product
malfunctions, which can lead to user injury or property damage. Please contact
Horizon Hobby or an authorized retailer with compatibility questions.
General Charging Warnings
• NEVER LEAVE CHARGING BATTERIES UNATTENDED.
• NEVER CHARGE BATTERIES OVERNIGHT.
• Never attempt to charge dead, damaged or wet battery packs.
• Never attempt to charge a battery pack containing different types of batteries.
• Never allow children under 14 years of age to charge battery packs.
• Never charge batteries in extremely hot or cold places or place in direct sunlight.
• Never charge a battery if the battery leads have been pinched or shorted.
• Never plug in a charger if the power cable has been pinched or shorted.
• Never connect the charger to an automobile 12V battery while the vehicle is running.
• Never attempt to dismantle the charger or use a damaged charger.
• Never attach your charger to both an AC and a DC power source at the same time.
• Never connect the input jack (DC input) to AC power.
• Always use only rechargeable batteries designed for use with this type of charger.
• Always charge batteries in the correct program mode according to the battery type.
• Always inspect the battery before charging.
• Always charge batteries on a heat-resistant surface and clear of ammable materials.
• Always monitor the charging area and have a re extinguisher available at all times.
• Always end the charging process if the battery becomes hot to the touch or
starts to change form (swell) during the charge process.
• Always connect the charge cable to the charger rst, then connect the
battery to avoid short circuit between the charge leads. Reverse the
sequence when disconnecting.
8
EN

• Always connect the positive red leads (+) and negative black leads (–) correctly.
• Always disconnect the battery after charging, and let the charger cool
between charges.
• Always charge in a well-ventilated area.
• Always terminate all processes and contact Horizon Hobby if the product
malfunctions.
WARNING: Never leave charger unattended, exceed maximum charge
rate, charge with non-approved batteries or charge batteries in the wrong
mode. Failure to comply may result in excessive heat, re and serious injury.
WARNING: Always check charging parameters before initiating the
charge process. Charging any battery with improper settings, including
charging a battery in the wrong mode, can result in property damage and re.
CAUTION: Always ensure the battery you are charging meets the
specications of this charger and that the charger settings are correct.
Not doing so can result in excessive heat and other related product
malfunctions, which can lead to user injury or property damage. Please contact
Horizon Hobby or an authorized retailer with compatibility questions.
General Charging Warnings
• NEVER LEAVE CHARGING BATTERIES UNATTENDED.
• NEVER CHARGE BATTERIES OVERNIGHT.
• Never attempt to charge dead, damaged or wet battery packs.
• Never attempt to charge a battery pack containing different types of batteries.
• Never allow children under 14 years of age to charge battery packs.
• Never charge batteries in extremely hot or cold places or place in direct sunlight.
• Never charge a battery if the battery leads have been pinched or shorted.
• Never plug in a charger if the power cable has been pinched or shorted.
• Never connect the charger to an automobile 12V battery while the vehicle is running.
• Never attempt to dismantle the charger or use a damaged charger.
• Never attach your charger to both an AC and a DC power source at the same time.
• Never connect the input jack (DC input) to AC power.
• Always use only rechargeable batteries designed for use with this type of charger.
• Always charge batteries in the correct program mode according to the battery type.
• Always inspect the battery before charging.
• Always charge batteries on a heat-resistant surface and clear of ammable materials.
• Always monitor the charging area and have a re extinguisher available at all times.
• Always end the charging process if the battery becomes hot to the touch or
starts to change form (swell) during the charge process.
• Always connect the charge cable to the charger rst, then connect the
battery to avoid short circuit between the charge leads. Reverse the
sequence when disconnecting.
9
EN

10
EN
Before operating the charger, know your battery’s specifications and any
battery-specific safety warnings.
1. Connect an appropriate power supply to the INPUT side of the charger.
Refer to the Input Voltage in the Specications table for more information.
The charger will initialize and display the home screen, indicating the
charger is ready to charge.
2. Connect the battery to be charged to the OUTPUT side of the charger.
3. Connect the battery balance lead, if available, to the charger balance port.
4. Press and release the menu button to display the Task Settings list:
Task Settings
Task Charge, Discharge, Storage
Battery Type Select the appropriate battery chemistry
Battery Voltage Set the individual cell ending voltage
Cell Count
Set the number of cells in the battery (this value auto-
detects if using a Spektrum
™
Smart Connector equipped
battery or if the battery balance lead is connected to the
balance port)
Current Set the charge current
Start Start the task cycle
Back Return to the home screen
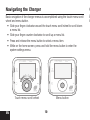
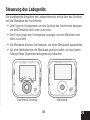
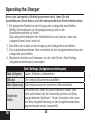
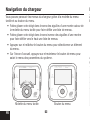
Operating the Charger
Basic navigation of the charger menus is accomplished using the touch menu scroll
wheel and menu button.
• Slide your nger clockwise around the touch menu scroll wheel to scroll down
a menu list.
• Slide your nger counter-clockwise to scroll up a menu list.
• Press and release the menu button to select a menu item.
• While on the home screen, press and hold the menu button to enter the
system settings menu.
Navigating the Charger
Touch menu scroll wheel Menu button

11
EN
Before operating the charger, know your battery’s specifications and any
battery-specific safety warnings.
1. Connect an appropriate power supply to the INPUT side of the charger.
Refer to the Input Voltage in the Specications table for more information.
The charger will initialize and display the home screen, indicating the
charger is ready to charge.
2. Connect the battery to be charged to the OUTPUT side of the charger.
3. Connect the battery balance lead, if available, to the charger balance port.
4. Press and release the menu button to display the Task Settings list:
Task Settings
Task Charge, Discharge, Storage
Battery Type Select the appropriate battery chemistry
Battery Voltage Set the individual cell ending voltage
Cell Count
Set the number of cells in the battery (this value auto-
detects if using a Spektrum
™
Smart Connector equipped
battery or if the battery balance lead is connected to the
balance port)
Current Set the charge current
Start Start the task cycle
Back Return to the home screen
Operating the Charger
Basic navigation of the charger menus is accomplished using the touch menu scroll
wheel and menu button.
• Slide your nger clockwise around the touch menu scroll wheel to scroll down
a menu list.
• Slide your nger counter-clockwise to scroll up a menu list.
• Press and release the menu button to select a menu item.
• While on the home screen, press and hold the menu button to enter the
system settings menu.
Navigating the Charger

12
EN
During the charging process:
• While the battery is “fast charging” the background of the charger screen
is orange.
• When the fast charge cycle is complete, the charger will beep once and
the background screen will change to green. The charger is balancing the
battery cells.
• Once the background changes to blue, charging is complete.
• The bottom of the screen displays battery information during the charge
process. Scroll through the information screens using the touch scroll wheel.
- The rst screen displays the individual cell voltage.
- The second screen displays the individual cell resistance (available only
during cell balancing).
- The third screen displays the charger input voltage, output voltage,
temperature, total output energy of the active cycle, completed charge
cycles of the system and charge cycles of the battery.
When charging is complete:
The charger double beeps twice to indicate the charge cycle is complete.
1. Disconnect the battery from the charger. The charger will continue to beep
until the battery is disconnected.
2. The charger will return to the home screen.
3. If you are done charging, disconnect the power supply from the charger
to power off.
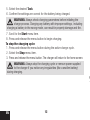
5. Select the desired Task.
6. Conrm the settings are correct for the battery being charged.
WARNING: Always check charging parameters before initiating the
charge process. Charging any battery with improper settings , including
charging a battery in the wrong mode, can result in property damage and re.
7. Scroll to the Start menu item.
8. Press and release the menu button to begin charging.
To stop the charging cycle:
1. Press and release the menu button during the active charge cycle.
2. Select the Stop menu item.
3. Press and release the menu button. The charger will return to the home screen.
WARNING: Always stop the charging cycle or remove power supplied
to the charger if you notice any irregularities (like a swollen battery)
during charging.

13
EN
During the charging process:
• While the battery is “fast charging” the background of the charger screen
is orange.
• When the fast charge cycle is complete, the charger will beep once and
the background screen will change to green. The charger is balancing the
battery cells.
• Once the background changes to blue, charging is complete.
• The bottom of the screen displays battery information during the charge
process. Scroll through the information screens using the touch scroll wheel.
- The rst screen displays the individual cell voltage.
- The second screen displays the individual cell resistance (available only
during cell balancing).
- The third screen displays the charger input voltage, output voltage,
temperature, total output energy of the active cycle, completed charge
cycles of the system and charge cycles of the battery.
When charging is complete:
The charger double beeps twice to indicate the charge cycle is complete.
1. Disconnect the battery from the charger. The charger will continue to beep
until the battery is disconnected.
2. The charger will return to the home screen.
3. If you are done charging, disconnect the power supply from the charger
to power off.
5. Select the desired Task.
6. Conrm the settings are correct for the battery being charged.
WARNING: Always check charging parameters before initiating the
charge process. Charging any battery with improper settings , including
charging a battery in the wrong mode, can result in property damage and re.
7. Scroll to the Start menu item.
8. Press and release the menu button to begin charging.
To stop the charging cycle:
1. Press and release the menu button during the active charge cycle.
2. Select the Stop menu item.
3. Press and release the menu button. The charger will return to the home screen.
WARNING: Always stop the charging cycle or remove power supplied
to the charger if you notice any irregularities (like a swollen battery)
during charging.

14
EN
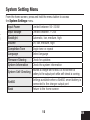
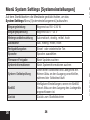
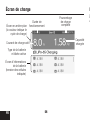
System Setting Menu
From the home screen, press and hold the menu button to access
the System Settings menu.
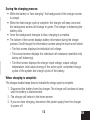
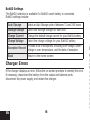
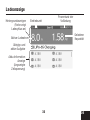
Charge Screen
Operating Time
Percentage of
Full Charge
Capacity
Charged
Active Charging Current
Background Screen
(color indicates
charge cycle)
Battery Type
and Active Task
Battery
Information
Screen
(cell voltage shown)

15
EN
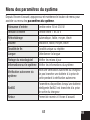
System Setting Menu
From the home screen, press and hold the menu button to access
the System Settings menu.
Input Power Limited between 50–230W
Input Voltage Limited between 7–24V
Backlight Automatic, low, medium, high
Volume Off, low, medium, high
Completion Tone Single tone or repeat
Language Select language
Firmware Sharing Check for updates
System Information Check the system information
System Self-Checking
Initiates a charger self-check. Do not connect a
battery to the output port while self-check is running
BattGO
Settings available when a BattGO smart battery is
connected to the charger output port
Back Return to the home screen
Charge Screen
Capacity
Charged

Limited Warranty
What this Warranty Covers – Horizon Hobby, LLC, (Horizon) warrants to the original
purchaser that the product purchased (the “Product”) will be free from defects in
materials and workmanship for a period of 1 year from the date of purchase.
What is Not Covered – This warranty is not transferable and does not cover (i)
cosmetic damage, (ii) damage due to acts of God, accident, misuse, abuse, negligence,
commercial use, or due to improper use, installation, operation or maintenance, (iii)
modification of or to any part of the Product, (iv) attempted service by anyone other
than a Horizon Hobby authorized service center, (v) Product not purchased from an
authorized Horizon dealer, or (vi) Product not compliant with applicable technical
regulations or (vii) use that violates any applicable laws, rules, or regulations.
OTHER THAN THE EXPRESS WARRANTY ABOVE, HORIZON MAKES NO OTHER
WARRANTY OR REPRESENTATION, AND HEREBY DISCLAIMS ANY AND ALL
IMPLIED WARRANTIES, INCLUDING, WITHOUT LIMITATION, THE IMPLIED
WARRANTIES OF NON-INFRINGEMENT, MERCHANTABILITY AND FITNESS FOR
16
EN
Optional Parts
Part # Description
SPMXCA507 IC5 Device to IC3 Battery 4” / 100mm; 10 AWG
SPMXCA310 IC3 Device to JST Device
SPMXCA309 IC3 Device to JST PH2.0 Device
SPMXC10201 30A Power Supply
Charger Errors
BattGO Settings
Auto Storage Select an Auto Storage cycle of between 12 and 240 hours
Storage Voltage Select the storage voltage for each cell
Charge Current Change the default charge current for your BattGo battery
Charge Voltage Select the charge voltage for your BattGO battery
Exception Record
Provides a list of exceptions, including over-voltage, under-
voltage or over-temperature, and the date of exception.
Back Return to the home screen
The BattGO selection is available if a BattGO smart battery is connected.
BattGO settings include:
If the charger displays an error, follow the on-screen prompts to remedy the error.
If necessary, disconnect the battery from the output and balance ports,
disconnect the power supply, and restart the charger.

Limited Warranty
What this Warranty Covers – Horizon Hobby, LLC, (Horizon) warrants to the original
purchaser that the product purchased (the “Product”) will be free from defects in
materials and workmanship for a period of 1 year from the date of purchase.
What is Not Covered – This warranty is not transferable and does not cover (i)
cosmetic damage, (ii) damage due to acts of God, accident, misuse, abuse, negligence,
commercial use, or due to improper use, installation, operation or maintenance, (iii)
modification of or to any part of the Product, (iv) attempted service by anyone other
than a Horizon Hobby authorized service center, (v) Product not purchased from an
authorized Horizon dealer, or (vi) Product not compliant with applicable technical
regulations or (vii) use that violates any applicable laws, rules, or regulations.
OTHER THAN THE EXPRESS WARRANTY ABOVE, HORIZON MAKES NO OTHER
WARRANTY OR REPRESENTATION, AND HEREBY DISCLAIMS ANY AND ALL
IMPLIED WARRANTIES, INCLUDING, WITHOUT LIMITATION, THE IMPLIED
WARRANTIES OF NON-INFRINGEMENT, MERCHANTABILITY AND FITNESS FOR
17
EN
Optional Parts
Part # Description
SPMXCA507 IC5 Device to IC3 Battery 4” / 100mm; 10 AWG
SPMXCA310 IC3 Device to JST Device
SPMXCA309 IC3 Device to JST PH2.0 Device
SPMXC10201 30A Power Supply
Charger Errors
The BattGO selection is available if a BattGO smart battery is connected.
BattGO settings include:
If the charger displays an error, follow the on-screen prompts to remedy the error.
If necessary, disconnect the battery from the output and balance ports,
disconnect the power supply, and restart the charger.

WARRANTY SERVICES
Questions, Assistance, and Services – Your local hobby store and/or place of
purchase cannot provide warranty support or service. Once assembly, setup or use of
the Product has been started, you must contact your local distributor or Horizon directly.
This will enable Horizon to better answer your questions and service you in the event
that you may need any assistance. For questions or assistance, please visit our website
at www.horizonhobby.com, submit a Product Support Inquiry, or call the toll free
telephone number referenced in the Warranty and Service Contact Information section
to speak with a Product Support representative.
Inspection or Services – If this Product needs to be inspected or serviced and
is compliant in the country you live and use the Product in, please use the Horizon
Online Service Request submission process found on our website or call Horizon to
obtain a Return Merchandise Authorization (RMA) number. Pack the Product securely
using a shipping carton. Please note that original boxes may be included, but are not
designed to withstand the rigors of shipping without additional protection. Ship via a
carrier that provides tracking and insurance for lost or damaged parcels, as Horizon
is not responsible for merchandise until it arrives and is accepted at our facility. An
Online Service Request is available at http://www.horizonhobby.com/content/service-
center_render-service-center. If you do not have internet access, please contact Horizon
Product Support to obtain a RMA number along with instructions for submitting your
product for service. When calling Horizon, you will be asked to provide your complete
name, street address, email address and phone number where you can be reached
during business hours. When sending product into Horizon, please include your RMA
number, a list of the included items, and a brief summary of the problem. A copy of your
original sales receipt must be included for warranty consideration. Be sure your name,
address, and RMA number are clearly written on the outside of the shipping carton.
A PARTICULAR PURPOSE. THE PURCHASER ACKNOWLEDGES THAT THEY
ALONE HAVE DETERMINED THAT THE PRODUCT WILL SUITABLY MEET THE
REQUIREMENTS OF THE PURCHASER’S INTENDED USE.
Purchaser’s Remedy – Horizon’s sole obligation and purchaser’s sole and exclusive
remedy shall be that Horizon will, at its option, either (i) service, or (ii) replace, any
Product determined by Horizon to be defective. Horizon reserves the right to inspect
any and all Product(s) involved in a warranty claim. Service or replacement decisions
are at the sole discretion of Horizon. Proof of purchase is required for all warranty
claims. SERVICE OR REPLACEMENT AS PROVIDED UNDER THIS WARRANTY IS THE
PURCHASER’S SOLE AND EXCLUSIVE REMEDY.
Limitation of Liability – HORIZON SHALL NOT BE LIABLE FOR SPECIAL, INDIRECT,
INCIDENTAL OR CONSEQUENTIAL DAMAGES, LOSS OF PROFITS OR PRODUCTION OR
COMMERCIAL LOSS IN ANY WAY, REGARDLESS OF WHETHER SUCH CLAIM IS BASED
IN CONTRACT, WARRANTY, TORT, NEGLIGENCE, STRICT LIABILITY OR ANY OTHER
THEORY OF LIABILITY, EVEN IF HORIZON HAS BEEN ADVISED OF THE POSSIBILITY OF
SUCH DAMAGES. Further, in no event shall the liability of Horizon exceed the individual
price of the Product on which liability is asserted. As Horizon has no control over use,
setup, final assembly, modification or misuse, no liability shall be assumed nor accepted
for any resulting damage or injury. By the act of use, setup or assembly, the user accepts
all resulting liability. If you as the purchaser or user are not prepared to accept the
liability associated with the use of the Product, purchaser is advised to return the Product
immediately in new and unused condition to the place of purchase.
Law – These terms are governed by Illinois law (without regard to conflict of law
principals). This warranty gives you specific legal rights, and you may also have other
rights which vary from state to state. Horizon reserves the right to change or modify this
warranty at any time without notice.
18
EN

WARRANTY SERVICES
Questions, Assistance, and Services – Your local hobby store and/or place of
purchase cannot provide warranty support or service. Once assembly, setup or use of
the Product has been started, you must contact your local distributor or Horizon directly.
This will enable Horizon to better answer your questions and service you in the event
that you may need any assistance. For questions or assistance, please visit our website
at www.horizonhobby.com, submit a Product Support Inquiry, or call the toll free
telephone number referenced in the Warranty and Service Contact Information section
to speak with a Product Support representative.
Inspection or Services – If this Product needs to be inspected or serviced and
is compliant in the country you live and use the Product in, please use the Horizon
Online Service Request submission process found on our website or call Horizon to
obtain a Return Merchandise Authorization (RMA) number. Pack the Product securely
using a shipping carton. Please note that original boxes may be included, but are not
designed to withstand the rigors of shipping without additional protection. Ship via a
carrier that provides tracking and insurance for lost or damaged parcels, as Horizon
is not responsible for merchandise until it arrives and is accepted at our facility. An
Online Service Request is available at http://www.horizonhobby.com/content/service-
center_render-service-center. If you do not have internet access, please contact Horizon
Product Support to obtain a RMA number along with instructions for submitting your
product for service. When calling Horizon, you will be asked to provide your complete
name, street address, email address and phone number where you can be reached
during business hours. When sending product into Horizon, please include your RMA
number, a list of the included items, and a brief summary of the problem. A copy of your
original sales receipt must be included for warranty consideration. Be sure your name,
address, and RMA number are clearly written on the outside of the shipping carton.
19
EN

Warranty and Service Contact Information
Horizon Hobby
Contact
Information
Address
Horizon Service Center
(Repairs and Repair Requests)
servicecenter.horizonhobby.com/
RequestForm/
1608 Interstate Drive
Champaign, Illinois,
61822 USA
Horizon Product Support
(Product Technical Assistance)
productsupport@
horizonhobby.com
877-504-0233
Sales
websales@horizonhobby.com
800-338-4639
Horizon Hobby
Contact
Information
Address
Horizon Technischer Service service@ horizonhobby.eu
Hanskampring 9
D 22885 Barsbüttel,
Germany
Sales: Horizon Hobby GmbH
+49 (0) 4121 2655 100
United States of America
EU
NOTICE: Do not ship Li-Po batteries to Horizon. If you have any issue
with a Li-Po battery, please contact the appropriate Horizon Product
Support office.
Warranty Requirements – For Warranty consideration, you must include
your original sales receipt verifying the proof-of-purchase date. Provided
warranty conditions have been met, your Product will be serviced or replaced free of
charge. Service or replacement decisions are at the sole discretion of Horizon.
Non-Warranty Service – Should your service not be covered by warranty,
service will be completed and payment will be required without
notification or estimate of the expense unless the expense exceeds 50%
of the retail purchase cost. By submitting the item for service you are agreeing
to payment of the service without notification. Service estimates are available upon
request. You must include this request with your item submitted for service. Non-
warranty service estimates will be billed a minimum of ½ hour of labor. In addition
you will be billed for return freight. Horizon accepts money orders and cashier’s
checks, as well as Visa, MasterCard, American Express, and Discover cards. By
submitting any item to Horizon for service, you are agreeing to Horizon’s Terms and
Conditions found on our website http://www.horizonhobby.com/content/service-
center_render-service-center.
ATTENTION: Horizon service is limited to Product compliant in the country
of use and ownership. If received, a non-compliant Product will not be
serviced. Further, the sender will be responsible for arranging return
shipment of the un-serviced Product, through a carrier of the sender’s choice
and at the sender’s expense. Horizon will hold non-compliant Product for a
period of 60 days from notification, after which it will be discarded.
10/15
20
EN
La page est en cours de chargement...
La page est en cours de chargement...
La page est en cours de chargement...
La page est en cours de chargement...
La page est en cours de chargement...
La page est en cours de chargement...
La page est en cours de chargement...
La page est en cours de chargement...
La page est en cours de chargement...
La page est en cours de chargement...
La page est en cours de chargement...
La page est en cours de chargement...
La page est en cours de chargement...
La page est en cours de chargement...
La page est en cours de chargement...
La page est en cours de chargement...
La page est en cours de chargement...
La page est en cours de chargement...
La page est en cours de chargement...
La page est en cours de chargement...
La page est en cours de chargement...
La page est en cours de chargement...
La page est en cours de chargement...
La page est en cours de chargement...
La page est en cours de chargement...
La page est en cours de chargement...
La page est en cours de chargement...
La page est en cours de chargement...
La page est en cours de chargement...
La page est en cours de chargement...
La page est en cours de chargement...
La page est en cours de chargement...
La page est en cours de chargement...
La page est en cours de chargement...
La page est en cours de chargement...
La page est en cours de chargement...
La page est en cours de chargement...
La page est en cours de chargement...
La page est en cours de chargement...
La page est en cours de chargement...
La page est en cours de chargement...
La page est en cours de chargement...
La page est en cours de chargement...
La page est en cours de chargement...
La page est en cours de chargement...
La page est en cours de chargement...
La page est en cours de chargement...
La page est en cours de chargement...
La page est en cours de chargement...
La page est en cours de chargement...
La page est en cours de chargement...
La page est en cours de chargement...
La page est en cours de chargement...
La page est en cours de chargement...
La page est en cours de chargement...
La page est en cours de chargement...
La page est en cours de chargement...
La page est en cours de chargement...
La page est en cours de chargement...
La page est en cours de chargement...
La page est en cours de chargement...
La page est en cours de chargement...
La page est en cours de chargement...
La page est en cours de chargement...
La page est en cours de chargement...
La page est en cours de chargement...
La page est en cours de chargement...
La page est en cours de chargement...
-
 1
1
-
 2
2
-
 3
3
-
 4
4
-
 5
5
-
 6
6
-
 7
7
-
 8
8
-
 9
9
-
 10
10
-
 11
11
-
 12
12
-
 13
13
-
 14
14
-
 15
15
-
 16
16
-
 17
17
-
 18
18
-
 19
19
-
 20
20
-
 21
21
-
 22
22
-
 23
23
-
 24
24
-
 25
25
-
 26
26
-
 27
27
-
 28
28
-
 29
29
-
 30
30
-
 31
31
-
 32
32
-
 33
33
-
 34
34
-
 35
35
-
 36
36
-
 37
37
-
 38
38
-
 39
39
-
 40
40
-
 41
41
-
 42
42
-
 43
43
-
 44
44
-
 45
45
-
 46
46
-
 47
47
-
 48
48
-
 49
49
-
 50
50
-
 51
51
-
 52
52
-
 53
53
-
 54
54
-
 55
55
-
 56
56
-
 57
57
-
 58
58
-
 59
59
-
 60
60
-
 61
61
-
 62
62
-
 63
63
-
 64
64
-
 65
65
-
 66
66
-
 67
67
-
 68
68
-
 69
69
-
 70
70
-
 71
71
-
 72
72
-
 73
73
-
 74
74
-
 75
75
-
 76
76
-
 77
77
-
 78
78
-
 79
79
-
 80
80
-
 81
81
-
 82
82
-
 83
83
-
 84
84
-
 85
85
-
 86
86
-
 87
87
-
 88
88


Spektrum S1200 Le manuel du propriétaire
- Taper
- Le manuel du propriétaire
- Ce manuel convient également à
dans d''autres langues
- italiano: Spektrum S1200 Manuale del proprietario
- English: Spektrum S1200 Owner's manual
- Deutsch: Spektrum S1200 Bedienungsanleitung
Documents connexes
Autres documents
-
E-flite EFL12550UC Le manuel du propriétaire
-
Blade BLH9017 Le manuel du propriétaire
-
E-flite EFL01150 Le manuel du propriétaire
-
Losi LOS03033T1 Le manuel du propriétaire
-
-
ParkZone PKZ1040 Le manuel du propriétaire
-
Horizon DYN4110 Manuel utilisateur
-
-
 Spektrum SMART SPMXC2060 Le manuel du propriétaire
