Maytag MFW9600SQ1 Le manuel du propriétaire
- Catégorie
- Machines à laver
- Taper
- Le manuel du propriétaire
Ce manuel convient également à

MAYI'AG °
®
FRONT-LOADING AUTOMATIC WASHER
For questions about features, operation/performance, parts, accessories or service, call: 1-800-688-9900
In Canada, call: 1-800-688-2002 or visit our website at...
www.maytag.com or www.maytag.ca
p
LAVADORA AUTOMATICA DE CARGA
FRONTAL
Si tiene preguntas respecto alas caracterfstioas, funcionamiento/rendimiento, partes, aooesorios o servioio t_onico, Ilame al: 1-800-688-9900
En Canada, Ilame al: 1-800-688-2002 o visite nuestro sitio web en...
www.maytag.com o www.maytag.ca
LAVEUSE AUTOMATIQUE A
CHARGEMENT FRONTAL
g" i , i .....
Au Canada, pour assistance composez le 1-800-688-2002 ou visitez notre site web a...
www.maytag.ca
Table of Contents/indice/Table des matieres ................................................................. 2
461970234611
_8182969

TABLEOF CONTENTS
WASHER SAFETY .......................................................................... 3
INSTALLATION REQUIREMENTS ................................................ 4
Tools and Parts ............................................................................ 4
Options ......................................................................................... 4
Location Requirements ................................................................ 5
Drain System ................................................................................ 6
Electrical Requirements ............................................................... 7
INSTALLATION INSTRUCTIONS .................................................. 7
Remove Transport System .......................................................... 7
Connect the Inlet Hoses ............................................................... 8
Route the Drain Hose ................................................................... 8
Secure the Drain Hose ................................................................. 9
Level the Washer .......................................................................... 9
Complete Installation ................................................................... 9
FEATURES AND BENEFITS ........................................................ 10
WASHER USE............................................................................... 11
Starting Your Washer ................................................................. 11
Using the Proper Detergent ....................................................... 11
Using the Dispenser ................................................................... 12
Pausing or Restarting ................................................................. 13
Changing Cycles, Options and Modifiers .................................. 13
Status Lights .............................................................................. 13
Cycles ......................................................................................... 14
Options ....................................................................................... 16
Modifiers ..................................................................................... 16
Laundry Guide ............................................................................ 17
LAUNDRY TIPS ............................................................................ 18
Loading ....................................................................................... 18
WASHER CARE ............................................................................ 19
Cleaning Your Washer ............................................................... 19
Water Inlet Hoses ....................................................................... 19
Vacation, Storage, and Moving Care ......................................... 19
TROUBLESHOOTING .................................................................. 20
ASSISTANCE OR SERVICE ......................................................... 23
In the U.S.A ................................................................................ 23
In Canada ................................................................................... 23
WARRANTY .................................................................................. 24
P
INDICE
SEGURIDAD DE LA LAVADORA ................................................. 26
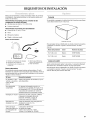
REQUISITOS DE INSTALACION ................................................. 27
Herramientas y piezas ................................................................ 27
Opciones .................................................................................... 27
Requisitos de ubicaci6n ............................................................. 28
Sistema de desag(Je .................................................................. 29
Requisitos electricos .................................................................. 30
INSTRUCCIONES DE INSTALACION ......................................... 30
Eliminaci6n del sistema de transporte ....................................... 30
Conexi6n de las mangueras de entrada .................................... 31
Tendido de la manguera de desag0e ........................................ 31
Fijaci6n de la manguera de desag0e ......................................... 32
Nivelaci6n de la lavadora ........................................................... 32
Complete la instalaci6n .............................................................. 32
CARACTER|STICAS Y BENEFICIOS .......................................... 33
USO DE LA LAVADORA ............................................................... 34
Puesta en marcha de la lavadora .............................................. 34
Uso de detergente adecuado .................................................... 34
Uso del dep6sito ........................................................................ 35
C6mo hacer una pausa o reanudar la marcha .......................... 36
Cambio de ciclos, opciones y modificadores ........................... 36
Luces de estado ......................................................................... 37
Ciclos .......................................................................................... 37
Opciones .................................................................................... 39
Modificadores ............................................................................. 40
Guia para el lavado ..................................................................... 41
CONSEJOS DE LAVANDERIA ..................................................... 42
C6mo cargar ............................................................................... 42
CUIDADO DE LA LAVADORA ..................................................... 42
C6mo limpiar su lavadora .......................................................... 42
Mangueras de entrada de agua ................................................. 43
Cuidado para las vacaciones,
el almacenaje o en caso de mudanza ....................................... 43
SOLUCION DE PROBLEMAS ...................................................... 44
AYUDA O SERVICIO TECNICO ................................................... 47
En los EE.UU.............................................................................. 47
En Canada .................................................................................. 47
GARANT|A ..................................................................................... 48
TABLE DES MATIERES
S¢:CURIT¢: DE LA LAVEUSE ........................................................ 49
EXIGENCES D'INSTALLATION ................................................... 50
Outillage et pieces ...................................................................... 50
Options ....................................................................................... 50
Exigences d'emplacement ......................................................... 51
Systeme de vidange ................................................................... 52
Specifications electriques .......................................................... 53
INSTRUCTIONS D'INSTALLATION ............................................. 53
Elimination des accessoires de transport .................................. 53
Raccordement des tuyaux d'alimentation ................................. 54
Acheminement du tuyau de vidange ......................................... 54
Immobilisation du tuyau de vidange .......................................... 55
Reglage de I'aplomb de la laveuse ............................................ 55
Achever I'installation .................................................................. 55
CARACTI:!:RISTIQUES ET AVANTAGES ..................................... 56
UTILISATION DE LA LAVEUSE ................................................... 57
Mise en marche de la laveuse .................................................... 57
Utilisation du detergent approprie ............................................. 57
Utilisation du distributeur ........................................................... 58
Pause ou remise en marche ....................................................... 59
Changement des programmes, options et modificateurs .........59
Temoins lumineux ...................................................................... 60
Programmes ............................................................................... 60
Options ....................................................................................... 62
Modificateurs .............................................................................. 63
Guide de lessivage ..................................................................... 64
CONSEILS DE LESSIVAGE .......................................................... 65
Chargement ................................................................................ 65
ENTRETIEN DE LA LAVEUSE ..................................................... 65
Nettoyage de la laveuse ............................................................. 65
Tuyaux d'arrivee d'eau ............................................................... 66
Precautions a prendre avant les vacances,
un entreposage ou un dem6nagement ...................................... 66
DEPANNAGE ................................................................................. 67
ASSISTANCE OU SERVICE ......................................................... 70
Aux €:tats-Unis ............................................................................ 70
Au Canada .................................................................................. 70
GARANTI E ..................................................................................... 71

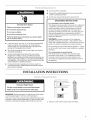
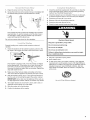
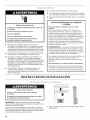
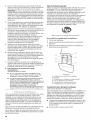
WASHER SAFETY
Your safety and the safety of others are very important.
We have provided many important safety messages in this manual and on your appliance. Always read and obey all safety
messages.
This is the safety alert symbol.
This symbol alerts you to potential hazards that can kill or hurt you and others.
All safety messages will follow the safety alert symbol and either the word "DANGER" or "WARNING."
These words mean:
You can be killed or seriously injured if you don't immediately
follow instructions.
You can be killed or seriously injured if you don't follow
instructions.
All safety messages will tell you what the potential hazard is, tell you how to reduce the chance of injury, and tell you what can
happen if the instructions are not followed.
IMPORTANT SAFETY INSTRUCTIONS
WARNING: To reduce the risk of fire, electric shock, or injury to persons when using the washer follow basic precautions,
including the following:
[] Read all instructions before using the washer.
[] Do not wash articles that have been previously cleaned
in, washed in, soaked in, or spotted with gasoline,
dry-cleaning solvents, other flammable, or explosive
substances as they give off vapors that could ignite or
explode.
[] Do not add gasoline, dry-cleaning solvents, or other
flammable, or explosive substances to the wash water.
These substances give off vapors that could ignite or
explode.
[] Under certain conditions, hydrogen gas may be
produced in a hot water system that has not been used
for 2 weeks or more. HYDROGEN GAS IS
EXPLOSIVE. Ifthe hot water system has not been
used for such a period, before using the washing
machine, turn on all hot water faucets and let the water
flow from each for several minutes. This will release
any accumulated hydrogen gas. As the gas is
flammable, do not smoke or use an open flame during
[] Do not allow children to play on or in the washer. Close
supervision of children is necessary when the washer is used
near children.
[] Before the washer is removed from service or discarded,
remove the door or lid.
[] Do not reach into the washer if the drum, tub or agitator is
moving.
[] Do not install or store the washer where it will be exposed to
the weather.
[] Do not tamper with controls.
[] Do not repair or replace any part of the washer or attempt any
servicing unless specifically recommended in this manual or in
published user-repair instructions that you understand and
have the skills to carry out.
[] See "Electrical Requirements" for grounding instructions.
this time.
SAVE THESE INSTRUCTIONS

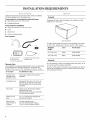
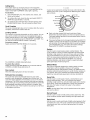
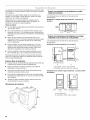
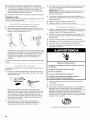
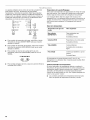
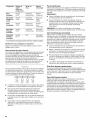
IN STALLATION REQUIREMENTS
Gather the required tools and parts before starting installation.
The parts supplied are in the washer drum.
Tools needed for connecting the water inlet hoses
• Pliers (that open to 1%6" [39.5 mm])
• Flashlight (optional)
Tools needed for installation
• Open end wrenches 17 mm and 13 mm
• Level
• Wood block
• Ruler or measuring tape
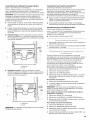
Parts supplied:
A B
O
A.Drain hose form
B. Inlet hose (2)
C. Inlethose washer(4)
D. Transportbolt hole plug (4)
E.Beaded strap
Alternate Parts
Your installation may require additional parts. Ifyou are interested
in purchasing one of the items listed here, call the toll-free
number on the cover or inthe "Assistance or Service" section.
If You Have You Will Need to Buy
Laundry tub or Sump pump system (if not already
standpipe taller available)
than 96" (2.4 m)
Overhead sewer
Standard 20 gal. (76 L), 30" (76.2 cm)
tall drain tub or utility sink and sump
pump (available from local plumbing
suppliers)
Floor drain Siphon break, Part Number 285834;
additional drain hose
Part Number 8318155; and connector
kit, Part Number 285835
Drain hose too 4 ft (1.2 m) drain hose extension kit,
short Part Number 285863
Pedestal
A pedestal will add to the total height of the washer for a total
height of 53.5" (135.9 cm).
Optional pedestal
To order, call the dealer from whom you purchased your washer
or refer to the "Assistance or Service" section of this manual.
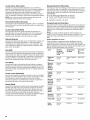
Pedestal Color Part Number
Height
15.5" (39.4 cm) White WHP1500SQ
15.5" (39.4 cm) Black WHP1500SB
Stack Kit
Are you planning to stack your Maytag washer and dryer? To do
so you will need to purchase a Stack Kit.
To order, call the dealer from whom you purchased your dryer or
refer to the "Assistance or Service" section of this manual. Ask
for Part Number 8541503.
Water faucets 2 longer water fill hoses:
beyond reach of 6 ft (1.8 m) Part Number 76314,
fill hoses 10 ft (3.0 m) Part Number 350008

Selectingtheproperlocationforyourwasherimproves
performanceandminimizesnoiseandpossiblewasher"walk."
Yourwashercanbeinstalledunderacustomcounter,orina
basement,laundryroom,closet,orrecessedarea.See"Drain
System."
Companionappliancelocationrequirementsshouldalsobe
considered.Properinstallationisyourresponsibility.
Youwillneed
• Awaterheatersettodeliver120°F(49°C)watertothe
washer.
• Agroundedelectricaloutletlocatedwithin6ft(1.8m)of
wherethepowercordisattachedtothebackofthewasher.
See"ElectricalRequirements."
• Hotandcoldwaterfaucetslocatedwithin4ft(1.2m)ofthe
hotandcoldwaterfillvalves,andwaterpressureof
20-100psi(137.9-689.6kPa).
• Alevelfloorwithamaximumslopeof1"(2.5cm)underentire
washer.Installingthewasheronsoftfloorsurfaces,suchas
carpetsorsurfaceswithfoambacking,isnotrecommended.
• Asturdyandsolidfloortosupportthewasherwithatotal
weight(waterandload)of400Ibs(180kg).
Donotoperateyourwasherintemperaturesbelow32°F(0°C).
Somewatercanremaininthewasherandcancausedamagein
lowtemperatures.
Installation clearances
• The location must be large enough to allow the washer door
to be fully opened.
• Additional spacing should be considered for ease of
installation and servicing.
• Additional clearances might be required for wall, door, and
floor moldings.
• Additional spacing of 1" (2.5 cm) on all sides of the washer is
recommended to reduce noise transfer.
• Companion appliance spacing should also be considered.
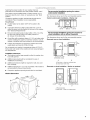
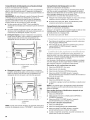
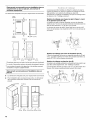
Washer Dimensions
5OW'
(128.3¢rn)
Recommended installation spacing for custom
undercounter installation
The dimensions shown are for the recommended spacing.
Custom undercounter installation - Washer only
t
39" rnin.
(99.0 crn)
+
1" _ 27"--_1_- 1"
(2.5 cm) (68.6 cm) (2.5 cm)
Recommended installation spacing for recessed or
closet installation, with or without a pedestal
The dimensions shown are for the recommended spacing.
Recessed area or closet installation
34"'
(86.4cm)
24 in.2 * -]
(155cm2)
I1"I_-31_/="-_14"t'_-
(2.5cm) (80cm} (10.2crn)
(7.6 crn}
48 in.2* -_ _ -
(310 cm 2)
(7.8cm)
3-
A B
A. Side view - closet or confined area
B. Closet door with vents
Recessed or closet installation - Washer on pedestal
1" -_
(2.5 cm)
A. Recessed area
B. Side view - closet or confined area
31W'
(80.0crn)

Recommended installation spacing for recessed or
closet installation, with stacked washer and dryer
The dimensions shown are for the recommended spacing.
48 in? *
(310 cm 2}
T NNN-
o
__ __
24 in.2*
(155crn2)
i
3" (7.6 cm}
T
!
3" (7.6 crn}
6"(L_)
t
70"
-- (193cm)
(14 cm) (2.5crn)
_(- 27" _ _ 1"***
66.6 crn 2.5 crn
*Min. top and bottom air openings for closet door.
**External exhaust elbow requires additional space.
***Wall, door and floor molding may require additional spacing.
Recommended installation spacing for cabinet
installation
The dimensions shown are for the recommended spacing.
For cabinet installation, with a door, the minimum ventilation
1
openings in the top are required.
._ir._(17.8 cm) 7"(17,8cm)
4 _ 31Y2 _'
(lO,2crn) (80,Ocm) (2,6cm) (2,Scrn)(68,6crn) (2,6cm)
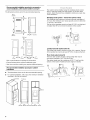
The washer can be installed using the standpipe drain system
(floor or wall), the laundry tub drain system, or the floor drain
system. Select the drain hose installation method you need. See
"Tools and Parts."
Standpipe drain system - wall or floor (views A & B)
The standpipe drain requires a minimum diameter standpipe of
2" (5 cm). The minimum carry-away capacity can be no less than
17 gal. (64 L) per minute.
The top of the standpipe must be at least 30" (76.2 cm) high and
no higher than 96" (2.4 m) from the bottom of the washer.
B
Laundry tub drain system (view A)
The laundry tub needs a minimum 20 gal. (76 L) capacity. The top
of the laundry tub must be at least 30" (76.2 cm) above the floor.
Floor drain system (view B)
The floor drain system requires a siphon break that may be
purchased separately. See "Tools and Parts."
The siphon break must be a minimum of 28" (71 om) from the
bottom of the washer. Additional hoses might be needed.
L ....... i"¸i_'__.!__
U
A

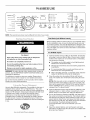
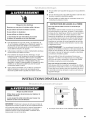
Electrical Shock Hazard
Plug into a grounded 3 prong outlet.
Do not remove ground prong.
Do not use an adapter.
Do not use an extension cord.
Failure to follow these instructions can result in death,
fire, or electrical shock.
A 120-volt, 60-Hz., AC-only, 15- or 20-amp, fused electrical
supply is required. Time-delay fuse or circuit breaker is
recommended. It is recommended that a separate circuit
serving only this appliance be provided.
This washer is equipped with a power supply cord having a
3 prong grounding plug.
To minimize possible shock hazard, the cord must be
plugged into a mating, 3 prong, grounding-type outlet,
grounded in accordance with local codes and ordinances. If a
mating outlet is not available, it is the personal responsibility
and obligation of the customer to have the properly grounded
outlet installed by a qualified electrician.
If codes permit and a separate ground wire is used, it is
recommended that a qualified electrician determine that the
ground path is adequate.
• Do not ground to a gas pipe.
• Check with a qualified electrician if you are not sure the
washer is properly grounded.
• Do not have a fuse in the neutral or ground circuit.
GROUNDING INSTRUCTIONS
For a grounded, cord-connected washer:
This washer must be grounded. In the event of a malfunction
or breakdown, grounding will reduce the risk of electrical
shock by providing a path of least resistance for electric
current. This washer is equipped with a cord having an
equipment-grounding conductor and a grounding plug. The
plug must be plugged into an appropriate outlet that is
properly installed and grounded in accordance with all local
codes and ordinances.
WARNING: Improper connection of the equipment-
grounding conductor can result in a risk of electric shock.
Check with a qualified electrician or serviceman if you are in
doubt as to whether the appliance is properly grounded.
Do not modify the plug provided with the appliance - if it will
not fit the outlet, have a proper outlet installed by a qualified
electrician.
For a permanently connected washer:
This washer must be connected to a grounded metal,
permanent wiring system, or an equipment grounding
conductor must be run with the circuit conductors and
connected to the equipment-grounding terminal or lead on
the appliance.
INSTALLATION INSTRUCTIONS
Excessive Weight Hazard
Use two or more people to move and install washer.
Failure to do so can result in back or other injury.
IMPORTANT: Position the washer so that the rear of the washer
is within approximately 3 ft (90 cm) of its final location.
There are 4 bolts in the rear panel of the washer that support the
suspension system during transportation. These bolts also retain
the power cord inside the washer until the bolts are removed.
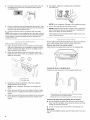
1. Using a 13 mm wrench, loosen each of the bolts.

2. Oncetheboltisloose,moveittothecenteroftheholeand
completelypulloutthebolt,includingtheplasticspacer
coveringthebolt.
6. Usingpliers,tightenthecouplingswithanadditional
two-thirdsturn.
3. Onceall4boltsareremoveddiscardboltandspacers.Then
pullthepowercordthroughtheopeningoftherearpaneland
closetheholewiththeattachedcap.
4. Closetheboltholeswiththe4transportboltholeplugs.
NOTE:Ifthewasheristobetransportedatalaterdate,callyour
localservicecenter.Toavoidsuspensionandstructuraldamage
toyourwasher,itmustbeproperlysetupforrelocationbya
certifiedtechnician.
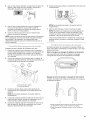
{1@ x0_5@5
Makesurethewasherdrumisempty.
1. AttachthehosewiththeredcolorindicatortotheHot(left)
inletvalve.Attachingtheredcouplingfirstmakesiteasierto
tightenconnectionwithpliers.Screwoncouplingbyhand
untilitisseatedonthewasher.
2. AttachthehosewiththebluecolorindicatortotheCold
(right)waterinletvalve.Screwoncouplingbyhanduntilitis
seatedonthewasher.
7.
NOTE: Do not overtighten. Damage to the coupling can result.
Turn on the water faucets and check for leaks.
NOTE: Replace inlet hoses after 5 years of use to reduce the
risk of hose failure. Record hose installation or replacement
dates on the hoses for future reference.
Periodically inspect and replace hoses if bulges, kinks, cuts,
wear, or leaks are found.
Proper routing of the drain hose protects your floors from damage
due to water leakage, Read and follow these instructions,
Remove drain hose from washer cabinet
Gently pull the corrugated drain hose from the shipping clips.
3=
H. Hot water inlet
C. Cold water inlet
Using pliers, check the tightness of the hose couplings
already attached to the washer.
NOTE: Do not overtighten. Damage to the coupling can
result.
4. Attach the hose with the red color indicator to the hot water
faucet. Screw on coupling by hand until it is seated on the
washer.
5. Attach the hose with the blue color indicator to the cold water
faucet. Screw on coupling by hand until it is seated on the
washer.
Laundry tub drain or standpipe drain
Connect the drain hose form to the corrugated drain hose.
B
A. Snap either end of the drain hose form to the drain hose at
the point where the corrugation begins.
B. Bend drain hose over drain hose form and snap into place.
To keep drain water from going back into the washer:
• Do not straighten the drain hose, and do not force excess
drain hose into standpipe. Hose should be secure, but loose
enough to provide a gap for air.
• Do not lay excess hose on the bottom of the laundry tub.
Floor drain
You may need additional parts. See Floor drain under "Tools and
Parts."

1=
2.
Drape the power cord over the washer top.
Secure the drain hose to the laundry tub leg or standpipe with
the beaded strap provided. (See illustrations A and B.)
II I"_ d;l { '_III
1..o ]_,IIQIQ I"_=" -i =....
f. Check the electrical requirements. Be sure that you have the
correct electrical supply and the recommended grounding
method. See "Electrical Requirements."
2. Check that all parts are now installed. If there is an extra part,
go back through the steps to see which step was skipped.
3. Check that you have all of your tools.
4. Dispose of/recycle all packaging materials.
5. Check that the water faucets are on.
6. Check for leaks around faucets and inlet hoses.
C
If the washer faucets and the drain standpipe are recessed
(see illustration C), put the hooked end of the drain hose in
the standpipe. Tightly wrap the beaded strap around the
water inlet hoses and the drain hose.
Do not force excess drain hose into the standpipe.
Properly leveling your washer avoids excessive noise and
vibration.
f. Check the levelness of the washer by placing a level on the
top edge of the washer, first side to side, then front to back.
\
2=
3.
4.
5.
6.
If the washer is against a wall, move the washer out slightly
before tipping back. If the washer is not level, first prop the
front with a wood block and adjust the feet as necessary;
then prop the back and adjust feet as necessary. Repeat this
step until washer is level.
Make sure all four feet are stable and resting on the floor.
Then check that the appliance is perfectly level (use a level).
After the washer is level, use a 17 mm open-end wrench to
turn the nuts on the feet tightly against the washer cabinet.
IMPORTANT: All four feet must be tightened. Ifthe nuts are
not tight against the washer cabinet, the washer may vibrate.
The washer should not move front to back, side to side, or
diagonally when pushed on its top edges.
Slide the washer to its final location.
Confirm the levelness of the washer.
7.
8.
9.
Electrical Shock Hazard
Plug into a grounded 3 prong outlet.
Do not remove ground prong.
Do not use an adapter.
Do not use an extension cord.
Failure to follow these instructions can result in death,
fire, or electrical shock.
Plug into a grounded 3 prong outlet.
Read "Washer Use."
Totest and to clean your washer, measure _/2the detergent
manufacturer's recommended amount of HE High Efficiency
detergent for a medium-size load. Pour the detergent into the
detergent dispenser. Select NORMAL/CASUAL, and then
select HOLD TO START. Allow the washer to complete one
whole cycle.
Use only HE High Efficiency detergenL

FEATURES AND BENEFITS
Electronic Controls
Flexible electronic controls are easy to use whether you are a
beginner or an expert.
Smart Dispensers
The Smart Dispensers make your washer truly automatic. This
washer provides a four-compartment dispenser which includes
separate compartments for main wash detergent, fabric softener,
bleach, and auto prewash or auto soak. The dispenser has large
pour zones, is self-cleaning, and can be easily removed. Laundry
additives are diluted with fresh water and added to the load at the
proper time in the wash cycle.
Auto Water Level
This washer automatically adjusts water level for best cleaning
and rinsing performance. Two sensors determine load size, load
composition, and suds level, then the sensors adjust the water
level to the proper setting. This eliminates guesswork. The water
level is just right for every wash load size.
Larger Load Size
Since there is no agitator, you can wash larger, bulkier items such
as a king-sized bedspread. You are also able to wash more
clothes at one time, which means fewer loads.
Suspension System
To reduce washer "walk" and "off-balance" conditions, your new
washer combines:
• 2 Springs to isolate vibration
• 4 Shock absorbers at the washer base to minimize movement
Stainless Steel Drum
The stainless steel drum eliminates corrosion and enables higher
spin speeds for more water extraction, reducing drying time.
High-Efficiency Wash System
Your new front-loading, high-efficiency washer saves time with
fewer, larger loads, and lowers your water and energy bills by
helping conserve resources.
Spin Speeds
This washer automatically selects the spin speed based on the
cycle selected. This factory setting can be changed, however.
This washer offers up to five different spin speed choices.
Heating Element
This washer has a heating element that automatically heats the
water to the best temperature on select cycles. This enables
stepped cleaning, a process in which warm water is brought in
and mixed with detergent first, then the water is heated. The
warm water cleans stains such as blood and eggs, and the
heated water removes oily stains such as perspiration and dirty
mechanical oil. This heater is active in the Sanitary, Whitest
Whites and Heavy Duty cycles.
Automatic Temperature Control
The automatic temperature control electronically senses and
maintains a uniform water temperature. Automatic temperature
control regulates incoming hot and cold water. Automatic
temperature control is automatically turned On when a cycle is
selected.
Add A Garment
When this option is available at the beginning of the cycle the
Add A Garment status light will glow for the first 8 minutes. This
washer allows an 8-minute period in which forgotten garments
may be added to a load.
Special Cleaning Action with Direct Injection
This washer channels 100% of the water through the dispensers
to assure thorough rinse-out and mixture of all the additives
before they touch any garments. The water is then sprayed from
the top front onto the center of the load, providing even
distribution and optimum cleaning performance. It is normal for
small amounts of water to remain in the dispensers when the
wash cycle is complete.
Efficient Detergent System
This washer has a specially designed valve that closes during the
wash portion of the cycle so that 100% of the water and
detergent mixture is used on the load. The Efficient Detergent
System ensures that no water or detergent is wasted.
Dynamic Off-Balance Detection
This washer uses two sensors to detect load size and the amount
of off-balance within the load. The suspension system and
controls are specially designed to redistribute the load
automatically.
10

WASHER USE
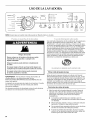
f
O Estknated Tree ¢0 Super Hot / Cold
CONTROL ON Drain / Spin Rema nlng I0 Hot / Cdd
H
Add a Garment O Whitest Whites ,Rinse / Spin IO Warm / Warm
Soak / Prewash O mSoak I O Warm / Cold
Cold / Cold
Wash 0
Rinse 0
R,o,oHo,dO @ o
Spin 0 Silk SOIL LEVEL WATER Prewash
TEMP
Cycle Complete O Wool
Control Locked O
Extra HighO_*}
HighO I
Medium O I
Extra Low O I
No Spin O?
0 0 0 0 0
Auto Extra Rinse SPIN CYCLEEND
Soak Rinse Hold SPEED SIGNAL
Hold for 3
secondsta
lock/unlock
¢o_troi
Pause
NOTE: The panel shown above may be different from that of your model.
First Wash Cycle Without Laundry
Fire Hazard
Never place items in the washer that are dampened
with gasoline or other flammable fluids.
No washer can completely remove oil.
Do not dry anything that has ever had any type of oil on
it (including cooking oils).
Doing so can result in death, explosion, or fire.
WARNING: To reduce the risk of fire, electric shock, or injury to
persons, read the IMPORTANT SAFETY INSTRUCTIONS before
operating this appliance.
The following is a guide to using your washer. Please refer to
specific sections of this manual for more detailed information.
Do not store laundry additives on the top surface of this washer.
Vibration is normal during operation.
Use only High Efficiency detergents. The package for this type of
detergent will be marked "HE" or "High Efficiency." This wash
system, along with less water, will create too much sudsing with a
regular non-HE detergent. Using regular detergent will likely result
in washer errors, longer cycle times and reduced rinsing
performance. It may also result in component failures and
noticeable mold or mildew. HE detergents are made to produce
the right amount of suds for the best performance. Follow the
manufacturer's instructions to determine the amount of detergent
to use.
Before washing clothes for the first time, if not completed during
the final installation step, choose the Normal/Casual cycle and
run it without clothes. Use only HE High Efficiency detergent. Use
1/2the manufacturer's recommended amount for a medium-size
load. This initial cycle serves to ensure the interior is clean before
washing clothes.
For All Wash Cycles
Open the washer door by pulling on the handle. Sort laundry
according to color and type of fabric. Place a load of sorted
clothes in the washer. Do not overload washer. Overloading
can cause poor cleaning.
• The washer can be fully loaded, but not tightly packed.
Washer door should close easily.
• Mix large and small items and avoid washing single items.
Load evenly.
• It is recommended that you wash small items such as
infant socks in a mesh garment bag.
• When unloading garments, occasionally check under the
rubber rim at the front of the tub for small items.
2.
Close the washer door by pushing it firmly until the lock
clicks. The washer door will remain locked during the wash
cycle.
NOTE: After any wash cycle is completed, the door must be
opened and then closed before a new cycle can begin. The
door can be opened only if PAUSE/OFF is selected while the
ADD A GARMENT light is glowing or if the cycle has been
canceled. See "To cancel a cycle."
3. Open the dispenser drawer and add laundry additives to the
detergent, bleach, or fabric softener compartments. Close
drawer slowly to avoid spills. See "Using the Dispenser."
4. Turn on the washer by selecting CONTROL ON. Select one of
the cycles by turning the cycle selector. The indicator light for
the selected cycle will glow. When selecting a wash cycle, the
preset Options, Water Temp, Spin Speed, and Soil Level for
the selected cycle will glow. The display shows the estimated
time remaining. The preset settings provide the
recommended fabric care for the selected cycle. See
"Cycles."
5. Select the desired Options, such as Prewash, Auto Soak,
Extra Rinse and Rinse Hold. Not all options are available with
all cycles. See "Options."
Use only HE High Efficiency detergent.
11

6. 3. Push in the dispenser drawer slowly and completely (to avoid
a spill).
7=
8=
Select the desired Modifiers, such as Soil Level, Water Temp,
Spin Speed and Cycle End Signal. Not all modifiers are
available with all cycles and options. See "Modifiers."
If desired, select the CYCLE END SIGNAL. The signal is
helpful when you are washing items that should be removed
from the washer as soon as it stops. Select LOUD, SOFT or
OFE
To begin the wash cycle immediately
Select HOLD TO START.
• Ifyou do not select HOLD TO START within 5 minutes of
choosing a cycle, the washer automatically shuts off.
• When the wash cycle is complete, the CYCLE
COMPLETE status light glows, the door unlocks, and the
wash load can be removed from the washer. The washer
powers down automatically 5 minutes after the cycle is
complete and the CYCLE COMPLETE light goes off. To
power down the washer manually after the wash cycle is
complete, select PAUSE/OFF once.
Your new washer has a dispenser drawer with four separate
compartments for your laundry products--two are for detergent,
one is for liquid chlorine bleach, and one is for liquid fabric
softener. Laundry products are diluted and dispensed
automatically at the proper time during the wash cycle, making it
unnecessary for you to return to the washer during the cycle to
add them.
It is normal for small amounts of water to remain in the
dispensers when the wash cycle is complete.
Do not put laundry additives directly into the wash tub. Always
use the proper dispensers when adding laundry products.
Ohoosing the Right Detergent
Use only High Efficiency detergents. The package for this type of
detergent will be marked "HE" or "High Efficiency." This wash
system, along with less water, will create too much sudsing with a
regular non-HE detergent. Using regular detergent will likely result
in washer errors, longer cycle times and reduced rinsing
performance. It may also result in component failures and
noticeable mold or mildew. HE detergents are made to produce
the right amount of suds for the best performance. Follow the
manufacturer's instructions to determine the amount of detergent
to use.
Use only HE High Efficiency detergent.
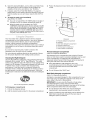
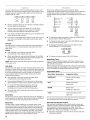
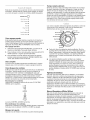
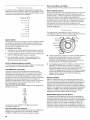
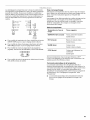
To fill dispenser compartments
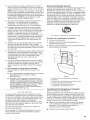
1. Pull out the dispenser drawer.
2. Add the desired laundry product to the proper compartment.
Dispenser
A. Prewash detergent compartment
B. Separator
C. Main Wash detergent compartment
D. Dispenser release lever
E, Chlorine bleach compartment
F. Fabric softener compartment
Prewash detergent compartment
(Letter A in Dispenser Illustration)
Add detergent to this compartment when using the Prewash
option or Auto Soak. Liquid or powdered detergent may be used
in this compartment. The detergent will automatically be
dispensed during Prewash if the Prewash option is selected or
during the soak time if Auto Soak is selected.
• Using High Efficiency (HE) detergent, add 1/3the
recommended amount to the Prewash compartment and
2/3the recommended amount to the Main Wash
compartment.
• Do not fill beyond the "MAX" level.
Main Wash detergent compartment
(Letter C in Dispenser Illustration)
Add liquid or powdered detergent to this compartment for your
main wash cycle. The detergent separator must always be in
place, either in the front or back position.
IMPORTANT: If you are using the Prewash or Soak option,
powdered detergent must be used in the Main Wash
compartment, since liquid detergents may seep out of the Main
Wash compartment before the main wash begins.
• Do not fill beyond the "MAX" level. Use the detergent
manufacturer's recommended amount for load size.
• Liquid or powdered color-safe bleach may be added to the
Main Wash compartment along with the same type of
detergent, liquid or powdered.
12

Liquid detergent: Put the separator in the front position,
between the guides, as shown following. There will be no gap
between the bottom of the wash cycle detergent
compartment and the bottom of the separator.
_'[_ MAINWASH_
Separator in front position, between guides
A.Separator
B.Guide
LIQUI
SO
Powdered detergent: Put the separator in the back position,
behind the guides, as shown following. There will be a gap
between the bottom of the wash cycle detergent
compartment and the bottom of the separator.
[] POWDER PREWASH
A
LiQUiD MAINWASHV
Separator in back position, behind guides
A. Separator
B. Guide
LIQUI
SO
NOTE: The separator will be in the POWDER (back) position
when shipped from the factory.
Chlorine bleach compartment
(Letter E in Dispenser Illustration)
Add no more than 1/3cup (80 mL) liquid chlorine bleach to this
compartment. The bleach will be automatically diluted and
dispensed at the optimum time during the first rinse after the
wash cycle. This compartment cannot dilute powdered bleach.
• Always measure liquid chlorine bleach, Use a measuring cup
with a pour spout; do not guess.
• Do not fill beyond the "MAX" level. Overfilling could cause
severe garment damage.
Fabric softener compartment
(Letter F in Dispenser Illustration)
Add 1/4cup (60 mL) liquid fabric softener to this compartment,
Fabric softener will be automatically dispensed in the final rinse.
• Do not fill beyond the "MAX" level.
1. To pause the washer at any time, select PAUSE/OFE
2. To continue the cycle, select HOLD TO START (for
approximately 1 second).
Not all Options and Modifiers are available with all cycles. Cycles,
Options and Modifiers can be changed anytime before HOLD TO
START is selected.
Options and Modifiers can be changed anytime after HOLD TO
START is selected and before the start of the selected Option or
Modifier.
To cancel a cycle and select a new cycle
1. Select PAUSE/OFF twice.
2. Select desired cycle.
3. Select the desired OPTIONS.
4. Select HOLD TO START (for approximately 1 second) to
restart the washer at the beginning of the new cycle.
To cancel a cycle
1. Select PAUSE/OFF twice.
2. The washer powers down, the door unlocks, and clothes can
be removed.
NOTE: If the water level or the temperature is too high, the
washer will drain automatically before the door unlocks.
To change Options or Modifiers after the cycle has started
1. Select PAUSE/OFE
2. Select the desired OPTIONS or MODIFIERS.
3. Select HOLD TO START (for approximately 1 second) to
continue the cycle.
To drain the washer manually
1. Select PAUSE/OFE
2. Select DRAIN/SPIN.
3. Select HOLD TO START (for approximately 1 second) to
begin the drain.
4. When the spin is complete, the door unlocks. Items can be
removed from the washer.
These lights show which portion of the cycle the washer is
operating. They also indicate when you can add an additional
item to the wash cycle and when the controls are locked.
CONTROL ON O
Add a Garment O
Soak / Prewash O
Wash O
Rinse O
Rinse Hold O
Spin O
Cycle Complete O
Control Locked O
13

Adding items
This washer allows an 8-minute period in which forgotten
garments may be added to the load. You can add items to the
washer if the ADD A GARMENT status light is glowing.
To add items
1. Select PAUSE/OFF once. The washer door unlocks, and
items can be added.
2. To continue the cycle, close the door and select HOLD TO
START (for approximately I second).
3. To unlock the door after the Add a Garment period, press
PAUSE/CANCEL twice. This will cancel the Wash Cycle.
Cycle Complete
The cycle complete light stays on for 5 minutes after the cycle is
complete, and then the washer shuts off.
Locking controls
The Control Lock avoids unintended use of the washer. You can
also use the control lock feature to avoid unintended cycle or
option changes during a cycle. When CONTROL LOCKED is lit,
all buttons are disabled except for PAUSE/OFF and START. You
can lock the controls while the washer is operating.
To lock the controls
Select and hold CYCLE END SIGNAL for 3 seconds.
LoudO'_
Soft O I
O
CYCLE
END
SIGNAL
Hold {o¢ 3
seconds to
ock / unlock
control
The CONTROL LOCKED status light glows.
To unlock the controls
Select and hold CYCLE END SIGNAL for 3 seconds until the
CONTROL LOCKED Status light turns off.
Door Locked
Whenthe status light glows, the door is locked.
Estimated time remaining
The cycle time varies automatically based on your water
pressure, water temperature, detergent and clothes load. The
cycle time will be extended if oversudsing occurs or the load is
unbalanced. The SUDs routine removes extra suds and assures
proper rinsing of your garments. During the unbalance routine the
time displayed may pause until this activity is complete, then
resume with the cycle. These routines may add up to a half-hour
to the default cycle time.
Cycles can be selected by turning the Cycle control knob to the
desired cycle. Each cycle is designed for different types of fabric
and soil levels.
Whitest Whites
Drain / Spin
Rinse / Spin
Hear Soak
Silk
Wool
Each cycle has a preset Soil Level (cycle time), Water
Temperature and Spin Speed, and may have preset options.
The preset settings provide the recommended fabric care for
the selected cycle.
The preset settings can be changed anytime before HOLD TO
START is pressed. Not all options and modifiers are available
with all cycles. (Tochange settings after the cycle has started,
press PAUSE/OFF once, then select the desired settings.
Press HOLD TO START to continue the cycle.)
Sanitary
Use this cycle to clean heavily soiled, colorfast fabrics. This
cycle combines a super hot water temperature and fast-speed
tumbling to help ensure the removal of heavy soils and stains.
It is recommended that you set your hot water heater to 120°F
(49°C) to ensure proper performance during this cycle. The
Sanitary cycle also helps eliminate 99.999% of 3 common
infectious bacteria, even when no bleach is used. Extra high
speed spin helps shorten drying time.
Whitest Whites
This cycle is especially designed for cleaning loads of soiled
white fabrics with the addition of bleach. Hot washing
temperatures assure optimal bleach activity. An additional rinse
provides optimal rinse performance to avoid chlorine residues on
your laundry. This cycle combines fast-speed tumbling, longer
wash time, and extra high speed spin to shorten drying time.
Heavy Duty
Use this cycle to wash loads of sturdy, colorfast fabrics and
heavily soiled garments. This cycle combines fast-speed
tumbling, longer wash time, and extra high speed spin to shorten
drying times. Ifthe water temperature is lower than needed for
this cycle, the heater will warm the water to the optimum
temperature.
NOTE: Use the Heavy Duty cycle for optimal removal of organic
soils such as blood.
NormaVCasual
Use this cycle to wash normally soiled cottons and linens. This
cycle combines medium-speed tumbling and high-speed spin.
Rapid Wash
Use this cycle to wash small loads of lightly soiled garments that
are needed in a hurry. This cycle combines fast-speed tumbling,
a shortened wash time, and extra high speed spin to shorten
drying time.
14

Delicate
Use this cycle to wash no-iron fabrics and garments labeled
"Permanent Press" or "Wrinkle Free" or that indicate using a
"Gentle" cycle on the care label. This cycle combines low-speed
tumbling and low-speed spin to reduce wrinkling.
Silk
Use this cycle to clean washable silk garments. (Check label
instructions to make sure that garment is washable.) This cycle
gently tumbles and drains without spinning to gently clean
garments and minimize wrinkling. Because there is no spinning
action, garments will contain a higher amount of water at the end
of this cycle.
Wool
Use this cycle to clean machine washable woolen garments.
(Check the care instructions to make sure that garment is
washable.) This cycle features gentle tumbling and low-speed
spin to provide optimum garment care.
Handwash
Use this cycle to clean hand washable and special-care
garments. Similar to the way garments are hand washed in a
sink, the wash action of this cycle combines periods of low-
speed tumbling and soaking. Low-speed spin reduces wrinkling.
Soak
Use the Soak cycle to remove small spots of set-in stains on
fabrics. This cycle provides a soak time with warm or cold water
followed by drain. Extra water, a short tumbling phase for equal
distribution of the laundry, and a soaking time without drum
movement improve the removal of set-in stains. Drain without
spin assures gentle treatment, even for delicate articles.
Rinse/Spin
Use this cycle to get a rinse and spin only. This cycle combines
fast-speed tumbling and extra high speed spin. If desired, you
can reduce the spin speed by selecting the speed you want from
the SPIN SPEED modifier.
A Rinse/Spin cycle is useful for
• Loads that need rinsing only.
• Adding fabric softener to a load.
Drain/Spin
Use this cycle to drain your washer or to drain and spin your
wash load. The spin speed is preset to extra high. If desired, you
can reduce the spin speed by selecting the speed you want from
the SPIN SPEED modifier.
NOTE: Loads of synthetics, delicate fabrics, hand washables,
and woolens should be drained with no spin or low spin speed to
avoid fabric stress.
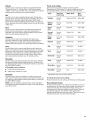
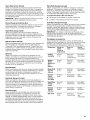
Preset cycle settings
Each cycle has a preset Soil Level (cycle time), Water
Temperature, and Spin Speed. The preset settings provide the
recommended fabric care for the selected cycle. See chart.
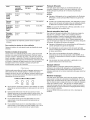
Cycle Soil Level Water Temp Spin
(cycle time) Speed
Sanitary Normal Super Hot/Cold Extra High_
(1:55)
Whitest Normal Hot/Cold Extra High_
Whites (1:00)
Heavy Normal Hot/Cold Extra High _
Duty (1:15)
Normal/ Normal Warm/Cold High
Casual (0:40)
Rapid Less soil Warm/Cold Extra High_
Wash (0:35)
Delicate Normal Warm/Cold Medium
(0:35)
Silk Normal Cold/Cold No Spin
(0:26)
Wool Normal Cold/Cold Medium
(o:3o)
Nandwash Normal Cold/Cold Extra Low
(o:3o)
Soak Normal Warm/Cold No Spin
(o:3o)
Rinse/Spin Normal Cold/Cold Extra High
(0:21)
Drain/Spin Normal N/A Extra High
(0:11)
tSpin speeds may vary on some models.
To change the preset cycle settings
Press the selector of each setting until the desired setting glows.
Normal Washer Sounds
As with any new product, you will hear sounds that you are not
accustomed to. You may hear various sounds when the door is
locked and unlocked, and during the washing, rinsing, and
spinning process. Between changes in wash actions, there will
be momentary pauses. You will hear water spraying and
splashing during the wash and rinse cycles. These new sounds
and pauses are part of normal washer operation.
15

You can customize your wash by adding options to your cycle
selections. You can add or change an option after starting a cycle
anytime before the selected option begins. Not all options are
available with all cycles.
Q Q Q :
0 0 0 0
Prewash Auto Extra Rinse
Soak Rinse Hold
• See the "Laundry Guide" for an overview of possible options
for each Wash Cycle selection.
• You can select more than one option for a cycle. Some
options cannot be added to some cycles; for example,
Prewash cannot be added to the Rapid Wash cycle.
• If an option is available with a selected cycle, the light for that
option will glow when selected.
• If an option is unavailable with a selected cycle, there will be a
short tone, and the light for that option will not glow when
selected.
Prewash
Use this option for heavily soiled loads that need pretreatment.
This option adds a 15-minute prewash and drain to the main
wash cycle.
NOTES:
• Add detergent to the Prewash and Main Wash
compartments of the Dispenser Drawer.
• When using Prewash, use powdered detergent for the Main
Wash detergent compartment because liquid detergent will
seep into the washer during Auto Soak.
NOTE: The Prewash and Auto Soak options cannot be selected
in the same cycle.
Auto Soak
Use the Auto Soak option for loads of heavily soiled cotton, linen,
polyester or nylon with set-in stains. During Auto Soak, water will
be added to the drum and the laundry will be equally distributed
by a short tumbling phase. Laundry will then be soaked by
phases without drum movement. After soaking, the washer
drains without spinning.
• Add detergent to both the Prewash and Main Wash
compartments of the Dispenser Drawer.
• Use powdered detergent for the main wash cycle because
liquid detergent will seep into the washer during Auto Soak.
• For cycles with Hot Wash Temperatures, the Soak
temperature is set to WARM. Otherwise the Soak
temperature is the same as the Wash Temperature.
• The Auto Soak and Prewash options cannot be selected in
the same cycle.
Extra Rinse
An extra rinse can be used to ensure the removal of detergent or
bleach residue from garments. This option provides an additional
rinse with the same water temperature as the first rinse.
Rinse Hold
Use this option to avoid wrinkling of your laundry when a load
cannot be removed from the washer immediately. The wash cycle is
paused before the final drain and spin phase so that the laundry
stays in the rinse water until the cycle is continued. This provides
optimal wrinkle care of your wet laundry. The door stays locked
during the Rinse Hold cycle and the indicator light is flashing. Press
RINSE HOLD to finish the cycle and unload the washer.
16
Preset cycle settings of Soil Level (cycle time), Water
Temperature, and Spin Speed can be changed. You can change a
modifier after starting a cycle anytime before the selected
modifier begins. Not all modifiers are available with all cycles and
options.
Ii uper Hot / Cold
Hot / Cold
Warm / Warm
Warm / Cold
Cold / Cold
Extra HighO_
HighO I
MediumO I LoudO_
Extra howOI Soft OI
No spinor _ offor)
0 0 0
WATER SPIN CYCLE
TEMP SPEED END
SIGNAL
Hold for 3
seconds to
lock / unock
control
To change the water temperature, select the WATER TEMP
button until the desired setting glows.
To change the spin speed, select the SPIN SPEED button
until the desired setting glows.
To change the loudness of the Cycle End Signal, select
(ADJUSTABLE) CYCLE END SIGNAL.
• To change cycle time, select SOIL LEVEL button.
Wash/Rinse Temp
Select a water temperature based on the type of load you are
washing. Use the warmest wash water safe for fabrics. Follow
garment label instructions.
Warm rinses leave the loads dryer than cold rinses. Warm rinses
increase wrinkling. In cold climates, a warm rinse makes the load
more comfortable to handle. Cold rinses save energy.
Temperature Guide
Wash Water Temperature Suggested Fabrics
SUPER HOT Sturdy colorfast fabrics
Heavy soils
HOT Whites and pastels
Heavy soils
WARM Bright colors
Moderate to light soils
COLD Colors that bleed or fade
Light soils
In wash water temperatures colder than 60°F (15.6°C), detergents
do not dissolve well. Soils may be difficult to remove.
Automatic Temperature Control
The automatic temperature control electronically senses and
maintains a uniform water temperature. Automatic temperature
control regulates incoming hot and cold water. Automatic
temperature control is automatically turned On when a cycle is
selected. See "Preset Cycle Settings" in "Cycles."
• Automatic temperature control works for all wash and rinse
temperature settings.

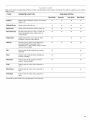
Refertothischartforsuggestedloadtypesandtheircorrespondingcycles.Listedtotherightaretheoptionsavailabletoeachofthese
washercycles.
_sssssss/_
CYCLE SUGGESTED LOAD TYPE AVAILABLE OPTIONS
Rinse/Hold Prewash* Auto Soak* Extra Rinse
Sanitary Heavily soiled underwear, towels, work clothes, v' v' i/ v'
diapers, etc.
Whitest Whites Heavily soiled white fabrics v' _/ v' _/
Heavy Duty Heavily soiled underwear, towels, shirts, etc. v' _/ i/ _/
Normal/Casual Normally soiled blouses, shirts, overalls, etc., v' _/ V _/
made of polyester, nylon, cotton, linen, or
cotton blends
Rapid Wash Lightlysoiled sports wear made of cotton, v' i/ _/
polyester, nylon and cotton blends
Delicate Use this cycle to wash no-iron fabrics and v' _/ v' _/
garments labeled "Permanent Press" or
"Wrinkle Free" or that indicate using a "Gentle"
cycle on the care label.
Silk Fabrics made of silk identified as machine v' v'
washable
Wool Woolens with a felt-free finish, identified as v' _/
machine washable
Handwash Fabrics made of silk, special-care items V v'
marked "Handwashable"
Soak Fabrics made of cotton, linen, polyester or
nylon
Rinse/Soak Fabrics made of cotton, linen, polyester or v' _/
nylon
Drain/Spin Fabrics made of cotton, linen, polyester or
nylon
*Prewash and Auto Soak cannot be selected at the same time.
17

LAUNDRY TIPS
Preparing clothes for washing
Follow these recommendations to help you prolong the life of
your garments.
• Use only High Efficiency detergents, The package for this type
of detergent will be marked "HE" or "High Efficiency." This
wash system, along with less water, will create too much
sudsing with a regular non-HE detergent. Using regular
detergent will likely result in washer errors, longer cycle times
and reduced rinsing performance, It may also result in
component failures and noticeable mold or mildew. HE
detergents are made to produce the right amount of suds for
the best performance, Follow the manufacturer's instructions
to determine the amount of detergent to use.
Sorting
• Separate heavily soiled items from lightly soiled ones, even if
they would normally be washed together. Separate lint-givers
(towels, chenille) from lint-takers (corduroy, synthetics,
permanent press), When possible, turn lint-givers inside-out.
• Separate dark colors from light colors, colorfast items from
noncolorfast items.
• Sort by fabric and construction (sturdy cottons, knits, delicate
items).
Unloading
• Remove clothes from washer after the cycle is completed.
Metal objects such as zippers, snaps, and buckles may rust if
left in the washer basket for a long time.
• When unloading garments, occasionally check under the gray
rubber seal/bellow at the front of the tub for small items.
Use only HE High Efficiency detergent.
Close zippers, snaps, and hooks to avoid snagging other
items. Remove pins, buckles, and other hard objects to avoid
scratching the washer interior. Remove non-washable trim
and ornaments.
Empty pockets and turn them inside-out.
Turn down cuffs; brush away lint and dirt.
Turn synthetic knits inside-out to avoid pilling.
Tie strings and sashes so they will not tangle.
Mend tears, loose hems, and seams.
Treat spots and stains.
Stained or wet garments should be washed promptly for best
results.
Mix large and small items, avoid washing single items, and
load evenly.
Wash small items, such as infant socks, in a mesh garment
bag. To create a balanced load it is recommended that more
than one garment bag be used, and that each garment bag
be filled with equal amounts of material.
NOTE: If you are washing only small items, it is
recommended that more than one mesh garment bag be
used, and that each garment bag be filled with equal
amounts of material.
Loading suggestions (maximum size loads).
Heavy Work Clothes
4 jeans 2 sweatpants
4 workpants 2 sweatshirts
4 workshirts
Towels
10 bath towels
10 hand towels
14 washcloths
Mixed Load
3 sheets (1 king, 2 twin) 9 T-shirts
4 pillowcases 9 shorts
3 shirts 10 handkerchiefs
3 blouses
18

WASHER CARE
Cleaning the exterior
Use a soft damp cloth or sponge to wipe up any spills.
Occasionally wipe the outside of your washer to keep it looking
new. Use mild soap and water. Do not use abrasive products.
Cleaning the interior
To keep the interior of your washer clean, run the Sanitary cycle
without clothes. Use 1/2of the detergent manufacturer's
recommended amount of High Efficiency (HE) powdered or liquid
detergent for a medium-size load.
Cleaning the door seal
Check the fold of the seal periodically for any foreign objects. To
clean the seal, mix a dilute solution, using 3Acup (177.4 mL) of
liquid chlorine bleach, and 1 gal. (3.8 L) of warm tap water. Wipe
the seal area with the dilute solution, using a damp cloth. Let
stand 5 minutes. Wipe down area thoroughly with a dry cloth and
let the washer interior air dry with door open.
IMPORTANT:
• Wear rubber gloves when cleaning for prolonged periods.
• Refer to the bleach manufacturer's instructions for proper
use.
Cleaning the dispenser drawer
The dispenser drawer is removable for easy cleaning.
1. Unlock the dispenser drawer by pressing the Release Lever in
the Prewash compartment. See "Using the Dispenser."
Remove the drawer.
2. Remove the inserts (the siphon from the softener and bleach
compartments and the separator).
3. Wash the parts under running water.
4. Replace the inserts and return the dispenser to the drawer.
Replace inlet hoses after 5 years of use to reduce the risk of hose
failure. Periodically inspect and replace inlet hoses if bulges,
kinks, cuts, wear or leaks are found.
When replacing your inlet hoses, record the date of replacement.
........ .... C .............. _:_
Install and store your washer where it will not freeze. Because
some water may stay in the hoses, freezing can damage your
washer. If storing or moving your washer during freezing weather,
winterize it.
Non-use or vacation care:
Operate your washer only when you are at home. If you will be on
vacation or not using your washer for an extended period of time,
you should:
• Unplug washer or disconnect power.
• Turn off the water supply to the washer. This helps avoid
unintended flooding (due to awater pressure surge) while you
are away.
To winterize washer:
1. Put I qt (1 L) of R.V.-type antifreeze in the drum.
2. Run washer on a DRAIN/SPIN cycle,
3. Unplug washer or disconnect power.
4. Shut off both water faucets.
5. Disconnect water inlet hoses from faucets and drain.
To use washer again:
1. Flush water pipes, Reconnect water inlet hoses to faucets,
Turn on both water faucets.
Electrical Shock Hazard
Plug into a grounded 3 prong outlet.
Do not remove ground prong.
Do not use an adapter.
Do not use an extension cord,
Failure to follow these instructions can result in death,
fire, or electrical shock.
2. Plug in washer or reconnect power.
3. Run the washer through the Normal/Casual cycle with 1/2the
manufacturer's recommended amount of HE detergent for a
medium-size load, to clean the washer and remove the
antifreeze, if used.
To transport the washer:
1. If washer will be moved during freezing weather, put in
1 qt (1 L) of R.V.-type antifreeze in the drum. Run washer on
a DRAIN/SPIN cycle.
2. Unplug the power cord.
3. Disconnect the drain hose from the drain system and attach
to rear panel clips.
4. Shut off both water faucets.
5. Disconnect the water inlet hoses from faucets, then drain the
hoses and clip them to the rear panel of the washer.
IMPORTANT: Call service. Do not reuse transport bolts. Washer
must be transported in the upright position. To avoid suspension
and structural damage to your washer, it must be properly set up
for relocation by a certified technician.
Reinstalling the washer
1. Follow the "Installation Instructions" to locate, level and
connect the washer.
2. Run the washer through the Normal/Casual cycle with 1/2the
manufacturer's recommended amount of HE detergent for a
medium-size load, to clean the washer and remove the
antifreeze, if used.
• Slightly open door to provide ventilation.
19

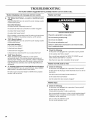
TROUBLESHOOTING
Firsttry the solutions suggested here to possibly avoid the cost of a service call...
Washer displaying code message and tone sounds
"FH" (Water Inlet Problem--no water or insufficient water
supply)
Select PAUSE/OFF twice to cancel the cycle. Unplug washer
or disconnect power.
Check the following:
Are water faucets completely turned on?
Are screens at inlet hose connection to washer clogged?
Are water inlet hoses kinked?
Are water inlet hoses frozen?
Plug in washer or reconnect power. Re-select cycle and press
HOLD TO START. If the problem remains, call for service.
• "F02" (Drain Problem)
Select PAUSE/OFF twice to cancel the cycle. Unplug washer
or disconnect power.
Check the following:
Is the drain hose kinked?
Is the drain hose frozen?
Is the drain hose clogged?
Is the drain hose more than 96" (2.4 m) above the floor?
"SUD" (Suds Routine)
When excessive suds are detected, a suds routine
automatically starts. This routine removes extra suds and
assures proper rinsing of your garments. "SUD" is displayed
during rinsing and at the end of the cycle to inform you that
Suds Routine was activated. Use only HE (High Efficiency)
detergents.
• "F" Variables [other than FH and F02] (Electrical Problem)
Select PAUSE/OFF twice to cancel the cycle. Select DRAIN/
SPIN if there is excessive water in the washer.
Re-select cycle and press HOLD TO START. Ifthe problem
remains, call for service.
Washer won't start
Electrical Shock Hazard
Plug into a grounded 3 prong outlet.
Do not remove ground prong.
Do not use an adapter.
Do not use an extension cord.
Failure to follow these instructions can result in death,
fire, or electrical shock.
• Checkthe following:
Is the power cord plugged into a grounded 3 prong outlet?
Is the washer door firmly closed?
Has a cycle been selected, but HOLD TO START has not
been selected and held for 1 second?
Was the door open after completion of last cycle?
Washer won't fill, wash or rinse
• Checkthe following:
Is the power cord plugged into a grounded 3 prong outlet?
Is there power at the plug? Check electrical source or call an
electrician.
Are the hot and cold water faucets turned on?
Is the water inlet hose kinked?
Are the water inlet valve screens clogged?
Washer stops
• Check the following:
Is the power cord plugged into a grounded 3 prong outlet?
Is there power at the plug?
Check electrical source or call an electrician.
Has a household fuse blown, or has a circuit breaker tripped?
Replace the fuse or reset the circuit breaker. Ifthe problem
continues, call an electrician.
Are you using an extension cord?
Do not use an extension cord.
2O
La page est en cours de chargement...
La page est en cours de chargement...
La page est en cours de chargement...
La page est en cours de chargement...
La page est en cours de chargement...
La page est en cours de chargement...
La page est en cours de chargement...
La page est en cours de chargement...
La page est en cours de chargement...
La page est en cours de chargement...
La page est en cours de chargement...
La page est en cours de chargement...
La page est en cours de chargement...
La page est en cours de chargement...
La page est en cours de chargement...
La page est en cours de chargement...
La page est en cours de chargement...
La page est en cours de chargement...
La page est en cours de chargement...
La page est en cours de chargement...
La page est en cours de chargement...
La page est en cours de chargement...
La page est en cours de chargement...
La page est en cours de chargement...
La page est en cours de chargement...
La page est en cours de chargement...
La page est en cours de chargement...
La page est en cours de chargement...
La page est en cours de chargement...
La page est en cours de chargement...
La page est en cours de chargement...
La page est en cours de chargement...
La page est en cours de chargement...
La page est en cours de chargement...
La page est en cours de chargement...
La page est en cours de chargement...
La page est en cours de chargement...
La page est en cours de chargement...
La page est en cours de chargement...
La page est en cours de chargement...
La page est en cours de chargement...
La page est en cours de chargement...
La page est en cours de chargement...
La page est en cours de chargement...
La page est en cours de chargement...
La page est en cours de chargement...
La page est en cours de chargement...
La page est en cours de chargement...
La page est en cours de chargement...
La page est en cours de chargement...
La page est en cours de chargement...
La page est en cours de chargement...
-
 1
1
-
 2
2
-
 3
3
-
 4
4
-
 5
5
-
 6
6
-
 7
7
-
 8
8
-
 9
9
-
 10
10
-
 11
11
-
 12
12
-
 13
13
-
 14
14
-
 15
15
-
 16
16
-
 17
17
-
 18
18
-
 19
19
-
 20
20
-
 21
21
-
 22
22
-
 23
23
-
 24
24
-
 25
25
-
 26
26
-
 27
27
-
 28
28
-
 29
29
-
 30
30
-
 31
31
-
 32
32
-
 33
33
-
 34
34
-
 35
35
-
 36
36
-
 37
37
-
 38
38
-
 39
39
-
 40
40
-
 41
41
-
 42
42
-
 43
43
-
 44
44
-
 45
45
-
 46
46
-
 47
47
-
 48
48
-
 49
49
-
 50
50
-
 51
51
-
 52
52
-
 53
53
-
 54
54
-
 55
55
-
 56
56
-
 57
57
-
 58
58
-
 59
59
-
 60
60
-
 61
61
-
 62
62
-
 63
63
-
 64
64
-
 65
65
-
 66
66
-
 67
67
-
 68
68
-
 69
69
-
 70
70
-
 71
71
-
 72
72


Maytag MFW9600SQ1 Le manuel du propriétaire
- Catégorie
- Machines à laver
- Taper
- Le manuel du propriétaire
- Ce manuel convient également à
dans d''autres langues
- English: Maytag MFW9600SQ1 Owner's manual
- español: Maytag MFW9600SQ1 El manual del propietario