AT&T DLP70110 Manuel utilisateur
- Catégorie
- Téléphones
- Taper
- Manuel utilisateur

User’s manual
DLP70110
DECT 6.0 expansion handset
for use with AT&T models
DLP73210/DLP73410/DLP73440/
DLP73540
with BLUETOOTH® wireless technology

Congratulations
on your purchase of this AT&T product. Before using this AT&T
product, please read the Important safety information section on
pages 1-3 of this manual. For complete instructions, please
refer to the manual provided with your DLP73210/DLP73410/
DLP73440/DLP73540 telephone. You can also visit our website at
https://telephones.att.com or call 1 (800) 222-3111. In
Canada, dial 1 (866) 288-4268.
This telephone meets the California Energy Commission regulations for
energy consumption. Your telephone is set up to comply with the energy-
conserving standards right out of the box. No further action is necessary.
Model number: DLP70110
Type: DECT 6.0 expansion handset
Serial number:
Purchase date:
Place of purchase:
Both the model and serial numbers of your AT&T product can be
found on the bottom of the telephone base.
Save your sales receipt and original packaging in case it is
necessary to return your telephone for warranty service.
© 2020 Advanced American Telephones. All Rights Reserved. AT&T and
the AT&T logo are trademarks of AT&T Intellectual Property licensed to
Advanced American Telephones, San Antonio, TX 78219. Printed in China.
Telephones identied with this logo have reduced noise and
interference when used with most T-coil equipped hearing aids and
cochlear implants. The TIA-1083 Compliant Logo is a trademark of the
Telecommunications Industry Association. Used under license.
The Bluetooth® word mark and logos are owned by Bluetooth SIG, Inc. and any use of such
marks by Advanced American Telephones and its parent, VTech Holdings Limited, is under
license. VTech Holdings Limited is a member of Bluetooth SIG, Inc. Other trademarks and trade
names are those of their respective owners.
The ENERGY STAR® program (www.energystar.gov) recognizes and
encourages the use of products that save energy and help protect
our environment. We are proud to supply this product with an
ENERGY STAR® qualied power adapter meeting the latest energy
eciency guidelines.

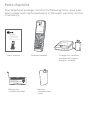
Parts checklist
Your telephone package contains the following items. Save your
sales receipt and original packaging in the event warranty service
is necessary.
Battery for
cordless handset
Cordless handset
Charger for cordless
handset with power
adapter installed
Battery
compartment
cover
User’s manual
User’s manual
DLP70110
DECT 6.0 expansion handset
for use with AT&T models
DLP73210/DLP73410/DLP73440/
DLP73540
with BLUETOOTH® wireless technology
THIS SIDE UP / CE CÔTÉ VERS LE HAUT
Battery Pack / Bloc-piles :
BT162342/BT262342 (2.4V 300mAh Ni-MH)
WARNING / AVERTISSEMENT :
DO NOT BURN OR PUNCTURE BATTERIES.
NE PAS INCINÉRER OU PERCER LES PILES.
Made in China / Fabriqué en chine GP1621

User’s manual
DLP70110
DECT 6.0 expansion handset
for use with AT&T models
DLP73210/DLP73410/DLP73440/DLP73540
with BLUETOOTH® wireless technology
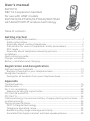
Table of contents
Getting started
Important safety information ....................................................................................................1
Safety information ........................................................................................................................1
Especially about cordless telephones ............................................................................. 2
Precautions for users of implanted cardiac pacemakers .................................. 3
ECO mode ...........................................................................................................................................3
Especially about telephone answering systems ...................................................... 3
Installation ..............................................................................................................................................4
Quick reference guide .....................................................................................................................5
Charger installation ..........................................................................................................................9
Battery installation and charging .........................................................................................10
Registration and deregistration
Add and register handsets ........................................................................................................13
Register a handset to your telephone base ..............................................................13
Deregister handsets .......................................................................................................................15
Deregister all handsets from your telephone base ............................................. 15
Appendix
Troubleshooting................................................................................................................................16
Maintenance ........................................................................................................................................27
For C-UL compliance .....................................................................................................................28
Mesures de sécurité importantes ................................................................................... 28
FCC Part 68 and ACTA ...................................................................................................................32
FCC Part 15 ........................................................................................................................................... 34
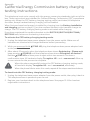
California Energy Commission battery charging testing instructions ........35
Limited warranty ............................................................................................................................. 36
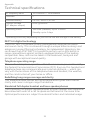
Technical specications .............................................................................................................. 39
DECT 6.0 digital technology ................................................................................................ 39
Telephone operating range .................................................................................................39
Redening long range coverage and clarity ............................................................ 39
Simulated full-duplex handset and base speakerphones .............................. 39

Important safety information
This symbol is to alert you to important operating or servicing instructions
that may appear in this user’s manual. Always follow basic safety precautions
when using this product to reduce the risk of injury, re, or electric shock.
Safety information
f Read and understand all instructions in the user’s manual. Observe all markings on
the product.
f Avoid using a telephone during a thunderstorm. There may be a slight chance of
electric shock from lightning.
f Do not use a telephone in the vicinity of a gas leak. Under certain circumstances,
a spark may be created when the adapter is plugged into the power outlet, or
when the handset is replaced in its cradle. This is a common event associated with
the closing of any electrical circuit. In an inadequately ventilated environment,
the user should not plug the phone into a power outlet, nor put a charged
handset into the cradle where there are concentrations of ammable or ame-
supporting gases. A spark in such an environment could create a re or explosion.
Such environments might include: medical use of oxygen without adequate
ventilation; industrial gases (cleaning solvents; gasoline vapors; etc.); a leak of natural
gas; etc.
f Do not use this product near water or when you are wet. For example, do not use
it in a wet basement or shower, nor next to a swimming pool, bathtub, kitchen sink
and laundry tub. Do not use liquids or aerosol sprays for cleaning. If the product
comes in contact with any liquid, unplug any line or power cord immediately. Do not
plug the product back in until it has dried thoroughly.
f Install this product in a protected location where no one can trip over any line or
power cords. Protect cords from damage or abrasion.
f If this product does not operate normally, see the Troubleshooting section on
pages 16-26 of this user’s manual. If you cannot solve the problem, or if the
product is damaged, refer to the Limited warranty section pages 36-38. Do
not open this product except as directed in your user’s manual. Opening the product
or reassembling it incorrectly may expose you to hazardous voltages or other risks.
f Replace batteries, only as described in your user’s manual (pages 10-12). Do
not burn or puncture batteries — they contain caustic chemicals.
f This power adapter is intended to be correctly oriented in a vertical or oor mount
position. The prongs are not designed to hold the plug in place if it is plugged into a
ceiling or an under-the-table/cabinet outlet.
f For pluggable equipment, the socket-outlet shall be installed near the equipment
and shall be easily accessible.
1
Getting started

Important safety information
CAUTIONS:
f Use only the power adapter provided with this product. To obtain a replacement,
visit our website at https://telephones.att.com or call
1 (800) 222-3111. In Canada, dial 1 (866) 288-4268.
f U
se only the supplied rechargeable battery or replacement battery (model
BT162342/
BT262342).
To order, visit our website at
https://telephones.att.com, or call 1 (800) 222-3111. In
Canada, dial 1 (866) 288-4268.
CAUTION: To prevent risk of re or battery explosion, replace with
the correct battery type. Dispose of used batteries according to the
instructions.
Especially about cordless telephones
f Privacy: The same features that make a cordless telephone convenient create
some limitations. Telephone calls are transmitted between the telephone base
and the handset by radio waves, so there is a possibility that your cordless
telephone conversations could be intercepted by radio receiving equipment within
range of the cordless handset. For this reason, you should not think of cordless
telephone conversations as being as private as those on corded telephones.
f Electrical power: The telephone base of this cordless telephone must be
connected to a working electrical outlet which is not controlled by a wall switch.
Calls cannot be made from the handset if the telephone base is unplugged,
switched o or if the electrical power is interrupted.
f Potential TV interference: Some cordless telephones operate at frequencies
that may cause interference to TVs and VCRs. To minimize or prevent such
interference, do not place the telephone base of the cordless telephone near
or on top of a TV or VCR. If interference is experienced, moving the cordless
telephone farther away from the TV or VCR will oen reduce or eliminate the
interference.
f Rechargeable batteries: This product contains nickel-metal hydride rechargeable
batteries. Exercise care in handling batteries in order not to create a short
circuit with conductive material such as rings, bracelets, and keys. The battery or
conductor may overheat and cause harm. Observe proper polarity between the
battery and the battery charger.
f Nickel-metal hydride rechargeable batteries: Dispose of these batteries in a safe
manner. Do not burn or puncture. Like other batteries of this type, if burned or
punctured, they could release caustic material which could cause injury.
2
i
Getting started

3
The RBRC® Seal means that the manufacturer is voluntarily
participating in an industry program to collect and recycle nickel-
metal hydride rechargeable batteries when taken out of service
within the United States. These batteries may be taken to a
participating local retailer of replacement batteries or recycling
center. You may call 1-800-8-BATTERY® for locations accepting
spent Ni-MH batteries.
RBRC® and 1-800-8-BATTERY® are registered trademarks of the
Rechargeable Battery Recycling Corporation.
Precautions for users of implanted cardiac pacemakers
Cardiac pacemakers (applies only to digital cordless telephones):
Wireless Technology Research, LLC (WTR), an independent research entity, led
a multidisciplinary evaluation of the interference between portable wireless
telephones and implanted cardiac pacemakers. Supported by the U.S. Food and
Drug Administration, WTR recommends to physicians that:
Pacemaker patients:
f Should keep wireless telephones at least six inches from the pacemaker.
f Should NOT place wireless telephones directly over the pacemaker, such as in a
breast pocket, when it is turned ON.
f Should use the wireless telephone at the ear opposite the pacemaker.
WTR’s evaluation did not identify any risk to bystanders with pacemakers from
other persons using wireless telephones.
ECO mode
This power conserving technology reduces power consumption for optimal battery
performance. The ECO mode activates automatically whenever the handset is
synchronized with the telephone base.
Especially about telephone answering systems
Two-way recording: This unit does not sound warning beeps to inform the other
party that the call is being recorded. To ensure that you are in compliance with any
federal or state regulations regarding recording a telephone call, you should start
the recording process and then inform the other party that you are recording the
conversation.
SAVE THESE INSTRUCTIONS
Important safety information
Getting started

4
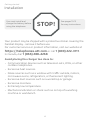
See pages 10-12
for easy instructions.
You must install and
charge the battery before
using the telephone.
STOP!
Installation
Your product may be shipped with a protective sticker covering the
handset display - remove it before use.
For customer service or product information, visit our website at
https://telephones.att.com or call 1 (800) 222-3111.
In Canada, dial 1 (866) 288-4268.
Avoid placing the charger too close to:
f Communication devices such as television sets, VCRs, or other
cordless telephones.
f Excessive heat sources.
f Noise sources such as a window with trac outside, motors,
microwave ovens, refrigerators, or uorescent lighting.
f Excessive dust sources such as a workshop or garage.
f Excessive moisture.
f Extremely low temperature.
f Mechanical vibration or shock such as on top of a washing
machine or workbench.
Getting started

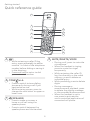
Quick reference guide
Getting started
5
CHARGE light
f On when the handset is charging
in the telephone base or charger.
VOL p DIR
f Press p DIR to show directory
entries when the handset is not
in use.
f Press to scroll up while in menus.
f While entering names or numbers,
press to move the cursor to the
right.
f Press to increase the listening
volume when on a call, or to
increase the message playback
volume.
VOL q CID
f Press q CID to show caller ID log
when the handset is not in use.
f Press to scroll down while in
menus.
f While entering names or numbers,
press to move the cursor to the
le.
f Press to decrease the listening
volume when on a call, or
to decrease the message
playback volume.
CELL
f Press to make or answer a
cell call.
f During a cell call, press to
answer an incoming cell call
when you hear a call waiting
alert.
f During message playback,
press to call back the caller
if the caller’s number is
available.
HOME/FLASH
f Press to make or answer a
home call.
f During a call, press to answer
an incoming home call when
you receive a call waiting alert.
f During message playback,
press to call back the caller
if the caller’s number is
available.
1
2
3
4
5
6
7
8
9
10
11
12
13
14
4
3
2
1

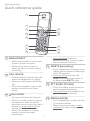
Quick reference guide
Getting started
6
1
f While reviewing a caller ID log
entry, press repeatedly to add or
remove 1 in front of the telephone
number before dialing or saving it
in the directory.
f Press and hold to set or to dial
your voicemail number.
TONE /a>A
f Press to switch to tone dialing
temporarily during a call if you
have pulse service.
f While entering names, press to
change the next letter to upper or
lower case.
/SPEAKER
f Press to make or answer a
home or cell call using the
speakerphone.
f Press to switch between the
speakerphone and the handset.
MUTE/DELETE/VOICE
f During a call, press to mute the
microphone.
f When the handset is ringing,
press to mute the ringer
temporarily.
f While reviewing the caller ID
log, the directory or the redial
memory, press to delete an
individual entry.
f While predialing, press to delete
digits.
f During message or
announcement playback, press
to delete the playing message
or the recorded announcement.
f When the handset is not in
use, press to activate the
voice-controlled application of
connected cell phone.
1
2
3
4
5
6
7
8
9
10
11
12
13
14
6
8
7
5

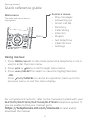
Quick reference guide
Getting started
7
MENU/SELECT
f When the handset is not in use,
press to show the menu.
f While in the menu, press to
select an item or save an entry
or setting.
CALL BLOCK
f Press to block the incoming call
when the telephone is ringing.
f When on a call, press to block the
call.
f When the handset is not in use,
press to show the call block
menu.
OFF/CANCEL
f During a call, press to hang up.
f While in a menu, press to cancel
an operation, back up to the
previous menu, or exit the menu
display; or press and hold this
button to exit to idle mode.
f When the handset is ringing,
press to mute the ringer
temporarily.
9
f Press and hold while the
telephone is not in use to erase
the missed call indicator.
QUIET# (pound key)
f Press repeatedly to display other
dialing options when reviewing a
caller ID log entry.
f Press and hold to enter the
QUIET mode setting screen, or
to deactivate QUIET mode.
PTT (PUSH TO TALK)
f Press to initiate a one-to-one or
one-to-group broadcast.
f Press and hold to broadcast to a
group of system devices.
REDIAL/PAUSE
f Press repeatedly to view the last
10 numbers dialed.
f While entering numbers, press
and hold to insert a dialing
pause.
1
2
3
4
5
6
7
8
9
10
11
12
13
14
10
11
13
12
14

Quick reference guide
Getting started
8
For complete instructions, refer to the manual provided with your
DLP73210/DLP73410/DLP73440/DLP73540 telephone system. If
you are unable to nd your manual, go to
https://telephones.att.com/manuals to read and/or
download the manual.
Main menu
The selected menu item is
highlighted.
Menu
Feature menu
f Play messages
f Answering sys
f Smart call blk
f Directory
f Caller ID log
f Intercom
f Ringers
f Set date/time
f Caller ID annc
f Settings
Using menus:
1. Press MENU/SELECT in idle mode (when the telephone is not in
use) to enter the main menu.
2. Press CID or DIR to scroll through menu items.
3. Press MENU/SELECT to select or save the highlighted item.
-OR-
Press OFF/CANCEL to cancel an operation, back up to the
previous menu, or exit the menu display.

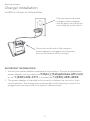
IMPORTANT INFORMATION
1. Use only the power adapter supplied with this product. To order a replacement
power adapter, visit our website at https://telephones.att.com
or call 1 (800) 222-3111. In Canada, dial 1 (866) 288-4268.
2. The power adapter is intended to be correctly oriented in a vertical or oor
mount position. The prongs are not designed to hold the plug in place if it is
plugged into a ceiling, under-the-table or cabinet outlet.
9
Charger installation
Install the charger, as shown below.
Getting started
Plug the large end of the
charger’s power adapter
into an electrical outlet not
controlled by a wall switch.
Ensure the small end of the charger’s
power adapter is plugged into the power
jack on the bottom of the charger.

10
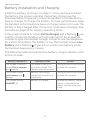
Battery installation and charging
Install the battery, as shown on page 11. Once you have installed
the battery, the screen indicates the battery status (see the
following table). If necessary, place the handset in the telephone
base or charger to charge the battery. For best performance, keep
the handset in the telephone base or charger when not in use. The
battery is fully charged aer 16 hours of continuous charging. See
the table on page 39 for battery operating times.
If the screen is blank or shows Put in charger and a ashing , you
need to charge the handset without interruption for at least 30
minutes to give the handset enough charge to use the telephone
for a short time. When the battery is low, the handset shows Low
battery and a ashing . If you are on a call in low battery mode,
the handset beeps every minute.
The following table summarizes the battery charge indicators and
actions to take.
Battery indicators Battery status Action
The screen is blank or
shows Put in charger
and ashes.
The battery has no or
very little charge. The
handset cannot be used.
Charge without interruption
(at least 30 minutes).
The screen shows
Low battery and
ashes.
Battery has enough
charge to be used for a
short time.
Charge without interruption
(at least 30 minutes).
The screen shows
HANDSET X.
Battery is charged. To keep the battery charged,
place it in the telephone
base or charger when not
in use.
Getting started

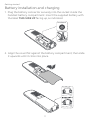
Battery installation and charging
Getting started
11
1. Plug the battery connector securely into the socket inside the
handset battery compartment. Insert the supplied battery with
the label THIS SIDE UP facing up, as indicated.
2. Align the cover at against the battery compartment, then slide
it upwards until it clicks into place.
THIS SIDE UP / CE CÔTÉ VERS LE HAUT
Battery Pack / Bloc-piles :
BT183342/BT283342 (2.4V 400mA
h Ni-MH)
WARNING / AVERTISSEMENT :
DO NOT BURN OR PUNCTU
RE BATTERIES.
NE PAS INCINÉRER OU PERCER LES PILES.
Made in China / Fabriqué en chine CR1535
THIS SIDE UP
THIS SIDE UP / CE CÔTÉ VERS LE HAUT
Battery Pack / Bloc-piles :
BT183342/BT28334
2 (2.4V 400mAh Ni-MH)
WARNING / AVERTISSEMENT :
DO NOT BURN OR PUNCTURE BATTERIES.
NE PAS INCINÉRER OU PERCER LES PILES.
Made in China / Fabriqué en chine CR1535

IMPORTANT INFORMATION
1. Use only the supplied rechargeable battery or replacement battery
(model BT162342/BT262342). To order, visit our website at
https://telephones.att.com or call 1 (800) 222-3111. In
Canada, dial 1 (866) 288-4268.
2. If you do not use the handset for a long time, disconnect and remove
the battery to prevent possible leakage.
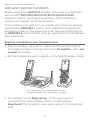
Battery installation and charging
Getting started
12
3. Charge the handset by placing it face forward in the telephone
base or charger. The CHARGE light on the top of the handset is
on during charging.
To replace the battery, press
the tab and slide the battery
compartment cover downwards.
Li out the old battery and
disconnect it from the handset.
Follow the instructions to install
and charge a new battery.
THIS SIDE UP / CE CÔTÉ VERS LE HAUT
Battery Pack / Bloc-piles :
BT183342/BT283342 (2.4V 400mAh Ni-MH)
WARNING / AVERTISSEMENT :
DO
NOT BURN OR PUNCTURE BATTERIES.
NE PAS INCINÉRER OU PERCER LES PILES.
Made in China / Fabriqué en chine CR1
535

Add and register handsets
Before using a new DLP70110 handset, make sure it is registered
with an AT&T DLP73210/DLP73410/DLP73440/DLP73540
telephone system (purchased separately). These telephone
systems can support up to ve handsets.
The handset(s) provided with your telephone system are already
registered as HANDSET 1, and so forth. Additional handsets are
assigned numbers in the sequential order they are registered (up
to HANDSET 5). Each handset must be registered to the telephone
base before use.
Register a handset to your telephone base
1. Before you begin registration, make sure the handset is out of
the telephone base or charger and shows To register... and ...see
manual alternately.
2. Put the handset you wish to register on the telephone base cradle.
Registration and deregistration
13
3. The handset shows Registering.... If the registration is
successful, the handset beeps and its screen displays
Registered. The handset is now registered with the telephone
base.
For registration, put the handset on the
telephone base, not the handset charger.

Add and register handsets
If registration fails, the system will automatically try to register
again. If registration fails aer the third try, Registration failed
appears on the handset screen. The handset shows To register...
and ...see manual alternately, and the telephone base returns to
idle mode. This may take up to ve minutes to occur. Please start
again from Step 1.
Notes:
f You cannot register a handset if any other system handset is in use.
f If you try to register more than five handsets to the telephone base, the telephone base shows
Registration slots are full and sounds two beeps.
Registration and deregistration
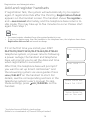
14
If it is the rst time you install your AT&T
DLP73210/DLP73410/DLP73440/DLP73540
telephone system, or power returns following
a power outage, the handset and telephone
base will prompt you to set the date and time
when registration is successful.
Aer that, the telephone base will prompt if
you want to set up Smart call blocker* and
the answering system via voice guides. Press
MENU/SELECT on the handset to start. For
details, see the corresponding sections in the
telephone system’s user’s manual. To skip
these settings, press OFF/CANCEL on the
handset.
* Includes licenced Qaltel
TM
technology.
Qaltel
TM
is a trademark of Truecall Group Limited.
Date: MM/DD/YY
ECO
Time: HH:MM -
-
ECO
Voice guide to
set up Ans sys?
Voice guide set
Smart Call Blk?

Deregister handsets
You may need to deregister your handsets if:
f You have ve registered handsets and need to replace a handset.
-OR-
f You wish to change the designated handset number of your
registered handsets.
You must rst deregister ALL handsets, and then register each
handset you wish to use again, one at a time.
Please read carefully through all the instructions on this page
before beginning the deregistration process.
Deregister all handsets from your telephone base
In addition to the cordless handsets, this operation will also
deregister all cordless headsets registered to your telephone base.
1. Make sure that all handsets are out of the telephone base and
chargers before you begin deregistration.
2. Press and hold /FIND HS on the telephone base for about 10
seconds (until the screen shows Deregister all devices?).
Release /FIND HS.
3. Immediately press /FIND HS again. The telephone base shows
Deregistered all devices, and you hear a conrmation tone.
4. It takes up to 10 seconds to complete the deregistration process.
Before registering the handset again, wait for the cordless
handset screen to display To register HS... and ...see manual
alternately.
5. Aer deregistering, register each handset again individually
following the registration instructions on the pages 13-14.
Notes:
f If the deregistration fails, you may need to reset the system and try again. To reset, unplug the power
from the telephone base and plug it back in.
f You cannot deregister the handset(s) if any other system handset is in use.
f Even if the battery is depleted, you can still deregister the handset by following the steps mentioned
above. After the handset is charged for at least 10 minutes, the screen shows To register HS... and
...see manual alternately.
Registration and deregistration
15

Troubleshooting
If you have diculty with your phone, please try the following
suggestions. For Customer Service, visit our website at
https://telephones.att.com or call 1 (800) 222-3111. In
Canada, dial 1 (866) 288-4268.
The handset registration is unsuccessful.
f Follow the handset registration instructions to register the handset
again (see Add and register handsets on pages 13-14).
My telephone doesn’t work at all.
f Make sure the power cord is securely plugged in.
f Make sure you plug the battery connector securely into the
cordless handset.
f Make sure you plug the telephone line cord securely and rmly
into the telephone base and the telephone wall jack.
f Charge the battery in the cordless handset for at least 11 hours.
For optimum daily performance, return the cordless handset to
the telephone base or charger when not in use.
f If the battery is depleted, it might take approximately 30 minutes
to charge the handset before it shows Low battery. See page
10 for details.
f Reset the telephone base. Unplug the electrical power. Wait for
approximately 15 seconds, then plug it back in. Allow up to one
minute for the cordless handset and telephone base to reset.
f You may need to purchase a new battery. Refer to Battery
installation and charging in this user’s manual on pages
10-12.
Appendix
16
La page est en cours de chargement...
La page est en cours de chargement...
La page est en cours de chargement...
La page est en cours de chargement...
La page est en cours de chargement...
La page est en cours de chargement...
La page est en cours de chargement...
La page est en cours de chargement...
La page est en cours de chargement...
La page est en cours de chargement...
La page est en cours de chargement...
La page est en cours de chargement...
La page est en cours de chargement...
La page est en cours de chargement...
La page est en cours de chargement...
La page est en cours de chargement...
La page est en cours de chargement...
La page est en cours de chargement...
La page est en cours de chargement...
La page est en cours de chargement...
La page est en cours de chargement...
La page est en cours de chargement...
La page est en cours de chargement...
La page est en cours de chargement...
-
 1
1
-
 2
2
-
 3
3
-
 4
4
-
 5
5
-
 6
6
-
 7
7
-
 8
8
-
 9
9
-
 10
10
-
 11
11
-
 12
12
-
 13
13
-
 14
14
-
 15
15
-
 16
16
-
 17
17
-
 18
18
-
 19
19
-
 20
20
-
 21
21
-
 22
22
-
 23
23
-
 24
24
-
 25
25
-
 26
26
-
 27
27
-
 28
28
-
 29
29
-
 30
30
-
 31
31
-
 32
32
-
 33
33
-
 34
34
-
 35
35
-
 36
36
-
 37
37
-
 38
38
-
 39
39
-
 40
40
-
 41
41
-
 42
42
-
 43
43
-
 44
44


AT&T DLP70110 Manuel utilisateur
- Catégorie
- Téléphones
- Taper
- Manuel utilisateur
dans d''autres langues
- English: AT&T DLP70110 User manual
Documents connexes
-
AT&T DL70010 Manuel utilisateur
-
AT&T TL86003 Manuel utilisateur
-
-
-
AT&T CL80107 Manuel utilisateur
-
-
-
-
-