
DE 110 SH, DE 110 H, DE 120 H
EN Operator's manual 2-29
ES-MX Manual de usuario 30-60
FR-CA Manuel d’utilisation 61-91

Contents
Introduction..................................................................... 2
Safety..............................................................................5
Operation........................................................................ 9
Maintenance................................................................. 16
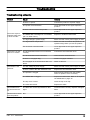
Troubleshooting............................................................ 21
Transportation, storage and disposal........................... 23
Technical data.............................................................. 26
Warranty....................................................................... 28
Registered trademarks................................................. 29
Introduction
Owner responsibility
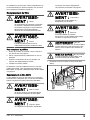
WARNING: Processing of concrete and
stone by methods such as cutting, grinding
or drilling, especially during dry operation,
generates dust that comes from the material
being processed, which frequently contains
silica. Silica is a basic component of sand,
quartz, brick clay, granite and numerous
other minerals and rocks. Exposure to
excessive amount of such dust can cause:
Respiratory disease (affecting your ability
to breathe), including chronic bronchitis,
silicosis and pulmonary fibrosis from
exposure to silica. These diseases may be
fatal;
Skin irritation and rash.
Cancer according to NTP* and IARC* */
National Toxicology Program, International
Agency for Research on Cancer.
Take precautionary steps:
Avoid inhalation of and skin contact with
dust, mist and fumes.
Wear and ensure that all bystanders
wear appropriate respiratory protection such
as dust masks designed to filter out
microscopic particles. (See OSHA 29 CFR
Part 1926.1153)
To minimize dust emissions use an
appropriate dust extractor.
It is the owner’s/employer’s responsibility that the
operator has sufficient knowledge about how to use the
product safely. Supervisors and operators must have
read and understood the Operator’s Manual. They must
be aware of:
• The product’s safety instructions.
• The product’s range of applications and limitations.
• How the product is to be used and maintained.
National/Local regulations could restrict the use of this
product. Find out what regulations are applicable where
you work before you start using the product.
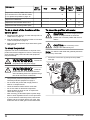
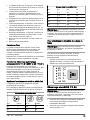
Product description
The product is a single phase dust extractor. Dust-laden
air goes through the suction hose into the inlet valve.
The product separates the dust particles from the air.
The particles falls into the plastic bag at the bottom of
the product.
Intended use
WARNING: Only use the socket outlet
on the machine for purposes specified in the
instructions.
WARNING: Do not collect ignition
sources, hot particles, liquids, explosive
material and unstable or pyrophoric
particles.
The product is for professional operations only. The
product is used to collect and remove dry material from
machines and devices. The material can be dangerous
and harmful to health, refer to the dust class H in EN
60335-2-69.
You can connect an electric power tool to DE 110 H
230V with the power outlet. Make sure that the power
consumption (W) of the power tool is not more than
the maximum power consumption (W) identified on the
power outlet.
Do not use the product for other tasks. Only use the
product with accessories that are approved by the
manufacturer.
21587 - 011 - 06.03.2023

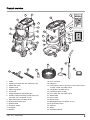
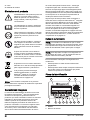
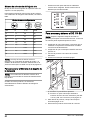
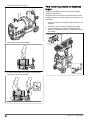
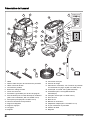
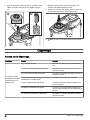
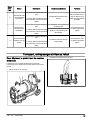
Product overview
17
18
22
12
27
14
15
21
8
7
6
25
23
16
20
11
28
24
1
2
3
5
4
13
10
26
919
1. Cable
2. Fastener for cable and dust extraction hose
3. HEPA filter cover
4. Prefilter cover
5. Filter purge button
6. Cover lock
7. Toggle fastener for the handle pipe
8. Auxiliary outlet for auxiliary power tools (only
220-230V, DE 110 SH/DE 110 H)
9. Main switch (DE 110 H/DE 120 H)
10. Dust release rubber cone
11. Wand bracket
12. Longopac holder
13. Longopac
14. Handle
15. Hose connector
16. Lifting eye
17. Control panel, refer to
Functions of the control panel
on page 12
(DE 110 H/DE 120 H)
18. On/Off (DE 110 H/DE 120 H)
19. On/Off/Auto (DE 110 SH)
20. Hour meter (DE 110 H/DE 120 H)
21. Wheel brake
22. Floor nozzle
23. Rubber strips
24. Multi adapter (DE 110 SH/DE 110 H)
25. Dust extraction hose
26. Cable tie
27. Wand
28. Operator's manual
1587 - 011 - 06.03.2023 3

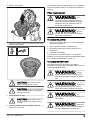
Symbols on the product
WARNING: This product can be
dangerous and cause serious injury or
death to the operator or others. Be careful
and use the product correctly.
Read the manual carefully and make
sure that you understand the instructions
before you use the product.
Use hearing protection, eye protection
and respiratory protection. Refer to
Personal protective equipment on page
7
.
Do not use metal hooks, chains or other
lifting equipment with rough edges that
can cause damage to the lifting eye. Only
use soft lifting straps.
The electrical grounding point on this
product is identified by the ground symbol.
Refer to
Grounded product instructions on
page 9
The product is not domestic waste.
Recycle it at an approved disposal
location for electrical and electronic
equipment.
If the product features Bluetooth® wireless
technology, the Bluetooth® symbol is on
the product. Refer to
Bluetooth® wireless
technology on page 11
.
Note: Other symbols/decals on the product refer to
special certification requirements for some markets.
Embedded connectivity
The cloud asset management solution Husqvarna
Fleet Services™ gives the fleet manager an overview
of all products that are connected via either
embedded or aftermarket sensors. The position
of the gateway or smartphone can be used to
indicate the location of connected products. The
sensors record data like runtime, service intervals
and more. For more information about the cloud
asset management solution Husqvarna Fleet Services™,
download the iOS or Android app Husqvarna Fleet
Services at https://apps.apple.com/se/app/husqvarna-
fleet-services/id1334672726 or https://play.google.com/
store/apps/details?id=com.husqvarna.hfsmobile&hl=en.
Speak to your Husqvarna sale representative for more
information.
Some types of this product are connected via the
embedded Husqvarna Fleet Services™ sensor that has
the Bluetooth Low Energy (BLE) function. For more
information regarding how to use it, refer to
To use
embedded connectivity with fleet on page 11
. For
information about the BLE technology radio spectrum,
refer to
Embedded connectivity on page 27
. For
compliance reservations regarding Husqvarna Fleet
Services™, refer to
Compliance reservations on page
4
.
Compliance reservations
Note: Changes or modifications made to this
equipment not expressly approved by Husqvarna may
void the equipment's compliance with FCC regulations,
and limit the user's authority to operate the equipment.
Note: This device complies with Part 15 of the FCC
Rules and with Industry Canada licence-exempt RSS
standard(s).
Operation is subject to the following two conditions:
• this device may not cause harmful interference
• this device must accept any interference received,
including interference that may cause undesired
operation
Type plate
Art noType
Husqvarna Identity No. (HID) / Serial No.
Rated voltage, V
Rated power, kW Operating mass, kg
Frequancy, HZ IP:
Year of Mfg
2 3
4 11
5678910
1
1. Model
2. Article number
3. Scannable code
4. Serial number
5. Rated power or current (A)
6. Rated voltage
7. Frequency
8. Weight
9. IP class
10. Production year
11. Personal protective equipment
41587 - 011 - 06.03.2023

Product liability
As referred to in the product liability laws, we are not
liable for damages that our product causes if:
• the product is incorrectly repaired.
• the product is repaired with parts that are not
from the manufacturer or not approved by the
manufacturer.
• the product has an accessory that is not from the
manufacturer or not approved by the manufacturer.
• the product is not repaired at an approved service
center or by an approved authority.
Safety
Safety definitions
Warnings, cautions and notes are used to point out
specially important parts of the manual.
WARNING: Used if
there is a risk of injury or death for the
operator or bystanders if the instructions in
the manual are not obeyed.
CAUTION: Used if there
is a risk of damage to the product, other
materials or the adjacent area if the
instructions in the manual are not obeyed.
Note: Used to give more information that is necessary
in a given situation.
IMPORTANT
SAFETY
INSTRUCTIONS
WARNING: Read the
warning instructions that follow before you
use the product.
• This product is a dangerous tool if you are not
careful or if you use the product incorrectly. This
product can cause serious injury or death to the
operator or others. Before you use the product,
you must read and understand the contents of this
operator’s manual.
• Do not let a person (including children) with reduced
physical, sensory or mental capabilities use the
product, unless they have been given supervision
or instruction concerning use of the product by a
person responsible for their safety.
• Make sure that you have experience and knowledge
about the product before use.
• Make sure that all controls are off before you
disconnect the power cord.
• Comply with all applicable laws and regulations.
• The operator and the employer of the operator must
know and prevent the risks during operation of the
product.
• Do not let a person operate the product unless they
read and understand the contents of the operator's
manual.
• Do not operate the product unless you receive
training before use. Make sure that all operators
receive training.
• Do not let a child operate the product.
• Only let approved persons operate the product.
• The operator is responsible for accidents that occur
to other persons or their property.
• Do not use the product if you are tired, ill, or under
the influence of alcohol, drugs or medicine.
• Always be careful and use your common sense.
• This product produces an electromagnetic field
during operation. This field can under some
circumstances interfere with active or passive
medical implants. To decrease the risk of serious
injury or death, we recommend persons with medical
implants to speak to their physician and the medical
implant manufacturer before operating this product.
• Keep the product clean. Make sure that you can
clearly read signs and decals.
• Do not use the product if it is defective.
• Do not do modifications to this product.
• Do not operate the product if it is possible that other
persons have done modifications to the product.
• Do not operate the product without necessary filters.
Work area safety
•Keep work area clean and well lit. Cluttered or dark
areas invite accidents.
•Do not operate the product in explosive
atmospheres, such as in the presence of flammable
liquids, gases or dust. The product create sparks
which may ignite the dust or fumes.
•Keep children and bystanders away while operating
the product. Distractions can cause you to lose
control.
1587 - 011 - 06.03.2023 5

Electrical safety
WARNING: Do not
expose the appliance to rain or wet
conditions.Water entering a an electric
appliance will increase the risk of electric
shock.
•The plug on the supply cord of the appliance must
match the outlet. Do not change the plug in any way.
Do not use adapter plugs with earthed (grounded)
appliances. Unmodified plugs and matching outlets
reduce risk of electric shock.
•Insert the plug in a suitable earthed/grounded power
outlet which has been correctly and safely installed
and is in compliance with local regulations. If you
are in doubt about the effectiveness of the power
outlet’s earth/ground connection, have it checked by
a qualified specialist.
•Avoid body contact with earthed or grounded
surfaces, such as pipes, radiators, cookers, stoves
and refrigerators. There is an increased risk of
electric shock if your body is earthed or grounded.
•Check to ensure that the supply cord does not lie in
a puddle of water.
•Check the appliance’s supply cord at regular
intervals and have it replaced by the manufacturer or
his agent if damage is found. Check extension cords
at regular intervals and replace them if found to be
damaged.
•Do not touch the supply cord or extension cord if
they are damaged while working. Disconnect the
supply cord plug from the power outlet. Damaged
supply cords or extension cords present a risk of
electric shock.
•Do not abuse the cord. Never use the cord for
carrying, pulling or unplugging the appliance. Keep
the cord away from heat, oil, sharp edges or moving
parts. Damaged or entangled cords increase the risk
of electric shock.
•When operating an electric appliance outdoors, use
only extension cords of a type suitable for outdoor
use. Use of an extension cord suitable for outdoor
use reduces the risk of electric shock.
•In the event of an interruption in the electric supply,
switch the appliance off and unplug it from the power
outlet.
•Never operate the appliance when it is dirty or wet.
Dust (especially dust from conductive materials) or
dampness adhering to the surface of the appliance
may, under unfavorable conditions, lead to electric
shock. Dirty or dusty appliances should thus be
checked by an approved service agent at regular
intervals, especially if used frequently for working on
conductive materials.
•If operating an appliance in a damp location is
unavoidable, use a residual current device (RCD)
protected supply. Use of a RCD reduces the risk of
electric shock.
• Do periodic electrical safety tests on the product.
Refer to local regulations for the correct procedure.
Personal safety
•Stay alert, watch what you are doing and use
common sense when operating the product. Do not
use the product while you are tired or under the
influence of drugs, alcohol or medication. A moment
of inattention while operating the product may result
in serious personal injury.
•Use personal protective equipment. Always wear
eye protection. Protective equipment such as dust
mask, non-skid safety shoes, hard hat or hearing
protection used for appropriate conditions will reduce
personal injuries.
•Prevent unintentional starting. Ensure the switch is in
the off-position before connecting to power source,
picking up or carrying the tool. Carrying the product
with your finger on the switch or energising product
that have the switch on invites accidents.
•Remove any adjusting key or wrench before turning
the product on. A wrench or a key left attached to
a rotating part of the product may result in personal
injury.
•Do not overreach. Keep proper footing and balance
at all times. This enables better control of the
product in unexpected situations.
•Dress properly. Do not wear loose clothing or
jewellery. Keep your hair and clothing away from
moving parts. Loose clothes, jewellery or long hair
can be caught in moving parts.
•If devices are provided for the connection of dust
extraction and collection facilities, ensure these are
connected and properly used. Use of dust collection
can reduce dust-related hazards.
•Do not let familiarity gained from frequent use of
tools allow you to become complacent and ignore
tool safety principles. A careless action can cause
severe injury within a fraction of a second.
Product use and care
•Do not force the product. Use the correct product
for your application. The correct product will do the
job better and safer at the rate for which it was
designed.
•Do not use the product if the switch does not turn
it on and off. Any product that cannot be controlled
with the switch is dangerous and must be repaired.
•Disconnect the plug from the power source, if
detachable, from the product before making any
adjustments, changing accessories, or storing the
product. Such preventive safety measures reduce
the risk of starting the product accidentally.
•Store idle the product out of the reach of children
and do not allow persons unfamiliar with the product
or these instructions to operate the product. The
61587 - 011 - 06.03.2023

product is dangerous in the hands of untrained
users.
•Maintain the product and accessories. Check for
misalignment or binding of moving parts, breakage
of parts and any other condition that may affect the
product´s operation. If damaged, have the product
repaired before use. Many accidents are caused by
poorly maintained product.
•Keep cutting tools sharp and clean. Properly
maintained cutting tools with sharp cutting edges are
less likely to bind and are easier to control.
•Use the product, accessories and tool bits etc.
in accordance with these instructions, taking into
account the working conditions and the work to
be performed. Use of the product for operations
different from those intended could result in a
hazardous situation.
•Keep handles and grasping surfaces dry, clean
and free from oil and grease. Slippery handles and
grasping surfaces do not allow for safe handling and
control of the tool in unexpected situations.
Service
• Only let an approved service center do servicing and
only with approved spare parts. This will keep the
product safe.
• Refer to
Maintenance schedule on page 17
for
more information.
Safety instructions for assembly
WARNING: Read the
warning instructions that follow before you
assemble the product.
• Unauthorized modifications and/or accessories may
lead to serious injury or death to the user or others.
• Use only attachments as described in this manual.
Use only manufacturers recommended attachments.
• Make sure that the assembly area is firm, so the
product does not tip over. Risk of personal and
material injury.
• Be careful, the toggle fasteners can cause damage
to the operator when assembling the product.
Safety instructions for operation
WARNING: Read the
warning instructions that follow before you
use the product.
• Do not operate the product if the power cord or the
plug is damaged.
• If the product does not operate correctly, hits the
ground, is damaged, left outdoors or falls into water,
stop the product. Let an approved service agent
repair the product.
• Make sure that the motor and all controls are off
before you disconnect the power cord.
• Disconnect the power cord from the outlet, when
the product is not used, before you do servicing or
before you go away from the product.
• Do not pull the power cord to disconnect the
power cord from the outlet. Always pull the plug to
disconnect from the outlet.
• Do not operate the product at temperatures below
-10°C.
• Do not operate the product where there is a risk
of explosion or in areas where there is flammable
liquids or materials.
• Do not put objects into openings.
• Do not operate if an opening is blocked. Remove
dust, lint, hair or other material that can decrease the
air flow.
• Do not operate the product or pull the power plug
with wet hands.
• Keep hair, loose clothing and all body parts away
from openings and moving parts.
• Operate the product very carefully on stairs to
prevent damage and injury if the product falls.
• Make sure that you always can stop the motor
quickly in an emergency.
• Always lock the transport wheels if you do work on a
rough surface.
• Do not operate the product without a Longopac bag
and the filters installed. Replace the Longopac bag
and the filters as given in this manual.
• If the product has unusual vibration or noise level,
stop the product immediately and disconnect the
power supply. Examine the product for damages.
Unusual vibration is usually a warning of damage.
Repair the damages or let an approved service
agent do the repair.
• Always use approved accessories. Speak to your
Husqvarna representative for more information.
Personal protective equipment
WARNING: Read the
warning instructions that follow before you
use the product.
• Always use approved personal protective equipment
when you operate the product. Personal protective
equipment cannot fully prevent injury but it
decreases the degree of injury if an accident does
occur. Let your dealer help you select the correct
personal protective equipment.
• Regularly do a check of the condition of the personal
protective equipment.
• Use an approved protective helmet.
• Use approved hearing protection.
• Use approved respiratory protection with class P2 or
higher.
1587 - 011 - 06.03.2023 7

• Use approved eye protection.
• Use protective gloves.
• Use protective shoes.
Safety instructions for maintenance
WARNING: Read the
warning instructions that follow before you
use the product.
• If the maintenance is not done correctly and
regularly, the risk of injury and damage to the
product increases.
• Use personal protective equipment. Refer to
Safety
instructions for operation on page 7
.
• Disconnect the product from the power source
before you do the maintenance.
• Do not change the product. Modifications that are
not approved by the manufacturer can cause serious
injury or death.
• Always use original accessories and spare parts.
Accessories and spare parts that are not approved
by the manufacturer, can cause serious injury or
death.
• Replace damaged, worn or broken parts.
• Only do the maintenance as given in this operator's
manual. Let an approved service agent do all other
servicing.
• If the replacement of the supply cord is necessary,
this has to be done by the manufacturer or his agent
in order to avoid a safety hazard.
• Let an approved service agent do servicing on the
product regularly.
Safety devices on the product
WARNING: Read the
warning instructions that follow before you
use the product.
• Never use a product that has faulty safety
equipment! If your product fails any checks contact
your service agent to get it repaired.
• Do not use the product if protective plates, protective
covers, safety switches or other protective devices
are not attached or are defective.
Always use common sense
WARNING: Under no
circumstances should you modify the
original design of the product without
approval from the manufacturer. Always
use original spare parts. Unauthorized
modifications and/or accessories may lead
to serious injury or death to the user or
others.
WARNING: The use of
products such as cutters, grinders, drills,
that sand or form material can generate
dust and vapours which may contain
hazardous chemicals. Check the nature of
the material you intend to process and use
an appropriate breathing mask.
It is not possible to cover every conceivable situation
you can face when using the product. Always exercise
care and use your common sense. Avoid all situations
which you consider to be beyond your capability. If
you still feel uncertain about operating procedures after
reading these instructions, you should consult an expert
before continuing.
Do not hesitate to contact your Husqvarna
representative if you have any more questions about the
use of the product. We will willingly be of service and
provide you with advice as well as help you to use your
product both efficiently and safely.
Let your Husqvarna dealer check the product regularly
and make essential adjustments and repairs.
Husqvarna AB has a policy of continuous product
development. Husqvarna reserves the right to modify
the design and appearance of products without prior
notice and without further obligation introduce design
modifications.
All information and all data in the operator’s manual
were applicable at the time the operator’s manual was
sent to print.
Bluetooth®
CAUTION: Changes or modifications
made to this equipment not expressly
approved by Husqvarna may void the FCC
authorization to operate this equipment.
Notice: This device complies with Part 15 of FCC
Rules and with Industry Canada licence-exempt RSS
standard. Operation is subject to the following two
conditions:
• This device may not cause harmful interference
• This device must accept any interference received,
including interference that cause undesired
operation.
Note:This equipment has been tested and found to
comply with the limits for a Class B digital device,
pursuant to part 15 of the FCC Rules. These limits
are designed to provide reasonable protection against
harmful interference in a residential installation. This
equipment generates, uses and can radiate radio
frequency energy and, if not installed and used in
81587 - 011 - 06.03.2023

accordance with the instructions, may cause harmful
interference to radio communications. However, there
is no guarantee that interference will not occur in a
particular installation. If this equipment does cause
harmful interference to radio or television reception,
which can be determined by turning the equipment off
and on, the user is encouraged to try to correct the
interference by one or more of the following measures:
• Reorient or relocate the receiving antenna.
• Increase the separation between the equipment and
receiver.
• Connect the equipment into an outlet on a circuit
different from that to which the receiver is connected.
• Consult the dealer or an experienced radio/TV
technician for help.
Le présent appareil est conforme aux CNR d'Industrie
Canada applicables aux appareils radio exempts de
licence. L'exploitation est autorisée aux deux conditions
suivantes:
• l'appareil ne doit pas produire de brouillage, et
• l'appareil doit accepter tout brouillage radioélectrique
subi, même si le brouillage est susceptible d'en
compromettre le fonctionnement.
Suppliers Declaration of Conformity for Husqvarna DE
110 H, DE 120 H
47 CFR § 2.1077 Compliance Information
Responsible Party
Husqvarna Construction Products North America, Inc.
17400 W 119th Street
Olathe, Kansas 66061
USA
U.S. Contact Information:Neil Stanford, Compliance
Manager, Telephone number: 913-928-1000
SAVE THESE
INSTRUCTIONS
Operation
Grounded product instructions
WARNING: Incorrect
connection can result in electrical shock.
Speak to an approved electrician if you are
not sure if your mains outlet is correctly
grounded.
Do not do modifications to the power plug
from its factory specification. If the power
plug or power cord is damaged or must be
replaced, speak to your Husqvarna service
agent. Obey local regulations and laws.
If you do not fully understand the
instructions about the grounded product,
speak to an approved electrician.
Use only grounded outdoor extension cables with
grounding plugs and grounding outlet that accepts the
product power plug.
The product has a grounded power cord and power
plug. Always connect the product to a grounded mains
outlet. This decreases the risk of electrical shock if there
is a malfunction.
Use nominal 120V supply circuit with this product.
Do not use electrical adapters with the product.
Product rated more than 15A
WARNING: Do not use
an adapter with a product where the current
rate is more than 15A.
WARNING: Make sure
that the power plug of the product agrees
with the outlet.
If your product current is rated with more than 15A, it is
supplied from the manufacturer with correct power cord
and power plug for outlet connection.
Product rated less than 15A
WARNING: Make sure
that the power plug of the product agrees
with the outlet.
WARNING: It is not
permitted to use a temporary adapter in
Canada, refer to C22.1.
WARNING: Only use
the temporary adapter until a grounded
1587 - 011 - 06.03.2023 9

outlet can be installed by an approved
electrician.
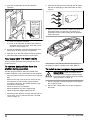
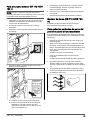
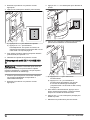
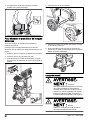
The power plug (A) is grounded and can be used with or
without a temporary adapter (B).
B
A
Use an adapter when the outlet (C) is not grounded. Use
the temporary adapter to connect the power plug to the
outlet that is not grounded. The tab for grounding screw
(D) on the adapter must be connected to a grounded
outlet box cover. You must use the metal screw (E) to
hold the adapter in position.
E
D
C
Do not use an adapter if the outlet (F) is grounded.
F
To do before you operate the product
WARNING: To prevent
the risk of injury, make sure that you attach
the product plug fully to the extension cable.
Do regular checks of the connection while
you operate the product to make sure that
it is fully attached. Do not use an extension
cable that makes a loose connection.
Note: The operation conditions are 800 m/2625 ft
maximum altitude, temperature between -10⁰C/14⁰F to
+40⁰C/104⁰F and humidity 85%.
Note: Read the operator’s manual of the attached
equipment carefully. If specified requirements or settings
are given for the dust extractor, make sure that you obey
these.
1. Read the operator's manual carefully and make sure
that you understand the instructions.
2. Do the daily maintenance. Refer to
Maintenance
schedule on page 17
.
3. Make sure that the work area is clean and bright.
4. Use personal protective equipment. Refer to
Personal protective equipment on page 7
.
5. Make sure that the product is installed correctly.
6. Make sure that the frequency and voltage shown on
the type plate agrees with the power supply voltage.
This is also applicable for the extension cables.
7. Attach the product cord (A) with the extension cable
(B) during operation to make sure that they stay
connected.
A
B
To attach the dust extraction hose
WARNING: Use an
antistatic hose to prevent antistatic effects.
1. Open the hose connector.
10 1587 - 011 - 06.03.2023

2. Put the hose adapter in the hose connector.
3. Push the hose adapter until you hear a click to get it
in correct position.
To remove the dust extraction hose
• Push the hose lock button (A) and pull the dust
extraction hose.
A
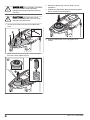
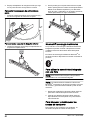
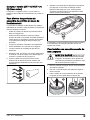
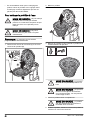
To attach and adjust the floor nozzle
1. Put the end of the handle fully into the shaft of the
floor nozzle.
2. Turn the knob (A) at the rear of the floor nozzle
to adjust the floor nozzle wheels. Different surfaces
and different types of dust and materials make it
necessary to adjust the wheels to get the best
performance.
A
Bluetooth® wireless technology
Products with built-in Bluetooth® wireless technology
can connect to mobile devices and enables additional
functions from Husqvarna Connect.
The symbol for
Bluetooth®
wireless technology comes
on when your mobile device is connected to the product.
To use embedded connectivity with
fleet
Note: This part is applicable only for products
supplied with embedded connectivity.
Note: Radio transmission by the Bluetooth® function
will be enabled on the first time of connection to a power
outlet, and stay on after that.
1. Download the Husqvarna Fleet Services iOS or
Android app Husqvarna Fleet Services.
2. Go to Husqvarna Fleet Services website https://
fleetservices.husqvarna.com for more information.
To lock and unlock the transport
wheels
For operation on a surface with a slope it is necessary to
lock the transport wheels.
WARNING: Wheels and
bearings must be clean and without dust
1587 - 011 - 06.03.2023 11

for safe operations. Refer to
Maintenance
schedule on page 17
.
1. Hold the product in a stationary and safe position.
2. Push down the wheel brake on each side to lock the
wheels.
Note: DE 110 SH/DE 110 H has only 1 wheel
brake.
3. Pull up the wheel brakes to unlock the wheels.
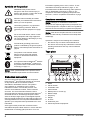
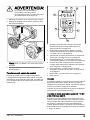
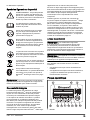
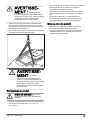
Functions of the control panel
The control panel controls and monitors important
functions and setups of the product. Refer to
Warnings
on the control panel (DE 110 H/DE 120 H) on page 22
to find solutions for the warnings.
1
6
234
7
8
5
1. The prefilter is clogged. Refer to
To remove dust
particles from the prefilter during operation on page
14
.
2. The HEPA filter is clogged, damaged or missing.
Refer to
Warnings on the control panel (DE 110
H/DE 120 H) on page 22
.
3. Warning. Refer to
Warnings on the control panel (DE
110 H/DE 120 H) on page 22
.
4. Bluetooth® connection. Refer to
To use embedded
connectivity with fleet on page 11
.
5. Diameter change function for hose, refer to
To select
the hose nozzle diameter on page 13
6. Automatic start, refer to
Automatic start function
(Only 230V DE 110 SH and DE 110 H) on page 12
7. e-Flow button, refer to
e-Flow function on page 12
8. On/Off button
e-Flow function
The product has an e-Flow function. This function
automatically adjusts the airflow to the workload for
optimal performance. The product always starts with the
last settings used.
Refer to
Functions of the control panel on page 12
to
engage or disengage the function.
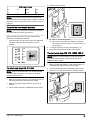
Automatic start function (Only 230V DE 110
SH and DE 110 H)
The product can be used to collect dust from equipment
such as a grinder or power cutter. When you start
the equipment that is connected to the electrical outlet
on the product, the product starts automatically. When
you stop the equipment, the product operates for
approximately 10 seconds to empty the hose and then
stops.
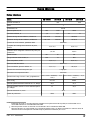
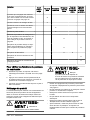
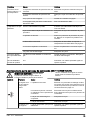
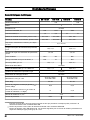
Airflow warning system
The airflow in the suction hose must be more than 20
m/s (66 ft/s).
For the minimum airflow with the selected hose diameter
refer to the table.
Airflow alarm levels
mm inch m3/h CFM
21 5/625 15
27 1 41 24
32 1¼ 58 34
38 1 ½ 82 48
42 1 ⅔ 100 59
51 2 147 87
12 1587 - 011 - 06.03.2023

Airflow alarm levels
63 2 ½ 224 132
76 3 327 192
Note: If the airflow is less than 20 m/s (66 ft/s), the
sound alarm and the warning symbol comes on. Refer to
Warnings on the control panel (DE 110 H/DE 120 H) on
page 22
.
To select the hose nozzle diameter
Note: If you do not select the correct hose diameter,
the airflow warning system will come on.
When you start the product, the last selected hose
diameter is automatically selected.
• Push the button to select the correct hose diameter.
The green LED tells which diameter you have
selected.
38 11/2
42 12/3
51 2
63 21/2
76 3
To start and stop DE 110 SH
Note: Wait for 5 seconds after you start the product
to operate with full suction. The suction is not at full
capacity directly at start.
1. Make sure that the frequency and voltage shown on
the rating plate agree with the power supply.
2. Make sure that the On/Off switch is set to the "0"
position.
3. Connect the product to an applicable power socket.
4. Push the On/Off switch.
a) Push "I" to start the product.
b) Push "II" for automatic start. Refer to
Automatic
start function (Only 230V DE 110 SH and DE 110
H) on page 12
.
5. To stop the product, set the On/Off switch to "0".
6. Disconnect the product from the power socket.
To start and stop DE 110 H/DE 120 H
Note: Wait for 5 seconds after you start the product
to operate with full suction. The suction is not at full
capacity directly at start.
1. Make sure that the frequency and voltage shown on
the rating plate agree with the power supply.
2. Connect the product to an applicable power socket.
3. Push the "I" on the main switch to start the product.
1587 - 011 - 06.03.2023 13

4. Push the On/Off button to start and stop the
operation.
a) Push "I" to start the operation.
b) Push "A" for automatic operation start. Refer to
Automatic start function (Only 230V DE 110 SH
and DE 110 H) on page 12
.
5. To stop the operation, push the On/Off button. The
button goes off when you stop the operation.
6. Push the "0" on the main switch to stop the product.
7. Disconnect the product from the power socket.
Hour meter (DE 110 H/DE 120 H)
The hour meter shows the total operation time of the
product in hours.
To remove dust particles from the
prefilter during operation
The filter purge procedure cleans the prefilter from
unwanted material. Do the procedure in these situations:
• Stop the product to let the dust fall into the Longopac
bag.
• Before a work stop or at the end of each work day.
If the product is off for a while, it gives the dust
more time to fall down. This makes the filter purge
procedure more powerful.
• When the suction is not sufficient.
• Before installation of a new Longopac bag.
• When the prefilter clogged alarm goes off.
1. Start the product. Refer to
To start and stop DE 110
SH on page 13
or
To start and stop DE 110 H/DE
120 H on page 13
.
2. Close the air flow that moves through the air intake
with the air intake plug or the intake valve to make
vacuum.
3. Wait 5 seconds until vacuum is made, then push the
filter purge button. Do this step 3 to 5 times. It is
important to let the product make vacuum between
each button push.
X 3-5
If the suction is not sufficient after this procedure, it is
necessary to clean the prefilter with water. Refer to .
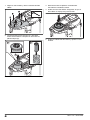
To install a new Longopac bag cassette
CAUTION: Clean the prefilter before
you install a new Longopac cassette. Refer
to
To remove dust particles from the prefilter
during operation on page 14
.
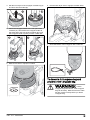
1. Put the Longopac cassette around the inner edge of
the Longopac holder.
2. Remove the 4 straps after you put the Longopac in
the holder.
14 1587 - 011 - 06.03.2023

3. Pull the inner layer of the Longopac cassette up (A)
and fold it into the holder (B).
A B
4. Attach the Longopac holder to the rear part of the
container (A). Then attach the Longopac holder to
the sides and to the front of the container (B). Push
the Longopac holder up until you hear a solid click.
A B
5. Make sure that the Longopac is sealed.
6. Pull the outer layer of the Longopac cassette down.
7. Close the bottom of the Longopac with a cable tie.
To discard a full Longopac bag and
prepare a new Longopac bag
WARNING: Lift the
Longopac bag with caution, a full Longopac
bag can be heavy. Make sure that the cable
ties are closed correctly before you lift the
Longopac bag.
1587 - 011 - 06.03.2023 15

1. Pull out the Longopac bag (A) and attach a cable tie
(B) to close the new Longopac bag.
A
B
2. Shake down the dust in the used Longopac bag.
3. Attach a cable tie 10 cm/3.9 in. below the first cable
tie to close the used Longopac bag. Cut off the
Longopac bag between the cable ties.
4. If the remaining part of the Longopac bag cassette
is too small to prepare a new Longopac bag, install
a new Longopac bag cassette. Refer to
To install a
new Longopac bag cassette on page 14
.
5. Obey local regulations for disposal of the full
Longopac bag.
To do after completed work
1. Do the filter purge procedure. Refer to
To remove
dust particles from the prefilter during operation on
page 14
.
2. Stop the product, refer to
To start and stop DE 110
SH on page 13
or
To start and stop DE 110 H/DE
120 H on page 13
.
3. Discard the Longopac bag. Refer to
To discard a full
Longopac bag and prepare a new Longopac bag on
page 15
.
4. Clean the product. Refer to
To clean the product on
page 18
.
5. Prepare the product for transportation. Refer to
To
move the product long distances on page 24
.
Maintenance
Introduction
WARNING: Product
related accidents occur during the
troubleshooting, servicing and maintenance
as the operator must be in the risk area of
the product. The operator must be careful,
make a plan and prepare the work to
prevent accidents.
WARNING: Before you
do maintenance, make sure that the motor
switch and the pump switch are in the Off
positions. Disconnect the power cord and
remove the pump cable.
16 1587 - 011 - 06.03.2023

WARNING: Only let an
approved electrician do all checks of the
electric components.
WARNING: Make sure
that you do not make a hole in the filter. Risk
of dust dispersion.
WARNING: Make sure
that you obey all local regulations to dispose
the dangerous dust correctly, before and
during maintenance.
WARNING: The manufacturer, or an
instructed person, must do a technical
inspection at least annually. The technical
inspection includes an inspection of the
filters for damage, air tightness of the
product and correct function of the
control mechanism. In addition the filtration
efficiency of the product must be tested at
least annually, or more frequently as may
be specified by national requirements. If the
test is not conducted the HEPA filter must be
replaced by a new one.
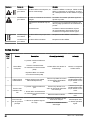
Maintenance schedule
The maintenance intervals are calculated from daily use
of the product. The intervals change if the product is not
used daily.
Maintenance Before
each use Daily Weekly
When
suction is
low
Each 6
months or
600 h
Each 12
months or
2000 h
Do the filter purge procedure. Refer to
To remove dust particles from the prefil-
ter during operation on page 14
.
X
Look for signs of wear or damage of the
dust release rubber cone. X
Do a check of the power plug and the
power cord. X
Look for signs of wear, damage or loose
connections of the controls before the
unit is connected.
X
Do a check of the hose and the hose
connectors. X
Look for signs of wear or damage of the
plastic parts. X
Do a check of the lifting eyes. X
Make sure that the Longopac is correct
and that it is correctly attached. Refer to
To install a new Longopac bag cassette
on page 14
.
X
Do a check of the filter purge function. X
Do a check of the wheels. Look for
damage and bad connections. X
Do a check of the filter seals. X
Do the filter purge procedure. If the
suction continues to be not sufficient,
clean the prefilter with water. Refer to
To clean the prefilter with water on page
18
.
X
1587 - 011 - 06.03.2023 17

Maintenance Before
each use Daily Weekly
When
suction is
low
Each 6
months or
600 h
Each 12
months or
2000 h
Replace the cleaned prefilter if the suc-
tion continues to be not sufficient. Refer
to
To replace the prefilter on page 19
.
X X
Replace the HEPA filter. X X
Replace the dust release rubber cone. X
Replace the filter cleaning rubber parts. X
To do a check of the functions of the
control panel
1. Start the product. Refer to
To start and stop DE 110
H/DE 120 H on page 13
.
2. Push and hold the On/Off button. Refer to
Functions
of the control panel on page 12
3. Make sure that the product stops and that the green
LED goes off.
To clean the product
Operation can cause contamination on all parts of the
product and all used equipment. Thus it is necessary to
clean all parts of the product and all used equipment
fully and carefully.
WARNING: Disconnect
the product from the power supply.
WARNING: Clean the
product before it is moved from the work
area. Remaining dust on the product can go
into the air and cause a health risk.
• Use personal protective equipment. Refer to
Personal protective equipment on page 7
.
• Do not clean the product with a high-pressure
washer or compressed air.
• Clean the external surface with a moist cloth.
• Do not use water on electrical components.
• Clean the filters as given in and
To replace the
HEPA filter on page 19
.
• After servicing, put discarded parts in plastic bags.
Refer to local regulations for the correct procedure.
• If you use water to clean the product, remove the
prefilter and the Longopac before you clean. Also
make sure that no water goes into the HEPA filter.
To clean the prefilter with water
CAUTION: Do not use a high-pressure
washer or compressed air to clean the
prefilter. Do not hit the prefilter with force to
clean it.
CAUTION: Do not let it dry in full
sunlight. The seals will dry out.
Note: To clean the with water will gradually decrease
the efficiency of the filter.
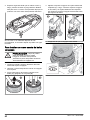
1. Loosen the cover locks (A) and open the prefilter
cover (B).
A
B
18 1587 - 011 - 06.03.2023

2. Remove the prefilter.
3. Clean the prefilter with running water from the inner
surface of the prefilter.
CAUTION: The water pressure
must not be higher than 4 bars.
CAUTION: Do not hit or drag items
across the filter surface as this will do
damage to the filter.
4. Let the prefilter dry fully.
CAUTION: The prefilter must be
100% dry before you install it into the
housing.
5. Install the prefilter, close the prefilter cover and
tighten the cover locks.
If the prefilter cannot be fully cleaned or if it is damaged,
it must be replaced. Refer to
To replace the prefilter on
page 19
.
Filter replacement
WARNING: Use
personal protective equipment. Refer to
Personal protective equipment on page 7
.
Dangerous dust can release into the air
during filter replacement.
WARNING: Stop the
product and disconnect the power supply
before filter replacement.
To replace the prefilter
1. Remove the prefilter. Refer to
To clean the prefilter
with water on page 18
.
2. Put the prefilter carefully in a plastic bag.
3. Discard the plastic bag correctly. Refer to local
regulations.
4. Install the new prefilter.
If the suction is not sufficient when a new prefilter is
installed, it is necessary to replace the HEPA filter. Refer
to
To replace the HEPA filter on page 19
.
To replace the HEPA filter
The HEPA filter cannot be cleaned. It is always
necessary to replace it with a new HEPA filter. Only use
Husqvarna AB HEPA filters.
WARNING: Only an
approved service center or an approved
authority is permitted to replace the HEPA
filter.
WARNING: Always use
personal protective equipment, refer to
Personal protective equipment on page 7
.
WARNING: The
particles in the HEPA filter are dangerous to
your health.
WARNING: Make sure
that there are no holes in the HEPA filter. A
damaged HEPA filter is a health risk.
1587 - 011 - 06.03.2023 19

WARNING: Do not install a used HEPA
filter. If you install a used HEPA filter,
leakage and decreased filtration efficiency
can occur.
CAUTION: Do not touch the inner
surface of the HEPA filter. This can cause
damage to the HEPA filter.
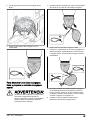
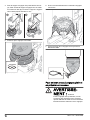
1. Loosen the 6 screws and remove the HEPA filter
cover.
2. Attach the dust cap (A) and pull out the HEPA filter.
Put it into a clean plastic bag (C).
A
B
C
3. Discard the plastic bag correctly. Refer to local
regulations.
4. Install a new HEPA filter. Make sure that the HEPA
filter is pushed to the end position.
5. Install the HEPA filter cover and tighten the 6
screws.
20 1587 - 011 - 06.03.2023
La page est en cours de chargement...
La page est en cours de chargement...
La page est en cours de chargement...
La page est en cours de chargement...
La page est en cours de chargement...
La page est en cours de chargement...
La page est en cours de chargement...
La page est en cours de chargement...
La page est en cours de chargement...
La page est en cours de chargement...
La page est en cours de chargement...
La page est en cours de chargement...
La page est en cours de chargement...
La page est en cours de chargement...
La page est en cours de chargement...
La page est en cours de chargement...
La page est en cours de chargement...
La page est en cours de chargement...
La page est en cours de chargement...
La page est en cours de chargement...
La page est en cours de chargement...
La page est en cours de chargement...
La page est en cours de chargement...
La page est en cours de chargement...
La page est en cours de chargement...
La page est en cours de chargement...
La page est en cours de chargement...
La page est en cours de chargement...
La page est en cours de chargement...
La page est en cours de chargement...
La page est en cours de chargement...
La page est en cours de chargement...
La page est en cours de chargement...
La page est en cours de chargement...
La page est en cours de chargement...
La page est en cours de chargement...
La page est en cours de chargement...
La page est en cours de chargement...
La page est en cours de chargement...
La page est en cours de chargement...
La page est en cours de chargement...
La page est en cours de chargement...
La page est en cours de chargement...
La page est en cours de chargement...
La page est en cours de chargement...
La page est en cours de chargement...
La page est en cours de chargement...
La page est en cours de chargement...
La page est en cours de chargement...
La page est en cours de chargement...
La page est en cours de chargement...
La page est en cours de chargement...
La page est en cours de chargement...
La page est en cours de chargement...
La page est en cours de chargement...
La page est en cours de chargement...
La page est en cours de chargement...
La page est en cours de chargement...
La page est en cours de chargement...
La page est en cours de chargement...
La page est en cours de chargement...
La page est en cours de chargement...
La page est en cours de chargement...
La page est en cours de chargement...
La page est en cours de chargement...
La page est en cours de chargement...
La page est en cours de chargement...
La page est en cours de chargement...
La page est en cours de chargement...
La page est en cours de chargement...
La page est en cours de chargement...
La page est en cours de chargement...
-
 1
1
-
 2
2
-
 3
3
-
 4
4
-
 5
5
-
 6
6
-
 7
7
-
 8
8
-
 9
9
-
 10
10
-
 11
11
-
 12
12
-
 13
13
-
 14
14
-
 15
15
-
 16
16
-
 17
17
-
 18
18
-
 19
19
-
 20
20
-
 21
21
-
 22
22
-
 23
23
-
 24
24
-
 25
25
-
 26
26
-
 27
27
-
 28
28
-
 29
29
-
 30
30
-
 31
31
-
 32
32
-
 33
33
-
 34
34
-
 35
35
-
 36
36
-
 37
37
-
 38
38
-
 39
39
-
 40
40
-
 41
41
-
 42
42
-
 43
43
-
 44
44
-
 45
45
-
 46
46
-
 47
47
-
 48
48
-
 49
49
-
 50
50
-
 51
51
-
 52
52
-
 53
53
-
 54
54
-
 55
55
-
 56
56
-
 57
57
-
 58
58
-
 59
59
-
 60
60
-
 61
61
-
 62
62
-
 63
63
-
 64
64
-
 65
65
-
 66
66
-
 67
67
-
 68
68
-
 69
69
-
 70
70
-
 71
71
-
 72
72
-
 73
73
-
 74
74
-
 75
75
-
 76
76
-
 77
77
-
 78
78
-
 79
79
-
 80
80
-
 81
81
-
 82
82
-
 83
83
-
 84
84
-
 85
85
-
 86
86
-
 87
87
-
 88
88
-
 89
89
-
 90
90
-
 91
91
-
 92
92


dans d''autres langues
- English: Husqvarna DE 110 SH User manual
- español: Husqvarna DE 110 SH Manual de usuario
Documents connexes
-
Husqvarna DE 110i Manuel utilisateur
-
Husqvarna S 13 Single Phase HEPA Dust Extractor Le manuel du propriétaire
-
Husqvarna PG 690 Manuel utilisateur
-
Husqvarna BMG 444 Manuel utilisateur
-
Husqvarna BMS 220 ADB Manuel utilisateur
-
Husqvarna 230iB Manuel utilisateur
-
-
Husqvarna FS400LV Manuel utilisateur
-
-