
Solstice Comfort
Doc-No. (GB) / Dok.-Nr. (DE) / Doc. n° (FR) / Doc. n° (ES) / N° doc. (IT)
Doc.-nr. (NL) / Αρ. εγγράφου (GR): 22076 – 15.09.2010
Operating manual
Wheelchairs
GB
Bedienungsanleitung
Rollstühle
DE
Manuel d'utilisation
Fauteuil roulant
FR
Manual de instrucciones
Silla de ruedas
ES
Istruzioni d'uso
Sedia a rotelle
IT
Gebruiksaanwijzing
Rolstoelen
NL
Οδηγίες χειρισμού
Αναπηρικο αμαξιδιο
GR


Solstice Comfort – 15.09.2010
GB – 1
GBDEFRESITNLGR
Table of contents
1 Preface . . . . . . . . . . . . . . . . . . . . . . . . . . . . . . . . . .2
1.1 Introduction . . . . . . . . . . . . . . . . . . . . . . . . . . . . .2
1.2 Information regarding this operating manual . . . .2
1.3 Symbols used in this operating manual . . . . . . . . .2
2 Safety
. . . . . . . . . . . . . . . . . . . . . . . . . . . . . . . . . . .2
2.1 Safety information . . . . . . . . . . . . . . . . . . . . . . . .2
2.1.1 Safety information – General. . . . . . . . . . . . . . . . .2
2.1.2 Safety information – When driving . . . . . . . . . . . .3
2.1.3 Safety information – Transport, assembly and
maintenance. . . . . . . . . . . . . . . . . . . . . . . . . . . . .3
2.2 Intended use. . . . . . . . . . . . . . . . . . . . . . . . . . . . .3
3Version
. . . . . . . . . . . . . . . . . . . . . . . . . . . . . . . . . .4
3.1 Delivery scope. . . . . . . . . . . . . . . . . . . . . . . . . . . .4
4 Assembly after delivery
. . . . . . . . . . . . . . . . . . . . . .4
4.1 Wheelchair – Designation of components . . . . . . .4
4.2 Wheelchair – Assembly . . . . . . . . . . . . . . . . . . . . .5
5 Getting in and out of the chair
. . . . . . . . . . . . . . . . .5
5.1 Restraining belt. . . . . . . . . . . . . . . . . . . . . . . . . . .5
5.1.1 Adjusting length of restraining belt . . . . . . . . . . . .5
5.1.2 Locking restraining belt . . . . . . . . . . . . . . . . . . . . .5
5.2 Footplates. . . . . . . . . . . . . . . . . . . . . . . . . . . . . . .5
5.2.1 Footplates – Flip up. . . . . . . . . . . . . . . . . . . . . . . .5
5.2.2 Footplates – Flip down . . . . . . . . . . . . . . . . . . . . .5
5.3 Legrests . . . . . . . . . . . . . . . . . . . . . . . . . . . . . . . .5
5.3.1 Legrests – Remove . . . . . . . . . . . . . . . . . . . . . . . .5
5.3.2 Legrests – Inserting and swinging in . . . . . . . . . . .5
6 Information about safe driving
. . . . . . . . . . . . . . . .6
6.1 Increasing the anti-tip safety in driving position . . .6
6.2 Driving information. . . . . . . . . . . . . . . . . . . . . . . .6
6.3 Securing the wheelchair against rolling away –
Wheel locks . . . . . . . . . . . . . . . . . . . . . . . . . . . . .7
6.4 Behaviour during stops . . . . . . . . . . . . . . . . . . . . .7
6.5 Information for attendants . . . . . . . . . . . . . . . . . .7
6.5.1 Handbrakes for attendants . . . . . . . . . . . . . . . . . .7
7 Things to know
. . . . . . . . . . . . . . . . . . . . . . . . . . . .8
7.1 Insurance . . . . . . . . . . . . . . . . . . . . . . . . . . . . . . .8
7.2 Authorisation for road traffic. . . . . . . . . . . . . . . . .8
8 Adjusting the wheelchair
. . . . . . . . . . . . . . . . . . . . .8
8.1 Seat . . . . . . . . . . . . . . . . . . . . . . . . . . . . . . . . . . .8
8.1.1 Seat – Adjusting the angle . . . . . . . . . . . . . . . . . .8
8.1.2 Seat – Removing/inserting the cushion . . . . . . . . .8
8.2 Backrest . . . . . . . . . . . . . . . . . . . . . . . . . . . . . . . .8
8.2.1 Backrest – Adjusting the angle . . . . . . . . . . . . . . .8
8.3 Armrests . . . . . . . . . . . . . . . . . . . . . . . . . . . . . . . .9
8.3.1 Armrests – Adjusting the height . . . . . . . . . . . . . .9
8.3.2 Armrests – Adjusting the position . . . . . . . . . . . . .9
8.4 Headrest . . . . . . . . . . . . . . . . . . . . . . . . . . . . . . . .9
8.4.1 Headrest – Adjusting the height . . . . . . . . . . . . . .9
8.4.2 Headrest – Adjusting the head gap . . . . . . . . . . . .9
8.4.3 Headrest – Adjusting the angle . . . . . . . . . . . . . . .9
8.5 Arm rest . . . . . . . . . . . . . . . . . . . . . . . . . . . . . . 10
8.5.1 Arm rest – Removing/inserting. . . . . . . . . . . . . . 10
8.5.2 Push handle – Adjusting the height . . . . . . . . . . 10
8.6 Adjustment of seat depth . . . . . . . . . . . . . . . . . 10
8.7 Legrests. . . . . . . . . . . . . . . . . . . . . . . . . . . . . . . 10
8.7.1 Legrests – Adjusting the width . . . . . . . . . . . . . 10
8.7.2 Legrests – Adjusting the length . . . . . . . . . . . . . 10
8.7.3 Legrests – Adjusting the angle. . . . . . . . . . . . . . 11
8.8 Calf pads. . . . . . . . . . . . . . . . . . . . . . . . . . . . . . 11
8.8.1 Calf pads – Adjusting the height . . . . . . . . . . . . 11
8.9 Anti-tip brackets . . . . . . . . . . . . . . . . . . . . . . . . 11
8.9.1 Anti-tip brackets – Adjusting the height . . . . . . 11
9 Transport
. . . . . . . . . . . . . . . . . . . . . . . . . . . . . . . 12
9.1 Transport information . . . . . . . . . . . . . . . . . . . . 12
9.2 Wheelchair as vehicle seat . . . . . . . . . . . . . . . . . 12
9.3 Transportation. . . . . . . . . . . . . . . . . . . . . . . . . . 13
9.3.1 Transportation – Dismantling components. . . . . 13
9.3.2 Transportation – Assembling components . . . . . 13
9.3.3 Backrest – Fold forward. . . . . . . . . . . . . . . . . . . 13
9.3.4 Backrest – Fold back . . . . . . . . . . . . . . . . . . . . . 13
10 Cleaning and disinfection
. . . . . . . . . . . . . . . . . . . 14
10.1 Wheelchair – Cleaning . . . . . . . . . . . . . . . . . . . 14
10.2 Wheelchair – Disinfection . . . . . . . . . . . . . . . . . 14
11 Maintenance and inspection
. . . . . . . . . . . . . . . . . 14
11.1 Daily maintenance prior to use . . . . . . . . . . . . . 14
11.2 Annual inspection – Inspection schedule . . . . . . 14
12 Re-use
. . . . . . . . . . . . . . . . . . . . . . . . . . . . . . . . . 16
12.1 Drive wheel – Removal and installation . . . . . . . 16
12.1.1 Removing the drive wheel . . . . . . . . . . . . . . . . . 16
12.1.2 Installing the drive wheel. . . . . . . . . . . . . . . . . . 16
12.2 Drive wheels – Replacing the tyre . . . . . . . . . . . 16
12.3 Wheel locks – Adjusting the braking force. . . . . 17
12.3.1 Adjusting the wheel lock . . . . . . . . . . . . . . . . . . 17
12.4 Handbrakes – Adjusting the braking force . . . . . 17
12.4.1 Adjusting the handbrake . . . . . . . . . . . . . . . . . . 17
12.5 Checking the brake functions . . . . . . . . . . . . . . 17
13 Appendix
. . . . . . . . . . . . . . . . . . . . . . . . . . . . . . . 17
13.1 Technical data. . . . . . . . . . . . . . . . . . . . . . . . . . 17
13.2 Torques for fastening . . . . . . . . . . . . . . . . . . . . 18
13.3 Name plate . . . . . . . . . . . . . . . . . . . . . . . . . . . . 18
13.4 Spare parts . . . . . . . . . . . . . . . . . . . . . . . . . . . . 18
13.5 Temporary decommissioning of the wheelchair . 18
13.6 Disposing of the wheelchair . . . . . . . . . . . . . . . 18
14 Warranty
. . . . . . . . . . . . . . . . . . . . . . . . . . . . . . . 18
15 Annual inspections – Proof of service . . . . . . . . . . 19

Solstice Comfort – 15.09.2010
GB – 2
GB DE FR ES IT NL GR
1 Preface
1.1 Introduction
With the Solstice Comfort wheelchair, you have pur-
chased a product manufactured in accordance with the
latest state of the art technology and with regard to max-
imum operating comfort.
During the construction and selection of materials, great
value has been placed on simple operation and long serv-
ice life.
A variety of useful accessories rounds off the range to the
Solstice Comfort series.
This operating manual presumes that the suitability of the
user for Solstice Comfort usage has been discussed with
a doctor, therapist and/or specialised dealer prior to op-
eration.
This operating manual will familiarise you with the func-
tions of the Solstice Comfort and, in addition, describes
• operation,
• care and maintenance,
• repair.
The wheelchair version shown is only intended to explain
operation, and may vary from the version available on
site.
The manual has been drawn up using information availa-
ble at the time of printing with regard to the construction
and operation of the Solstice Comfort.
We reserve the right to make changes due to technical
improvements.
If you have any questions regarding the Solstice Comfort,
please contact your Days Healthcare specialised dealer
(see dealer stamp on the back cover).
1.2 Information regarding this operat-
ing manual
Thoroughly read the entire operating manual prior to us-
ing the wheelchair!
Ensure that:
• the operating manual is read by all people who drive,
care for and service the wheelchair.
• all people who drive, care for, service or repair the
wheelchair have access to the operating manual at
any time.
Any damage resulting from nonobservance of this oper-
ating manual is excluded from the warranty.
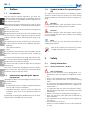
1.3 Symbols used in this operating man-
ual
This operating manual contains the following symbols
which are used to show you specific risks when dealing
with the product or information on how to simplify han-
dling.
Caution!
This symbol identifies safety information which notifies
you of hazards when dealing with the product.
Caution!
This symbol identifies safety information which notifies
you of crushing and pinch point hazards when dealing
with the product.
Note
Under this symbol, you will find useful information on
handling the product.
Next to this symbol, you will find a list of tools
needed to perform the work described.
2 Safety
2.1 Safety information
2.1.1 Safety information – General
Risk of accidents!
• Never use the wheelchair if your driving ability is im-
paired due to the consumption of medication or alco-
hol.
• Only use the wheelchair for its intended purpose.
• Only use the wheelchair when it is in perfect working
order.
• In the event of any defects/breakdowns, stop (using)
the wheelchair immediately and secure it against un-
authorised use.
• It is imperative that you have all malfunctions affect-
ing the function and safety of the wheelchair rectified
immediately.
• Observe the maximum load capacity (see page 17).
• Only use accessories and spare parts authorised by
Days Healthcare.
• The wheelchair is only authorised for the transport of
one person.
• The wheelchair is not a toy!
Please ensure that children do not use the wheelchair
as a toy.

Solstice Comfort – 15.09.2010
GB – 3
GBDEFRESITNLGR
2.1.2 Safety information – When driving
Risk of accidents!
• If the tyres are wet due to rain or driving on wet paths,
the braking ability of the wheelchair is impaired/re-
stricted.
• Check to ensure perfect function of the brakes prior
to each use.
• When parked, always apply the wheel locks to secure
the wheelchair against rolling away.
• Always apply both wheel locks simultaneously.
• We recommend that you use the restraining belts pri-
or to each journey.
• Never drive up or down inclines which are too steep,
over obstacles on inclines and ramps.
• Never use the wheelchair to drive through water!
Risk of tipping!
• Only use the wheelchair on level, solid ground.
• Avoid steep slopes or inclines.
• Avoid gradients or inclines where there is a danger of
slipping (ice, snow, wet surfaces, etc.).
• Avoid loose surfaces the characteristics of which you
cannot assess (woodlands, lawns, beaches, gravel,
etc.)
• Always drive straight up and down inclines and gradi-
ents – Never drive in zigzags.
• Never turn around on inclines.
• Only drive over obstacles and up kerbs at the lowest
point and at a right angle.
• Never drive up or down stairs.
• Never drive backwards down inclines, stairs, kerbs or
over obstacles.
• Never lean out to the side over the armrests or back-
wards over the backrest.
Pinching hazard! Crushing hazard!
• At all joints of the seat and legrest adjustments there
is an increased risk of being pinched or crushed.
• Ensure that nobody has their hands in the hazardous
area when adjusting the position of the seat or
legrest.
Risk of accidents when being pushed on
gradients!
• If the gradient is too steep, the danger exists that the
wheelchair cannot be safely held and will roll down
the slope uncontrolled!
• Avoid areas with steep gradients.
• Use the attendant-operated brakes.
2.1.3 Safety information – Transport, assembly
and maintenance
Risk of accidents during passenger trans-
porting!
• The wheelchair has been crash tested according to
ISO 7176/19.
• By using approved tiedown systems to secure the
wheelchair and the vehicle specific restraint system to
secure the person, the wheelchair can be used as a
transport seat in a vehicle.
Pinching hazard! Crushing hazard!
• Due to the rotating and movable parts, there is an in-
creased risk of being pinched or crushed during prep-
aration for transport and repair work.
• Always carry out any work to be done with great care.
• Only perform any of the work described if you are fa-
miliar with handling the required tools.
• Only perform the work using suitable tools.
Risk of injury due to incorrect assembly!
• Check the wheelchair brakes after every wheel
change to ensure perfect function and readjust them,
if necessary.
• Ensure that all wheelchair components have been cor-
rectly assembled.
• After assembly, check to ensure that all locking devic-
es are holding correctly.
2.2 Intended use
The Solstice Comfort has been designed to increase the
mobility of persons with a walking disability.
Possible illnesses or results of injuries leading to the ina-
bility to walk or very distinct walking disability may in-
clude:
• paralysis,
• loss of limbs,
• defective / deformed limbs,
• joint contracture / joint damage,
• other illnesses.
The use of the wheelchair depends on your physical con-
dition and degree of disability. The wheelchair is deliv-
ered in non-sterile condition.
The Solstice Comfort is designed for indoor and outdoor
use (Standard EN 12 183) and intended for reuse.

Solstice Comfort – 15.09.2010
GB – 4
GB DE FR ES IT NL GR
When used outdoors, Days Healthcare wheelchairs are
designed for use on pavements, foothpaths and pedestri-
an areas. They are not approved for use in road traffic
and therefore, must not be used on public roads.
The wheelchair is not intended:
• for the administration of medicine (e.g. suspension of
IV bags)
• for use in combination with other products
• for examinations or treatments (e.g. not a treatment
chair for dental treatment)
• for sterilisation
3 Version
3.1 Delivery scope
The equipment of the wheelchair depends on the scope
of equipment variations ordered.
Once you have received the wheelchair, check to ensure
that the delivery is complete on the basis of the order list.
In the event of noticeable defects or missing compo-
nents, please contact your DaysHealthcare specialised
dealer (see dealer stamp on the back cover).
In addition to the wheelchair, the following items are part
of the delivery scope:
• 1 × Operating manual
4 Assembly after delivery
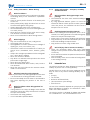
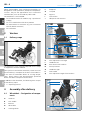
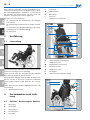
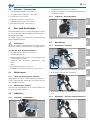
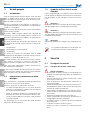
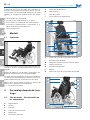
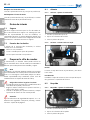
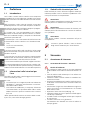
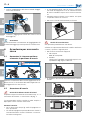
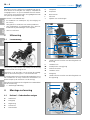
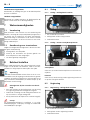
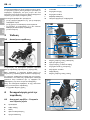
4.1 Wheelchair – Designation of compo-
nents
A Head rest
B Push handle
C Backrest
D Wheel locks
E Steering wheels
F Footplates
G Calf pads
H Leg rests
I Seat cushion
J Side panels with armrests
K Lever adjustment seat angle
L Handbrake left
M Rear wheels with hand rim
N Anti-tip brackets
O Handbrake right
P Push handle
Q Lever adjustment angle of the backrest
A
C
B
D
E
F
G
H
I
J
L
M
O
P
Q
K
N

Solstice Comfort – 15.09.2010
GB – 5
GBDEFRESITNLGR
4.2 Wheelchair – Assembly
1. Attach drive wheels, see page 16.
2. Attach Anti-tip brackets, see page 11.
3. Insert seat cushion, see page 8.
4. Insert headrest, see page 9.
5. Adjust backrest, see page 8.
6. Adjust legrests, see page 10.
5 Getting in and out of the chair
The physical condition and degree of disability determine
the most sensible method for getting in and out of the
wheelchair.
If you have any questions, please consult your therapist
and/or specialised dealer.
Risk of accidents!
Prior to getting in or out of the wheelchair, ensure that it
is standing on a solid, level and nonslip surface.
Please observe the following prior to getting in or
out:
• Apply wheel locks, see page 7.
• Open restraining belt.
• Do not step on the footplates when standing up or
getting in and out of the wheelchair.
• Flip up the footplates of the legrests, see page 5
or
• remove the legrests, see page 5.
• If necessary, remove side panels, see page 10.
5.1 Restraining belt
5.1.1 Adjusting length of restraining belt
Adjust the belt strap of the catch to the required length.
Tighten the loose-hanging end of the belt strap and fas-
ten it with the holder.
5.1.2 Locking restraining belt
Press the catch of the restraining belt into the lock until it
is latching hearable.
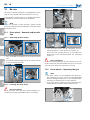
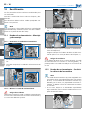
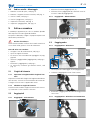
5.2 Footplates
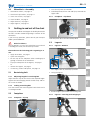
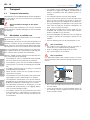
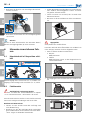
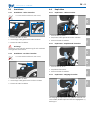
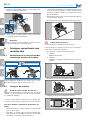
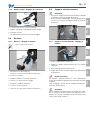
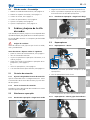
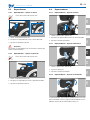
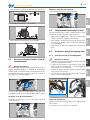
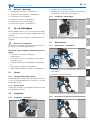
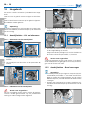
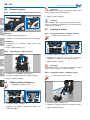
5.2.1 Footplates – Flip up
A
B
1. Turn the calf pads (A) outwards.
2. Grab footplate (B) on the side and flip up towards the
legrest tube.
5.2.2 Footplates – Flip down
Grab foot plate (B) on the side and flip down.
5.3 Legrests
5.3.1 Legrests – Remove
1. Press legrest lock (A) and keep it pressed.
2. Swing out legrest.
3. Remove legrest upward out of the fitting tube.
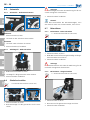
5.3.2 Legrests – Inserting and swinging in
B
A

Solstice Comfort – 15.09.2010
GB – 6
GB DE FR ES IT NL GR
1. Insert legrest from above into the fitting tube, down
to the stop.
2. Swing in the legrest until locking lever (A) engages.
Note
When swinging in the legrest ensure that the locking le-
ver (A) engages correctly.
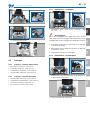
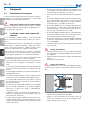
6 Information about safe driv-
ing
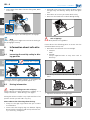
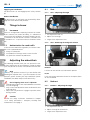
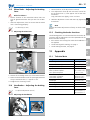
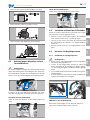
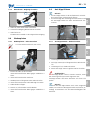
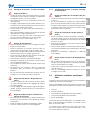
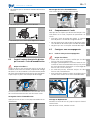
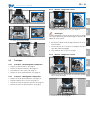
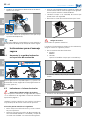
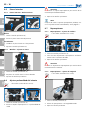
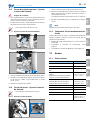
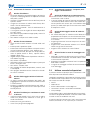
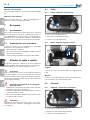
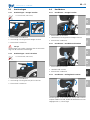
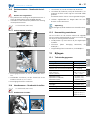
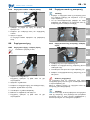
6.1 Increasing the anti-tip safety in driv-
ing position
Recline the backrest slightly (approx. 8°) and adjust the
seat angle (seat tilt) slightly upward (approx. 4°).
6.2 Driving information
Danger of falling over! Risk of injury!
Always observe the safety information in Chapter "2.1.2
Safety information – When driving" from page 3.
Driving the Solstice Comfort is very simple and after a few
practice sessions you will find it very easy.
Please observe the following when driving:
• Always use the grip rings and not the tyres to move
the wheelchair.
• Please note that the grip rings can become slippery
due to moisture and your hands will slip off more eas-
ily. If necessary, wear gloves.
A
4˚
8˚
Correct adjustment
CAUTION! Risk of tipping!
• Increased risk of injury exists when the drive wheels
and grip rings are rotating. Always drive with great
care.
• Never drive so fast that you cannot brake safely.
• Never use the wheel locks to brake during driving.
Risk of tipping!
Never drive parallel to the gradient.
Please observe the following points to ensure that the
wheelchair does not tip over:
• Never drive over obstacles that are too high.
Example:
Kerbs
Remedy:
Always negotiate kerbs at entry areas such as
driveways.
• Do not try to climb an obstacle when driving on in-
clines.
• Approach the obstacle at a right angle.

Solstice Comfort – 15.09.2010
GB – 7
GBDEFRESITNLGR
• Never drive over obstacles with just one wheel.
• Never drive backwards over an obstacle.
• Never drive backwards down a kerb.
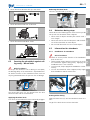
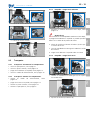
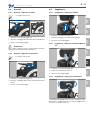
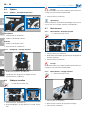
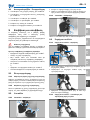
6.3 Securing the wheelchair against roll-
ing away – Wheel locks
Risk of accidents!
If the tyres are wet due to rain or driving on wet paths,
the braking ability of the wheelchair is impaired/restrict-
ed. Perfect function of the wheelchair wheel locks can
only be guaranteed when the tyres are free of damage.
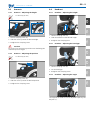
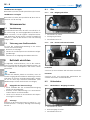
The wheel lock levers (A) are located near the drive
wheels on both side of the wheelchair.
Applying the wheel locks
Press lever (A) forward until the lever noticeably engages.
A
A
Releasing the wheel locks
Pull lever (A) backwards up to the stop.
6.4 Behaviour during stops
Please observe the following points to ensure that you do
not tip with the wheelchair when stopped:
• Never reach for objects outside your normal reach =
arm’s length.
• Never lean too far over the side panels and the back-
rest of the wheelchair to reach objects.
• Do not slide forward in the seat to reach objects.
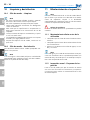
6.5 Information for attendants
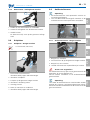
6.5.1 Handbrakes for attendants
Risk of accidents!
• Check to ensure perfect function of the handbrakes
prior to each use.
• When parked, always apply the wheel locks to secure
the wheelchair against rolling away. Applying the
handbrake alone is not sufficient!
• In push mode, always apply both handbrakes simulta-
neously.
• To lock the wheelchair when stopped, always apply
both handbrakes and the wheel locks.
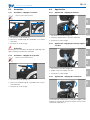
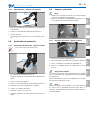
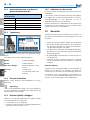
Braking while driving
Apply the brake lever (A) until the wheelchair comes to a
halt.
Let go of the brake lever to release the brake.
A
B
A

Solstice Comfort – 15.09.2010
GB – 8
GB DE FR ES IT NL GR
Applying the handbrakes
Pull brake levers (A) and engage pawls (safety catches)
(B).
Release handbrakes
Pull brake levers (A) and pawls (B) automatically disen-
gage out of the detent (lock position).
7 Things to know
7.1 Insurance
There are no regulations requiring insurance for wheel-
chairs. However, for reasons of liability, it is advisable to
consult your own third-party insurance company to clari-
fy whether or not the Solstice Comfort is insured in case
of accidents or if a separate insurance should be taken
out.
7.2 Authorisation for road traffic
In the sense of road traffic regulations, the Solstice Com-
fort is not a powered vehicle.
• Always use footpaths.
• Use pedestrian crossings to cross lanes of traffic.
• Pay particular attention to pedestrians.
8 Adjusting the wheelchair
The following describes how you can operate the me-
chanical adjustments of the wheelchair in order to adjust
your seat position to ensure a comfortable and safe ride.
Note
However, only perform the work if you are familiar with
handling the required tools. If you are uncertain or have
questions, please contact your Days Healthcare special-
ised dealer (see dealer stamp on the back cover).
Risk of tipping when seat is adjusted!
• Changing the angle of the seat and backrest increases
the risk of tipping.
• Only use the seat adjustment when inside and on level
and solid floors.
• Adjust the seat position as upright as possible when
driving outside.
Caution!
Observe the safety instruction contained in Chapter
"2.1.3 Safety information – Transport, assembly and
maintenance" from page 3.
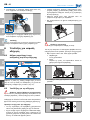
8.1 Seat
8.1.1 Seat – Adjusting the angle
1. Pull adjustment lever (A).
2. Adjust the seat angle.
3. Let go of the adjustment lever.
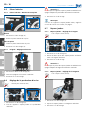
8.1.2 Seat – Removing/inserting the cushion
Remove
Lift front of seat cushion (A) and remove upward.
Insert
Push seat cushion towards the back rest and press down
to the seat board.
8.2 Backrest
8.2.1 Backrest – Adjusting the angle
1. Pull adjustment lever (A).
2. Adjust the angle of the backrest
3. Let go of the adjustment lever.
A
A
A

Solstice Comfort – 15.09.2010
GB – 9
GBDEFRESITNLGR
8.3 Armrests
8.3.1 Armrests – Adjusting the height
1 × Allen key (4 mm)
1. Loosen clamping screw (A).
2. Slide the armrest pad to the desired height.
3. Retighten the clamping screw.
Caution!
Do not pull out armrests beyond the mark indicating the
maximum pull-out height.
8.3.2 Armrests – Adjusting the position
1 × Allen key (4 mm)
1. Loosen clamping screw (A).
2. Slide the armrest pad to the desired position.
3. Retighten the clamping screw
A
A
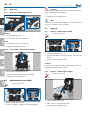
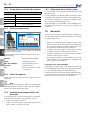
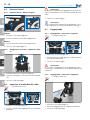
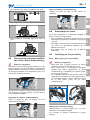
8.4 Headrest
8.4.1 Headrest – Adjusting the height
1. Loosen clamping lever (A).
2. Slide the headrest to the desired height.
3. Retighten the clamping lever.
8.4.2 Headrest – Adjusting the head gap
1. Loosen clamping lever (B).
2. Set the head gap.
3. Retighten the clamping screw.
8.4.3 Headrest – Adjusting the angle
The angle of the headrest can be adjusted stepless by the
ball joint (C).
A
B
C

Solstice Comfort – 15.09.2010
GB – 10
GB DE FR ES IT NL GR
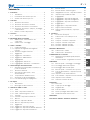
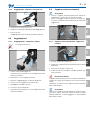
8.5 Arm rest
8.5.1 Arm rest – Removing/inserting
Remove
1. Loosen clamping screw (A).
2. Pull side panel out of its receptacle.
Insert
1. Insert side panel into its receptacle.
2. Retighten clamping screw (A).
8.5.2 Push handle – Adjusting the height
1. Loosen both clamping screws (A).
2. Slide the push handle to the desired height.
3. Retighten the clamping screws.
8.6 Adjustment of seat depth
1 × Allen key (4 mm)
1. Loosen clamping screws (A).
2. Pull out the legrest supports to the desired depth.
A
A
A
Caution!
Do not pull out legrest supports beyond the mark indicat-
ing the maximum pull-out depth.
3. Retighten the clamping screws.
Note
After pulling out the legrest support, ensure that the seat
cushion is moved forward, see page 8.
8.7 Legrests
8.7.1 Legrests – Adjusting the width
1 × Allen key (4 mm)
1. Loosen clamping screws (A).
2. Pull out both legrest receptacles evenly to the desired
width.
3. Retighten the clamping screws.
Caution!
Do not pull out legrest receptacle beyond the mark indi-
cating the maximum pull-out depth.
8.7.2 Legrests – Adjusting the length
1 × Allen key (4 mm)
1. Loosen clamping screw (A).
2. Adjust legrest to the desired length.
3. Retighten the clamping screw.
A
A

Solstice Comfort – 15.09.2010
GB – 11
GBDEFRESITNLGR
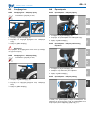
8.7.3 Legrests – Adjusting the angle
1. Pull lever (A) forward and hold.
2. Adjust legrest to the desired angle.
3. Let go of the lever.
The legrest remains at the adjusted angle.
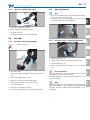
8.8 Calf pads
8.8.1 Calf pads – Adjusting the height
1 × Allen key (4 mm)
1. Unscrew nut (A),
while securing the hexagon socket screw against turn-
ing.
2. Remove hexagon socket screw.
3. Adjust the calf pad to the desired height.
4. Insert hexagon socket screw into the hole.
5. Place spring washer.
6. Refit nut (A) and tighten it firmly.
7. Secure the hexagon socket screw against turning.
A
A
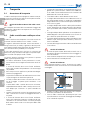
8.9 Anti-tip brackets
Note
• Push the anti-tip bracket into the fitting tube and fas-
ten by means of the locking pin.
• To remove, pull out the locking pin and remove the
anti-tip brackets from the fitting tube.
8.9.1 Anti-tip brackets – Adjusting the height
1. Loosen locking pin (A).
2. Adjust anti-tip bracket (B) to the desired height.
3. Fasten locking pin (A).
4. Adjust the second anti-tip bracket in the same man-
ner.
Risk of accidents!
The anti-tip brackets are not installed correctly unless
locking pins (A) are inserted correctly.
Following adjustment, check the anti-tip brackets to en-
sure firm seating.
Note
The further down the anti-tip brackets are adjusted, the
higher the degree of safety against tipping backwards.
However, this does reduce the manoeuvrability of the
wheelchair.
A
B

Solstice Comfort – 15.09.2010
GB – 12
GB DE FR ES IT NL GR
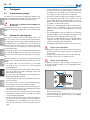
9 Transport
9.1 Transport information
The wheelchair can be folded together or disassembled in
just a few moves so that it can also be easily transported
in small vehicles.
Risk of accidents! Damage to the wheel-
chair!
Always ensure that components are securely fastened
during transport. Transport damages are not covered by
the warranty.
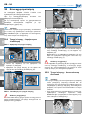
9.2 Wheelchair as vehicle seat
The wheelchair has been subjected to a crash test accord-
ing to ISO 10542 – part 2.
The following information must be communicated to all
end users, transport services, prescribing medical profes-
sionals, parents or any other person or organisation when
advising them on the use of a product for transportation.
Due to the potentially serious health risks for end users,
Days Healthcare does not recommend transporting peo-
ple in vehicles while seated in their wheelchairs.
However, should a person need to be transported in this
way, strictly observe the following:
• The wheelchair must be positioned facing forward,
not at an angle or facing sideways or rearwards.
• The tie-down system must be fastened according to
manufacturers' instructions and labelling on the prod-
uct.
• A headrest (head restraint) must always be attached
and appropriately positioned.
• When possible, remove the seat cushion to create a
lower centre of gravity.
• The wheelchair must be secured by a four-point strap-
type tiedown system, conforming to ISO 10542-2.
• The wheelchair user/occupant must be restrained in-
dependently of the wheelchair by means of a lap and
diagonal shoulder belt, conforming to ISO 10542-1
• Any detachable accessories or components must be
removed and stored securely in the luggage depart-
ment (car boot) during transport.
• The tiedown system must be fitted to the main frame
of the wheelchair, as indicated by the carabiner stick-
ers and in the user manual, and not any other part of
the wheelchair.
• The tiedown system should be attached as close as
possible to an angle of 45 degrees and tightened se-
curely in accordance with the tiedown system's in-
structions.
• The wheelchair brakes must be firmly applied.
• The lap belt must be worn low across the front of the
pelvis, so that the angle of the lap belt is within the
preferred area of 30 to 75 degrees to the horizontal.
• The lap and diagonal shoulder belt must not be held
away from the body by wheelchair components or
parts, such as armrests or wheels.
• The diagonal shoulder belt must be fitted over the
shoulders and secured to the vehicle above and be-
hind the shoulders of the occupant.
• The lap and diagonal shoulder belt must be adjusted
as tightly as possible to the occupant without loss of
comfort.
• The belt webbing must not be twisted when in use.
Risk of accidents!
• The weight of the wheelchair with its occupant in-
creases the risk of accidents during loading.
• Only use loading ramps designed for the load.
• Ask a second person for assistance.
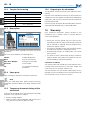
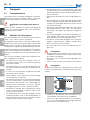
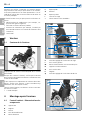
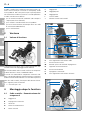
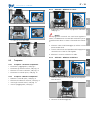
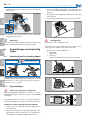
Risk of accidents!
Use approved tiedown and restraint systems to secure
the user/occupant and wheelchair during transport in the
vehicle.
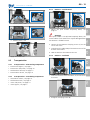
• Use a ramp or lifting platform to push the wheelchair
into the vehicle.
• Secure the wheelchair at the four tiedown points (A)
by attaching it with an approved restraint system (B)
to the transport vehicle.
ca. 45˚
ca. 45˚
B
B

Solstice Comfort – 15.09.2010
GB – 13
GBDEFRESITNLGR
Tiedown points, front
Tiedown points, rear
• Apply the wheel locks.
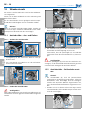
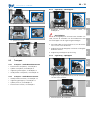
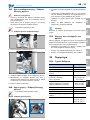
9.3 Transportation
9.3.1 Transportation – Dismantling components
• Remove the legrests, see page 5.
• Remove the side panels, see page 10.
• Fold backrest forward, see page 13.
• Remove drive wheels, see page 16.
9.3.2 Transportation – Assembling components
• Attach drive wheels, see page 16.
• Fold backrest back, see page 13.
• Insert side panels, see page 10.
• Insert legrests, see page 5.
A
A
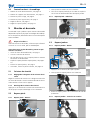
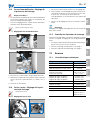
9.3.3 Backrest – Fold forward
1. Adjust the push handle completely down, see
page 10.
Damage!
If the push handle is not adjusted completely down, the
control cables of the hand levers may be damaged when
the backrest is folded forward.
2. Loosen the two bottom clamping screws (A) on the
rear of the frame.
3. Grab the push handle and pull the backrest out of the
brackets from above.
4. Fold the backrest forward onto the seat.
9.3.4 Backrest – Fold back
1. Insert the backrest into the brackets (A) on the rear of
the frame.
2. Retighten clamping screws (B).
A
A
B

Solstice Comfort – 15.09.2010
GB – 14
GB DE FR ES IT NL GR
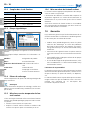
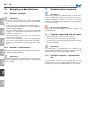
10 Cleaning and disinfection
10.1 Wheelchair – Cleaning
Note
• Never use sharp-edged tools (knives, metal scrapers)
or aggressive solvents for cleaning.
• Never use high-pressure cleaners for cleaning.
• Only use mild detergents without scouring agents to
clean any surfaces.
• Please observe the instructions on how to use the de-
tergents in order to avoid damage to the component
surfaces.
• Light soiling or dust is best removed using soft cloths.
• Heavy soiling can best be removed with damp cloths
and mild soapy water.
• Use a dry cloth to dry off the wheelchair after clean-
ing!
10.2 Wheelchair – Disinfection
If disinfection is required, only use suitable disinfectants
in accordance with the scope of the wheelchair.
Note
If you are uncertain or have questions, please contact
your Days Healthcare specialised dealer (see dealer stamp
on the back cover).
11 Maintenance and inspection
Note
If you notice any faults on your wheelchair during main-
tenance that are not described in the repair instructions,
please contact your Days Healthcare specialised dealer
(see dealer stamp on the back cover).
Risk of accidents!
Never use faulty and/or damaged wheelchairs.
11.1 Daily maintenance prior to use
• Check function of handbrakes.
• Check function of wheel locks.
• Visually check the grip rings, tyres and rims for dam-
age.
Note
The steering wheels and drive wheels are equipped with
puncture-proof (tubeless) PU tyres, therefore, it is not
necessary to check the air pressure of the tyres.
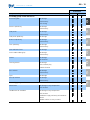
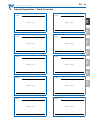
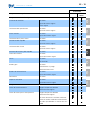
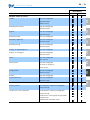
11.2 Annual inspection – Inspection
schedule
Have your wheelchair inspected by your specialised deal-
er once a year. He will have the necessary tools and expe-
rience to service your wheelchair correctly.

GBDEFRESITNLGR
Solstice Comfort – 15.09.2010
GB – 15
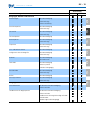
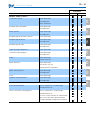
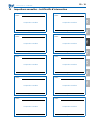
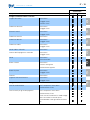
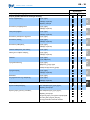
Evaluation
Component/inspection for OK defective
Assembly group: Frame and chassis
Restraining belt no damage
fixed securely
safe closing
Armrest upholstery no damage
fixed securely
Side panels no damage
fixed securely
Side panel upholstery no damage
Backrest upholstery no damage
fixed securely
Seat upholstery no damage
fixed securely
Seat and back frame no damage
Push handle rubber grips no damage
fixed securely
Frames no damage
no corrosion
Steering wheels no damage
joints without play
smooth function
Drive wheels no damage
fixed securely
Tyres no damage
Anti-tip brackets no damage
fixed securely
Assembly group: Brakes
Wheel locks no damage to any components
safe function
Handbrakes for attendant no damage to any components
safe function
handbrakes apply uniformly on both drive
wheels
Bowden cables are easy to move

Solstice Comfort – 15.09.2010
GB – 16
GB DE FR ES IT NL GR
12 Re-use
The Solstice Comfort wheelchairs are designed for re-use.
They must be cleaned and disinfected prior to re-use.
If disinfection is required, only use suitable disinfectants
in accordance with the scope of the wheelchair.
Note
If you are uncertain or have questions, please contact
your Days Healthcare specialised dealer (see dealer stamp
on the back cover).
12.1 Drive wheel – Removal and installa-
tion
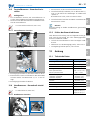
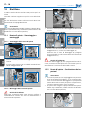
12.1.1 Removing the drive wheel
1. Press and hold the interlock (A) of the quick-release
axle
2. Pull the drive wheel together with the wheel axle out
of the mounting socket (B).
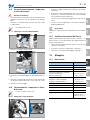
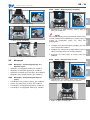
12.1.2 Installing the drive wheel
Risk of accidents!
Check the wheel locks after every wheel change to en-
sure perfect function and readjust them, if necessary.
A
B
1. Press and hold the interlock (A) of the quick-release
axle.
2. Push the quick-release axle (B) completely into the
mounting socket (C) and release the interlock (A).
Ensure that the retaining balls (D) at the end of the
quick-release axle protrude beyond the mounting
socket (C).
Risk of accidents!
When the retaining balls (D) do not protrude out of the
quick-release axle, the affected drive wheel is not secured
and can fall off when the wheelchair is moved.
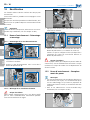
12.2 Drive wheels – Replacing the tyre
Note
• The drive wheels (A) are equipped with puncture-
proof (tubeless) PU tyres. If a tyre is heavily damaged
and the driving characteristics of the wheelchair are
impaired, the affected tyre must be replaced.
• In this case, please contact your Days Healthcare spe-
cialised dealer (see dealer stamp on back cover).
A
B
C
D
A

Solstice Comfort – 15.09.2010
GB – 17
GBDEFRESITNLGR
12.3 Wheel locks – Adjusting the braking
force
Risk of accidents!
• Perfect function of the wheelchair wheel locks can
only be guaranteed when the tyres are free of dam-
age.
• After the adjustment, check to ensure that the wheel
lock is functioning properly.
1 × Allen key (5 mm)
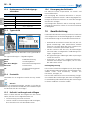
12.3.1 Adjusting the wheel lock
1. Release wheel lock.
2. Loosen the fastening screws (A) of the brake bracket.
3. Move the brake bracket until the spacing (B) between
the tyre and the brake (C) is approx. 5 mm.
4. Retighten the fastening screws.
12.4 Handbrakes – Adjusting the braking
force
1 × open-end spanner (8 mm)
12.4.1 Adjusting the handbrake
A
B
C
C
B
A
1. Loosen locknut (A) of adjustment screw (B).
2. Turn adjustment screw (B) until resistance can be felt
on the brake lever (C) after approx. half of the lever
movement.
Only pull brake lever lightly, never use force.
3. Hold the adjustment screw and secure by tightening
the locknut.
Note
Perform the brake adjustment uniformly on both hand-
brakes.
12.5 Checking the brake functions
The following points must be checked after the brake ad-
justment, and the adjustment must be repeated until the
brake functions correctly.
• Drive wheels are running free when the handbrake is
not applied.
• Check braking while moving, see page 7.
• Check locking function, see page 8.
13 Appendix
13.1 Technical data
Designation Value
Total weight 36.6 kg (18“)
Maximum user weight 135.0 kg
Weight of heaviest part 23,0 kg
Tyre size (Standard)
front / puncture-proof
rear / puncture-proof
200 × 50 (8 × 2“)
24 × 1 3/8“
Seat width (Option)
Seat width (Standard)
Seat width (Option)
41.0 cm (16“)
46.0 cm (18“)
56.0 cm (22“)
Seat depth 46.0 cm (18“)
Seat height, without seat cushion 53.0 cm (21“)
Total height 122.0 – 142.0 cm
Total length, with legrests 115.0 cm (45“)
Total width 66.0 cm (26“)
70.0 cm (27.5“)
80.0 cm (31.5“)

Solstice Comfort – 15.09.2010
GB – 18
GB DE FR ES IT NL GR
13.2 Torques for fastening
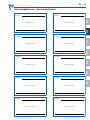
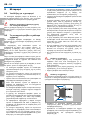
13.3 Name plate
A name plate has been attached in the front area of the
wheelchair.
The name plate indicates the following data:
13.4 Spare parts
Only use original spare parts from Days Healthcare.
Note
When you need spare parts, please contact your Days
Healthcare specialised dealer (see dealer stamp on back
cover).
13.5 Temporary decommissioning of the
wheelchair
If you are not intending to use your wheelchair for longer
periods of time, prepare it as follows:
• Remove soiling and dust.
• Fold the Solstice Comfort together and store in such a
way, that the tyres do not touch the floor.
General torques for screws and nuts
M5 4.5 – 6.0 Nm
M6 8.0 – 12.0 Nm
M8 18.0 – 25.0 Nm
M10 30.0 – 40.0 Nm
M12 50.0 – 60.0 Nm
Model: Product designation
Date: Date of manufacture
Max. User Weight: Maximum user weight
Serial No: Serial number
CE: CE-marking according to
93/42/EEC
13.6 Disposing of the wheelchair
The wheelchair consists mainly of metal and plastic com-
ponents.
Disposal of the individual materials must be carried out in
accordance with the regional environmental and disposal
regulations, and may only take place after the wheelchair
has been dismantled.
Please have your wheelchair dismantled and the materials
separated and disposed of by a specialised dealer.
14 Warranty
Days Healthcare guarantees perfect function of the
wheelchairs for 12 months within its General Business
Terms and Conditions.
• During the warranty period any parts that have be-
come defective due to faulty workmanship or material
will be repaired or replaced without charge by Days
Healthcare supplier / dealer.
• The warranty excludes all items that have been subject
to undue wear and items subjected to misuse.
• Unauthorized changes or modifications will forfeit
your warranty.
• If a defect or fault is discovered, the Days healthcare
supplier / dealer from whom the wheelchair was pur-
chased should be notified immediately.
Limitation of liability
The warranty does not extend to the consequential costs
resulting from fault clearance, in particular freight and
travel costs, loss of earnings, expenses, etc.
The manufacturer will not accept responsibility for any
damage or injury caused by misuse or non-observance of
the instructions set out in this user manual
La page est en cours de chargement...
La page est en cours de chargement...
La page est en cours de chargement...
La page est en cours de chargement...
La page est en cours de chargement...
La page est en cours de chargement...
La page est en cours de chargement...
La page est en cours de chargement...
La page est en cours de chargement...
La page est en cours de chargement...
La page est en cours de chargement...
La page est en cours de chargement...
La page est en cours de chargement...
La page est en cours de chargement...
La page est en cours de chargement...
La page est en cours de chargement...
La page est en cours de chargement...
La page est en cours de chargement...
La page est en cours de chargement...
La page est en cours de chargement...
La page est en cours de chargement...
La page est en cours de chargement...
La page est en cours de chargement...
La page est en cours de chargement...
La page est en cours de chargement...
La page est en cours de chargement...
La page est en cours de chargement...
La page est en cours de chargement...
La page est en cours de chargement...
La page est en cours de chargement...
La page est en cours de chargement...
La page est en cours de chargement...
La page est en cours de chargement...
La page est en cours de chargement...
La page est en cours de chargement...
La page est en cours de chargement...
La page est en cours de chargement...
La page est en cours de chargement...
La page est en cours de chargement...
La page est en cours de chargement...
La page est en cours de chargement...
La page est en cours de chargement...
La page est en cours de chargement...
La page est en cours de chargement...
La page est en cours de chargement...
La page est en cours de chargement...
La page est en cours de chargement...
La page est en cours de chargement...
La page est en cours de chargement...
La page est en cours de chargement...
La page est en cours de chargement...
La page est en cours de chargement...
La page est en cours de chargement...
La page est en cours de chargement...
La page est en cours de chargement...
La page est en cours de chargement...
La page est en cours de chargement...
La page est en cours de chargement...
La page est en cours de chargement...
La page est en cours de chargement...
La page est en cours de chargement...
La page est en cours de chargement...
La page est en cours de chargement...
La page est en cours de chargement...
La page est en cours de chargement...
La page est en cours de chargement...
La page est en cours de chargement...
La page est en cours de chargement...
La page est en cours de chargement...
La page est en cours de chargement...
La page est en cours de chargement...
La page est en cours de chargement...
La page est en cours de chargement...
La page est en cours de chargement...
La page est en cours de chargement...
La page est en cours de chargement...
La page est en cours de chargement...
La page est en cours de chargement...
La page est en cours de chargement...
La page est en cours de chargement...
La page est en cours de chargement...
La page est en cours de chargement...
La page est en cours de chargement...
La page est en cours de chargement...
La page est en cours de chargement...
La page est en cours de chargement...
La page est en cours de chargement...
La page est en cours de chargement...
La page est en cours de chargement...
La page est en cours de chargement...
La page est en cours de chargement...
La page est en cours de chargement...
La page est en cours de chargement...
La page est en cours de chargement...
La page est en cours de chargement...
La page est en cours de chargement...
La page est en cours de chargement...
La page est en cours de chargement...
La page est en cours de chargement...
La page est en cours de chargement...
La page est en cours de chargement...
La page est en cours de chargement...
La page est en cours de chargement...
La page est en cours de chargement...
La page est en cours de chargement...
La page est en cours de chargement...
La page est en cours de chargement...
La page est en cours de chargement...
La page est en cours de chargement...
La page est en cours de chargement...
La page est en cours de chargement...
La page est en cours de chargement...
La page est en cours de chargement...
La page est en cours de chargement...
La page est en cours de chargement...
La page est en cours de chargement...
La page est en cours de chargement...
La page est en cours de chargement...
La page est en cours de chargement...
La page est en cours de chargement...
La page est en cours de chargement...
La page est en cours de chargement...
La page est en cours de chargement...
La page est en cours de chargement...
-
 1
1
-
 2
2
-
 3
3
-
 4
4
-
 5
5
-
 6
6
-
 7
7
-
 8
8
-
 9
9
-
 10
10
-
 11
11
-
 12
12
-
 13
13
-
 14
14
-
 15
15
-
 16
16
-
 17
17
-
 18
18
-
 19
19
-
 20
20
-
 21
21
-
 22
22
-
 23
23
-
 24
24
-
 25
25
-
 26
26
-
 27
27
-
 28
28
-
 29
29
-
 30
30
-
 31
31
-
 32
32
-
 33
33
-
 34
34
-
 35
35
-
 36
36
-
 37
37
-
 38
38
-
 39
39
-
 40
40
-
 41
41
-
 42
42
-
 43
43
-
 44
44
-
 45
45
-
 46
46
-
 47
47
-
 48
48
-
 49
49
-
 50
50
-
 51
51
-
 52
52
-
 53
53
-
 54
54
-
 55
55
-
 56
56
-
 57
57
-
 58
58
-
 59
59
-
 60
60
-
 61
61
-
 62
62
-
 63
63
-
 64
64
-
 65
65
-
 66
66
-
 67
67
-
 68
68
-
 69
69
-
 70
70
-
 71
71
-
 72
72
-
 73
73
-
 74
74
-
 75
75
-
 76
76
-
 77
77
-
 78
78
-
 79
79
-
 80
80
-
 81
81
-
 82
82
-
 83
83
-
 84
84
-
 85
85
-
 86
86
-
 87
87
-
 88
88
-
 89
89
-
 90
90
-
 91
91
-
 92
92
-
 93
93
-
 94
94
-
 95
95
-
 96
96
-
 97
97
-
 98
98
-
 99
99
-
 100
100
-
 101
101
-
 102
102
-
 103
103
-
 104
104
-
 105
105
-
 106
106
-
 107
107
-
 108
108
-
 109
109
-
 110
110
-
 111
111
-
 112
112
-
 113
113
-
 114
114
-
 115
115
-
 116
116
-
 117
117
-
 118
118
-
 119
119
-
 120
120
-
 121
121
-
 122
122
-
 123
123
-
 124
124
-
 125
125
-
 126
126
-
 127
127
-
 128
128
-
 129
129
-
 130
130
-
 131
131
-
 132
132
-
 133
133
-
 134
134
-
 135
135
-
 136
136
-
 137
137
-
 138
138
-
 139
139
-
 140
140
-
 141
141
-
 142
142
-
 143
143
-
 144
144


dans d''autres langues
- italiano: Days Solstice Comfort Istruzioni per l'uso
- English: Days Solstice Comfort Operating instructions
- español: Days Solstice Comfort Instrucciones de operación
- Deutsch: Days Solstice Comfort Bedienungsanleitung
- Nederlands: Days Solstice Comfort Handleiding
Autres documents
-
Life & Mobility Plus Manuel utilisateur
-
Invacare Alu Lite Manuel utilisateur
-
-
Sunrise Medical Quickie GP Serie Le manuel du propriétaire
-
 Zippie Z-Bop Manuel utilisateur
-
-
-
-
Vermeiren Eclips X4 90° Manuel utilisateur
-
