
U300
MANUAL
READ AND SAVE THESE INSTRUCTIONS

Instructions for use 3
Instructions d’utilisation 15
Instrucciones de uso 27

3
en
INSTRUCTIONS FOR USE
BONECO U300

4
en
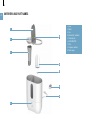
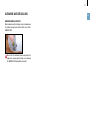
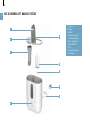
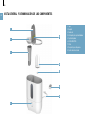
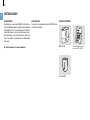
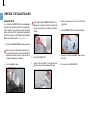
1 Cover
2 Nozzle
3 Flue
4 Main switch / controller
5 Cleaning brush
6 A250 AQUA PRO
7 Filter
8 Fragrance container
9 Power supply
1
2
4
7
6
5
8
9
3
OVERVIEW AND PART NAMES

5
en
Overview and part names 4
Introduction 6
Introduction 6
A250 AQUA PRO 6
Items included 6
Start-up 7
The right location 8
The right location 8
Functions and indicators 8
Water level 8
Fragrance container 8
Notes on care 9
Care instructions 9
Cleaning agent 9
Cleaning and descaling 10
Descaling 10
Removing mineral deposits 11
Replacing the A250 AQUA PRO 12
Replacing THE A250 AQUA PRO 12
Filter function 13
Cleaning the filter 13
Cleaning the filter 13
Technical data 14
TABLE OF CONTENTS

6
en
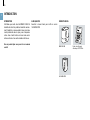
ITEMS INCLUDED
BONECO U300 “A7417 EZCal” cleaning and
descaling powder
A250 AQUA PRO
INTRODUCTION
Congratulations on your purchase of the BONECO U300.
This high-performance humidifier keeps the humidity at
a comfortable level at all times. No longer will you have
to contend with itchy eyes, dry skin and dry mucous
membranes. This helps make you and your family less
susceptible to colds and other infectious diseases.
You will not want to give up your newly gained com-
fort.
INTRODUCTION
A250 AQUA PRO
Please refer to the enclosed manual for putting the A250
AQUA PRO into operation.

7
en
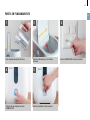
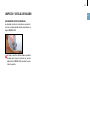
4
3
1 2
5
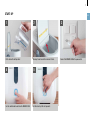
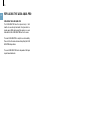
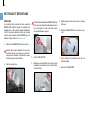
Connect the BONECO U300 to the power outlet.
Fill the tank with cold tap water. Warning: Do not exceed the maximum fill level.
Use the control knob to switch on the BONECO U300.
Set the intensity of the mist you want.
START-UP

8
en
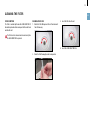
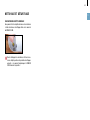
WATER LEVEL
The LED lighting on the switch indicates the operating
status and water level.
• Blue: The appliance is switched on and in operation. A
sufficient amount of water is in the tank.
• Red: The appliance is switched on, but the water tank
is empty. Switch off the appliance or refill the tank with
fresh water.
• No display: The appliance is switched off or discon-
nected from the power outlet.
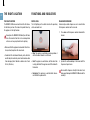
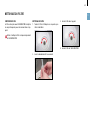
FRAGRANCE CONTAINER
Commercially available fragrances can be inserted into
the fragrance container on the rear side.
1. Press down on the fragrance container to unlock the
drawer.
2. Sprinkle the cotton wadding in the drawer with the
fragrance of your choice.
Never add the fragrance directly to the water tank;
doing so will damage the BONECO U300 and void the
warranty!
FUNCTIONS AND INDICATORS
THE RIGHT LOCATION
The BONECO U300 releases more than half a liter of wa-
ter into the air per hour. This makes it important to set up
the appliance in the right location.
Do not place the BONECO U300 directly on the floor,
since the moisture from the mist can damage floor
surfaces such as parquet or delicate carpeting.
• Make sure that the appliance stands about 30 centime-
ters (one foot) away from the closest wall.
• Do not direct the mist toward the wall, plants, furniture
or other objects in order to prevent water condensation
from damaging them. Maintain a distance of at least
50cm (20 inches).
THE RIGHT LOCATION

9
en
CARE INSTRUCTIONS
With increasing time and use, the performance of the
A250 AQUA PRO decreases. The inside of the BONECO
U300 becomes coated with limescale. Stagnant water
can also impair cleanliness and lead to unpleasant odors.
This means regular maintenance and cleaning is neces-
sary to ensure clean and unimpaired operation.
Always unplug the unit from the power outlet before
cleaning. Failure to do so can result in electric shock
and pose the risk of severe or fatal injury!
CLEANING AGENT
Clean the housing of the BONECO U300 with a soft cloth.
Use warm tap water with a small amount of dishwashing
detergent.
Interval* Task
Daily Check the water level; add water if necessary
After 1 week without operation Empty and clean the BONECO U300
Every 2 weeks Clean and descale the water tank
Every 2 to 6 months Replacing the A250 AQUA PRO
NOTES ON CARE
* Effective time intervals vary depending on air and water quality and the length of operation.
For this reason, the information here should be viewed as a recommendation.
FUNCTIONS AND INDICATORS

10
en
DESCALING
If stubborn limescale deposits form at the bottom of the
BONECO U300, the appliance must also be descaled in
addition to the cleaning. For this process, use the pro-
vided “EZCal” descaling agent. You can get replacement
parts at your BONECO specialist dealer or at the online
store under shop.boneco.us
1. Disconnect the BONECO U300 from the power out-
let.
The unit must always be unplugged from the power
outlet before draining it. Failure to do so can result in
electric shock and pose the risk of severe or fatal
injury!
2. Empty the water tank.
Tip the long side of the BONECO U300 towards the
sink (with the viewing window facing down). This
prevents water from getting into the air outlet and
damaging the unit.
3. Remove the A250 AQUA PRO.
4. Mix 1 bag of EZCal with 1 liter (a quarter gallon) of
warm water and pour the mixture into the water
tank.
5. Wait a few hours to allow the EZCal mixture to take
effect.
6. Clean the BONECO U300 with a dish brush.
7. Rinse the inside of the water tank with fresh tap wa-
ter.
8. Reinsert the A250 AQUA PRO.
CLEANING AND DESCALING

11
en
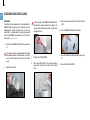
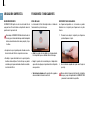
REMOVING MINERAL DEPOSITS
Mineral deposits on the membrane can be removed using
the yellow cleaning brush attached to the cover of the
BONECO U300.
Never clean the membrane using sharp objects or
aggressive cleaning agents; doing so can damage
the BONECO U300 and voids the warranty!
CLEANING AND DESCALING

12
en
REPLACING THE A250 AQUA PRO
The A250 AQUA PRO must be replaced every 2 to 6
months. In cases of very hard water, it may have to be re-
placed sooner. White dust around the appliance is a sure
indication that the A250 AQUA PRO has run its course.
The new A250 AQUA PRO is ready for use immediately.
Please refer to the enclosed manual for putting the A250
AQUA PRO into operation.
The used A250 AQUA PRO can be disposed of with your
regular household waste.
REPLACING THE A250 AQUA PRO

13
en
FILTER FUNCTION
The filter is located right below the A250 AQUA PRO. It
blocks foreign bodies from moving out of the water tank
and into the unit.
The filter must be removed and cleaned every time
the A250 AQUA PRO is replaced.
CLEANING THE FILTER
1. Rotate the filter 90 degrees to the left and remove it
from the housing.
2. Wash the filter thoroughly under running water.
3. Insert the filter into the unit.
4. Insert the A250 AQUA PRO filter.
CLEANING THE FILTER

14
en
Mains voltage 120 V / 60 Hz
Power consumption 45 W
Humidity output 2.5 gal / 24h (400 g/h)
For rooms up to 645 sqft / (60 m
2
)
Water capacity 1.30 gallons (5.0 Liter)
Dimensions L×W×H 12.12×6.49 ×12.79 in / (308×165×325 mm)
Weight (empty) 7.7 lbs / (3.5 kg)
Operating noise level < 30 dB (A)
TECHNICAL DATA

15
fr
INSTRUCTIONS D’UTILISATION
BONECOU300

16
fr
1 Couvercle
2 Embout
3 Conduit
4 Interrupteur principal/
Commande principale
5 Brosse de nettoyage
6 A250AQUAPRO
7 Filtre
8 Récipient pour parfum
9 Alimentation
1
2
4
7
6
5
8
9
3
VUE D’ENSEMBLE ET NOM DES PIÈCES

17
fr
Vue d’ensemble et nom des pièces 16
Introduction 18
Introduction 18
A250AQUAPRO 18
Éléments inclus 18
Mise en marche 19
Le bon endroit 20
Le bon endroit 20
Fonctions et indicateurs 20
Niveau de l’eau 20
Récipient pour parfum 20
Remarques sur l’entretien 21
Consignes d’entretien 21
Produit de nettoyage 21
Nettoyage et détartrage 22
Détartrage 22
Élimination des dépôts minéraux 23
Remplacement de l’A250AQUAPRO 24
Remplacement de l’A250AQUAPRO 24
Fonction du filtre 25
Nettoyage du filtre 25
Nettoyage du filtre 25
Caractéristiques techniques 26
SOMMAIRE

18
fr
ÉLÉMENTS INCLUS
BONECOU300 Poudre de nettoyage et
détartrage «A7417 EZCal»
A250AQUAPRO
INTRODUCTION
Félicitations pour votre achat du BONECO U300. Cet
humidificateur d’air très performant maintient constam-
ment l’humidité à un niveau agréable. Vous n’aurez plus
à subir picotements dans les yeux, peau et muqueuses
sèches. Vous et votre famille serez ainsi moins vulné-
rables aux rhumes et aux autres maladies infectieuses.
Vous ne pourrez plus vous passer de ce nouveau
confort.
INTRODUCTION
A250AQUAPRO
Consultez le manuel fourni pour mettre en service
l’A250AQUAPRO.

19
fr
4
3
1 2
5
Branchez le BONECOU300 sur une prise électrique.
Remplissez le réservoir avec de l’eau du robinet
froide.
Avertissement: Ne dépassez pas le niveau maximal
de remplissage.
Utilisez le bouton de commande pour allumer
le BONECOU300.
Définissez l’intensité du brouillard que vous souhaitez
atteindre.
MISE EN MARCHE

20
fr
NIVEAU DE L’EAU
Le voyant DEL sur l’interrupteur indique l’état de fonction-
nement et le niveau de l’eau.
• Bleu: L’appareil est allumé et est en service. Une quan-
tité suffisante d’eau se trouve dans le réservoir.
• Rouge: L’appareil est allumé et est en service, mais le
réservoir d’eau est vide. Éteignez l’appareil ou remplis-
sez le réservoir avec de l’eau fraîche.
• Aucun affichage: L’appareil est éteint ou n’est pas
branché sur la prise murale.
RÉCIPIENT POUR PARFUM
Vous pouvez remplir le récipient situé à l’arrière avec les
parfums disponibles dans le commerce.
1. Appuyez sur le récipient pour parfum afin de déblo-
quer le compartiment.
2. Aspergez de parfum l’ouate de coton qui se trouve
dans le compartiment.
N’ajoutez pas directement le parfum dans le réser-
voir d’eau ; cela endommagerait le BONECOU300 et
annulerait la garantie !
FONCTIONS ET INDICATEURS
LE BON ENDROIT
Le BONECOU300 diffuse plus d’un demi-litre d’eau par
heure dans l’air. C’est pourquoi il est important de placer
l’appareil au bon endroit.
Ne placez pas le BONECO U300 directement par
terre, car l’humidité produite par le brouillard peut
endommager les sols comme le parquet ou les mo-
quettes fragiles.
• Assurez-vous que l’appareil se trouve à environ
30centimètres (un pied) du mur le plus proche.
• N’orientez pas le brouillard en direction d’un mur, de
plantes, de meubles ou d’autres objets, afin d’éviter les
dommages dus à l’eau de condensation. Maintenez une
distance d’au moins 50cm (20po).
LE BON ENDROIT
La page charge ...
La page charge ...
La page charge ...
La page charge ...
La page charge ...
La page charge ...
La page charge ...
La page charge ...
La page charge ...
La page charge ...
La page charge ...
La page charge ...
La page charge ...
La page charge ...
La page charge ...
La page charge ...
La page charge ...
La page charge ...
La page charge ...
La page charge ...
-
 1
1
-
 2
2
-
 3
3
-
 4
4
-
 5
5
-
 6
6
-
 7
7
-
 8
8
-
 9
9
-
 10
10
-
 11
11
-
 12
12
-
 13
13
-
 14
14
-
 15
15
-
 16
16
-
 17
17
-
 18
18
-
 19
19
-
 20
20
-
 21
21
-
 22
22
-
 23
23
-
 24
24
-
 25
25
-
 26
26
-
 27
27
-
 28
28
-
 29
29
-
 30
30
-
 31
31
-
 32
32
-
 33
33
-
 34
34
-
 35
35
-
 36
36
-
 37
37
-
 38
38
-
 39
39
-
 40
40


dans d''autres langues
- English: Boneco U300 User manual
- español: Boneco U300 Manual de usuario
Documents connexes
-
Boneco U300 Manuel utilisateur
-
Boneco U200 Quick Manual
-
-
-
Boneco U350 Manuel utilisateur
-
-
-
-
-
Boneco 7142 Manuel utilisateur