Skil PM4912B-20 Manuel utilisateur
- Catégorie
- Tondeuses à gazon
- Taper
- Manuel utilisateur

WARNING: To reduce the risk of injury, the user must read and understand the
Owner’s Manual before using this product. Save these instructions for future reference.
AVERTISSEMENT : Afin de réduire les risques de blessure, l’utilisateur doit lire et
comprendre le guide d’utilisation avant d’utiliser cet article. Conservez le présent guide
afin de pouvoir le consulter ultérieurement.
ADVERTENCIA : Para reducir el riesgo de lesiones, el usuario debe leer y comprender
el Manual del operador antes de utilizar este producto. Guarde estas instrucciones para
consultarlas en caso sea necesario.
Owner’s Manual
Guide d’utilisation
Manual del propietario
For Customer Service
Pour le service à la clientèle
Servicio al cliente
2 X 20V 18'' Brushless Mower
Tondeuse sans balai de 2 X 20 V, 45.7 cm / 18 po
Cortadora de césped sin escobillas de 2 X 20 V de 18 pulgadas
1-877-SKIL-999
OR
www.skil.com
Model/ Modelo/ Modèle: PM4912B-00

2
TABLE OF CONTENTS
Safety Rules for Cordless Lawn Mower ...........................3-6
Symbols ....................................................7-10
Get to Know Your Lawn Mower ................................11-12
Specifications .................................................12
Accessory .....................................................12
Assembly ..................................................13-15
Operating Instructions .......................................16-20
Maintenance ...............................................21-26
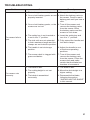
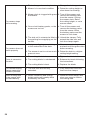
Troubleshooting .............................................27-28
Limited Warranty of SKIL Consumer Tool ...........................29

3
SAFETY RULES FOR CORDLESS LAWN MOWER
WARNING
This machine was built to be operated according to the rules for safe
operation included in this manual. As with any type of power equipment,
carelessness or error on the part of the operator can result in serious injury. This machine is
capable of amputating hands and feet and throwing objects. Failure to observe all safety
instructions could result in serious injury or death.
WARNING
When using electric lawn mowers, basic safety precautions should always
be followed to reduce the risk of re, electric shock, and personal injury.
These basic precautions include the following:
WARNING
Read all safety warnings, instructions, illustrations and specifications.
Failure to follow all instructions listed below may result in electric shock, re
and/or serious injury.
Avoid accidental starting. Be sure that the switch is in the locked or off position before
inserting the battery pack.
Carrying blowers with your nger on the switch or inserting the
battery pack into a blower with the switch on invites accidents.
Disconnect the battery pack from the blower before making any adjustments, changing
accessories, or storing the blower.
Such preventive safety measures reduce the risk of
starting the blower accidentally.
Recharge only with the charger specied by the manufacturer. A charger that is suitable
for one type of battery pack may create a risk of re when used with another battery pack.
Use power tools only with specically designated battery packs. Use of any other battery
packs may create a risk of injury and re.
When battery pack is not in use, keep it away from other metal objects, like paper clips,
coins, keys, nails, screws or other small metal objects, that can make a connection
from one terminal to another. Shorting the battery terminals together may cause burns or a
re.
Under abusive conditions, liquid may be ejected from the battery; avoid contact. If
contact accidentally occurs, ush with water. If liquid contacts eyes, additionally seek
medical help. Liquid ejected from the battery may cause irritation or burns.
Do not use a battery pack or tool that is damaged or modied. Damaged or modied
batteries may exhibit unpredictable behaviour resulting in re, explosion or risk of injury.
Do not expose a battery pack or tool to re or excessive temperature. Exposure to re or
temperature above 265 °F may cause explosion.
Follow all charging instructions and do not charge the battery pack or tool outside the
temperature range specied in the instructions. Charging improperly or at temperatures
outside the specied range may damage the battery and increase the risk of re.
Have your power tool serviced by a qualied repair person using only identical
replacement parts. This will ensure that the safety of the power tool is maintained.
Never service damaged battery packs. Service of battery packs should only be performed
by the manufacturer or authorized service providers.
Children
Tragic accidents can occur if the operator is not alert to the presence of children.
Children are often attracted to the mower and mowing activity. They do not understand the
dangers. Never assume that children will remain where you last saw them.
•
Keep children out of the mowing area and under the watchful care of a responsible adult
other than the operator.
•
Be alert and turn the mower off if a child enters the area.
•
Use extreme care when approaching blind corners, doorways, shrubs, trees, or other objects
that may obscure your vision of a child who may run into the mower.

4
•
Never allow children under 14 years old to operate a power mower. Children 14 years old
and over should read and understand the operation instructions and safety rules in this
manual and should be trained and supervised by a parent. Only responsible individuals who
are familiar with these rules of safe operation should be allowed to use this machine.
Operation
General Operation:
•
Read this operator’s manual carefully in its entirety before attempting to assemble this
machine. Read, understand, and follow all instructions on the machine and in the manuals
before operation. Be completely familiar with the controls and proper use of this machine
before operating it. Keep this manual in a safe place for future and regular reference.
•
Don’t use in rain.
•
Use the right appliance – Do not use the lawn mower for any job except that for which it is
intended. Your lawn mower has been designed to perform only one job: to mow grass.
•
Don’t overreach – Keep proper footing and balance at all times.
•
Objects struck by the lawn mower blade can cause severe injuries to persons. The lawn
should always be carefully examined and cleared of all objects prior to each mowing.
•
Keep the area of operation clear of all persons, particularly small children, and pets.
•
Before and while moving backwards with the mower, look behind and down for small children
and other people.
•
Keep clear of the discharge opening at all times.
•
This machine is a precise piece of power equipment, not a plaything. Therefore, exercise
extreme caution at all times. Your unit has been designed to perform one job: to mow grass.
Do not use it for any other purpose.
•
Don’t force the lawn mower – it will do the job better and more safely at the rate for which it
was designed.
•
Thoroughly inspect the area where the equipment is to be used. Remove all stones, sticks,
wire, toys and other foreign objects that could be tripped over or picked up and thrown by the
blade. Thrown objects can cause serious personal injury.
•
Plan your mowing pattern to avoid discharge of material toward roads, sidewalks, bystanders
and the like. Also, avoid discharging material against walls or obstructions, which may cause
discharged material to ricochet back toward the operator.
•
To help avoid blade contact or an injury from thrown objects, stay in the operator zone behind
the handles and keep children, bystanders, helpers and pets at least 100 feet (30m) from the
mower while it is in operation. Stop the machine if anyone enters the area.
•
Always wear safety glasses or safety goggles during operation and while performing an
adjustment or repair to protect your eyes. Thrown objects that ricochet can cause serious
injury to the eyes. Always use a face or dust mask if the operation is dusty.
•
Dress properly – Do not wear loose clothing or jewelry. They can be caught in moving parts.
Use of rubber gloves and footwear is recommended when working outdoors. Wear sturdy,
rough-soled work shoes and close-tting slacks and shirts. Shirts and pants that cover the
arms and legs and steel-toed shoes are recommended. Never operate this machine in bare
feet, sandals, slippery or lightweight (e.g., canvas) shoes.
•
Do not put hands or feet near rotating parts or under the cutting deck. Contact with the blade
can amputate hands and feet.
•
A missing or damaged discharge cover can cause blade contact or injuries from thrown objects.
•
Many injuries occur as a result of the mower being pulled over the foot during a fall caused by
slipping or tripping. Do not hold onto the mower if you are falling; immediately release the handle.

5
•
Never pull the mower back toward you while you are walking. If you must back the mower
away from a wall or obstruction, rst look down and behind you to avoid tripping, and then
follow these steps:
–
Step back from mower to fully extend your arms.
–
Be sure you are well balanced with sure footing.
–
Pull the mower back slowly, no more than half way toward you.
–
Repeat these steps as needed.
•
Do not operate the mower while under the inuence of alcohol or drugs.
•
Stay alert – watch what you are doing. Use common sense. Do not operate the lawn mower
when you are tired.
•
The motor/blade control handle is a safety device. Never attempt to bypass its operation.
Doing so makes the safety device inoperative and may result in personal injury through
contact with the rotating blade. The motor/blade control handle must operate easily in both
directions and automatically return to the disengaged position when released.
•
Avoid dangerous environments – Don’t use lawn mowers in damp or wet locations so as to
avoid slipping and falling during operation.
•
Always be sure of your footing. A slip and fall can cause serious personal injury. If you feel
you are losing your footing, release the motor/blade control handle immediately and the
blade will stop rotating within three seconds.
•
Mow only in daylight or good articial light. Walk, never run while operating.
•
Stop the blade when crossing gravel drives, walks or roads.
•
If the equipment should start to vibrate abnormally, immediately stop the motor, remove the
battery and check for the cause. Vibration is generally a warning of trouble.
•
Never operate the mower without the proper trailing shield, discharge cover, grass bag,
mulching insert, side discharge chute, motor/blade control handle or other safety protective
devices in place and working. Never operate the mower with damaged safety devices.
Failure to do so can result in personal injury.
•
Always stop the motor before making adjustments to a wheel or a cutting-height adjustment.
•
If situations occur that are not covered in this manual, use care and good judgment. Contact
SKIL Customer Service for assistance.
•
Use only the charger supplied by the manufacturer to recharge.
•
Do not charge the battery pack outdoors.
•
Do not charge the battery pack in rain or in wet locations.
•
Use the lawn mower only with specically designated battery pack. Use of any other batteries
may create a risk of re.
Operation on a Slope:
Slopes are a major factor related to slip-and-fall accidents, which can result in severe injury.
Operation on slopes requires extra caution. If you feel uneasy on a slope, do not mow it. For
your safety, use the slope gauge on page 21 to measure slopes before operating this unit on a
sloped or hilly area. If the slope is greater than 15 degrees, do not mow it.
Do:
•
Mow across the face of slopes; Never mow up and down. Exercise extreme caution when
changing direction on slopes.
•
Watch for holes, ruts, rocks, hidden objects, or bumps which can cause you to slip or trip. Tall
grass can hide obstacles.
Do not:
•
Do not mow near drop-offs, ditches or embankments; You could lose your footing or balance.

6
•
Do not mow slopes greater than 15 degrees, as shown on the slope gauge.
•
Do not mow on wet grass. Unstable footing could cause slipping.
Service
WARNING
Grass bag components, the discharge cover, side discharge chute,
mulching insert and trailing shield are subject to wear and damage, which
could expose moving parts or allow objects to be thrown and could increase the risk of injury.
For safety protection, frequently check all components and replace damaged components
immediately with identical replacement parts. Contact SKIL Customer Service for assistance.
•
Do not wash the mower with a hose; Avoid getting water in the motor and electrical
connections.
•
Before cleaning the machine, turn the motor off and wait until the blade comes to a complete
stop, then remove the battery pack. The cutting blade continues to rotate for a few seconds
after the motor is shut off. Never place any part of the body in the blade area until you are
sure the blade has stopped rotating. Then unclog the chute or remove or replace the grass
bag, or mulching insert.
•
Follow instructions for lubricating and changing accessories.
•
Keep handles dry, clean and free from oil and grease.
•
To reduce a re hazard, keep the motor cover free of grass, leaves and debris build-up.
•
Check the blade and motor mounting bolts at frequent intervals for proper tightness. Also,
visually inspect the blade for damage (e.g., bending, cracking and wear.). Replace the blade
only with the identical replacement blade.
•
Maintain your mower with care – keep the mower blade sharp and clean for the best and
safest performance. Mower blades are sharp and can cut. Wrap the blade or wear gloves
and use extra caution when servicing it.
•
Keep all nuts, bolts, and screws tight to be sure the equipment is in safe working condition.
•
Never remove or tamper with safety devices. Regularly check their proper operation.
•
Never do anything to interfere with the intended function of a safety device or to reduce the
protection provided by a safety device.
•
After striking a foreign object, stop the motor, remove the battery pack, allow the blade to
stop rotating, and thoroughly inspect the mower for any damage. Repair the damage before
operating the mower.
•
Remove the battery and store the idle lawn mower in a covered area when not in use. Allow
the motor to cool before storing it in any enclosure. The lawn mower should be stored in a
dry, high, or locked-up enclosure, out of reach of children.
•
Maintain or replace safety and instruction labels, as necessary.
•
Do not incinerate the appliance even if it is severely damaged. The batteries can explode in a
re.
•
When servicing, use only identical replacement parts. Use of parts that do not meet the
original equipment specications may lead to improper performance and compromised
safety.
•
SAVE THESE INSTRUCTIONS.
Refer to them frequently and use them to instruct others
who may use this tool. If you lend this tool to someone else, also lend these instructions to
them to prevent misuse of the product and possibly injury.
SAVE THESE INSTRUCTIONS!

7
SYMBOLS
Safety Symbols
The purpose of safety symbols is to attract your attention to possible dangers. The safety
symbols and the explanations with them deserve your careful attention and understanding. The
symbol warnings do not, by themselves, eliminate any danger. The instructions and warnings
they give are no substitutes for proper accident prevention measures.
WARNING
Be sure to read and understand all safety instructions in this Owner's
Manual, including all safety alert symbols such as “
DANGER
,”
“
WARNING
,” and “
CAUTION
” before using this tool. Failure to following all instructions listed
below may result in electric shock, re, and/or serious personal injury.
The denitions below describe the level of severity for each signal word. Please read the
manual and pay attention to these symbols.
This is the safety alert symbol. It is used to alert you to potential
personal injury hazards. Obey all safety messages that follow this
symbol to avoid possible injury or death.
DANGER
DANGER indicates a hazardous situation which, if not avoided, will
result in death or serious injury.
WARNING
WARNING indicates a hazardous situation which, if not avoided,
could result in death or serious injury.
CAUTION
CAUTION, used with the safety alert symbol, indicates a hazardous
situation which, if not avoided, will result in minor or moderate
injury.
Damage Prevention and Information Messages
These inform the user of important information and/or instructions that could lead to equipment
or other property damage if they are not followed. Each message is preceded by the word
“NOTICE”, as in the example below:
NOTICE:
Equipment and/or property damage may result if these instructions are not followed.
WARNING
The operation of any power tools can result in foreign
objects being thrown into your eyes, which can result
in severe eye damage. Before beginning power tool operation, always
wear safety goggles or safety glasses with side shields and a full face
shield when needed. We recommend a Wide Vision Safety Mask for use
over eyeglasses or standard safety glasses with side shields. Always use
eye protection which is marked to comply with ANSI Z87.1.

8
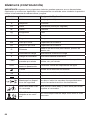
SYMBOLS (CONTINUED)
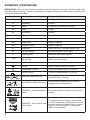
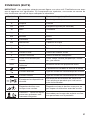
IMPORTANT:
Some of the following symbols may be used on your tool. Please study them
and learn their meaning. Proper interpretation of these symbols will allow you to operate the
tool better and more safely.
Symbol Name Designation/Explanation
V Volts Voltage (potential)
A Amperes Current
Hz Hertz Frequency (cycles per second)
W Watt Power
kg Kilograms Weight
min Minutes Time
s Seconds Time
Wh Watt-hours Battery capacity
Ah Ampere-Hours Battery capacity
Ø Diameter Size of drill bits, grinding wheels, etc.
n
0
No load speed Rotational speed, at no load
n Rated speed Maximum attainable speed
…/min
Revolutions or reciprocation
per minute
Revolutions, strokes, surface speed,
orbits, etc. per minute
IPX4 Ingress Protection Degree Protection from splashing water
Arrow Action in the direction of arrow
Alternating current Type or a characteristic of current
Direct current Type or a characteristic of current
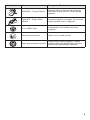
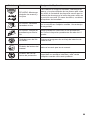
Maintain Safety Devices
Do not open or remove safety shields
while the tool is running.
Look Behind While Backing
Look down and behind rst to avoid
tripping when pulling back.
DANGER - Keep Bystanders
Away
Do not mow when children or others are
nearby.
KEEP HANDS and FEET AWAY
GARDEZ VOS MAINS et VOS PIEDS À DISTANCE
MANTENGA LAS MANOS Y LOS PIES ALEJADOS
DANGER - Keep Hands and
Feet Away
To reduce the risk of injury, keep hands
and feet away from rotating parts. Do not
operate unless discharge cover or grass
bag is in its proper place. If damaged,
replace immediately.

9
Symbol Name Designation/Explanation
DANGER – Thrown Debris
Remove objects that can be thrown by
the blade in any direction. Wear safety
glasses.
DANGER - Steep Slope
Hazard
Use extra caution on slopes. Do not mow
slopes greater than 15 degrees.
Li-ion RBRC seal
Designates Li-ion battery recycling
program
Read manual symbol Alerts user to read manual
Wear eye protection symbol
Always wear safety goggles or safety
glasses with side shields and a full face
shield when operating this product.

10
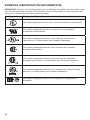
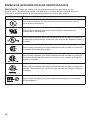
SYMBOLS (CERTIFICATION INFORMATION)
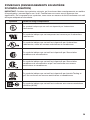
IMPORTANT:
Some of the following symbols for certication information may be used on your
tool. Please study them and learn their meaning. Proper interpretation of these symbols will
allow you to operate the tool better and more safely.
Symbol Designation/Explanation
This symbol designates that this tool is listed by Underwriters Laboratories.
This symbol designates that this component is recognized by
Underwriters Laboratories.
This symbol designates that this tool is listed by Underwriters
Laboratories, to United States and Canadian Standards.
This symbol designates that this tool is listed by the Canadian
Standards Association.
This symbol designates that this tool is listed by the Canadian
Standards Association, to United States and Canadian Standards.
This symbol designates that this tool is listed by the Intertek Testing
Services, to United States and Canadian Standards.
This symbol designates that this tool complies to NOM Mexican
Standards.

11
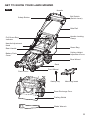
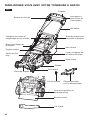
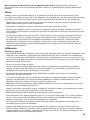
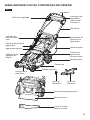
GET TO KNOW YOUR LAWN MOWER
Fig. 1
Bail Switch
(Switch Lever)
Side Rail
Handle-Locking
Clamp
Grass Bag
Rear Wheel
Deck
Front Wheel
Safety Key
Rear-Discharge Door
Trailing Shield
Blade Wrench
Mulching Insert
Deck Cover
Cutting-Height
Adjustment Leve
Full Grass-Bag
Indicator
Safety Button
Handle
Handle-Adjustment
Knob
Battery Pack-
Cover
Rear Handle

12
Safety Key
The safety key must be inserted and turned
to “I” position to enable the mower to operate.
To prevent unauthorized use, remove the
safety key and store in a safe place.
Bail Switch
The bail switch is located on the upper
handle of the mower. The switch engages
and disengages the motor/ blade.
Safety Button
The safety button must be pressed down
before the motor can be started.
WARNING
The bail switch and the
safety button are safety
devices. Never attempt to bypass their
operations.
Handle-Locking Clamp
Locks/unlocks the side rails in the extended
or the recessed position.
Side Rails
Can be extended and locked for operation or
recessed for storage.
Handle-Adjustment Knob
Locks/unlocks the handle position when
adjusting the angle of the mower handle:
1. Locked Storage Position
2. Upper Operating Position
3. Middle Operating Position
4. Lower Operating Position
Trailing Shield and Rear Discharge Door
The trailing shield is designed to minimize
stones or other objects being thrown
backward by the mower blade. The shield
and the rear discharge door minimize the
possibility of accidental foot contact with the
blade. DO NOT operate the mower without
the trailing shield and rear discharge door in
place.
Spring-Loaded Cutting-Height Adjustment
Lever
One-handed cutting-height adjustment.
SPECIFICATIONS
Model No PM4912B-00
Rated Voltage 40V d.c. (2×20V d.c.)
No-load Speed 3100 RPM
Cutting Height 1”(25mm) – 3” (75mm)
Cutting-Height Positions 6 Settings
Deck Size 18” (45.7cm)
Grass-Bag Volume 1-1/4 Bushel (44L)
Recommended operating temperature 14 – 104°F (-10 – 40℃)
Recommended storage temperature 32 – 104°F (0 – 40℃)
Recommended charging temperature 41 – 95°F (5 – 35°C)
ACCESSORIES
WARNING
The following part is subjected to be worn out from normal use. Use
only identical replacement parts listed below.
Use of parts that do not
meet the original equipment specications may lead to improper performance and
compromised safety.
Part name Model Number
18” Lawn Mower Blade SMB1800

13
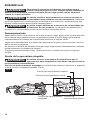
ASSEMBLY
WARNING
To prevent accidental starting that could cause serious personal
injury, always remove both battery packs from the tool when
assembling parts, making adjustments, cleaning, or when not in use.
WARNING
Do not attempt to modify this tool or create accessories not
recommended for use with this tool.
Any such alteration or modication
is misuse and could result in a hazardous condition leading to possibly serious injury.
WARNING
Do not use any attachments or accessories not recommended by the
manufacturer of this product.
The use of attachments or accessories not
recommended can result in serious personal injury.
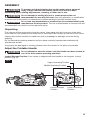
Unpacking
First remove all the accessories from the carton, then grasp both the front part of the deck
cover and the rear handle at the same time to carefully lift the mower up and out of the carton.
Inspect the product carefully to make sure that no breakage or damage occurred during
shipping.
Do not discard the packing material until you have carefully inspected and satisfactorily
operated the mower.
If any parts are damaged or missing, please return the mower to the place of purchase.
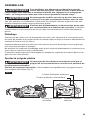
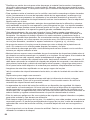
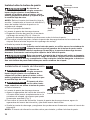
Adjust the Foldable Handle
WARNING
Do not attempt to start the mower until the handle has been locked at
one of the three preset operating positions.
Locked Storage Position:
Your mower is shipped with the handle in the compact, locked
position (Fig. 2).
Fig. 2
Upper Operating Position
Middle Operating Position
Lower Operating
Position
Locked Storage
Position

14
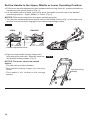
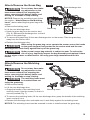
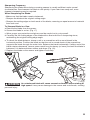
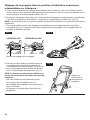
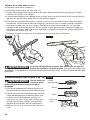
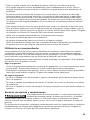
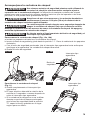
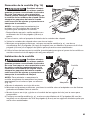
Set the Handle to the Upper, Middle or Lower Operating Position:
a. Pull the two handle-adjustment knobs outward while turning them 90° counterclockwise or
clockwise to the unlock position (Fig. 3).
b. Lift the handle with one hand, then gently pivot the handle to select one of the desired
operating positions – Upper, Middle, or Lower. (Fig. 4)
NOTICE:
Taller users may prefer the upper operating position.
c. Turn the two handle-adjustment knobs back to the locked position (Fig. 3) and make sure
that the lock pin has been engaged in the desired operating position.
Fig. 3
Handle-adjustment knob
LOCK UNLOCK
Fig. 4
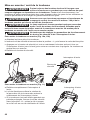
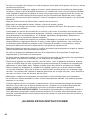
d. Open the two handle-locking clamps and
fully extend the side rails. Securely close the
two handle-locking clamps. (Fig. 5)
NOTICE: The motor cannot be started
unless:
•
The side rails are fully extended.
•
Both handle-locking clamps are securely
closed.
•
The handle is not located at the storage
position.
Fig. 5
handle-locking
clamps

15
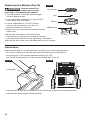
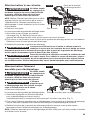
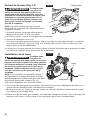
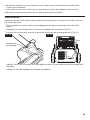
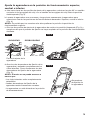
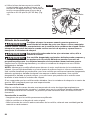
Attach/Remove the Grass Bag
WARNING
Do not at any time make
any adjustment to the
lawn mower without first stopping the
motor, removing both battery packs, and
waiting for the blade to stop rotating.
NOTICE:
Remove the mulching insert (follow
the section: “
Attach/Remove the Mulching
Insert”
) before attaching the grass bag to the
mower.
a. Remove the battery pack.
b. Lift the rear-discharge door.
c. Hook the grass bag onto the anchor stud
(Fig. 6). Release the discharge door so that it
rests on the grass bag.
d. To remove the grass bag, lift the rear-discharge door on the mower. Take the grass bag
away from the anchor stud.
e. Release the discharge door.
WARNING
When using the grass bag, never operate the mower unless the hooks
on the grass bag are firmly seated on the anchor stud and the rear-
discharge door rests firmly against the top of the grass bag.
WARNING
Under normal usage, bag material is subject to wear. To reduce the
risk of injury, frequently inspect the bag assembly and replace if there
are any signs of wear or deterioration. Use only grass bags manufactured for this
mower.
Attach/Remove the Mulching
Insert
WARNING
Do not at any time make
any adjustment to the
lawn mower without first stopping the
motor, removing both battery packs, and
waiting for the blade to stop rotating.
WARNING
The mulching insert must
be installed when not
using the grass bag.
a. Remove the battery.
b. Lift the rear-discharge door.
c. Grasp the handle of the mulching insert
and fully insert it into the mower, so that it is
securely seated (Fig. 7)
d. To remove the mulching insert, lift the rear-discharge door, grasp the handle of the mulching
insert, and pull it out.
e. Release the discharge door and make sure it rests rmly against the mulching insert.
NOTICE:
The mulching insert must be removed in order to install and use the grass bag.
1
2
Fig. 6
Rear-discharge door
Anchor Stud
Grass bag
Fig. 7
Mulching insert

16
OPERATING INSTRUCTIONS
WARNING
To reduce the risk of fire, personal injury, and product damage due to
a short circuit, never immerse your tool, battery pack, or charger in
fluid or allow a fluid to flow inside them.
Corrosive or conductive uids, such as seawater,
certain industrial chemicals, and bleach or bleach-containing products, etc. can cause a short
circuit.
WARNING
If any parts are damaged or missing, do not operate this product until
the parts are replaced.
Use of this product with damaged or missing parts
could result in serious personal injury.
WARNING
Always wear eye protection with side shields marked to comply with
ANSI Z87 .1.
Failure to do so could result in objects being thrown into your
eyes and other possible serious injuries.
Before each use, inspect the entire product for damaged, missing, or loose parts, such as
screws, nuts, bolts, caps, etc. Tighten securely all fasteners and caps and do not operate this
product until all missing or damaged parts are replaced.
This lawn mower must be used only with the battery packs and charger listed below:
Battery Pack
Charger
2Ah 2.5Ah 4Ah 5Ah
SKIL BY519701
SKIL BY519702
SKIL BY519703
SKIL
BY519601
SKIL BY519603
SKIL SC535801
SKIL QC536001
SKIL SC5358B-02
NOTICE:
Please refer to the battery and charger manuals for detailed operating information.
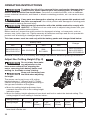
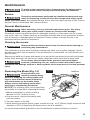
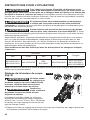
Adjust the Cutting Height (Fig. 8)
WARNING
Do not at any time make
any adjustment to the
lawn mower without first stopping the
motor, removing both battery packs, and
waiting for the blade to stop rotating.
WARNING
Keep your feet away from
the deck when adjusting
its height.
The mower can be set to any of 6 cutting
heights between 1” (25mm) and 3” (75mm).
Choose the proper cutting height according to
the type and condition of the grass.
a. Move the cutting-height adjustment lever
outwards from the slots in the cutting-height
indication plate.
b. Move the cutting–height adjustment lever back and forth to select the desired setting. The
cutting height for each setting is listed as below:
Cutting Setting 1 2 3 4 5 6
Cutting Height 1” (25mm) 1-3/8”
(35mm)
1-3/4”
(45mm)
2-3/16”
(55mm)
2-9/16”
(65mm)
3” (75mm)
c. Once arriving at the desired cutting-height position, engage the cutting-height adjustment
lever back into the slot.
Fig. 8

17
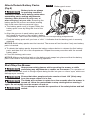
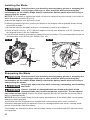
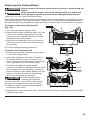
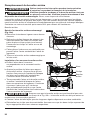
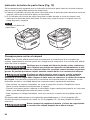
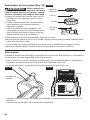
Attach/Detach Battery Packs
(Fig.9)
WARNING
Battery tools are always
in operating condition.
Therefore, remove both battery packs when
assembling parts, making adjustments,
cleaning, when the tool is not in use, or
when carrying it at your side.
Removing the
battery packs will prevent accidental starting
that could cause serious personal injury.
a. The battery-pack cover is hinged. Raise the
battery-pack cover by lifting the front of the
cover.
b. Align the grooves in each battery pack with
the raised ribs in each of the mower’s battery
compartment. Then insert the battery pack into its corresponding compartment.
c. Push the battery pack until you hear a “click”. It indicates that the battery pack is securely
attached.
NOTICE:
Both battery packs must be inserted. The mower will not function if only one battery
pack is inserted.
d. To detach the battery packs, depress the battery-release button to release the rst battery
pack, and then lift it out of the compartment. Repeat the same procedure with the second
battery pack.
e. Close the battery pack cover.
NOTICE:
Make sure that the latch on the battery pack snaps into place and that the battery
pack is secured to the mower before starting operation.
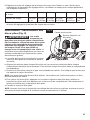
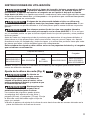
Start/Stop the Mower
WARNING
Always wear safety glasses while operating the mower or while
performing any adjustments or repairs on the mower.
The operation of
any lawn mower can result in foreign objects being thrown into your or others’ eyes, which can
damage eyes severely.
WARNING
Ensure that other people and pets remain at least 100’ (30m) away
from the mower when it is in use.
WARNING
The blade will continue to rotate for a few seconds after the mower is
turned off. Allow the motor/blade to stop rotating before starting it
again. Do not rapidly turn the mower off and on.
WARNING
Do not attempt to override the operation of the safety button and bail
switch.
Fig. 9
Battery-pack cover
Battery-release button

18
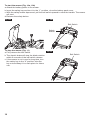
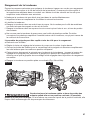
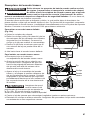
To start the mower (Fig. 10a, 10b)
a. Attach the battery packs to the mower.
b. Insert the safety key and turn it to the “1” position, close the battery-pack cover.
c. With the safety button depressed, pull the bail switch upward to meet the handle. The mower
will start.
d. Release the safety button.
1
2
Fig. 10a
Fig. 10b
Safety
Button
Bail Switch
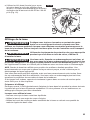
To stop the mower (Fig. 11)
a. Fully release the bail switch.
b. The electric brake will stop the blade rotation
within 3 seconds of the bail switch release.
c. If the mower is not in use for long time, turn
the safety key to the “0” position, take the
key out and keep it in a safe place for future
use.
Fig. 11
Bail Switch

19
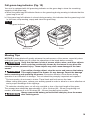
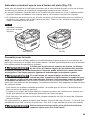
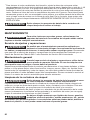
Full grass-bag indicator (Fig. 12)
Your tool is equipped with full grass-bag indicator on the grass bag to show the remaining
capacity of the grass bag.
a. When the grass-bag full indicator oats on the grass bag during mowing to indicate that the
grass bag is not full.
b. If the grass-bag full indicator is closed during mowing, this indicates that the grass bag is full.
In this case, stop mowing, empty and clean the grass bag.
Fig. 12
Full-grass indicator
NOT FULL FULL
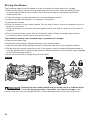
Mowing Tips
NOTICE:
A sharp blade will greatly enhance the performance of the mower, especially when
cutting tall grass. Make sure to check the sharpness of the blade before mowing.
WARNING
Verify that the lawn is free of stones, sticks, wires, and other objects
which could be accidentally thrown by the mower in any direction
causing serious personal injury. These objects may also cause damage to the lawn
mower.
WARNING
If you strike a foreign object, stop the motor and remove the battery.
Thoroughly inspect the mower for any damage. Repair the damage
before restarting and operating the mower.
Excessive vibration of the mower during
operation is an indication of damage. The unit should be promptly inspected and repaired.
•
For best results, do not mow in circles. Travel back and forth across the lawn.
•
When cutting thick grass, reduce your walking speed in order to allow for a more effective cut
and a proper discharge of the clippings.
•
To maintain a healthy lawn, cut off only one-third or less of the total length of the grass.
The average lawn should be approximately 1-1/2 to 2 inches (38 – 50 mm) long during cool
months, and between 2 to 3-1/4 inches (50 – 83 mm) long during hot months.
WARNING
Always remove the battery packs and the safety key from the mower
after finishing work.

20
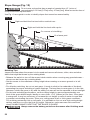
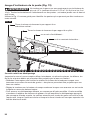
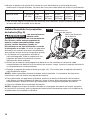
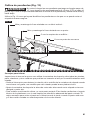
Slope Gauge (Fig. 13)
WARNING
Do not mow a slope that has an angle of greater than 15° (a rise of
approximately 2-1/2 feet [0.75m] every 10 feet [3m]). Mow across the face of
a slope and never up and down.
Use Fig. 13 as a guide in order to identify slopes that cannot be mowed safely.
15
o
Fig. 13
Sight and hold the line level with a vertical tree...
Sight and hold the line level with a pole...
Fold along dotted line (represents a 15° slope)
Or a fence post
Or a corner of a building...
Mulching Tips
Inspect the area where the mower is to be used and remove all stones, sticks, wire and other
debris that might be thrown by the rotating blade.
•
Release the switch to turn off the mower blade rotation when crossing any graveled areas –
stones can be thrown by a rotating blade.
•
Set the mower to the maximum cutting height when mowing on uneven ground or in tall
growth.
•
For effective mulching, do not cut wet grass. It tends to stick to the underside of the deck,
preventing the proper mulching of grass clippings. The best time to mow grass is in the late
afternoon, when the grass is dry and the newly cut area will not be exposed to direct sunlight.
•
For the best mulching performance, set the cutting height to remove approximately one
third of the grass-blade length, ideally no more than 1-1/2” (38mm) at one time. If the grass
is overgrown, it may be necessary to increase the cut height to make it easier to mow and
to prevent overloading the motor. Slow your cutting pace in tall or thick grass conditions.
For mulching extremely thick or tall grass, it is advisable to rst cut at a high cutting-height
setting, and then re-cut to the nal cut height. Otherwise, make narrower cuts and mow
slowly. ALWAYS MAKE SURE THAT THE BLADE IS SHARP.
WARNING
Always remove the battery packs from the mower after finishing work.
La page est en cours de chargement...
La page est en cours de chargement...
La page est en cours de chargement...
La page est en cours de chargement...
La page est en cours de chargement...
La page est en cours de chargement...
La page est en cours de chargement...
La page est en cours de chargement...
La page est en cours de chargement...
La page est en cours de chargement...
La page est en cours de chargement...
La page est en cours de chargement...
La page est en cours de chargement...
La page est en cours de chargement...
La page est en cours de chargement...
La page est en cours de chargement...
La page est en cours de chargement...
La page est en cours de chargement...
La page est en cours de chargement...
La page est en cours de chargement...
La page est en cours de chargement...
La page est en cours de chargement...
La page est en cours de chargement...
La page est en cours de chargement...
La page est en cours de chargement...
La page est en cours de chargement...
La page est en cours de chargement...
La page est en cours de chargement...
La page est en cours de chargement...
La page est en cours de chargement...
La page est en cours de chargement...
La page est en cours de chargement...
La page est en cours de chargement...
La page est en cours de chargement...
La page est en cours de chargement...
La page est en cours de chargement...
La page est en cours de chargement...
La page est en cours de chargement...
La page est en cours de chargement...
La page est en cours de chargement...
La page est en cours de chargement...
La page est en cours de chargement...
La page est en cours de chargement...
La page est en cours de chargement...
La page est en cours de chargement...
La page est en cours de chargement...
La page est en cours de chargement...
La page est en cours de chargement...
La page est en cours de chargement...
La page est en cours de chargement...
La page est en cours de chargement...
La page est en cours de chargement...
La page est en cours de chargement...
La page est en cours de chargement...
La page est en cours de chargement...
La page est en cours de chargement...
La page est en cours de chargement...
La page est en cours de chargement...
La page est en cours de chargement...
La page est en cours de chargement...
La page est en cours de chargement...
La page est en cours de chargement...
La page est en cours de chargement...
La page est en cours de chargement...
La page est en cours de chargement...
La page est en cours de chargement...
La page est en cours de chargement...
La page est en cours de chargement...
La page est en cours de chargement...
La page est en cours de chargement...
La page est en cours de chargement...
La page est en cours de chargement...
-
 1
1
-
 2
2
-
 3
3
-
 4
4
-
 5
5
-
 6
6
-
 7
7
-
 8
8
-
 9
9
-
 10
10
-
 11
11
-
 12
12
-
 13
13
-
 14
14
-
 15
15
-
 16
16
-
 17
17
-
 18
18
-
 19
19
-
 20
20
-
 21
21
-
 22
22
-
 23
23
-
 24
24
-
 25
25
-
 26
26
-
 27
27
-
 28
28
-
 29
29
-
 30
30
-
 31
31
-
 32
32
-
 33
33
-
 34
34
-
 35
35
-
 36
36
-
 37
37
-
 38
38
-
 39
39
-
 40
40
-
 41
41
-
 42
42
-
 43
43
-
 44
44
-
 45
45
-
 46
46
-
 47
47
-
 48
48
-
 49
49
-
 50
50
-
 51
51
-
 52
52
-
 53
53
-
 54
54
-
 55
55
-
 56
56
-
 57
57
-
 58
58
-
 59
59
-
 60
60
-
 61
61
-
 62
62
-
 63
63
-
 64
64
-
 65
65
-
 66
66
-
 67
67
-
 68
68
-
 69
69
-
 70
70
-
 71
71
-
 72
72
-
 73
73
-
 74
74
-
 75
75
-
 76
76
-
 77
77
-
 78
78
-
 79
79
-
 80
80
-
 81
81
-
 82
82
-
 83
83
-
 84
84
-
 85
85
-
 86
86
-
 87
87
-
 88
88
-
 89
89
-
 90
90
-
 91
91
-
 92
92


Skil PM4912B-20 Manuel utilisateur
- Catégorie
- Tondeuses à gazon
- Taper
- Manuel utilisateur
dans d''autres langues
- English: Skil PM4912B-20 User manual
- español: Skil PM4912B-20 Manual de usuario
Documents connexes
Autres documents
-
Ferm LMM1012 Manuel utilisateur
-
Worx WG749E Manuel utilisateur
-
EGO LM2000-S Le manuel du propriétaire
-
-
-
-
-
-
-