Power Fist 8532251 Manuel utilisateur
- Catégorie
- Outils électroportatifs
- Taper
- Manuel utilisateur

V4.0 8532251
Please read and understand all instructions before use. Retain this manual for
future reference.
User Manual
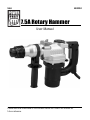
7.5A Rotary Hammer

8532251 7.5A Rotary Hammer V4.0
2 For technical questions call 1-800-665-8685
SPECIFICATIONS
Voltage Rating 120V AC
Amperage Rating 7.5A
Frequency Rating 60 Hz
Impact Rate 2,920 IPM
Handle Type D-handle
Handle Material Plastic
INTRODUCTION
The 7.5A Rotary Hammer can drill through 1-9/16 in. thick wood, 1-3/32 in.
thick concrete and 5/8 in. thick steel. The drill is equipped with a D-handle and
side handle for optimum control.
SAFETY
WARNING! Read and understand all instructions before using this tool. The
operator must follow basic precautions to reduce the risk of personal injury
and/or damage to the equipment.
Keep this manual for safety warnings, precautions, operating or inspection and
maintenance instructions.
HAZARD DEFINITIONS
Please familiarize yourself with the hazard notices found in this manual. A notice
is an alert that there is a possibility of property damage, injury or death if certain
instructions are not followed.
DANGER! This notice indicates an immediate and specific hazard that will
result in severe personal injury or death if the proper precautions
are not taken.
7.5A Rotary Hammer

V4.0 7.5A Rotary Hammer 8532251
Visit www.princessauto.com for more information 3
WARNING! This notice indicates a specific hazard or unsafe practice that
could result in severe personal injury or death if the proper
precautions are not taken.
CAUTION! This notice indicates a potentially hazardous situation that may result
in minor or moderate injury if proper practices are not taken.
NOTICE! This notice indicates that a specific hazard or unsafe practice will
result in equipment or property damage, but not personal injury.
WORK AREA
1. Operate in a safe work environment. Keep your work area clean, well-lit
and free of distractions. Place lights so you are not working in a shadow.
2. Keep anyone not wearing the appropriate safety equipment away from the
work area.
3. Store unused tools properly in a safe and dry location to prevent rust or
damage. Lock tools away and keep out of the reach of children.
4. Do not install or use in the presence of flammable gases, dust or liquids.
PERSONAL SAFETY
WARNING! Wear personal protective equipment approved by the Canadian
Standards Association (CSA) or American National Standards Institute (ANSI).
PERSONAL PROTECTIVE EQUIPMENT
1. Always wear impact safety goggles that provide front and side protection
for the eyes. Eye protection equipment should comply with CSA Z94.3-07
or ANSI Z87.1 standards based on the type of work performed.
2. Wear the appropriate type of full-face shield in addition to safety googles,
as the work can create chips, abrasive or particulate matter.
3. Wear gloves that provide protection based on the work materials or to
reduce the effects of tool vibration.
a. Do not wear gloves when operating a tool that can snag the material
and pull the hand into the tool.
4. Wear protective clothing designed for the work environment and tool.
5. Non-skid footwear is recommended to maintain footing and balance in the
work environment.

8532251 7.5A Rotary Hammer V4.0
4 For technical questions call 1-800-665-8685
6. Wear steel toe footwear or steel toe caps to prevent a foot injury from
falling objects.
7. Wear the appropriate rated dust mask or respirator.
PERSONAL PRECAUTIONS
Control the tool, personal movement and the work environment to avoid
personal injury or damage to tool.
1. Do not operate any tool when tired or under the influence of drugs, alcohol
or medications.
2. Avoid wearing clothes or jewelry that can become entangled with the
moving parts of a tool. Keep long hair covered or bound.
3. Do not overreach when operating a tool. Proper footing and balance
enables better control in unexpected situations.
4. Securely hold this tool using both hands. Using a tool with only one hand
can result in loss of control.
SPECIFIC SAFETY PRECAUTIONS
WARNING! DO NOT let comfort or familiarity with product (gained from
repeated use) replace strict adherence to the tool safety rules. If you use
this tool unsafely or incorrectly, you can suffer serious personal injury.
WARNING! Immediately release the trigger if the drill bit becomes stuck or
jammed. The tool’s torque can twist your arm and cause an injury. The tool
may twist out of your grip and cause an injury to yourself or a bystander.
1. Use the correct tool for the job. This tool was designed for a specific function.
Do not modify or alter this tool or use it for an unintended purpose.
2. Do not use the tool if any parts are damage broken or misplaced. Repair or
replace the parts.
3. Verify the drill’s rotation before starting the drill.
4. A loose or mismatched bit may be ejected by the tool, causing an injury to
the user or a bystander. It may also fail to penetrate the material as the
point may move around under pressure, damaging the workpiece.
a. Ensure the bit shank size matches the tool’s chuck or collet size.
b. Tighten the chuck or collet so the shank is tightly held with no room
to move.

V4.0 7.5A Rotary Hammer 8532251
Visit www.princessauto.com for more information 5
5. Always hold the tool firmly in your hands before switching the tool ON. The
reaction to the motor’s torque may cause the tool to twist, as it accelerates
to full speed.
6. Do not use the drill as a router or try to elongate or enlarge holes by
twisting the drill. Drill bits can break and can cause injury.
7. Do not apply side pressure on the bit unless it is designed for such a
purpose. The bit may bind or break.
8. Never attempt to change the rotation direction while the switch is ON. To
do so, may damage the interlock feature built into the switch. Be sure the
switch is OFF and the motor has completely stopped before changing the
rotation direction.
POWER TOOL PRECAUTIONS
1. Do not use any power tool with a malfunctioning power switch or control.
A power tool that fails to respond to the controls is dangerous and can
cause an injury. A qualified technician must repair and verify the power tool
is operating correctly, before it can be used.
2. Do not cover the air vents. Proper cooling is necessary prevent damage to
the tool’s motor.
3. Avoid unintentional starts. Ensure the switch is off when connecting to the
power source.
4. Disconnect the power source before installing or servicing the tool.
5. Remove adjusting keys and wrenches before using the tool. The tool may eject
an attached wrench or a key and cause an injury to you or a bystander.
6. Never point the tool towards yourself. It could inflict an injury.
7. Never force the tool. Excessive pressure could break the tool, resulting in
damage to your workpiece or serious personal injury. Excessive pressure is
the cause if your tool runs smoothly under no load, but roughly under load.
8. Keep hands and fingers away from the work area. Any part of the body
contacting the tool’s working parts could result in an injury.
9. Only use accessories that are specifically designed for use with the tool.
Ensure the accessory is tightly installed.

8532251 7.5A Rotary Hammer V4.0
6 For technical questions call 1-800-665-8685
10. Before using the tool on a workpiece, test the tool by running it at the
highest Speed Rating for at least 30 seconds in a safe position. Stop
immediately if there is any abnormal vibration or wobbling. Check the tool
to determine the cause.
a. Do not allow the tool to run without load for an extended period of
time, as this will shorten its life.
11. Never use a tool with a cracked or worn tool accessory. Change the tool
accessory before using it.
12. Do not place the tool down until the tool’s accessory has stopped moving.
The accessory may catch the surface of work material and wrench itself
free, causing injury to the user or others in the work area.
13. Hold the tool by the insulated gripping surfaces when performing an operation
where the tool may contact hidden electrical wiring. The tool’s exposed metal
surfaces may convey a shock to the operator from a ‘live’ wire.
ELECTRICAL SAFETY
WARNING! Do not touch or handle a live tool with any part of your body that
is wet or damp. Wet skin reduces resistance to electrical current,
increasing the danger of a serious or fatal shock.
WARNING! To reduce risk of electric shock, be certain that the plug is
connected to a properly grounded receptacle.
1. Disconnect the tool from the power supply before making any adjustments,
changing accessories, cleaning, servicing or when storing. Such preventive
safety measures reduce the risk of starting the tool accidentally.
2. Do not expose the tool to rain, snow, frost or any other damp or wet
conditions. Water entering a tool will increase the risk of electric shock.
3. Do not alter any parts of the tool or accessories. All parts and accessories are
designed with built-in safety features that may be compromised if altered.
4. Make certain the power source conforms to requirements of your
equipment (see Specifications).
5. A polarized plug has two blades of different widths, allowing only one way
to insert the plug into the outlet. If the outlet does not accept a polarized
plug, contact a qualified electrician to install a polarized outlet. Do not alter
the plug, as this may compromise the built-in safety feature.
WARNING! All wiring should be performed by a qualified electrician.

V4.0 7.5A Rotary Hammer 8532251
Visit www.princessauto.com for more information 7
POWER CORD
1. Insert the power cord plug directly to the power supply whenever possible.
Use extension cords or surge protectors only when the tool's power cord
cannot reach a power supply from the work area.
a. When operating a tool outside, use an outdoor extension cord marked
W-A or W. These cords are rated for outdoor use and reduce the risk
of electric shock.
b. Use in conjunction with a Ground Fault Circuit Interrupter (GFCI). It is
recommended that the GFCI should have a rated residual current of
30 mA or less.
2. Do not operate this tool if the power cord is frayed, damaged or poorly
spliced, as an electric shock may occur, resulting in personal injury or
property damage.
a. Inspect the tool's power cord for cracks, fraying or other faults in the
insulation or plug before each use.
b. Discontinue use if a power cord feels more than comfortably warm
while operating the tool.
3. Keep all connections dry and off the ground to reduce the risk of electric
shock. Do not touch the plug with wet hands.
4. Prevent damage to the power cord by observing the following:
a. Do not pull on the cord to disconnect the plug from an outlet.
b. Keep the cord away from heat, oil, sharp edges or moving parts.
c. Never use the cord to carry the tool.
d. Place the electrical cord in a position that prevents it from coming into
contact with the tool and getting caught by the workpiece. The cord
should always stay behind the tool.
5. Do not allow people, mobile equipment or vehicles to pass over
unprotected power cords.
a. Position power cords away from traffic areas.
b. Place cords in reinforced conduits or place planks on either side of
the power cord to create a protective trench.

8532251 7.5A Rotary Hammer V4.0
8 For technical questions call 1-800-665-8685
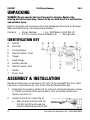
UNPACKING
WARNING! Do not operate the tool if any part is missing. Replace the
missing part before operating. Failure to do so could result in a malfunction
and personal injury.
Remove the parts and accessories from the packaging and inspect for damage.
Make sure that all items in the contents are included.
Contents: • Rotary Hammer • 6 in. SDS Masonry Drill Bits (3)
• 9-1/2 in. Chisels (Flat and Needle) (2) • Storage Case
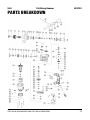
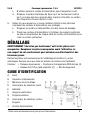
IDENTIFICATION KEY
A Drill Bit
B Dust Cap
C Locking Sleeve
D Selector Switch, Front
E Trigger
F Depth Gauge
G Auxiliary Handle
H Selector Switch, Rear
I Handle
J Power Cord
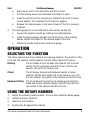
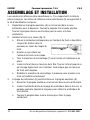
ASSEMBLY & INSTALLATION
Numbered references in parenthesis (#1) refer to the included Parts List. Letter
references in parenthesis (A) refer to the included Identification Key.
1. Reposition the auxiliary handle (G) by turning it counterclockwise to loosen
it. Rotate the handle to the new position. Turn the handle clockwise to
tighten and secure it.
2. Install the drill bit or chisel (Fig. 2).
a. Slide the dust protector onto the
drill bit’s butt if the bit angle can
result in debris falling into the drill.
Fig. 1
Fig. 2

V4.0 7.5A Rotary Hammer 8532251
Visit www.princessauto.com for more information 9
b. Add a touch of oil to the butt of the drill bit or chisel.
c. Pull the locking sleeve (C) backwards and hold it in place.
d. Insert the drill bit into the head sleeve. Rotate the bit until it moves
inward slightly. This indicates the bit slots are aligned.
e. Release the locking sleeve. It will snap forward if the bit is properly
installed.
3. The depth gauge (F) can be attached to the auxiliary handle (G).
a. Loosen the auxiliary handle by rotating it counterclockwise.
b. Insert the depth gauge’s straight end into the hole in the auxiliary
handle. Adjust the length for the desired depth of the hole.
c. Rotate the handle clockwise to secure the gauge.
OPERATION
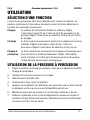
SELECTING THE FUNCTION
The rotary hammer has three methods of removing material. The position of the
front and rear selector switch together sets the rotary hammer’s function.
Drilling The bit rotates to bore through the material. Set the front
switch (D) to the hammer and drill bit icon. Set the rear
selector (H) switch to the drill icon.
Chisel The bit moves forward and backward rapidly to break
material. Set the front switch (D) to the hammer icon. Set
the rear selector (H) switch to the hammer and drill bit icon.
Hammer Drilling The bit combines the motions of chiseling and drilling to
break and remove material rapidly. Set both the front and
rear switch to the hammer and drill bit icon.
USING THE ROTARY HAMMER
1. Adjust the auxiliary handle position. You can also install the depth gauge.
2. Install the drill or chisel bit.
3. Select the tool function.
4. Position the bit against the material.

8532251 7.5A Rotary Hammer V4.0
10 For technical questions call 1-800-665-8685
5. Squeeze the trigger (E). Maintain a firm grip as the bit may drift once
power is applied.
6. Only apply enough pressure for the bit to work the material.
7. Release the trigger and raise the bit slightly above the work when the task is
done. Wait for the bit to stop before removing the tool from the work area.
CARE & MAINTENANCE
1. Maintain the tool with care. A tool in good condition is efficient, easier to
control and will have fewer problems.
2. Inspect the tool components periodically. Repair or replace damaged or
worn components. Only use identical replacement parts when servicing.
3. Follow instructions for lubricating and changing accessories.
4. Only use accessories intended for use with this tool.
5. Keep the tool handles clean, dry and free from oil/grease at all times.
6. Maintain the tool’s labels and name plates. These carry important information.
If unreadable or missing, contact Princess Auto Ltd. for replacements.
WARNING! Only qualified service personnel should repair the tool. An
improperly repaired tool may present a hazard to the user and/or others.
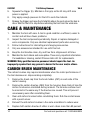
CARBON BRUSH MAINTENANCE
The carbon brushes may require maintenance when the motor performance of
the tool decreases or stops working completely.
1. Remove the brush cap from the brush holder (#57) on each side of the
motor housing.
2. Remove the carbon brushes (#59) from the housing. Keep track of how the
carbon brushes are orientated during removal. The concave surface must
be oriented in the same way if the brushes are reused. This will prevent
unnecessary wear after reinstalling them.
3. Clean old carbon brushes before reinstalling them. Rub the contact areas
with a pencil eraser.
4. Reinsert the old carbon brushes in the same orientation to reduce wear.
5. Replace both carbon brushes if either is worn down more than 50 percent.

V4.0 7.5A Rotary Hammer 8532251
Visit www.princessauto.com for more information 11
6. When installing the carbon brushes make sure the carbon portions of the
carbon brushes contact the motor armature, and that the springs face
away from the motor. Also, make sure the springs operate freely.
7. Replace the brush caps. Do not overtighten.
8. Run the tool for a while to help shape the new carbon brushes.
IMPORTANT! New carbon brushes tend to spark when first used until they
wear and conform to the motor's armature.
DISPOSAL
Recycle a tool damaged beyond repair at the appropriate facility.
Contact your local municipality for a list of disposal facilities or by-laws for
electronic devices, batteries, oil or other toxic liquids.
TROUBLESHOOTING
Visit a Princess Auto Ltd. location for a solution if the tool does not function
properly or parts are missing. If unable to do so, have a qualified technician
service the tool.
Problem(s) Possible Cause(s) Suggested Solution(s)
Electric
motor does
not rotate
switch on
power
supply
1. Breakage of power supply
2. Poor contact of no effect of
the switch
3. Armature winding or field
winding has been burnt
4. Breakage of the stator winding
5. Brushes are worn out
1. Inspect power supply
2. Repair or change the switch
3. Change the armature winding
or field winding.
4. Weld again if terminal the
winding
5. Change the carbon brushes
Abnormal
noise and
electric
motor does
not rotates
or rotates
very slowly.
1. The contact of the switch has
been burnt.
2. Mechanical part is blocked.
3. Overload of electric motor
caused by excessive drilling
depth or pressure.
4. Partial short circuit or open
circuit of armature.
5. Lower voltage of main power
1. Repair or change the switch.
2. Check mechanical part.
3. Reduce drilling depth or
pressure. Decrease force.
4. Repair or change the
armature.
5. Adjust the voltage of main
power

8532251 7.5A Rotary Hammer V4.0
12 For technical questions call 1-800-665-8685
Problem(s) Possible Cause(s) Suggested Solution(s)
The surface
of the
gearbox
becomes
over hot.
1. Overload, dull bit
2. Damp winding
3. Electric motor can’t run freely
because of incorrect fitting
4. Decrease of voltage
1. Reduce load, sharpen bit
2. Dry the winding
3. Check the armature to the
see if it is blocked or rubs the
core.
4. Adjust the voltage of main
power.
Round
sparkle or
bright
sparkle of
commutator
1. Short circuit or breakage of
armature
2. The surface of the armature is
not smooth and clean
1. Repair the armature
2. Free from foreign objects to
smooth the surface of the
armature

V4.0 7.5A Rotary Hammer 8532251
Visit www.princessauto.com for more information 13
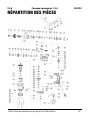
PARTS BREAKDOWN

8532251 7.5A Rotary Hammer V4.0
14 For technical questions call 1-800-665-8685
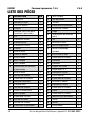
PARTS LIST
# DESCRIPTION QTY
1 Cover 1
2 Steel ring 1
3 Spring pocket 1
4 Spring 1
5 Hammer head sleeve 1
6 Screw 4
7
Spring washer
4
8 Flat washer 4
9 Felt washer 1
10 Tray 1
11 Steel ball 2
12 Retainer sleeve 1
13 Steel ball 3
14 O-ring 2
15 O-ring 2
16 Shock hammer 1
17 Steel ball 3
18 Retaining ring 1
19 Roller Bearing 1
20 Piston sleeve 1
21 Flat key 2
22 Retaining ring 1
23 Shock piston 1
24 O-ring 1
25 Cone gear 1
26 Steel ring 1
27 Retaining ring 1
28 Slide bearing 1
29 O-ring 1
30 Piston pin 1
31 Level 1
32 Slide bearing 1
33 Retaining ring 1
34 Seat 1
35 Front Selector switch 1
36 Screw 3
37 Oil cap 1
38 Gear box 1
39 Cone gear shaft 1
40 Steel space ring 1
41 Roller Bearing 1
42 Washer 1
43 Washer 2
44 Friction plate 2
45 #2 gear 1
46 Spring washer 1
47 Special nut 1
48 Roller Bearing 1
49 Middle cover 1
50 Felt washer 1
51 Roller Bearing 1
52 Rotor 1
53 Roller Bearing 1
54 Rubber sleeve 1
55 Stator 1
56 House 1
57 Brush holder 2
58 Screw 4
59 Carbon brush 2
60 Screw 2
61 Flat washer 4

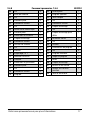
V4.0 7.5A Rotary Hammer 8532251
Visit www.princessauto.com for more information 15
62 Spring washer 4
63 Screw 4
64 Eccentric hollow shaft 1
65 Flat key 1
66 Roller Bearing 1
67 Clamp plate 1
68 Spring washer 2
69 Retaining ring 1
70 Screw 2
71 Spring 1
72 #1 gear 1
73 Steel sleeve 1
74 Pin 1
75 Slide bearing 1
76 Flat washer 2
77 Screw 2
78 Spring washer 2
79 Handle 1
80 Switch 1
81 Special handle 1
82 O-ring 1
83 Screw 2
84 Spring washer 2
85 Clamp plate 1
86 Screw 2
87 Cable clamp plate 1
88 Jacket 1
89 Screw 2
90 Cord 1
91 Handle cover 1
92 Screw 4
93 Auxiliary handle 1
94 Handle seat 1
95 Clamp 1
96 Clamp plate 1
97 Square cap bolt 1
98 Position limit level 1
99 Sealing 1

V 4,0 8532251
Vous devez lire et comprendre toutes les instructions avant d'utiliser l'appareil.
Conservez ce manuel afin de pouvoir le consulter plus tard.
Manuel d'utilisateur
Perceuse à percussion,
7,5 A

8532251 Perceuse à percussion, 7,5 A V 4,0
2 En cas de questions techniques, appelez le 1-800-665-8685
SPÉCIFICATIONS
Tension nominale 120 V c.a.
Intensité de courant nominale 7,5 A
Fréquence nominale 60 Hz
Vitesse d’impact 2 920 chocs/min
Type de manche
Poignée en D
Matériau de manche Plastique
INTRODUCTION
La perceuse à percussion de 7,5 A peut percer dans des épaisseurs de bois de 1
9/16 po, de béton de 1 3/32 po et d’acier de 5/8 po. La perceuse est munie
d’une poignée en D et d’une poignée latérale pour un contrôle optimal.
SÉCURITÉ
AVERTISSEMENT ! Veuillez lire et comprendre toutes les instructions avant
d'utiliser cet outil. L'utilisateur doit respecter les précautions de base
lorsqu'il utilise cet outil afin de réduire le risque de blessure ou de
dommage à l'équipement.
Conservez ce manuel qui contient les avertissements de sécurité, les
précautions, les instructions de fonctionnement ou d'inspection et d'entretien.
DÉFINITIONS DE DANGER
Veuillez-vous familiariser avec les avis de danger qui sont présentés dans ce
manuel. Un avis est une alerte indiquant qu'il existe un risque de dommage à la
propriété, de blessure ou de décès si on ne respecte pas certaines instructions.
Perceuse à percussion,
7,5 A

V 4,0 Perceuse à percussion, 7,5 A 8532251
Visitez www.princessauto.com pour plus d'informations 3
DANGER ! Cet avis indique un risque immédiat et particulier qui
entraînera des blessures corporelles graves ou même la
mort si on omet de prendre les précautions nécessaires.
AVERTISSEMENT ! Cet avis indique un risque particulier ou une pratique non
sécuritaire qui pourrait entraîner des blessures
corporelles graves ou même la mort si on omet de
prendre les précautions nécessaires.
ATTENTION ! Cet avis indique une situation possiblement dangereuse qui
peut entraîner des blessures mineures ou modérées si on
ne procède pas de la façon recommandée.
AVIS ! Cet avis indique un risque particulier ou une pratique non
sécuritaire qui entraînera des dommages au niveau de
l'équipement ou des biens, mais non des blessures corporelles.
AIRE DE TRAVAIL
1. Travaillez dans un environnement de travail sécuritaire. Gardez votre aire
de travail propre, bien éclairée et exempte de toute distraction. Placez les
lampes de façon à ne pas travailler dans l’ombre.
2. Assurez-vous que les personnes qui ne portent pas l'équipement de
sécurité approprié ne se trouvent pas à proximité de l'aire de travail.
3. Rangez les outils correctement dans un lieu sécurisé et sec. Gardez les
outils hors de la portée des enfants.
4. N'installez pas et n'utilisez pas d'outils électriques en présence de gaz, de
poussière ou de liquides inflammables.
SÉCURITÉ PERSONNELLE
AVERTISSEMENT ! Portez de l'équipement de protection personnelle
homologué par l'Association canadienne de normalisation (CSA) ou
l'American National Standards Institute (ANSI).
ÉQUIPEMENT DE PROTECTION PERSONNELLE
1. Portez toujours des lunettes antiprojections qui offrent une protection
frontale et latérale pour les yeux. L'équipement de protection des yeux
devrait être conforme à la norme CSA Z94.3-07 ou ANSI Z87.1 fonction du
type de travail effectué.

8532251 Perceuse à percussion, 7,5 A V 4,0
4 En cas de questions techniques, appelez le 1-800-665-8685
2. Portez un écran facial panoramique de type approprié avec les lunettes de
sécurité puisque cette tâche peut créer des copeaux, des matières
abrasives ou des particules.
3. Portez des gants qui protègent en fonction des matériaux de travail et pour
réduire les effets des vibrations de l'outil.
a. Ne portez pas de gants lorsque vous utilisez un outil dans lequel le
tissu pourrait demeurer coincé, entraînant ainsi la main.
4. Portez des vêtements de protection conçus pour l'environnement de travail
et pour l'outil.
5. Les chaussures antidérapantes sont recommandées pour maintenir la
stabilité et l'équilibre au sein de l'environnement de travail.
6. Portez des chaussures à embout d'acier ou à coquilles d'acier pour éviter
les blessures aux pieds dues à la chute d'objets.
7. Portez un masque antipoussières ou un appareil respiratoire
nominal approprié.
PRÉCAUTIONS PERSONNELLES
Gardez le contrôle de l'outil, de vos mouvements et de l'environnement de
travail pour éviter les blessures ou le bris de l'outil.
1. N'utilisez pas l'outil si vous êtes fatigué ou sous l'effet de drogues, d'alcool
ou de médicaments.
2. Évitez de porter des vêtements ou des bijoux pouvant se prendre dans les pièces
mobiles d'un outil. Gardez les cheveux longs recouverts ou attachés.
3. N'utilisez pas l'outil si vous devez étirer les bras pour vous en servir. Une
stabilité et un équilibre appropriés sont nécessaires afin d'avoir un meilleur
contrôle en cas de situations inattendues.
4. Tenez cet outil solidement à l’aide des deux mains. Un outil tenu d’une
seule main peut causer une perte de contrôle.
CONSIGNES DE SÉCURITÉ SPÉCIFIQUES
AVERTISSEMENT! Ne permettez PAS au confort ou à votre familiarisation
avec l'outil (obtenus après un emploi répété) de se substituer à une
adhésion stricte aux règles de sécurité de l'outil. Si vous utilisez cet outil
de façon dangereuse ou incorrecte, vous pouvez subir des blessures
corporelles graves.

V 4,0 Perceuse à percussion, 7,5 A 8532251
Visitez www.princessauto.com pour plus d'informations 5
AVERTISSEMENT ! Relâchez immédiatement la gâchette si le foret devient
coincé ou bloqué. Le couple de l’outil est si important que cela peut tordre
votre bras et vous blesser. L’outil peut vous échapper, et peut causer, à vous
et aux gens à proximité des blessures.
1. Utilisez le bon outil pour la tâche à effectuer. Cet outil a été conçu pour une
utilisation spécifique. Évitez de modifier ou d'altérer cet outil ou de l'utiliser
à une fin autre que celle pour laquelle il a été conçu.
2. N’utilisez pas l’outil si des pièces présentent des dommages ou sont
déplacées. Réparez ou remplacez les pièces.
3. Vérifier la rotation de la perceuse avant de la mettre en marche.
4. Un foret desserré ou inadéquat peut être éjecté par l’outil, blessant ainsi
l'utilisateur ou les gens à proximité. Il se peut également qu'il soit
incapable de pénétrer le matériau, puisque la pointe pourrait se déplacer
sous la pression, endommageant ainsi la pièce à travailler.
a. Assurez-vous que le format de tige de foret correspond à la taille du
mandrin ou de la pince de serrage de l’outil.
b. Serrez le mandrin ou la pince de serrage de façon à ce que la tige soit
retenue solidement sans pouvoir se déplacer.
5. Tenez toujours fermement l’outil dans vos mains avant de le mettre en
marche. La réaction au couple du moteur peut faire pivoter l’outil lorsqu’il
accélère jusqu’à la vitesse maximale.
6. Ne pas utiliser la perceuse comme une évideuse ni essayer d’allonger ou
d’agrandir des trous en tordant la mèche. Les mèches de perceuse peuvent
se rompre et provoquer des blessures.
7. N'exercez pas de pression latérale sur l'embout à moins qu'il ne soit conçu
à cette fin. Il peut en résulter un grippage ou un bris de l'embout.
8. Ne tentez jamais de changer le sens de rotation pendant que l’interrupteur
est à la position de marche. Autrement, cela pourrait endommager le
dispositif Interlock intégré à l’interrupteur. Assurez-vous que l’interrupteur
est à la position d’arrêt et que le moteur est complètement arrêté avant de
changer le sens de rotation.
La page est en cours de chargement...
La page est en cours de chargement...
La page est en cours de chargement...
La page est en cours de chargement...
La page est en cours de chargement...
La page est en cours de chargement...
La page est en cours de chargement...
La page est en cours de chargement...
La page est en cours de chargement...
La page est en cours de chargement...
La page est en cours de chargement...
La page est en cours de chargement...
-
 1
1
-
 2
2
-
 3
3
-
 4
4
-
 5
5
-
 6
6
-
 7
7
-
 8
8
-
 9
9
-
 10
10
-
 11
11
-
 12
12
-
 13
13
-
 14
14
-
 15
15
-
 16
16
-
 17
17
-
 18
18
-
 19
19
-
 20
20
-
 21
21
-
 22
22
-
 23
23
-
 24
24
-
 25
25
-
 26
26
-
 27
27
-
 28
28
-
 29
29
-
 30
30
-
 31
31
-
 32
32


Power Fist 8532251 Manuel utilisateur
- Catégorie
- Outils électroportatifs
- Taper
- Manuel utilisateur
dans d''autres langues
- English: Power Fist 8532251 User manual
Documents connexes
Autres documents
-
Powerfist 8659005 Le manuel du propriétaire
-
-
-
-
-
-
PROPOINT 8740144 Le manuel du propriétaire