PROPOINT 8740144 Le manuel du propriétaire
- Taper
- Le manuel du propriétaire

V1.0 8740144
Please read and understand all instructions before use. Retain this
manual for future reference.
USER MANUAL
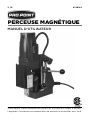
MAGNETIC DRILL

8740144 MAGNETIC DRILL V1.0
2 For technical questions call 1-800-665-8685
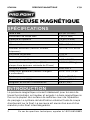
SPECIFICATIONS
Arbor Size
3/4 in. (19 mm)
Max. Cut Depth 2 in. (51 mm)
Chuck Capacity
1/2 in. (13 mm)
Chuck Type Keyed
No Load Speed
270 to 610 RPM
Rating (Voltage, Current, Frequency)
110V, 10A, 60 Hz
Motor Output
1,100W
Magnetic Output 45W
Magnetic Footprint
6-1/2 x 3-5/32 in.
Magnetic Holding Force
(20°C with 25 mm min. plate thickness.)
8,000 N (815 kg)
Fuse Type
F2AL 250V
Dimensions (H x W x D) 20 x 7 x 10-1/2 in.
Weight
32.18 lb (14.6 kg)
Noise Level dB(A) 88.4 LPA/ 101.4 LWA
Power Cord Length
9.8 ft (3 m)
INTRODUCTION
The Magnetic Drill Press is perfect for drilling horizontal,
overhead or in tight work areas. The magnetic base secures to
most metal surfaces during the drilling process. The lubrication
system delivers cutting oil directly to the drill bit. The drill has
an interchangeable arbor and drill chuck.
MAGNETIC DRILL

V1.0 MAGNETIC DRILL 8740144
Visit www.princessauto.com for more information 3
SAFETY
WARNING! Read and understand all instructions. Failure to
follow all instructions listed below, may result in electric shock,
fire and/or serious personal injury.
Keep this manual for safety warnings, precautions, operating or
inspection and maintenance instructions.
HAZARD DEFINITIONS
Please familiarize yourself with the hazard notices found in this
manual. A notice is an alert that there is a possibility of property
damage, injury or death if certain instructions are not followed.
DANGER! This notice indicates an immediate and specific
hazard that will result in severe personal injury or death if the
proper precautions are not taken.
WARNING! This notice indicates a specific hazard or unsafe
practice that could result in severe personal injury or death if
the proper precautions are not taken.
CAUTION! This notice indicates a potentially hazardous
situation that may result in minor or moderate injury if proper
practices are not taken.
NOTICE! This notice indicates that a specific hazard or unsafe
practice will result in equipment or property damage, but not
personal injury.
WORK AREA
1. Keep your work area clean and well lit. Cluttered benches
and dark areas invite accidents.
2. Keep anyone not wearing the appropriate safety
equipment away from the work area.
3. Store idle tools out of reach of children and other untrained
persons. Tools are dangerous in the hands of untrained users.
4. Store tools properly in a safe and dry location.

8740144 MAGNETIC DRILL V1.0
4 For technical questions call 1-800-665-8685
5. Do not operate power tools in explosive atmospheres, such as
in the presence of flammable liquids, gases, or dust. Power
tools create sparks which may ignite the dust or fumes.
6. Keep bystanders, children, and visitors away while operating
a power tool. Distractions can cause you to lose control.
PERSONAL SAFETY
WARNING! Wear personal protective equipment approved by
the Canadian Standards Association (CSA) or American
National Standards Institute (ANSI).
PERSONAL PROTECTIVE EQUIPMENT
Use safety equipment. Always wear eye protection. Dust
mask, non-skid safety shoes, hard hat, or hearing protection
must be used for appropriate conditions.
1. Always wear impact safety goggles that provide front and
side protection for the eyes. Eye protection equipment
should comply with CSA Z94.3-07 or ANSI Z87.1 standards
based on the type of work performed.
2. Wear the appropriate type of full-face shield in addition to
safety googles, as the work can create chips, abrasive or
particulate matter.
3. Wear gloves that provide protection based on the work
materials or to reduce the effects of tool vibration.
3.1 Do not wear gloves when operating a tool that can
snag the material and pull the hand into the tool.
4. Wear protective clothing designed for the work
environment and tool.
4.1 Wear earplugs when operating the drill overhead to
prevent debris from falling into your ears.
5. Non-skid footwear is recommended to maintain footing
and balance in the work environment.
6. Wear steel toe footwear or steel toe caps to prevent a foot
injury from falling objects.
7. Wear the appropriate rated dust mask or respirator.

V1.0 MAGNETIC DRILL 8740144
Visit www.princessauto.com for more information 5
PERSONAL PRECAUTIONS
Control the tool, personal movement and the work
environment to avoid personal injury or damage to the tool.
1. Stay alert, watch what you are doing and use common
sense when operating a power tool. Do not use tool while
tired or under the influence of drugs, alcohol, or
medication. A moment of inattention while operating
power tools may result in serious personal injury.
2. Dress properly. Do not wear loose clothing or jewelry.
Contain long hair. Keep your hair, clothing, and gloves away
from moving parts. Loose clothes, jewelry, or long hair can
be caught in moving parts.
3. Avoid accidental starting. Be sure switch is off before
plugging in. Carrying tools with your finger on the switch or
plugging in tools that have the switch on invites accidents.
4. Use clamps or other practical way to secure and support
the workpiece to a stable platform. Holding the work by
hand or against your body is unstable and may lead to loss
of control.
5. Do not overreach. Keep proper footing and balance at all
times. Proper footing and balance enables better control of
the tool in unexpected situations.
SPECIFIC SAFETY PRECAUTIONS
WARNING! DO NOT let comfort or familiarity with product
(gained from repeated use) replace strict adherence to the
tool safety rules. If you use this tool unsafely or incorrectly,
you can suffer serious personal injury.
1. Use the correct tool for the job. This tool was designed for
a specific function. Do not modify or alter this tool or use it
for an unintended purpose.
1.1 Do not force tool. Use the correct tool for your
application. The correct tool will do the job better and
safer at the rate for which it is designed.

8740144 MAGNETIC DRILL V1.0
6 For technical questions call 1-800-665-8685
2. Install and use the safety strap with this drill to prevent an
injury if the electromagnet fails and the drill falls.
3. Do not drill on metal that is also being welded. The electrical
current from the welder can damage the drill’s electronics.
4. The magnetic base needs a large surface to grip. A
metal surface that is too narrow won’t hold the drill in
place during use.
5. Do not use water or a flammable liquid as a coolant. A
shock hazard may result with water and flammable liquid
may ignite due to heat and sparks during operation.
6. Only use the minimum amount of coolant when the drill is
inverted to prevent it from entering the motor unit or
contaminating the gripping surfaces.
7. Thoroughly inspect the drill for damage if accidentally
dropped. Operate the drill under load, before resuming
drilling to make sure it still works.
8. Clear the drill and work area of swarf and dirt at regular
intervals to maintain cutting speed and prevent jamming.
ELECTROMAGNETIC FIELDS
WARNING! Shut off the electrical tool or device and move away
if you feel faint, dizzy, nausea or shocks. Seek medical attention.
Electromagnetic Fields (EMF) can interfere with electronic
devices such as pacemakers. Anyone with a pacemaker should
consult with their doctor before working with or near a tool
that generates an EMF. The following steps can minimize the
effects of electromagnetic fields.
1. Keep the power source and any power cables as far away from
the user as practical. A minimum of 24 in. is recommended.
2. Avoid long and regular bursts of energy while operating
the tool. Use the tool for short or intermittent periods of
time. This will prevent a pacemaker from interpreting the
signal as a rapid heartbeat.

V1.0 MAGNETIC DRILL 8740144
Visit www.princessauto.com for more information 7
3. Alert other people in the work area, so they can take
precautions or can watch out for those with a pacemaker.
ELECTRICAL SAFETY
WARNING! Do not touch or handle a live tool with any
part of your body that is wet or damp. Wet skin reduces
resistance to electrical current, increasing the danger of a
serious or fatal shock.
WARNING! To reduce risk of electric shock, be certain that
the plug is connected to a properly grounded receptacle.
Disconnect the plug from the power source before making
any adjustments, changing accessories, or storing the tool.
Such preventive safety measures reduce the risk of starting the
tool accidentally.
1. Disconnect tool from power source before cleaning,
servicing, changing parts/accessories or when not in use.
2. Avoid body contact with grounded surfaces such as pipes,
radiators, ranges and refrigerators. There is an increased
risk of electric shock if your body is grounded.
3. Do not expose the tool to rain or wet conditions. Water
entering a power tool will increase the risk of electric shock.
4. Do not disconnect the power cord in place of using
the ON/OFF switch on the tool. This will prevent an
accidental startup when the power cord is plugged
into the power supply.
4.1 In the event of a power failure, turn off the machine as
soon as the power is interrupted. The possibility of
accidental injury could occur if the power returns and
the unit is not switched off.
5. Do not alter any parts of the tool or accessories. All parts
and accessories are designed with built-in safety features
that may be compromised if altered.
6. Make certain the power source conforms to requirements
of your equipment (see Specifications).

8740144 MAGNETIC DRILL V1.0
8 For technical questions call 1-800-665-8685
7. When wiring an electrically driven device, follow all
electrical and safety codes, as well as the most recent
Canadian Electrical Code (CE) and Canadian Centre for
Occupational Health and Safety (CCOHS).
8 Grounded tools must be plugged into an outlet properly
installed and grounded in accordance with all codes and
ordinances. Never remove the grounding prong or modify the
plug in any way. Do not use any adaptor plugs. Check with a
qualified electrician if you are in doubt as to whether the
outlet is properly grounded. If the tools should electrically
malfunction or break down, grounding provides a low
resistance path to carry electricity away from the user.
9. This device is only for use on 120 V (single phase) and is
equipped with a 3-prong grounded power supply cord
and plug.
10. DO NOT use this device with a 2-prong wall receptacle.
10.1 Choose an available 3-prong power outlet.
10.2 Replace 2 prong outlet with a grounded 3-prong
receptacle, installed in accordance with the CE Code
and local codes and ordinances.
WARNING! All wiring should be performed by a
qualified electrician.
POWER CORD
Do not abuse the cord. Never use the cord to carry the tools or
pull the plug from an outlet. Keep cord away from heat, oil, sharp
edges or moving parts. Replace damaged cords immediately.
Damaged cords increase the risk of electric shock.
1. Insert the power cord plug directly to the power supply
whenever possible. Use extension cords or surge protectors
only when the tool's power cord cannot reach a power
supply from the work area.

V1.0 MAGNETIC DRILL 8740144
Visit www.princessauto.com for more information 9
1.1 When operating a power tool outside, use an outdoor
extension cord marked ‘W-A’ or ‘W’. These cords are rated
for outdoor use and reduce the risk of electric shock.
1.2 Use in conjunction with a Ground Fault Circuit
Interrupter (GFCI). If operating a power tool in a damp
location is unavoidable, the use of a GFCI reduces the
risk of electric shock. It is recommended that the GFCI
should have a rated residual current of 30mA or less.
2. Do not operate this tool if the power cord is frayed or
damaged, as an electric shock or surge may occur, resulting
in personal injury or property damage.
2.1 Inspect the tool's power cord for cracks, fraying or
other faults in the insulation or plug before each use.
2.2 Discontinue use if a power cord feels more than
comfortably warm while operating the tool.
2.3 Have the power cord replaced by a qualified service
technician.
3. Keep all connections dry and off the ground to reduce the
risk of electric shock. Do not touch plug with wet hands.
4. Prevent damage to the power cord by observing the
following:
4.1 Do not pull on the cord to disconnect the plug from
an outlet.
4.2 Keep cord away from heat, oil, sharp edges or
moving parts.
4.3 Never use the cord to carry the tool.
4.4 Place the electrical cord in a position that prevents it
from coming into contact with the tool and from
getting caught by the workpiece. The cord should
always stay behind the tool.

8740144 MAGNETIC DRILL V1.0
10 For technical questions call 1-800-665-8685
5. Do not allow people, mobile equipment or vehicles to pass
over unprotected power cords.
5.1 Position power cords away from traffic areas.
5.2 Place cords in reinforced conduits.
5.3 Place planks on either side of the power cord to create
a protective trench.
6. Do not the wrap cord around the tool as the sharp edges
may cut the insulation or cause cracks, if wound too tight.
Gently coil the cord and either hang it on a hook or fasten
with a device to keep the cord together during storage.
POWER TOOL PRECAUTIONS
1. Do not use the tool if the switch does not turn it ON or
OFF. Any tool that cannot be controlled with the switch is
dangerous and must be repaired.
2. Do not allow the tool to run without a load for an extended
period of time, as this will shorten its life.
3. Do not cover the air vents. Proper cooling of the motor is
necessary to ensure normal life of the tool.
4. Avoid unintentional starts. Ensure the switch is OFF when
connecting to the power source.
5. Disconnect the power source before installing or servicing
the tool.
6. After making adjustments, make sure that any adjustment
devices are securely tightened.
7. Remove adjusting keys or switches before turning the tool
on. A wrench or a key that is left attached to a rotating part
of the tool may result in personal injury.
8. Do not touch an operating motor. Motors can operate at
high temperatures and can cause a burn injury.
9. Only use accessories that are specifically designed for use
with the tool. Ensure the accessory is tightly installed.
10. Never point the tool towards yourself.

V1.0 MAGNETIC DRILL 8740144
Visit www.princessauto.com for more information 11
DRILLING PRECAUTIONS
WARNING! Some workpieces can contain toxic or
hazardous materials. When working on materials that may
contain lead, asbestos, copper chromium arsenate or other
toxic materials, extra care should be taken to avoid
inhalation and minimize skin contact.
The term bit refers to any drill bits, router bits or tool
accessories that penetrate a material and creates a cavity
through a rotary motion.
1. Keep hands away from the work area and the bit.
2. Only use a bit that exceeds the No Load Speed rating
(see Specifications).
3. Only use a drill bit designed to cut through the
workpiece material.
4. Check the bit for damage before each use. A damaged bit
can break during use and cause serious injury.
5. Inspect the workpiece for foreign objects such as
staples, nails or debris. Remove the objects from
material before drilling.
6. Never force the tool’s bit. Forcing the tool will slow down
the cutting speed of the bit, causing it to bind. Apply
gentle pressure and allow the bit to do the cutting.
7. Do not use a bit with a dull or damaged cutting edge. Keep
the cutting edge sharp and clean. A dull bit may cause the
tool to skitter across the work surface instead of
penetrating the material. This may cause an injury and will
damage the workpiece.
8. Do not apply side pressure on the bit unless it is designed
for such a purpose. The bit may bind or break.
9. A loose or mismatched cutting bit may be ejected by the
tool, causing an injury to the user or a bystander. It may

8740144 MAGNETIC DRILL V1.0
12 For technical questions call 1-800-665-8685
also fail to penetrate the material as the point may move
around under pressure, damaging the workpiece.
9.1 Ensure the cutting bit shank size matches the tool’s
chuck or collet size.
9.2 Tighten the chuck or collet so the shank is tightly held
with no room to move.
10. Do not place the tool down after use until the bit has come
to a complete stop.
11. Do not touch the bit or workpiece surface cut with this
tool. They may be hot and could inflict a burn injury.
12. Always place the guard over the cutter before applying
power to the drill. The cutting bit could shatter under load
and cause a serious injury to you or bystanders.
13. Do not operate the drill if a metal slug is not released when
cutting is complete. The slug is jammed and could be
forcibly ejected, causing an injury to you or bystanders. It
may also damage the drill. See Operation - Releasing the
Slug to correct this issue.
KICKBACK PRECAUTIONS
Kickback is a sudden reaction to a pinched or snagged cutting
accessory caught on the material. The material can be ejected
and inflict a serious injury on the user or a bystander. Kickback
can also damage the tool or workpiece.
Kickback can be avoided by taking proper precautions:
1. Maintain a firm grip on the material and position your body
and arms to allow you to resist a kickback. Kickback can
propel the material in the direction of the cutting
accessory’s rotation.
2. Use special care when working on corners, sharp edges or
flexible material. These workpieces have a tendency to
snag the cutting accessory.
3. Only use cutting accessories designed for the tool.

V1.0 MAGNETIC DRILL 8740144
Visit www.princessauto.com for more information 13
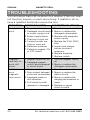
VIBRATION PRECAUTIONS
1. This tool vibrates during use. Repeated or long-term
exposure to vibration may cause temporary or permanent
physical injury. Take frequent breaks when using the tool.
2. If you feel any medical symptoms related to vibrations
(such as tingling, numbness, and white or blue fingers),
seek medical attention as soon as possible.
3. Wear suitable gloves to reduce the effects of vibration.
4. DO NOT use this tool before consulting a physician if one
of the following applies:
• Pregnant
• Impaired blood circulation to the hands
• Past hand injuries
• Nervous system disorders
• Diabetes
• Raynaud's Disease
UNPACKING
WARNING! Do not operate the tool if any part is missing.
Replace the missing part before operating. Failure to do so
could result in a malfunction and personal injury.
Remove the parts and accessories from the packaging and inspect
for damage. Make sure that all items in the parts list are included.
Contents:
• Magnetic Drill
• Drill Chuck, 13 mm
• Drill Chuck Key
• Drill Chuck Adaptor
• Safety Strap
• Storage Case
• Hex Wrench 4 mm
• Hex Wrench 3 mm
• Replacement Carbon
Brushes
• Lubricant System
(Bottle, Cage and Hose)

8740144 MAGNETIC DRILL V1.0
14 For technical questions call 1-800-665-8685
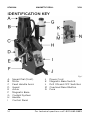
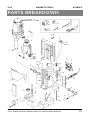
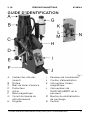
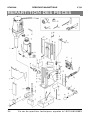
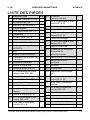
IDENTIFICATION KEY
Fig. 1
A Speed Dial (front)
B Motor
C Feed Handle Arms
D Guard
E Arbor
F Magnetic Base
G Coolant System
H Handle
I Control Panel
J Power Cord
K Magnetic Base Switch
L Drill ON and OFF Switches
M Overload Reset Button
N Fuse

V1.0 MAGNETIC DRILL 8740144
Visit www.princessauto.com for more information 15
ASSEMBLY & INSTALLATION
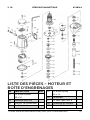
Numbered references in parenthesis (#1) refer to the included
Parts List. Letter references in parenthesis (A) refer to the
included Identification Key.
1. Place the magnetic drill on a flat surface.
2. Screw each of the feed handle arms (C) into the feed
handle hub until hand tight.
3. Install the coolant bottle assembly (G) on the side opposite
of the feed handles.
3.1 Insert the M6x25 socket cap screw (#32) through the
clamp assembly (#31). Set aside.
3.2 The bottle must be above the drill so the coolant will
flow downward. Choose the correct angle based on the
working angle for the drill.
3.3 Hold the bottle assembly so the bar’s interlocking pad
(#29) is held against the drill’s interlocking pad.
3.4 Insert the socket cap screw, set aside earlier, through
the bar into the interlocking pads and tighten until the
assembly does not move.
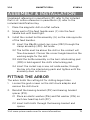
FITTING THE ARBOR
The arbor holds the cutting bit for drilling larger holes.
1. Loosen the grub screws on the drill chuck adapter and
remove the drill chuck.
2. Reinstall the bearing bracket (#12) and bearing bracket
spacer (#13).
2.1 Place an elastic washer (#16) and flat washer (#15) on
each hex head tap bolt (#17).
2.2 Insert both bolts through the bearing bracket and
spacer.

8740144 MAGNETIC DRILL V1.0
16 For technical questions call 1-800-665-8685
2.3 Insert the ends of the bolt into the magnetic assembly
(#14) and hand-tighten them.
3. Push the guard (D) down, then retract the arbor (E) until
the two grub screws (#7) at the top are accessible.
4. Lay the drill on its side.
5. Insert the arbor through the bearing bracket.
6. Loosen the grub screws. Push the arbor over the arbor
spindle (#8.6), aligning the screws with the spindle’s flat
surfaces. Tighten the screws.
7. Follow Care & Maintenance – Slide Adjustment step 8 to
see if the slide needs adjustment. Tighten the hex head tap
bolts if no adjustment is needed. Follow all the steps in
Slide Adjustment if the bearing bracket oscillates
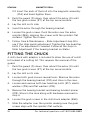
FITTING THE CHUCK
A drill chuck with adaptor is included to allow the use of a drill
bit instead of a cutting bit. This requires the removal of the
guard.
1. Push the guard (D) down, then retract the arbor (E) until
the two grub screws (#7) at the top are accessible.
2. Lay the drill on its side.
3. Loosen both grub screws several turns. Remove the arbor
through the bearing bracket (#12) and store in the case.
4. Loosen and remove both hex head tap bolts (#17), elastic
washers (#16) and flat washers (#15).
5. Remove the bearing bracket and bearing bracket spacer
(#13). Store in the case along with hardware removed in
step 4.
6. Loosen the grub screws in the drill chuck adapter (#69).
7. Slide the adapter over the spindle, making sure the grub
screws align with the spindle’s flat surfaces.

V1.0 MAGNETIC DRILL 8740144
Visit www.princessauto.com for more information 17
8. Tighten the grub screws.
9. Insert the appropriate drill bit and tighten the chuck by
hand. Complete tightening with the chuck key (#67).
OPERATION
The magnetic drill must be connected to a minimum 20A
electrical circuit to accommodate the power draw in
exceptional circumstances.
PREPARATIONS
1. Check that the magnetic base is flat and undamaged. A
magnet base with a rough surface will have less contact
with the metal and may fall, injuring you or a bystander.
2. Assemble the magnetic drill.
2.1 Lay the drill on its side with the handle upward.
2.2 Lower the arbor to its lowest point to allow access to
the socket screws.
2.3 Insert a pilot drill bit and place through the cutter
shank’s opening. Insert the cutter’s shank into the
arbor’s bore, aligning the two drive flats (Weldon
shank) with the socket screws.
2.4 Tighten the screws with a hex wrench.
2.5 Follow the assembly instructions for Fitting The Chuck,
if installing the chuck and a drill bit.
3. Prepare the metal surface by cleaning it of debris, grease or
other materials that can interfere with a flush contact with
the drill’s magnetic base.
4. A coating on the metal surface may also affect the
magnetic base’s adhesion. Remove the coating if necessary.
5. Check the bottom of the magnetic base (F) and wipe clean
of debris or dirt.
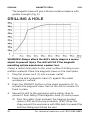
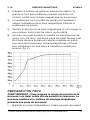
6. Confirm that the metal workpiece is a minimum of 1 in.
(25 mm). Another piece of ferrous metal may be clamped
behind the original metal workpiece to increase the thickness.

8740144 MAGNETIC DRILL V1.0
18 For technical questions call 1-800-665-8685
The magnetic base will grip a thicker metal workpiece with
greater strength (Fig. 2).
DRILLING A HOLE
WARNING! Always attach the drill’s safety strap to a secure
object to prevent injury. The drill will fall if the magnetic
mounting system experiences a power loss.
Clamp a metal steel plate to the work surface if drilling a non-
metallic material. Place the magnetic base on the steel plate.
1. Plug the power cord (J) into a power outlet.
2. Place the drill’s magnetic base (F) against the metal
workpiece’s surface.
3. Press the MAGNET button on the panel assembly (K) to
activate the magnetic base. Pull on the drill to ensure it is
fixed in place.
4. Secure the drill to the workpiece with a safety strap to
prevent it from falling if the magnetic base (G) loses power.
4.1 Pass the safety strap between the bearing bracket
spacer (#13) and housing assembly (#18). Wrap the
strap around the workpiece with little slack to prevent the
drill from falling and striking the user.
Fig. 2

V1.0 MAGNETIC DRILL 8740144
Visit www.princessauto.com for more information 19
4.2 At times the safety strap can’t be attached to a
workpiece to prevent it from slipping. Attach a clamp to
the workpiece and secure the strap to the clamp.
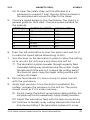
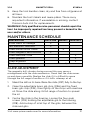
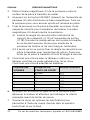
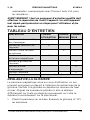
5. Choose a speed based on the chart below. The chart is a
general guide for mild steel. Choose a speed suitable for
the material.
SPEED DIAL
CUTTER DIAMETER
NOMINAL RPM
1
40 mm
270
2 32 mm 330
3 24 mm 400
4 19 mm 470
5 16 mm 570
6 14 mm 610
6. Press the left drill button to start the motor and wait for it
to reach full speed before attempting to drill.
7. Turn the lever on the lubrication system to allow the cutting
oil to run into the drill chuck and down the drill bit.
7.1 The lubrication system operates through a gravity feed.
Overhead drilling may preclude using the system. Angle
the lubricant bottle arm so it is above the cutting area. If
this does not work, spray the target drilling surface with
cutting oil instead.
8. Pull the feed handle (C) down slowly to make contact
with the workpiece.
9. Apply light pressure. Once the drill bit penetrates the
surface, increase the pressure on the drill bit. The motor
should sound as if it is under pressure.
9.1 Do not ‘pump’ the drill bit up and down during drilling, this
will wear out the bit prematurely. Apply steady pressure.
9.2 Adjust the lubrication feed with the lever as necessary.
9.3 Continue to liberally spray cutting lubricant into the drill
hole during drilling if the lubrication system isn’t in use.

8740144 MAGNETIC DRILL V1.0
20 For technical questions call 1-800-665-8685
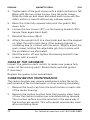
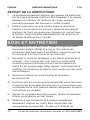
OVERLOAD PROTECTION
The drill has an overload protection feature that will activate if the
drill is drawing too much power and is overheating. Once
activated, turn the tool off, unplug it and let cool for several
minutes. When ready to resume, plug the tool back into the
power outlet, press the reset button (M) and proceed through the
normal start up procedure.
The tool should be allowed to cool after several hours of
continuous use, regardless if the overload protection feature
was activated or not.
RELEASING THE SLUG
1. The drill will eject a metal slug upon completion of the cut.
DO NOT operate the machine if the slug remains in the
cutter bit, as it may cause injury if flung out.
2. Place the drill on a flat surface, switch on the magnet to lock
it into place. Gently bring the cutter bit down to make
contact with the surface. This will usually straighten and
release the stuck slug.
CARE & MAINTENANCE
1. Maintain tools with care. Keep cutting tools sharp and
clean. Properly maintained tools, with sharp cutting edges
are less likely to bind and are easier to control.
2. Check for misalignment or binding of moving parts,
breakage of parts, and any other condition that may affect
the tools operation. If damaged, have the tool serviced
before using. Many accidents are caused by poorly
maintained tools.
3. Follow instructions for lubricating and changing accessories.
4. Use only accessories that are recommended by the
manufacturer for your model. Accessories that may be
suitable for one tool, may become hazardous when used on
another tool.
La page est en cours de chargement...
La page est en cours de chargement...
La page est en cours de chargement...
La page est en cours de chargement...
La page est en cours de chargement...
La page est en cours de chargement...
La page est en cours de chargement...
La page est en cours de chargement...
La page est en cours de chargement...
La page est en cours de chargement...
La page est en cours de chargement...
La page est en cours de chargement...
La page est en cours de chargement...
La page est en cours de chargement...
La page est en cours de chargement...
La page est en cours de chargement...
La page est en cours de chargement...
La page est en cours de chargement...
La page est en cours de chargement...
La page est en cours de chargement...
La page est en cours de chargement...
La page est en cours de chargement...
La page est en cours de chargement...
La page est en cours de chargement...
La page est en cours de chargement...
La page est en cours de chargement...
La page est en cours de chargement...
La page est en cours de chargement...
La page est en cours de chargement...
La page est en cours de chargement...
La page est en cours de chargement...
La page est en cours de chargement...
La page est en cours de chargement...
La page est en cours de chargement...
La page est en cours de chargement...
La page est en cours de chargement...
La page est en cours de chargement...
La page est en cours de chargement...
La page est en cours de chargement...
La page est en cours de chargement...
La page est en cours de chargement...
La page est en cours de chargement...
La page est en cours de chargement...
La page est en cours de chargement...
La page est en cours de chargement...
La page est en cours de chargement...
La page est en cours de chargement...
La page est en cours de chargement...
La page est en cours de chargement...
La page est en cours de chargement...
La page est en cours de chargement...
La page est en cours de chargement...
-
 1
1
-
 2
2
-
 3
3
-
 4
4
-
 5
5
-
 6
6
-
 7
7
-
 8
8
-
 9
9
-
 10
10
-
 11
11
-
 12
12
-
 13
13
-
 14
14
-
 15
15
-
 16
16
-
 17
17
-
 18
18
-
 19
19
-
 20
20
-
 21
21
-
 22
22
-
 23
23
-
 24
24
-
 25
25
-
 26
26
-
 27
27
-
 28
28
-
 29
29
-
 30
30
-
 31
31
-
 32
32
-
 33
33
-
 34
34
-
 35
35
-
 36
36
-
 37
37
-
 38
38
-
 39
39
-
 40
40
-
 41
41
-
 42
42
-
 43
43
-
 44
44
-
 45
45
-
 46
46
-
 47
47
-
 48
48
-
 49
49
-
 50
50
-
 51
51
-
 52
52
-
 53
53
-
 54
54
-
 55
55
-
 56
56
-
 57
57
-
 58
58
-
 59
59
-
 60
60
-
 61
61
-
 62
62
-
 63
63
-
 64
64
-
 65
65
-
 66
66
-
 67
67
-
 68
68
-
 69
69
-
 70
70
-
 71
71
-
 72
72


PROPOINT 8740144 Le manuel du propriétaire
- Taper
- Le manuel du propriétaire
dans d''autres langues
- English: PROPOINT 8740144 Owner's manual
Documents connexes
Autres documents
-
Powerfist 9027814 Le manuel du propriétaire
-
Walter ICECUT MINI Le manuel du propriétaire
-
-
Power Fist 8654345 Le manuel du propriétaire
-
-
-
-
-
-