
Digital Hay Tester
SW16136
ISSUE: 29 JUN 12
John Deere Merchandise Division
SW16136
Litho in U.S.A.
ENGLISH


Digital Hay Tester
SW16136
ISSUE: 28 JAN 11
John Deere Merchandise Division
SW16136
Litho in U.S.A.
ENGLISH

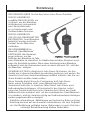
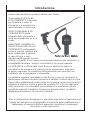
THANK YOU for purchasing a John Deere Product.
READ THIS MANUAL carefully
to learn how to operate and
service your machine correctly.
Failure to do so could result in
personal injury or equipment
damage.
THIS MANUAL SHOULD BE
CONSIDERED a permanent
part of your machine and
remain with the machine when
you sell it.
WRITE IDENTIFICATION
NUMBERS in the
Specifications section.
Accurately record all the
numbers to help in tracing
the machine should it be stolen. Your dealer also needs these numbers
when you order parts. If this manual is kept on the machine, also file the
identification numbers in a secure place off the machine.
WARRANTY is provided through John Deere dealers for customers who
operate and maintain their equipment as described in this manual. The
warranty is explained on the warranty certificate which you should have
received from your dealer.
This warranty provides you the assurance that John Deere will back
its products where defects appear within the warranty period. In some
circumstances, John Deere also provides field improvements, often
without charge to the customer, even if the product is out of warranty.
Should the equipment be abused, or modified to change specifications,
the warranty will become void and field improvements may be denied.
All information, illustrations and specifications in this manual are based
on the latest information available at the time of publication. The right is
reserved to make changes at any time without notice.
Introduction

i
Contents
Page
Safety ................................................................................................05-1
Operation
Understanding Hay Conditions and Test Readings ........................10-1
Hay Testing Guidelines ...................................................................10-2
Operating Hay Tester (Moisture Test) .............................................10-4
Operating Hay Tester (Temperature Test) .......................................10-5
Troubleshooting
Troubleshooting Hay Tester .............................................................15-1
Service
Replacing 9 - Volt Alkaline Battery ................................................. 20-1
Care, Maintenance and Storage ....................................................20-1
Specifications
Hay Tester Features ....................................................................... 25-1
Warranty and Service
Product Warranty and Repair Program .......................................... 30-1
Record Serial Number ...................................................................30-1
Accessories
Tester Probes .................................................................................35-1
Manufacturer Contact Information ................................................35-1
All information, illustrations and specifications in this manual are based
on the latest information available at the time of publication. The right is
reserved to make changes at any time without notice.

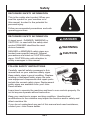
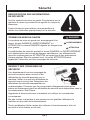
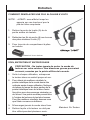
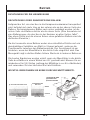
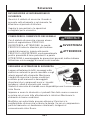
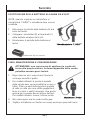
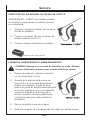
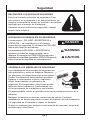
RECOGNIZE SAFETY INFORMATION
This is the safety-alert symbol. When you
see this symbol on your machine or in
this manual, be alert to the potential for
personal injury.
Follow recommended precautions and safe
operating practices.
05-1
Safety
RECOGNIZE SAFETY INFORMATION
A signal word - DANGER, WARNING or
CAUTION - is used with the safety-alert
symbol. DANGER identifies the most
serious hazards.
DANGER or WARNING safety signs are
located near specific hazards. General
precautions are listed on CAUTION safety
signs. CAUTION also calls attention to
safety messages in this manual.
DANGER
WARNING
CAUTION
FOLLOW SAFETY INSTRUCTIONS
Carefully read all safety messages in this
manual and on your machine safety signs.
Keep safety signs in good condition. Replace
missing or damaged safety signs. Be sure
new equipment components and repair parts
include the current safety signs. Replacement
safety signs are available from your John
Deere dealer.
Learn how to operate the machine and how to use controls properly. Do
not let anyone operate without instruction.
Keep your machine in proper working condition. Unauthorized
modifications to the machine may impair the function and/or safety and
affect machine life.
If you do not understand any part of this manual and need assistance,
contact your John Deere dealer.

Operation
UNDERSTANDING HAY CONDITIONS AND TEST READINGS
Many variables affect the
accuracy of test readings.
Understanding these variables
can help to obtain accurate
test readings.
IMPORTANT: Because of the
numerous variables which
affect test readings, the
indicate moisture content
should not be used as
an absolute, quantitative
measurement. Test readings
are, however, very useful
guidelines for baling and
storing hay.
• Bale Density: The tighter the bale, the higher the moisture readings.
Compact ion also varies within each bale. Although each brand
of baler feeds hay into its chamber differently, in general, small,
rectangular bales are denser toward the bottom or “tight” side; and
large rectangular bales are densest in their upper corners.
• Natural variations within the plant before proper curing. The
higher the moisture content, the wider the variations. Greater
uniformity can be expected as more curing takes place.
• Sweating: Higher readings may occur during the first couple of days
after baling; moisture readings may be low and then climb during the
“sweating” process. As the hay cures, moisture readings should drop
and continue to decline as the hay becomes progressively drier. It is
important to continue to monitor moisture for several days.
10-1

HAY TESTING GUIDELINES
RECTANGULAR OR SQUARE BALES:
The way hay is fed into the baler’s compression chamber results in more
hay toward the bottom of the bale than the top. Any shattered leaves,
etc., will sift downward, causing the bottom or “tight” side of the bale to
be denser than the top or “loose” side. (An exception to this is a baler
which “folds” hay into the chamber on each side. The top third of a folded
bale and its upper corners are the densest areas.)
Because the inside of each bale is not uniform in density or leaf-to-stem
ratio, moisture readings will vary from one part of the bale to another. It
will read highest if the probe is inserted into the “dense” side. Tester will
give higher readings in tight bales than in loose bales.
For best results, insert probe into the “dense” side of bale at a 45° angle.
Take readings in at least five (5) places (approximately 6 in. apart along
the bale center line) and use the highest reading as a guideline.
IMPORTANT: DO NOT AVERAGE RESULTS.
10-2
Operation

Operation
HAY TESTING GUIDELINES – CONTINUED
ROUND BALES:
Test readings can be taken anywhere around the outside surface of the
bale, as long as the probe tip is inside the outer wrap, since the outer
wrap tends to dry out first.
IMPORTANT: Do not insert probe into the wound end of the bale. If
inserted from the wound end, probe tip can end up between the hay
wraps and not have sufficient contact to produce an accurate test
reading.
For best results, insert probe into the outside radius of the bale at a 45°
angle and at least 12 in. deep. Take readings in at least five (5) places
(approximately 6 in. apart) and use the highest reading as a guideline.
IMPORTANT: DO NOT AVERAGE RESULTS.
10-3

Operation
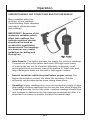
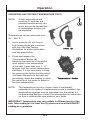
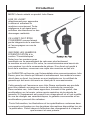
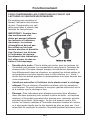
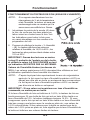
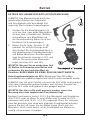
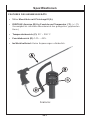
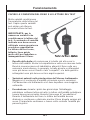
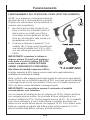
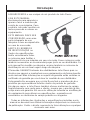
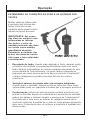
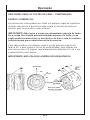
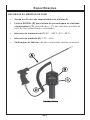
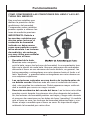
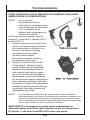
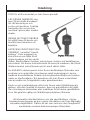
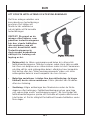
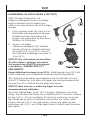
OPERATING HAY TESTER (MOISTURE TEST)
1. Insert probe tip (A) into hay so both
brass pieces are in contact with
hay. See Hay Testing Guidelines
for probe information and hay
preparation.
2. Press and release the “Moisture
%” button (B).The tester will
then display a moisture readings
from 14.5% - 45%, with the most
accurate readings between 15%
and 30%.
IMPORTANT: Take readings in at least five
(5) places in the windrow or bale and use
the HIGHEST reading as a guideline. DO
NOT AVERAGE.
High Moisture Readings (above 30%):
Readings over 30% should only be used as
a qualitative indication of very high moisture.
According to most local Agricultural extension agents, hay at
more than 20% moisture should not be baled or stored without
preservative. Hay at more than 25% moisture should not be
baled or stored.
IMPORTANT: If one reading is over the recommended moisture
content, do not bale.
Low Moisture Readings (under 14.5%): Hay tester will not test below
14.5%. If a hay bale being tested is 12% moisture, the tester will still
read at <14.5% (+/–0.3%). If you suspect that the hay being tested is
very low moisture, take a reading of the air before probing the bale.
If the display does not change from the air reading (<14.5%), then the
bale moisture is below the limits of the tester.
10-4
NOTE:
NOTE: When you turn the unit on, it will display the
software version h1.4 or d1.
NOTE - Unit stays on and will shut off after 3 minutes
of no use.
If both temperature and moisture % switches
are pressed simultaneously, the tester will not
be harmed but a meaningless number
will be displayed.
NOTE:

Operation
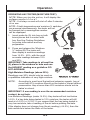
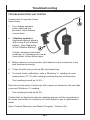
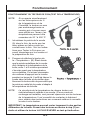
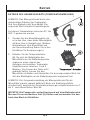
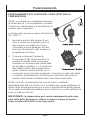
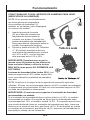
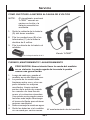
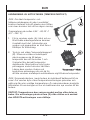
OPERATING HAY TESTER (TEMPERATURE TEST)
If both temperature and
moisture % switches are
pressed simultaneously, the
tester will not be harmed but
a meaningless number will
be displayed.
Temperatures can be measured from
33° - 200 °F.
1. Insert probe tip (A) into hay so
both brass pieces are in contact
with hay. See Hay Testing
Guidelines for probe information
and hay preparation.
2. Press and release the
“Temperature” button (B).
Because the metal tip of the probe
must adjust to the temperature
of the bale, it may take from 1 - 2
minutes until the correct temperature
stabilizes. It is not necessary to keep
the pressing the button for this period.
Just leave the probe in the bale and
periodically check the reading to allow
the metal tip of the probe to adjust to
the bale temperature.
The temperature circuitry of each tester is individually
calibrated to its probe. If a replacement probe is installed, the
temperature readings may be impacted from the actual. It is
recommended that you contact the manufacture for instruction
on how to calibrate the new probe to your tester.
IMPORTANT: Temperature may vary widely in different parts of the
bale. Take readings in at least five (5) places and use the HIGHEST
reading as a guideline.
10-5
NOTE:
NOTE:

Troubleshooting
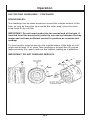
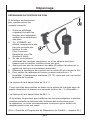
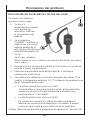
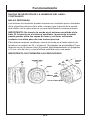
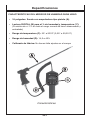
TROUBLESHOOTING H AY TESTER
If tester fails to operate, follow
these steps:
1. If no display appears
when switches are
pressed, check battery
connections.
2. If Battery symbol is
displayed replace battery
with a new 9-volt alkaline
battery. (See Replacing
9-Volt Alkaline Battery.)
If tester displays inaccurate
readings, or if readings are lower
than actual, follow these steps:
3. Make certain cord connection (A) between tester and probe is dry
and fastened correctly.
4. Clean tarnish from probe tip (B) and retest hay.
5. To check tester calibration, take a “Moisture %” reading at room
temperature (72 °F) with nothing touching the end of the probe.
• Test reading should be 14.5%.
Short two brass parts of probe tip with a piece of aluminum foil and take
a second “Moisture %” reading.
• Test reading should be 45.0%
If tester fails to display the above readings please call the manufacture
for repair instruction or contract your local dealer to get a replacement
tester.
(See “Product Warranty and Repair Program”, Section 30.)
15-1

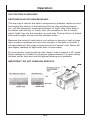
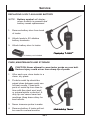
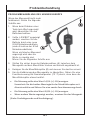
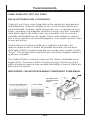
REPLACING 9-VOLT ALKALINE BATTERY
1. Remove battery door from back
of tester.
2. Attach leads to 9V alkaline
battery terminals.
3. Attach battery door to tester.
CARE, MAINTENANCE AND STORAGE
CAUTION: Never attempt to wear tester probe on your belt.
Serious injury could occur from sharp tip of probe.
1. After each use, store tester in a
clean, dry place.
2. Probeʼs metal tip should be
wiped clean between each use
for best results. Clean both
parts of metal tip from time-to-
time with fine steel wool and/
or mineral spirits or alcohol. A
dirty tip can cause lower test
readings. Keep brass shiny for
best results.
3. Never immerse probe in water.
4. Remove battery if tester will not
be used for several months.
Service
20-1
NOTE:
9V battery not included
Battery symbol will display
when a switch is pressed and
battery needs replacement.

Specifications
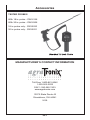
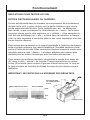
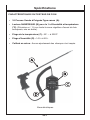
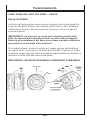
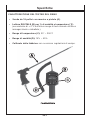
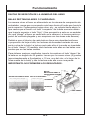
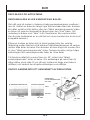
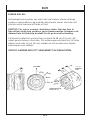
HAY TESTER FEATURES
• 18 In. Probe with Gun-Type Grip (A).
• DIGITAL Readout (B) for % Moisture and Temperature (°F).
(+/-1% accuracy throughout the normal test range of stored, baled hay.)
• Temperature Range (C): 33° – 200°F
• Moisture Range (D): 14% – 45%.
• Factory Calibrated: No field adjustments required.
25-1
Features

30-1
PRODUCT WARRANTY AND REPAIR PROGRAM
Warranty is provided through John Deere dealers for customers who
operate and maintain their equipment as described in this manual. See
warranty tag for terms and conditions.
The warranty does not cover:
A — Products which have been altered or modified in ways not approved
by John Deere.
B — Depreciation or damage caused be normal wear, accident, lack
of reasonable and necessary maintenance as specified in this manual,
improper maintenance, improper protection in storage, or improper
use or abuse.
C — Transportation, mailing and service call charges for warranty
service.
Should your product fail after the warranty period, it can be reconditioned
for a nominal charge. See your John Deere dealer for further information.
RECORD SERIAL NUMBER
The tester serial number is located on the back of the unit.
Write your model number, serial number, and date of purchase in the
space provided below. Your dealer needs this information when ordering
parts and when filing warranty claims.
Model No. _________________________________________________
Serial No. _________________________________________________
Date of Purchase ___________________________________________
(To be filled in by purchaser)
Warranty & Service
NOTE:

Accessories
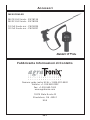
TESTER PROBES
With 18 in. probe - SW16136
With 32 in. probe - SW16326
18 in. probe only - SW16220
32 in. probe only - SW16221
35-1
MANUFACTURER’S CONTACT INFORMATION
Toll-Free 1-800-821-9542
1-330-562-2222
FAX 1-330-562-7403
www.agratronix.com
10375 State Route 43
Streetsboro, OH 44241
USA

Testeur Digital du Foin
SW16136
PUBLICATION: 29 JUN 12
John Deere Division Commerciale
SW16136
Litho in U.S.A.
FRANÇAIS


Testeur Digital du Foin
SW16136
PUBLICATION: 28 JANVIER 11
John Deere Division Commerciale
SW16136
Litho in U.S.A.
FRANÇAIS

MERCI d’avoir acheté un produit John Deere.
LIRE CE LIVRET
attentivement pour apprendre
à utiliser et entretenir la
machine correctement. Toute
négligence à cet égard peut
entraîner des blessures ou des
dommages matériels.
CE LIVRET DOIT ÊTRE
CONSIDÉRÉ comme faisant
partie intégrante de la machine
et l’accompagner en cas de
revente.
INSCRIRE LES NUMÉROS
D’IDENTIFICATION à la
section “Caractéristiques”.
Noter tous les numéros avec
exactitude car ils permettraient de retrouver plus facilement
la machine en cas de vol. En outre, le concessionnaire aura besoin de
ces numéros lors de la commande de pièces. Si ce livret est gardé à
bord de la machine, conserver une copie des numéros en lieu sûr.
La GARANTIE est fournie, par l’intermédiaire des concessionnaires John
Deere, pour les clients qui utilisent et entretiennent leur matériel comme
décrit dans ce livret. Les termes en sont expliqués sur le certificat de
garantie qui doit avoir été remis au client par le concessionnaire.
Cette garantie est l’assurance que John Deere soutiendra ses produits
pour tous défauts survenus au cours de la période de couverture.
Dans certains cas, John Deere apportera, souvent à titre gratuit, des
améliorations sur le terrain, même après expiration de la période de
garantie. Si l’équipement est soumis à un usage abusif ou s’il est modifié
en vue de changer ses caractéristiques, la garantie sera annulée et les
améliorations pourront être refusées.
Toute l’information, les illustrations et les spécifications contenues dans
ce manuel sont basées sur les dernières informations disponibles lors de
la publication. Ddroit réservé d’effectuer des changements à n’importe
quel moment et sans préavis.
Introduction
La page charge ...
La page charge ...
La page charge ...
La page charge ...
La page charge ...
La page charge ...
La page charge ...
La page charge ...
La page charge ...
La page charge ...
La page charge ...
La page charge ...
La page charge ...
La page charge ...
La page charge ...
La page charge ...
La page charge ...
La page charge ...
La page charge ...
La page charge ...
La page charge ...
La page charge ...
La page charge ...
La page charge ...
La page charge ...
La page charge ...
La page charge ...
La page charge ...
La page charge ...
La page charge ...
La page charge ...
La page charge ...
La page charge ...
La page charge ...
La page charge ...
La page charge ...
La page charge ...
La page charge ...
La page charge ...
La page charge ...
La page charge ...
La page charge ...
La page charge ...
La page charge ...
La page charge ...
La page charge ...
La page charge ...
La page charge ...
La page charge ...
La page charge ...
La page charge ...
La page charge ...
La page charge ...
La page charge ...
La page charge ...
La page charge ...
La page charge ...
La page charge ...
La page charge ...
La page charge ...
La page charge ...
La page charge ...
La page charge ...
La page charge ...
La page charge ...
La page charge ...
La page charge ...
La page charge ...
La page charge ...
La page charge ...
La page charge ...
La page charge ...
La page charge ...
La page charge ...
La page charge ...
La page charge ...
La page charge ...
La page charge ...
La page charge ...
La page charge ...
La page charge ...
La page charge ...
La page charge ...
La page charge ...
La page charge ...
La page charge ...
La page charge ...
La page charge ...
La page charge ...
La page charge ...
La page charge ...
La page charge ...
-
 1
1
-
 2
2
-
 3
3
-
 4
4
-
 5
5
-
 6
6
-
 7
7
-
 8
8
-
 9
9
-
 10
10
-
 11
11
-
 12
12
-
 13
13
-
 14
14
-
 15
15
-
 16
16
-
 17
17
-
 18
18
-
 19
19
-
 20
20
-
 21
21
-
 22
22
-
 23
23
-
 24
24
-
 25
25
-
 26
26
-
 27
27
-
 28
28
-
 29
29
-
 30
30
-
 31
31
-
 32
32
-
 33
33
-
 34
34
-
 35
35
-
 36
36
-
 37
37
-
 38
38
-
 39
39
-
 40
40
-
 41
41
-
 42
42
-
 43
43
-
 44
44
-
 45
45
-
 46
46
-
 47
47
-
 48
48
-
 49
49
-
 50
50
-
 51
51
-
 52
52
-
 53
53
-
 54
54
-
 55
55
-
 56
56
-
 57
57
-
 58
58
-
 59
59
-
 60
60
-
 61
61
-
 62
62
-
 63
63
-
 64
64
-
 65
65
-
 66
66
-
 67
67
-
 68
68
-
 69
69
-
 70
70
-
 71
71
-
 72
72
-
 73
73
-
 74
74
-
 75
75
-
 76
76
-
 77
77
-
 78
78
-
 79
79
-
 80
80
-
 81
81
-
 82
82
-
 83
83
-
 84
84
-
 85
85
-
 86
86
-
 87
87
-
 88
88
-
 89
89
-
 90
90
-
 91
91
-
 92
92
-
 93
93
-
 94
94
-
 95
95
-
 96
96
-
 97
97
-
 98
98
-
 99
99
-
 100
100
-
 101
101
-
 102
102
-
 103
103
-
 104
104
-
 105
105
-
 106
106
-
 107
107
-
 108
108
-
 109
109
-
 110
110
-
 111
111
-
 112
112


dans d''autres langues
- italiano: John Deere SW16136 Manuale utente
- español: John Deere SW16136 Manual de usuario
- Deutsch: John Deere SW16136 Benutzerhandbuch
- português: John Deere SW16136 Manual do usuário
- svenska: John Deere SW16136 Användarmanual
Documents connexes
Autres documents
-
Haba 4551 Op het platteland Le manuel du propriétaire
-
Mattel Go Piggy Go Le manuel du propriétaire
-
Klein Tools CL445 Manuel utilisateur
-
-
 Welch Allyn 9600 Plus Manuel utilisateur
-
Amprobe VPC-10A Manuel utilisateur
-
 HAYGAIN HGP713 Slow Feeder Manuel utilisateur
-
-
Pottinger ROLLPROFI G 400 S Mode d'emploi

