TOA WM-D5200 -C4/-C7/-G1/-H1 Manuel utilisateur
- Catégorie
- Microphones
- Taper
- Manuel utilisateur

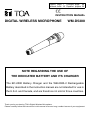
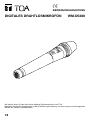
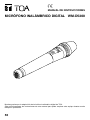
WM-D5200Digital Wireless Microphone
instrUction ManUal
Thank you for purchasing TOA’s Digital Wireless Microphone.
Please carefully follow the instructions in this manual to ensure long, trouble-free use of your equipment.
English: page 1 Français: page 34
Deutsch: seite 18 Español: página 50
note regarDing the Use oF
the DeDicateD BatterY anD its charger
The BC-2000 Battery Charger and the WB-2000-2 Rechargeable
Battery described in the instruction manual are not intended for use in
the U.S.A. and Canada, and are therefore not sold in those countries.

2
TABLE OF CONTENTS
1. SAFETY PRECAUTIONS
......................................................................................................... 3
2. GENERAL DESCRIPTION ....................................................................................................... 5
3. FEATURES ................................................................................................................................. 5
4. HANDLING PRECAUTIONS .................................................................................................... 5
5. NOMENCLATURE AND FUNCTIONS ................................................................................... 6
6. PREPARING BATTERIES ........................................................................................................ 8
6.1. Battery Insertion .................................................................................................................... 8
6.2. Guide to Battery Operating Times ........................................................................................ 8
6.3. When Operating on Rechargeable Battery .......................................................................... 9
7. OPERATION ............................................................................................................................. 10
8. FUNCTION SETTINGS .......................................................................................................... 10
8.1. Setting the Bank and Channel Numbers ............................................................................ 10
8.2. Performing Encryption Settings ......................................................................................... 11
8.3. Performing Code Settings (When Encryption Function Is OFF) ........................................ 14
8.4. Performing Transmission Output Changeover Switch Settings ......................................... 15
9. CONVENIENT FUNCTIONS
(MICROPHONE SENSITIVITY SELECTOR SWITCH SETTINGS)
.................................. 16
10. SPECIFICATIONS ................................................................................................................. 17
Accessories ............................................................................................................................. 17

3
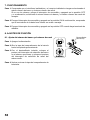
1. SAFETY PRECAUTIONS
•Beforeuse,besuretocarefullyreadalltheinstructionsinthissectionforcorrectandsafe
operation.
•Besuretofollowalltheprecautionaryinstructionsinthissection,whichcontainimportant
warnings and/or cautions regarding safety.
•Afterreading,keepthismanualhandyforfuturereference.
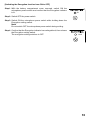
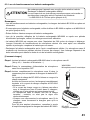
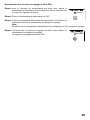
When the Unit is in Use
•Besuretouseadedicatedbatterycharger
when recharging a battery. Using other
battery charger may cause the battery to
leakorexplode,resultinginare,personal
injury, property damage, and/or pollution.
•Topreventtheelectromagneticwavefrom
badlyinuencingmedicalequipment,make
sure to switch off the unit's power when
placing it in close proximity to the medical
equipment.
When the Unit is in Use
•Whentheunitisnotinusefor2weeksor
more, be sure to take the batteries out of the
unit because battery leakage may cause a
re, personal injury, or contamination of
environment.
•Makesuretoobservethefollowinghandling
precautionssothatareorpersonalinjury
does not result from leakage or explosion of
the battery.
· Do not short, disassemble, heat nor put
thebatteryintoare.
· Avoid using both new and old batteries
together.
· Never charge batteries of the type which
are not rechargeable.
· Do not solder a battery directly.
·Be sure to use the specied type of
batteries.
· Note correct polarity (positive and
negative orientation) when inserting a
battery in the unit.
· Avoid locations exposed to the direct
sunlight, high temperature and high
humidity when storing batteries.
Do not place the dry cell battery into charger.
Placing non-rechargeable batteries in the
charger may cause the battery to crack
resultinginareand/orharmtothebody.
When recharging, please only use the BC-
2000 Battery charger and WB-2000 Battery.
Do not use other battery types.
Whenthebatterybecomesinatedorleaks,
discontinue use and replace with new one
immediately.
If there’s any burning and/or peculiar smell
while charging the battery, please switch off
the power immediately.
CAUTION TO USER:
Changes or modications not expressly
approved by the party responsible for
compliance could void the user's authority to
operate the equipment.
IMPORTANT NOTE: To comply with the
FCC RF exposure compliance requirements,
no change to the antenna or the device is
permitted. Any change to the antenna or the
device could result in the device exceeding
the RF exposure requirements and void
user’s authority to operate the device.
Indicates a potentially hazardous situation
which, if mishandled, could result in death
or serious personal injury.
WARNING
Indicates a potentially hazardous situation
which, if mishandled, could result in
moderate or minor personal injury, and/or
property damage.
CAUTION

4
This device complies with Industry Canada’s licence-exempt RSSs. Operation is subject to the
following two conditions:
(1) This device may not cause interference; and
(2) This device must accept any interference, including interference that may cause undesired
operation of the device.
This device operates on a no-protection, no-interference basis. Should the user seek to
obtain protection from other radio services operating in the same TV bands, a radio licence is
required. For further details, consult Innovation, Science and Economic Development Canada’s
document Client Procedures Circular CPC-2-1-28, Voluntary Licensing of Licence-Exempt Low-
Power Radio Apparatus in the TV Bands.
Le présent appareil est conforme aux CNR d’Industrie Canada applicables aux appareils radio
exempts de licence. L’exploitation est autorisée aux deux conditions suivantes :
(1) l’appareil ne doit pas produire de brouillage;
(2) l’utilisateur de l’appareil doit accepter tout brouillage radioélectrique subi, même si le
brouillage est susceptible d’en compromettre le fonctionnement.
Ce dispositif fonctionne selon un régime de non-brouillage et de non-protection. Si l’utilisateur
devait chercher à obtenir une certaine protection contre d’autres services radio fonctionnant
dans les mêmes bandes de télévision, une licence radio serait requise. Pour en savoir plus,
veuillez consulter la Circulaire des procédures concernant les clients CPC-2-1-28, Délivrance
de licences sur une base volontaire pour les appareils radio de faible puissance exempts de
licence et exploités dans les bandes de télévision d’Innovation, Sciences et Développement
économique Canada.

5
2. GENERAL DESCRIPTION
The WM-D5200 is a digital wireless microphone employing a condenser microphone element that
features high sensitivity and clear sound quality. The microphone is specially designed to be used
in conjunction with TOA's WT-D5800 digital wireless receiver.
3. FEATURES
•EmploysthePLL-synthesizersystem.
•TOA'suniquedigitalaudioprocessingtechnologyensureshighqualitysound.
•Digital transmissionis highlyresistant toradio interference and noise,enablingclearer,more
stable communication.
•Whenusedforimportantconferencesorinotherhigh-securityvenues,TOA'suniqueencryption
software combines with digital transmission technology to prevent leakage of or eavesdropping
on sensitive information.
•Switchablemicrophonesensitivityallowstheunittobeusedinawiderangeofapplications.
•Powercanbesuppliedbyeitherthededicatedrechargeable(NiH2=nickel-hydrogen)batteryor
an AA alkaline battery. When replacing the rechargeable battery, use the optional TOA WB-2000-
2 (package of 2).
•Employsaninternalantenna.
4. HANDLING PRECAUTIONS
•Donotexposetheunittorainoranenvironmentwhereitmaybesplashedbywaterorother
liquids, as doing so may result in unit failure.
•Neveropennorremovetheunitcasetomodifytheunit.ReferallservicingtoyournearestTOA
dealer.
•Takecarenottodroptheunitontotheoornorbumpitagainstahardobjectastheunitcouldfail.
•Donotplacetheunitinlocationsofhightemperature(ex.inanill-ventilatedcarinsummer)orhigh
humidity as the unit could fail.
•Donotusetheunitinlocationswhereitisexposedtoseawater.
•Toclean,useadrycloth.Whentheunitgetsverydirty,wipelightlywithaclothdampedinadilute
neutral cleanser, then wipe with a dry cloth. Never use benzine, thinner, or chemically-treated
cleaning towel.
•Avoidusingamobiletelephoneneartheunitinuse.Noisecouldbepickedup.
•Whenusingtwoormoreunits,keepthematleast50cmawayfromeachothertoavoidmalfunctions
or noise.
•Keeptheunitatleast3mawayfromthereceivingantenna.Usingtheunitincloseproximitytothe
antenna could result in malfunctions or noise.

6
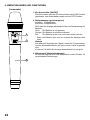
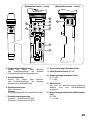
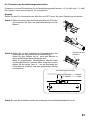
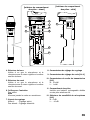
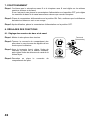
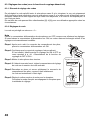
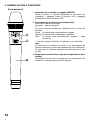
5. NOMENCLATURE AND FUNCTIONS
1. Power switch [ON/OFF]
Power can be turned on by sliding the power switch to the
ON position, while it can be turned off by sliding it back to the
OFF position.
2. Battery checker (green/orange/red)
Lit: Power ON
Unlit: Power OFF*
The remaining battery power is represented by the color of
the indicator.
Green: Battery power is at full charge.
Orange: Battery power depletion has started.
Red: Battery power is almost depleted, and battery
replacement is required.
* When the battery power is depleted, the indicator will not
light up.
Note
The microphone does not transmit the signal if the bank and
channel selector switches are set to the empty channel.
Inthiscase,theindicatorashesredandgreenalternately.
3. Microphone grip (Battery compartment cover)
The internal parts consist of the battery compartment and
switches for various settings.
ON
OFF
1
2
3
[Front]

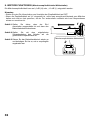
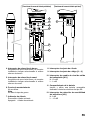
7
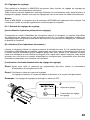
4. Bank selector switch
Make sure that the microphone is identical
to the wireless receiver in the bank number.
5. Channel selector switch
Make sure that the microphone is identical
to the wireless receiver in the channel
number.
6. Maintenance port
Not used.
Note
Never open the rubber cover.
7. Encryption indicator
Lit: Encryption ON
Unlit: Encryption OFF
8. Encryption setting switch
9. Code setting switch [0 – 9]
10. Transmission output changeover switch
[H/L]
H:10mW
L: 1 mW
11. Battery compartment
Insert and use a dedicated rechargeable
battery or AA alkaline batteries.
12. Microphone sensitivity selector switch
[H/L]
H:0dB
L: –10 dB
ON
OFF
H L
6
7
8
9
10
11
4
5
[Battery case internals – front] [Battery case internals – side]
12

8
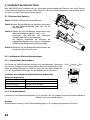
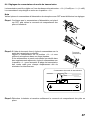
6. PREPARING BATTERIES
The WM-D5200 can operate on both the optional rechargeable battery or replaceable dry batteries.
Please carefully read the corresponding sections for correct use.
6.1. Battery Insertion
Step 1. Turn off the power switch.
Step 2. Holdthemicrophonebodyandrotatethebattery
compartment cover counterclockwise to remove
it.
Step 3. Insert an AA battery according to (+) and (–)
indications on the battery compartment.
For the rechargeable battery, use the optional
TOA WB-2000-2 (package of 2).
For dry batteries, use either the supplied battery
or commercial AA alkaline batteries (LR6).
Step 4. Replace the battery compartment cover by
sliding and rotating it clockwise.
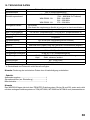
6.2. Guide to Battery Operating Times
6.2.1. Remaining operating time
The color of the battery checker changes from green to orange as
battery consumption progresses, and to red if the battery is further
continuously used. When the battery checker turns red, charge the
battery if the dedicated rechargeable battery is used. In the case of dry
batteries, replace it with a new one.
[Guide to the remaining operating time based on the battery
charge indicator status]
Battery checker status Remaining operating time
Lights green 2 – 8 hours
Lights orange Less than 2 hours
Lights red Battery requires charge or replacement.
6.2.2. Continuous operating time
Guide to continuous operating times: Approx. 8 hours (for fully-charged dedicated rechargeable
battery or alkaline battery)
Note
Operating times may vary depending on usage conditions, such as ambient temperature.
2
3
ON
OFF
Green Orange Red

9
6.3. When Operating on Rechargeable Battery
Notes
•Whenoperatingonrechargeablebatteries,theoptionalBC-2000Batterychargerisrequired.
•For rechargeable batteries, be sure to use the optional BC-2000 or the optional WB-2000-2
(package of 2).
•Avoidusingothermakesofrechargeablebatteries.
•WhenusingtheWB-2000rechargeablebatteryforthersttimeorwhenusingitafterithasbeen
stored for a long period of time, be sure to charge it before use.
•TheWB-2000batteryisdesignedtocyclethroughabout500chargesanddischarges.Whenthe
microphone operation interval becomes extremely short after prolonged repeated use, change
the battery with a new one.
•Charge the rechargeable battery after it has been fully used. (The wireless microphone will
continue to operate for approx. 8 hours per charge.) Frequent charging at short intervals may
shorten the operating life of the rechargeable battery.
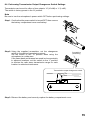
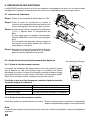
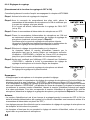
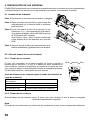
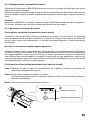
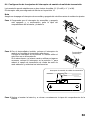
[How to charge]
Step 1. Place the WB-2000 rechargeable battery in the wireless microphone.
(See p. 8, "Battery Insertion.")
Step 2. Set the wireless microphone's power switch to the OFF
position.
Step 3. Fully insert the wireless microphone into the microphone
receptacle of the BC-2000 Battery charger.
The BC-2000's charging indicator lights red and charging
begins.
Charging is completed in approximately 3 hours and the
BC-2000's full-charge indicator lights green.
•If the red charging indicator does not light even if
the wireless microphone has been inserted into the
charger, check to see if the microphone has been
correctly inserted.
•Thewirelessmicrophonebecomeswarmaftercharging
completion, however this is not a failure.
•When disconnecting the wireless microphone from
thecharger,rmlyholdthechargersothatitdoesnot
move.
For more information, see the instruction manual
enclosed with the BC-2000 Battery charger.
WM-D5200
Digital wireless microphone
BC-2000
Battery charger
Do not charge the unit with an alkaline dry battery installed.
Charge the dedicated rechargeable battery*.
Failuretoobservetheseinstructionscouldcausereorpersonal
injury due to a bursting battery.
* The optional TOA WB-2000-2 (package of 2).
CAUTION

10
7. OPERATION
Step 1. Conrmthatthewirelessmicrophoneandthewirelessreceiverareidenticalinthebank
and channel numbers
If not identical, turn the power switch to the OFF position, then set the bank and channel
numbers to the same ones as the receiver.
Step 2. TurnthePowerswitchtotheONposition.Then,conrmthebatterycheckerwilllightgreen
or orange.
Step 3. Turn the Power switch to the OFF position after use.
8. FUNCTION SETTINGS
8.1. Setting the Bank and Channel Numbers
Step 1. Switch off the power.
Step 2. Rotate the battery compartment cover
counterclockwise to detach it.
Step 3. Using the supplied screwdriver, set the
bank selector switch’s pointer to the desired
number, and set the channel selector switch’s
pointer likewise.
Step 4. Replace the battery compartment cover.
2
3
Screwdriver
(accessory)

11
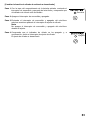
8.2. Performing Encryption Settings
To enhance security, the WM-D5200 is provided with an encryption setting function that prevents
leakage of transmitted information.
This function also has the advantage of eliminating radio interference if enabled. Before enabling
theencryptionsetting,besurethatbankandchannelsettingsarecompletedrst.
Tip
In addition to the WM-D5200, the WT-D5800 Digital Wireless Receiver also requires setup.
Therefore, be sure to see the receiver's instruction manual as well.
8.2.1. Encryption settings summary
[Before use (preparatory operation for setting)]
Transmit an ID number from the wireless microphone to the receiver. The ID number is randomly
selected on the wireless microphone side. The ID number to be used is selected from an extensive
numberofcombinationsandcannotbedesignatedbytheoperator,norcanitbeidentiedfrom
outside.
[In use] (No operations required.)
When the receiver detects a signal from the wireless microphone, it simultaneously reads the
microphone's ID information, ensuring that only the audio of the wireless microphone assigned
with the same ID number as the receiver can be output. Even if the bank/channel numbers are
identically set in an attempt to enable reception of a radio signal from outside, since no audio is
output if the ID number does not match, the possibility of leakage of transmitted information to the
outside is quite low.
[Encryption setting ON/OFF confirmation]
Step 1. After removing the battery compartment cover, switch ON the microphone power switch.
Step 2. ConrmthestatusoftheEncryptionindicator.
The setting is ON when the indicator is lit, and OFF when the indicator is unlit.
Note: The encryption setting is factory-preset to OFF
1
2
Encryption setting switch
Encryption indicator

12
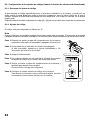
8.2.2. Performing encryption settings
[Switching the Encryption function from OFF to ON]
See also the instruction manual enclosed with the WT-D5800 receiver.
Step 1. Enable the receiver's encryption function.
Step 2. With the battery compartment cover removed, switch ON the
microphonepowerswitchandconrmthattheEncryptionindicator
is unlit.
If the indicator is lit, switch encryption from ON to OFF (see p. 13).
Step 3. Switch OFF the microphone power switch.
Step 4. Switch ON the microphone power switch while holding down the
microphone's Encryption setting switch (continue holding until Step
6).
Conrmthatthemicrophone'sEncryptionindicatorisashing.
An ID number is transmitted while the microphone's Encryption
setting switch is held down.
Step 5. Perform pairing setting at the receiver.
The receiver waits for the microphone’s transmitted ID number for
as long as the Set key is held down. The "RECEIVING" indication
is displayed on the receiver's LCD screen until the ID number is
correctly received.
Step 6. AfterconrmingthattheLCDdisplayhasswitchedtothe"SUCCESS"
indication, release both the microphone's Encryption setting switch
and the receiver's Set key.
Step 7. Conrmthatthemicrophone'sEncryptionindicatorislit.
The encryption setting is now ON.
Notes
•DonotswitchOFFthepowertothemicrophoneorreceiverduringsetting.
•Hold down the microphone's Encryption setting switch and the receiver's Set key until the
"SUCCESS" indication appears on the receiver's LCD screen.
If the microphone's Encryption setting switch or the receiver's Set key is released while the
"RECEIVING" indication is displayed on the receiver's screen, the receiver will not have correctly
received the new ID number, leaving the ID number unchanged from the previous value. To match
the receiver ID number with the microphone ID number, switch OFF the microphone's encryption
setting, then repeat Steps 1 – 7 above.
Tips
•TheIDnumberisupdatedwhentheencryptionisswitchedfromOFFtoONagain.(Theencryption
ON/OFF status and ID number are retained even if the power switch is switched OFF.)
•SettingscanbeperformedregardlessofwhetherthemicrophoneorreceiverEncryptionsetting
switchwasdepressedrst.
•ThereceiverdoesnotoutputaudioduringIDnumbersetting,evenifitreceivesaradiosignalfrom
the microphone.
Unlit
Flashing
Lit

13
Unlit
[Switching the Encryption function from ON to OFF]
Step 1. With the battery compartment cover removed, switch ON the
microphonepowerswitchandconrmthattheEncryptionindicator
is lit.
Step 2. Switch OFF the power switch.
Step 3. Switch ON the microphone power switch while holding down the
Encryption setting switch.
Note
Do not switch OFF the microphone power switch during setting.
Step 4. ConrmthattheEncryptionindicatorhasextinguished,thenrelease
the Encryption setting switch.
The encryption setting switches to OFF.
Lit

14
8.3. Performing Code Settings (When Encryption Function Is OFF)
8.3.1. Code Setting Summary
By presetting the specied code between thewireless microphone and receiver, audio is only
output when a digital signal received from the wireless microphone has the same ID code as the
receiver. Even if another signal is received from an adjacent area, if the code does not match, audio
is not output.
Ten varieties of code can be selected ([0] – [9]) for appropriate use, depending on circumstances.
8.3.2. Code settings
Code is factory-preset to "0."
Note
Switch OFF the microphone power switch when performing settings. If the power switch is left ON,
the codes will remain unaffected even if the settings are manually changed.
Step 1. After removing the battery compartment cover, switch ON
the microphone power switch.
Step 2. ConrmthattheEncryptionindicatorisunlit.
If it is lit, switch encryption from ON to OFF, referring to p.
12, "Switching the Encryption function from OFF to ON."
Step 3. Switch OFF the power.
Step 4. Using the supplied screwdriver, set the code setting switch to
the desired code number.
Step 5. Reinstall and securely tighten the battery compartment
cover, as it was before.
This puts the code into the set state.
Step 6. Set the same code number for the receiver, as well.
For the setting method, see the instruction manual enclosed
with the receiver.
1
2
4
Encryption indicator
Unlit
Code setting switch

15
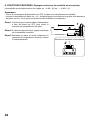
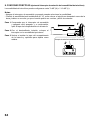
8.4. Performing Transmission Output Changeover Switch Settings
Transmissioncanbesetforeitheroftwooutputs:‘H’(10mW)or‘L’(1mW).
Theswitchisfactory-presettothe‘H’position.
Note
Be sure to turn the microphone’s power switch OFF before performing settings.
Step 1. ConrmthatthepowerswitchisturnedOFF,thenremove
the battery compartment cover and battery.
Step 2. Using the supplied screwdriver, set the changeover
switch to the desired transmission output.
Set the switch to the ‘H’ position when using the
microphone in a wide area.
If the same bank and channel are used in close proximity
in adjacent locations, set the switch to the ‘L’ position
to shorten the radio wave transmission range for each
location to minimize interference.
Step 3. Reinsert the battery and securely replace the battery compartment cover.
1
2
1
H L
Screwdriver
(accessory)
Transmission output changeover switch

16
9. CONVENIENT FUNCTIONS (Microphone Sensitivity Selector Switch Settings)
Microphonesensitivitycanbesetto"0dB"(H)or"–10dB"(L).
Notes
•SwitchOFFthepowerswitchwhenselectingthesensitivity.
•Whenthesensitivityissetto"H,"avoidpositioningthemicrophonetooclosetothemouthand
speakinginaloudvoice,asthesoundcouldbecomemuddledanddifculttounderstand.
Step 1. Conrm that the power switch has been
switched off, then remove the battery
compartment cover.
Step 2. Using the supplied screwdriver, set the switch
to the desired sensitivity.
Step 3. Reinstall and securely tighten the battery
compartment cover, as it was before.
1
Microphone sensitivity selector switch
2

17
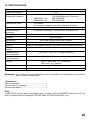
10. SPECIFICATIONS
Microphone Element Electret condenser unit: Unidirectional
Modulation type FSK
Version and
Frequency Range
WM-D5200-C4,-C7:794–832MHz
(794–806MHzforThailand)
WM-D5200-G1: 606–636MHz
WM-D5200-H1: 576–606MHz
Channel Selectable 160 channels
(The number of channels may differ from country to country.)
RF Carrier Power Less than 50 mW
Maximum Input Level 132dBSPL(Sensitivity:L)/122dBSPL(Sensitivity:H)
Audio Frequency
Response
100Hz–12kHz
Antenna Built-in type
Dynamic Range Typ. 90 dB (when used with WT-D5800)
ID Selectable 10 patterns
Battery WB-2000 rechargeable battery (option) or AA Alkaline dry cell battery
Battery Life Approx. 8 hours
Operating Temperature –10 to +50 °C (14 to 122 °F) (except battery)
OperatingHumidity 30to85%RH(nocondensation)
Finish Body: ABS resin, black, coating
Head:steel,black,paint
Dimensions ø47 × 239.5 mm (ø1.85" × 9.43")
Weight 220 g (0.49 lb) (with battery)
Note: Thedesignandspecicationsaresubjecttochangewithoutnoticeforimprovement.
• Accessories
Storage case ........................................................... 1
Screw driver (for setting) ......................................... 1
Microphone holder .................................................. 1
Note
The WM-D5200 cannot communicate with the TRANTEC Wireless System (S4 and S5 Series) nor
with the TOA Analog Wireless System (WT-5800, WT-5805, and WT-5810 etc.).

18
WM-D5200
DIGITALES DRAHTLOSMIKROFON
BEDIENUNGSANLEITUNG
WirdankenIhnenfürdenKaufdiesesdigitalenDrahtlosmikrofonsvonTOA.
Beachten Sie bitte die Anweisungen in dieser Bedienungsanweisung, um einen langen und störungsfreien
Betrieb des Geräts zu gewährleisten.

19
INHALTSVERZEICHNIS
1. SICHERHEITSHINWEISE
...................................................................................................... 20
2. ALLGEMEINE BESCHREIBUNG ......................................................................................... 21
3. LEISTUNGSMERKMALE ....................................................................................................... 21
4. VORSICHTSMASSNAHMEN BEI DER HANDHABUNG .................................................. 21
5. BEZEICHNUNGEN UND FUNKTIONEN ............................................................................. 22
6. VORBEREITEN DER BATTERIE .......................................................................................... 24
6.1. Einsetzen der Batterie ......................................................................................................... 24
6.2. Leitfaden zur Batterie-Betriebsdauer ................................................................................. 24
6.3. Bei Betrieb mit einem Akku ................................................................................................ 25
7. BEDIENUNG ............................................................................................................................ 26
8. FUNKTIONSEINSTELLUNGEN ............................................................................................ 26
8.1.EinstellenderFrequenzbank-undKanalnummer .............................................................. 26
8.2. Vornehmen von Verschlüsselungseinstellungen ............................................................... 27
8.3. Durchführen von Code-Einstellungen (bei deaktivierter Verschlüsselungsfunktion) ........ 30
8.4. Einstellen des Sendeleistungsumschalters ........................................................................ 31
9. WEITERE FUNKTIONEN (MIKROFONEMPFINDLICHKEITS-WÄHLSCHALTER) ....... 32
10. TECHNISCHE DATEN .......................................................................................................... 33
Zubehör .................................................................................................................................... 33

20
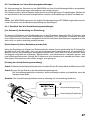
Beim Gebrauch des Geräts
•
Verwenden Sie zum Laden eines Akkus unbedingt
das spezielle Ladegerät. Bei Verwendung
eines anderen Ladegeräts kann die Batterie
auslaufen oder explodieren, was einen Brand,
eineKörperverletzung,einenSachschadenoder
Umweltverschmutzung zur Folge haben kann.
•
Das Gerät bitte nach Gebrauch immer
ausschalten. Insbesondere ist darauf zu achten,
dasseszukeinergegenseitigenBeeinussung
mit medizintechnischen Geräten kommt.
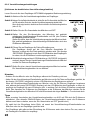
Beim Gebrauch des Geräts
•Wenn das Gerät voraussichtlich 2 Wochen
oder länger nicht gebraucht wird, entfernen
Sie unbedingt die Batterien aus dem Gerät, da
diese anderenfalls auslaufen und einen Brand,
eine Verletzung oder Umweltverschmutzung
verursachen könnte.
•AchtenSiedarauf,dassbeiderHandhabung
die nachstehenden Vorsichtsmaßregeln
eingehalten werden, um einen Brand oder
eine Verletzung durch Auslaufen oder
Bersten der Batterie zu vermeiden.
· Die Batterie nicht kurzschließen, zerlegen,
erhitzen oder verbrennen.
· Neue und alte Batterien nicht zusammen
verwenden.
· Niemals versuchen, Batterien zu laden.
· Batterien nicht fest anlöten.
· Unbedingt eine Batterie des vorgeschriebenen
Typs verwenden.
· Beim Einlegen der Batterie in das Gerät auf
korrekte Ausrichtung der Batteriepole (Plus
und Minus) achten.
· Batterien nicht an Orten aufbewahren, wo sie
direktem Sonnenlicht, hohen Temperaturen
und hoher Luftfeuchtigkeit ausgesetzt sind.
Legen Sie keine Batterien in das Ladegerät
ein.
Wenn Batterien in das Ladegerät gelegt
werden, können sie explodieren und einen
Brand und/oder eine Verletzung verursachen.
Verwenden Sie zum Wiederauaden
ausschließlich das Ladegerät BC-2000 und
den Akku WB-2000.
Verwenden Sie keine anderen Batterietypen.
Sollte die Batterie anschwellen oder auslaufen,
sehen Sie sofort von einer weiteren Nutzung
ab und ersetzen sie durch eine neue.
Sollte sich beim Laden der Batterie Rauch und/
oder ein ungewöhnlicher Geruch entwickeln,
schalten Sie das Gerät unverzüglich aus.
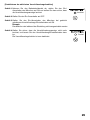
WARNHINWEIS:
DerVersuch,ÄnderungenoderModikationen
am Gerät vorzunehmen, die nicht von der
zuständigen Stelle genehmigt wurden, kann
zu Schäden am Gerät und zum Erlöschen der
Betriebserlaubnis für das Gerät führen.
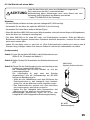
Macht auf eine potenziell gefährliche Situation aufmerksam.
Die Nichtbeachtung der Warnhinweise kann zu Verletzungen,
möglicherweise auch mit tödlichem Ausgang, führen.
WARNUNG
1. SICHERHEITSHINWEISE
•Lesen Sie vor der Inbetriebnahme unbedingt alle Anweisungen in diesem Abschnitt
aufmerksam durch, damit ein korrekter und sicherer Betrieb gewährleistet ist.
•Folgen Sie unbedingt allen Vorsichtsmaßregeln in diesem Abschnitt, die wichtige, die
Sicherheit betreffende Warn- und/oder Vorsichtshinweise enthalten.
•BewahrenSiedieseAnleitungnachdemLesenzurspäterenBezugnahmegriffbereitauf.
Macht auf eine potenziell gefährliche
Situation aufmerksam. Die Nichtbeachtung
dieserHinweisekannzuleichten
Verletzungen oder Sachschäden führen.
ACHTUNG
La page charge ...
La page charge ...
La page charge ...
La page charge ...
La page charge ...
La page charge ...
La page charge ...
La page charge ...
La page charge ...
La page charge ...
La page charge ...
La page charge ...
La page charge ...
La page charge ...
La page charge ...
La page charge ...
La page charge ...
La page charge ...
La page charge ...
La page charge ...
La page charge ...
La page charge ...
La page charge ...
La page charge ...
La page charge ...
La page charge ...
La page charge ...
La page charge ...
La page charge ...
La page charge ...
La page charge ...
La page charge ...
La page charge ...
La page charge ...
La page charge ...
La page charge ...
La page charge ...
La page charge ...
La page charge ...
La page charge ...
La page charge ...
La page charge ...
La page charge ...
La page charge ...
La page charge ...
La page charge ...
La page charge ...
La page charge ...
La page charge ...
La page charge ...
La page charge ...
La page charge ...
La page charge ...
La page charge ...
La page charge ...
La page charge ...
-
 1
1
-
 2
2
-
 3
3
-
 4
4
-
 5
5
-
 6
6
-
 7
7
-
 8
8
-
 9
9
-
 10
10
-
 11
11
-
 12
12
-
 13
13
-
 14
14
-
 15
15
-
 16
16
-
 17
17
-
 18
18
-
 19
19
-
 20
20
-
 21
21
-
 22
22
-
 23
23
-
 24
24
-
 25
25
-
 26
26
-
 27
27
-
 28
28
-
 29
29
-
 30
30
-
 31
31
-
 32
32
-
 33
33
-
 34
34
-
 35
35
-
 36
36
-
 37
37
-
 38
38
-
 39
39
-
 40
40
-
 41
41
-
 42
42
-
 43
43
-
 44
44
-
 45
45
-
 46
46
-
 47
47
-
 48
48
-
 49
49
-
 50
50
-
 51
51
-
 52
52
-
 53
53
-
 54
54
-
 55
55
-
 56
56
-
 57
57
-
 58
58
-
 59
59
-
 60
60
-
 61
61
-
 62
62
-
 63
63
-
 64
64
-
 65
65
-
 66
66
-
 67
67
-
 68
68
-
 69
69
-
 70
70
-
 71
71
-
 72
72
-
 73
73
-
 74
74
-
 75
75
-
 76
76


TOA WM-D5200 -C4/-C7/-G1/-H1 Manuel utilisateur
- Catégorie
- Microphones
- Taper
- Manuel utilisateur
dans d''autres langues
Documents connexes
-
TOA WM-D5300 -C4/-C7/-G1/-H1 Manuel utilisateur
-
-
Optimus WM-5225 D01 Manuel utilisateur
-
-
-
-
-
-
-