
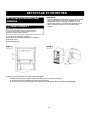
BUILT-IN ICE MAKER
MACHINE À GLAÇONS
Model / Modèle:CLIM15 Model / Modèle:BIM45
Makes 32 lbs daily / Ice storage capacity: 25 lbs
32 livres par jour / la capacité de la boîte de glace est 25 livres
BEFORE USE, PLEASE READ AND FOLLOW
ALL SAFETY RULES AND OPERATING INSTRUCTIONS
AVANT D’UTILISER CET APPAREIL, VEUILLEZ LIRE ET RESPECTER
TOUTES LES RÈGLES DE SÉCURITÉ ET INSTRUCTIONS D’UTILISATION
Write the Serial Number here:
Inscrivez le numéro de série ici :
Felix Storch, Inc.
Summit Appliance Division
770 Garrison Avenue
Bronx, NY 10474
www.summitappliance.com
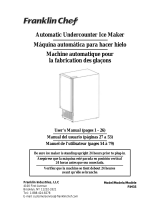
Owner’s Manual
Manuel du propriétaire

TABLE OF CONTENTS
Important Safety Information ........................................................................... 2
Installation Instructions .............................................................................. 3 – 8
Before Using Your Ice Maker .................................................................... 3
Installation of Your Ice Maker .................................................................... 3
Installation Specifications (Built-In) ........................................................... 3
Connecting Ice Maker to Water Supply .............................................. 4 – 5
Door Reversal Instructions ....................................................................... 5
Ice Maker Performance Mode Instructions ......................................... 6 – 8
Operating Instructions .............................................................................. 8 – 10
Controls of the Ice Maker .................................................................... 8 – 9
Controlling the Size of Ice Cubes ........................................................... 10
Ice Bin ..................................................................................................... 10
Care and Maintenance ............................................................................ 11 – 12
Cleaning Your Ice Maker ........................................................................ 11
Power Failure ......................................................................................... 11
Moving Your Ice Maker ........................................................................... 11
Vacation Time ......................................................................................... 11
Cleaning the Inner Water Container ....................................................... 12
Troubleshooting .............................................................................................. 13
Limited Warranty ............................................................................................. 15
1
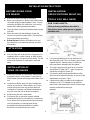
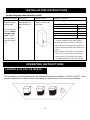
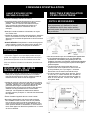
NOTES ON INSTALLATION OF ICE MAKER CLIM15 / BIM45
When installing the ice maker under a counter or other enclosed space, follow
these spacing dimensions: Allow approximately 2" (50 mm) of clearance at rear,
1/16” (2 mm) at the top and 1" (25 mm) at sides for proper air circulation. The
ventilation grille at the bottom should never be blocked. The installation should
allow the ice maker to be pulled forward for servicing if necessary.
Even if the unit is to be installed free-standing, leave at least 4” of clearance at
sides, top and back.
See pages 3-5 for more details on installation.

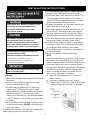
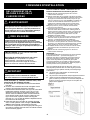
IMPORTANT SAFETY INFORMATION
READ ALL SAFETY INFORMATION BEFORE USING.
WARNING: RISK OF CHILD ENTRAPMENT
An empty ice maker is a very dangerous attraction to children. Remove either the gasket, latches, lock and/or doors from
unused or discarded appliances, or take some other action to make sure it is harmless.
To avoid installation/operation difficulties,
read these instructions thoroughly.
This appliance must be grounded. Connect only to a
properly grounded outlet. See “Grounding
Instructions” section.
Do not operate this appliance if it has a damaged
power cord or plug, if it is not working properly, or if
the appliance has been damaged or dropped.
Never allow children to operate, play with, or crawl
inside the appliance.
Never clean appliance parts with flammable fluids.
The fumes can create a fire hazard or explosion.
Do not store or use gasoline or any other flammable
vapors or liquids in the vicinity of this or any other
appliance. The fumes can create a fire hazard or
explosion.
Do not splice the power cord that is equipped with this
appliance.
Keep the power cord away from heated surfaces.
Do not immerse power cord plug or the appliance
itself in water.
Do not use this product near water, for example, in a
wet basement, near a swimming pool or near a sink.
Do not use corrosive chemicals or vapors in this
appliance.
Use this appliance only for its intended use, as
described in this manual.
See door surface cleaning instructions in the Care and
Cleaning section(s) of this manual.
Do not cover or block any openings on the appliance.
This appliance is intended for household use only. Do
not attempt to operate or store this appliance
outdoors.
This appliance should be serviced only by qualified
service personnel. Contact the nearest authorized
service facility for examination, repair or adjustment.
WARNING:
Improper use of the grounding plug can
result in a risk of electric shock.
This appliance must be grounded. In the event of an
electrical short circuit, grounding reduces the risk of
electric shock by providing an escape wire for the
electric current.
This appliance is equipped with a power cord having a
grounding wire with a grounding plug. The plug must
be plugged into an outlet that is properly installed and
grounded.
Consult a qualified electrician or service technician if
the grounding instructions are not completely
understood, or if doubt exists as to whether the
appliance is properly grounded.
If the outlet is a standard 2-prong wall outlet, it is your
personal responsibility and obligation to have it
replaced with a properly grounded 3-prong wall outlet.
For best operation, plug this appliance into its own
electrical outlet to prevent flickering of lights, blowing
of fuse or tripping of circuit breaker.
Do not under any circumstances cut or remove the
third (ground) prong from the power cord.
Do not use an adapter plug with this appliance.
Do not use an extension cord with this appliance. If
the power cord is too short, have a qualified electrician
or service technician install an outlet near the
appliance.
DANGER! Risk of child entrapment
Before you throw away your old appliance:
Take off the door.
Leave the shelves in place so that children
may not easily climb inside.
PRECAUTIONS
GROUNDING INSTRUCTIONS
2

INSTALLATION INSTRUCTIONS
BEFORE USING YOUR
ICE MAKER
Remove the exterior and interior packaging.
Before connecting the Ice Maker to the power source,
let it stand upright for approximately 2 hours. This will
reduce the possibility of a malfunction in the cooling
system from handling during transportation.
Clean the interior surface with lukewarm water using a
soft cloth.
Attach the water inlet and outlet pipe, loosen the
screwnut, choose the function switch. (See Ice Maker
Performance Mode instructions.)
Before first use: Make two full batches of ice and
then discard to insure that future batches are clean
and sanitary.
ATTENTION
Do not open the door unless necessary.
If the Ice Maker will not be used for a long period, it is
suggested, after a careful cleaning, to leave the door
ajar to allow air to circulate inside the cabinet. This will
minimize the formation of condensation, mold and
odors.
INSTALLATION OF YOUR
ICE MAKER
Place your Ice Maker on a floor that is strong enough
to support it when it is fully loaded. To level your Ice
Maker, adjust the front leveling leg at the bottom of the
unit.
Locate the Ice Maker away from direct sunlight and
sources of heat (stove, heater, radiator, etc.). Direct
sunlight and heat sources may increase electrical
consumption. Extremely cold ambient temperatures
may also cause the unit not to perform properly.
Avoid locating the unit in moist areas.
Plug the unit into an exclusive, properly installed,
grounded wall outlet. Do not under any circumstances
cut or remove the third (ground) prong from the power
cord. Any questions concerning power and/or
grounding should be directed toward a certified
electrician or an authorized service center.
INSTALLATION
SPECIFICATIONS (BUILT-IN)
TOOLS YOU WILL NEED
FOR YOUR SAFETY:
While performing installations described in
this section, gloves, safety glasses or goggles
should be worn.
SrewdriverPhillipsLevelCarpentersSquareFlashlightMeasu
It is recommended that you do not install the unit
directly beside a wall. This is to allow the door to have
a greater than 90° opening swing. A limited door
swing may lead to damaging the door gasket.
The rough cabinet opening must be on a level floor
area at least 25" deep and 17 " wide. The opening
should have a height of at least 35".
The electrical outlet may be positioned from within
either side of the adjacent cabinetry, or the rear of the
shaded area (as shown in Fig A).
If the electrical outlet is located inside the adjacent
cabinetry, cut a 1-1/2” diameter hole to admit the
power cord. If the cabinet wall is metal, the hole edge
must be covered with a bushing or
grommet.
INSTALLATION OF
YOUR ICE MAKER
BEFORE USING YOUR
ICE MAKER
INSTALLATION
SPECIFICATIONS (BUILT-IN)
3
17”

INSTALLATION INSTRUCTIONS
To avoid electric shock, which can cause death or severe
personal injury, disconnect the Ice Maker from an
electrical power outlet before connecting a water
supply line to the Ice Maker
.
Copper tubing is recommended for the water supply line.
Water supply tubing made of 1/4” plastic is not
recommended since it greatly increases the potential
for water leaks. Manufacturer will not be responsible for
any damage if plastic tubing is used for the supply line.
DO NOT install water supply tubing in areas where
temperatures fall below freezing.
Connect the ice maker to a drinkable water source
that is not tied into a water softening system.
Chemicals from the softener may damage the ice
maker, causing it to malfunction.
Ensure that your water supply line connections comply
with all local plumbing codes.
Before Installing the Water Supply Line, You
Will Need
1. Basic tools: adjustable wrench and standard, flat blade
screwdriver.
2. Access to a household cold water line with water
pressure between 20 and 120 psi.
3. A water supply line made of 1/4 inch (6.4mm)OD,
copper tubing, To determine the length of copper
tubing needed, you will need to measure the distance
from the ice maker inlet valve at the back of the Ice
Maker to your cold water pipe. Then add approximately
7 feet (2.1 meters), so the Ice Maker can be moved out
for cleaning.
4. A shutoff valve to connect the water supply line to your
household water system. (DO NOT use a self-piercing
type shutoff valve.)
5. A compression nut and ferrule (sleeve) for connecting the
water supply line to the ice maker inlet valve.
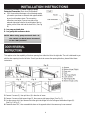
To Connect Water Supply Line to Ice Maker Inlet Valve
1. Disconnect Ice Maker from electric power supply.
2. Place end of water supply line into sink or bucket. Turn
ON water supply and flush supply line until water is
clear, turn OFF water supply at shut off valve. Unscrew
plastic cap from water valve inlet and save.
3. Slide brass compression nut, then ferrule (sleeve), onto
water supply line, as shown in Fig. A.
4. Push water supply line into water valve inlet as far as it
will go (1/4 inch). Slide ferrule (sleeve) into valve inlet
and finger tighten compression nut onto valve. Tighten
another half turn with a wrench; DO NOT over-tighten.
5. With steel clamp and screw, secure water supply line to
rear panel of Ice Maker at location shown in Fig. A.
6. Coil excess water supply line (about 2½ turns) behind
Ice Maker as shown in Fig. A and arrange coils so they
do not vibrate or wear against any other surface.
7. Turn ON water supply at shut off valve and tighten any
connections that leak.
8. Reconnect Ice Maker to electric power supply.
NOTE:
It takes approximately 24 hours for the ice maker to begin
producing ice. Air in new plumbing lines may cause ice
maker to cycle two or three times before making a full tray
of ice. New plumbing may cause ice to be discolored or
have poor flavor. Discard ice made during the first 24hours.
Although the unit has been tested and cleaned at the
factory, due to long-term transit and storage, the first
batch or two of cubes must be discarded.
Never turn the water supply tap off when the ice
maker is working.
Never touch evaporator when unit is running!
Except to take ice from the unit, keep the door closed
to reduce melting and insure proper ice formation.
4

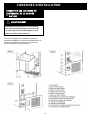
Connecting Ice Maker To Water Supply (cont’d):
Drain-pipe Connection (Drain hose not provided)
If you choose direct drainage or force drainage mode,
you need to purchase an external drain pipe available
at your local hardware store. The connection
instructions are below: Connect one side of the
external drain pipe linked to the outlet pipe of the ice
maker; put the other side into the drain hole. (See Fig
B.)
A - Is a pump-assisted drain
B - Is a gravity-fed continuous drain
NOTE: When using pump-assisted drain “A”,
the switch (on back) must be turned
to the “ON” position.
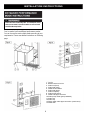
This appliance has the capability of the door opening from either the left or the right side. The unit is delivered to you
with the door opening from the left side. Should you desire to reverse the opening direction, please follow these
instructions.
1. Remove 2 screws (1), then pull door (4) in direction of arrow.
2. Remove 3 screws of right upper hinge (5), then remove right upper hinge. (See Fig. C.)
3. Use the screws which you removed from the right side hinges to fix the left upper and bottom hinges (8).
(See Fig. D & Fig. E.)
4. Rotate the door 180°, then assemble the door on the opposite side in the same way it was removed.
5

Please disconnect unit from power. To avoid electric shock,
make sure no water is near the ice maker or on floor board
and follow the steps below.
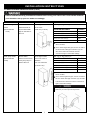
Your ice maker has three different performance modes.
You can choose the most suitable mode according to your
requirements. Please see detailed instructions on following
page.
1. Ice bin
2. Bottom board of ice bin
3. Drain nut (front)
4. Drain seal (front)
5. Water level indicator
6. Drain seal (back)
7. Drain nut (back)
8. Drain pump switch
9. Water inlet pipe connector
10. Drain pump outlet (pump-assisted)
11. Drain cap
12. Drain cap
13. Direct water outlet pipe connection (continuous)
14. Water tank
6
INSTALLATION INSTRUCTIONS

Ice Maker Performance Mode Instructions (cont’d)
Please read the following installation methods before using, and choose the correct drain mode for
your situation. Set up your ice maker accordingly.
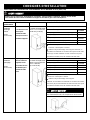
Performance Mode Instructions Suitable situation Operation instruction
Direct drainage
mode
(Recommended
mode)
Excess water
will be drained off
by the outlet water
pipe on the back of
the unit
The height of drain hole
in the room
≤100 mm (3-15/16”)
Ref.: Fig. A, Fig. B & Fig. C
Screw Nut and Switch
Condition
screw nut(front) (3) + seal washer(front) (4)
lock
screw nut(back) (7) + seal washer(back) (6)
open
screw nut for valve seal (11)
lock
screw nut for valve seal (12)
open
force water outlet switch (8)
OFF
1. Please be sure the screw nut and switch are in the
above condition;
2. Use a certain length drain pipe,connect one side to
the direct water outlet pipe connection (13), the
other to the drain hole. Please be sure the
connection is tight to avoid water leakage.
Drain pump mode
(Recommended
mode)
Excess water
will be forced to drain
out by the pump on
back of the unit.
The height of drain
hole in the room is
between
101 mm~1500 mm
(3-15/16”~59”)
Ref.: Fig. A, Fig. B & Fig. C
Screw Nut and Switch Condition
screw nut(front) (3) + seal washer(front)(4)
lock
screw nut(back) (7) + seal washer(back) (6)
open
screw nut for valve seal (11)
open
screw nut for valve seal (12)
lock
force water outlet switch (8)
ON
1. Please be sure the screw nut and switch are in the
above condition;
2. Use a certain length drain pipe, connect one side to
the force water outlet pipe connector (10), the other
to the drain hole. Please be sure the connection is
tight to avoid water leakage.
The lengthen of drainpipe is no more than 6000 mm
(236-4/16”) in order to prevent slops return.
7
INSTALLATION INSTRUCTIONS

INSTALLATION INSTRUCTIONS
Ice Maker Performance Mode Instructions (cont’d)
Performance Mode Instructions Suitable situation Operation instruction
Manual drainage
system mode
(If you’re operating
using the “Manual
drainage system
mode”, ice water
will restrict drain
water from flowing
out.)
Manually drain the
water from the ice
bin.
There is no drain hole
in the room.
Ref.: Fig. A, Fig. B & Fig. C
Screw Nut and Switch
Condition
screw nut (front) (3) + seal washer (front) (4)
lock
screw nut (back) (7) + seal washer(back) (6)
lock
screw nut for valve seal (11)
lock
screw nut for valve seal (12)
lock
force water outlet switch (8)
OFF
1. Please be sure the screw nut and switch are in
the above condition to avoid water leakage.
2. Periodically check the ice bin (1), and water
level indicator (5). If the water level exceeds the
indicator water level, please drain off the excess
water.
3. When draining off the water, you can remove
the ice bin (1), screw nut (front) (3) and seal
washer (front) (4). Remove the excess water,
then tighten the above screw and seal washer.
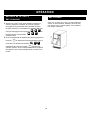
OPERATING INSTRUCTIONS
The Ice Maker should be placed where the ambient temperature is between 10-32°C (50-90°F). If the
ambient temperature is above or below this range, the performance of the unit may be affected.
8
CONTROLS OF THE ICE MAKER

OPERATING INSTRUCTIONS
CONTROLS OF THE ICE MAKER
Control
Type Condition Function Explanation CHECKING THE
WATER SUPPLY
Button Press To turn the Ice Maker on/off,
press and hold this button
for approximately 3 seconds.
1. Turn off water supply.
2. Disconnect line from the ice
maker.
3. Position water supply line in
a bucket.
4. Turn on water and make
sure water falls into bucket.
5. Before reconnecting the
water supply line to the ice
maker, make sure the
water is turned off, then
reconnect the water supply
line to the ice maker.
If unsure, please contact
your local plumber.
① “Water tank is full.”
a. Unscrew the drain cap (12)
located on the back of the
unit and let out the water.
(Refer to Page 5, Fig. B.)
Button Press Small size of ice
Button Press Medium size of ice
Button Press Large size of ice
Indicator Light ON Small size of ice is selected.
FLASHING
Water tank is full. ①
Indicator Light ON Medium size of ice is selected.
Indicator Light ON Large size of ice is selected.
FLASHING
Ice bin is full of ice. ④
Indicator Light ON Compressor is working.
OFF Compressor stopped working.
FLASHING Stand by condition.
Indicator Light
Flashing at the
same time.
Ice maker low on water.②
Indicator Light
Flashing at the
same time.
Sensor breakdown ③
b. After draining out all the water from the outside water tank, reconnect unit to power and it will continue to run normally.
c. If “Drain pump mode” is chosen, please confirm the “Pumped water outlet switch” is in the“ON” position. If it is in the
correct position but you still get a WARNING ALARM after you power off the unit, please contact a service center
.
d. If “Manual drainage system mode” is chosen, the outside water tank will be full of water within one or two weeks
depending on differences in ambient temperatures, please drain the water.
②
“Ice maker low on water”
a. Check if outside water supply is functioning normally. Please see “Checking the water supply” box above.
b. The icemaker will remove faults automatically within 30 minutes and work normally when outside water pipe is functioning.
c. Press “
” button and turn on the unit again if icemaker does not function normally after 30 minutes;
d. If the icemaker still shows a WARNING ALARM after the above process is repeated, contact the service center.
③
“Sensor breakdown” Please contact our authorized service center.
④
“Bucket full” alarm:
a. Check if the ice bucket is full. If so, remove the ice, and the alarm will stop.
b. If the ice bucket is not full when the alarm sounds, check to see if the ice maker cover plate is stuck. Clear any obstruction and
replace the cover. The alarm should stop.
c. When there is an insufficient water supply, the ice maker cover plate may stick and the “bucket full” alarm will sound. Remove any
ice from around the cover plate and check that the water supply is sufficient. The alarm should stop.
9

OPERATING INSTRUCTIONS
CONTROLLING THE SIZE
OF ICE CUBES
1. Please insure the water supply is properly connected.
The default setting of the ice maker is set to make
medium ice. If you need to revise the ice size, you can
press buttons The relevant Indicator light
will display.
2. If you want to stop making ice, please press button
for about 3 seconds; all the indicator lights
will go off and the indicator light
will stay on flashing. If you want to return to making ice,
just press the button one more time.
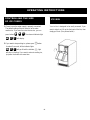
ICE BIN
Your ice bin is designed to be easily removed, if you
want to take it out, lift up the front part of the bin, then
simply pull it out. (See picture below.)
10

CARE AND MAINTENANCE
CLEANING YOUR ICE MAKER
Turn off the power, unplug the appliance, and remove
the ice bin.
Wash the inside surfaces with a warm water and
baking soda solution. The solution should be about 2
tablespoons of baking soda to a quart of water.
Wash the ice bin with a mild detergent solution.
Wring excess water out of the sponge or cloth when
cleaning area of the controls, or any electrical parts.
Wash the outside cabinet with warm water and mild
liquid detergent. Rinse well and wipe dry with a clean,
soft cloth.
POWER FAILURE
Most power failures are corrected within a few hours
and should not affect the temperature of your
appliance if you minimize the number of times the
door is opened. If the power is going to be off for a
longer period of time, you need to take the proper
steps to protect your contents.
MOVING YOUR ICE MAKER
Remove all items.
Securely tape down all loose items (such as the
bucket) inside your appliance.
Turn the adjustable leg up to the base to avoid
damage.
Tape the door shut.
Be sure the appliance stays secure in the upright
position during transportation. Also protect the outside
of the appliance with a blanket or similar item.
The Ice Maker should be located in the coolest area of
the room, away from heat producing appliances, and
out of direct sunlight.
VACATION TIME
Short vacations: Leave the Ice Maker operating
during vacations of less than three weeks.
Long vacations: If the appliance will not be used for
several months, remove all items and turn off the
appliance. Clean and dry the interior thoroughly. To
prevent odor and mold growth, leave the door open
slightly, blocking it open if necessary.
11

CARE AND MAINTENANCE
CLEANING THE INNER
WATER CONTAINER
Please disconnect unit from power. To avoid electric
shock, make sure no water is near the ice maker or
on floor board and follow the steps below.
1. Ice maker machine cover board
2. Ice maker machine cover plate
3. Water container
4. Drain tube
NOTE:
If the unit is unplugged, has lost power, or is turned off,
you must wait 3 to 5 minutes before restarting the unit.
If you attempt to restart before this time delay, the Ice
Maker will not start.
1. Take out the cover board (1) of the ice maker machine (Fig. A).
2. Use the brush to clean all the parts, then use clean water to flush them.
3. After cleaning, install parts in reverse order.
4. To drain water from the water container (3), dislodge drain tube.(4) (Fig. B).
12

TROUBLESHOOTING
Occasionally, a problem is minor and a service call may not be necessary. Use this troubleshooting guide for a possible
PROBLEM
The Ice Maker does not operate.
The ice cubes are not big enough or melt
too quickly.
Ice Maker Alarm
Vibrations
Noise
Water leakage from
ice maker
POSSIBLE CAUSE
• Not plugged in.
• The appliance is turned off.
• No power to unit.
• The ambient temperature is too high.
• The door is opened too often.
• The door is ajar.
• The door gasket does not seal properly.
• Incorrect mode was set.
• Dirty condenser.
• External water tank is full.
• Not enough water.
• Check to be sure the Ice Maker is level.
• A rattling noise may come from the
flow of the refrigerant. This is normal.
• As each cycle ends, you may hear
gurgling sounds caused by the flow of
refrigerant in your Ice Maker.
• Contraction and expansion of the inside
walls may cause popping and crackling
noises.
• The ice dispensing during each cycle
may cause a little noise.
• The flow of water causes noise during normal
ice maker operation.
• The Ice Maker is not level.
• The water inlet pipe in the back is loose.
• The water outlet pipe in the back is loose.
13
solution. If the unit continues to operate improperly, call an authorized servicer or our toll-free number 1-800-932-4267.

NOTES
14

LIMITED WARRANTY
ONE-YEAR LIMITED WARRANTY
Within the 48 contiguous United States, for one year from the date of purchase, when this appliance is operated and
maintained according to instructions attached to or furnished with the product, warrantor will pay for factory-specified
parts and repair labor to correct defects in materials or workmanship. Service must be provided by a designated
service company. Outside the 48 states, all parts are warranted for one year from manufacturing defects. Plastic parts,
shelves and cabinets are warranted to be manufactured to commercially acceptable standards, and are not covered
from damage during handling or breakage.
5-YEAR COMPRESSOR WARRANTY
1. The compressor is covered for 5 years.
2. Replacement does not include labor.
ITEMS WARRANTOR WILL NOT PAY FOR:
1. Service calls to correct the installation of your appliance, to instruct you how to use your appliance, to replace or
repair fuses or to correct wiring or plumbing.
2. Service calls to repair or replace appliance light bulbs or broken shelves. Consumable parts (such as filters) are
excluded from warranty coverage.
3. Damage resulting from accident, alteration, misuse, abuse, fire, flood, acts of God, improper installation,
installation not in accordance with electrical or plumbing codes, or use of products not approved by warrantor.
4. Replacement parts or repair labor costs for units operated outside the United States.
5. Repairs to parts or systems resulting from unauthorized modifications made to the appliance.
6. Expenses for travel and transportation for product service in remote locations.
7. The removal and reinstallation of your appliance if it is installed in an inaccessible location or is not installed in
accordance with published installation instructions.
DISCLAIMER OF IMPLIED WARRANTIES – LIMITATION OF REMEDIES
CUSTOMER'S SOLE AND EXCLUSIVE REMEDY UNDER THIS LIMITED WARRANTY SHALL BE PRODUCT REPAIR AS
PROVIDED HEREIN. IMPLIED WARRANTIES, INCLUDING WARRANTIES OF MERCHANTABILITY OR FITNESS FOR A
PARTICULAR PURPOSE, ARE LIMITED TO ONE YEAR. WARRANTOR SHALL NOT BE LIABLE FOR INCIDENTAL OR
CONSEQUENTIAL DAMAGES. SOME STATES DO NOT ALLOW THE EXCLUSION OR LIMITATION OF INCIDENTAL OR
CONSEQUENTIAL DAMAGES, OR LIMITATIONS ON THE DURATION OF IMPLIED WARRANTIES OF
MERCHANTABILITY OR FITNESS, SO THESE EXCLUSIONS OR LIMITATIONS MAY NOT APPLY TO YOU. THIS
WARRANTY GIVES YOU SPECIFIC LEGAL RIGHTS AND YOU MAY ALSO HAVE OTHER RIGHTS, WHICH VARY FROM
STATE TO STATE.
WARNING! This product may contain chemicals known to the state of California to cause
cancer or birth defects or other reproductive harm. For more information, visit:
www.summitappliance.com/prop65. Chemicals known by the manufacturer to be present
in this product in concentrations higher than threshold limits: NONE.
Printed in China
For parts and accessory ordering,
troubleshooting and helpful hints, visit:
www.summitappliance.com/support
15
www.summitappliance.com
FELIX STORCH, INC.
770 Garrison Avenue
Bronx, New York 10474
Tel.: (718) 893-3900
Fax: (844) 478-8799

TABLE DES MATIÈRES
.............................................................................
17
Consignes d'installation
.............................................................................
18 – 23
Avant d’utiliser votre machine à glaçons .................................................. 18
Installation de votre machine à glaçons .................................................... 18
Spécifications d’installation (encastré) ...................................................... 18
Raccord de la machine à glaçons à l’alimentation en eau ................ 19 – 20
Instructions pour l’inversion de la porte .................................................... 20
Instructions sur les fonctions de performance de la machine à glaçons 21 – 23
Opération
.........................................................................
23 – 25
Commandes de la machine à glaçons .............................................. 23 – 24
Réglage de la taille des glaçons ............................................................... 25
Contenant à glaçons ................................................................................. 25
Nettoyage et entretien ............................................................................. 26 – 27
Nettoyage de votre machine à glaçons .................................................... 26
Coupure de courant .................................................................................. 26
Déplacement de votre machine à glaçons ................................................ 26
Périodes d’inutilisation .............................................................................. 26
Nettoyage du contenant d’eau intérieur .................................................... 27
……………………………………………………………………………28
Garantie limitée ............................................................................................... 29
16
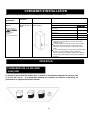
REMARQUES SUR L’INSTALLATION DE LA MACHINE À GLAÇONS CLIM15/BIM45
Si vous installez la machine à glaçons sous un comptoir ou dans un espace restreint,
veuillez respecter les espaces libres suivants : Gardez un espace libre d’environ 2 po
(50 mm) à l’arrière, de 1/16 po (2 mm) au-dessus, et de 1 po (25 mm) sur les côtés de
la machine pour favoriser la circulation de l’air. La grille de ventilation au bas de la
machine ne doit jamais être obstruée. L’installation doit permettre de tirer la machine à
glaçons vers l’avant afin d’accéder à ses composantes en cas de réparation.
Si vous n’encastrez pas ou n’installez pas la
machine à glaçons dans un endroit
restreint, gardez au moins 4 po d’espace libre sur les côtés, au-dessus et à l’arrière.
Veuillez consulter les pages 18-20 pour obtenir de plus amples renseignements à
propos de l’installation.
Information importante de sécurité
Dépannage

CONSIGNES DE SÉCURITÉ IMPORTANTES
LISEZ TOUTES LES INFORMATIONS DE SÉCURITÉ AVANT DE FAIRE FONCTIONNER L’APPAREIL.
ADVERTISSEMENT: RISQUE DES DENFANTS DEVIENNENT COINCERADANS L’APPAREIL.
Un vidé unité est une attraction dangereuse aux enfants. Enlever les joints étanches, les loquets, les couvercles ou
les porte des appareils qui ne sont pas utiliser, ou faites de soit que l’appareil ne présente aucun danger.
DIRECTIVES DE RANGEMENT
Cet appareil est conçu pour un usage domestique à
l’intérieur seulement. N’entreposez ni n’utilisez pas cet
appareil à l’extérieur.
• Cet appareil doit être mis à la terre. Branchez le
seulement dans une prise correctement mise à la terre.
Référez-vous au chapitre “Instructions de mise à la
terre” ci-dessus.
• Ne faites pas fonctionner cet appareil s’il a un cordon ou
fiche électrique endommagé, s’il ne fonctionne pas
correctement, ou si l’appareil a été endommagé ou
échappé.
• N'épissez pas le cordon électrique.
• Ne permettez jamais à un enfant de faire fonctionner
l’appareil, de jouer avec ou de ramper à l’intérieur.
• Ne nettoyez jamais des pièces de l’appareil avec un
liquide inflammable. Les vapeurs peuvent constituer un
risque d’incendie ou provoquer une explosion.
• N’entreposez et n’utilisez pas d’essence ou d’autres
liquides ou vapeurs inflammables à proximité de cet
appareil ou de tout autre appareil. Les vapeurs peuvent
constituer un risque d’incendie ou provoquer une
explosion.Gardez le cordon électriqueéloigné des
sources de chaleur.
• N’immersez pas le cordon ou sa fiche dans aucun
liquide.
• N’utilisez pas cet appareil près de bassins d’eau, par
exemple dans un sous-sol détrempé, près d’une piscine
ou d’un évier.
• N’utilisez pas de produits chimiques ou vapeurs
corrosives dans/près de cet appareil.
• N’utilisez cet appareil que pour les fins aux quelles il est
conçu comme indiqué dans ce guide.
• Ne placez pas les articles périssables de nourriture dans
votre appareil (pour example, les viandes et les
produits laitiers)
• Référez-vous aux instructions de nettoyage du fini de la
porte se trouvant au chapitre de Soins et nettoyage de
ce guide.
• Ne recouvrez pas ou n’obstruez aucune ouverture de
l’appareil.
• Cet appareil ne devrait être réparé que par du personnel
qualifié. Pour tout examen, réparation ou réglage,
contactez votre centre de service le plus rapproché.
MISE À LA TERRE
ADVERTISSEMENT
Une mauvaise utilisation de la prise de mise à
la terre peut causer une décharge électrique.
• Cet appareil doit être mis à la terre. Dans l’éventualité
d’un court-circuit, la mise à la terre procure un chemin
direct decontournement du courant pour prévenir
l’électrocution des manipulateurs de l’appareil.
• Cet appareil est muni d’un cordon comprenant une fiche
et fil de mise à la terre.
• La fiche doit être branchée dans une prise correctement
installée et mise à la terre.
• Si les directives de mise à la terre ne sont pas tout à fait
comprises ou en cas de tout doute relatif à la mise à la
terre appropriée de l’appareil, faites appel à un
électricien ou à un technicien qualifié.
• Si la prise murale est une prise à 2 branches, c’est votre
obligation, et la responsabilité vous en incombe, de la
faire remplacer par une prise à trois branches
adéquatement mise à la terre.
• Pour un meilleur rendement et pour éviter que les
ampoules d’éclairage de la résidence soient affectées
d’un affaissement de tension, ou que le fusible ou
disjoncteur du circuit ne grille ou ne se déclenche,
dédiez un circuit individuel d’alimentation à la machine à
glaçons (prise (double) unique sur le circuit).
• Sous aucun prétexte il est permis de couper ou
d’enlever la troisième branche (mise à la terre) de la
fiche du cordon électrique.
• N’utilisez pas d’adaptateur de fiche avec cet appareil.
• N’utilisez pas de cordon de rallonge avec cet appareil.
Si le cordon électrique de l’appareil ne rejoint pas la
prise murale, faites installer une prise plus rapprochée
par un électricien ou un technicien qualifié.
DANGER! Un enfant pourrait rester coincé
dans la machine à glaçons
. Avant de jeter votre
Vieil appareil :
Démontez la porte.
Laissez les tablettes en place pour éviter qu’un
enfant puisse entrer facilement dans la machine.
SAUVEGARDE CES INSTRUCTIONS
17

CONSIGNES D’INSTALLATION
AVANT D’UTILISER VOTRE
MACHINE À GLAÇONS
• Enlevez l’emballage extérieur et intérieur.
• Avant de brancher la machine à glaçons sur la source
d’alimentation, laissez-la reposer à la verticale
pendant environ 2 heures. Cela réduira le risque
que le système de refroidissement subisse une
défaillance causée par la manutention lors du
transport.
• Nettoyez la surface intérieure à l’eau tiède, au moyen
d’un chiffon doux.
• Installez la conduite d’arrivée et de sortie d’eau, desserrez
l’écrou et choisissez un mode sur le sélecteur.(voir les
directives sur les modes de performance de la machine à
glaçons)
• Avant l’utilisation: Remplissez le contenant de glaçons
à deux reprises et jetez ces glaçons pour garantir que
les prochains glaçons seront propres et sanitaires.
ATTENTION
• N’ouvrez la porte qu’en cas de besoin.
• Si la machine à glaçons ne sera pas utilisée pendant une longue
période, nous suggérons de la nettoyer délicatement et de laisser la
porte entrouverte pour faire circuler l’air à l’intérieur de la machine.
Ainsi, vous minimisez la formation de condensation, de moisissure et
d’odeurs
INSTALLATION DE VOTRE
MACHINE À GLAÇONS
• Placez votre machine à glaçons sur un sol suffisamment
solide pour la supporter une fois pleine. Pour mettre
votre machine à glaçons au niveau, ajustez la patte de
nivellement avant, située au bas de l’appareil.
• Installez la machine à glaçons à l’abri des rayons directs
du soleil et de toute source de chaleur (four, appareil de
chauffage, radiateur, etc.). Les rayons directs du soleil
peuvent endommager le revêtement extérieur de
l’appareil; quant aux sources de chaleur, elles peuvent
entraîner une augmentation de sa consommation
électrique. Les températures extrêmement basses
peuvent peuvent provoquer un mauvais fonctionnement
de l’appareil.
• Évitez d’installer l’appareil dans une zone humide.
• Branchez l’appareil dans une prise murale exclusive,
bien installée et mise à la terre. Sous aucun prétexte,
vous ne devez couper ou enlever la troisième broche
(mise à la terre) de la fiche du cordon électrique. Pour
toute question relative à l’alimentation ou à la mise à la
terre, faites appel à un électricien qualifié ou à un centre
de service autorisé.
DIRECTIVES D’INSTALLATION
POUR L’ENCASTRAGE
OUTILS NÉCESSAIRES
POURVOTRESÉCURITÉ:
Les personnes qui réalisent le travail
d’installation décrit dans cette section
doivent porter des gants et des lunettes
de protection.
• Nous recommandons que vous n'installez pas l’appareil dans
un coin (directement près d'un mur). Ceci permettre les
portes d'avoir une oscillation plus grande que 90°. Une
oscillation d’ouverture qui est limitée, empêchera les étagères
de glisser dehors comme supposé, et peut endommager la
garniture deporte.
• L’ouverture brute de l’armoire doit être sur une
surface niveau avec le plancher et d’au moins 25
po de profondeur par 17 po largeur. L’ouverture
devrait être à une hauteur maximale de 35 po.
• Si la prise murale et dans l’autre armoire, percez
un trou de1 po 1/2”de diamètre afin d’insérer le
câble électrique. Si l’armoire est faite de métal, le
bord du trou doit être couvert d’une bague ou
d’un passe-câble.
18

CONSIGNES D’INSTALLATION
RACCORDEMENT DE LA
MACHINE À GLAÇONS À
L’ARRIVÉE D’EAU
AVERTISSEMENT
Afin de prévenir tout choc électrique pouvant entraîner un
décès ou de graves blessures corporelles, débranchez la
machine à glaçons de la source d’alimentation électrique
avant d’y raccorder une conduite d’arrivée d’eau.
MISE EN GARDE
Il est recommandé d’utiliser un tuyau en cuivre pour la
conduite d’arrivée d’eau. Il n’est pas recommandé
d’utiliser un tuyau en plastique de 0,25 po pour l’arrivée
d’eau, parce que cela augmente beaucoup le risque de fuite
d’eau. Le fabricant ne pourra être tenu responsable des
dommages subis si un tuyau en plastique est utilisé pour la
conduite d’arrivée d’eau.
N’INSTALLEZ PAS de tuyau d’arrivée d’eau dans
un endroit où il pourrait geler.
- Raccordez la machine à glaçons à une source
d’eau potable qui n’est pas liée à un système
d’adoucissement. Les produits chimiques de
l’adoucisseur peuvent endommager la machine à
glaçons et causer son mauvais fonctionnement.
IMPORTANT
Vérifiez que tous vos raccordements de conduites
d’eau sont conformes aux codes de plomberie locaux.
Avant d’installer la conduite d’arrivée d’eau, vous
aurez besoin des éléments suivants :
1. Outils de base : clé ajustable et tournevis standard à
bout plat.
2. Accès à une conduite d’eau froide ménagère dont la
pression est comprise entre 20 et 120 lb/po
2.
3. Conduite d’arrivée d’eau faite d’un tuyau de cuivre dont
le diamètre extérieur est de 6,4 mm (1/4 po). Pour
déterminer la longueur de tuyauterie requise, vous
devrez mesurer la distance entre le robinet d’entrée
d’eau situé à l’arrière de la machine à glaçons et le
tuyau d’eau froide. Ajoutez ensuite une longueur
d’environ 2,1 m (7 pi) afin de faciliter le déplacement de
la machine lors du nettoyage.
4. Robinet d’arrêt pour raccorder la conduite d’arrivée
d’eau à votre système d’eau ménager. (N’UTILISEZ
PAS de robinet d’arrêt à perforation autonome.)
5. Un écrou à compression et une bague (manchon) pour
raccorder la conduite d’arrivée d’eau au robinet d’entrée
de la machine à glaçons.
Pour raccorder la conduit d’arrivée d’eau au
Robinet d’entrée de la machine à glaçons
1.
Débranchez la machine à glaçons de la source
d’alimentation électrique.
2.
Placez l’extrémité de la conduite d’arrivée d’eau dans
un évier ou un seau. OUVREZ le robinet d’entrée d’eau
et purgez la conduite d’arrivée d’eau jusqu’à ce que
l’eau en ressorte propre, puis FERMEZ la conduite au
niveau du robinet d’arrêt. Dévissez le capuchon en
plastique du robinet d’entrée d’eau et conservez-le.
Glissez un écrou à compression en laiton, puis une
3.
bague (manchon) sur la conduite d’arrivée d’eau,
comme sur le schéma A.
4.
Poussez le plus loin possible (0,25 po) la conduite
d’arrivée d’eau dans l’entrée d’eau. Faites glisser la
bague (manchon) dans l’entrée d’eau, puis serrez à la
main l’écrou à compression sur le robinet. Faites un
demi-tour supplémentaire à l’aide d’une clé; NE
SERREZ PAS TROP FORT.
5.
À l’aide d’un serre-joint et d’une vis, fixez la conduite
d’arrivée d’eau au panneau arrière de la machine à
glaçons,
à l’endroit indiqué sur le schéma A.
6.
Enroulez la conduite d’arrivée d’eau excédentaire
(environ 2 1/2 tours) derrière la machine comme dans
le schéma A, et disposez les spirales de façon à éviter
toute vibration ou usure contre une autre surface.
7.
OUVREZ l’arrivée d’eau au niveau du robinet d’arrêt,
puis resserrez les raccordements qui fuient, le cas
échéant.
8.
Rebranchez la machine à glaçons sur la source
d’alimentation électrique.
REMARQUE :
Il faut approximativement
24 heures pour que la machine
à glaçons commence à produire des glaçons. La
présence d’air dans une plomberie neuve peut faire en
sorte que la machine à glaçons effectue deux ou trois
cycles avant de produire un plateau de glace plein.
Lorsque la plomberie est nouvelle, les glaçons peuvent
être décolorés ou avoir mauvais goût. Jetez les glaçons
produits pendant les 24 premières heures.
Bien que l'appareil ait été testé et nettoyé en usine, il con-
vient de jeter la première série de cubes de glace produite
en raison de la longue période écoulée pour l'entreposage
et la livraison.
Ne jamais fermer l'alimentation en eau•lorsque la
machine à glace fonctionne.
Ne pas toucher à l'évaporateur lorsque l'appareil fonctionne!
Garder la porte de l'appareil fermée pour éviter que la
glace ne fonde et pour assurer une formation adéquate de
la glace. N'ouvrir la porte que lorsque l'on récupère des
glaçons dans l'appareil.
19
La page est en cours de chargement...
La page est en cours de chargement...
La page est en cours de chargement...
La page est en cours de chargement...
La page est en cours de chargement...
La page est en cours de chargement...
La page est en cours de chargement...
La page est en cours de chargement...
La page est en cours de chargement...
La page est en cours de chargement...
-
 1
1
-
 2
2
-
 3
3
-
 4
4
-
 5
5
-
 6
6
-
 7
7
-
 8
8
-
 9
9
-
 10
10
-
 11
11
-
 12
12
-
 13
13
-
 14
14
-
 15
15
-
 16
16
-
 17
17
-
 18
18
-
 19
19
-
 20
20
-
 21
21
-
 22
22
-
 23
23
-
 24
24
-
 25
25
-
 26
26
-
 27
27
-
 28
28
-
 29
29
-
 30
30


dans d''autres langues
- English: Summit Appliance BIM45 User guide
Autres documents
-
Danby DIM3225BLSST Mode d'emploi
-
-
-
 Franklin Industries, L.L.C. FIM35 Manuel utilisateur
-
Franklin Chef FIM35 Le manuel du propriétaire
-
KitchenAid 2313684A Manuel utilisateur
-
Whirlpool GI15NFRTS1 Le manuel du propriétaire
-
KitchenAid KUIC15NLSS0 Le manuel du propriétaire
-
Whirlpool GI1500PHB8 Le manuel du propriétaire
-
