Toro 21in Recycler/Rear Bagging Lawn Mower Manuel utilisateur
- Catégorie
- Tondeuses à gazon
- Taper
- Manuel utilisateur

FormNo.3408-825RevA
21inRecycler®/RearBagging
LawnMower
21319
Cortacésped
Recycler®/Ensacadotrasero
de51cm(21”)
21319
TondeuseRecycler®51cm(21
pouces)avecbacarrière
21319
www.T oro.com.
*3408-825*A


CV
FormNo.3408-822RevA
21inRecycler
®
/RearBaggingLawnMower
ModelNo.21319—SerialNo.400000000andUp
Operator'sManual
Introduction
Thisrotary-blade,walk-behindlawnmowerisintendedto
beusedbyresidentialhomeowners.Itisdesignedprimarily
forcuttinggrassonwell-maintainedlawnsonresidential
properties.Itisnotdesignedforcuttingbrushorfor
agriculturaluses.
Readthisinformationcarefullytolearnhowtooperateand
maintainyourproductproperlyandtoavoidinjuryand
productdamage.Youareresponsibleforoperatingthe
productproperlyandsafely.
YoumaycontactTorodirectlyatwww.Toro.comforproduct
andaccessoryinformation,helpndingadealer,ortoregister
yourproduct.
Wheneveryouneedservice,genuineToroparts,oradditional
information,contactanAuthorizedServiceDealerorToro
CustomerServiceandhavethemodelandserialnumbersof
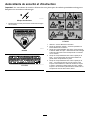
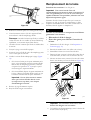
yourproductready.Figure1identiesthelocationofthe
modelandserialnumbersontheproduct.Writethenumbers
inthespaceprovided.
g186304
Figure1
1.Modelandserialnumberplate
ModelNo.
SerialNo.
Thismanualidentiespotentialhazardsandhassafety
messagesidentiedbythesafety-alertsymbol(Figure2),
whichsignalsahazardthatmaycauseseriousinjuryordeath
ifyoudonotfollowtherecommendedprecautions.
g000502
Figure2
1.Safety-alertsymbol
Thismanualuses2wordstohighlightinformation.
Importantcallsattentiontospecialmechanicalinformation
andNoteemphasizesgeneralinformationworthyofspecial
attention.
WARNING
CALIFORNIA
Proposition65Warning
Thisproductcontainsachemicalorchemicals
knowntotheStateofCaliforniatocausecancer,
birthdefects,orreproductiveharm.
Theengineexhaustfromthisproduct
containschemicalsknowntotheStateof
Californiatocausecancer,birthdefects,
orotherreproductiveharm.
ItisaviolationofCaliforniaPublicResourceCode
Section4442or4443touseoroperatetheengineonany
forest-covered,brush-covered,orgrass-coveredlandunless
theengineisequippedwithasparkarrester,asdenedin
Section4442,maintainedineffectiveworkingorderorthe
engineisconstructed,equipped,andmaintainedforthe
preventionofre.
ThissparkignitionsystemcomplieswithCanadianICES-002.
Theenclosed
Engine Owner's Man ual
issuppliedfor
informationregardingtheUSEnvironmentalProtection
Agency(EPA)andtheCaliforniaEmissionControl
Regulationofemissionsystems,maintenance,and
warranty.Replacementsmaybeorderedthroughthe
enginemanufacturer.
NetTorque:Thegrossornettorqueofthisenginewas
laboratoryratedbytheenginemanufacturerinaccordance
withtheSocietyofAutomotiveEngineers(SAE)J1940.
Asconguredtomeetsafety,emission,andoperating
requirements,theactualenginetorqueonthisclassofmower
willbesignicantlylower.Gotowww .Toro.comtoview
specicationsonyourmowermodel.
©2016—TheToro®Company
8111LyndaleAvenueSouth
Bloomington,MN55420
Registeratwww.T oro.com.
OriginalInstructions(EN)
PrintedintheUSA
AllRightsReserved
*3408-822*A

Contents
Introduction..................................................................1
Safety...........................................................................2
GeneralSafety.........................................................2
SafetyandInstructionalDecals.................................3
Setup............................................................................4
1InstallingtheHandle.............................................4
2InstallingtheRecoil-StarterRopeintheRope
Guide.................................................................4
3FillingtheEnginewithOil......................................4
4AssemblingtheGrassBag......................................5
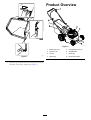
ProductOverview..........................................................6
Operation.....................................................................7
BeforeOperation.......................................................7
BeforeOperationSafety...........................................7
Attachments/Accessories.........................................7
FillingtheFuelTank................................................7
CheckingtheEngine-OilLevel..................................8
AdjustingtheCuttingHeight....................................8
DuringOperation......................................................9
DuringOperatingSafety...........................................9
StartingtheEngine..................................................9
ShuttingOfftheEngine...........................................9
RecyclingtheClippings...........................................10
BaggingtheClippings.............................................10
OperatingTips......................................................10
AfterOperation........................................................11
AfterOperatingSafety............................................11
FoldingtheHandle.................................................11
Maintenance.................................................................12
RecommendedMaintenanceSchedule(s)......................12
MaintenanceSafety.................................................12
PreparingforMaintenance.......................................12
ServicingtheAirCleaner.........................................13
ChangingtheEngineOil.........................................13
ReplacingtheBlade................................................14
CleaningundertheMachine.....................................14
Storage........................................................................15
PreparingtheMachineforStorage............................15
RemovetheMachinefromStorage............................15
Safety
ThismachinehasbeendesignedinaccordancewithENISO
5395:2013andANSIB71.1-2012.
GeneralSafety
Thisproductiscapableofamputatinghandsandfeetand
ofthrowingobjects.Alwaysfollowallsafetyinstructionsto
avoidseriouspersonalinjury.
Usingthisproductforpurposesotherthanitsintendeduse
couldprovedangeroustoyouandbystanders.
•ReadandunderstandthecontentsofthisOperator’sManual
beforeyoustarttheengine.Ensurethateveryoneusing
thisproductknowshowtouseitandunderstandsthe
warnings.
•Donotputyourhandsorfeetnearmovingcomponents
ofthemachine.
•Donotoperatethemachinewithoutallguardsandother
safetyprotectivedevicesinplaceandworkingonthe
machine.
•Keepclearofanydischargeopening.Keepbystandersa
safedistancefromthemachine.
•Keepchildrenoutoftheoperatingarea.Neverallow
childrentooperatethemachine.
•Stopthemachineandshutofftheenginebeforeservicing,
fueling,oruncloggingthemachine.
Improperlyusingormaintainingthismachinecanresult
ininjury.Toreducethepotentialforinjury,complywith
thesesafetyinstructionsandalwayspayattentiontothe
safety-alertsymbol,whichmeansCaution,Warning,or
Danger—personalsafetyinstruction.Failuretocomplywith
theseinstructionsmayresultinpersonalinjuryordeath.
Youcanndadditionalitemsofsafetyinformationintheir
respectivesectionsthroughoutthismanual.
2

SafetyandInstructionalDecals
Important:Safetyandinstructiondecalsarelocatednearareasofpotentialdanger.Replacedamageddecals.
decaloemmarkt
Manufacturer'sMark
1.Indicatesthatthebladeisidentiedasapartfromthe
originalmachinemanufacturer.
decal94-8072
94-8072
decal117-2718
117–2718
decal117-4143
117-4143
1.Warning—readtheOperator'sManual.
2.Thrownobjecthazard—keepbystandersasafedistance
awayfromthemachine.
3.Cutting/dismembermenthazardofhandorfoot,mower
blade—disconnectthespark-plugwireandreadthe
instructionsbeforeservicingorperformingmaintenance.
4.Cutting/dismembermenthazardofhandorfoot,mower
blade—stayawayfrommovingpartsandkeepallguards
andshieldsinplace.
5.Cutting/dismembermenthazardofhandorfoot,mower
blade—donotmowupanddownslopes,onlymowacross;
stopthemowerandshutofftheengine,pickupdebris
beforeoperating;lookbehindanddownwhenreversing.
3

Setup
Important:Removeanddiscardtheprotectiveplastic
sheetthatcoverstheengineandanyotherplasticor
wrappingonthemachine.
1
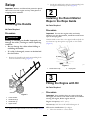
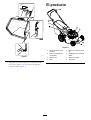
InstallingtheHandle
NoPartsRequired
Procedure
WARNING
Foldingorunfoldingthehandleimproperlycan
damagethecables,causinganunsafeoperating
condition.
•Donotdamagethecableswhenfoldingor
unfoldingthehandle.
•Ifacableisdamaged,contactanAuthorized
ServiceDealer.
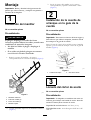
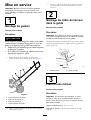
1.Removethehandleknobsandcorrespondingbolts
fromthemachinehousing(Figure3).
g189298
Figure3
1.Lowerhandles
2.Handleknob(2)
3.Handlebolt(2)
4.Upperhandle
2.Positiontheupperhandleonthelowerhandles(Figure
3).
3.Installthehandleknobswiththecorrespondingbolts
andtightenthemrmlybyhand(Figure3).
2
InstallingtheRecoil-Starter
RopeintheRopeGuide
NoPartsRequired
Procedure
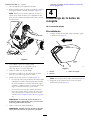
Important:Tostarttheenginesafelyandeasily
wheneveryouusethemachine,installtherecoil-starter
ropeintheropeguide.
Holdtheblade-controlbartotheupperhandleandpullthe
recoil-starterropethroughtheropeguideonthehandle
(Figure4).
g003251
Figure4
1.Recoil-starterrope2.Ropeguide
3
FillingtheEnginewithOil
NoPartsRequired
Procedure
Important:Yourmachinedoesnotcomewithoilin
theengine,butitdoescomewithabottleofoil.Before
startingtheengine,lltheenginewithoil.
Engineoilcapacity:0.47L(16oz)
Oilviscosity:SAE30orSAE10W-30detergentoil
APIserviceclassication:SJorhigher
1.Movethemachinetoalevelsurface.
4

2.Removethedipstickbyrotatingthecap
counterclockwiseandpullingitout(Figure5).
Note:Allow3minutesfortheoiltosettletothe
bottomofthecrankcase.Checkingtheoilleveltoo
quicklymayproduceafalsereading.
g186326
Figure5
3.Carefullypourabout3/4oftheenginecapacityofoil
intotheoil-lltube.
4.Wipethedipstickcleanwithacleancloth.
5.Insertthedipstickintotheoil-lltube,butdonot
screwitin,thenremovethedipstick.
6.Readtheoillevelonthedipstick(Figure5).
•IftheoillevelisbelowtheAddmarkonthe
dipstick,carefullypourasmallamountofoilinto
theoil-lltube,wait3minutes,andrepeatsteps3
through5untiltheoillevelisattheFullmarkon
thedipstick.
•IftheoillevelisabovetheFullmarkonthe
dipstick,draintheexcessoiluntiltheoillevelisat
theFullmarkonthedipstick;refertoChanging
theEngineOil(page13).
Important:Iftheoillevelintheengineistoo
lowortoohighandyouruntheengine,youmay
damagetheengine.
7.Installthedipsticksecurely.
Important:
Change the engine oil after the r st 5
operating hour s
;changeityearlythereafter.Refer
toChangingtheEngineOil(page13).
4
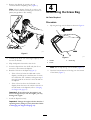
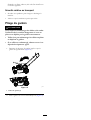
AssemblingtheGrassBag
NoPartsRequired
Procedure
1.SlipthegrassbagovertheframeasshowninFigure6.
g027543
1
2
3
g027543
Figure6
1.Handle
3.Grassbag
2.Frame
Note:Donotslipthebagoverthehandle(Figure6).
2.Hookthebottomchannelofthebagontothebottom
oftheframe(Figure7).
5


Operation
BeforeOperation
BeforeOperationSafety
GeneralSafety
•Becomefamiliarwiththesafeoperationoftheequipment,
operatorcontrols,andsafetysigns.
•Checkthatallguardsandsafetydevices,suchasdoors
and/orgrasscatchers,areinplaceandworkingproperly.
•Alwaysinspectthemachinetoensurethattheblades,
bladebolts,andcuttingassemblyarenotwornor
damaged.
•Inspecttheareawhereyouwillusethemachineand
removeallobjectsthatthemachinecouldthrow .
•Adjustingthecuttingheightmaybringyouintocontact
withthemovingblade,causingseriousinjury.
–Shutofftheengineandwaitforallmovingpartsto
stop.
–Donotputyourngersunderthehousingwhen
adjustingthecuttingheight.
FuelSafety
DANGER
Fuelisextremelyammableandhighlyexplosive.
Areorexplosionfromfuelcanburnyouand
othersandcandamageproperty.
•Topreventastaticchargefromignitingthefuel,
placethecontainerand/ormachinedirectlyon
thegroundbeforelling,notinavehicleoron
anobject.
•Fillthefueltankoutdoors,inanopenarea,when
theengineiscold.Wipeupanyfuelthatspills.
•Donothandlefuelwhensmokingoraroundan
openameorsparks.
•Storefuelinanapprovedcontainerandkeepit
outofthereachofchildren.
WARNING
Fuelisharmfulorfatalifswallowed.Long-term
exposuretovaporscancauseseriousinjuryand
illness.
•Avoidprolongedbreathingofvapors.
•Keepyourhandsandfaceawayfromthenozzle
andthefuel-tankopening.
•Keepfuelawayfromyoureyesandskin.
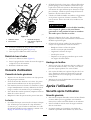
Attachments/Accessories
AselectionofToroapprovedattachmentsandaccessoriesis
availableforusewiththemachinetoenhanceandexpand
itscapabilities.ContactyourAuthorizedServiceDealeror
Distributororgotowww .Toro.comforalistofallapproved
attachmentsandaccessories.
FillingtheFuelTank
DANGER
Gasolineisextremelyammableandexplosive.A
reorexplosionfromgasolinecanburnyouand
others.
•Topreventastaticchargefromignitingthe
gasoline,placethecontainerand/ormachine
directlyonthegroundbeforelling,notina
vehicleoronanobject.
•Fillthetankoutdoorswhentheengineiscold.
Wipeupspills.
•Donothandlegasolinewhensmokingoraround
anopenameorsparks.
•Storegasolineinanapprovedfuelcontainer,out
ofthereachofchildren.
•Forbestresults,useonlyclean,fresh(lessthan30days
old),unleadedgasolinewithanoctaneratingof87or
higher((R+M)/2ratingmethod).
•Oxygenatedfuelwithupto10%ethanolor15%MTBE
byvolumeisacceptable.
•Ethanol:Gasolinewithupto10%ethanol(gasohol)
or15%MTBE(methyltertiarybutylether)byvolume
isacceptable.EthanolandMTBEarenotthesame.
Gasolinewith15%ethanol(E15)byvolumeisnot
approvedforuse.Neverusegasolinethatcontains
morethan10%ethanolbyvolume,suchasE15
(contains15%ethanol),E20(contains20%ethanol),or
E85(containsupto85%ethanol).Usingunapproved
gasolinemaycauseperformanceproblemsand/orengine
damagewhichmaynotbecoveredunderwarranty.
•Donotusegasolinecontainingmethanol.
•Donotstorefueleitherinthefueltankorinfuel
containersoverthewinter.
•Donotaddoiltogasoline.
Important:Toreducestartingproblems,addfuel
stabilizertothefuelallseason,mixingitwithgasoline
lessthan30daysold.
Refertoyourenginemanualforadditionalinformation.
7

g186339
Figure9
CheckingtheEngine-OilLevel
ServiceInterval:Beforeeachuseordaily
1.Movethemachinetoalevelsurface.
2.Removethedipstickbyrotatingthecap
counterclockwiseandpullingitout(Figure10).
g186326
Figure10
3.Wipethedipstickcleanwithacleancloth.
4.Insertthedipstickintotheoil-lltube,butdonot
screwitin,thenremovethedipstick.
5.Readtheoillevelonthedipstick(Figure10).
•IftheoilisbelowtheAddmarkonthedipstick,
slowlypourasmallamountofoilintotheoil-ll
tube,wait3minutes,andthenrepeatsteps3
through5untiltheoillevelisattheFullmarkon
thedipstick.
•IftheoilisabovetheFullmarkonthedipstick,
draintheexcessoiluntiltheoillevelisattheFull
markonthedipstick.Todraintheexcessoil,refer
toChangingtheEngineOil(page13).
Important:Iftheoillevelinthecrankcaseistoo
lowortoohighandyouruntheengine,youmay
damagetheengine.
6.Installthedipstickintotheoil-lltubesecurely.
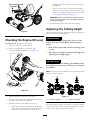
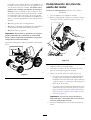
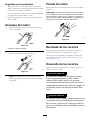
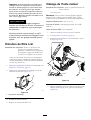
AdjustingtheCuttingHeight
Adjustthecuttingheightasdesired.Setthefrontwheelsand
therearwheelstothesameheight.
WARNING
Adjustingthecuttingheightmaybringyouinto
contactwiththemovingblade,causingserious
injury.
•Shutofftheengineandwaitforallmovingparts
tostop.
•Donotputyourngersunderthehousingwhen
adjustingthecuttingheight.
CAUTION
Iftheenginehasbeenrunning,themuferwillbe
hotandcanseverelyburnyou.Keepawayfromthe
hotmufer.
Note:Toraiseorlowerthemachine,movethecutting-height
leversasshowninFigure11.
g186340
Figure11
1.Raisethemachine2.Lowerthemachine
Thecutting-heightsettingsare32mm(1-1/4inches);44mm
(1-3/4inches);57mm(2-1/4inches);70mm(2-3/4inches);
83mm(3-1/4inches);95mm(3-3/4inches)
8

DuringOperation
DuringOperatingSafety
GeneralSafety
•Wearappropriateclothing,includingeyeprotection;
slip-resistant,substantialfootwear;andhearing
protection.Tiebacklonghair,securelooseclothing,and
donotwearjewelry.
•Donotoperatethemachinewhileill,tired,orunderthe
inuenceofalcoholordrugs.
•Thebladeissharp;contactingthebladecanresultin
seriouspersonalinjury.Shutofftheengineandwaitfor
allmovingpartstostopbeforeleavingtheoperating
position.
•Whenyoureleasetheblade-controlbar,theengineshould
shutoffandthebladeshouldstopwithin3seconds.If
not,stopusingyourmachineimmediatelyandcontactan
AuthorizedServiceDealer.
•Operatethemachineonlyingoodvisibilityand
appropriateweatherconditions.Donotoperatethe
machinewhenthereistheriskoflightning.
•Wetgrassorleavescancauseseriousinjuryifyouslipand
contacttheblade.Avoidmowinginwetconditions.
•Useextremecarewhenapproachingblindcorners,
shrubs,trees,orotherobjectsthatmayblockyourview .
•Watchforholes,ruts,bumps,rocks,orotherhidden
objects.Uneventerraincouldcauseaslip-and-fall
accident.
•Stopthemachineandinspectthebladesafterstrikingan
objectorifthereisanabnormalvibrationinthemachine.
Makeallnecessaryrepairsbeforeresumingoperation.
•Beforeleavingtheoperatingposition,shutofftheengine,
andwaitforallmovingpartstostop.
•Iftheenginehasbeenrunningthemuferwillbehotand
canseverelyburnyou.Keepawayfromthehotmufer.
•Checkthegrasscatchercomponentsandthedischarge
guardfrequentlyandreplacethemwiththemanufacturer’s
recommendedpartswhennecessary.
•UseaccessoriesandattachmentsapprovedbytheThe
Toro®Companyonly.
SlopeSafety
•Mowacrossthefaceofslopes;neverupanddown.Use
extremecautionwhenchangingdirectiononslopes.
•Donotmowonexcessivelysteepslopes.Poorfooting
couldcauseaslip-and-fallaccident.
•Mowwithcautionneardrop-offs,ditches,or
embankments.
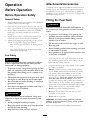
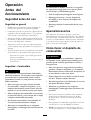
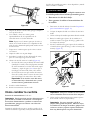
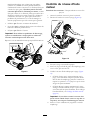
StartingtheEngine
1.Holdtheblade-controlbar(Figure12)againstthe
handle.
g014712
Figure12
1.Blade-controlbar
2.Pulltherecoil-starthandle(Figure13).
g014718
Figure13
Note:Ifthemachinedoesnotstartafterseveral
attempts,contactanAuthorizedServiceDealer.
ShuttingOfftheEngine
Toshutofftheengine,releasetheblade-controlbar(Figure
14).
Important:Whenyoureleasetheblade-controlbar,
boththeengineandbladeshouldstopwithin3seconds.
Iftheydonotstopproperly,stopusingyourmachine
immediatelyandcontactanAuthorizedServiceDealer.
g009643
Figure14
9

RecyclingtheClippings
Yourmachinecomesfromthefactoryreadytorecyclethe
grassandleafclippingsbackintothelawn.
Ifthegrassbagisonthemachine,removeitbeforerecycling
theclippings.RefertoRemovingtheGrassBag(page10).
BaggingtheClippings
Usethegrassbagwhenyouwanttocollectgrassandleaf
clippingsfromthelawn.
WARNING
Aworngrassbagcouldallowsmallstonesand
othersimilardebristobethrowntowardyouor
bystanders,resultinginseriouspersonalinjuryor
death.
Checkthegrassbagfrequently.Ifitisdamaged,
installanewTororeplacementbag.
WARNING
Thebladeissharp;contactingthebladecanresult
inseriouspersonalinjury.
Shutofftheengineandwaitforallmovingpartsto
stopbeforeleavingtheoperatingposition.
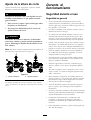
InstallingtheGrassBag
1.Liftupthereardeector(Figure15).
g186498
Figure15
1.Reardeector3.Rodend(2)
2.Grassbag
4.Notchinthehandle
bracket(2)
2.Inserttherodendsofthegrassbagintothenotches
inthehandlebrackets(Figure15).
3.Allowthereardeectortorestonthebag.
RemovingtheGrassBag
1.Liftupthereardeector(Figure15).
2.Liftthegrass-baghandleoutfromthenotchesonthe
handlebracketsandremovethebagfromthemachine.
3.Closethereardeector.
OperatingTips
GeneralMowingTips
•Inspecttheareawhereyouwillusethemachineand
removeallobjectsthatthemachinecouldthrow .
•Avoidstrikingsolidobjectswiththeblade.Never
deliberatelymowoveranyobject.
•Ifthemachinestrikesanobjectorstartstovibrate,
immediatelyshutofftheengine,disconnectthewirefrom
thesparkplug,andexaminethemachinefordamage.
•Forbestperformance,installanewbladebeforethe
cuttingseasonbegins.
•ReplacethebladewhennecessarywithaToro
replacementblade.
CuttingGrass
•Cutonlyaboutathirdofthegrassbladeatatime.Donot
cutbelowthe57mm(2-1/4inch)settingunlessthegrass
issparseoritislatefallwhengrassgrowthbeginstoslow
down.RefertoAdjustingtheCuttingHeight(page8).
•Whencuttinggrassover15cm(6inches)tall,mowatthe
highestcutting-heightsettingandwalkslower;thenmow
againatalowersettingforthebestlawnappearance.If
thegrassistoolong,themachinemayplugandcause
theenginetostall.
•Wetgrassandleavestendtoclumpontheyardandcan
causethemachinetoplugortheenginetostall.Avoid
mowinginwetconditions.
WARNING
Wetgrassorleavescancauseseriousinjuryif
youslipandcontacttheblade.Mowonlyindry
conditions.
•Alternatethemowingdirection.Thishelpsdispersethe
clippingsoverthelawnforevenfertilization.
•Ifthenishedlawnappearanceisunsatisfactory,try1
ormoreofthefollowing:
–Replacethebladeorhaveitsharpened.
–Walkataslowerpacewhilemowing.
–Raisethecuttingheightonyourmachine.
–Cutthegrassmorefrequently.
–Overlapcuttingswathsinsteadofcuttingafullswath
witheachpass.
10

CuttingLeaves
•Aftercuttingthelawn,ensurethathalfofthelawnshows
throughthecutleafcover.Youmayneedtomakemore
thanasinglepassovertheleaves.
•Iftherearemorethan13cm(5inches)ofleavesonthe
lawn,mowatahighercuttingheightandthenagainat
thedesiredcuttingheight.
•Slowdownyourmowingspeedifthemachinedoesnot
cuttheleavesnelyenough.
AfterOperation
AfterOperatingSafety
GeneralSafety
•Cleangrassanddebrisfromthemachinetohelpprevent
res.Cleanupoilorfuelspills.
•Allowtheenginetocoolbeforestoringthemachinein
anyenclosure.
•Neverstorethemachineorfuelcontainerwherethereis
anopename,spark,orpilotlight,suchasonawater
heateroronotherappliances.
HaulingSafety
•Usecarewhenloadingorunloadingthemachine.
•Securethemachinefromrolling.
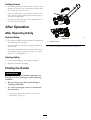
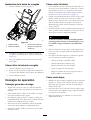
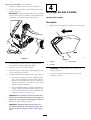
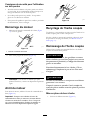
FoldingtheHandle
WARNING
Foldingorunfoldingthehandleimproperlycan
damagethecables,causinganunsafeoperating
condition.
•Donotdamagethecableswhenfoldingor
unfoldingthehandle.
•Ifacableisdamaged,contactanAuthorized
ServiceDealer.
1.Loosenthehandleknobsuntilyoucanmovethe
handlefreely(Figure16).
g186341
Figure16
1.Handleknob(2)
2.MovethehandleforwardasshowninFigure16.
11

Maintenance
Note:Determinetheleftandrightsidesofthemachinefromthenormaloperatingposition.
ReplacementpartsareavailablefromanAuthorizedServiceDealeroratwww.torodealer.com(UScustomersonly).
RecommendedMaintenanceSchedule(s)
MaintenanceService
Interval
MaintenanceProcedure
Aftertherst5hours
•Changetheengineoil.
Beforeeachuseordaily
•Checktheengine-oillevel.
•Ensurethattheengineshutsoffwithin3secondsafterreleasingtheblade-control
bar.
Aftereachuse
•Cleangrassclippingsanddirtfromunderthemachine.
Every25hours
•Checktheaircleanerfordirty,loose,ordamagedparts,andcleanorreplacethem
ifnecessary.
Every100hours
•Replacetheaircleanerelement(morefrequentlywhenoperatingthemachine
industyordirtyoperatingconditions).
•Cleanthecoolingsystem(refertoyourengineowner'smanual).
•Replacethesparkplug.
Beforestorage
•Emptythefueltankbeforerepairsasdirectedandbeforeannualstorage.
Yearly
•Changetheengineoil.
•Replacethebladeorhaveitsharpened(morefrequentlyiftheedgedullsquickly).
•Refertoyourengineowner'smanualforanyadditionalyearlymaintenance
procedures.
Important:Refertoyourenginemanualforadditionalmaintenanceprocedures.
MaintenanceSafety
•Disconnectthespark-plugwirefromthesparkplug
beforeperforminganymaintenanceprocedure.
•Wearglovesandeyeprotectionwhenservicingthe
machine.
•Thebladeissharp;contactingthebladecanresultin
seriouspersonalinjury.Weargloveswhenservicingthe
blade.
•Nevertamperwithsafetydevices.Checktheirproper
operationregularly.
•Tippingthemachinemaycausethefueltoleak.Fuelis
ammableandexplosive,andcancausepersonalinjury.
Runtheenginedrytoremovethefuelwithahandpump;
neversiphonthefuel.
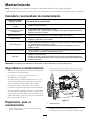
PreparingforMaintenance
1.Shutofftheengineandwaitforallmovingpartsto
stop.
2.Disconnectthespark-plugwirefromthesparkplug
(Figure17)beforeperforminganymaintenance
procedure.
g186525
Figure17
1.Spark-plugwire
3.Afterperformingthemaintenanceprocedure(s),
connectthespark-plugwiretothesparkplug.
12

Important:Beforetippingthemachinetochange
theoilorreplacetheblade,allowthefueltankto
rundrythroughnormalusage.Ifyoumusttip
themachinepriortorunningoutoffuel,usea
handfuelpumptoremovethefuel.Alwaystipthe
machineontoitssidewiththedipstickdown.
WARNING
Tippingthemachinemaycausethefuelto
leak.Gasolineisammableandexplosiveand
cancausepersonalinjury.
Runtheenginedryorremovethegasoline
withahandpump;neversiphon.
ServicingtheAirCleaner
ServiceInterval:Every25hours/Yearly(whichevercomes
rst)—Checktheaircleanerfordirty,
loose,ordamagedparts,andcleanor
replacethemifnecessary.
Every100hours/Yearly(whichevercomes
rst)—Replacetheaircleanerelement(more
frequentlywhenoperatingthemachineindustyor
dirtyoperatingconditions).
1.Performthepre-maintenanceprocedures;referto
PreparingforMaintenance(page12).
2.Pressdownonthelatchtabontopoftheair-cleaner
cover(Figure18).
g186015
Figure18
1.Latchtab
3.Replacetheair-cleanerelement.
4.Installtheair-cleanercover.
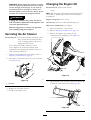
ChangingtheEngineOil
ServiceInterval:Aftertherst5hours
Yearly
Note:Runtheengineafewminutesbeforechangingthe
oiltowarmit.Warmoilowsbetterandcarriesmore
contaminants.
Engineoilcapacity:0.47L(16oz)
Oilviscosity:SAE30orSAE10W-30detergentoil
APIserviceclassication:SJorhigher
1.Movethemachinetoalevelsurface.
2.RefertoPreparingforMaintenance(page12).
3.Removethedipstickbyrotatingthecap
counterclockwiseandpullingitout(Figure16).
g186326
Figure19
4.Tipthemachineontoitsside(sothattheairlterisup)
todraintheusedoilfromtheoil-ll(Figure20).
G020050
g020050
Figure20
13

5.Afterdrainingtheusedoil,returnthemachinetothe
operatingposition.
6.Carefullypourabout3/4oftheenginecapacityofoil
intotheoil-lltube.
Note:Allow3minutesfortheoiltosettletothe
bottomofthecrankcase.Checkingtheoilleveltoo
quicklymayproduceafalsereading.
7.Waitabout3minutesfortheoiltosettleintheengine.
8.Wipethedipstickcleanwithacleancloth.
9.Insertthedipstickintotheoil-lltube,butdonot
screwitin,thenremovethedipstick.
10.Readtheoillevelonthedipstick(Figure16).
•IftheoillevelisbelowtheAddmarkonthe
dipstick,carefullypourasmallamountofoilinto
theoil-lltube,wait3minutes,andrepeatsteps
8through10untiltheoillevelisattheFullmark
onthedipstick.
•IftheoillevelisabovetheFullmarkonthe
dipstick,draintheexcessoiluntiltheoillevelisat
theFullmarkonthedipstick.
Important:Iftheoillevelinthecrankcaseis
toolowortoohighandyouruntheengine,
youmaydamagetheengine.
11.Installthedipsticksecurely.
12.Recycletheusedoilproperly.
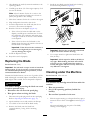
ReplacingtheBlade
ServiceInterval:Yearly
Important:
Y ou will need a torque wr ench to install the
blade pr oper l y
.Ifyoudonothaveatorquewrenchor
areuncomfortableperformingthisprocedure,contact
anAuthorizedServiceDealer.
Examinethebladewheneveryourunoutofgasoline.Ifthe
bladeisdamagedorcracked,replaceitimmediately.Ifthe
bladeedgeisdullornicked,haveitsharpenedorreplaceit.
WARNING
Thebladeissharp;contactingthebladecanresult
inseriouspersonalinjury.
•Disconnectthewirefromthesparkplug.
•Weargloveswhenservicingtheblade.
1.Disconnectthespark-plugwirefromthesparkplug.
RefertoPreparingforMaintenance(page12).
2.Tipthemachineontoitsside,withtheairlterup.
3.Useablockofwoodtoholdthebladesteady.
4.Removetheblade(turnthebladebolt
counterclockwise),savingallthemounting
hardware.
5.Installthenewblade(turnthebladeboltclockwise)
andallmountinghardware(Figure21).
g002599
Figure21
Important:Positionthecurvedendsoftheblade
topointtowardthemachinehousing.
6.Useatorquewrenchtotightenthebladeboltto68
N∙m(50ft-lb).
Important:Abolttorquedto68N∙m(50ft-lb)is
verytight.Whileholdingthebladewithablock
ofwood,putyourweightbehindtheratchetor
wrenchandtightentheboltsecurely.Thisboltis
verydifculttoovertighten.
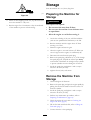
CleaningundertheMachine
ServiceInterval:Aftereachuse
WARNING
Themachinemaydislodgematerialfromunderthe
machine.
•Weareyeprotection.
•Stayintheoperatingposition(behindthe
handle).
•Donotallowbystandersinthearea.
1.Withtheenginerunningonaatpavedsurface,spraya
streamofwaterinfrontoftherightrearwheel(Figure
22).
Thewaterwillsplashintothepathoftheblade,
cleaningouttheclippings.
14

g002600
Figure22
2.Whennomoreclippingscomeout,stopthewaterand
movethemachinetoadryarea.
3.Runtheengineforafewminutestodrytheunderside
ofthemachinetopreventitfromrusting.
Storage
Storethemachineinacool,clean,dryplace.
PreparingtheMachinefor
Storage
WARNING
Fuelvaporscanexplode.
•Donotstorefuelmorethan30days.
•Donotstorethemachineinanenclosurenear
anopename.
•Allowtheenginetocoolbeforestoringit.
1.Onthelastrefuelingoftheyear,addfuelstabilizer
(suchasToropremiumfueltreatment)tothefuel.
2.Runthemachineuntiltheengineshutsofffrom
runningoutoffuel.
3.Primetheengineandstartitagain.
4.Allowtheenginetorununtilitshutsoff.Whenyou
cannolongerstarttheengine,itissufcientlydry.
5.Disconnectthewirefromthesparkplug.
6.Removethesparkplug,add30ml(1oz)ofoilthrough
thesparkplughole,andpullthestarterropeslowly
severaltimestodistributeoilthroughoutthecylinder
topreventcylindercorrosionduringtheoffseason.
7.Installthesparkplugandtightenitwithatorque
wrenchto20N∙m(15ft-lb).
8.Tightenallnuts,bolts,andscrews.
RemovetheMachinefrom
Storage
1.Checkandtightenallfasteners.
2.Removethesparkplugandspintheenginerapidlyby
pullingtherecoil-starthandletoblowtheexcessoil
fromthecylinder.
3.Installthesparkplugandtightenitwithatorque
wrenchto20N∙m(15ft-lb).
4.Performanymaintenanceprocedures;referto
PreparingforMaintenance(page12).
5.Checktheengine-oillevel;refertoCheckingthe
Engine-OilLevel(page8).
6.Fillthefueltankwithfreshfuel;refertoFillingthe
FuelTank(page7).
7.Connectthewiretothesparkplug.
15

TheToroWarranty
20inand22in
Recycler
®
A2-YearFullWarranty(45DayLimitedWarrantyforCommercialUse)20inMulcher/Bagger
TheToroGTSStartingGuarantee
WalkPowerMowers
A3-YearFullWarranty(NotApplicableforCommercialUse)
SteelDecks
ConditionsandProductsCovered
TheT oroCompanyanditsafliate,ToroWarrantyCompany,pursuantto
anagreementbetweenthem,jointlypromisetorepairtheT oroProduct
listedbelowifusedforresidentialpurposes*;ifitisdefectiveinmaterials
orworkmanshiporifitstopsfunctioningduetothefailureofacomponent;
oriftheToroGTS(GuaranteedtoStart)enginewillnotstartontherstor
secondpull,providedtheroutinemaintenancerequiredintheOperator's
Manualhavebeenperformed.
Thiswarrantycoversthecostofpartsandlabor,butyoumustpay
transportationcosts.
Thefollowingtimeperiodsapplyfromtheoriginaldateofpurchase:
ProductsWarrantyPeriod
20inand22inRecyclerand20in
Mulcher/Bagger
2-yearfullwarranty
Attachments
2-yearfullwarranty
GTS(GuaranteedtoStart)3-yearfullwarranty
Engine
1
3-yearfullwarranty
Engine
1
-CommercialUse
Toro-45Days
Otherengines-90days
Battery
1-yearfullwarranty
1
SomeenginesusedonToroProductsarewarrantedbytheenginemanufacturer.
LimitedWarrantyforCommercialUse*
Gas-poweredT oroProductsusedforcommercial,institutional,orrental
use,arewarrantedfor45daysagainstdefectsinmaterialsorworkmanship.
Componentsfailingduetonormalweararenotcoveredbythiswarranty.
Fortheenginewarrantyperiods,seethetableabove.
TheT oroGTS(GuaranteedtoStart)StartingGuaranteedoesnotapply
whentheproductisusedcommercially*.
InstructionsforObtainingWarrantyService
IfyouthinkthatyourT oroProductcontainsadefectinmaterialsor
workmanship,orifanormal,able-bodiedadultcannolongerstartyour
product'sengineinoneortwopulls,followthisprocedure:
1.ContactanyAuthorizedT oroServiceDealertoarrangeserviceat
theirdealership.T olocateadealerconvenienttoyou,accessourweb
siteatwww.Toro.com.Youmayalsocallthenumberslistedinitem#3
tousethe24-hourT oroDealerlocatorsystem.
2.Bringtheproductandyourproofofpurchase(salesreceipt)tothe
ServiceDealer.Thedealerwilldiagnosetheproblemanddetermineif
itiscoveredunderwarranty.
3.IfforanyreasonyouaredissatisedwiththeServiceDealer’s
analysisorwiththeassistanceprovided,contactusat:
ToroWarrantyCompany
CustomerCareDepartment,RLCDivision
8111LyndaleAvenueSouth
Bloomington,MN55420-1196
Tollfreeat866-214-9807(U.S.customers)
Tollfreeat866-214-9808(Canadiancustomers)
OwnerResponsibilities
YoumustmaintainyourT oroProductbyfollowingthemaintenance
proceduresdescribedintheOperator'sManual.Suchroutinemaintenance,
whetherperformedbyadealerorbyyou,isatyourexpense.
ItemsandConditionsNotCovered
Thereisnootherexpresswarrantyexceptforspecialemissionsystem
coverageandenginewarrantycoverageonsomeproducts.Thisexpress
warrantydoesnotcoverthefollowing:
•Costofregularmaintenanceserviceorparts,suchaslters,fuel,
lubricants,oilchanges,sparkplugs,airlters,bladesharpening
orwornblades,cable/linkageadjustments,orbrakeandclutch
adjustments
•Anyproductorpartwhichhasbeenaltered,misused,neglected,or
requiresreplacementorrepairduetoaccidentsorlackofproper
maintenance
•Pickupanddeliverycharges
•RepairsorattemptedrepairsbyanyoneotherthananAuthorizedT oro
ServiceDealer
•Repairsnecessaryduetofailuretofollowrecommendedfuel
procedure(consulttheOperator'sManualformoredetails)
–Removingcontaminantsfromthefuelsystemisnotcovered
–Useofoldfuel(morethanonemonthold)orfuelwhichcontains
morethan10%ethanolormorethat15%MTBE
–Failuretodrainthefuelsystempriortoanyperiodofnon-use
overonemonth
•Repairsoradjustmentstocorrectstartingdifcultiesduetothe
following:
–Failuretofollowpropermaintenanceproceduresorrecommended
fuelprocedures
–Rotarymowerbladestrikinganobject
•Specialoperationalconditionswherestartingmayrequiremorethan
twopulls:
–Firsttimestartsafterextendedperiodofnon-useoverthree
monthsorseasonalstorage
–Cooltemperaturestartssuchasthosefoundinearlyspringand
lateautumn
–Improperstartingprocedures-ifyouarehavingdifcultystarting
yourunit,pleasechecktheOperator'sManualtoensurethat
youareusingthecorrectstartingprocedures.Thiscansavean
unnecessaryvisittoanAuthorizedToroServiceDealer.
GeneralConditions
AllrepairscoveredbythesewarrantiesmustbeperformedbyanAuthorized
ToroServiceDealerusingT oro-approvedreplacementparts.Repairbyan
AuthorizedToroServiceDealerisyoursoleremedyunderthiswarranty.
NeitherTheToroCompanynorToroWarrantyCompanyisliablefor
indirect,incidental,orconsequentialdamagesinconnectionwiththe
useoftheToroProductscoveredbythesewarranties,includingany
costorexpenseofprovidingsubstituteequipmentorserviceduring
reasonableperiodsofmalfunctionornon-usependingcompletionof
repairsunderthesewarranties.
Somestatesdonotallowexclusionsofincidentalorconsequential
damages,sotheaboveexclusionsmaynotapplytoyou.
Thiswarrantygivesyouspeciclegalrights,andyoumayalsohaveother
rightswhichvaryfromstatetostate.
CountriesOtherthantheUnitedStatesorCanada
ThiswarrantyisnotvalidinMexico.CustomerswhohavepurchasedT oroproductsexportedfromtheUnitedStatesorCanadashouldcontacttheirToro
Distributor(Dealer)toobtainguaranteepoliciesforyourcountry,province,orstate.IfforanyreasonyouaredissatisedwithyourDistributor'sserviceor
havedifcultyobtainingguaranteeinformation,contacttheT oroimporter.Ifallotherremediesfail,youmaycontactusatT oroWarrantyCompany.
AustralianConsumerLaw:AustraliancustomerswillnddetailsrelatingtotheAustralianConsumerLaweitherinsidetheboxoratyourlocalToro
Dealer.
*Residentialpurposesmeansuseoftheproductonthesamelotasyourhome.Useatmorethanonelocation,orinstitutionalorrentaluse,isconsidered
commercialuse,andthecommercialusewarrantywouldapply.
374-0254RevG

CV
FormNo.3408-823RevA
CortacéspedRecycler
®
/Ensacadotraserode51cm
(21")
Nºdemodelo21319—Nºdeserie400000000ysuperiores
Manualdeloperador
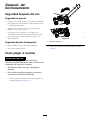
Introducción
Estecortacéspeddirigidodecuchillasrotativasestádiseñado
paraserusadoporusuariosdomésticos.Estádiseñado
principalmenteparasegarcéspedbienmantenidoenzonas
verdesresidenciales.Noestádiseñadoparacortarmaleza
oparaaplicacionesagrícolas.
Leaestemanualdetenidamenteparaaprenderautilizary
mantenercorrectamentesuproducto,yparaevitarlesiones
ydañosalproducto.Ustedeselresponsabledeutilizarel
productodeformacorrectaysegura.
UstedpuedeponerseencontactodirectamenteconToroen
www.Toro.comsideseaobtenerinformaciónsobreproductos
yaccesorios,osinecesitalocalizarundistribuidororegistrar
suproducto.
Cuandonecesiteasistenciatécnica,piezasgenuinasToroo
informaciónadicional,póngaseencontactoconunServicio
TécnicoAutorizadooconAsistenciaalClienteToro,ytenga
amanolosnúmerosdemodeloyseriedesuproducto.Figura
1identicalaubicacióndelosnúmerosdemodeloyserieen
elproducto.Escribalosnúmerosenelespacioprovisto.
g186304
Figura1
1.Placaconlosnúmerosdemodeloydeserie
Nºdemodelo
Nºdeserie
Estemanualidenticapeligrospotencialesycontiene
mensajesdeseguridadidenticadosporelsímbolodealerta
deseguridad(Figura2),queseñalaunpeligroquepuede
causarlesionesgravesolamuertesiustednosiguelas
precaucionesrecomendadas.
g000502
Figura2
1.Símbolodealertadeseguridad
Estemanualutiliza2palabraspararesaltarinformación.
Importantellamalaatenciónsobreinformaciónmecánica
especial,yNotaresaltainformacióngeneralquemereceuna
atenciónespecial.
ADVERTENCIA
CALIFORNIA
AdvertenciadelaPropuesta65
Esteproductocontieneunaomássustancias
químicasqueelEstadodeCaliforniaconsidera
causantesdecáncer,defectoscongénitoso
trastornosdelsistemareproductor.
Losgasesdeescapedeesteproductocontienen
productosquímicosqueelEstadodeCalifornia
sabequecausancáncer,defectoscongénitos
uotrospeligrosparalareproducción.
Elusoolaoperacióndelmotorencualquierterrenoforestal,
demonteocubiertodehierbaamenosqueelmotoresté
equipadoconparachispas(conformealadeniciónde
lasección4442)mantenidoenbuenascondicionesde
funcionamiento,oqueelmotorhayasidofabricado,equipado
ymantenidoparalaprevencióndeincendios,constituyeuna
infraccióndelalegislacióndeCalifornia(CaliforniaPublic
ResourceCodeSection4442o4443).
Estesistemadeencendidoporchispacumplelanorma
canadienseICES-002.
El
Man ual del pr opietario del motor
adjuntoofrece
informaciónsobrelasnormasdelaAgenciade
protecciónambientaldeEE.UU.(U.S.Environmental
ProtectionAgency/EPA)ydelaNormadecontrol
deemisionesdeCalifornia(CaliforniaEmission
ControlRegulation)sobresistemasdeemisiones,
mantenimientoygarantía.Puedesolicitarseunmanual
nuevoalfabricantedelmotor.
©2016—TheToro®Company
8111LyndaleAvenueSouth
Bloomington,MN55420
Registresuproductoenwww.T oro.com.
Traduccióndeloriginal(ES)
ImpresoenEE.UU.
Reservadostodoslosderechos
*3408-823*A

Parneto:Elparbrutoonetodeestemotorfuedeterminado
enellaboratorioporelfabricantedelmotorconarregloala
normaJ1940delaSocietyofAutomotiveEngineers(SAE).
Debidoaqueelmotorestáconguradoparacumplirlos
requisitosdeseguridad,emisionesyoperación,supotencia
realenestetipodecortacéspedserásignicativamentemenor.
Vayaawww.Toro.comparaverlasespecicacionesdesu
modelodecortacésped.
Contenido
Introducción.................................................................1
Seguridad......................................................................2
Seguridadengeneral................................................2
Pegatinasdeseguridadeinstrucciones.......................3
Montaje........................................................................4
1Instalacióndelmanillar..........................................4
2Instalacióndelacuerdadearranqueenlaguíade
lacuerda.............................................................4
3Llenadodelcárterdeaceite.....................................4
4Ensamblajedelabolsaderecogida..........................5
Elproducto...................................................................6
Operación.....................................................................7
Antesdelfuncionamiento............................................7
Seguridadantesdeluso............................................7
Aperos/Accesorios.................................................7
Cómollenareldepósitodecombustible......................7
Comprobacióndelniveldeaceitedelmotor.................8
Ajustedelaalturadecorte........................................9
Duranteelfuncionamiento..........................................9
Seguridadduranteeluso...........................................9
Arranquedelmotor................................................10
Paradadelmotor...................................................10
Recicladodelosrecortes..........................................10
Ensacadodelosrecortes.........................................10
Consejosdeoperación............................................11
Despuésdelfuncionamiento.......................................12
Seguridaddespuésdeluso........................................12
Cómoplegarelmanillar...........................................12
Mantenimiento.............................................................13
Calendariorecomendadodemantenimiento..................13
Seguridadenelmantenimiento.................................13
Preparaciónparaelmantenimiento...........................13
Mantenimientodellimpiadordeaire.........................14
Cómocambiarelaceitedelmotor.............................14
Cómocambiarlacuchilla.........................................15
Limpiezadelosbajosdelamáquina..........................16
Almacenamiento...........................................................16
Preparacióndelamáquinaparael
almacenamiento.................................................16
Despuésdelalmacenamiento...................................16
Seguridad
Estamáquinahasidodiseñadaconarregloaloestipuladoen
lasnormasENISO5395:2013yANSIB71.1–2012.
Seguridadengeneral
Esteproductoescapazdeamputarmanosypiesydelanzar
objetosalaire.Sigasiempretodaslasinstruccionesde
seguridadconelndeevitarlesionespersonalesgraves.
Elusodeesteproductoparaotrospropósitosquelos
previstospodríaserpeligrosoparaustedyparaotraspersonas.
•LeaycomprendaelcontenidodeesteManualdeloperador
antesdearrancarelmotor.Asegúresedequetodaslas
personasqueutilicenesteproductosepancómoutilizarlo
ycomprendanlasadvertencias.
•Nopongalasmanosolospiescercadeloscomponentes
móvilesdelamáquina.
•Nohagafuncionarlamáquinasinoestáncolocados
yfuncionandotodoslosprotectoresydispositivosde
seguridad.
•Noseacerquealosoriciosdedescarga.Mantengaa
otraspersonasaunadistanciaprudencialdelamáquina.
•Mantengaalosniñosalejadosdelazonadetrabajo.
Nuncapermitaalosniñosutilizarlamáquina.
•Parelamáquinaypareelmotorantesderealizartareas
demantenimientoorepostaje,yantesdeeliminar
obstruccionesenlamáquina.
Elusoomantenimientoincorrectodeestamáquinapuede
causarlesiones.Parareducirelpeligrodelesiones,cumpla
estasinstruccionesdeseguridadypresteatenciónsiempre
alsímbolodealertadeseguridad,quesignicaCuidado,
AdvertenciaoPeligro–instrucciónrelativaalaseguridad
personal.Elincumplimientodeestasinstruccionespuededar
lugaralesionespersonalesolamuerte.
Puedeencontrarinformacióndeseguridadadicionalentodo
estemanual,enlasseccionescorrespondientes.
2
La page est en cours de chargement...
La page est en cours de chargement...
La page est en cours de chargement...
La page est en cours de chargement...
La page est en cours de chargement...
La page est en cours de chargement...
La page est en cours de chargement...
La page est en cours de chargement...
La page est en cours de chargement...
La page est en cours de chargement...
La page est en cours de chargement...
La page est en cours de chargement...
La page est en cours de chargement...
La page est en cours de chargement...
La page est en cours de chargement...
La page est en cours de chargement...
La page est en cours de chargement...
La page est en cours de chargement...
La page est en cours de chargement...
La page est en cours de chargement...
La page est en cours de chargement...
La page est en cours de chargement...
La page est en cours de chargement...
La page est en cours de chargement...
La page est en cours de chargement...
La page est en cours de chargement...
La page est en cours de chargement...
La page est en cours de chargement...
La page est en cours de chargement...
La page est en cours de chargement...
La page est en cours de chargement...
La page est en cours de chargement...
La page est en cours de chargement...
La page est en cours de chargement...
La page est en cours de chargement...
La page est en cours de chargement...
-
 1
1
-
 2
2
-
 3
3
-
 4
4
-
 5
5
-
 6
6
-
 7
7
-
 8
8
-
 9
9
-
 10
10
-
 11
11
-
 12
12
-
 13
13
-
 14
14
-
 15
15
-
 16
16
-
 17
17
-
 18
18
-
 19
19
-
 20
20
-
 21
21
-
 22
22
-
 23
23
-
 24
24
-
 25
25
-
 26
26
-
 27
27
-
 28
28
-
 29
29
-
 30
30
-
 31
31
-
 32
32
-
 33
33
-
 34
34
-
 35
35
-
 36
36
-
 37
37
-
 38
38
-
 39
39
-
 40
40
-
 41
41
-
 42
42
-
 43
43
-
 44
44
-
 45
45
-
 46
46
-
 47
47
-
 48
48
-
 49
49
-
 50
50
-
 51
51
-
 52
52
-
 53
53
-
 54
54
-
 55
55
-
 56
56


Toro 21in Recycler/Rear Bagging Lawn Mower Manuel utilisateur
- Catégorie
- Tondeuses à gazon
- Taper
- Manuel utilisateur
dans d''autres langues
Documents connexes
-
Toro 20in Recycler/Rear Bagging Lawn Mower Manuel utilisateur
-
-
Toro 22in Recycler Lawn Mower Manuel utilisateur
-
-
-
-
-
Toro Super Recycler Lawn Mower Manuel utilisateur
-
Toro 55cm Recycler Lawn Mower Manuel utilisateur
-
