Maytag FAV-2 Mode d'emploi
- Catégorie
- Machines à laver
- Taper
- Mode d'emploi
Ce manuel convient également à

MAYTAG NEPTUNE
®
TL WASHER
MAYTAG NEPTUNE
®
TL WASHER
FAV-2
6 2906140 Rev. B B/01/04 ©2004 Maytag Appliances Sales Co.
Safety Instructions ................................................. 1-2
Operating Instructions...............................................3
Control Panel ............................................................. 4
Set Your Own Cycle...............................................5-6
Rinse or Spin Only..................................................7-8
Favorites..................................................................9-11
Cycle Library.......................................................11-12
Stain Brain ..................................................................12
Using Help............................................................13-16
Detergent Use...........................................................17
Features.................................................................17-18
Care & Cleaning................................................ 19-20
Troubleshooting ..................................................21-22
Operating Sounds ................................................... 23
Questions and Answers......................................... 24
Warranty................................................................... 25
Guide de Utilisation et d’entretien..................... 26
Guía de Uso y Cuidado......................................... 53
Pour obtenir un affichage en français ou en espagnol, appuyer sur la touche Help (Aide), puis sur la zone (Sélection des préférences) et sélectionner la langue de votre choix.
Para cambiar el idioma de la pantalla a español o francés, oprima la tecla Help (Ayuda),oprima Select Preferences (Seleccionar Preferencias) y seleccione el idioma preferido.
GUIDE
USE & CARE
USE & CARE
GUIDE
TABLE OF CONTENTS

1
1. Read all instructions before using the appliance.
2. As with any equipment using electricity and having moving parts, there are
potential hazards.To use this appliance safely, the operator should become
familiar with the instructions for operation of the appliance and always
exercise care when using it.
3. Do not install or store this appliance where it will be exposed to the
weather.
4. Install and level washer on a floor that can support the weight.
5. This appliance must be properly grounded. Never plug the appliance cord
into a receptacle which is not grounded adequately and in accordance
with local and national codes. See installation instructions for grounding
this appliance.
6. To avoid the possibility of fire or explosion:
a. Do not wash items that have been previously cleaned in, washed in,
soaked in, or spotted with gasoline, dry-cleaning solvents, other flammable
or explosive substances as they give off vapors that could ignite or
explode. Hand wash and line dry any items containing these substances.
Any material on which you have used a cleaning solvent, or which is
saturated with flammable liquids or solids, should not be placed in the
washer until all traces of these liquids or solids and their fumes have
been removed.
These items include acetone, denatured alcohol, gasoline, kerosene,
some liquid household cleaners, some spot removers, turpentine, waxes
and wax removers.
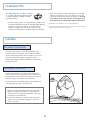
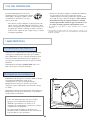
Welcome
Welcome and congratulations on your
purchase of a Maytag Neptune
®
TL
washer! Your complete satisfaction is
very important to us. For best results,
we suggest reading this material to help
acquaint you with proper operating and
maintenance procedures.
Should you need assistance in the future,
it is helpful to:
1) Have complete model and serial
number identification of your washer.
This is located on a data plate on the
back right side of the control panel.
Date of Purchase __________________
Model Number ____________________
Serial Number ____________________
2) IMPORTANT: Keep this guide and
the sales receipt in a safe place for
future reference. Proof of original
purchase date is needed for
warranty service.
If you have questions call:
Maytag Customer Assistance
1-888-462-9824 USA and CANADA
(Mon.–Fri., 8am–8pm Eastern Time)
Internet: http://www.maytag.com
U.S.A. customers using TTY for deaf,
hearing impaired or speech
impaired, call 1-800-688-2080
NOTE: In our continuing effort to
improve the quality of our
appliances, it may be necessary to
make changes to the appliance
without revising this guide.
For service and warranty
information, see page 25.
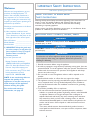
IMPORTANT SAFETY INSTRUCTIONS
read before operating your washer
WARNING – Hazards or unsafe practices which COULD result in severe
personal injury or death.
RECOGNIZE SAFETY SYMBOLS, WORDS, LABELS
WARNING
CAUTION
To r educe the risk of fire, explosion, electric shock property damage or
injury to persons when using your appliance, follow basic precautions,
including the following:
WARNING
WHAT YOU NEED TO KNOW ABOUT
SAFETY INSTRUCTIONS
Warning and Important Safety Instructions appearing in this manual are not
meant to cover all possible conditions and situations that may occur.
Common sense, caution, and care must be exercised when installing,
maintaining or operating appliance.
Always contact your dealer, distributor, service agent, or manufacturer about
problems or conditions you do not understand.
CAUTION – Hazards or unsafe practices which COULD result in minor
personal injury.

2
b. Do not add gasoline, dry-cleaning solvents, or other
flammable or explosive substances to the wash
water.These substances give off vapors that could
ignite or explode.
c. Under certain conditions, hydrogen gas may be
produced in a hot water system that has not been
used for two weeks or more. HYDROGEN GAS IS
EXPLOSIVE. If the hot water system has not been
used for such a period, before using a washing
machine or combination washer-dryer, turn on all
hot water faucets and let the water flow from each
for several minutes.This will release any accumulated
hydrogen gas. As the gas is flammable, do not smoke
or use an open flame during this time.
d. Do not wash or dry items that are soiled with
vegetable or cooking oil.These items may contain
some oil after laundering. Due to the remaining oil,
the fabric may smoke or catch fire by itself.
7. Do not reach into the appliance if the tub or tumblers
are moving.
8. Do not allow children or pets to play on, in, or in front
of the appliance. Close supervision is necessary when
the appliance is used near children and pets.
9. Do not tamper with controls.
10. Do not repair or replace any part of the appliance or
attempt any servicing unless specifically recommended
in published user-repair instructions that you
understand and have the skills to carry out.
11. Unplug power supply cord before attempting to service
your washer. Service is to be done only by qualified
service personnel.
12. Keep all laundry aids such as detergents, bleach, etc.,
out of the reach of children, preferably in a locked
cabinet. Use laundry aids only as directed by the
manufacturer. Observe all warnings on container labels.
13. Keep the area around and underneath washer free from
the accumulation of combustible materials, such as lint,
paper, rags, gasoline, and all other flammable vapors and
liquids.
14. Do not use chlorine bleach and ammonia or acids (such
as vinegar or rust remover) in the same wash.
Hazardous fumes can form.
15. Do not machine wash fiberglass materials. Small
particles can stick to fabrics washed in following loads
and cause skin irritation.
16. For flame resistant finishes - follow garment
manufacturer's instructions carefully. Improper
laundering could remove the finish.
17. Before the appliance is removed from service or
discarded, remove the lid to the washing compartment.
18. Inlet hoses are subject to damage and deterioration
over time. Check the hoses periodically for bulges,
kinks, cuts, wear or leaks and replace them every five
years.
S
AVE
T
HESE
I
NSTRUCTIONS

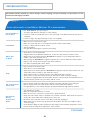
3
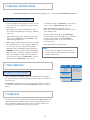
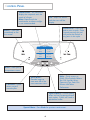
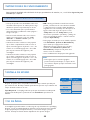
STATUS DISPLAY
After pressing Start, this display will show the estimated time remaining in
the cycle. The estimated time may fluctuate to better indicate the wash time
left in the cycle.
Lid Locked – Displays whenever the lid of the clothes washer is locked.
The lid can be unlocked by pressing the Start/Pause touchpad to stop the
washer.
WATER USE
The amount of water used will vary with each load.The Maytag Neptune
®
TL
clothes washer uses an adaptive fill to provide the appropriate amount of
water for efficient cleaning performance and conservation of water and
energy. Fill time will vary depending on water pressure.
ESTIMATED TIME DISPLAY
OPERATING INSTRUCTIONS
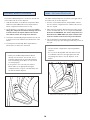
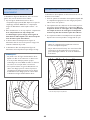
• Put dry, unfolded clothes loosely in the tub, up to the
top row of holes for a maximum load. Do not pack
down the load.
•Overloading may reduce washing efficiency, cause
excess wear and possibly cause creasing or wrinkling
of the load.
•Wash delicate items such as bras, hosiery and other
lingerie in the “delicates” or “hand wash” cycle
with similar lightweight items.
• When washing smaller, bulky items that do not fill the
tub completely such as a rug, one pillow, stuffed toys
or one or two sweaters, a few towels should be
added for improved tumbling and spin performance.
• DO NOT overload the washer when washing large,
bulky items such as comforters, blankets or mattress
pads. Items should fit loosely in the tub, below the
top row of holes. Use the “bulky items” cycle for
these loads. The “bulky items” cycle can be
accessed by touching “cycle library” on the Home
screen or use the Cycle Library option pad.
•When washing heavily soiled loads, it is very
important to avoid overloading the washer to assure
good cleaning results.
•To load a forgotten item, press the Start/Pause
touchpad, wait for the Locked light to go out, add the
item, close the lid and press the Start/Pause
touchpad. After a pause of up to one minute, the
cycle will resume.
•Close lid carefully to avoid slamming
NOTE:
• To assure that your additional items get clean, do
not wait more than five minutes after the cycle has
started to add the item.
For detailed information on sorting, pretreating stains, etc., see the enclosed Laundering Tips booklet.
LOAD THE CLOTHES WASHER
est. time:
your cycle
main wash
lid locked
40
warm wash
cold rinse
medium soil
14 min. wash
cotton
fabrics
OPTIONS
max extract spin
medium cycle chime
Auto Temp ON
save as a favorite

4
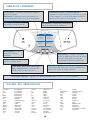
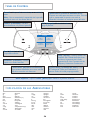
CONTROL PANEL
cycle
library
Home
stain
brain
favorite
cycles
set your
own cycle
Touchscreen - An interactive
display that responds with the
touch of a finger.
Note: Exposure of the
touchscreen to direct sunlight
is not recommended.
Favorites - Quick
access to your
named cycles.
Start/Pause - Press this
pad to start a cycle. Once
started, pressing this pad
will pause the washer at
any point in the cycle.
Help - Quick access to
Fabric Care Symbols, Before
You Call, Laundry Hints,
Operating Tips, Lock Out
Feature and Select
Preferences.
Back - Takes you to
the previous screen.
Home - Takes you
immediately to the
first screen.
Off - Stops the washer
and the turns off the
display.
Special Note: Press Back for previous touchscreen.
Stain Brain -
Detailed steps to
treat over 60 of the
most common stains.
Cycle Library - Use to quickly
select and start preprogrammed
wash cycles. Cycles are listed in
alphabetical order.

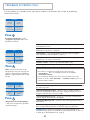
5
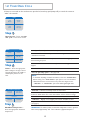
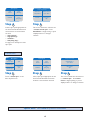
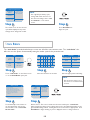
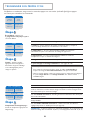
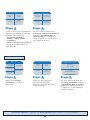
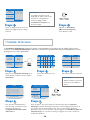
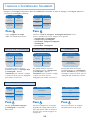
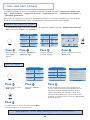
Home Screen – Touch “set your
own cycle” on the Home screen.
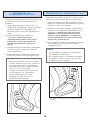
Wash/Rinse Temperature –
Select the appropriate wash/rinse
temperature.
If there are no words on the touchscreen, open the lid, touch any pad (except off), or touch the screen to
“wake” the controls.
SET YOUR OWN CYCLE
Step 1
Step 3
cycle
library
Home
stain
brain
favorite
cycles
set your
own cycle
hot wash
cold rinse
Wash/Rinse Temperature
cold wash
cold rinse
warm wash
warm rinse
tap cold wash
cold rinse
warm wash
cold rinse
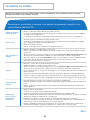
“cottons” – For most normally soiled items including cottons, sheets, linens,
underwear and t-shirts.
“sturdy” – For sturdy, color-fast and heavily soiled items.
“wrinkle free” – For dress shirts/pants, wrinkle free clothing, poly/cotton
blend clothing and jeans.
“delicates” – For dress shirts/blouses, nylons, sheer or lacy garments and
lingerie.
“hand wash” – For items labeled hand wash.
“rinse or spin only cycles” – See pages 7-8.
“hot/cold” – Whites and heavily soiled color-fast items.
“warm/warm” – Color-fast items.When warm rinse is selected, only the
final rinse will be warm.The other rinses will be cold to conserve energy.
“warm/cold” – Moderately soiled color-fast items; most wrinkle free items.
“cold/cold” – Brightly colored, lightly soiled items; washable woolens.
“tap cold/cold” – Uses cold water from the tap. Auto Temp will not heat
(see page 6).
IMPORTANT: The washer features an automatic temperature control to provide a
warm wash of approximately 105° F and cold wash of approximately 85° F.
NOTE:
• To minimize wrinkling of wrinkle free fabrics, select the “wrinkle free”
fabrics setting. The “max extract” spin option is not recommended.
• Wash delicate items such as bras, hosiery and other lingerie in the
“delicates” or “hand wash” cycle with similar lightweight items.
Fabrics – Select the appropriate
fabric setting for the type of load.
This will determine the tumble or
tumble/pause pattern for the
load.
Step 2
sturdy
Fabrics
wrinkle free
hand wash
cottons
delicates
rinse or spin
only cycles

6
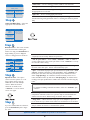
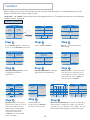
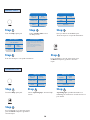
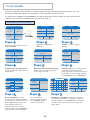
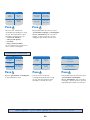
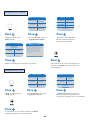
Review Screen – This screen reviews
your selections before starting the
washer. You may press Start/Pause to
begin washing or press a displayed
choice to change previous selections.
Options Screen – The option
choices turn the options on or off.
Some option choices show an
additional screen with multiple
choices. When the desired
selections are made, touch
“continue” to see the review
screen once again.
If you are satisfied with the selections,
press the Start/Pause pad to begin
the cycle.
Step 5
Step 6
Step 7
cotton
fabrics
Press "Start/Pause" or
change your selections below.
warm wash
cold rinse
medium soil
14 min. wash
OPTIONS
max extract spin
medium cycle chime
Auto Temp ON
save as a favorite
medium end of
cycle chime
max extract
spin
Options
continue
extra rinse
on off
presoak
on off
Auto Temp
on off
remind chime
on off
delay wash
on off
Special Note: Press Back for previous touchscreen.
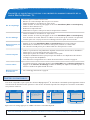
“extra rinse” – An additional rinse at the end of the cycle to more
completely remove laundry additives and perfumes.
“end of cycle chime” – Touch “loud”, “medium”, “soft” or “off” to
set the volume level of the end of cycle chime. Touch “continue” to accept
the selected volume setting.
“presoak” – Adds 12 minutes of mostly soaking with minimal tumbling at
the start of the wash cycle. Can be selected with any cycle.
“spin” – This allows the proper spin speed selection for specific loads. “max
extract” should be selected for towels and bedding. Select “medium” for
khakis, jeans, dress shirts and other permanent press or wrinkle free items.
Select “high (flat dry)” for underwear, t-shirts and sturdy cottons or for
items that will be laid to dry and select “low (hang dry)” for delicate items
needing a slow spin speed because of fabric and construction and for hang dry
items.
“Auto Temp” – Uses an internal heater to provide the best water
temperature and wash results. The cycle time may be extended while the
washer heats the water. While heating, the washer will not tumble.
“delay wash” – Allows the start of any cycle to be delayed for up to 12
hours.Touch the up or down arrow under hour and minutes to set the time.
“remind chime” – When on, the washer will chime at the end of the cycle
every 5 minutes for 2 hours or until the lid is opened.
Soil Level/Wash Time – Select the
appropriate soil level/wash time.
Step 4
heavy soil
19 min. wash
light soil
9 min. wash
medium soil
14 min. wash
stain treat
24 min. wash
freshen
4 min. wash
Soil Level/Wash Time
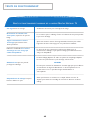
“stain treat” – Use for cleaning ground-in, stubborn soils and stains.
“heavy soil” – Use for cleaning heavily soiled loads.
“medium soil” – Use for cleaning moderately soiled loads.This setting will
be appropriate for most loads.
“light soil” – Use for cleaning lightly soiled loads.
“freshen” – The freshen setting offers a quick cycle time. Suggested uses
include freshening newly purchased clothes or clothing that has been packed
away.
NOTE:
• To minimize wrinkling of wrinkle free fabrics, select the “medium” spin
selection.

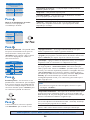
7
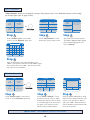
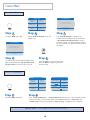
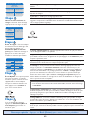
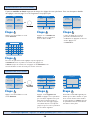
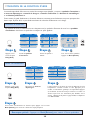
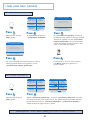
RINSE OR SPIN ONLY
Rinse or Spin Only offers the ability to choose a rinse and spin only cycle or a spin only cycle.
Touch “set your own cycle”
on the Home screen.
Step 1
cycle
library
Home
stain
brain
favorite
cycles
set your
own cycle
Select “rinse or spin only cycles”. These settings
allow you to choose from the following:
• “warm rinse & spin”
• “cold rinse & spin”
• “custom rinse & spin”
• “spin”
• “custom spin”
Step 2
warm
rinse & spin
cold
rinse & spin
custom
rinse & spin
spin
custom
spin
More Cycles
This screen reviews the preset
selection for a “warm rinse & spin”.
Press Start/Pause to begin rinsing or
press a displayed choice to change a
selection.
Press "Start/Pause" or
change selections below.
warm rinse
temperature
1 rinse
medium end of
cycle chime
max extract
spin
WARM RINSE & SPIN
This screen reviews the preset selection
for a “cold rinse & spin”.Press
Start/Pause to begin rinsing or press a
displayed choice to change a selection.
Press "Start/Pause" or
change selections below.
cold rinse
temperature
1 rinse
medium end of
cycle chime
max extract
spin
COLD RINSE & SPIN
This screen reviews the preset selection
for a “spin”.Press Start/Pause to
begin spinning or press a displayed choice
to change a selection.
Press "Start/Pause" or
change selections below.
medium end of
cycle chime
max extract
spin
SPIN
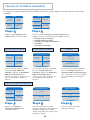
Touch “custom rinse & spin”
on the More Cycles Screen.
Step 1
Select the appropriate rinse temperature.
A warm rinse may feel better for those
with arthritic hands but uses more energy
than a cold rinse.
Step 2
CUSTOM RINSE & SPIN
warm
rinse & spin
cold
rinse & spin
custom
rinse & spin
spin
custom
spin
More Cycles
Select the number of rinses
appropriate for the load.
Step 3
warm rinse
Rinse Temperature
cold rinse
one
Number of rinses
three
two

8
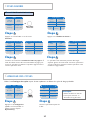
Select a spin speed appropriate for
the load. This will determine how
much moisture is removed from
the load.
• “max extract”
• “high (flat dry)”
• “medium”
• “low (hang dry)”
See page 6 for descriptions of the
spin cycles.
Step 4
This screen reviews the selections for
“custom rinse & spin”.Press
Start/Pause to begin rinsing or press
a displayed choice to change a
selection.
Step 5
max
extract
Spin Speeds
medium
high
(flat dry)
low
(hang dry)
Press "Start/Pause" or
change selections below.
warm rinse
temperature
2 rinses
medium end of
cycle chime
max extract
spin
This screen reviews the selections for
a “custom spin”.Press Start/
Pause to begin spinning or press a
displayed choice to change a selection.
Step 3
Touch “custom spin” on the
More Cycles Screen.
Step 1
Select a spin speed appropriate for the
load. This will determine how much
moisture is removed from the load.
Step 2
CUSTOM SPIN
max
extract
Spin Speeds
medium
high
(flat dry)
low
(hang dry)
warm
rinse & spin
cold
rinse & spin
custom
rinse & spin
spin
custom
spin
More Cycles
Press "Start/Pause" or
change selections below.
medium end of
cycle chime
max extract
spin
Special Note: Press Back for previous touchscreen.

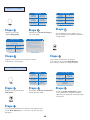
9
FAVORITES
cycle
library
Home
stain
brain
favorite
cycles
set your
own cycle
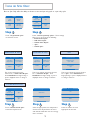
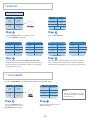
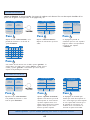
Favorites allows you to create, name and save up to 24 commonly used wash cycles. For a detailed description of the
settings, see Set Your Own Cycle on pages 5 and 6.
“blue jeans” and “towels” favorite cycles have been programmed for you. To change these cycles for your preferences,
see Edit a Favorite on page 10.
Touch “favorite cycles” on the Home
screen or use the Favorites option pad.
CREATE A FAVORITE
Step 1
Step 3
Step 4
Step 5 Step 6
blue jeans towels
Favorites
create a
favorite
edit a
favorite
delete a
favorite
sturdy
Fabrics
wrinkle free
hand wash
cottons
delicates
hot wash
cold rinse
Wash/Rinse Temperature
cold wash
cold rinse
warm wash
warm rinse
tap cold wash
cold rinse
warm wash
cold rinse
cotton
fabrics
Press "continue" to name your
favorite or change selections below.
hot wash
cold rinse
medium soil
14 min. wash
OPTIONS
max extract spin
medium cycle chime
Auto Temp ON
continue
Step 7
heavy soil
19 min. wash
light soil
9 min. wash
medium soil
14 min. wash
stain treat
24 min. wash
freshen
4 min. wash
Soil Level/Wash Time
medium end of
cycle chime
max extract
spin
Options
continue
extra rinse
on off
presoak
on off
Auto Temp
on off
remind chime
on off
delay wash
on off
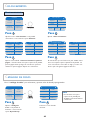
Name the Favorite Cycle – Touch the corresponding
letter and space combination to spell out your favorite
cycle name, up to 12 characters. Press “save”.Your new
Favorite Cycle will be displayed on the Favorites pages.
abcde f
g
vwx z&
'
y
hi
j
klmn
o
qp
clear
space
save
rstu
Step 9
Fabrics – Select the appropriate
fabric setting.
Wash/Rinse Temperature – Select
the appropriate wash/rinse
temperature.
Soil Level/Wash Time – Select the
appropriate soil level/wash time.
Review Screen – This screen reviews
your cycle choices and allows you to
choose Options to further customize
your wash cycle. Press “options” if
desired, or press “continue”.
Options Screen – The option
choices turn the options on or off.
Some option choices show an
additional screen with multiple
choices. When the desired
selections are made, touch
“continue” to see the review
screen once again.
Step 8
cotton
fabrics
Press "continue" to name your
favorite or change selections below.
hot wash
cold rinse
medium soil
14 min. wash
OPTIONS
max extract spin
medium cycle chime
Auto Temp ON
continue
If satisfied with your
selections, press “continue”
to name your favorite cycle.
blue jeans towels
Favorites
whites
create a
favorite
edit a
favorite
delete a
favorite
Touch “create a favorite”.
Step 2
or

10
Touch “favorite cycles” on the Home
screen or use the Favorites option pad.
Touch
“edit a favorite”. Touch
the favorite cycle you want to edit.
“edit a favorite” allows you to change the settings of any favorite cycle. For a detailed description of the settings,
see Set Your Own Cycle on pages 5 and 6.
Step 1
Step 2
Step 3
Step 4
cycle
library
Home
stain
brain
favorite
cycles
set your
own cycle
EDIT A FAVORITE
blue jeans towels
Favorites
create a
favorite
edit a
favorite
delete a
favorite
cotton
fabrics
Press "continue" to name your
favorite or change selections below.
hot wash
cold rinse
medium soil
14 min. wash
OPTIONS
max extract spin
medium cycle chime
Auto Temp ON
continue
If the current favorite cycle name still applies, touch
“save”. If you prefer a new name, touch “clear”, type in
the new name and touch “save”. Use the arrow at the
top of the screen to backspace.
abcde f
g
vwx z&
'
y
hi
j
klmn
o
qp
clear
space
save
rstu
The review screen for that specific
cycle will be displayed. Make changes
by touching the appropriate area.
Press “continue”.
or
DELETE A FAVORITE
Touch “favorite cycles” on the Home
screen or use the Favorites option pad.
Touch
“delete a favorite”. Touch
the favorite cycle you want to delete.
If the favorite cycle you want to delete
is on another page, touch the arrow in
the upper corner until you see the
favorite cycle you want to delete.
Step 1
Step 2
cycle
library
Home
stain
brain
favorite
cycles
set your
own cycle
blue jeans towels
dress shirts
Favorites
create a
favorite
edit a
favorite
delete a
favorite
whites
blankets
sweaters
A pop-up window will appear to verify
that you want to delete a favorite cycle.
If you are sure you want to delete a
cycle, press “Yes”.Once the favorite
cycle is deleted, the other favorites will
move up one position.
Step 3
blue jeans towels
Select a favorite to delete
return without
making changes
Are you sure you want
to delete "blue jeans"?
Yes No
or
Special Note: Press Back for previous touchscreen.

11
FAVORITES
MOVE A FAVORITE
Touch “favorite cycles” on the Home screen
or use the Favorites option pad.
Touch
“edit a favorite”.
Step 1
Step 2
Step 3
cycle
library
Home
stain
brain
favorite
cycles
set your
own cycle
blue jeans towels
dress shirts
Favorites
create a
favorite
edit a
favorite
delete a
favorite
whites
blankets
sweaters
whites
blankets
sweaters
towels
dress shirts
blue jeans
Select favorite to edit
move favorite
to first page
return without
making changes
khakis
Select favorite to edit
move favorite
to first page
return without
making changes
Touch the area entitled “move favorite to first page”.
Using the arrow at the top, scroll through the pages until you
get to the favorite you would like to move to the first page.
Touch that favorite cycle.
Step 4
Now the favorite cycle will appear in the upper left position
of the touchscreen.The other favorite cycles move back one
position with the sixth favorite cycle moving to the next page.
khakis
towels
return without
making changes
dress shirts
blue jeans
whites blankets
move favorite
to first page
Select a favorite to
move to the top of the first page
sweaters
Select a favorite to
move to the top of the first page
move favorite
to first page
return without
making changes
or
or
CYCLE LIBRARY
Use the “cycle library” to quickly select and start preset wash cycles.
Touch “cycle library” from
the Home screen or use the
Cycle Library option pad.
Select the desired cycle from the
alphabetical listing.
Step 1
Step 2
bright colors bulky items
colors
Cycle Library 1 of 3
delicates
diapers
dress pants
dress shirts
Enviro Plus
cycle
library
Home
stain
brain
favorite
cycles
set your
own cycle
NOTE:
• Use the arrows at the top of the
screen to move back or forward
through the list.

12
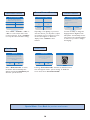
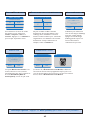
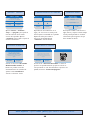
To automatically set the washer to
run the appropriate cycle for the
selected stain, touch “set washer
for this stain”.
Review Screen - This screen reviews the selections made by the “stain brain”
before starting the washer. Some settings may need to be adjusted depending on the
garment/fabric being washed. Follow garment care instructions as appropriate. Press
Start/Pause to begin washing, or press a displayed choice to change selections.
Step 4
Step 5
Baby Formula
1. Pre-treat the stain.
2. Soak in warm water for 1/2 hour.
3. Launder with appropriate bleach and
hottest water safe for the fabric and color.
4. Select the stain treat wash time.
5. If a greasy-looking stain remains,
re-launder.
set washer for this stain
cotton
fabrics
Press "Start/Pause" or
change selections below.
warm wash
cold rinse
stain treat
24 min. wash
OPTIONS
max extract spin
medium cycle chime
extra rinse ON
presoak ON
Auto Temp ON
save as a favorite
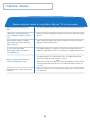
The “stain brain” provides detailed steps to treat over 60 of the most common stains. The “stain brain” also
offers the user the option of automatically setting the washer cycle for the particular stain.
Touch “stain brain” on the Home screen
or use the Stain Brain option pad.
Select the first letter of the stain.
Step 1
Step 2
Step 3
cycle
library
Home
stain
brain
favorite
cycles
set your
own cycle
beverages
"B" Stains
butter
baby formula
blood
abcde f
g
vwx z
y
hi
j
klmn
o
qp
unknown
stains
rstu
Touch first letter of stain
Select the appropriate stain listing.
NOTE:
• Use the arrows at the top of
the screen to scroll from letter
to letter.
STAIN BRAIN
The review screen for the selected
cycle will be displayed. Any of the
settings can be changed as needed.
Step 3
Press Start/Pause to
begin the cycle.
Step 4
wrinkle free
fabrics
Press "Start/Pause" or
change your selections below.
cold wash
cold rinse
medium soil
14 min. wash
OPTIONS
medium spin
medium cycle chime
Auto Temp ON
save as a favorite
NOTE:
• The original Cycle Library cycle
settings will remain the same. To
save the new settings, select “save
as a favorite” on the review
screen.
or

13
USING HELP
Touch the Help option pad.
Select
“before you call”.
Step 1
Step 2
Step 3
won't fill
Before You Call
washer won't
spin & drain
To answer questions or request service,
call PriorityOne at 1-888-462-9824
washer stops
won't tumble
too noisy
leaks water
BEFORE YOU CALL
Here you will see headings for common trouble-shooting
topics.Touch one of the displayed areas to see specific
information.Touch the arrows at the top of the screen to
move forward or back through the topics. For more detailed
information see Troubleshooting on pages 21-22, or call
1-888-462-9824 for further assistance.
If you would like to see the other topics, press the
Back
touchpad to get back to the main topics.
Step 4
Too Noisy
• Your Maytag Neptune washer should be
properly leveled.
• Weak floors can cause vibration and
walking.
• Be sure the rubber feet are installed on the
legs.
• Check that the leveling leg lock nuts are
tight.
fabric care
symbols
Help Screen
laundry hints
lock out
feature
before
you call
operating tips
select
preferences
Most garments and fabrics carry fabric care symbols on the care label. The “fabric care symbols” feature lists
the symbols and what they mean.
Touch the Help
option pad.
Select
“fabric care
symbols”.
Step 1
Step 2
Step 3
normal
cold warm hot
wrinkle
release
delicate
/gentle
Cycle
Wash Symbols
Temperature
wash
Fabric Care Symbols
tumble
dry
iron
bleach
dry
dry
clean
To see other symbols, press Back.
Step 4
Select the symbol to be
displayed.
FABRIC CARE SYMBOLS
The Help feature offers a variety of detailed information including “fabric care symbols”,“before you call”,
“laundry hints”,“operating tips”,“lock out feature”
and “select preferences”.
This section of the use and care guide will demonstrate how to easily navigate to the main areas of the help topics.
From there, you will easily be able to narrow your search for finding laundry information.
fabric care
symbols
Help Screen
laundry hints
lock out
feature
before
you call
operating tips
select
preferences
Special Note: Press Back for previous touchscreen.

14
dispeners
Operating Tips
control
settings
unique
sounds
control
panel
washer care
fabric care
symbols
Help Screen
laundry hints
lock out
feature
before
you call
operating tips
select
preferences
Touch the Help option pad.
“operating tips” provides information on
maximizing the touchscreen controls and use of
your washer.
Step 1
OPERATING TIPS
Step 2
Select “operating tips” from the Help
Screen.
Step 3
If you would like to see the other topics,
press the Back touchpad to get back to
the main topics.
Step 4
Touch the Help option pad.
Select
“laundry hints” from
the Help screen.
Step 1
Step 2
Step 4
fabric care
symbols
Help Screen
laundry hints
lock out
feature
before
you call
operating tips
select
preferences
LAUNDRY HINTS
Laundry Hints
water
temperature
dryer hints
washer
additives
cycles
detergents
washer
sorting
pre-treating
Step 3
color-safe bleach
Washer Additives
chlorine
bleach
starch
fabric
softener
bluing
Color-Safe Bleach
• Color-safe bleach should be added in with
detergent at the beginning of the cycle for most
benefit.
• Color-safe bleach can be used on most
items. It is most effective when used with a
warm or hot water wash.
Here you will see the available topics.
Touch the topics to see specific information.
Touch the sub-topic to see specific information.
If you would like to see the other topics, press
the
Back touchpad to get back to the main
topics.
Step 5

15
Touch the Help option pad.
Touch
“select preferences”. “select preferences” allows you to select the volume of the
touchscreen beeps, set the intensity of the screen display, activate the “auto start” and
“screen saver” functions, and change the display language to English, French or Spanish.
Step 1
fabric care
symbols
Help Screen
laundry hints
lock out
feature
before
you call
operating tips
select
preferences
SELECT PREFERENCES
Special Note: Press Back for previous touchscreen.
Step 2
Select Preferences
change monitor
contrast
medium touch
screen volume
cambiar a
español
change
to English
changer pour
le français
auto start
on off
screen saver
on off
USING HELP
To activate lock out
press here
Lock Out Feature
To lock out the controls, touch
the area below for three seconds.
LOCK OUT FEATURE
fabric care
symbols
Help Screen
laundry hints
lock out
feature
before
you call
operating tips
select
preferences
Touch the Help option pad.
The
“lock out feature” deactivates the
touchscreen and touchpads. Press and hold the
“To activate lock out press here” section
for three seconds. Use this feature for cleaning
the control panel or to prevent unwanted use of
the washer.
Step 1
Step 2
Select “lock out feature” from the
Help Screen.
Step 3
If you would like to see the other topics,
press the Back touchpad to get back to
the main topics.
Step 5
To deactivate lock out
press here
Lock Out Feature
To unlock the controls, touch
the area below for three seconds.
To make the touchscreen and touchpads active
again, press and hold the “To deactivate lock
out press here” section for three seconds.
Step 4

16
Touch “loud”, “medium”, “soft” or
“off” to set the volume level of the
touchscreen beeps. Touch “continue”
to accept the selected volume setting.
This provides audible feedback upon
making selections on the touch screen.
loud
soft
medium
off
Touch Screen Volume
continue
Depending on the lighting in your home
and other factors, you may want to adjust
the intensity of your touchscreen. Touch
the arrows to lighten or darken the
display. Touch “continue” when
finished.
Use the arrow keys to adjust
the contrast of the viewing screen.
default
continue
You have the ability to change the
language between English, French
and Spanish. You will always see the
next screen in the selected language
to make sure you want to change
the language.
Are you sure you would like to change the
language to French?
English to French
De l'anglais au français
Yes/Oui
No/Non
Souhaitez-vous vraiment sélectionner le
français?
TOUCHSCREEN VOLUME
CHANGE MONITOR CONTRAST
CHANGE LANGUAGE
AUTO START
SCREEN SAVER
Special Note: Press Back for previous touchscreen.
If "Auto Start On" is chosen, the washer will
automatically start when the cycle is selected.
Once selected, it remains on until "Auto Start
Off" is selected.
Auto Start
Auto Start
On
Auto Start
Off
To disable the animated screen saver that
appears while a cycle is running, select
"Screen Saver Off".
Screen Saver
Screen Saver
On
Screen Saver
Off
When “Auto Start On” is chosen,
the washer will automatically start
without pressing the Start/Pause pad
when the cycle is selected.
Selecting
“Screen Saver On” activates the animated screen
saver that appears when a cycle is running. To disable the
screen saver, select “Screen Saver Off”.

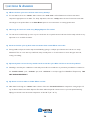
17
DETERGENT USE
FEATURES
Your Maytag Neptune
®
TL washer is designed
to use either high efficiency (HE) detergents
or regular detergents normally used with
top-loading washers.
•For best cleaning results, use a high efficiency detergent such
as Tide HE, Wisk HE, Cheer HE or Gain HE*. High efficiency
detergents contain suds suppressors which reduce or
eliminate suds.When less suds are produced, the load
tumbles more efficiently and cleaning results are maximized.
• When using regular detergent formulated for top-loading
washers, it is important to pay close attention to the soil
level of the load, load size, and water hardness**. To avoid
over-sudsing, reduce the amount of detergent used
with soft water or with small or lightly soiled loads.
The Detergent Dispenser is located under the lid of the
washer. There are two compartments in the dispenser, one
for liquid detergent and liquid color-safe bleach, and one for
powder detergent and powder color-safe bleach.
The dispenser will automatically dispense the detergent and
color-safe bleach (if used) as the washer fills.
The washer has separate compartments for dispensing
detergent and color-safe bleach, chlorine bleach and fabric
softener. All laundry products can be added at once in their
respective compartments before starting the washer.
The detergent dispenser MUST ALWAYS be in place before
starting the washer.
* Brand names are trademarks of the respective manufacturers.
** To determine water hardness in your area, contact your local water utility or
State University Extension office in your area.
AUTOMATIC DISPENSERS
DETERGENT DISPENSER
NOTES:
• When using color-safe bleach, add it to the appropriate
dispenser compartment (liquid or powder) with the
detergent. Do not mix liquids and powders in the same
compartment of the dispenser.
• Do not place detergent or softener bottle lids, caps or
dispensers into the washtub. Damage to the load or
washer may result.

18
CHLORINE BLEACH DISPENSER
The Chlorine Bleach Dispenser is located on the left side
of the washer tub.To use the dispenser:
1. Add chlorine bleach to the bleach compartment. DO
NOT exceed the MAX FILL line.The liquid chlorine
bleach compartment will hold 1/3 of a cup.
2. Avoid splashing or over-filling the compartment.
Over-
filling the compartment will not damage the load
but will release the liquid chlorine bleach into
the clothes washer too early to be effective.
3. The washer automatically dispenses bleach into the tub
in the first rinse.This maximizes the effectiveness of the
bleach.
4. The dispenser automatically dilutes liquid chlorine
bleach before it reaches the wash load.
The Fabric Softener Dispenser is located on the right side of
the washer tub.To use the dispenser:
1. Pour the recommended amount of liquid fabric softener
into the softener compartment. For smaller loads use less
than one cap full.
2. Fabric softener should be diluted with warm water until it
reaches the MAX FILL line on the compartment.
Do not
fill above the MAX FILL line. If the compartment is
filled above the MAX FILL line, fabric softener will
enter the clothes washer too early to be effective.
3. This compartment automatically releases liquid fabric
softener at the proper time during the final rinse portion of
the cycle.
*Brand names are trademarks of the respective manufacturers.
FABRIC SOFTENER DISPENSER
NOTES:
• Never pour undiluted liquid chlorine bleach
directly onto the load or into the tub. It is a
powerful chemical and can cause fabric damage,
such as weakening of the fibers or color loss, if
not used properly.
• If you prefer to use color-safe, non-chlorine
bleach, add it to the appropriate detergent
compartment. Do not pour color-safe bleach into
the chlorine bleach dispenser.
NOTES:
• Use the softener compartment only for liquid fabric
softeners.
• Do not use the Downy Ball* with this washer. It will
not add fabric softener at the appropriate time and
may damage the washer. Use the dispenser in the
washer.

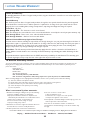
19
Turn off the water faucets after finishing the day’s
washing. This will shut off the water supply to the clothes
washer and prevent the unlikely possibility of damage from
escaping water.
Use a soft cloth to wipe up all detergent, bleach or other
spills as they occur.
Clean the following as recommended:
Control Panel – clean with a soft, damp cloth. Do not use
abrasive powders or cleaning pads. Do not spray cleaners
directly on the panel.
Cabinet – clean with soap and water.
The Detergent, Fabric Softener and Bleach dispensers may need
to be cleaned periodically due to laundry additive buildup.
Detergent Dispenser:
1. Remove the dispenser by releasing the top end from the lid
with a quarter or something similar.
2. Take the dispenser to a sink.
3. Wash thoroughly with plain water and soft brush if necessary.
4. Rinse and dry the dispenser.
5. Replace dispenser in washer lid by fitting the bottom in first,
then snapping the top all the way in. Important: Make sure
all three tabs on the dispenser bottom are securely
fastened to the lid.
6. DO NOT clean the dispenser in the dishwasher.
Chlorine Bleach Dispenser:
The dispenser cover is not removable.
Wipe thoroughly with a clean, damp cloth or paper towel.
CARE AND CLEANING
CLEANING THE DISPENSERS
Fabric Softener Dispenser:
The rear portion of the fabric softener dispenser cover is
removable for cleaning.
1. Grasp the rear portion of the cover and pull straight up.
2. Wash with hot, soapy water and a soft cloth. Rinse and
dry thoroughly.
3. Wipe dispenser compartment with a dry paper towel to
remove buildup. Follow with a clean, damp cloth or paper
towel.
4. Replace dispenser cover.
5. DO NOT clean the dispenser cover in the dishwasher.
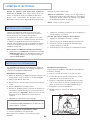
The interior of the washer should be cleaned periodically to
remove dirt, soil, odor or bacteria residue that may remain in
the washer as a result of washing clothes. We recommend
taking the following steps every 60 to 120 days to clean and
freshen your washer interior. The frequency with which the
washer should be cleaned and freshened depends on factors
such as usage, the amount of dirt, soil or bacteria being run
through your washer, or the use of cold water.
To clean and freshen the washer interior:
1. Select Normal cycle, hot wash/cold rinse water
temperature, heavy soil level and the max extract spin
option.
CLEANING THE INTERIOR
2. Press Start/Pause and wait until the washer has stopped
filling with water
When the washer has stopped filling with water:
1. Press Start/Pause and lift the lid.
2. Add 1/2 cup liquid chlorine bleach to the water in the tub.
3. Close the lid and press Start/Pause to restart the washer.
4. Allow the washer to complete the cycle.
NOTE:
• The dispenser MUST ALWAYS be in place before starting
the washer.
La page est en cours de chargement...
La page est en cours de chargement...
La page est en cours de chargement...
La page est en cours de chargement...
La page est en cours de chargement...
La page est en cours de chargement...
La page est en cours de chargement...
La page est en cours de chargement...
La page est en cours de chargement...
La page est en cours de chargement...
La page est en cours de chargement...
La page est en cours de chargement...
La page est en cours de chargement...
La page est en cours de chargement...
La page est en cours de chargement...
La page est en cours de chargement...
La page est en cours de chargement...
La page est en cours de chargement...
La page est en cours de chargement...
La page est en cours de chargement...
La page est en cours de chargement...
La page est en cours de chargement...
La page est en cours de chargement...
La page est en cours de chargement...
La page est en cours de chargement...
La page est en cours de chargement...
La page est en cours de chargement...
La page est en cours de chargement...
La page est en cours de chargement...
La page est en cours de chargement...
La page est en cours de chargement...
La page est en cours de chargement...
La page est en cours de chargement...
La page est en cours de chargement...
La page est en cours de chargement...
La page est en cours de chargement...
La page est en cours de chargement...
La page est en cours de chargement...
La page est en cours de chargement...
La page est en cours de chargement...
La page est en cours de chargement...
La page est en cours de chargement...
La page est en cours de chargement...
La page est en cours de chargement...
La page est en cours de chargement...
La page est en cours de chargement...
La page est en cours de chargement...
La page est en cours de chargement...
La page est en cours de chargement...
La page est en cours de chargement...
La page est en cours de chargement...
La page est en cours de chargement...
La page est en cours de chargement...
La page est en cours de chargement...
La page est en cours de chargement...
La page est en cours de chargement...
La page est en cours de chargement...
La page est en cours de chargement...
La page est en cours de chargement...
La page est en cours de chargement...
-
 1
1
-
 2
2
-
 3
3
-
 4
4
-
 5
5
-
 6
6
-
 7
7
-
 8
8
-
 9
9
-
 10
10
-
 11
11
-
 12
12
-
 13
13
-
 14
14
-
 15
15
-
 16
16
-
 17
17
-
 18
18
-
 19
19
-
 20
20
-
 21
21
-
 22
22
-
 23
23
-
 24
24
-
 25
25
-
 26
26
-
 27
27
-
 28
28
-
 29
29
-
 30
30
-
 31
31
-
 32
32
-
 33
33
-
 34
34
-
 35
35
-
 36
36
-
 37
37
-
 38
38
-
 39
39
-
 40
40
-
 41
41
-
 42
42
-
 43
43
-
 44
44
-
 45
45
-
 46
46
-
 47
47
-
 48
48
-
 49
49
-
 50
50
-
 51
51
-
 52
52
-
 53
53
-
 54
54
-
 55
55
-
 56
56
-
 57
57
-
 58
58
-
 59
59
-
 60
60
-
 61
61
-
 62
62
-
 63
63
-
 64
64
-
 65
65
-
 66
66
-
 67
67
-
 68
68
-
 69
69
-
 70
70
-
 71
71
-
 72
72
-
 73
73
-
 74
74
-
 75
75
-
 76
76
-
 77
77
-
 78
78
-
 79
79
-
 80
80


Maytag FAV-2 Mode d'emploi
- Catégorie
- Machines à laver
- Taper
- Mode d'emploi
- Ce manuel convient également à
dans d''autres langues
- English: Maytag FAV-2 User guide
- español: Maytag FAV-2 Guía del usuario
Documents connexes
-
Maytag NEPTUNE FAV9800AWQ Mode d'emploi
-
-
-
-
-
-
-
-