La Crosse Technology C82929-INT Guide d'installation
- Catégorie
- Stations météo
- Taper
- Guide d'installation

Page 3 Page 5Page 2 Page 4
STEP 3 OPTIONAL:
STANDALONE BASIC SETTINGS
SETTINGS MENU
1. Hold the SET button for 3 seconds to enter the Settings Menu.
2. Press the + or – button to adjust the values.
3. Press the SET button to confirm and move to the next item.
Note: Press the SNOOZE/LIGHT button at any time to exit settings.
Settings menu order:
BEEP ON | OFF • 12/24 hour format • Hour • Minutes • Year • Month
Date • Temperature Fahrenheit | Celsius
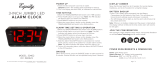
MODEL#: C82929
DC: 012619
Full manual can be found under the Support tab here: bit.ly/C82929
WIFI PROJECTION
ALARM CLOCK
WITH FORECAST
QUICK START GUIDE
STEP 2:
CONNECT TO THE LA CROSSE VIEW™ APP
STEP 1:
POWER UP ALARM CLOCK
• Insert the power cord into an outlet, then into your Alarm Clock.
• Remove the battery insulation tab installed on the bottom of the
clock.
DOWNLOAD
Visit the App Store or Google Play Store to download the free
LaCrosse View™ app onto your mobile device.
LAUNCH & FOLLOW
Open the LaCrosse View™ app and follow the on-screen
instructions.
GET YOUR STATION READY
Ensure your station’s Wi-Fi Indicator is flashing. If it is not, press
and hold the Plus (+) and Minus (–)button down together until it
begins flashing. This tells you that your station is ready to connect.
HAVING TROUBLE CONNECTING?
Make sure your mobile device is connected to your router’s
2.4GHz Wi-Fi network, and that you’ve correctly entered your
Wi-Fi password.
For more troubleshooting tips and support visit:
www.lacrossetechnology.com/lacrosseviewsupport
Note: If you have connected to the La Crosse View™ app time
& date will automatically update from the internet.
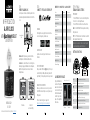
IN
MOON PHASE
COMFORT
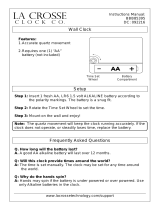
Standalone: When first powered up, your clock will show the
default Nap Time, Comfort Statement, & Moon Phase
Connected: Once connected to the La Crosse View™ app, these
will change to display your AccuWeather: Outdoor Temperature,
Daily HI & LO Temperatures, Forecast Icons, and Chance of
Precipitation values.
IN
TODAY
LO
HI
OUT
FORECAST
12 HR
PRECIP
Standalone Connected to
La Crosse View™ App
BUTTONS & FUNCTIONS
ALARM Press to activate/deactivate alarm. Hold to set alarm.
EXTRA SENSOR Press to see options. Hold to add sensors.
Press to adjust projection brightness.
PROJ INFO Press to see options. Hold to alternate.
+ or Press either to adjust value. Hold both to search for Wi-Fi signal.
SET Press to view Wi-Fi Status. Hold for basic settings.
NAP Press to start Nap countdown. Hold to set Nap time.
SNOOZE/LIGHT Press to adjust backlight. Hold to set Auto Dim time.
ALARM + NAP Hold both to Factory Reset Clock.
Projection Alarm Clock
C82929
BENEFITS OF CONNECTING TO LA CROSSE VIEW™
Feature Standalone Connected
Customizable Projection Image ✓ ✓
Programmable Snooze ✓ ✓
Remote Alarm Setting ✓
Nap Timer ✓ ✓
Home Conditions ✓ ✓
Comfort Level ✓
Moon Phase ✓
Internet Time & Calendar ✓
Outdoor Temperature ✓
Advanced Forecast Icons ✓
Daily Forecast HIs & LOs ✓
% Chance of Precipitation ✓
Ability to Add Sensors ✓ ✓
Data Stream Technology ✓
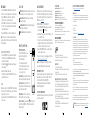
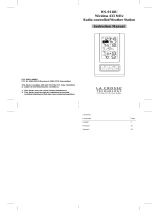
ACCUWEATHER FORECASTS
Enjoy colorful Weather Icons
and Chance of Precipitation
values when connected with
La Crosse View™. These icons
will indicate future weather
conditions for your location
in place of the original Moon
Phase feature.
Partly Sunny
Thunderstorm
FORECAST
12 HR
PRECI P
FORECAST
12 HR
PRECI P
Examples of Forcast Icons (2 of 12)

Page 8 Page 10Page 7Page 6 Page 9
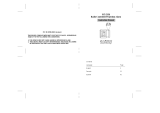
PROJECTION OPTIONS
PROJECTION SELECTION
Press the PROJ INFO button to select
projected data. Projection Options:
• Current Time (Default)
• Indoor Temperature & Humidity
• Outdoor Temperature (when connected)
• Extra Sensor Info (if an extra sensor is
connected to your clock)
Projection Angle: Tip the Projection Arm forward
or backward to adjust projected image location.
Projection Rotation: Rotate the bottom of the
Projection Arm to customize the rotation angle of
your projected image up to 270°.
Projection Focus: Use the Focus Ring on top of
the Projection Arm to focus projected image.
Projection Intensity: Press and release the button to adjust the
Projection Intensity (HI-MED-LO-OFF). Projection level will show
briefly on the display.
ADD-ON SENSORS
Whether you choose to connect with the La Crosse View app or
not, this clock has the ability to display data for up to 4 additional
sensors. A full list of compatible sensors can be found under the
PARTS tab here: bit.ly/C82929
ADD EXTRA SENSORS TO YOUR ALARM CLOCK
1. Hold the EXTRA SENSOR button until you see the Sensor
Reception Indicator start to animate.
2. Install batteries into your sensor, if it has a TX button press it to
force a transmission signal.
3. Your sensor should connect within the next 3 minutes, briefly
displaying its ID and type. The Sensor Reception Indicator will
show solid on screen when a sensor is connected.
4. Press the EXTRA SENSOR button to cycle through the data
you’d like displayed on screen.
5. To add sensors to your La Crosse View app, watch this video:
bit.ly/LaCrosseView_Support_Vid_10
Note: When first powering up, or after a factory restart, extra
sensors should automatically connect with your display.
LA CROSSE TECHNOLOGY™ PATENTS
Visit www.lacrossetechnology.com/patents for patent information.
WARRANTY INFO
La Crosse Technology, Ltd. provides a 1-year limited time warranty (from date of purchase) on this
product relating to manufacturing defects in materials & workmanship. Before returning this product,
please contact our friendly customer support team with questions or visit our online support site.
Phone: 1.844.200.8752
La Crosse Technology, Ltd
2830 S. 26th St.
La Crosse, WI 54601
For Full Warranty Details, Visit: www.lacrossetechnology.com/support
FCC STATEMENT
This equipment has been tested and found to comply with the limits for a Class B digital device,
pursuant to part 15 of the FCC Rules. These limits are designed to provide reasonable protection
against harmful interference in a residential installation. This equipment generates, uses and can
radiate radio frequency energy and, if not installed and used in accordance with the instructions, may
cause harmful interference to radio communications. However, there is no guarantee that interference
will not occur in a particular installation. If this equipment does cause harmful interference to radio
or television reception, which can be determined by turning the equipment off and on, the user is
encouraged to try to correct the interference by one or more of the following measures:
•
Reorient or relocate the receiving antenna.
•
Connect the equipment into an outlet on a circuit dierent from that to which the receiver is
connected.
•
Increase separation between equipment & receiver.
•
Consult the dealer or an experienced radio/TV technician for help.
This device must not be co-located or operating in conjunction with any other antenna or transmitter.
Operation is subject to the following two conditions:
(1 ) This device may not cause harmful interference, and (2) This device must accept any interference
received, including interference that may cause undesired operation.
CAUTION!
The manufacturer is not responsible for any radio or TV interference caused by unauthorized changes
or modifications to this equipment. Such changes or modifications could void the user authority to
operate the equipment.
All rights reserved. This manual may not be reproduced in any form, even in part, or duplicated or
processed using electronic, mechanical or chemical process without the written permission of the
publisher.
This booklet may contain errors or misprints. The information it contains is regularly checked and
corrections are included in subsequent editions. We disclaim any responsibility for any technical error
or printing error, or their consequences. All trademarks and patents are recognized.
WARNING: This product can expose you to chemicals including styrene, which is known to
the State of California to cause cancer. For more information go to: www.P65Warnings.gov
CLOCK SPECS
Indoor Temperature Range: 32°F to 99°F (0°C to 37°C)
Indoor Humidity Range: 10% to 99%RH
Power Requirements: 5.0V AC Adapter (included)
Battery Backup: 1 CR2032 Battery (included)
USB Charging Port: 1 Amp (charging cord sold separately)
Dimensions: 6.04” W x 2.42” D x 4.10” H (15.34 cm x 6.15 cm x 10.41 cm)
WI-FI NETWORK REQUIREMENTS
• Broadcast Frequency: 2.4GHz (802.11 b/g/n)
• Network Name/Password: Must Not Exceed 45 Characters
• Network Speed: Must Be Greater than 1 Mbps
Note: If you have a multiple band router, be sure your mobile device is connected to the
2.4 GHz frequency when connecting your station to the app.
MOBILE REQUIREMENTS
Apple phones require iOS 9.0 or higher with cellular or Wi-Fi service. Android phones require
Android OS 5.0 or higher with cellular or Wi-Fi service
Focus Ring
Projection Arm
LCD ICONS
Wi-Fi Indicator: Will flash when your station is ready to connect
to the Internet, and be solid on screen when connected.
Internet Indicators: Will display in areas to indicate data
coming from the Internet.
Low Battery Indicator: Will let you know when to replace your
alarm’s backup coin cell battery.
Alarm Indicator: Indicates an active time alarm.
TIME ALARM
1. Hold the ALARM button until the Alarm Hour begins to flash.
2. Press the + or – button to adjust values, hold to adjust quickly.
3. Press ALARM button to confirm and move to the Alarm
Minutes. Use the + or – button again to adjust.
4. Press ALARM to confirm and move to your Snooze Duration.
5. Use the + or – button to adjust Snooze Duration in 5 minute
intervals up to 120 minutes.
6. Press the ALARM button to confirm and activate the alarm.
Note: This clock uses a crescendo alarm, which will increase in
volume over time. If no buttons are pressed within 2 minutes, it will
shut off automatically.
ACTIVATE/DEACITIVATE TIME ALARM
1. Press the ALARM button to view your alarm time, with alarm
time showing, press the ALARM button again to activate or
deactivate your Time Alarm.
2. Your Alarm Indicator will show when active and disappear
when deactivated.
• Alarm icon will flash when alarm sounds.
• Press any button except the SNOOZE/LIGHT button to stop a
sounding alarm for one day.
SNOOZE
• When alarm sounds, press the SNOOZE/LIGHT button to activate
the Snooze function. “SNOOZE” and your selected duration will
show and begin to count down.
• Press any button besides the SNOOZE/LIGHT button to exit out
of Snooze mode.
WE’RE HERE TO HELP!
If you require additional support, call our friendly customer support
representatives based out of our office at 2830 S. 26th St, La
Crosse, Wisconsin 54601.Phone: 1.844.200.8752
Our knowledgeable customer support team is available:
Monday-Friday, 8am-6pm CST.
JOIN THE CONVERSATION
Ask questions, watch detailed setup videos, and provide feedback
on our social media outlets!
WARNING:
1. This product contains a button battery.
2. If swallowed, it could cause severe injury or death in just 2 hours.
3. Seek medical attention immediately.
AVERTISSEMENT:
1. Cet article contient une pile bouton.
2. De graves blessures ou la mort pourraient suivre dans les deux heures
Suivant l’ingestion.
3. Demander l’aide de professionnels de la santé sur le champ.
WARNING - KEEP BATTERIES OUT OF REACH OF CHILDREN
1. Swallowing may lead to serious injury in as little as 2 hours or death,
due to chemical burns and potential perforation of the oesophagus.
2. If you suspect your child has swallowed or inserted a button battery,
immediately seek urgent medical assistance.
3. Examine devices and make sure the battery compartment is correctly
secured, e.g. that the screw or other mechanical fastener is tightened.
4. Do not use if compartment is not secure.
5. Dispose of used button batteries immediately and safely. Flat batteries
can still be dangerous.
6. Tell others about the risk associated with button batteries and how to
keep their children safe.
-
 1
1
-
 2
2


La Crosse Technology C82929-INT Guide d'installation
- Catégorie
- Stations météo
- Taper
- Guide d'installation
dans d''autres langues
Documents connexes
-
La Crosse Technology 617-148 Setup Manual
-
 La Crosse Technology C79790V2-BBQ1 Guide d'installation
-
LA CROSS TECHNOLOGY WS-9037U-IT Manuel utilisateur
-
 La Crosse Technology CA80550 Manuel utilisateur
-
 La Crosse Technology WS-8035U-IT Manuel utilisateur
-
 La Crosse Technology BBB85395 Manuel utilisateur
-
 La Crosse Technology WS-9118U Manuel utilisateur
-
LA CROSS TECHNOLOGY WS-7017U-IT Le manuel du propriétaire
-
La Crosse Technology V21-WTHV4 Manuel utilisateur
-
 La Crosse Technology WT-5350U Manuel utilisateur