NEATO botvac D3/ D5 Connected Mode d'emploi
- Catégorie
- Aspirateurs robotiques
- Taper
- Mode d'emploi


EN
..............
01
FR
...............
17
ES
...............
33

1
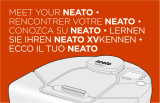
Meet Your Neato Robot
Congratulations on your new home robot – now “connected” in your smart home so you can
manage your floor cleaning from a smartphone or tablet.
This guide will help get your robot set up and connected via the Neato app. You’ll also find
some important information on operating and maintaining your robot for best performance.
Then relax. Your robot will let you know when your floors are clean.
Any problems? Just let us know. We are here to help. www.neatorobotics.com/support
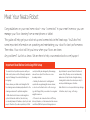
To ensure the best possible experience with your
Neato robot, please note the following to minimize
any risk of damage to household, furnishings or
belongings:
Please observe your Neato robot during the first
few cleaning runs and make any adjustments to the
cleaning environment to optimize navigation.
• While Neato robots have a smart navigation
system that avoids obstacles, the robot may
occasionally bump into furniture, objects, pets and
people. Therefore if you have special objects that
could potentially be damaged by the bumping,
remove these objects from the room or use
boundary markers.
• Similarly, the Neato robot’s rotating brush
operates like a regular upright vacuum cleaner,
so do not use the Neato robot on floors or rugs
(e.g. with fringes) that you would not use a regular
upright vacuum on.
• If the area to be cleaned contains a cli, drop,
balcony, fireplace, or other area where the vacuum
could travel/fall that represents danger, place a
physical barrier to prevent travel in that area to
ensure safety. The drop sensors and boundary
markers are to help the robot navigate during
cleaning but should not be relied upon solely to
avoid a potential dangerous situation.
Neato Robotics is not responsible for any damage
to furniture, objects, rugs, or flooring.
Important: Read Before Continuing With Setup

2
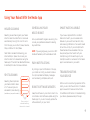
Table of Contents
Overview ............................................................................................. 3
Important Items and Tips ............................................................ 4
Preparation and Set Up ................................................................ 6
Setting Up Your Robot With Wi-Fi and
the Neato App .................................................................................. 7
Using Your Robot With the Neato App ............................... 9
How Neato Cleans .......................................................................... 11
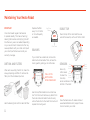
Maintaining Your Neato Robot ................................................. 12
More Info ............................................................................................. 13
You and Your Neato Robot ........................................................ 16
Want to see how it’s done?
Go to www.NeatoRobotics.com/support for installation videos and tips.

3
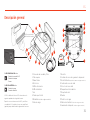
Overview
4
5
10
9
2
8
3
1
7
6
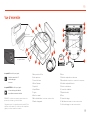
1 Dirt Bin and Filter
2 Top
3 Laser Cover
4 Start Button
5 Info LED
6 Battery LED
7 Handle
8 Front Bumper
9 Boundary Marker (included in some models)
10 Charge Base
11 Brush
12 Wall Following Sensor Window
13 Side Brush (available on specific models only)
14 Drop Sensor Window
15 Brush Guard
16 Battery Door
17 Robot Label
18 Wheels
19 Charging Contacts
20 Upgrade Cable (included in some models)
21 Cleaning Tool (included in some models)
12
21
20
11
14
16
17
19
13
18
15
INFO LED is used for:
· Wi-Fi connection status
· Cleaning status
· Errors
BATTERY LED is used to show:
· Charge state
· Battery Errors
NOTE: LED light details are described later
in this user guide.
Requirements: You need Wi-Fi, an iOS or
Android phone or tablet, and a Neato
account (free) in order to use some features.
Start Button & LED Lights
(filter may
vary by model)
EN

4
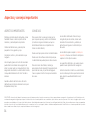
TIPS
To keep your robot out of places you don’t
want it to go, set down boundary markers
(included in specic models, however Neato
Boundary Markers are compatible with all
Neato robots).
You can use scissors to cut boundary
markers to a shorter length.
You can use removable tape to keep
boundary markers at on the oor.
To do a Reset of the Neato robot, press and
hold the button for 10 seconds and all the
lights will turn off. Press Start button once
more to turn the robot back on.
The combo brush offers superior pick-up
of pet hair, reduced noise during operation,
and is ideal for homes with multiple types of
ooring.
The spiral blade brush (sold separately)
offers deep cleaning performance across all
oor surfaces.
Shiny surfaces and black oors might cause
navigation issues.
Before connecting your robot to your Neato
account, view the How-To Video online at
www.NeatoRobotics.com/Support
Important Items and Tips
IMPORTANT ITEMS
Keep your robot away from liquids and wet
areas. Move or cover pet bowls and plant trays.
Clear the area of small items such as toys
and clothing.
Tie up wires, curtains and other low-hanging
items.
Thick carpet on top stair may affect the
ability of the robot’s navigation system to
prevent falls (top stair with low pile carpet is
OK). To make sure your robot sees the drop,
place boundary markers 6 inches/15cm from
the edge of the stair.
Keep your Neato inside the house. It was not
designed for outdoor cleaning or freezing
temperatures.
IMPORTANT: Please observe your Neato robot during the first few cleaning runs and make any adjustments to the cleaning environment to optimize navigation. Also, while Neato robots have a
smart navigation system that avoids obstacles, the robot may occasionally bump into furniture, objects pets and people. Therefore, if you have special objects that could potentially be damaged
by the bumping, remove these objects from the room or use boundary markers. Similarly, the Neato robot’s rotating brush operates like a regular upright vacuum cleaner, so do not use the
Neato robot on floors or rugs (e.g., with fringes) that you would not use a regular upright vacuum on. Neato Robotics is not responsible for any damage to furniture, objects, rugs, or flooring.

5
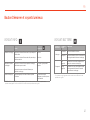
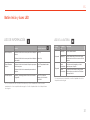
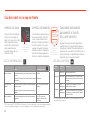
Start Button & LED Lights
EN
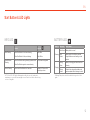
ROBOT IS: LED COLOR WHAT IT MEANS
Cleaning
Solid Green Battery level is normal
Solid
Amber
Battery level is low. Battery must be
charged before a new cleaning can be
started
Charging
Pulsing
Green
Battery is charging and robot can start
cleaning
Pulsing
Amber
Robot is fast-charging the battery and
must complete before cleaning can start
BATTERY LED
* If Blinking Red, please check the troubleshooting section of this
guide.
ACTION INFO LED
Start Cleaning Press Start Button 1x for house cleaning Solid Blue
Press Start Button 2x for spot cleaning Solid White
Pause/Resume
Cleaning
Press Start Button during cleaning to pause robot. LED pulses during pause
Press Start Button again to resume cleaning.
Cancel Cleaning Press & hold Start Button for 5 seconds Robot & LEDs turn off &
robot plays a tone.
INFO LED
* NOTE: if the INFO LED light is blinking red or solid red, your robot needs robot
maintenance or your robot has a navigation issue. Please check the troubleshooting
section of this guide.

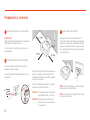
6
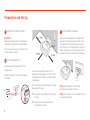
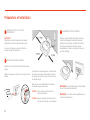
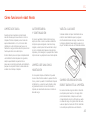
IMPORTANT
Remove all protective lms and shipping
material from the robot and charge base.
If they are not removed, your Neato robot
will not operate correctly.
Place the rounded side of your Neato robot
against the metal charging contacts on the
charge base until the contacts are pushed
all of the way in. For best results, charge the
robot fully before your rst cleaning cycle to
experience a full high performance cleaning.
NOTE During bootup, the robot will
alternately blink green and blue.
NOTE Your robot is only compatible with the
included charge base.
Plug the power cord securely into the
charge base.
Adjust the length of the cord by wrapping
it as shown.
REMOVE FILMS AND STICKERS INITIAL ROBOT CHARGING
SET UP CHARGE BASE
1 3
2
Choose a wall outlet that has a 3’ (1 m)
clearance on both sides and in front of the
charge base. This helps your robot nd the
charge base.
Plug in the power cord and push the charge
base against the wall.
TIP Locate the charge base on a hard oor
surface.
TIP Make sure the power outlet is not
controlled by a switch.
Charging
Contacts
Preparation and Set Up

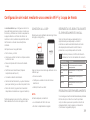
7
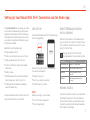
It is recommended that you setup your robot
to work with the Neato app to get the best
experience and access to all of the features.
The Neato app is the optimal way to control
your robot and receive notications via your
smartphone or tablet.
Benets of using the Neato app:
• Easy access & control
• Start your robot when you are not home
• Easily pause cleaning from the app
• Instant notications (cleaning complete,
alerts, etc.)
• Battery status
• Maintenance alerts and context sensitive
help to keep your robot in top form
• Dashboard (some features available on
specic models only)
It is also possible to start and stop the robot
using the Start Button on the robot.
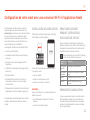
APP SET-UP
Download the Neato app from the Apple App
Store or Google Play.
Follow the directions within the Neato app.
You will be prompted to:
• Create an account
• Verify your account via email
• Add/Connect your robot
NOTE
Before you begin, you will need:
• Your home Wi-Fi password
• Fully charged robot
ROBOT FEEDBACK DURING
INITIAL PAIRING
Follow the instructions on the Neato app to
pair your robot. Your robot is in pairing mode
for the rst 60 minutes after you turn on your
robot for the rst time.
During pairing the INFO LED will
change based on the connection status:
PAIRING ISSUES
If you are not able to connect your robot within
the rst 60 minutes (or if the robot does not
connect the rst time), you will need to return
the robot to pairing mode. Follow these steps:
(Continued on next page)
LED COLOR WHAT IT MEANS
Slow Blinking Blue Robot is in Pairing Mode
Fast Blinking Blue Pairing to Neato app/account
Solid Blue Pairing successful
(shows for
5seconds)
Solid Red Pairing unsuccessful (shows for
5seconds)
Setting Up Your Robot With Wi-Fi Connection and the Neato App
EN

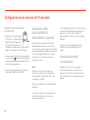
8
OPERATING THE ROBOT
FROM MULTIPLE
SMARTPHONES & TABLETS
The Neato app can be used by multiple
devices in a household to operate the same
robot. Just download the Neato app to other
smartphones or tablets and sign in to the
same My Neato account using the email and
password used to setup the robot.
NOTE
Only 2.4GHz Wi-Fi networks are supported
and will display in the list of available options
during robot set-up.
WEP EAP is not supported at this time.
The FCC requires all wireless devices in the US
to operate on wireless spectrum channels 1-11.
If you are still having issues connecting your
robot, certain Wi-Fi router rewall and port
settings can prevent a connection with the
Neato servers.
Please reference troubleshooting information
at www.NeatoRobotics.com/support.
CONNECTING YOUR ROBOT
TO ADDITIONAL NETWORKS
If you would like to add additional networks,
see instructions on the Neato website support
center at www.neatorobotics.com/support.
PAIRING ISSUES (CONTINUED)
• Press and hold the Start
button and right bumper
for 10 seconds to turn robot
off. The robot will turn off
and revert to factory settings
(and original software installed).
• Press the Start button once more to turn the
robot on. The
LED will be slow blinking
blue showing that the robot is now in pairing
mode.
• Follow steps in the Neato app to CONNECT
YOUR ROBOT.
Robot Wi-Fi Set-Up
Start
Button
Right
Side
Bumper

9
SCHEDULING YOUR
NEATO ROBOT
Set up a schedule for regular vacuuming. You
can set your preferences based on cleaning
days and times.
NOTE If you are going away, you can turn OFF
Enable Schedule to put the schedule on hold.
PUSH NOTIFICATIONS
By turning on push notications in the app,
your robot can notify you about its status.
Your phone/tablet will display messages
such as cleaning complete, alerts, etc.
ROBOT SOFTWARE UPDATES
Keep the software on your robot current. You
can initiate a robot software update using the
Neato app. Or, you can manually update the
software directly on your robot.
HOUSE CLEANING
Selecting House Cleaning sets your Neato
robot to clean the entire oor on one level
automatically moving from room to room.
From the app you can Start, Pause, Resume,
Stop, and Return to Start/Base.
Note: When canceled mid-cleaning, your
robot will stop in place. You can ask your
robot to return to its base station using the
Neato app. If the robot has detected the base,
it will attempt to return to base and dock.
SPOT CLEANING
Selecting Clean Spot sets
your Neato robot to clean
a 7’x7’ area and you can
also select 2-pass cleaning
(available only on specific models).
SMART WATCH CAPABLE
If you have an Apple Watch or Android
Wear smart watch, you can access some
features on your watch such as start, stop,
and receiving notications. Your watch needs
to be in the vicinity of your smartphone for
these features to be accessible. After you
have paired your smart watch with your
smartphone, go to the watch app on your
smartphone and turn access on to the Neato
app to view features on your watch.
TROUBLESHOOTING
YOUR DEVICE
When an error occurs during operation of the
robot, you can click the error link in the Neato
app to see what it means and what to do.
For additional information on troubleshooting
your device, please see Help in the app.
Place your robot
centered and facing
the area to be cleaned.
Using Your Robot With the Neato App
EN

10
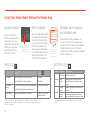
SPOT CLEANING
You can initiate Spot Cleaning
by pressing the Start Button
twice. During Spot Cleaning,
if you press the Start Button,
the robot will pause. If you
press it again, it will resume.
To cancel the Spot Cleaning,
press the Start Button and
hold it down for 5 seconds.
HOUSE CLEANING
You can initiate House
Cleaning by pressing the
Start Button once. Your
Neato robot will clean the
entire oor on one level
automatically moving
from room to room.
FEATURES ONLY AVAILABLE
VIA THE NEATO APP
Some features are only available if you
connect your robot to the Neato app on
your smartphone or tablet. These features
include scheduling, push notications,
context sensitive help, and cleaning statistics
(specic models only).
Initiate
House Cleaning
by pressing the
Start Button 1 time.
Place your robot
centered and
facing the area
to be cleaned.
Using Your Neato Robot Without the Neato App
ROBOT IS: LED COLOR WHAT IT MEANS
Cleaning
Solid Green Battery level is normal
Solid
Amber
Battery level is low. Battery must be
charged before a new cleaning can be
started
Charging
Pulsing
Green
Battery is charging and robot can start
cleaning
Pulsing
Amber
Robot is fast-charging the battery and
must complete before cleaning can start
BATTERY LED
* If Blinking Red, please check the troubleshooting section of this
guide.
ACTION INFO LED
Start Cleaning Press Start Button 1x for house cleaning Solid Blue
Press Start Button 2x for spot cleaning Solid White
Pause/Resume
Cleaning
Press Start Button during cleaning to pause robot. LED pulses during pause
Press Start Button again to resume cleaning.
Cancel Cleaning Press & hold Start Button for 5 seconds Robot & LEDs turn off &
robot plays a tone.
INFO LED
* NOTE: if the INFO LED light is blinking red or solid red, your robot needs robot
maintenance or your robot has a navigation issue. Please check the troubleshooting
section of this guide.

11
HOUSE CLEANING
In normal operation, Neato comes off of
its base, explores its surroundings and
starts cleaning. It starts cleaning in sections
approximately 15’x15’ depending on layout
and furniture in the room. It will continue to
clean section by section until the entire area is
cleaned.
Your Neato robot will also try to clean one
room fully before moving on to the next,
assuming it can detect your doorways. If it
cleans a partial room, your Neato robot will
come back to nish the room before nishing
the complete job.
AUTO CHARGE AND RESUME
If the area the Neato robot is attempting
to clean is very large, the robot will return
to its base mid-cleaning to recharge. Once
recharged, it will return to nish where it left
off. A complete cleaning cycle includes 3
cleanings and 2 recharges so that Neato can
clean very large areas on one level.
SINGLE ROOM CLEANING
If you just want to clean a single room, you
can manually place your robot in the room,
press the start button, and close the door.
Your Neato robot will clean the room, and
return to where you originally placed it in the
room. When the robot has nished cleaning,
please put the robot back on its charge base.
RETURNING TO BASE
For best results, we recommend you start
your robot from its charge base. When
started from its charge base, it has a better
result in returning to base when it is complete.
MOVING A ROBOT MID-CLEANING
It is not recommended to pick up your robot
and move it mid-cleaning. It can become
disoriented, not follow its normal smart
behavior, and have difculty nding its charge
base. If you pick up your robot, put it back
down within 1 foot of where you picked
it up for best results.
How Neato Works
EN

12
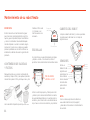
IMPORTANT
Your robot needs regular maintenance
to operate reliably. This means checking/
cleaning the brushes and emptying the dirt
bin after every use or as needed, depending
on your environment. Failure to do this may
cause problems with your robot and impact
your robot’s performance and void your
warranty coverage.
SENSORS
ROBOT TOP
Use a dry
cotton swab
to clean the
two drop
sensor windows on the
bottom of the robot.
Clean the top of the robot and the area
around the laser top with a soft cotton cloth.
NOTE
View the Neato How-To videos online at
www.NeatoRobotics.com/support to see
how to maintain your robot.
DIRT BIN AND FILTERS
After each use, empty the dirt bin, clean the
airways/openings and lter. To remove the
lter, pinch the handle and pull out.
Use the cleaning tool comb to clean the lter.
BRUSHES
Replace the lter
every 1 to 2 months
or more frequently
as needed.
If your robot has a side brush, remove the
side brush and set aside. Then, remove the
brush guard by pulling up on both sides.
Use the hair/ber blade to cut and remove
hair from the brush. Remove any debris from
the brush ends and inside the brush cavity
where the brush sits. Re-insert the brush and
replace the brush guard.
PULL UP ON
BOTH SIDES
SIMULTANEOUSLY
Filter Comb
Drop
Sensor
Window
Drop
Sensor
Window
Wall
Following
Sensor
Window
Hair/Fiber
Cutter
Maintaining Your Neato Robot

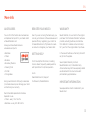
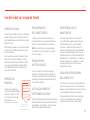
13
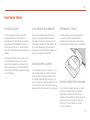
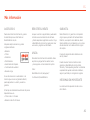
ACCESSORIES
You can nd information about accessories
and replacement parts for your Neato robot
at NeatoRobotics.com.
Always purchase Neato Genuine
accessories and parts:
• Batteries
• Filters
• Brushes
• Boundary Markers
• Cleaning Tool
• Dirt Bin
• Charge Base
Using unauthorized or 3rd party accessories
(non-Neato Genuine) can damage your robot
and will void your warranty.
Recommended replacement schedule
depends on use.
• Filters - every 1 to 2 months
• Batteries – every 12 to 18 months
REGISTER YOUR NEATO
Even if you are not using the Neato app, you
can stay up to date on software releases and
special offers by registering your robot. Go
to NeatoRobotics.com/My-Neato to create
an account and register your Neato robot.
GETTING HELP
Find more helpful information, including
how-to videos, frequently asked questions,
and tips & tricks for optimal operation.
Go to:
NeatoRobotics.com/Support
YouTube.com/NeatoRobotics
WARRANTY
Neato Robotics, Inc. warrants to the original
purchaser that the Neato Robotics hardware
product, excluding batteries, shall be free
from defects in material and workmanship
for 1 year from the original date of purchase.
In the case of batteries, a Warranty Period of
six (6) months applies.
See complete Warranty terms at
NeatoRobotics.com/Limited-Warranty.
All warranties beyond those expressly stated
are disclaimed to the maximum extent
permissible by applicable law.
IMPORTANT INFORMATION
See separate document included with your
Neato robot.
More Info
EN

14
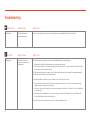
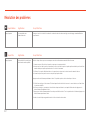
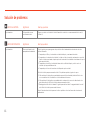
Battery LED What it means
Info LED What it means
What to do
What to do
Blinking Red The robot battery has
experienced an error.
Please contact Customer Care. For local contact information: www.NeatoRobotics.com/Contact-Us
Blinking Red Your robot needs to be
cleaned to operate at best
performance.
Follow these steps to make sure your robot is well-maintained before running it again:
1 - Ensure that both the filter and dirt bin are clean and properly inserted.
2 - Make sure the dirt bin is in the robot and properly seated in position. The top of the dirt bin should be level with
the top of the robot if inserted correctly.
3 - Make sure the brush and end caps are clear of debris and remove any hair or debris that is wrapped around it.
4 - Make sure wheel wells aren’t blocked with debris
Press the Start Button to start the robot. If it still has issues, follow the next 2 steps:
5 - Using a dry cotton swab, please spin the laser housing under the laser cover 5 times in each direction being
careful to avoid the openings in the housing.
6 - Use a dry cotton swab to clean the two drop sensor windows on the bottom of the robot. Press the Start Button
to start the robot.
7 - Press and hold the Start Button for 10 seconds to reset your robot. All of the lights on the robot will turn o.
Press the Start Button to turn the robot back on.
Go to the support center to watch how-to videos on these maintenance items.
Troubleshooting

15
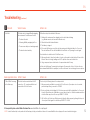
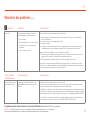
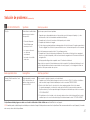
Info LED What it means
Neato app robot status What it means
What to do
What to do
Solid Red The Neato robot is having diculty navigating
the environment. Possible reasons for this:
• The laser is blocked.
• It is having diculty navigating the floor.
• The sensors are dirty or not working properly.
• The wheels or brush are dirty.
Follow these steps to troubleshoot. Make sure:
1 - Nothing in the environment has changed since the robot started cleaning
(e.g., furniture moved, robot moved to dierent room)
2 - Wheel wells aren’t blocked with debris.
3 - The battery is charged.
4 - If the robot still has issues, reset the robot by pressing and holding the button for 10 seconds.
The robot will turn o. Press the Start Button to turn it back on. Try running the robot again.
Press the button to start the robot. If it still has issues,
5 - Make sure the robot’s laser freely rotates: Use a dry cotton swab to rotate the laser 5 times to the
left and 5 times to the right, making sure NOT to put the cotton swab in either hole.
6 - Using compressed air, use short bursts of compressed air about 6” away.
Let the robot fully charge. Try running the robot again. If issue persists, click on Chat icon for assis-
tance at www.NeatoRobotics.com/support, or visit our Customer Care contact page for more options.
“Robot Oine” message
in the Neato app
The robot has disconnected from its Wi-Fi
connection – OR – your phone/tablet is not
connected to a 3G or 4G service.
Check or try the following items in the order provided.
1 – Make sure your phone/tablet is connected to 3G or 4G service. If your phone is not connected,
your Neato app will say your robot is OFFLINE.
2 – Reset your Neato robot by taking it o of its base, press and hold the start button for 10 seconds
to turn it o, and then press Start button one more time to turn it on. Wait a few minutes and then
check the Neato app to see if it now says READY TO CLEAN.
3 – If #1 or #2 do not fix the issue: Delete your robot from the Neato app and go through the steps to
Connect your Robot again. It should then say READY TO CLEAN.
If issue persists, please contact Neato Customer Care www.NeatoRobotics.com/support
NOTE Context Sensitive help is also provided in the Neato app to help you troubleshoot items. Go to www.NeatoRobotics.com/support for more troubleshooting tips.
Troubleshooting (conti nue d)
EN

16
Congratulations on your new Neato robot. You will soon experience the joy
of having clean oors without ever pushing a vacuum.
Observe your robot during the rst few cleaning runs. You may nd that a
few small adjustments in your home (moving a chair or lamp a few inches,
picking up cords) will make a big difference in your experience /results.
Help your robot and your robot will help you.
You and Your Neato Robot

17
Voici votre robot Neato
Félicitations pour l’acquisition de votre nouveau robot domestique, désormais «connecté»
àvotre maison intelligente pour vous permettre de gérer le nettoyage de vos sols depuis
votre smartphone ou votre tablette.
Ce guide vous aidera à installer votre robot et à le connecter via l’application Neato. Vous
ytrouverez également des informations importantes sur le fonctionnement et l’entretien de
votre robot, afin d’obtenir des performances optimales. Alors, détendez-vous. Votre robot
vous préviendra lorsque vos sols seront propres.
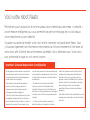
Afin de garantir la meilleure expérience possible avec
votre robot Neato, veuillez noter les points suivants.
Vous minimiserez ainsi le risque de dommages aux
meubles et biens de votre domicile.
Veuillez observer votre robot Neato pendant les
premiers cycles de nettoyage et apporter les
ajustements nécessaires à l’environnement de
nettoyage pour optimiser la navigation.
• Même si les robots Neato disposent d’un système
de navigation intelligente qui évite les obstacles, le
robot peut parfois heurter les meubles, les objets, les
animaux et les personnes. Par conséquent, si vous
avez des objets auxquels vous tenez particulièrement
qui pourraient être endommagés en cas de choc avec
le robot, retirez-les de la pièce ou utilisez des balises
de délimitation.
• De même, la brosse rotative du robot Neato
fonctionne comme celle d’un aspirateur balai
standard ; n’utilisez donc pas le robot Neato sur les
planchers ou les tapis (par exemple, avec des franges)
sur lesquels nous n’utiliseriez pas un aspirateur balai
standard.
• Si la zone à nettoyer présente un rebord, un
dénivelé, un balcon, une cheminée ou tout autre
élément où l’aspirateur pourrait circuler/chuter et
qui représente un danger, empêchez l’aspirateur
d’accéder à cette zone en y plaçant un obstacle
physique. Les balises de délimitation et les capteurs
anti-chute assistent le robot pendant le nettoyage,
mais ne doivent pas être les seules méthodes
permettant d’éviter une situation potentiellement
dangereuse.
Neato Robotics décline toute responsabilité en cas de
dommage causé à des meubles, des objets, des tapis
ou des sols.
Important : Lire avant de poursuivre la configuration

18
Table des matières
Vue d’ensemble .............................................................................. 19
Points et conseils importants .................................................. 20
Préparation et installation ......................................................... 22
Configuration de votre robot avec le réseau Wi-Fi et
l’application Neato ........................................................................ 23
Utilisation de votre robot avec l’application Neato ...... 25
Comment Neato nettoie ............................................................ 27
Entretien de votre robot Neato .............................................. 28
Plus d’informations ....................................................................... 29
Vous et votre robot Neato ...................................................... 32
Vous voulez voir comment ça marche?
Accédez au site www.NeatoRobotics.com/support pour regarder des vidéos
d’installation etobtenir des conseils.
La page est en cours de chargement...
La page est en cours de chargement...
La page est en cours de chargement...
La page est en cours de chargement...
La page est en cours de chargement...
La page est en cours de chargement...
La page est en cours de chargement...
La page est en cours de chargement...
La page est en cours de chargement...
La page est en cours de chargement...
La page est en cours de chargement...
La page est en cours de chargement...
La page est en cours de chargement...
La page est en cours de chargement...
La page est en cours de chargement...
La page est en cours de chargement...
La page est en cours de chargement...
La page est en cours de chargement...
La page est en cours de chargement...
La page est en cours de chargement...
La page est en cours de chargement...
La page est en cours de chargement...
La page est en cours de chargement...
La page est en cours de chargement...
La page est en cours de chargement...
La page est en cours de chargement...
La page est en cours de chargement...
La page est en cours de chargement...
La page est en cours de chargement...
La page est en cours de chargement...
La page est en cours de chargement...
La page est en cours de chargement...
-
 1
1
-
 2
2
-
 3
3
-
 4
4
-
 5
5
-
 6
6
-
 7
7
-
 8
8
-
 9
9
-
 10
10
-
 11
11
-
 12
12
-
 13
13
-
 14
14
-
 15
15
-
 16
16
-
 17
17
-
 18
18
-
 19
19
-
 20
20
-
 21
21
-
 22
22
-
 23
23
-
 24
24
-
 25
25
-
 26
26
-
 27
27
-
 28
28
-
 29
29
-
 30
30
-
 31
31
-
 32
32
-
 33
33
-
 34
34
-
 35
35
-
 36
36
-
 37
37
-
 38
38
-
 39
39
-
 40
40
-
 41
41
-
 42
42
-
 43
43
-
 44
44
-
 45
45
-
 46
46
-
 47
47
-
 48
48
-
 49
49
-
 50
50
-
 51
51
-
 52
52


NEATO botvac D3/ D5 Connected Mode d'emploi
- Catégorie
- Aspirateurs robotiques
- Taper
- Mode d'emploi
dans d''autres langues
Documents connexes
-
Neato Robotics 9450270 Manuel utilisateur
-
 NEATO DKSH48230 Manuel utilisateur
-
-
NEATO D503 / BOTVAC D5 CONNECTE Le manuel du propriétaire
-
 NEATO Signature Pro Le manuel du propriétaire
-
 NEATO XV-11 Le manuel du propriétaire
-
NEATO Intelligent Robot Vacuum Manuel utilisateur