Tripp Lite B032-HUA2 Le manuel du propriétaire
- Catégorie
- Commutateurs KVM
- Taper
- Le manuel du propriétaire

1
Owner’s Manual
2-Port USB/HD Cable
KVM Switch with Audio
Model: B032-HUA2
Español 14 • Français 27 • Русский 40
PROTECT YOUR INVESTMENT!
Register your product for quicker service
and ultimate peace of mind.
You could also win an ISOBAR6ULTRA
surge protector—a $100 value!
www.tripplite.com/warranty
1111 W. 35th Street, Chicago, IL 60609 USA
www.tripplite.com/support
Copyright © 2016 Tripp Lite. All rights reserved.
16-11-116-93366A.indb 1 12/15/2016 10:43:24 AM

2
Product Features
• Control two computers or devices from a single USB keyboard, mouse
and HDMI monitor
• Compact design features built-in 4 ft. KVM and audio cables
• The KVM and audio can be switched independently of each other, so you
can access one computer while listening to audio from another at the
same time*
• Audio provides a full bass response for rich 2.1-channel surround sound
• USB mouse port can be used to connect a USB 2.0 hub for peripheral
sharing
• Supports video resolutions up to 1920 x 1200 (1080p)
• KVM stores the monitor’s EDID information to optimize display resolution
• Power on detection automatically switches to the powered-on computer
when the other one powers off
• Console mouse port emulation/bypass feature supports most mouse
drivers and multifunction mice
• Supports gaming keyboards and wireless keyboard/mouse
• Features Remote, Hotkey and Mouse Port Switching
• Supports Windows
®
, Mac
®
, and Linux
®
• Mac keyboard support and emulation**
• No external power required
• HDCP compatible
• Firmware upgradable
* Audio through the HDMI monitor’s built-in speakers cannot be switched independently
** PC keyboard combinations emulate Mac keyboards; Mac keyboards only work with
their own computers
16-11-116-93366A.indb 2 12/15/2016 10:43:24 AM

3
Optional Accessories
System Requirements
Package Contents
• P568-Series High Speed HDMI Cables
• U222-004-R 4-Port USB 2.0 Hub
• U222-007-R 7-Port USB 2.0 Hub
• U222-010-R 10-Port USB 2.0 Hub
• U022-Series USB 2.0 A/B Device Cables
• U030-Series USB 2.0 Mini-B Cables
• U050-Series USB 2.0 Micro-B Cables
• HDMI monitor
• USB Keyboard
• USB Mouse
• Computer with a HDMI and USB port
• B032-HUA2
• Owner’s Manual
16-11-116-93366A.indb 3 12/15/2016 10:43:24 AM

4
Installation
Note: Make sure the power to all devices is turned off prior to installation. You must
unplug the power cords of any computers that have the Keyboard Power On function.
1. Plug your USB keyboard, mouse and HDMI monitor into the console ports
on the unit.
Note: If using a wireless keyboard and mouse, the dongle must plug into the unit’s
keyboard port in order to use the hotkey function.
2. (Optional) A USB 2.0 hub can be connected to the USB console mouse
port, allowing you to add multiple USB peripherals to your installation.
Note: To ensure proper functionality, use a hub with an external power supply. Also,
the KVM’s Mouse Emulation Mode must be disabled (see the Keyboard Hotkey
Commands section of this manual for details) when connecting a hub.
3. (Optional) Plug your speakers and/or microphone into the audio jacks on
the side of the unit.
4. Plug the connectors of the built-in cables into their respective ports on
the computers you are installing.
5. Power on your devices.
Note: The unit’s power on default is to link to the first computer that is powered on.
16-11-116-93366A.indb 4 12/15/2016 10:43:24 AM

5
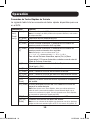
Operation
There are three ways of accessing computers and devices connected to the
KVM switch: Manual Remote Switching, Mouse Port Switching and Keyboard
Hotkeys.
Note: When switching ports, wait a few seconds for the selected computer’s video to
display on the console monitor prior to switching ports again. Do not switch ports when
a USB peripheral device is in operation.
Manual Remote Port Selection
Press the port selection pushbutton on the Remote Port Selector to toggle
the KVM and Audio focus between the two computers. The LED lights on the
unit will indicate which computer is selected.
Mouse Port Switching Functionality
Note: Mouse port switching is disabled by default, and must be enabled via keyboard
hotkey command. In addition, it is only supported when the KVM’s mouse emulation
mode is enabled, which is enabled by default (see the Keyboard Hotkey Commands
section for details). Only 3-key scroll wheel mice are supported.
When enabled, the Mouse Port Switching Functionality allows users with
scroll mice to simultaneously switch the focus of the KVM and Audio
between ports by double-clicking the scroll wheel on their mouse.
Keyboard Hotkey Commands
Hotkeys allow you to switch functionality focus between ports using only the
keyboard, as well as perform other functions on the KVM switch. All hotkey
operations begin by tapping the Scroll Lock key twice. See the Keyboard
Hotkey Commands table for full details. To switch the KVM and Audio
between the two ports, press the [Scroll Lock] key twice, and then the
[Enter] key. If the [Scroll Lock] [Scroll Lock] hotkey conflicts with other
programs running on your computer, it can be switched to [Ctrl] [Ctrl]
via Hotkey command. (See the Keyboard Hotkey Commands table for
details). The keyboard hotkey can also be switched by pressing and holding
the Remote Port Selector switch for 3 seconds.
16-11-116-93366A.indb 5 12/15/2016 10:43:24 AM

6
Operation
Keyboard Hotkey Commands
The following table lists the keyboard hotkey commands available for use on
the KVM switch.
Combination Function
[Scroll Lock]
[Scroll Lock]+
[Enter] Toggles the KVM and Audio focus between the two
ports
Note: If the KVM and Audio focus are on different ports, only
the KVM focus switches
[k] [Enter] Toggles the KVM focus only
[s] [Enter] Toggles the Audio focus only
[a] [Enter] Starts Auto Scan. The KVM focus cycles from port
to port at 5 second intervals
[a] [Enter] [n] Starts Auto Scan. The KVM focus cycles from port
to port at n second intervals
Note: Replace n with a number between 1 and 4
(1 = 3 sec; 2 = 5 sec (default); 3 = 10 sec; 4 = 20 sec)
To exit Auto Scan, press [Esc] or [Spacebar]. Auto
Scanning stops when you exit Auto Scan mode
[x] [Enter] Toggles the hotkey invocation key between
[Scroll Lock] and [Ctrl]
[m] [Enter] Enables/disables mouse emulation function
[n] [Enter] Enables/disables keyboard emulation
[w] [Enter] Enables/disables mouse port-switching function
[F2] [Enter] Activates Mac keyboard mapping
[F10] [Enter] Automatically detects and sets the keyboard
operating platform
[F4] [Enter] Lists current switch settings via the paste function
of a text editor
Note: To perform this hotkey, you must first have a text
editor or word processor (such as Microsoft Word) open, with
the cursor in the page window. Upon performing this hotkey,
the KVM’s current settings will be displayed.
[F5] [Enter] Performs a USB keyboard and mouse reset
[F6] [nn] [Enter] Sets the keyboard language layout
Note: nn is a two digit number that represents one of the
following keyboard language codes: US English 33; French
08; Japanese 15
16-11-116-93366A.indb 6 12/15/2016 10:43:24 AM

7
Operation
Combination Function
[Scroll Lock]
[Scroll Lock]+
[d] [Enter] Invokes the Video Sync function, which allows the
KVM to store the monitor’s EDID information to
optimize display resolution
[e] [Enter] Enables/disables the Power on Detection feature
[r] [Enter] Resets hotkeys to the default setting
Firmware Upgrade Utility
To update the B032-HUA2’s firmware, perform the following:
1. From a computer that is not part of the KVM installation, download the
latest Firmware Upgrade package for the B032-HUA2 from Tripp Lite’s
support site, www.tripplite.com/support.
2. Disconnect the B032-HUA2 from your KVM installation. Press and hold
the Remote Port Selector’s pushbutton. While you are still holding the
pushbutton, connect the KVM cable’s purple USB connector to a USB
port on the computer to which you have downloaded the Firmware
Upgrade package.
3. The B032-HUA2 now enters Firmware Upgrade Mode. The two port LED’s
flash together to indicate the unit is in Firmware Upgrade Mode.
Note: While the B032-HUA2 is in Firmware Upgrade Mode, normal keyboard and
mouse functions are suspended. You must complete the firmware upgrade or exit
Firmware Upgrade Mode to regain normal control of the console.
4. Run the Firmware Upgrade Package file; the Firmware Upgrade Utility
main screen appears.
5. Click Next to perform the upgrade. As the upgrade proceeds, status
messages appear in the Status Messages panel and the progress towards
completion is shown in the Progress bar.
6. After the upgrade has completed, a pop-screen appears to inform you
that the procedure to upgrade was successful. Click Finish to close the
Firmware Upgrade Utility.
7. Set up your KVM installation again.
16-11-116-93366A.indb 7 12/15/2016 10:43:24 AM

8
Operation
Firmware Upgrade Utility-Failed
If the Upgrade Succeeded screen does not appear, the upgrade failed to
complete successfully, in which case you should perform the following:
1. Disconnect the USB connectors on the KVM cables from the computer.
2. Press and hold the Remote Port Selector’s pushbutton. While still
pressing the pushbutton, reconnect the KVM cable’s USB connectors to
the computer.
3. Power on the B032-HUA2. It will now work with the factory default
firmware. Follow the steps in the Firmware Upgrade Utility section to
upgrade the firmware.
16-11-116-93366A.indb 8 12/15/2016 10:43:24 AM

9
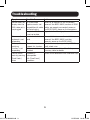
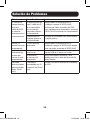
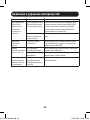
Troubleshooting
Symptom Possible Cause Action
Monitor does not
display after the
KVM cable set is
hot-plugged
HD audio/video
graphics card is not
compatible with cable
set hot-plugging
Power off all devices on the installation;
power off the B032-HUA2; confirm all KVM
cables are properly connected; power on
the B032-HUA2; power on the computers
Graphics card driver
is not up-to-date
Upgrade to the latest graphics card driver
Mouse and/or
keyboard is not
responding
Switch needs to be
reset
Power off all devices on the installation;
power off the B032-HUA2; wait five
seconds; power on the B032-HUA2
Mouse port-
switching
function is not
responding
Mouse does not
support this function
This feature is only supported by USB 3-key
scroll wheel mice
Mouse emulation is
disabled
Enable mouse emulation. See Hotkey
Summary table for details
Cannot switch
ports by pressing
[Scroll Lock]
twice
Keyboard is
incompatible
with [Scroll Lock]
invocation
Switch to the alternate HSM invocation keys
16-11-116-93366A.indb 9 12/15/2016 10:43:24 AM

10
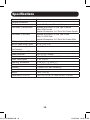
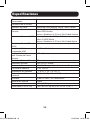
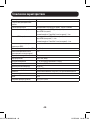
Specifications
Computer Connections 2
Console Connections 1
Port Selection Remote Port Selector, Mouse, Hotkeys
Connectors (Console Ports) Keyboard and Mouse: 2x USB Type A Female
Video: HDMI Female
Speakers/Microphone: 2x 3.5mm Mini-Stereo Female
Connectors (KVM Ports) Keyboard and Mouse: 4x USB Type A Male
Video: 2x HDMI Male
Speakers/Microphone: 4x 3.5mm Mini-Stereo Male
LED Quantity and Color (KVM) 2x Green
Built-In Cable Length (KVM) 2x 4 ft. (2x 1.2 m)
Built-In Cable Length (Remote
Port Selector)
6 ft. (1.8 m)
Emulation (keyboard/Mouse) USB
Video Resolution 1920 x 1200 (1080p)
Scan Interval 3, 5, 10, 20 seconds (default: 5 seconds)
Power Consumption DC 5V, 2.65 W
Operating Temperature 32° to 122° F (0° to 50° C)
Storage Temperature -4° to 140° F (-20° to 60° C)
Humidity 0% to 80% RH, Non-Condensing
Housing Material Plastic
Weight 0.9 lb. (0.41 kg)
Dimensions (L x W x H) 2.62 x 3.24 x 0.97 in. (6.65 x 8.23 x 2.46 cm)
16-11-116-93366A.indb 10 12/15/2016 10:43:24 AM

11
Appendix
Mac Keyboard Emulation
The PC compatible (101/104 key) keyboard can emulate the functions of
the Mac keyboard using the PC keystrokes in the table below.
Note: When more than one key is required on the PC Keyboard to emulate the Mac
keyboard, press and release the first key, and then press and release the second key.
PC Keyboard Mac Keyboard
[Shift] Shift
[Ctrl] Ctrl
[Ctrl], [1]
[Ctrl], [2]
[Ctrl], [3]
[Ctrl], [4]
[Alt] Alt
[Print Screen] F13
[Scroll Lock] F14
=
[Enter] Return
[Backspace] Delete
[Insert] Help
[Ctrl],
F15
Factory Default Settings
Setting Default
Hotkey Invocation Key [Scroll Lock] [Scroll Lock]
Auto Scan Interval 5 seconds
Keyboard Operating Platform PC Compatible
Mouse Emulation
Enabled
Keyboard Emulation
Enabled
Mouse Port Switching
Disabled
Power on Detection
Enabled
16-11-116-93366A.indb 11 12/15/2016 10:43:24 AM

12
Warranty & Product Registration
1-Year Limited Warranty
TRIPP LITE warrants its products to be free from defects in materials and workmanship for a period
of one (1) year from the date of initial purchase. TRIPP LITE’s obligation under this warranty is limited
to repairing or replacing (at its sole option) any such defective products. To obtain service under
this warranty, you must obtain a Returned Material Authorization (RMA) number from TRIPP LITE or
an authorized TRIPP LITE service center. Products must be returned to TRIPP LITE or an authorized
TRIPP LITE service center with transportation charges prepaid and must be accompanied by a brief
description of the problem encountered and proof of date and place of purchase. This warranty does
not apply to equipment, which has been damaged by accident, negligence or misapplication or has
been altered or modified in any way.
EXCEPT AS PROVIDED HEREIN, TRIPP LITE MAKES NO WARRANTIES, EXPRESS OR IMPLIED,
INCLUDING WARRANTIES OF MERCHANTABILITY AND FITNESS FOR A PARTICULAR PURPOSE.
Some states do not permit limitation or exclusion of implied warranties; therefore, the aforesaid
limitation(s) or exclusion(s) may not apply to the purchaser.
EXCEPT AS PROVIDED ABOVE, IN NO EVENT WILL TRIPP LITE BE LIABLE FOR DIRECT, INDIRECT,
SPECIAL, INCIDENTAL OR CONSEQUENTIAL DAMAGES ARISING OUT OF THE USE OF THIS PRODUCT,
EVEN IF ADVISED OF THE POSSIBILITY OF SUCH DAMAGE. Specifically, TRIPP LITE is not liable for any
costs, such as lost profits or revenue, loss of equipment, loss of use of equipment, loss of software,
loss of data, costs of substitutes, claims by third parties, or otherwise.
Product Registration
Visit www.tripplite.com/warranty today to register your new Tripp Lite product. You’ll be automatically
entered into a drawing for a chance to win a FREE Tripp Lite product!*
* No purchase necessary. Void where prohibited. Some restrictions apply. See website for details.
FCC Notice, Class B
This device complies with part 15 of the FCC Rules. Operation is subject to the following two
conditions: (1) This device may not cause harmful interference, and (2) this device must accept any
interference received, including interference that may cause undesired operation.
Note: This equipment has been tested and found to comply with the limits for a Class B digital device,
pursuant to part 15 of the FCC Rules. These limits are designed to provide reasonable protection
against harmful interference in a residential installation. This equipment generates, uses and can
radiate radio frequency energy and, if not installed and used in accordance with the instructions, may
cause harmful interference to radio communications. However, there is no guarantee that interference
will not occur in a particular installation. If this equipment does cause harmful interference to radio
or television reception, which can be determined by turning the equipment off and on, the user is
encouraged to try to correct the interference by one or more of the following measures:
• Reorient or relocate the receiving antenna.
• Increase the separation between the equipment and receiver.
• Connect the equipment into an outlet on a circuit different from that to which the receiver is
connected.
• Consult the dealer or an experienced radio/TV technician for help.
Any changes or modifications to this equipment not expressly approved by Tripp Lite could void the
user’s authority to operate this equipment.
16-11-116-93366A.indb 12 12/15/2016 10:43:24 AM

13
Warranty & Product Registration
WEEE Compliance Information for Tripp Lite Customers and Recyclers (European Union)
Under the Waste Electrical and Electronic Equipment (WEEE) Directive and implementing
regulations, when customers buy new electrical and electronic equipment from Tripp Lite they
are entitled to:
• Send old equipment for recycling on a one-for-one, like-for-like basis
(this varies depending on the country)
• Send the new equipment back for recycling when this ultimately becomes waste
Use of this equipment in life support applications where failure of this equipment can reasonably
be expected to cause the failure of the life support equipment or to significantly affect its safety or
effectiveness is not recommended.
Tripp Lite has a policy of continuous improvement. Specifications are subject to change without
notice.
1111 W. 35th Street, Chicago, IL 60609 USA
www.tripplite.com/support
16-11-116-93366A.indb 13 12/15/2016 10:43:25 AM

14
Manual del Propietario
Cable USB /
HD de 2 Puertos
KVM con Audio
Modelo: B032-HUA2
English 1 • Français 27 • Русский 40
1111 W. 35th Street, Chicago, IL 60609 EE UU
www.tripplite.com/support
Copyright © 2016 Tripp Lite. Todos los derechos reservados.
16-11-116-93366A.indb 14 12/15/2016 10:43:25 AM

15
Características del Producto
• Controle dos computadoras o dispositivos desde un solo teclado y mouse
USB y monitor HDMI
• El diseño compacto cuenta con cables de KVM y audio de 1.22 m [4
pies]
• El KVM y el audio puedan cambiarse independientemente uno del otro,
de modo que puede acceder a una computadora mientras que al mismo
tiempo escucha audio desde otra*
• El audio proporciona una respuesta completa de los bajos para un rico
sonido envolvente de 2.1 canales
• E puerto de mouse USB puede usarse para conectar un hub USB 2.0
para compartido de periféricos
• Soporta resoluciones de video de hasta 1920 x 1200 (1080p)
• El KVM almacena la información EDID del monitor para optimizar la
resolución de la pantalla
• La detección de encendido cambia automáticamente a la computadora
encendida cuando se apaga la otra
• La función de emulación / derivación de puerto de mouse de la consola
soporta la mayoría de los controladores de mouse y mouses multifunción
• Soporta teclados de juegos y teclados / mouse inalámbrico
• Cuenta con Conmutación de Puerto Remoto, por Teclas Rápidas y Mouse
• Soporta Windows
®
, Mac
®
y Linux
®
• Soporte y emulación de teclado Mac**
• No se necesita alimentación externa
• Compatible con HDCP
• Firmware actualizable
*El audio a través de las bocinas incorporadas del monitor HDMI no pueden alternarse
en forma independiente
** las combinaciones de teclado de PC emulan a los teclados Mac; los teclados Mac
solo trabajan con sus propias computadoras
16-11-116-93366A.indb 15 12/15/2016 10:43:25 AM

16
Accesorios Opcionales
Requisitos del Sistema
Contenido del Empaque
• Cables HDMI de Alta Velocidad de la Serie P568
• U222-004-R - Hub USB 2.0 de 4 Puertos
• U222-007-R - Hub de 7 puertos USB 2.0
• U222-010-R - Hub USB 2.0 de 10 puertos
• Cables para Dispositivo USB 2.0 A/B Serie U022
• Cables USB 2.0 Mini-B de la Serie U030
• Cables USB 2.0 Micro-B de la Serie U050
• Monitor HDMI
• Teclado USB
• Mouse USB
• Computadora con un puerto HDMI y USB
• B032-HUA2
• Manual del Propietario
16-11-116-93366A.indb 16 12/15/2016 10:43:25 AM

17
Instalación
Nota: Asegúrese de que todos los dispositivos estén apagados antes de la instalación.
Debe desconectar los cables de alimentación de cualquier computadora que tenga la
Función de Encendido del Teclado.
1. Enchufe su teclado y mouse USB y monitor HDMI en los puertos de
consola en la unidad.
Nota: Si usa un teclado y mouse inalámbricos, el adaptador debe enchufarse en el
puerto del teclado de la unidad a fin de usar la función de teclas rápidas.
2. (Opcional) Puede conectarse un hub USB 2.0 al puerto de mouse de la
consola, permitiéndole agregar múltiples periféricos USB a su instalación.
Nota: Para asegurar la funcionalidad correcta, use un hub que cuente con
una fuente de alimentación externa. Además, al conectar un hub debe estar
deshabilitado el Modo de Emulación de Mouse del KVM (para detalles, vea la
sección de Comandos de Teclas Rápidas de este manual).
3. (Opcional) Enchufe sus bocinas y/o micrófono en los conectores de
audio en el costado de la unidad.
4. Enchufe los conectores de los cables incorporados es sus respectivos
puertos en las computadoras que está instalando.
5. Encienda sus dispositivos.
Nota: El encendido predeterminado de la unidad es para enlazarse a la primera
computadora que se enciende.
16-11-116-93366A.indb 17 12/15/2016 10:43:25 AM

18
Operación
Hay tres formas de acceder las computadoras y dispositivos conectados al
KVM: Conmutación Remota Manual, Conmutación por Puerto de Mouse y
Teclas Rápidas.
Nota: Al alternar puertos, espere algunos segundos para que el video de la
computadora se muestre en el monitor de la consola antes de alternar puertos
nuevamente. No alterne los puertos cuando un dispositivo periférico esté en operación.
Selección por Puerto Remoto Manual
Oprima el botón de Selección de Puerto en el Selector de Puerto Remoto
para alternar el enfoque a KVM y Audio entre las dos computadoras. Las
luces LED en al unidad indicarán qué computadora está seleccionada.
Funcionalidad de Conmutación del Puerto de Mouse
Nota: La conmutación del puerto del mouse está desactivada de forma
predeterminada y debe ser activada mediante una orden de Teclas Rápidas de teclado.
Además, es solo permitida cuando está activado el modo de emulación de mouse del
KVM, que está activada de fábrica (para detalles, vea la sección Comandos de Teclas
Rápidas). Solo soporta mouse de tres teclas con rueda.
Cuando está activada, la Funcionalidad de Conmutación de Puerto del Mouse
permite a los usuarios con mouse de rueda alternar simultáneamente KVM y
Audio entre puertos haciendo doble click en la rueda en su mouse.
Comandos de Teclas Rápidas de Teclado
Las Teclas Rápidas le permiten alternar la funcionalidad entre puertos
usando solo el teclado, así como ejecutar otras funciones en el KVM.
Todas las operaciones de Teclas Rápidas inician tocando dos veces la tecla
[Scroll Lock]. Para detalles completos, consulte la tabla de Comandos
de Teclas Rápidas. Para alternar el KVM y Audio entre los dos puertos,
oprima dos veces la tecla [Scroll Lock] y después la tecla [Enter]. Si la
Teclas Rápidas [Scroll Lock] [Scroll Lock] entra en conflicto con otros
programas que corren en su computadora, puede cambiarse a [Ctrl] [Ctrl]
mediante un comando de Teclas Rápidas. Para detalles, consulte la tabla
de Comandos de Teclas Rápidas. La Teclas Rápidas puede cambiarse
también oprimiendo y sosteniendo durante 3 segundos el switch selector de
puerto remoto.
16-11-116-93366A.indb 18 12/15/2016 10:43:25 AM

19
Operación
Comandos de Teclas Rápidas de Teclado
La siguiente tabla lista los comandos de teclas rápidas disponibles para uso
en el KVM.
Combinación Función
[Scroll
Lock],
[Scroll
Lock]+
[Enter] Alterna el enfoque de KVM y Audio entre los dos puertos
Nota: Si el enfoque de KVM y Audio está en puertos diferentes, solo cambia
el enfoque del KVM
[k] [Enter] Solamente activa el enfoque del KVM
[s] [Enter] Solamente activa el enfoque del Audio
[a] [Enter] Inicia el Escaneo Automático. El enfoque del KVM alterna de
puerto a puerto a intervalos de 5 segundos
[a] [Enter]
[n]
Inicia el Escaneo Automático. El enfoque del KVM alterna de
puerto a puerto a intervalos de n segundos
Nota: Reemplace n con un número entre 1 y 4
(1 = 3 s; 2 = 5 s (predeterminado); 3 = 10 s; 4 = 20 s)
Para salir del Escaneo Automático, oprima [Esc] o [Barra
Espaciadora]. El Escaneo Automático se detiene cuando sale del
Modo de Escaneo Automático
[x] [Enter] Alterna la tecla de invocación de la Teclas Rápidas entre
[Scroll Lock] y [Ctrl]
[m] [Enter] Activa / Desactiva la función de emulación de mouse.
[n] [Enter] Activa / Desactiva la función de emulación de teclado
[w] [Enter] Activa / Desactiva la función de alternancia de puertos del Mouse.
[F2] [Enter] Activa el mapeo de teclado Mac
[F10]
[Enter]
Detecta y establece automáticamente la plataforma de operación
del teclado.
[F4] [Enter] Lista los parámetros actuales del KVM mediante la función de
pegar de un editor de texto
Nota: Para ejecutar estas Teclas Rápidas, debe tener abierto primero un
editor de texto o procesador de palabras (como Microsoft Word), con el
cursor en la ventana de la página. Una vez ejecutada estas Teclas Rápidas,
se mostrarán los parámetros actuales del KVM.
[F5] [Enter] Ejecuta una restauración del teclado y el mouse USB
[F6] [nn]
[Enter]
Establece la distribución de idioma del teclado
Nota: nn es un número de dos dígitos que representa uno de los siguientes
códigos de idioma de teclado: inglés de EE UU 33; francés 08; japonés 15
16-11-116-93366A.indb 19 12/15/2016 10:43:25 AM

20
Operación
Combinación Función
[Scroll
Lock],
[Scroll
Lock]+
[d] [Enter] Invoca la función de Sincronización de Video, que permite al
KVM almacenar la información EDID del monitor para optimizar
la resolución de pantalla
[e] [Enter] Activa / Desactiva la función de Detección de Encendido
[r] [Enter] Restaura las Teclas Rápidas a la configuración predeterminada
Herramienta de Actualización de Firmware
Para actualizar el firmware del B032-HUA2, ejecute lo siguiente:
1. Desde una computadora que no es parte de la instalación del KVM, descargue
el paquete de Actualización de Firmware para el B032-HUA2 desde el sitio de
soporte de Tripp Lite, www.tripplite.com/support.
2. Desconecte el B032-HUA2 de la instalación de su KVM. Oprima y sostenga
el botón del Selector Remoto del Puerto. Mientras que todavía mantiene el
botón, conecte el conector USB del cable morado del KVM a un puerto USB de
la computadora a la que usted ha descargado el paquete de actualización de
Firmware.
3. Ahora el B032-HUA2 ingresa al Modo de Actualización de Firmware. Los dos
LED’s de puerto destellan juntos para indicar que la unidad está en Modo de
Actualización de Firmware.
Nota: Mientras el B032-HUA2 está en Modo de Actualización de Firmware, están
suspendidas las funciones normales del teclado y del mouse. Debe completar la
Actualización de Firmware o salir del Modo de Actualización de Firmware para retomar el
control de la consola.
4. Corra el archivo del Paquete de Actualización de Firmware; aparece la pantalla
principal de la Herramienta de Actualización de Firmware.
5.Para ejecutar la actualización haga click en Siguiente. Según avance la
actualización, aparecen mensajes del estado en el panel de Mensaje de Estado
y el avance hacia el final se muestra en la barra de Avance.
6. Después de completada la actualización, aparece una pantalla emergente
para informarle que el proceso de actualización fue exitoso. Para cerrar la
Herramienta de Actualización de Firmware, haga click en Terminar.
7. Configure nuevamente la instalación de su KVM.
16-11-116-93366A.indb 20 12/15/2016 10:43:25 AM
La page est en cours de chargement...
La page est en cours de chargement...
La page est en cours de chargement...
La page est en cours de chargement...
La page est en cours de chargement...
La page est en cours de chargement...
La page est en cours de chargement...
La page est en cours de chargement...
La page est en cours de chargement...
La page est en cours de chargement...
La page est en cours de chargement...
La page est en cours de chargement...
La page est en cours de chargement...
La page est en cours de chargement...
La page est en cours de chargement...
La page est en cours de chargement...
La page est en cours de chargement...
La page est en cours de chargement...
La page est en cours de chargement...
La page est en cours de chargement...
La page est en cours de chargement...
La page est en cours de chargement...
La page est en cours de chargement...
La page est en cours de chargement...
La page est en cours de chargement...
La page est en cours de chargement...
La page est en cours de chargement...
La page est en cours de chargement...
La page est en cours de chargement...
La page est en cours de chargement...
La page est en cours de chargement...
La page est en cours de chargement...
-
 1
1
-
 2
2
-
 3
3
-
 4
4
-
 5
5
-
 6
6
-
 7
7
-
 8
8
-
 9
9
-
 10
10
-
 11
11
-
 12
12
-
 13
13
-
 14
14
-
 15
15
-
 16
16
-
 17
17
-
 18
18
-
 19
19
-
 20
20
-
 21
21
-
 22
22
-
 23
23
-
 24
24
-
 25
25
-
 26
26
-
 27
27
-
 28
28
-
 29
29
-
 30
30
-
 31
31
-
 32
32
-
 33
33
-
 34
34
-
 35
35
-
 36
36
-
 37
37
-
 38
38
-
 39
39
-
 40
40
-
 41
41
-
 42
42
-
 43
43
-
 44
44
-
 45
45
-
 46
46
-
 47
47
-
 48
48
-
 49
49
-
 50
50
-
 51
51
-
 52
52


Tripp Lite B032-HUA2 Le manuel du propriétaire
- Catégorie
- Commutateurs KVM
- Taper
- Le manuel du propriétaire
dans d''autres langues
Documents connexes
-
Tripp Lite B032-DUA2 Le manuel du propriétaire
-
Tripp Lite B032-VUA2 Le manuel du propriétaire
-
Tripp Lite B004-DP2UA2-K Le manuel du propriétaire
-
Tripp Lite TRIPP-LITE B021-SWHD-K Rack-Mount Short-Depth HDMI KVM Console Mode d'emploi
-
Tripp Lite B004-HUA4-K Le manuel du propriétaire
-
Tripp Lite B032-DPUA2 Le manuel du propriétaire
-
Tripp Lite B004-2DUA2-K & B004-2DUA4-K Le manuel du propriétaire
-
Tripp Lite SEC6C Le manuel du propriétaire
-
-
