Taylor Circa Mode d'emploi
- Catégorie
- Amplificateurs audio
- Taper
- Mode d'emploi

CIRCA 74
AMPLIFIER
®
USER GUIDE
English
Français
Deutsch
Español

CONGR ATUL ATI ON S on your new Circa 74® Amplifier.
With your Circa 74® Amplifier, getting a great-sounding amplified acoustic
tone is as easy as plugging in your guitar.
If you have any questions about your amplifier, please contact Taylor
Guitars Customer Service at 1-800-943-6782 in North America or +31 (0) 20
667 6033 in Europe.
CO NTENTS
3
5
6
7
8
9
SAFETY ADVI SOR I ES
CONTROL PANE L TOUR
BACK PANE L TOUR
S PECI FICATION S
FUS E R EPLACEMENT
LI M ITE D WARRANTY
All trademarks and registered trademarks mentioned herein are recognized as the
property of their respective holders.
ENGLISH
10
CERTIFICATIONS
BLUETOOTH INSTRUCTIONS
11

3
ENGLISH
Ce symbole est destiné à rappeler à l'utilisateur qu'il existe une non – isolation
"Tension dangereuse" dans l'enceinte du produit.
Ce symbole vise à attirer l'attention de l'utilisateur sur les instructions
importantes d'exploitation et d'entretien (réparation) contenues dans la
documentation accompagnant l'appareil.
Attention à la sécurité
Risque de choc électrique
Ne pas ouvrir
Note: pour réduire le risque de choc électrique,
Ne retirez pas le couvercle.
Il n'y a pas de pièces utilisables à l'intérieur.
Remettre les travaux d'entretien à un personnel d'entretien qualifié
Ne pas exposer l'équipement à des gouttes ou à des éclaboussures d'eau. Les
objets remplis de liquides, tels que les vases ou les contenants de boissons, ne
doivent pas être placés sur l'équipement.
Avertissement de sécurité

4
ENGLISH
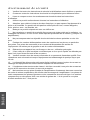
Avertissement de sécurité
1. Veuillez lire toutes les instructions de sécurité et d'utilisation avant d'utiliser ce produit.
2. Conserver toutes les instructions de sécurité et d'exploitation pour référence future.
3. Lisez et comprenez tous les avertissements énumérés dans les instructions
d'utilisation.
4. Utilisez ce produit conformément à toutes les instructions d'utilisation.
5. Attention: pour réduire le risque de choc électrique, ne pas exposer l'équipement à la
pluie ou à l'humidité. Ce produit ne doit pas être utilisé près de l'eau, comme baignoire,
évier, piscine, sous - sol humide, etc.
6. Nettoyer ce produit uniquement avec un chiffon sec
7. Ne pas placer ce produit à proximité d'une source de chaleur telle qu'un radiateur, un
échangeur de chaleur, un four ou tout autre dispositif produisant de la chaleur (y compris un
amplificateur).
8. Ne pas compromettre les objectifs de sécurité des bouchons polarisés ou mis à la
terre.
9. Protéger les cordons d'alimentation contre les marches ou les pinces, en particulier
aux prises, aux prises de commodité et aux cordons d'alimentation des sorties de
l'équipement. Ne retirez pas la goupille au sol du cordon d'alimentation.
10. Débranchez cet appareil en cas d'orage ou de non - utilisation prolongée.
11. Il faut veiller à ce que les objets ne tombent pas et à ce que le liquide ne déborde pas
dans l'unit é par l'évent ou toute autre ouverture.
12. Veuillez remettre tous les travaux d'entretien à un personnel d'entretien qualifié. Des
réparations sont nécessaires lorsque l'équipement est endommagé de quelque façon que
ce soit.
13. Le dispositif de déconnexion doit rester facile à utiliser lorsque la prise de courant ou
l'attelage de l'équipement est utilisé comme dispositif de déconnexion.
14. L'équipement des structures de classe 1 doit être raccordé à une prise de courant au
moyen d'une connexion de mise à la terre de protection.
15. Ne branchez aucune prise d'entrée de l'amplificateur directement dans une connexion
de sortie du même amplificateur afin d'éviter des dommages à l'amplificateur. Les prises de
sortie comprennent les prises d'écouteurs et les connexions de sortie de ligne. Les entrées
comprennent un microphone XLR, une entrée de guitare de 1 / 4 de pouce et une prise
d'entrée auxiliaire de 1 / 8 de pouce.

3
ENGLISH
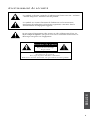
This symbol is intended to alert the user to the presence of non-insulated
“dangerous voltage” within the product’s enclosure.
This symbol is intended to alert the user to the presence of important
operating and maintenance (servicing) instructions in the literature
accompanying the unit.
CAUTION
RISK OF ELECTRIC SHOCK
DO NOT OPEN
CAUTION: TO REDUCE THE RISK OF ELECTRIC SHOCK,
DO NOT REMOVE COVER.
NO USER-SERVICEABLE PARTS INSIDE.
REFER SERVICING TO QUALIFIED SERVICE PERSONNEL.
Do not expose the device to dripping or splashing. Objects filled with liquids,
such as vases or beverage containers, should not be placed on the device.
SAFETY ADVISORIES

4
ENGLISH
SAFETY ADVISORIES
1. READ all safety and operating instructions before using this product.
2. KEEP all safety and operating instructions for future reference.
3. READ and understand all warnings listed in the operating instructions.
4. FOLLOW all operating instructions to use this product.
5. WARNING: To reduce the risk of electric shock, do not expose this apparatus to rain
or moisture. This product should not be used near water, i.e., bathtub, sink, swimming pool,
wet basement, etc.
6. Only use a dry cloth to clean this product.
7. DO NOT place this product near any heat sources such as radiators, heat registers,
stoves or other apparatus (including amplifiers) that produce heat.
8. DO NOT defeat the safety purpose of the polarized or grounding-type plug.
9. Protect the power cord from being walked on or pinched, particularly at plugs,
convenience receptacles, and the point where they exit from the apparatus. DO NOT
remove the ground pin from the power supply cord.
10. Unplug this apparatus during lightning storms or when unused for a long period of
time.
11. Care should be taken so that objects do not fall and liquids are not spilled into the unit
through the ventilation ports or any other openings.
12. Refer all servicing to qualified service personnel. Servicing is required when the
apparatus has been damaged in any way.
13. When a mains plug or an appliance coupler is used as the disconnect device, the
disconnect device shall remain readily operable.
14. An apparatus with Class 1 construction shall be connected to a mains socket outlet
with a protective grounding connection.
15. DO NOT plug any input jack from the amplifier directly into any output connection on
the same amplifier, for risk of damage to the amplifier. Output jacks include the Headphone
jack, and Line Out connections. Inputs include both XLR microphone, 1/4-inch guitar input,
and 1/8-inch Aux In jacks.

5
CONTROL PANEL TOUR
ENGLISH
1 2 3
4
6 7
8
9 10
111213
9 10
111213
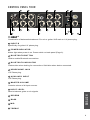
INPUT A
Combination of balanced/unbalanced. For mic or guitar. XLR male or 1/4" phone plug.
INPUT B
Specifically for guitar.1/4" phone plug.
1
2
3POWER INDICATOR
Amber light when power is on. Power switch on back panel (Page 6).
BLUETOOTH BUTTON
Hold to enable Bluetooth connections.
HEADPHONE JACK
4
6
1/8" Phone plug.
7 AUXILIARY INPUT
1/8" Phone plug.
MASTER VOLUME
Controls volume of all input sources.
INPUT LEVEL
Used to balance guitar or mic signals.
8
9
BASS
MID
11
12
13 TREBLE
5
BLUETOOTH INDICATOR
Flashes blue when looking for connections. Solid blue when device connected.
5
REVERB
10

6
ENGLISH
BACK PANEL TOUR
2
1
1 FUSE HOLDER
To replace fuse refer to page 9 of this manual.
2 POWE R CABLE INLET
The amplifier uses a standard IEC 320-C13 cable (provided) to interface to the wall socket. In
the event that the fuse in your amplifier becomes damaged, only replace it with the proper type
indicated for your region’s voltage in the table below the inlet.
3 DIRECT OUT
Balanced XLR Connector to appropriate PA connection.
LINE OUT
1/4" Mono Audio Jack for line level output signal to line level input of another powered
audio device.
4
3
4
5
POWER SWITCH
5

7
ENGLISH
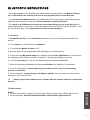
BLUETOOTH INSTRUCTIONS
-The only control on the amplifier that affects the Bluetooth Audio is the Master Volume,
which also affects the volume level of the two physical XLR & 1/4-inch inputs.
-You control the individual level of the Bluetooth Audio, with respect to the two physical
amplifier input channels, using the volume controls on the Input Device.
-The range of the Bluetooth connection varies depending on your Input Device and
material properties of any walls or barriers between the Input Device and the amplifier. Test
the connected range of the Input Device before any performance.
To Connect:
1. Enable Bluetooth on your Input Device and confirm it is not already connected to a
device.
2. Turn volume on Input Device to maximum.
3. Turn amplifier Master Volume to "0".
4. Remain within 3 feet of amplifier while attempting to connect device.
5. Press and hold Bluetooth button on amplifier until the blue light flashes. If at this point
the light goes from flashing to solid, it means it is already connecting to a device.
6. On your Input Device, look for the Bluetooth device labeled "Circa 74"
7. When the light stops flashing and remains solid blue, the amplifier is connected.
8. On your Input Device, select and play your audio source, such as a streaming
service or audio file.
9. On the Amplifier, slowly increase the Master Volume until you hear the audio source
playing on your Input Device.
10. Adjust Input Device audio source volume with the volume controls on the Input
Device.
To Disconnect:
Either:
1. On your input device, follow the device instructions to disconnect a Bluetooth Device.
2. On the amplifier, hold the Bluetooth Button until the blue light shuts off.

6
Diagram of Signal Flow
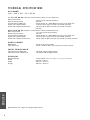
TECHNICAL SPECIFICATIONS
AC POWER
100 - 240 V AC ~ 50 / 60 Hz
11 5 V AC 60 Hz All power measurements taken at 115 V AC 60 Hz
Max Current Draw
Nominal Current Draw
Fuse Recommended Type
Power Consumption (Idle)
Power Consumption (Full Power)
1.97 A max (at full output power)
230 mA
250 V AC 2 A TL - Slow Blow Time Lag (5 mm X 20 mm)
12 W (No input signal, controls full C.C.W. position)
152 W (100 Hz Sine wave 30 mV, controls full C.W.
position)
230 V AC 50 Hz All power measurements taken at 230 VAC 50 Hz
Max Current Draw
Nominal Current Draw
Fuse Recommended Type
Power Consumption (Idle)
1.1 A max (at full output power)
148 mA
250 V AC 2 A TL - Slow Blow Time Lag (5 mm X 20 mm)
15 W (no input signal, controls full C.C.W. position)
Power Consumption (Full Power) 143 W (100 Hz Sine wave 30 mV, controls full C.W. position)
AUDIO POWER
RMS Power
Input Sensitivity
INPUT RESISTANCE
Input Resistance Balanced
Input Resistance Unbalanced
PHYSICAL
Nominal Weight
Depth
Width
Height
125 W (8 Ω resistive load)
30 mV ( 1000 Hz Sine wave controls full C.W. position)
3.6 kΩ @ 100 Hz (approximate)
110 kΩ @ 100 Hz (approximate)
10 kg / 22 lbs. *Depends slightly on wood type and density
234 mm / 9.21 in.
375 mm / 14.76 in.
422 mm / 16.61 in.
Specifications are subject to change without notice.
8
ENGLISH

9
Turn off power.
Unplug the power cable.
Unscrew fuse holder with flathead screwdriver.
Replace blown fuse with new T2L250V fuse.
Reinstall fuse holder.
Keep a spare fuse ready for future use.
If fuse continues to blow, contact an amplifier repair professional
ENGLISH
FUSE REPLACEMENT
1
2
3
4
5
FCC STATEMENT
Changes or modifications not expressly approved by the party responsible for compliance
could void the user's authority to operate the equipment.
NOTE: This equipment has been tested and found to comply with the limits for a Class B
digital device, pursuant to Part 15 of the FCC Rules. These limits are designed to provide
reasonable protection against harmful interference in a residential installation. This
equipment generates uses and can radiate radio frequency energy and, if not installed and
used in accordance with the instructions, may cause harmful interference to radio
communications. However, there is no guarantee that interference will not occur in a
particular installation. If this equipment does cause harmful interference to radio or
television reception, which can be determined by turning the equipment off and on, the
user is encouraged to try to correct the interference by one or more of the following
measures:
Reorient or relocate the receiving antenna.
Increase the separation between the equipment and receiver.
Connect the equipment into an outlet on a circuit different from that to which the
receiver is connected.
Consult the dealer or an experienced radio/TV technician for help.
FCC RADIATION EXPOSURE STATEMENT
The device has been evaluated to meet general RF exposure requirement.
The device can be used in portable exposure condition without restriction.

10
1980 Gillespie Way, El Cajon, CA 92020 USA (800) 943-6782
Maroastraat 113, 1060 LG Amsterdam, Netherlands +31 (0) 20 667 6033
taylorguitars.com
IC WARNING
This device contains licence-exempt transmitter(s)/receiver(s) that comply with
Innovation, Science
and Economic Development Canada’s licence-exempt RSS(s). Operation is subject
to the following two conditions:
(1) This device may not cause interference.
(2) This device must accept any interference, including interference that may cause
undesired operation of the device.
Le présent appareil est conforme aux CNR d’Industrie Canada applicables aux appareils
radio exempts de licence. Lexploitation est autorisée aux deux conditions suivantes:
(1) l’appareil ne diot pas produire de brouillage, et
(2) l’utilisateur de lappareil diot accepter tout bouillage radioélectrique subi, méme si le
brouillage est susceptible d’en compromettre le fonctionnement.
1. This device may not cause harmful interference.
2. This device must accept any interference received, including interference that may cause
undesired operation.
CALIFORNIA PROP 65 WARNING
This product may contain a chemical(s) known to the state of California to cause cancer,
birth defects, or other reproductive harm.

-
 1
1
-
 2
2
-
 3
3
-
 4
4
-
 5
5
-
 6
6
-
 7
7
-
 8
8
-
 9
9
-
 10
10
-
 11
11
-
 12
12
-
 13
13


Taylor Circa Mode d'emploi
- Catégorie
- Amplificateurs audio
- Taper
- Mode d'emploi
dans d''autres langues
- English: Taylor Circa User guide
Autres documents
-
Harbinger V3412 Le manuel du propriétaire
-
Philips 10.4" Multimedia 4:3 Frame Ratio Manuel utilisateur
-
Harbinger MLS1000 Le manuel du propriétaire
-
-
Alpine MRX-F30 Le manuel du propriétaire
-
 YORKVILLE EXM400 Le manuel du propriétaire
-
Eclipse AVN726E Manuel utilisateur
-
Philips Car Stereo System CEM200 Manuel utilisateur
-
Peavey LN 1263 Column Array Le manuel du propriétaire
-
YORKVILLE EF215P Le manuel du propriétaire
