Milwaukee 49-16-2720-49-16-2721 Manuel utilisateur
- Catégorie
- Tronçonneuses électriques
- Taper
- Manuel utilisateur

Cat. No. / No de cat.
49-16-2720
M18 FUEL™ 10" POLE SAW ATTACHMENT W/ QUIK-LOK™
ACCESSOIRE DE SCIE A LONG MANCHE DE 254 mm (10")
M18 FUEL™ AVEC QUIK-LOK™
ACCESORIO DE LA SIERRA DE PÉRTIGA DE 254 mm (10")
M18 FUEL™ CON QUIK-LOK™
WARNING To reduce the risk of injury, user must read and understand operator's manual.
AVERTISSEMENT An de réduire le risque de blessures, l'utilisateur doit lire et bien
comprendre le manuel.
ADVERTENCIA Para reducir el riesgo de lesiones, el usuario debe leer y entender el manual.
OPERATOR'S MANUAL
MANUEL de L'UTILISATEUR
MANUAL del OPERADOR

2
GENERAL POWER TOOL
SAFETY WARNINGS
WARNING
Read all safety warnings, instruc-
tions, illustrations and specica-
tions provided with this power tool. Failure to
follow all instructions listed below may result in
electric shock, re and/or serious injury. Save all
warnings and instructions for future reference.
The term "power tool" in the warnings refers to your
mains-operated (corded) power tool or battery-oper-
ated (cordless) power tool.
WORK AREA SAFETY
• Keep work area clean and well lit. Cluttered or
dark areas invite accidents.
• Do not operate power tools in explosive atmo-
spheres, such as in the presence of ammable
liquids, gases or dust. Power tools create sparks
which may ignite the dust or fumes.
• Keep children and bystanders away while operat-
ing a power tool. Distractions can cause you to lose
control.
ELECTRICAL SAFETY
• Power tool plugs must match the outlet. Never
modify the plug in any way. Do not use any
adapter plugs with earthed (grounded) power
tools. Unmodied plugs and matching outlets will
reduce risk of electric shock.
• Avoid body contact with earthed or grounded
surfaces, such as pipes, radiators, ranges and
refrigerators. There is an increased risk of electric
shock if your body is earthed or grounded.
• Do not expose power tools to rain or wet condi-
tions. Water entering a power tool will increase the
risk of electric shock.
• Do not abuse the cord. Never use the cord for
carrying, pulling or unplugging the power tool.
Keep cord away from heat, oil, sharp edges or
moving parts. Damaged or entangled cords increase
the risk of electric shock.
• When operating a power tool outdoors, use an
extension cord suitable for outdoor use. Use of
a cord suitable for outdoor use reduces the risk of
electric shock.
• If operating a power tool in a damp location is
unavoidable, use a ground fault circuit interrupter
(GFCI) protected supply. Use of an GFCI reduces
the risk of electric shock.
PERSONAL SAFETY
• Stay alert, watch what you are doing and use
common sense when operating a power tool. Do
not use a power tool while you are tired or under
the inuence of drugs, alcohol or medication. A
moment of inattention while operating power tools
may result in serious personal injury.
• Use personal protective equipment. Always
wear eye protection. Protective equipment such
as a dust mask, non-skid safety shoes, hard hat or
hearing protection used for appropriate conditions
will reduce personal injuries.
• Prevent unintentional starting. Ensure the switch
is in the o-position before connecting to power
source and/or battery pack, picking up or carrying
the tool. Carrying power tools with your nger on
the switch or energizing power tools that have the
switch on invites accidents.
• Remove any adjusting key or wrench before
turning the power tool on. A wrench or a key left
attached to a rotating part of the power tool may
result in personal injury.
• Do not overreach. Keep proper footing and
balance at all times. This enables better control
of the power tool in unexpected situations.
• Dress properly. Do not wear loose clothing or
jewelry. Keep your hair and clothing away from
moving parts. Loose clothes, jewelry or long hair
can be caught in moving parts.
• If devices are provided for the connection of
dust extraction and collection facilities, ensure
these are connected and properly used. Use of
dust collection can reduce dust-related hazards.
• Do not let familiarity gained from frequent use
of tools allow you to become complacent and
ignore tool safety principles. A careless action can
cause severe injury within a fraction of a second.
POWER TOOL USE AND CARE
• Do not force the power tool. Use the correct power
tool for your application. The correct power tool
will do the job better and safer at the rate for which
it was designed.
• Do not use the power tool if the switch does not
turn it on and o. Any power tool that cannot be
controlled with the switch is dangerous and must be
repaired.
• Disconnect the plug from the power source and/
or remove the battery pack, if detachable, from
the power tool before making any adjustments,
changing accessories, or storing power tools.
Such preventive safety measures reduce the risk of
starting the power tool accidentally.
• Store idle power tools out of the reach of children
and do not allow persons unfamiliar with the
power tool or these instructions to operate the
power tool. Power tools are dangerous in the hands
of untrained users.
• Maintain power tools and accessories. Check
for misalignment or binding of moving parts,
breakage of parts and any other condition that
may aect the power tool’s operation. If damaged,
have the power tool repaired before use. Many
accidents are caused by poorly maintained power
tools.
• Keep cutting tools sharp and clean. Properly
maintained cutting tools with sharp cutting edges
are less likely to bind and are easier to control.
• Use the power tool, accessories and tool bits
etc. in accordance with these instructions,
taking into account the working conditions and
the work to be performed. Use of the power tool
for operations dierent from those intended could
result in a hazardous situation.
• Keep handles and grasping surfaces dry, clean
and free from oil and grease. Slippery handles and
grasping surfaces do not allow for safe handling and
control of the tool in unexpected situations.
BATTERY TOOL USE AND CARE
• Recharge only with the charger specied by the
manufacturer. A charger that is suitable for one type
of battery pack may create a risk of re when used
with another battery pack.
• Use power tools only with specically designated
battery packs. Use of any other battery packs may
create a risk of injury and re.

3
• When battery pack is not in use, keep it away
from other metal objects, like paper clips, coins,
keys, nails, screws or other small metal objects,
that can make a connection from one terminal
to another. Shorting the battery terminals together
may cause burns or a re.
• Under abusive conditions, liquid may be ejected
from the battery; avoid contact. If contact acciden-
tally occurs, ush with water. If liquid contacts
eyes, additionally seek medical help. Liquid
ejected from the battery may cause irritation or burns.
• Do not use a battery pack or tool that is dam-
aged or modied. Damaged or modied batteries
may exhibit unpredictable behavior resulting in re,
explosion or risk of injury.
• Do not expose a battery pack or tool to re or
excessive temperature. Exposure to re or tem-
perature above 265°F (130°C) may cause explosion.
• Follow all charging instructions and do not charge
the battery pack or tool outside the temperature
range specied in the instructions. Charging
improperly or at temperatures outside the specied
range may damage the battery and increase the risk
of re.
SERVICE
• Have your power tool serviced by a qualied
repair person using only identical replacement
parts. This will ensure that the safety of the power
tool is maintained.
• Never service damaged battery packs. Service
of battery packs should only be performed by the
manufacturer or authorized service providers.
SPECIFIC SAFETY RULES
FOR POLE SAW
• Before use, read this manual, and all manuals and
labels of this tool and its power head. Failure to
follow the warnings and instructions may result
in serious injury. Use tool only as described in
this manual. Use only attachments recommended
by MILWAUKEE.
• Always wear eye, hearing, and head protection,
and protective clothing and footwear, according
to the operation being performed. Wear heavy,
long pants, long sleeves, boots, and gloves.
Contain long hair. Do not wear loose clothing or
jewelry. Do not wear short pants, sandals, or go
barefoot.
• Keep bystanders at least 50' away during use.
•This tool is for use in trimming and pruning wood
only. Do not use for felling trees or branches over
9" diameter, or cutting other materials such as
metal or plastic. Do not cut vines and/or small
underbrush.
•
WARNING
Do not operate near electric power
lines. The unit has not been de-
signed to provide protection from electric shock
in the event of contact with electric power lines.
Consult local regulations for safe distances from
electric power lines and ensure that the operating
position is safe and secure before use.
•Do not extend tool by more than one attachment
extension. Additional attachment extensions will
make the pole unstable and dicult to control, which
could result in injury.
• When using this attachment with larger-capacity
battery packs, use the shoulder strap to reduce
user fatigue and help in maintaining control of
the tool during use.
•Do not operate the tool without the front handle in
place. The front handle must be attached properly
during use. Use both hands when operating the
tool, according to the attachment instructions.
Maintain a rm grip. Using one hand could cause
loss of control and result in serious injury.
• Do not operate a pole saw in a tree, on a ladder,
from a rooftop, or any unstable support. Operation
of a pole saw in this manner could result in serious
personal injury.
•Identify a clear retreat path before beginning a cut.
Falling limbs and branches will cause injury.
•Keep face, hands and feet clear of moving parts at
all times. Moving parts can cause severe lacerations.
• Before you start the tool, make sure the saw chain
is not contacting anything. A moment of inattention
while operating saws may cause entanglement of your
clothing or body with the saw chain.
• Hold the tool by insulated gripping surfaces only,
because the saw chain may contact hidden wir-
ing. Saw chains contacting a "live" wire may make
exposed metal parts of the saw "live" and could give
the operator an electric shock.
• Before starting the tool check the work area for
hidden objects, such as wire fencing, posts, etc.
Striking a solid object could cause loss of control and
serious personal injury.
•Brace for unexpected movement when contact
is made with a hard object. Loss of control could
result in serious injury.
•Do not stand directly under branch/limb being
cut. Falling debris will cause injury. Do not use
tool at an angle greater than 60° to ground level.
• Always keep proper footing and operate the pole
saw only when standing on xed, secure and level
surface. Slippery or unstable surfaces may cause a
loss of balance or control of the tool.
• Do not overreach. This helps prevent unintended
tip contact and enables better control of the tool in
unexpected situations.
Causes and operator prevention of kickback:
Kickback may occur when the nose or tip of the guide
bar touches an object, or when the wood closes in and
pinches the saw chain in the cut.
Tip contact in some cases may cause a sudden reverse
reaction, kicking the guide bar up and back towards
the operator.
Pinching the saw chain along the top of the guide
bar may push the guide bar rapidly back towards the
operator.
Either of these reactions may cause you to lose con-
trol of the tool which could result in serious personal
injury. Do not rely exclusively upon the safety devices
built into your tool. As a pole saw user, you should
take several steps to keep your cutting jobs free from
accident or injury.
Kickback is the result of tool misuse and/or incorrect
operating procedures or conditions and can be avoided
by taking proper precautions as given below:
• Maintain a rm grip, with thumbs and ngers en-
circling the tool handles, with both hands on the
tool and position your body and arm to allow you
to resist kickback forces. Kickback forces can be
controlled by the operator, if proper precautions are
taken. Do not let go of the tool.
• Only use replacement guide bars and saw chains
specied by the manufacturer. Incorrect replace-
ment guide bars and saw chains may cause chain
breakage and/or kickback.

4
• Follow the manufacturer’s sharpening and main-
tenance instructions for the saw chain. Decreas-
ing the depth gauge height can lead to increased
kickback.
• Follow all instructions when clearing jammed
material, storing or servicing the tool. Make sure
the switch is o and the battery pack is removed.
Unexpected actuation of the tool while clearing
jammed material or servicing may result in serious
personal injury.
• Do not attempt to limb or trim a tree until you have
an understanding of the risks and how to avoid
them. Serious injury could occur to the operator or
bystanders while limbing or trimming a tree.
• When cutting a limb that is under tension be alert
for spring back. When the tension in the wood bres
is released the spring loaded limb may strike the op-
erator and/or throw the tool out of control.
• Use extreme caution when cutting brush and sap-
lings. The slender material may catch the saw chain
and be whipped toward you or pull you o balance.
• Stop the tool before setting it down.
• Carry the tool by the front handle to avoid ac-
cidental starting. Proper handling of the tool will
prevent injury.
• Always turn o the tool when transporting from
one location to another. Do not carry tool with nger
on the trigger. Accidental starting can cause serious
personal injury.
• When transporting or storing the pole saw always
t the guide bar cover. Proper handling of the pole
saw will reduce the likelihood of accidental contact
with the moving saw chain.
• Do not immerse in water or spray with a hose. Do
not clean with a pressure washer. Water entering
a power tool will increase the risk of electric shock.
Store tool indoors.
• Do not store the power tool on or near to fertilizers
or chemicals.
• Always turn o the tool and then remove battery
pack before changing or removing accessories.
•
Use only recommended accessories. Others
may be hazardous.
• Maintain the unit with care. Keep the cutting edge
sharp and clean for best performance and to reduce
the risk of injury. Follow instructions for lubricating and
changing accessories.
•
Chain is sharp. Always wear protective gloves
when handling the chain.
• Follow instructions for lubricating, chain tension-
ing and changing the bar and chain. Improperly
tensioned or lubricated chain may either break or
increase the chance for kickback.
Other Safety Rules
• Keep ALL children, bystanders, visitors, and ani-
mals out of the work area while starting or cutting
with the tool.
• Dress Properly - Wear snug tting clothing. Always
wear heavy, long pants, long sleeves, overalls, jeans
or chaps made of cut resistant material or ones that
contain cut resistant inserts. Wear non-slip safety
footwear. Wear non-slip heavy duty gloves to improve
your grip and to protect your hands. Do not wear
jewelry, short pants, sandals, or go barefoot. Do not
wear loose tting clothing, which could be drawn into
the motor or catch the chain or underbrush. Secure
hair so it is above shoulder level. Wear hearing and
head protection.
• Heavy protective clothing may increase operator
fatigue, which could lead to heat stroke. During
weather that is hot and humid, heavy work should be
scheduled for early morning or late afternoon hours
when temperatures are cooler.
• Always be aware of what you are doing when us-
ing the tool. Use common sense. Do not operate
the tool when you are tired, ill, or under the inuence
of alcohol, drugs, or medication.
• Keep all parts of your body away from the saw
chain when the unit is running.
• Never let anyone use your tool who has not re-
ceived adequate instructions in its proper use.
This applies to rentals as well as privately owned tools.
•Do not hang from pull hook.
• Always use common sense and be cautious when
using tools. It is not possible to anticipate every
situation that could result in a dangerous outcome.
Do not use this tool if you do not understand these
operating instructions or you feel the work is beyond
your capability; contact Milwaukee Tool or a trained
professional for additional information or training.
• Follow the manufacturer’s sharpening and main-
tenance instructions for the saw chain. Decreas-
ing the depth gauge height can lead to increased
kickback.
• Keep handles dry, clean, and free from oil and
grease. Greasy, oily handles are slippery causing
loss of control.
• Maintain labels and nameplates. These carry
important information. If unreadable or missing, contact
a MILWAUKEE service facility for a free replacement.
•
WARNING
Some dust created by power sanding,
sawing, grinding, drilling, and other
construction activities contains chemicals known to
cause cancer, birth defects or other reproductive harm.
Some examples of these chemicals are:
• lead from lead-based paint
• crystalline silica from bricks and cement and other
masonry products, and
• arsenic and chromium from chemically-treated lumber.
Your risk from these exposures varies, depending on
how often you do this type of work. To reduce your
exposure to these chemicals: work in a well ventilated
area, and work with approved safety equipment, such
as those dust masks that are specially designed to
lter out microscopic particles.
READ AND SAVE ALL
INSTRUCTIONS FOR
FUTURE USE
SPECIFICATIONS
Cat. No. ................................................ 49-16-2720
Power Head ............................................... 2825-20
3' Extension Attachment ....................... 49-16-2721
RPM ........................................................... 0 - 4600
Chain Speed ...........................1693 ft/min (8.6 m/s)
Bar Length .........................................10" (254 mm)
Cutting Capacity ..................................9" (230 mm)
Min Branch Diameter ............................1/4" (6 mm)
Max Branch Diameter ..........................9" (230 mm)
Chain Oil Tank Capacity ................ 4.7 oz (140 mL)
Replacement Bar .................................. 48-09-5001
Bar Groove Width ..........................0.043" (1.1 mm)
Replacement Chain ..............................49-16-2723
Chain Type ........................................Low Kickback
Chain Pitch .....................3/8" (9.5 mm) Low Prole
Chain Drive Teeth ................................................40

5
FUNCTIONAL DESCRIPTION
1. Guide bar cover
2. Saw chain
3. Guide bar nut
4. Pull hook
5. Chain tension adjustment
indicator
6. Chain tension adjustment
7. Drive cover
8. Guide bar
9. Direction of rotation
indicator
10. Oil cap
11. Hand grip
12. Attachment pole
13. Detent
2
1
4
9
6
5
10
3
8
11
12
13
7
SYMBOLOGY
Volts
Direct Current
No Load Revolutions per Minute (RPM)
Safety Alert Symbol
Read operator’s manual
Always wear eye protection and
use proper personal protective
equipment.
Wear non-slip safety footwear
Wear protective gloves
Keep tool at least 50' away from
electric power lines.
Keep bystanders at least 50' away
during use.
Avoid contact with bar tip
DANGER
Beware of kickback.
Chain Oil Reservoir
Chain Direction
Chain Tension Adjustment
C
US
UL Listing for Canada and U.S.

6
8. Ensure the chain is properly set in the slot around
the entire guide bar.
9. Loop the chain around the hub and t the bar
around the bolt.
Bolt
Hub
10. Replace the drive cover.
11. Use the adjustment tool to rotate the chain ten-
sioning screw to increase tension (clockwise)
until the chain is snug around the guide bar.
• The tension is correct when the chain snaps back
after being pulled 1/8" (3 mm) away from the
guide bar. No sag should be visible in the chain.
• Do not over-tension the chain - excess tension
will cause excessive wear and will reduce the
life of the chain and could damage the bar.
• New chains could stretch and loosen during
initial use. Remove battery pack and check
chain tension frequently during the rst two
hours of use.
12. Tighten the guide bar nuts securely.
ASSEMBLY
WARNING
Before use, read manual and labels
of the power head. Important as-
sembly and use instructions are provided in the
power head manual. Connect the attachment to
the power head in accordance with the power
head manual.
Always remove battery pack before changing or
removing accessories.
CAUTION
Chain is sharp. Always wear protec-
tive gloves when handling the
chain.
Replacing/Adjusting the
Saw Chain and Bar
Use
Low Kickback Saw Chains - The rakers (depth
gauges) ahead of each cutter can minimize the force
of a kickback reaction by preventing the cutters from
digging in too deeply at the kickback zone. Only
use replacement chain that is equivalent to original
chain or has been certied as low kickback chain
per ANSI B175.1.
As saw chains are sharpened during their useful life,
they lose some of the low kickback qualities and extra
caution should be used.
1. Remove the battery pack.
2. Place the tool on a at, rm surface.
3. Remove the drive cover by removing the guide
bar nuts using the adjustment tool.
4. Loosen the chain by turning the chain tensioning
screw counterclockwise with the adjustment tool.
5. Pull the guide bar o of the guide bar bolts and
unloop the chain from the drive hub. CAUTION!
Saw Chain is sharp.
6. Remove the chain from the guide bar groove.
CAUTION! Saw Chain is sharp. Inspect guide bar
for cracks or wear; replace if damaged.
7. Wrap the new or sharpened chain around the
guide bar in the direction indicated on the tool
.

7
Attaching the Shoulder Strap
(Available as an accessory)
When using this attachment with larger-capacity
battery packs, use the shoulder strap to reduce
user fatigue and help in maintaining control of the
tool during use.
To install the strap:
Nut
Bolt
Pole
clip
Bevel
Gate
Carabiner
1. Remove the battery
pack.
2. Fit the pole clip around
the power head pole
between the front han-
dle and rear handle in
a location comfortable
during use.
3. Insert the bolt through
the pole clip and strap
bevel. Thread the nut
onto the bolt and tight-
en securely.
4. Clip the strap cara-
biner to the bevel.
To wear the strap:
1. Put your right arm
and head through the
strap.
2. Adjust the strap clips
to change the strap
length to t comfort-
ably.
3. Slide the neck pad to
the appropriate posi-
tion.
To unclip the strap:
1. Hold the tool by the front handle with your left hand.
2. Grip the carabiner with your right hand and unclip
by pushing in the gate and it sliding o the bevel.
Quik-Lok™ System
Extension Attachment
(Available as an accessory)
Do not extend tool by more than one extension
attachment. Additional extension attachments will
make the pole unstable and dicult to control, which
could result in injury.
To install an attachment or extension:
1. Remove battery pack.
2. Loosen the lock knob.
3. Slide the pole into the Quik-Lok™ latch. The de-
tent on the pole should line up with the slot in the
Quik-Lok™ latch.
4. Push the sections together securely. Tug on the
poles to ensure they are secure.
5. Tighten the lock knob.
Quik-Lok ™ release button
Detent
Attachment pole
Lock knob
Power head
To remove an attachment or extension:
1. Remove battery pack.
2. Loosen the lock knob.
3. Push in the Quik-Lok™ release button and pull
the poles apart.
Chain Oil
WARNING
Always remove battery pack before
changing or removing accessories.
NOTICE
Fill oil reservoir with chain oil (not
provided) before starting the tool and
when tank is less than 1/4 full. Failure to oil the
chain will cause damage to the bar and chain.
Check oil level frequently and ll the oil reservoir after
each full battery discharge. Use a high quality chain
oil. The oil will keep the saw chain and guide bar
properly lubricated. Never run the tool without chain
oil. Keep the reservoir more than 1/4 full to ensure
sucient oil is available for the job. Always lightly oil
the chain when storing to prevent rust. Always empty
the oil tank when storing to prevent leakage.
NOTE: It is recommended to use a vegetable based
chain oil when pruning trees. Mineral oil may harm
trees. Never use waste oil automotive oil, or very
thick oils. These could damage the tool.
Filling the Oil Reservoir
1. Remove the battery pack.
2. Place the tool on a at, rm surface, blade side down.
3. Unscrew the oil cap.
4. Carefully ll reservoir with chain oil.
5. Tighten oil cap securely.
6. Repeat as needed during use.
7. Periodically check that the saw chain is lubricat-
ing correctly:
• With a full reservoir, hold the tool with the tip of
the guide bar pointing down toward a light-colored
surface.
• Run the tool for approximately 30 seconds.
• An oil line should become visible on the light
surface.
• If not, remove and clean the guide bar thoroughly.
Ensure the guide bar sprocket (at the tip) rotates
freely.
• If the lubrication system still does not work prop-
erly, contact a MILWAUKEE service facility.
Transporting Tool
WARNING
Carry the tool by the front handle
to avoid accidental starting. Prop-
er handling of the tool will prevent injury.
Always turn o the tool when transporting from
one location to another. Do not carry tool with
nger on the trigger. Accidental starting can
cause serious personal injury.
Before transporting, always:
1. Remove the battery pack
2. Place the cover over the guide bar.
Selecting the Speed
When using this attachment, only HIGH
High
Low
SPEED is recommended. Use the speed
control button to select HIGH SPEED.

8
OPERATION
DANGER
Never cut near power
lines, electric cords, or
other electric sources. If bar and chain
jams on any electrical cord or line, DO
NOT TOUCH THE BAR OR CHAIN! THEY CAN
BECOME ELECTRICALLY LIVE AND VERY DAN-
GEROUS. Continue to hold the tool by the insu-
lated rear handle or lay it down and away from
you in a safe manner. Disconnect the electrical
service to the damaged line or cord before at-
tempting to free the bar and chain from the line
or cord. Contact with the bar, chain, other con-
ductive parts of the tool or live electric cords or
lines will result in death by electrocution, electric
shock, or serious personal injury.
WARNING
Read and understand all instruc-
tions. Failure to follow all instruc-
tions listed below may result in electric shock,
re and/or serious personal injury.
• Guard Against Kickback which can result in
severe injury or death. See Important Safety
Instructions "Guard Against Kickback", to avoid
the risk of kickback.
• Always wear eye protection with side shield, as
well as head and hearing protection. Failure to
do so could result in objects being thrown into
your eyes and other possible serious injuries.
• Do not overreach. Do not cut with right hand
holding tool above chest height. Make sure
your footing is rm. Keep feet apart. Divide your
weight evenly on both feet.
• Do not allow familiarity with this product to make
you careless. Remember that a careless fraction
of a second is sucient to inict serious injury.
• Use a rm grip with your left hand on the front
handle and your right hand on the rear handle
so that your body is to the left of the guide bar.
• Never use a cross-handed grip (left hand on the
rear handles and right hand on the front handle).
• Never allow any part of your body to be in line
with the guide bar when operating the tool.
• Never operate while in a tree, in any awkward posi-
tion or on a ladder or other unstable surface. You
may loose control of tool causing severe injury.
• Never fell a tree or cut a log or limb that has a
diameter greater that the length of the guide
bar. Only properly trained professionals should
perform these cuts. Performing these types of
cuts can cause an accident and result in death
or serious personal injury.
• Keep the tool running at full speed the entire
time you are cutting.
• Allow the chain to cut for you. Exert only light
pressure. Do not put pressure on tool at end of cut.
• When not in use always remove the battery.
• Do not use any attachments or accessories not
recommended by the manufacturer. The use of
attachments or accessories not recommended
can result in serious personal injury.
Kickback
WARNING
Kickback may occur
when the moving chain
contacts an object at the upper portion
of the tip of the guide bar or when the
wood closes in and pinches the saw
chain in the cut. Contact at the upper portion of the tip
of the guide bar can cause the chain to dig into the
object and stop the chain for an instant. The result is
a lightning fast, reverse reaction which kicks the guide
bar up and back toward the operator. If the saw chain
is pinched along the top of the guide bar, the guide bar
can be driven rapidly back toward the operator. Either
of these reactions can cause loss of tool control which
can result in serious injury. Do not rely exclusively upon
the safety devices built into the tool. As a pole saw
user, you should take several steps to keep your cutting
jobs free from accident or injury.

9
The following precautions should be followed to
minimize kickback:
• Always grip the tool rmly with both
hands. Hold the tool rmly with both
hands when the unit is running.
• The tool can be held in multiple ori-
entations depending on the grip used. Keep your
right hand on the trigger handle and grip either the
front handle or pole hand grip with your left hand.
To increase control, always hold the tool using the
hand grip when using the attachment extension.
• Use your thumbs and ngers to fully encircle the
tool handles. A rm grip together with a sti left
arm will help you maintain control of the tool if
kickback occurs.
• Make sure that the area in which you are cutting
is free from obstructions. Do not let the nose of
the guide bar contact a log, branch, fence, or any
other obstruction that could be hit while you are
operating the tool.
• Always cut with the unit running at full speed. Fully
squeeze the throttle trigger and maintain a steady
cutting speed.
• Use replacement parts such as low kickback chain
and special guide bars that reduce the risks associ-
ated with rotational kickback. Use only the replace-
ment guide bars and low kickback chains specied
by the manufacturer for the tool.
With a basic understanding of kickback, you can
reduce or eliminate the element of surprise. Sud-
den surprise contributes to accidents.
Keep proper footing and balance at all times.
• Do not cut with right hand holding power unit above
shoulder height. Do not overreach when cutting.
• Follow the sharpening and maintenance instructions
for the saw chain.
• Push and Pull - This reaction force is always op-
posite to the direction the chain is moving where
wood contact is made. Thus, the operator must
be ready to control the PULL when cutting on the
bottom edge of the bar, and PUSH when cutting
along the top edge.
Reaction
Reaction
Direction of
rotation
Direction of
rotation
Turning the Tool On / O
WARNING
Always be sure of your footing and
grip the tool rmly with both hands.
The ngers should encircle the handle and the
thumb should be wrapped under the handlebar to
resist kickback. Keep body to the left of the chain
line. Always keep your left hand on the front
handle and your right hand on the rear handle so
that your body is to the left of the chain line.
Never straddle the saw or chain, or lean over past
the chain line.
Wear non-slip gloves for maximum grip and
protection.
1. WARNING! Always remove the guide bar cover
before use.
2. Insert the battery pack.
3. Grip the tool securely with both hands, keeping
body out of line with the chain.
4. To start the tool, squeeze the lock-o lever and
pull the trigger.
5. Allow tool to come to full speed before contacting
workpiece.
6. To vary the speed, increase or decrease the pres-
sure on the trigger. The further the trigger is pulled,
the greater the speed up to the maximum set by
the speed control button.
7. To stop the tool release the trigger. Make sure the tool
comes to a complete stop before laying the tool down.

10
WARNING
Never attempt to lock the trigger in
the ON position.
Proper Cutting Stance
Minimum
50' 15m
WARNING
Always use the proper cutting
stance described in this section.
Never kneel when using the tool. Kneeling could
result in loss of stability and control of the tool
resulting in serious personal injury.
• Weight should be balanced with both feet on
solid ground.
• Your body should always be to the left of the
chain line.
• Thumb should be on underside of handlebar.
Basic Cutting Procedure
Practice cutting a few small logs using the following
technique to get the “feel” of using the tool before
you begin a major sawing operation.
• Take the proper stance in front of the wood with the tool o.
• Squeeze the switch trigger and let the chain acceler-
ate to full speed before entering the cut.
• Begin cutting with the saw against the log.
• Keep the unit running the entire time you are cutting,
maintain a steady speed.
• Allow the chain to cut for you; exert only light down-
ward pressure. If you force the cut, damage to the
bar, chain, or unit can result.
• Release the switch trigger as soon as the cut is
completed, allowing the chain to stop. If you run the
tool without a cutting load, unnecessary wear can
occur to the chain, bar, and unit.
• Do not put pressure on the tool at the end of cut.
Work Area Precautions
• Cut only wood or materials made from wood, no
sheet metal, no plastics, no masonry, no non-wood
building materials.
• Never allow children to operate the tool. Allow no
person to use this tool who has not read this Opera-
tor’s Manual or received adequate instructions for
the safe and proper use of this tool.
• When cutting, keep everyone - helpers, bystanders,
children, and animals - a safe distance from the cut-
ting area. Trees should not be trimmed in a manner
that would endanger any person, strike any utility
line or cause any property damage. If a branch does
make contact with any utility line, the utility company
should be notied immediately.
• Always cut with both feet on solid ground to prevent
being pulled o balance.
• During use, right hand holding power unit should
not rise above chest height. Holding power head
higher is dicult to control against kickback forces.
• Do not trim trees near electrical wires or buildings.
Leave this operation for professionals.
• Cut only when visibility and light are adequate for
you to see clearly.
• Check work area for hazards such as bees, rodents,
snakes, etc., that may live in trees or brush.
WARNING
Never climb into a tree to limb or
prune. Do not stand on ladders,
platforms, a log, or in any position which can
cause you to lose your balance or control of the
tool.
Pruning
WARNING
If the limbs to be pruned are out of
the reach of the pole saw, hire a
professional to perform the pruning. Failure to
do so could result in serious personal injury.
Load
Second
Cut
First Cut
1/3 Diameter
Finishing Cut
Pruning is trimming limbs from a live tree.
• Work slowly, keeping both hands on the tool with a
rm grip. Always make sure your footing is secure
and your weight is distributed evenly on both feet.
• Do not cut from a ladder, this is extremely danger-
ous. Leave this operation for professionals.
• During use, right hand holding power unit should
not rise above chest height. Holding power head
higher is dicult to control against kickback forces.
• When pruning trees it is important not to make the n-
ishing cut next to the main limb or trunk until you have
cut o the limb further out to reduce the weight. This
prevents stripping the bark from the main member.
• Underbuck the branch 1/3 through for your rst cut.
• Your second cut should overbuck to drop the
branch o.
• Now make your nishing cut smoothly and neatly
against the main member so the bark will grow back
to seal the wound.
Pull Hook
Use the pull hook to grab the trimmed branches and
pull them from the tree canopy.
Limbing
Cut limbs one at a time and leave support limbs
under tree until log is cut
4
1
3
2

11
Limbing is removing branches from a fallen tree.
• Work slowly, keeping both hands on the tool with a
rm grip. Always make sure your footing is secure
and your weight is distributed evenly on both feet.
• Leave the larger support limbs under the tree to keep
the tree o the ground while cutting.
• Limbs should be cut one at a time. Remove the cut
limbs from the work area often to help keep the work
area clean and safe.
• Branches under tension should be cut from the bot-
tom up to avoid binding the tool.
• Keep the tree between you and the saw while limb-
ing. Cut from the side of the tree opposite the branch
you are cutting.
Springpoles
WARNING
Springpoles are dangerous and
could strike the operator, causing
the operator to lose control of the pole saw. This
could result in severe or fatal injury to the op-
erator.
Springpole
A springpole is any log, branch, rooted stump, or
sapling which is bent under tension by other wood
so that it springs back if the wood holding it is cut
or removed. On a fallen tree, a rooted stump has
a high potential of springing back to the upright
position during the bucking cut to separate the log
from the stump. Watch out for springpoles, they are
dangerous.
TROUBLESHOOTING
Problem Cause Solution
Bar and
chain
running
hot and
smoking.
Check chain ten-
sion for over tight
condition.
Chain oil reservoir
is empty.
Correct chain
tension.
Fill oil reservoir.
Motor
runs, but
chain
is not
rotating.
Chain tension too
tight.
Guide bar and
chain improperly
assembled.
Guide bar or
chain is damaged.
Correct chain
tension.
Correct
assembly.
Replace
damaged parts
before use.
MAINTENANCE
WARNING
To reduce the risk of injury, always
unplug the charger and remove the
battery pack from the charger or tool before
performing any maintenance. Never disassemble
the tool, battery pack or charger. Contact a
MILWAUKEE service facility for ALL repairs.
Maintaining Tool
Keep your tool, battery pack and charger in good
repair by adopting a regular maintenance program.
Inspect your tool for issues such as undue noise,
misalignment or binding of moving parts, breakage of
parts, or any other condition that may aect the tool
operation. Return the tool, battery pack, and charger
to a MILWAUKEE service facility for repair. After six
months to one year, depending on use, return the
tool, battery pack and charger to a MILWAUKEE
service facility for inspection.
If the tool does not start or operate at full power with
a fully charged battery pack, clean the contacts on
the battery pack. If the tool still does not work prop-
erly, return the tool, charger and battery pack, to a
MILWAUKEE service facility for repairs.
Chain and Bar
After every few hours of use, remove the drive cover,
guide bar and chain and clean thoroughly using a soft
bristle brush. Ensure oiling hole on bar is clear of de-
bris. When replacing dull chains with sharp chains it is
good practice to ip the chain bar from bottom to top.
Sharpening the Saw Chain
WARNING
Improper chain sharpening in-
creases the potential of kickback.
Failure to replace or repair damaged chain can
cause serious injury.
The saw chain is very sharp, always wear pro-
tective gloves when performing maintenance to
the chain.
Cutting Corner
Side Plate
Depth Gauge
Toe
Gullet
Heel
Rivet Hole
Top Plate
Be careful to le all cutters to the specied angles and
to the same length, as fast cutting can be obtained
only when all cutters are uniform.
• Wear gloves for protection. Properly tension the
chain prior to sharpening. Refer to Chain Tension
section earlier in this manual. Do all of your ling at
the mid-point of the bar.

12
Left Hand Cutters
Right Hand Cutters
• Use a 5/32" diameter round le and holder.
• Keep the le level with the top plate of the tooth. Do
not let the le dip or rock.
• Using light but rm pressure, stroke towards the
front corner of the tooth.
• Lift le away from the steel on each return stroke.
• Put a few rm strokes on every tooth. File all left
hand cutters in one direction. Then move to the other
side and le the right hand cutters in the opposite
direction. Occasionally remove lings from the le
with a wire brush.
Top Plate Filing Angle
CORRECT
Top Plate Filing Angle
More
than 30°
Less
than 30°
30°
INCORRECT
Top Plate Filing Angle
• CORRECT 30° - File holders are marked with guide
marks to align le properly to produce correct top
plate angle.
• LESS THAN 30° - For Cross Cutting.
• MORE THAN 30° - Feathered Edge Dulls Quickly.
Side Plate Angle
CORRECT
Side Plate
Filing Angle
Backward
Slope
Hook
80°
INCORRECT
Side Plate Filing Angle
• CORRECT - 80° Produced automatically if correct
diameter le is used in le holder.
• HOOK - “Grabs” and dulls quickly. Increases po-
tential of KICKBACK. Results from using a le with
diameter too small, or le held too low.
• BACKWARD SLOPE - Needs too much feed pres-
sure, causes excessive wear to bar and chain.
Results from using a le with diameter too large, or
le held too high.
Depth Gauge Clearance
• The depth gauge should be maintained at a clear-
ance of .025 in. Use a depth gauge tool for checking
the depth gauge clearances.
• Every time the chain is led, check the depth gauge
clearance.
Flat File
Depth Gauge Jointer
Use a at le and a depth gauge jointer to lower all
gauges uniformly. Depth gauge jointers are available
in .020" to .035" Use a .025" depth gauge jointer.
After lowering each depth
Restore
original
shape by
rounding
the front
gauge, restore original
shape by rounding the front.
Be careful not to damage
adjoining drive links with the
edge of the le.
Depth gauges must be ad-
justed with the at le in the
same direction the adjoin-
ing cutter was led with the
round le. Use care not to contact cutter face with
at le when adjusting depth gauges.
Guide Bar Maintenance
When the guide bar shows signs of wear, reverse it
on the tool to distribute the wear for maximum bar
life. The bar should be cleaned every day of use and
checked for wear and damage.
Feathering or burring of the bar rails is a normal
process of bar wear. Such faults should be smoothed
with a le as soon as they occur.
A bar with any of the following faults should be
replaced.
• Wear inside the bar rails which permits the chain to
lay over sideways.
• Bent guide bar.
• Cracked or broken rails.
• Spread rails.
Lubricate guide bars with a sprocket at their tip weekly.
Using a grease syringe, lubricate weekly in the lubri-
cating hole. Turn the guide bar and check that the lubri-
cation holes and chain groove are free from impurities.
NOTE: Do not replace the screw with an ordinary
screw. Use only identical replacement parts from the
manufacturer when replacing parts.

13
WARNING
To reduce the risk of personal in-
jury and damage, never immerse
your tool, battery pack or charger in liquid or
allow a liquid to ow inside them.
Cleaning
Clean dust and debris from vents. Keep handles
clean, dry and free of oil or grease. Use only mild
soap and a damp cloth to clean, since certain clean-
ing agents and solvents are harmful to plastics and
other insulated parts. Some of these include gasoline,
turpentine, lacquer thinner, paint thinner, chlorinated
cleaning solvents, ammonia and household deter-
gents containing ammonia. Never use ammable or
combustible solvents around tools.
Repairs
For repairs, return the tool, battery pack and charger
to the nearest service center.
ACCESSORIES
WARNING
Use only recommended accesso-
ries. Others may be hazardous.
For a complete listing of accessories, go online to
www.milwaukeetool.com or contact a distributor.
SERVICE - UNITED STATES
1-800-SAWDUST (1.800.729.3878)
Monday-Friday, 7:00 AM - 6:30 PM CST
or visit www.milwaukeetool.com
Contact Corporate After Sales Service Technical
Support with technical, service/repair, or warranty
questions.
Email: [email protected]
Become a Heavy Duty Club Member at
www.milwaukeetool.com to receive important
notications regarding your tool purchases.
SERVICE - CANADA
Milwaukee Tool (Canada) Ltd
1.800.268.4015
Monday-Friday, 7:00 AM - 4:30 PM CST
or visit www.milwaukeetool.ca
LIMITED WARRANTY
USA & CANADA
Every MILWAUKEE Outdoor Power Equipment Product* (see excep-
tions below) is warranted to the original purchaser only to be free from
defects in material and workmanship. Subject to certain exceptions,
MILWAUKEE will repair or replace any part on an outdoor power equip-
ment product which, after examination, is determined by MILWAUKEE
to be defective in material or workmanship for a period of three (3)
years after the date of purchase unless otherwise noted. Return of
the outdoor power equipment to a MILWAUKEE factory Service Center
location or participating MILWAUKEE Authorized Service Station,
freight prepaid and insured, is required. A copy of the proof of purchase
should be included with the return product. This warranty does not
apply to damage that MILWAUKEE determines to be from repairs
made or attempted by anyone other than MILWAUKEE authorized
personnel, misuse, alterations, abuse, normal wear and tear, lack of
maintenance, or accidents.
Normal Wear: Many outdoor power equipment products need periodic
parts replacement and service to achieve best performance. This war-
ranty does not cover repair when normal use has exhausted the life of
a part including, but not limited to trimmer head, trimmer head spool,
cutting lines, blades, chains, blower tubes, brushes, o-rings, and seals.
*This warranty does not cover Cordless Battery Packs or Recondi-
tioned Product. There are separate and distinct warranties available
for these products.
MILWAUKEE does not cover freight or labor charges associated with
the inspection and testing of outdoor power equipment products which
are found by MILWAUKEE not to be a valid warranty claim. A valid
warranty claim must be substantiated by the discovery of defective
material or workmanship by MILWAUKEE.
ACCEPTANCE OF THE EXCLUSIVE REPAIR AND REPLACEMENT
REMEDIES DESCRIBED HEREIN IS A CONDITION OF THE CON-
TRACT FOR THE PURCHASE OF EVERY MILWAUKEE PRODUCT.
IF YOU DO NOT AGREE TO THIS CONDITION, YOU SHOULD NOT
PURCHASE THE PRODUCT. IN NO EVENT SHALL MILWAUKEE
BE LIABLE FOR ANY INCIDENTAL, SPECIAL, CONSEQUENTIAL
OR PUNITIVE DAMAGES, OR FOR ANY COSTS, ATTORNEY FEES,
EXPENSES, LOSSES OR DELAYS ALLEGED TO BE AS A CONSE-
QUENCE OF ANY DAMAGE TO, FAILURE OF, OR DEFECT IN ANY
PRODUCT INCLUDING, BUT NOT LIMITED TO, ANY CLAIMS FOR
LOSS OF PROFITS. SOME STATES DO NOT ALLOW THE EX-
CLUSION OR LIMITATION OF INCIDENTAL OR CONSEQUENTIAL
DAMAGES, SO THE ABOVE LIMITATION OR EXCLUSION MAY NOT
APPLY TO YOU. THIS WARRANTY IS EXCLUSIVE AND IN LIEU
OF ALL OTHER EXPRESS WARRANTIES, WRITTEN OR ORAL.
TO THE EXTENT PERMITTED BY LAW, MILWAUKEE DISCLAIMS
ANY IMPLIED WARRANTIES, INCLUDING WITHOUT LIMITATION
ANY IMPLIED WARRANTY OF MERCHANTABILITY OR FITNESS
FOR A PARTICULAR USE OR PURPOSE; TO THE EXTENT SUCH
DISCLAIMER IS NOT PERMITTED BY LAW, SUCH IMPLIED WAR-
RANTIES ARE LIMITED TO THE DURATION OF THE APPLICABLE
EXPRESS WARRANTY AS DESCRIBED ABOVE. SOME STATES
DO NOT ALLOW LIMITATIONS ON HOW LONG AN IMPLIED WAR-
RANTY LASTS, SO THE ABOVE LIMITATION MAY NOT APPLY TO
YOU, THIS WARRANTY GIVES YOU SPECIFIC LEGAL RIGHTS,
AND YOU MAY ALSO HAVE OTHER RIGHTS WHICH VARY FROM
STATE TO STATE.
This warranty applies to product sold in the U.S.A. and Canada only.
Please consult the ‘Service Center Search’ in the Parts & Service sec-
tion of MILWAUKEE’s website www.milwaukeetool.com or call 1.800.
SAWDUST (1.800.729.3878) to locate your nearest service facility for
warranty and non-warranty service on a Milwaukee electric power tool.
LIMITED WARRANTY - MEXICO,
CENTRAL AMERICA & CARIBBEAN
TECHTRONIC INDUSTRIES' warranty is for 5 years since the original
purchase date.
This warranty card covers any defect in material and workmanship
on this Product.
To make this warranty valid, present this warranty card, sealed/
stamped by the distributor or store where you purchased the product,
to the Authorized Service Center (ASC). Or, if this card has not been
sealed/stamped, present the original proof of purchase to the ASC.
Call 55 4160-3547 to nd the nearest ASC, for service, parts, acces-
sories or components.
Procedure to make this warranty valid
Take the product to the ASC, along with the warranty card sealed/
stamped by the distributor or store where you purchased the product,
and any faulty piece or component will be replaced without cost for
you. We will cover all freight costs relative with this warranty process.
Exceptions
This warranty is not valid in the following situations
a) When the product is used in a dierent manner from the end-user
guide or instruction manual.
b) When the conditions of use are not normal.
c) When the product was modied or repaired by people not authorized
by TECHTRONIC INDUSTRIES.
Note: If cord set is damaged, it should be replaced by an Authorized
Service Center to avoid electric risks.
SERVICE AND ATTENTION CENTER
Call to 55 4160-3547
IMPORTED AND COMMERCIALIZED BY
TECHTRONIC INDUSTRIES MEXICO, S.A. DE C.V.
Miguel de Cervantes Saavedra No.301 Piso 5, Torre Norte
11520 Colonia Ampliación Granada
Miguel Hidalgo, Ciudad de Mexico, Mexico
Model:
Date of Purchase:
Distributor or Store Stamp:

14
RÈGLES DE SÉCURITÉ
GÉNÉRALES RELATIVES AUX
OUTILS ÉLECTRIQUES
AVERTISSEMENT
Lire toutes les consignes
de sécurité, consignes,
illustrations et spécications fournies avec cet
outil électrique. Ne pas suivre l’ensemble des règles
et instructions peut entraîner une électrocution, un
incendie ou des blessures graves. Conserver les
règles et les instructions à des ns de référence
ultérieure. Le terme «outil électrique» gurant dans
les avertissements ci-dessous renvoie à l’outil élec-
trique à alimentation par le réseau (à cordon) ou par
batterie (sans l).
SÉCURITÉ DU LIEU DE TRAVAIL
• Veillez à ce que l’aire de travail soit propre et bien
éclairée. Le désordre et le manque de lumière favorisent
les accidents.
• Ne pas utiliser d’outils électriques dans des
atmosphères explosives, par exemple en présence
de liquides, gaz ou poussières inammables. Les
outils électriques produisent des étincelles risquant
d'enammer les poussières ou vapeurs.
• S’assurer que les enfants et les curieux se trouvent
à une bonne distance au moment d’utiliser un outil
électrique. Les distractions peuvent causer une perte
de contrôle.
SÉCURITÉ ÉLECTRIQUE
• Les ches des outils électriques doivent correspon-
dre à la prise secteur utilisée. Ne jamais modier
la che, de quelque façon que ce soit. Ne jamais
utiliser d'adaptateurs de che avec des outils mis
à la terre. Les ches et prises non modiées réduisent
le risque de choc électrique.
• Éviter tout contact avec des surfaces mises à la terre
comme des tuyaux, des radiateurs, des cuisinières
et des réfrigérateurs. Le risque de choc électrique est
accru lorsque le corps est mis à la terre.
• Ne pas exposer les outils électriques à l'eau ou
l'humidité. La pénétration d’eau dans ces outils accroît
le risque de choc électrique.
• Ne pas maltraiter le cordon d'alimentation. Ne jamais
utiliser le cordon d’alimentation pour transporter
l’outil électrique et ne jamais débrancher ce dernier
en tirant sur le cordon. Garder le cordon à l'écart
de la chaleur, de l'huile, des objets tranchants et
des pièces en mouvement. Un cordon endommagé
ou emmêlé accroît le risque de choc électrique.
• Pour les travaux à l’extérieur, utiliser un cordon spéci-
alement conçu à cet eet. Utiliser un cordon conçu pour
l'usage extérieur réduit les risques de choc électrique.
• Si l’utilisation d’un outil électrique est inévitable dans
un endroit humide, utiliser une source d’alimentation
munie d’un disjoncteur de fuite de terre. L’utilisation
d’un disjoncteur de fuite de terre réduit le risque de
choc électrique.
SÉCURITÉ INDIVIDUELLE
• Rester attentif, prêter attention au travail et faire
preuve de bon sens lors de l'utilisation de tout outil
électrique. Ne pas utiliser cet appareil en cas de
fatigue ou sous l’inuence de l’alcool, de drogues
ou de médicaments. Un moment d’inattention pendant
l’utilisation d’un outil électrique peut entraîner des
blessures graves.
• Porter l’équipement de protection individuel requis.
Toujours porter une protection oculaire. Selon les
conditions, porter aussi un masque antipoussières, des
bottes de sécurité antidérapantes, un casque protecteur
ou une protection auditive an de réduire les blessures.
• Empêcher les démarrages accidentels. S’assurer
que la gâchette est en position d’arrêt avant de
brancher l’outil à une source de courant, d’insérer
la batterie, de le ramasser ou de le transporter.
Le fait de transporter un outil électrique en gardant
le doigt sur la gâchette ou de mettre sous tension un
outil électrique lorsque la gâchette est en position de
marche favorise les accidents.
• Retirer les clés de réglage avant de mettre l’outil
en marche. Une clé laissée sur une pièce rotative de
l’outil peut causer des blessures.
• Ne pas travailler hors de portée. Toujours se tenir bien
campé et en équilibre. Une bonne stabilité procure un
meilleur contrôle de l’outil électrique en cas d’imprévus.
• Porter une tenue appropriée. Ne porter ni vête-
ments amples, ni bijoux. Garder les cheveux et les
vêtements à l’écart des pièces en mouvement. Les
vêtements ottants, les bijoux ou les cheveux longs
risquent d’être happés par les pièces en mouvement.
• Si les outils sont équipés de dispositifs de dépous-
siérage, s'assurer qu'ils sont connectés et correcte-
ment utilisés. L’utilisation d’un collecteur de poussière
permet de réduire les dangers liés à la poussière.
• Ne pas laisser la familiarité avec l'outil acquise par
une utilisation fréquente vous rendre susant et
vous amener à ignorer les règles de sécurité. Une
utilisation négligée peut causer une blessure grave en
une fraction de seconde.
UTILISATION ET ENTRETIEN
DE L’OUTIL ÉLECTRIQUE
• Ne pas forcer l'outil électrique. Utiliser l'outil élec-
trique approprié pour l'application. Un outil électrique
approprié exécutera le travail mieux et de façon moins
dangereuse s’il est utilisé dans les limites prévues.
• Ne pas utiliser l'outil électrique si le commutateur ne
permet pas de le mettre en marche ou de l'arrêter.
Tout outil électrique qui ne peut pas être contrôlé par
son commutateur est dangereux et doit être réparé.
• Débrancher l'outil et/ou retirer le bloc-piles, si possible,
avant d’eectuer des réglages, de changer d’accessoire
ou de remiser l’outil. Ces mesures de sécurité préventives
réduisent les risques de démarrage accidentel de l'outil.
• Entreposer l’outil électrique hors de la portée des
enfants et interdire à quiconque de l’utiliser si la
personne ne connaît pas bien le produit ou les
instructions. Les outils électriques sont dangereux
dans les mains d’utilisateurs novices.
• Entretenir les outils électriques et les accessoires.
Vérier qu'aucune pièce mobile n'est mal alignée ou
bloquée, qu'aucune pièce n'est brisée et s'assurer
qu'aucun autre problème risque d'aecter le bon
fonctionnement de l'outil. En cas de dommages,
faire réparer l’outil avant de l’utiliser. Plusieurs
accidents sont causés par des produits mal entretenus.
• Garder les outils bien aûtés et propres. Des outils
correctement entretenus et dont les tranchants sont
bien aûtés risquent moins de se bloquer et sont plus
faciles à contrôler.
• Utiliser l’outil électrique, les accessoires, les em-
bouts etc. conformément à ces instructions en tenant
compte des conditions de travail et de la tâche à ef-
fectuer. L'usage d'un outil électrique pour des applications
pour lesquelles il n'est pas conçu peut être dangereux.
• Garder les poignées et les surfaces de préhension
sèches, propres et exemptes d’huile ou de graisse.
Des poignées et des surfaces de préhension glissantes
ne permettent pas de manipuler et de contrôler l'outil
en toute sécurité en cas de situation imprévue.

15
UTILISATION ET ENTRETIEN
DE LA BATTERIE
• Pour recharger le bloc-piles, utiliser seulement
le chargeur spécié par le fabricant. Un chargeur
pouvant convenir à un type de bloc-piles peut entraîner
un risque d’incendie lorsqu’il est utilisé avec un autre
type de bloc-piles.
• N’utiliser l’outil électrique qu’avec une batterie
recommandée. L’utilisation de tout autre bloc-piles
peut créer un risque de blessures et d’incendie.
• Lorsque le bloc-piles n’est pas utilisé, le tenir
éloigné des objets en métal tels que les trombones,
les pièces de monnaie, les clés, les clous, les vis
ou d’autres petits objets métalliques qui pourraient
connecter les bornes. Le court-circuitage des bornes
d’une pile peut entraîner des brûlures ou un incendie.
• Éviter tout contact avec le liquide pouvant être éjecté
de la pile en cas de manutention abusive. En cas
de contact accidentel, rincer immédiatement les
parties atteintes avec de l’eau. Si le liquide entre
en contact avec les yeux, consulter un médecin.
Le liquide éjecté des piles peut causer des irritations
ou des brûlures.
• N’utiliser aucun bloc-piles ni aucun outil ayant été
endommagé ou modié. Des piles endommagées ou
modiées peuvent adopter un comportement imprévis-
ible pouvant causer un incendie, une explosion ou le
risque de blessures.
• Ne pas exposer le bloc-piles ou l’outil aux ammes
ou à une température excessive. Une exposition aux
ammes ou à une température supérieure à 130°C
(265°F) peut causer une explosion.
• Suivre toutes les instructions de charge et ne pas
charger le bloc-piles ou l’outil en dehors de la plage
de température spéciée. Une charge incorrecte ou à
des températures en dehors de la plage spéciée peut
endommager la pile et augmenter le risque d’incendie.
ENTRETIEN
• Les réparations de l’outil électrique doivent être
conées à un technicien qualié, utilisant exclu-
sivement des pièces identiques à celles d’origine.
Le maintien de la sûreté de l’outil électrique sera ainsi
assuré.
• Ne jamais eectuer la réparation d’un bloc-piles
endommagé. La réparation du bloc-piles doit être
réalisée par le fabricant ou les fournisseurs de service
agréés uniquement.
RÈGLES DE SÉCURITÉ
SPÉCIFIQUES POUR
SCIES À LONG MANCHE
• Veuillez lire ce manuel, ainsi que tous les manuels et
les étiquettes de cet outil et son bloc moteur avant
de les utiliser. Ne pas suivre les avertissements
et les instructions pourra entraîner des blessures
graves. Utiliser exclusivement l’outil selon les
instructions de ce manuel. Utiliser uniquement les
accessoires recommandés par MILWAUKEE.
• Toujours porter une protection oculaire, une
protection auditive et un casque, ainsi que des
vêtements et des chaussures de protection, selon
l’opération en question. Porter des pantalons longs,
des manches longues, des chaussures de travail et
des gants épais. Attacher ou couvrir les cheveux
longs. Ne porter ni vêtements amples, ni bijoux. Ne pas
porter de shorts, sandales et ne pas travailler pieds nus.
• Ne laisser personne s’approcher à moins de 15 m (50’).
• Cet outil n’a été conçu que pour rogner et élaguer
du bois. Ne pas utiliser pour abattre d’arbres ou de
branches dont le diamètre est plus que 230 mm (9")
ou bien, pour couper d’autres matériaux tels que
le métal ou le plastique. Ne pas couper de lianes
ou de petites broussailles.
•
AVERTISSEMENT
Ne pas opérer autour de
lignes électriques. L’unité
n’a pas été conçue pour doter de la protection
contre les chocs électriques au cas de contact avec
les lignes électriques. Veuillez consulter les régle-
mentations à propos des distances sécuritaires
par rapport à des lignes électriques ; veuillez
s’assurer que la position d’opération soit en toute
sécurité et sûreté avant son utilisation.
•Ne pas rallonger l’outil plus qu’une extension
d'accessoire. Les extensions d’accessoire supplé-
mentaires rendront l’élagueuse instable et incontrôlable,
ce qui pourra entraîner des blessures.
•Lors de l’utilisation de cet accessoire avec des blocs-
piles de majeure capacité, utiliser la bandoulière
an de minimiser la fatigue de l’utilisateur et vous
aider à maintenir le contrôle durant l’utilisation.
•Ne pas opérer l’outil sans avoir premièrement
installée la poignée avant. Il faut bien installer la
poignée avant durant l’utilisation. Utiliser l’outil à
deux mains lorsque vous opérez l’outil, ceci selon
les consignes de l'accessoire. Maintenir une prise
ferme. L’utilisation à une main pourra causer la perte
de contrôle et des lésions graves pourront survenir.
•Ne pas opérer la scie à long manche dans un arbre,
sur une échelle ni un toit ni aucun support instable.
L’utilisation d’une scie à long manche de cette façon
peut entraîner des blessures graves.
•Il faut identier un chemin de retraite sans obstacles
avant de commencer à couper. L’ébranchage tombant
pourront provoquer de blessures.
•Toujours tenir le visage, les mains et les pieds loin
des pièces en mouvement. Les pièces en mouvement
peuvent provoquer des lacérations graves.
•Avant de démarrer l’outil, veuillez s’assurer que
la chaîne n’est en contact avec aucun objet. Un
moment d'inattention durant l’opération des scies peut
provoquer l’enchevêtrement de vos vêtements et même
votre corps avec la scie à chaîne.
•Ne tenir l’outil que par les surfaces de prise isolées
parce que la scie à chaîne pourra entrer en contact
avec le câblage caché. Les scies à chaîne entrant en
contact avec un l « électrie » peuvent provoquer que
les pièces métalliques exposées de la scie « s’électrient
» et électrocuter l’utilisateur.
•Avant de démarrer l’outil, vérier que le lieu de
travail n’ait pas d’objets cachés, tels que les treilles
à câbles, les piquets, etc. Frapper un objet solide
pourra entraîner une perte de contrôle et provoquer
des blessures physiques graves.
•Se tenir fortement lorsqu’un mouvement imprévu se
produit à l’occasion du contact avec un objet dur. La
perte de contrôle peut entraîner des blessures graves.
•Ne jamais se tenir directement au-dessous d’une
branche en train d’être coupée. Les débris qui
tombent pourront provoquer des blessures. Ne
pas utiliser un outil en un angle plus grand que
60º par rapport au sol.
•Toujours porter des chaussures appropriées et
utiliser la scie à long manche uniquement quand
vous soyez debout sur une surface nivelée, xe
et sûre. Les surfaces glissantes et instables pourront
entraîner une perte d’équilibre ou de contrôle de l’outil.
•Ne pas travailler hors de portée. Ceci vous aidera à
éviter le contact non intentionnel de la pointe et permet un
contrôle amélioré de l’outil dans de situations imprévues.

16
Causes du rebond et précautions à prendre :
Un rebond pourra se produire lorsque l’extrémité du
guide-chaîne touche un objet ou bien, lorsque le bois
se referme sur la lame et la pince dans l’entaille.
Dans certains cas, le contact de la pointe de la lame
avec un objet peut causer une réaction de rebond sou-
dain, projetant le guide-chaîne vers le haut et l’arrière,
en direction de l’utilisateur.
Le pincement de la chaîne sur le haut du guide-chaîne
peut causer une projection violente de la lame en ar-
rière, en direction de l’utilisateur.
Chacune de ces deux réactions peut entraîner la perte
de contrôle de l’outil, et causer des blessures graves.
Ne pas compter exclusivement sur les dispositifs de
sécurité intégrés à l’outil. L’utilisateur d’une scie à long
manche doit prendre un certain nombre de précautions
pour éviter les accidents et blessures.
Le rebond est causé par une utilisation et/ou des
méthodes de travail incorrectes et il peut être évité en
prenant les précautions suivantes :
• Tenir la scie à chaîne fermement, avec les pouces
et les doigts serrés sur ses prises ; les deux mains
doivent être posées sur l’outil et veuillez se tenir
bien campé et mettre les bras de telle façon que
vous pouviez résister à la force de rebond. S'il prend
les précautions nécessaires, l'opérateur peut contrôler
la force du rebond. Ne pas lâcher l’outil.
• Utiliser exclusivement les guides-chaînes et chaînes
pour scie spéciés par le fabricant. La substitution in-
adéquate des chaînes et guides-chaîne de scies pourra
provoquer que la chaîne se casse et/ou rebondisse.
• Suivre les instructions d'aûtage et d'entretien
fournies par le fabricant de la scie à chaîne. La
réduction de la hauteur de la jauge de profondeur peut
provoquer un rebond plus fort.
• Suivre toutes les instructions lors du nettoyage
de matériaux coincés, la rémission et l’entretien
de l’outil. Veuillez s’assurer que le commutateur
ne soit pas activé et le bloc-piles ait été retiré.
L'activation imprévue de l’outil lors du nettoyage de
matériaux coincés ou l’entretien pourra entraîner des
blessures corporelles graves.
• Ne pas essayer de couper les branches d’un arbre
ni d’en rogner un si vous ne comprenez pas les ris-
ques et la façon de les éviter. L’utilisateur et les per-
sonnes à proximité pourraient bien subir des blessures
graves lors de l’abattement ou l’élagage d’un arbre.
• Lors de la coupure d’une branche que soit sous ten-
sion, il faut rester vigilant d’une réaction élastique.
Lors de la libération de la tension dans les bres ligneu-
ses, la branche avec la force du ressort pourra frapper
l’opérateur et/ou provoquer la perte de contrôle de l’outil.
• Prendre toutes les précautions nécessaires lors de
la coupure de buissons et branchettes. Les maté-
riaux ns peuvent se prendre dans la scie à chaîne et
fouetter l’utilisateur ou le faire perdre l’équilibre.
• Arrêter le moteur avant de poser l’outil.
• Emporter l’outil par la poignée avant an d’éviter
les démarrages accidentels. La manipulation adé-
quate de l’outil évitera la lésion.
• Toujours éteindre l’outil lors de sa transportation
d’un espace à un autre. Ne pas amener l’outil avec
le doigt mis sur la gâchette. Le démarrage accidentel
peut causer des blessures graves.
• Lors de la transportation ou le rangement de la scie
à long manche, mettre le carter du guide-chaîne.
Le maniement approprié de la scie à long manche
minimisera la probabilité d’un contact accidentel avec
la scie à chaîne en mouvement.
• Ne pas l’immerger dans l’eau ni vaporiser avec un
tuyau. Ne pas nettoyer à l’eau en sous pression. La
pénétration d’eau dans ces outils accroît le risque de
choc électrique. Entreposer l’outil à l’intérieur.
• Ne pas entreposer l’outil électrique auprès ni sur
de substances chimiques ni de fertilisants.
• Toujours éteindre l’outil et après, retirer le bloc-
piles avant de changer ou enlever les accessoires.
• N’utiliser que les accessoires recommandés.
L’utilisation d’autres types d’accessoires pourrait
entraîner des situations dangereuses.
• Entretenir soigneusement l'outil. Garder l'outil bien af-
fûté et propre, pour obtenir des performances optimales
et réduire les risques d'accident. Suivre les instructions
de lubrification et de changement d’accessoires.
• La scie est tranchante. Toujours porter des gants
protecteurs lors de la manipulation de la chaîne.
• Suivre les instructions de lubrication, la mise en
tension de la chaîne et le changement de la barre
et la chaîne. La chaîne qui ne soit pas bien mise en
tension ni lubriée pourra se casser ou augmenter le
risque de rebond.
Autres règles de sécurité.
• Tenir TOUS les autres travailleurs, enfants,
badauds et animaux domestiques à distance sé-
curitaire de la zone de travail.
• Porter une tenue appropriée - des vêtements bien
ajustés. Toujours porter un pantalon long, des man-
ches longues, un bleu de travail, des jeans, des jam-
bières en tissu résistant ou dotés de pièces résistantes
aux coupures. Porter des chaussures de sécurité
antidérapantes. Porter des gants épais pour assurer
une bonne prise et protéger les mains. Ne pas porter de
bijoux, shorts, sandales et ne pas travailler pieds nus.
Ne pas porter des vêtements amples qui pourraient
être happés dans le moteur ou se prendre dans la
chaîne ou les broussailles. Attacher les cheveux longs
pour les maintenir au-dessus des épaules. Porter une
protection auditive et un casque.
• Les vêtements de protection lourdes pourront pro-
voquer des épisodes de fatigue dans l’utilisateur,
ce qui pourra le faire subir un coup de chaleur. Dans
de températures chaudes ou humides, il faut faire le tra-
vail pénible en début de la matinée ou à la n d’après-
midi quand les températures sont les plus faibles.
• Toujours se concentrer sur le travail lors de
l'utilisation de cet outil. Faire preuve de bon sens.
Ne pas utiliser cet outil en état de fatigue ou sous
l'inuence de l'alcool, de drogues ou de médicaments.
• Garder toutes les parties du corps à l'écart de la
scie à chaîne lorsque le moteur tourne.
• Ne jamais laisser quiconque n’ayant pas reçu des
instructions d’utilisation appropriées utiliser l’outil.
Cette règle s'applique aux outils de location aussi bien
qu’à celles appartenant à des particuliers.
• Ne pas suspendre d’un crochet.
• Faire toujours preuve de bons sens et procéder
avec prudence lors de l’utilisation d’outils. C'est im-
possible de prévoir toutes les situations qui pourraient
avoir un résultat dangereux. Ne pas utiliser cet outil si
vous ne comprenez pas ces instructions d’opération ou
si vous pensez que le travail dépasse votre capacité ;
veuillez contacter Milwaukee Tool ou un professionnel
pour recevoir plus d’information ou formation.
• Suivre les instructions d’aûtage et d’entretien
fournies par le fabricant de la scie à chaîne. La
réduction de la hauteur de la jauge de profondeur peur
provoquer un rebond plus fort.

17
• Garder les poignées sèches, propres et exemptes
d’huile et de graisse. Les poignées graisseuses ou
huileuses sont glissantes et peuvent provoquer une
perte de contrôle.
• Maintenir en l’état les étiquettes et les plaques
d’identication.Des informations importantes y gurent.
Si elles sont illisibles ou manquantes, contacter un
centre de services et d’entretien MILWAUKEE pour
un remplacement gratuit.
•
AVERTISSEMENT
Certaines poussières générées
par les activités de ponçage,
de coupe, de rectication, de perforage et d’autres
activités de construction contiennent des substances
considérées être la cause de malformations congéni-
tales et de troubles de l’appareil reproducteur. Parmi
ces substances gurent:
• le plomb contenu dans les peintures à base de plomb;
• la silice cristalline des briques, du ciment et d’autres
matériaux de maçonnerie, ainsi que
• l’arsenic et le chrome des sciages traités chimiquement.
Les risques encourus par l’opérateur envers ces exposi-
tions varient en fonction de la fréquence de ce type
de travail. Pour réduire l’exposition à ces substances
chimiques, l’opérateur doit: travailler dans une zone bien
ventilée et porter l’équipement de sécurité approprié,
tel qu’un masque anti-poussière spécialement conçu
pour ltrer les particules microscopiques.
LIRE ET CONSERVER
TOUTES LES
INSTRUCTIONS POUR
UTILISATION FUTURE
SPECIFICATIONS
No de Cat. ............................................ 49-16-2720
Bloc moteur ............................................... 2825-20
Accessoire d'extension 914 mm (3’) ..... 49-16-2721
RPM .......................................................... 0 - 4 600
Vitesse de la chaîne………. ..8,6 m/s (1 693 ft/min)
Longueur de la barre .........................254 mm (10")
Capacité de coupure ...........................230 mm (9")
Diamètre minimal de brancher .............6 mm (1/4")
Diamètre maximal de branche.............230 mm (9")
Capacité du système de lubrification
de la chaîne ................................140 mL (4,7 oz)
Guide substitutifr................................... 48-09-5001
Largeur de rainure de guide ..........1,1 mm (0,043")
Chaîne substitutive .............................. 49-16-2723
Type de chaîne ................................. Rebond faible
Pitch de la chaîne ........... 9,5 mm (3/8") Prol faible
Dents d’entraînement ..........................................40
DESCRIPTION FONCTIONNELLE
1. Carter de guide-chaîne
2. Scie à chaîne
3. Écrou de guide-chaîne
4. Crochet
5. Indicateur de réglage de
tension de la chaîne
6. Réglage de tension de la
chaîne
7. Carter d’entraînement
8. Guide-chaîne
9. Indicateur de sens de
rotation
10. Bouchon d’huile
11. Poignée
12. Élagueuse
13. Cran d’arrêt
2
1
4
9
6
5
10
3
8
11
12
13
7

18
PICTOGRAPHIE
Volts
Courant direct
Tours-minute á vide (RPM)
Symbole d’alerte de sécurité.
Lire le manuel d'utilisation.
Toujours porter une protection
oculaire et l’équipement de
protection individuelle.
Porter des chaussures de sécurité
antidérapantes.
Porter des gants de protection.
Tenir l’outil au moins à 15 m (50')
des lignes électriques.
Ne laisser personne s’approcher à
moins de 15 m (50').
Éviter tout contact avec la pointe
du guide.
DANGER
Attention aux rebonds.
Réservoir d’huile de chaîne.
Direction de la chaîne
Réglage de tension de la chaîne
C
US
UL Listing Mark pour
Canada et États-unis
MONTAGE DE L'OUTIL
AVERTISSEMENT
Avant de son utilisation,
lire le manuel et les éti-
quettes du bloc moteur. Des consignes impor-
tantes à propos de l’utilisation et l’assemblage
sont fournies dans le manuel du bloc moteur.
Brancher l'accessoire sur le bloc moteur selon
les consignes qui se trouvent dans le manuel du
bloc moteur.
Toujours retirer le bloc-piles avant de changer
ou enlever les accessoires.
PRÉCAUTION
La scie est tranchante. Tou-
jours porter des gants pro-
tecteurs lors de la manipulation de la chaîne.
Substitution/réglage de la scie à
chaîne et la barre
Utiliser des chaînes pour scie à rebond réduit. Les
jauges de profondeur placées en avant de chaque
dent peuvent réduire la force de réaction du rebond
en empêchant les dents de mordre trop profondément
dans la zone de rebond. Utiliser exclusivement des
chaînes de rechange équivalentes à celle d’origine
ou certiées « rebond réduit » selon ANSI B175.1.
À mesure qu’une chaîne est aûtée au cours de sa
vie utile, elle perd une partie de ses qualités antire-
bond. Il est convenable donc de l’utiliser avec une
prudence accrue.
1. Retirer le bloc-piles.
2. Poser l’outil sur un sol nu et plat.
3. Retirer le carter d’entraînement en enlevant les
boulons de guide-chaîne avec l’outil de réglage.
4. Desserrer la chaîne en tournant la vis de tension
de la chaîne ver la gauche avec l’outil de réglage.
5. Sortir le guide-chaîne des boulons de guide-chaîne
et déboucler la chaîne du moyeu d’entraînement.
ATTENTION ! La scie à chaîne est tranchante.
6. Retirer la chaîne de la rainure du guide-chaîne.
ATTENTION ! La scie à chaîne est tranchante. Ex-
aminer le guide-chaîne pour détecter toutes ssures
ou usure ; veuillez le remplacer si endommagé.
7. Enrouler la nouvelle chaîne ou celle qui a été
aiguisée autour du guide-chaîne vers la direction
indiquée sur l’outil .

19
8. Veuillez s’assurer que la chaîne soit bien mise
en place dans les fentes autour de tout le guide-
chaîne.
9. Boucler la chaîne autour du moyeu et le faire
convenir au guide autour du boulon.
Boulon
Moyeu
10. Remplacer le carter d’entraînement.
11. Utiliser l’outil de réglage pour faire tourner la vis
de tension de chaîne an d’augmenter la tension
(vers la droite) jusqu’à ce que la chaîne se serre
autour du guide-chaîne.
• Vous saurez que la tension est la correcte quand
la chaîne claque après l'avoir tiré 3 mm (1/8") du
guide-chaîne. La chaîne ne doit pas s’aaisser
visiblement.
• Ne pas appliquer tension excessive sur la chaîne
puisqu’elle provoquera de l’usure excessive et
réduira la vie de la chaîne et peut endommager
le guide-chaîne.
• Des nouvelles chaîner pourraient s’étirer et
desserrer pendant l’utilisation initiale. Retirer le
bloc-piles et vérier la tension de la chaîne sou-
vent pendant les premières heures d’utilisation.
12. Serrer fermement les boulons du guide-chaîne.
Installation de la bandoulière
(Disponible en tant qu'accessoire)
Lors de l’opération de cet outil, utiliser la bandoulière
an de minimiser la fatigue de l’utilisateur et vous
aider à maintenir le contrôle durant l’utilisation.
Pour installer la bandoulière :
1. Retirer le bloc-piles.
Écrou
Vis
Biseau
Mousqueton
Clip
d’élagueuse
Vanne
2. Convenir le clip de
l’élagueuse autour
de l’élagueuse du
bloc moteur entre
la poignée latérale
et la poignée arrière
dans un emplacement
confortable durant
l’utilisation.
3. Insérer le boulon à
travers du clip de
l’élagueuse et le bi-
seau de la bandou-
lière. Visser l’écrou sur
le boulon et le serrer
fermement.
4. Attacher le clip du
mousqueton de la
bandoulière dans le
biseau.
Pour porter la bandou-
lière :
1. Faire passer le bras
droit et la tête en des-
sous de la bandou-
lière.
2. Ajuster les clips de la bandoulière pour changer sa
longueur à une position convenable et confortable.
3. Glisser la nuquière vers la position appropriée.
Pour détacher la bandoulière :
1. Tenir l’outil par la poignée avant avec votre main
gauche.
2. Tenir le mousqueton avec la main droit et détacher
le clip en appuyant sur la vanne et en le glissant
dehors du biseau.
Système Quik-Lok™
Accessoire d'extension
(Disponible en tant qu'accessoire)
Ne pas rallonger l’outil plus qu’un accessoire
d'extension. Les accessoires d'extension supplémen-
taires rendront l’élagueuse instable et incontrôlable,
ce qui pourra entraîner des blessures.
Pour installer un accessoire ou une extension :
1. Retirer le bloc-piles.
2. Desserrer la poignée de verrouillage.
3. Glisser l’élagueuse dans le cliquet d'accrochage
Quik-Lok™. Le cran d'arrêt sur l’élagueuse
doit être alignée avec les fentes sur le cliquet
d’accrochage Quik-Lok™.
4. Appuyer sur les parties pour les unir fermement.
Tirer sur les élagueuses pour s’assurer qu’elles
soient mises d’une façon sécuritaire.
5. Serrer le bouton de verrouillage.

20
Bouton de libération Quik-Lok™
Cran d’arrêt
Élagueuse
Poignée de verrouillage
Bloc moteur
Pour retirer un accessoire ou une extension :
1. Retirer le bloc-piles.
2. Desserrer la poignée de verrouillage.
3. Appuyer sur le bouton de relâchement Quik-Lok™
et tirer des élagueuses pour les séparer.
Système de lubrication de la chaîne
AVERTISSEMENT
Toujours retirer le bloc-
piles avant de changer ou
enlever les accessoires.
AVIS
Remplir le réservoir d’huile avec de
l’huile de chaîne (non comprise) avant
de démarrer l’outil et quand le réservoir soit à
moins de 1/4. Ne pas lubrier la chaîne endom-
magera le guide-chaîne et la chaîne.
Veuillez vérier le niveau d’huile souvent et remplir le
réservoir d’huile après chaque fois que la batterie soit
vide. Utiliser une huile de chaîne de haute qualité.
L’huile maintiendra la chaîne de la scie ainsi que
le guide-chaîne bien lubriés. Ne jamais démarrer
l’outil sans de l’huile de chaîne. Maintenir le réser-
voir à plus de 1/4 pour garantir qu’il y ait de l’huileur
susant pour faire les travaux. Toujours lubrier la
chaîne légèrement lors de la rémission de l’outil an
de prévenir l’apparition de rouille. Toujours vider le
réservoir d’huile lors de la rémission de l’outil an de
prévenir des fuites.
REMARQUE : Il est suggéré d’utiliser de l’huile
de chaîne végétale lors d’élagage d’arbres. L’huile
minérale pourra nuire les arbres. Ne jamais utiliser
de l’huile moteur, usée ni épaisse. Ceci pourra en-
dommager l’outil.
Remplissage du réservoir d’huile
1. Retirer le bloc-piles.
2. Poser l’outil sur un sol nu et plat avec la lame
vers le haut.
3. Dévisser le bouchon d’huile.
4. Remplir soigneusement le réservoir avec de l’huile
de chaîne.
5. Serrer le bouchon d’huile fermement.
6. Répéter ce processus si nécessaire pendant
l’utilisation de l’outil.
7. Vérier fréquemment que la chaîne de la scie soit
bien lubriée :
• Avec le réservoir rempli, tenir l’outil avec la pointe
du guide-chaîne vers le bas, vers une surface en
couleur claire.
• Démarrer l’outil pour environ 30 secondes.
• Une ligne d’huile devra apparaître sur la surface claire.
• Si non, retirer et nettoyer le guide-chaîne soigneu-
sement. S’assurer que le pignon du guide-chaîne
(dans la pointe) tourne sans problème.
• Si le système de lubrication ne fonctionne pas
toujours bien, veuillez contacter le centre de
réparations MILWAUKEE.
Transport de l’outil
AVERTISSEMENT
Emporter l’outil par la
poignée avant an d’éviter
les démarrages accidentels. La manipulation
adéquate de l’outil évitera des lésions.
Toujours éteindre l’outil lors de sa transportation
d’un espace à un autre. Ne pas amener l’outil
avec le doigt mis sur la gâchette. Le démarrage
accidentel peut causer des blessures graves.
Avant de transporter la scie, toujours :
1. Retirer le bloc-piles.
2. Mettre le carter sur la guide-chaîne.
Sélection de la vitesse
Lors de l’utilisation de cet accessoire, la
Haute
Basse
seule vitesse recommandée est HAUTE
VITESSE. Utiliser le bouton de commande
de vitesse pour sélectionner le mode de
HAUTE VITESSE.
MANIEMENT
DANGER
Ne jamais utiliser l’outil
pour couper auprès de
lignes électriques ou de sources de
courant. Si le guide et la chaîne se co-
incent sur une ligne ou cordon électrié, NE PAS
LES TOUCHER ! ELLES PEUVENT ÊTRE SOUS
TENSION ET DONC, EXTRÊMEMENT DAN-
GEREUSES. Continuer de tenir l’outil par la poi-
gnée arrière isolée ou la poser à l'écart en prenant
les précautions nécessaires. Mettre le circuit
électrique de la ligne électrique hors tension ou
débrancher le cordon endommagé avant d'essayer
de débloquer le guide-chaîne et chaîne par la ligne
ou le cordon. Le contact avec le guide, la chaîne,
d’autres parties conductrices de l’outil ou bien,
d’autres lignes ou cordons électrique sous ten-
sion provoqueront la mort par électrocution, choc
électrique ou des blessures physiques graves.
AVERTISSEMENT
Lire et veiller à bien com-
prendre toutes les in-
structions. Le non-respect des instructions ci-
dessous peut entraîner un choc électrique, un
incendie et/ou des blessures graves.
• Ne pas se protéger contre le rebond peut pro-
voquer des lésions graves et même la mort.
Voir les « Instructions importantes concernant
la sécurité » sur la protection contre le rebond
an d’éviter les risques de rebond.
• Toujours porter de la protection oculaire munie
d’écrans latéraux ainsi que de la protection
auditive et de tête. Ne pas suivre cette instruc-
tion pourrait entraîner des blessures graves si
l’appareil projetait des objets dans vos yeux
ainsi que des blessures graves.
• Ne pas travailler hors de portée. Ne pas couper si
vous tenez l’outil avec la main droite au-dessus
de la poitrine. Veuillez s’assurer que vos pieds
soient rmes. Écarter les pieds. Repartir vos
poids uniformément sur vos deux pieds.
• Ne pas laisser la familiarité avec le produit faire
oublier la prudence. Ne pas oublier qu’une frac-
tion de seconde d’inattention peut entraîner des
blessures graves.
La page charge ...
La page charge ...
La page charge ...
La page charge ...
La page charge ...
La page charge ...
La page charge ...
La page charge ...
La page charge ...
La page charge ...
La page charge ...
La page charge ...
La page charge ...
La page charge ...
La page charge ...
La page charge ...
La page charge ...
La page charge ...
La page charge ...
La page charge ...
-
 1
1
-
 2
2
-
 3
3
-
 4
4
-
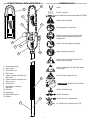 5
5
-
 6
6
-
 7
7
-
 8
8
-
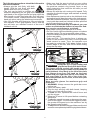 9
9
-
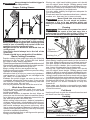 10
10
-
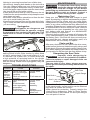 11
11
-
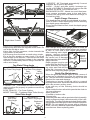 12
12
-
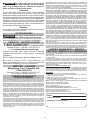 13
13
-
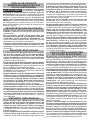 14
14
-
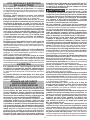 15
15
-
 16
16
-
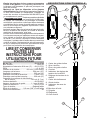 17
17
-
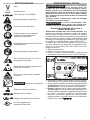 18
18
-
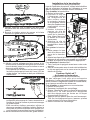 19
19
-
 20
20
-
 21
21
-
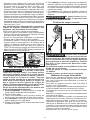 22
22
-
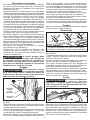 23
23
-
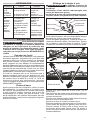 24
24
-
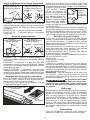 25
25
-
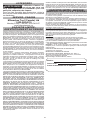 26
26
-
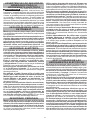 27
27
-
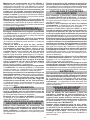 28
28
-
 29
29
-
 30
30
-
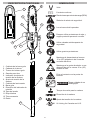 31
31
-
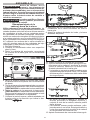 32
32
-
 33
33
-
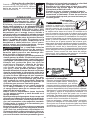 34
34
-
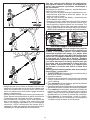 35
35
-
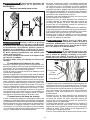 36
36
-
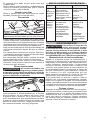 37
37
-
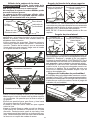 38
38
-
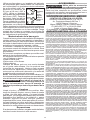 39
39
-
 40
40


Milwaukee 49-16-2720-49-16-2721 Manuel utilisateur
- Catégorie
- Tronçonneuses électriques
- Taper
- Manuel utilisateur
dans d''autres langues
Documents connexes
-
Milwaukee M18 Manuel utilisateur
-
Milwaukee M18 Fuel Pole Saw Kit Le manuel du propriétaire
-
-
-
-
-
-
Milwaukee M12 Fuel Hatchet 6Inch Pruning Saw Manuel utilisateur
-
-
Autres documents
-
STIHL HTA 66, 86 Manuel utilisateur
-
-
Worx WG309 Manuel utilisateur
-
Ryobi RY40001B Manuel utilisateur
-
-
 EarthWise CVPS44010 Le manuel du propriétaire
-
-
Remington RM4050 Manuel utilisateur
-
EGO MPS1001 Manuel utilisateur
-
Ryobi P2570 Le manuel du propriétaire
