Motorola IMPRES Smart Energy System Manuel utilisateur
- Catégorie
- Chargeurs de batterie
- Taper
- Manuel utilisateur

IMPRES
TM
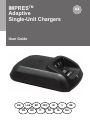
Adaptive
Single-Unit Chargers
User Guide
EN
LAS
BP FRC ID
DE
ES
FR
IT
PR NL
RU
简
frontcover.fm Page 1 Tuesday, June 16, 2009 11:49 AM

1
English
TABLE OF CONTENTS
Operational Safety Guidelines ................................. 4
Operating Instructions.............................................. 5
Charging Procedure......................................................5
Initialization .............................................................. 7
Automatic Reconditioning ........................................ 7
Manually Terminating the Reconditioning Process.......8
Manually Initiating the Reconditioning Process ............8
Troubleshooting ....................................................... 9
Service................................................................... 10
Motorola Authorized Transformers ........................ 10
Motorola Authorized Batteries ............................... 11
IMPRES Feature / Benefit Description .................. 11
87H01_AC_IMPRES_SUC.book Page 1 Monday, March 28, 2011 4:47 PM

3
English
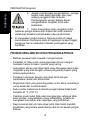
IMPORTANT
SAFETY INSTRUCTIONS
SAVE THESE INSTRUCTIONS
This document contains important safety and operating
instructions. Please read these instructions carefully and save
them for future reference.
Before using the battery charger, read all the instructions and
cautionary markings on (1) the charger, (2) the battery, and (3) the
radio using the battery.
1. To reduce risk of injury, charge only the
rechargeable Motorola authorized batteries
listed in Table 4 on page 11. Other batteries
may explode, causing personal injury and
damage.
2. Use of accessories not recommended by Motorola may result
in risk of fire, electric shock, or injury.
3. To reduce risk of damage to the electric plug and cord, pull by
the plug rather than the cord when disconnecting the charger.
4. An extension cord should not be used unless absolutely
necessary. Use of an improper extension cord could result in
risk of fire and electric shock. If an extension cord must be
used, make sure that the cord size is 18 AWG for lengths of
up to 100 feet (30.48 m), and 16 AWG for lengths up to
150 feet (45.72 m).
5. To reduce risk of fire, electric shock, or injury, do not operate
the charger if it has been broken or damaged in any way. Take
it to a qualified Motorola service representative.
!
W A R N I N G
!
87H01_AC_IMPRES_SUC.book Page 3 Monday, March 28, 2011 4:47 PM

4
English
WARNINGS (continued)
6. Do not disassemble the charger – it is not
repairable and replacement parts are not
available. Disassembly of the charger may
result in risk of electric shock or fire.
7. To reduce risk of electric shock, unplug the
charger from the AC outlet before attempting
any maintenance or cleaning.
8. This is a class A product. In a domestic environment this
product may cause radio interference in which case the user
may be required to take adequate measures.
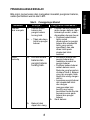
OPERATIONAL SAFETY GUIDELINES
• Turn the radio off when charging the battery.
• This equipment is not suitable for outdoor use. Use only in dry
locations / conditions.
• Connect equipment only to an appropriately fused and wired
supply of the correct voltage (as specified on the product).
• Disconnect from line voltage by removing the power plug from
the outlet.
• The socket outlet to which this equipment is connected should
be close and easily accessible.
• Maximum ambient temperature around the charger must not
exceed 40 °C (104 °F).
• Make sure the cord is located where it will not be stepped on,
tripped over, or subjected to water, damage, or stress.
• Output power from the power supply unit must not exceed the
ratings stated on the product label located on the bottom of the
charger.
!
W A R N I N G
!
87H01_AC_IMPRES_SUC.book Page 4 Monday, March 28, 2011 4:47 PM

5
English
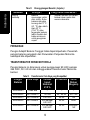
OPERATING INSTRUCTIONS
The IMPRES Adaptive Single-Unit Charger System is a fully
automated battery care system. All a user needs to do is follow
these simple steps:
1. Place the radio / IMPRES battery into the charger.
2. Remove the radio / IMPRES battery when it's fully charged
(LED turns steady GREEN).
The charger’s pocket accommodates either a radio with an
IMPRES battery attached or an IMPRES battery alone. Prior to
charging a radio with an IMPRES battery, turn the radio off.
Batteries charge best at room temperature.
Charging Procedure
1. Plug the charger end of the power supply cord into the power
receptacle located at the back of the charger.
2. Plug the wall receptacle end of the power supply cord into the
appropriate AC outlet. A successful power-up sequence is
indicated by a SINGLE GREEN BLINK on the charger
indicator.
3. Insert an IMPRES battery, or a radio with an IMPRES battery
(with the radio turned off), into the charger’s pocket by:
a. Aligning the groove on each side of the battery with the
corresponding raised rail on each side of the charger
pocket.
b. Pressing the battery toward the rear of the pocket.
c. Sliding the battery into the charger pocket, ensuring
complete contact between the charger and battery
contacts.
87H01_AC_IMPRES_SUC.book Page 5 Monday, March 28, 2011 4:47 PM

6
English
4. To remove a radio or IMPRES battery from the charger, use
two hands to remove a radio or battery from the charger
pocket - one hand to hold and support the charger, and the
other hand to remove the radio or battery.
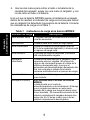
Once the IMPRES battery is properly seated into the pocket, the
charger indicator illuminates, indicating the charger has
recognized the presence of the battery. Refer to the charging
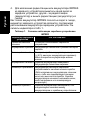
indicators in Table 1.
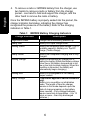
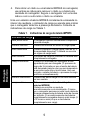
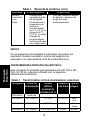
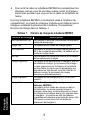
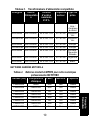
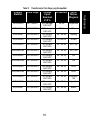
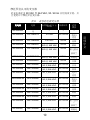
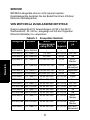
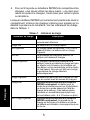
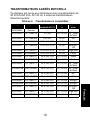
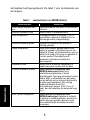
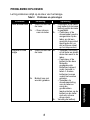
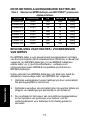
Table 1. IMPRES Battery Charging Indicators
Charge Indicator Description
Single Blink Green Charger has successfully powered up.
Steady Red Battery is in rapid charge mode.
Blinking Green Battery has completed rapid charge (> 90 %
available capacity). Battery is in Top-Off
charge (Trickle charge).
Steady Green Battery has completed charging and is fully
charged.
Blinking Orange Battery is recognized by charger but is
waiting to charge. (Either the battery voltage
is too low or the battery temperature is too
low or too high to allow charging. When this
condition is corrected, the battery will
automatically begin charging.)
Blinking Red Battery is unchargeable or not making
proper contact.
Steady Orange (This feature applies to IMPRES batteries
only)
Battery is in recondition or initialization
mode. The length of time the charger
remains in this mode depends upon the
state of charge remaining in the battery
when inserted. (Fully charged batteries
require more time to recondition – 8 to 12
hours or more – than fully discharged
batteries.)
87H01_AC_IMPRES_SUC.book Page 6 Monday, March 28, 2011 4:47 PM

7
English
INITIALIZATION
In order for the features of Motorola IMPRES batteries and the
Adaptive Charging System to be fully available, the data contained
in Motorola IMPRES batteries must be initialized by the charger
the first time it is charged. This process is indicated by a STEADY
ORANGE light on the charger indicator (the same as if the battery
were reconditioning). The process is automatic, includes an initial
reconditioning of the battery, and begins charging upon completion
of this process. This process requires time to initialize the battery,
so the battery should be left in the charger for approximately 12
hours to complete the process. Do not remove the battery from the
charger until the STEADY GREEN light is on.
AUTOMATIC RECONDITIONING
The Motorola IMPRES Adaptive Single-Unit Charger, when used
in conjunction with a Motorola IMPRES battery, has the ability to
determine when it is appropriate to recondition the battery
(required to remove memory issues in IMPRES batteries).
When an IMPRES battery is properly inserted into the charger, the
charger determines if it is appropriate to recondition the battery. If
the battery needs reconditioning, the charger automatically
indicates a STEADY ORANGE. This process may take up to 12
hours to complete, depending upon the state of charge and
capacity rating of the battery when it is inserted.
Blinking Red / Green (This feature applies to IMPRES batteries
only)
Battery has completed charging and is fully
charged. Battery continues to be usable, but
may be nearing the end of its rated service
life.
Table 1. IMPRES Battery Charging Indicators (continued)
Charge Indicator Description
87H01_AC_IMPRES_SUC.book Page 7 Monday, March 28, 2011 4:47 PM

8
English
It is important to note, for this process to be effective, the IMPRES
battery must be allowed to complete the recondition / recharge
process. Leave the battery in the charger until the charger
indicates a STEADY GREEN.
At the completion of the recondition cycle, the charger
automatically recharges the IMPRES battery.
Manually Terminating the Reconditioning Process
At any time during the reconditioning process of a Motorola
IMPRES battery (STEADY ORANGE indication), reconditioning
may be terminated by removing and reinserting the battery back
into the charger within 5 seconds. This causes the charger to
terminate the reconditioning process and begin the charging
process. The charger indicator changes to a STEADY RED. The
charger will attempt to recondition the battery at the next battery
insertion.
Manually Initiating the Reconditioning Process
Within 2 – 1/2 minutes of the initial insertion of an IMPRES battery
(STEADY RED indication), remove and reinsert the battery within
5 seconds to manually force reconditioning to occur. The charger
indicator changes from a STEADY RED to a STEADY ORANGE.
This forces the charger to recondition and automatically recharge
the battery. This is a useful feature to have when IMPRES
batteries have been in storage for several months or longer. Two
or three manual recondition cycles may be required to rejuvenate
the batteries, due to long term storage conditions.
87H01_AC_IMPRES_SUC.book Page 8 Monday, March 28, 2011 4:47 PM

9
English
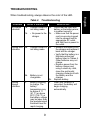
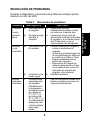
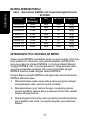
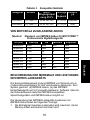
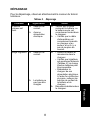
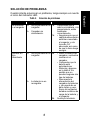
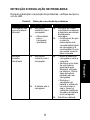
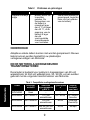
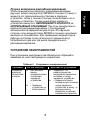
TROUBLESHOOTING
When troubleshooting, always observe the color of the LED.
Table 2. Troubleshooting
Problem What it means... What to do...
No charger
indication
1a. Charger contact is
not being made.
1b. • No power to the
charger.
1a. Check that the radio with
battery, or the battery alone,
is inserted correctly.
1b. • Make sure that the power
cord is securely plugged
into the charger and an
appropriate AC outlet,
and that there is power to
the outlet.
Blinking Red
Indication
2a. Charger contact is
not being made.
2b. Battery is not
chargeable.
2a. • Remove the battery from
the charger and replace it
back into the charger.
• Verify that the battery is a
Motorola-authorized
battery listed in Tables 4.
Other batteries may not
charge.
• Remove power from the
battery charger and,
using a clean dry cloth,
clean the gold metal
charging contacts of both
the battery and the
charger.
2b. Replace battery.
Blinking
Orange
Indication
3. Battery is waiting
to charge. The
battery
temperature may
be below 5 °C
(41 °F) or above
40°C (104 °F) or
the battery voltage
may be lower than
the predetermined
threshold level for
rapid charging.
3. When this condition is
corrected, the battery will
begin charging
automatically.
87H01_AC_IMPRES_SUC.book Page 9 Monday, March 28, 2011 4:47 PM

10
English
SERVICE
Adaptive Single-Unit Chargers are not repairable. Order
replacement chargers as necessary from your local Motorola
Sales Representative.
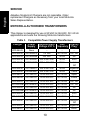
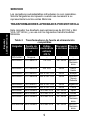
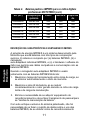
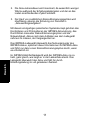
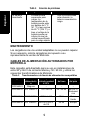
MOTOROLA AUTHORIZED TRANSFORMERS
This charger is designed for use in 90 VAC to 264 VAC, 50 / 60 Hz
applications and uses the following Motorola transformers.
Table 3. Compatible Power Supply Transformers
Charger Power
Supply
Nominal Input
Voltage ±10 %
Line
Frequency
Country
Plug
WPLN4243 None – – –
WPLN4232 2571586S13 110 VAC 50 / 60 Hz US / NA
WPLN4233 2571586S06 230 VAC 50 Hz UK
WPLN4234 2571586S07 220 to 240 VAC 50 Hz Euro
WPLN4235 2571586S08 220 to 240 VAC 50 Hz Australia /
NZ
WPLN4236 2571586S11 220 to 240 VAC 50 Hz Argentina
WPLN4245 2564060M01 220 to 240 VAC 50 Hz China
WPLN4247 2571886T01 90 to 264 VAC 50 / 60 Hz Japan
WPLN4249 2571886T01 90 to 264 VAC 50 / 60 Hz Korea
WPLN4253 2571886T01 90 to 264 VAC 50 / 60 Hz US / NA
WPLN4253B 25012006001 90 to 264 VAC 50 / 60 Hz US / NA
WPLN4254 2571886T01 90 to 264 VAC 50 / 60 Hz UK
WPLN4254B 25012006001 90 to 264 VAC 50 / 60 Hz UK
WPLN4255 2571886T01 90 to 264 VAC 50 / 60 Hz Euro
WPLN4255B 25012006001 90 to 264 VAC 50 / 60 Hz Euro
WPLN4256 2571886T01 90 to 264 VAC 50 / 60 Hz Australia /
NZ
WPLN4257 2571886T01 90 to 264 VAC 50 / 60 Hz Argentina
WPLN4281 2571886T01 90 to 264 VAC 50 / 60 Hz Brazil
87H01_AC_IMPRES_SUC.book Page 10 Monday, March 28, 2011 4:47 PM

11
English
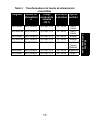
MOTOROLA AUTHORIZED BATTERIES
IMPRES FEATURE / BENEFIT DESCRIPTION
The IMPRES energy solution is an advanced Tri-Chemistry energy
system developed by Motorola which encompasses (a) IMPRES
batteries, (b) the IMPRES Adaptive Single-Unit Charger and, (c)
radio hardware / software which provides the capability for
IMPRES compatible radios to communicate with IMPRES
batteries.
The IMPRES Adaptive Charger, when used in conjunction with
Motorola IMPRES batteries, will:
1. Maximize operation time between charge cycles by
automatically eliminating memory effect.
2. Maximize battery life by significantly reducing heat during the
trickle and post-charge cycles.
3. Eliminate the need to purchase reconditioning equipment and
train personnel to “manage battery maintenance tasks.”
With this unique patented system approach, there is no need to
track and record IMPRES battery use, conduct manual
reconditioning cycles, or remove batteries from chargers following
charging.
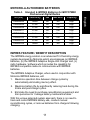
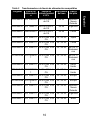
Table 4. Standard & IMPRES Batteries for MOTOTRBO
Professional Digital Radios
Kit (PN) Chemistry FM IMPRES Capacity
PMNN4065 NiMH No No High
PMNN4066 Li-Ion No Yes High
PMNN4069 Li-Ion Yes Yes High
PMNN4077 Li-Ion No Yes High
PMNN4101 Li-Ion No Yes High
PMNN4102 Li-Ion Yes Yes High
PMNN4103 Li-Ion No Yes High
PMNN4104 NiMH No No High
87H01_AC_IMPRES_SUC.book Page 11 Monday, March 28, 2011 4:47 PM

12
English
The IMPRES Adaptive Single-Unit Charger monitors the usage
pattern of the IMPRES battery, stores that information in the
IMPRES battery, and performs a recondition cycle only when
needed.
The IMPRES Adaptive Single-Unit Charger will not overheat the
IMPRES battery regardless of how long it is left in the pocket. The
charger monitors the battery and automatically “tops off” the
battery as required.
87H01_AC_IMPRES_SUC.book Page 12 Monday, March 28, 2011 4:47 PM

13
English
MOTOROLA, MOTO, MOTOROLA SOLUTIONS and the Stylized M logo
are trademarks or registered trademarks of Motorola Trademark Holdings,
LLC and are used under license. All other trademarks are the property of
their respective owners.
© 2007, 2009 – 2011 Motorola Solutions, Inc. All rights reserved.
87H01_AC_IMPRES_SUC.book Page 13 Monday, March 28, 2011 4:47 PM

1
Español
Latinoamericano
CONTENIDO
Normas de seguridad en la operación..................... 3
Instrucciones de operación...................................... 4
Procedimiento de carga................................................4
Inicialización ............................................................ 6
Reacondicionamiento automático............................ 6
Terminación manual del proceso de
reacondicionamiento..........................................................7
Iniciación manual del proceso
de reacondicionamiento................................................7
Resolución de problemas ........................................ 8
Servicio .................................................................... 9
Transformadores aprobados por Motorola .............. 9
Baterías aprobadas por Motorola .......................... 10
Descripción de las facilidades y ventajas del IMPRES
10
87H01_AC_IMPRES_SUC.book Page 1 Friday, April 8, 2011 10:49 AM

2
Español
Latinoamericano
INSTRUCCIONES DE SEGURIDAD
IMPORTANTES
GUARDE ESTAS INSTRUCCIONES
Este documento contiene importantes instrucciones de seguridad
y de operación. Por favor, léalas detenidamente y guárdelas como
referencia futura.
Antes de usar el cargador de batería, lea todas las instrucciones y
señales de advertencia que aparecen en (1) el cargador, (2) la
batería y (3) el radio que usa la batería.
1. Para reducir el peligro de lesiones, cargue
solamente las baterías recargables
aprobadas por Motorola que aparecen en la
tabla 4 de la página 10. Baterías de otro tipo
podrían explotar y producir lesiones
personales y daños.
2. El uso de accesorios no recomendados por Motorola puede
ocasionar incendios, choques eléctricos o lesiones.
3. Para reducir la posibilidad de daños al cable y al enchufe
eléctricos, tire del enchufe y no del cable al desconectar el
cargador.
4. No debe usarse cable de extensión, salvo que sea
absolutamente necesario. Al usar un cable de extensión
inadecuado se corre peligro de incendio y choque eléctrico. Si
es necesario usar un cable de extensión, asegúrese de que el
calibre del cable sea 18 AWG para longitudes de hasta
30 metros (100 pies) y 16 AWG para longitudes de hasta
45 metros (150 pies).
5. Para reducir el peligro de incendio, choque eléctrico o
lesiones, no use el cargador si está roto o si presenta algún
tipo de daño. Llévelo a un centro de servicio autorizado
Motorola.
!!
ADVERTENCIA
87H01_AC_IMPRES_SUC.book Page 2 Friday, April 8, 2011 10:49 AM

3
Español
Latinoamericano
ADVERTENCIAS (cont.)
6. No desarme el cargador; la unidad no es
reparable y no conseguirá partes de
repuesto. Al desarmar el cargador se corre
peligro de choque eléctrico o incendio.
7. Para reducir el peligro de choque eléctrico,
desenchufe el cargador del tomacorriente de corriente alterna
antes de limpiarlo o de hacerle mantenimiento.
8. Este es un producto de clase A. En un ambiente doméstico
este producto puede causar radio interferencia, en cuyo caso
puede requerirse que el usuario tome medidas al efecto.
NORMAS DE SEGURIDAD EN LA OPERACIÓN
• Apague el radio para cargar la batería.
• Este equipo no está diseñado para uso al aire libre. Úselo
únicamente en lugares secos.
• Conecte la unidad a un tomacorriente del voltaje apropiado
(según las especificaciones que aparecen en la etiqueta del
producto), correctamente instalado y con la debida protección
de sobrecorriente.
• Para desconectar la alimentación, desenchufe del
tomacorriente el cable de alimentación.
• El tomacorriente debe estar ubicado cerca de la unidad, en un
lugar fácilmente accesible.
• La temperatura ambiental máxima alrededor del cargador no
debe exceder los 40 °C (104 °F).
• Asegúrese de que el cable quede en una posición donde no
puedan pisarlo, donde no pueda provocar un traspié, y donde
esté protegido del agua, daño o tensión mecánica.
• La salida de la fuente de alimentación no deberá exceder el
voltaje especificado en la etiqueta del producto ubicada por
debajo del cargador.
!!
ADVERTENCIA
87H01_AC_IMPRES_SUC.book Page 3 Friday, April 8, 2011 10:49 AM

4
Español
Latinoamericano
INSTRUCCIONES DE OPERACIÓN
El sistema cargador autoadaptable individual IMPRES es un
sistema automatizado para el cuidado de las baterías. Todo lo que
el usuario necesita hacer es seguir estos sencillos pasos:
1. Coloque el radio o la batería IMPRES en el cargador.
2. Retire el radio o la batería IMPRES una vez que estén
completamente cargados (el LED se pone VERDE continuo).
La cavidad del cargador puede aceptar ya sea un radio con una
batería IMPRES instalada, o bien una batería IMPRES sola.
Antes de cargar una batería IMPRES instalada en un radio,
apague el radio. Las baterías se cargan mejor a temperatura
ambiente.
Procedimiento de carga
1. Enchufe uno de los extremos del cable de alimentación en el
receptáculo de alimentación ubicado en la parte posterior del
cargador.
2. Enchufe el otro extremo del cable de alimentación al
tomacorriente de CA correspondiente. Una vez que el
cargador ejecuta correctamente la secuencia inicial de
encendido su LED indicador emite un BREVE DESTELLO
VERDE.
3. Inserte una batería IMPRES, o un radio con batería IMPRES
(el radio deberá estar apagado), en la cavidad del cargador.
Para ello:
a. Alinee las ranuras ubicadas a cada lado de la batería con
sus respectivas guías dispuestas a cada lado de la
cavidad del cargador.
b. Presione la batería hacia la parte posterior de la cavidad.
c. Deslice la batería hacia dentro de la cavidad del cargador;
asegúrese de que los terminales del cargador y de la
batería hacen buen contacto.
87H01_AC_IMPRES_SUC.book Page 4 Friday, April 8, 2011 10:49 AM

5
Español
Latinoamericano
4. Use las dos manos para retirar el radio o la batería de la
cavidad del cargador: sujete con una mano el cargador, y con
la otra retire el radio o la batería.
Una vez que la batería IMPRES quede correctamente encajada
dentro de la cavidad, el indicador de carga se ilumina para indicar
que el cargador ha detectado la presencia de la batería. Consulte
los indicadores de carga en la Tabla 1.
Tabla 1. Indicadores de carga de la batería IMPRES
Indicador de carga Descripción
Breve destello verde El cargador ejecutó correctamente la secuencia
inicial de encendido.
Rojo continuo La batería está en el modo de carga rápida.
Verde intermitente La batería completó la carga rápida (más del
90 % de la capacidad disponible). La batería está
en régimen de carga lenta.
Verde continuo El proceso de carga ha terminado y la batería
está completamente cargada.
Anaranjado
intermitente
La batería fue detectada por el cargador y está
esperando para ser cargada. (El proceso de
carga no ha comenzado porque el voltaje de la
batería es demasiado bajo, o porque su
temperatura es demasiado baja o demasiado alta.
Una vez corregido el estado de la batería
comienza automáticamente el proceso de carga).
Rojo intermitente La batería no admite carga o no está haciendo
buen contacto.
Anaranjado continuo (Esta facilidad sólo la ofrecen las baterías
IMPRES)
La batería está en el modo de
reacondicionamiento o de inicialización. El tiempo
que el cargador permanece en este modo
depende de la carga que tenga la batería antes
de ser insertada. (El reacondicionamiento de las
baterías completamente cargadas demora más
tiempo (de 8 a 12 horas o más) que el de las
baterías completamente descargadas).
87H01_AC_IMPRES_SUC.book Page 5 Friday, April 8, 2011 10:49 AM

6
Español
Latinoamericano
INICIALIZACIÓN
Para aprovechar plenamente las facilidades de las baterías
IMPRES de Motorola y el sistema de carga autoadaptable, el
cargador tiene que inicializar los datos contenidos en dichas
baterías la primera vez que éstas se cargan. Este modo se indica
con el LED indicador en ANARANJADO CONTINUO (igual que
cuando la batería se está reacondicionando). El proceso es
automático, incluye un reacondicionamiento inicial de la batería y
la carga se inicia tras completarse dicho proceso. Este proceso
requiere tiempo para inicializar la batería. Por esa razón, hay que
dejar la batería en el cargador aproximadamente 12 horas hasta
que finalice el proceso. No retire la batería del cargador hasta que
el LED se ponga VERDE CONTINUO.
REACONDICIONAMIENTO AUTOMÁTICO
El cargador autoadaptable individual IMPRES de Motorola,
cuando se usa junto con una batería IMPRES de Motorola, tiene
la capacidad de determinar cuándo es procedente el
reacondicionamiento de la batería (necesario para eliminar el
efecto de memoria de las baterías IMPRES).
Cuando una batería IMPRES se inserta correctamente en el
cargador, éste último determina si es procedente el
reacondicionamiento de la batería. Si la batería necesita ser
reacondicionada el cargador se torna automáticamente
ANARANJADO CONTINUO. Este proceso puede durar hasta 12
Rojo / verde
intermitente
(Esta facilidad sólo la ofrecen las baterías
IMPRES)
El proceso de carga ha terminado y la batería
está completamente cargada. La batería puede
seguirse usando pero se está acercando al final
de su vida útil.
Tabla 1. Indicadores de carga de la batería IMPRES (cont.)
Indicador de carga Descripción
87H01_AC_IMPRES_SUC.book Page 6 Friday, April 8, 2011 10:49 AM

7
Español
Latinoamericano
horas, dependiendo del estado de carga y de la capacidad de
carga de la batería cuando se inserta en el cargador.
Es importante tener presente que, para que este proceso sea
eficaz, es necesario dejar que la batería IMPRES concluya el
proceso de reacondicionamiento / carga. Deje la batería en el
cargador hasta que el LED indicador se torne VERDE
CONTINUO.
Al completarse el ciclo de reacondicionamiento, el cargador
automáticamente recarga la batería IMPRES.
Terminación manual del proceso de reacondicionamiento
En cualquier momento durante el proceso de reacondicionamiento
de una batería IMPRES de Motorola (indicador ANARANJADO
CONTINUO), se puede terminar el reacondicionamiento con sólo
retirar y reinsertar en el cargador la batería en un lapso de 5
segundos. Esto hace que el cargador termine el proceso de
reacondicionamiento y comience el proceso de carga. El LED
indicador se torna ROJO CONTINUO. El cargador intentará
reacondicionar la batería la próxima vez que sea insertada.
Iniciación manual del proceso de reacondicionamiento
Antes de los 2,5 minutos de la inserción inicial de una batería
IMPRES (el LED indicador permanece en ROJO CONTINUO),
retire y reinserte la batería en un lapso de 5 segundos para forzar
manualmente su reacondicionamiento. El indicador del cargador
cambia de ROJO CONTINUO a ANARANJADO CONTINUO. Lo
anterior fuerza al cargador al modo de reacondicionamiento y
automáticamente se recarga la batería. Esta facilidad es útil
cuando las baterías IMPRES han estado guardadas por varios
meses. Puede que se requieran dos o tres ciclos de
reacondicionamiento manual para rejuvenecer las baterías, por
haber estado largo tiempo almacenadas.
87H01_AC_IMPRES_SUC.book Page 7 Friday, April 8, 2011 10:49 AM
La page charge ...
La page charge ...
La page charge ...
La page charge ...
La page charge ...
La page charge ...
La page charge ...
La page charge ...
La page charge ...
La page charge ...
La page charge ...
La page charge ...
La page charge ...
La page charge ...
La page charge ...
La page charge ...
La page charge ...
La page charge ...
La page charge ...
La page charge ...
La page charge ...
La page charge ...
La page charge ...
La page charge ...
La page charge ...
La page charge ...
La page charge ...
La page charge ...
La page charge ...
La page charge ...
La page charge ...
La page charge ...
La page charge ...
La page charge ...
La page charge ...
La page charge ...
La page charge ...
La page charge ...
La page charge ...
La page charge ...
La page charge ...
La page charge ...
La page charge ...
La page charge ...
La page charge ...
La page charge ...
La page charge ...
La page charge ...
La page charge ...
La page charge ...
La page charge ...
La page charge ...
La page charge ...
La page charge ...
La page charge ...
La page charge ...
La page charge ...
La page charge ...
La page charge ...
La page charge ...
La page charge ...
La page charge ...
La page charge ...
La page charge ...
La page charge ...
La page charge ...
La page charge ...
La page charge ...
La page charge ...
La page charge ...
La page charge ...
La page charge ...
La page charge ...
La page charge ...
La page charge ...
La page charge ...
La page charge ...
La page charge ...
La page charge ...
La page charge ...
La page charge ...
La page charge ...
La page charge ...
La page charge ...
La page charge ...
La page charge ...
La page charge ...
La page charge ...
La page charge ...
La page charge ...
La page charge ...
La page charge ...
La page charge ...
La page charge ...
La page charge ...
La page charge ...
La page charge ...
La page charge ...
La page charge ...
La page charge ...
La page charge ...
La page charge ...
La page charge ...
La page charge ...
La page charge ...
La page charge ...
La page charge ...
La page charge ...
La page charge ...
La page charge ...
La page charge ...
La page charge ...
La page charge ...
La page charge ...
La page charge ...
La page charge ...
La page charge ...
La page charge ...
La page charge ...
La page charge ...
La page charge ...
La page charge ...
La page charge ...
La page charge ...
La page charge ...
La page charge ...
La page charge ...
La page charge ...
La page charge ...
La page charge ...
La page charge ...
La page charge ...
La page charge ...
La page charge ...
La page charge ...
La page charge ...
La page charge ...
La page charge ...
La page charge ...
La page charge ...
-
 1
1
-
 2
2
-
 3
3
-
 4
4
-
 5
5
-
 6
6
-
 7
7
-
 8
8
-
 9
9
-
 10
10
-
 11
11
-
 12
12
-
 13
13
-
 14
14
-
 15
15
-
 16
16
-
 17
17
-
 18
18
-
 19
19
-
 20
20
-
 21
21
-
 22
22
-
 23
23
-
 24
24
-
 25
25
-
 26
26
-
 27
27
-
 28
28
-
 29
29
-
 30
30
-
 31
31
-
 32
32
-
 33
33
-
 34
34
-
 35
35
-
 36
36
-
 37
37
-
 38
38
-
 39
39
-
 40
40
-
 41
41
-
 42
42
-
 43
43
-
 44
44
-
 45
45
-
 46
46
-
 47
47
-
 48
48
-
 49
49
-
 50
50
-
 51
51
-
 52
52
-
 53
53
-
 54
54
-
 55
55
-
 56
56
-
 57
57
-
 58
58
-
 59
59
-
 60
60
-
 61
61
-
 62
62
-
 63
63
-
 64
64
-
 65
65
-
 66
66
-
 67
67
-
 68
68
-
 69
69
-
 70
70
-
 71
71
-
 72
72
-
 73
73
-
 74
74
-
 75
75
-
 76
76
-
 77
77
-
 78
78
-
 79
79
-
 80
80
-
 81
81
-
 82
82
-
 83
83
-
 84
84
-
 85
85
-
 86
86
-
 87
87
-
 88
88
-
 89
89
-
 90
90
-
 91
91
-
 92
92
-
 93
93
-
 94
94
-
 95
95
-
 96
96
-
 97
97
-
 98
98
-
 99
99
-
 100
100
-
 101
101
-
 102
102
-
 103
103
-
 104
104
-
 105
105
-
 106
106
-
 107
107
-
 108
108
-
 109
109
-
 110
110
-
 111
111
-
 112
112
-
 113
113
-
 114
114
-
 115
115
-
 116
116
-
 117
117
-
 118
118
-
 119
119
-
 120
120
-
 121
121
-
 122
122
-
 123
123
-
 124
124
-
 125
125
-
 126
126
-
 127
127
-
 128
128
-
 129
129
-
 130
130
-
 131
131
-
 132
132
-
 133
133
-
 134
134
-
 135
135
-
 136
136
-
 137
137
-
 138
138
-
 139
139
-
 140
140
-
 141
141
-
 142
142
-
 143
143
-
 144
144
-
 145
145
-
 146
146
-
 147
147
-
 148
148
-
 149
149
-
 150
150
-
 151
151
-
 152
152
-
 153
153
-
 154
154
-
 155
155
-
 156
156
-
 157
157
-
 158
158
-
 159
159
-
 160
160


Motorola IMPRES Smart Energy System Manuel utilisateur
- Catégorie
- Chargeurs de batterie
- Taper
- Manuel utilisateur
dans d''autres langues
- italiano: Motorola IMPRES Smart Energy System Manuale utente
- English: Motorola IMPRES Smart Energy System User manual
- español: Motorola IMPRES Smart Energy System Manual de usuario
- Deutsch: Motorola IMPRES Smart Energy System Benutzerhandbuch
- русский: Motorola IMPRES Smart Energy System Руководство пользователя
- Nederlands: Motorola IMPRES Smart Energy System Handleiding
- português: Motorola IMPRES Smart Energy System Manual do usuário
Documents connexes
-
Motorola IMPRES Smart Energy System Manuel utilisateur
-
-
-
-
-
Motorola IMPRES NNTN7595 Manuel utilisateur
-
-
-
-