Haier HDE03WNA Manuel utilisateur
- Catégorie
- Réfrigérateurs combinés
- Taper
- Manuel utilisateur

HDE03WNA-MANUAL 10/22/01 12:17 PM Pac_-_
What The World Comes Home To TM
TweDoorCempact
Cempact De Deu× Pertes
CempacteDeDesPuertas
Model
Guidede #'Uti#isateuro
Modele
Manua#de#Usuarieo
ParaModelode

HDE03WNA-MANUAL 10/22/01 12:17 PM Pac_
SAFETYPRECAUTIONS
Read all of the instructions before using this appliance.
When using this appliance, always exercise basic safety
precautions, including the following:
1) Use this appliance only for its intended purpose as described in this use
and care guide.
2) This refrigerator must be properly installed in accordance with the
installation instructions before it is used. See grounding instructions in the
installation section.
3) Never unplug your refrigerator by pulling on the power cord. Always
grasp the plug firmly and pull straight out from the outlet.
4) Repair or replace immediately, all electric service cords that have become
frayed or otherwise damaged. Do not use a cord that shows cracks or
abrasion damage along its length, the plug or the connector end.
5) Unplug your refrigerator before cleaning or before making any repairs.
Note: If for any reason this product requires service, we strongly
recommend that a certified technician performs the service.
6) Do not use any electrical device or any sharp instrument in defrosting your
refrigerator.
7) If your old refrigerator is not being used, we recommend that you remove
the doors and leave the shelves in place. This will reduce the possibility of
danger to children.
8) After your refrigerator is in operation, do not touch the cold surfaces in
the freezer compartment, particularly when hands are damp or wet. Skin
may adhere to these extremely cold surfaces.
9) Do not refreeze foods, which have been thawed completely. The United
States Department of Agriculture in Home and Garden Bulletin No. 69
reads: "...You may safely refreeze frozen foods that have thawed if they
still contain ice crystals or if they are still cold-below 40°F''.
"...Thawed ground meats, poultry, or fish that have any off-odor or off-
color should not be refrozen and should not be eaten. Thawed ice cream
should be discarded. If the odor or color of any food is poor or
questionable, discard it. The food may be dangerous to eat."
"...Even partial thawing and re-freezing reduce the eating quality of
foods, particularly fruits, vegetables, and prepared foods. The eating
quality of red meats is affected less than that of many other foods. Use
refrozen foods as soon as possible, to save as much of its eating quality
as you can,"

HDE 03 WNA -MANUAL 10/22/01 12:17 PM Pac_
iiiiiiiiiiiiiiiiiiiiiiiiiiiiiiiiiiiiiiiiiiiiiiiiiiiiiiii!i!ii!ii!ii!ii!ii!ii!ii!ii!ii!ii!ii!ii!ii!ii!ii!ii!ii!ii!ii!ii!ii!ii!i
10) This refrigerator should not be recessed or built-in an enclosed cabinet. It
is designed for freestanding installation only.
1 1) Do not operate your refrigerator in the presence of explosive fumes,
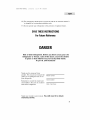
SAVETHESEINSTRUCTIONS
ForFutureReference
DANGER
Risk of child entrapment. Before you throw away your old
refrigerator or freezer, take off the doors. Leave the shelves
in place so that children may not easily climb inside.
As per UL 250 Standards
Thank you for using our Haler
product. This easy-to-use manual will
guide you in getting the best use of
your refrigerator.
Remember to record the model and
serial number. They are on a label in
back of the refrigerator,
Model number
Serial number
Date of purchase
Staple your receipt to your manual. You will need it to obtain
warranty service.

HDE 03WNA -MANUAL 10/22/01 12:17 PM Pa_
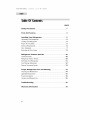
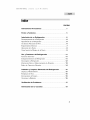
PAGE
Safety Precautions ........................................................................... 1
Parts And Features .......................................................................... 4
Installing Your Refrigerator ............................................................ 5
Unpacking Your Refrigerator .................................................................. 5
Leveling Your Refrigerator ...................................................................... 5
Proper Air Circulation ............................................................................ 5
Electrical Requirements ............................................................................ 6
Door Alignment ...................................................................................... 7
Reversing the Door Swing ...................................................................... 8
Refrigerator Features And Use .................................................... 10
General Features.................................................................................. 10
Refrigerator Interior Shelves.................................................................. 10
Defrosting Your Refrigerator .................................................................. 11
Food Storage Information .................................................................... 12
Normal Operating Sounds .................................................................... 13
Proper Refrigerator Care and Cleaning .................................... 14
Cleaning and Maintenance .................................................................. 14
Light Bulb Replacement ........................................................................ 15
Power Interruptions .............................................................................. 15
Vacation and Moving Care .................................................................. 15
Troubleshooting .............................................................................. 16
Warranty Information .................................................................. 18

HDE03WNA-MANUAL 10/22/01 12 :17 PM Pac/_Z
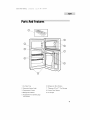
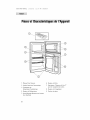
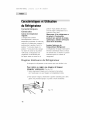
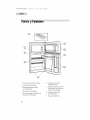
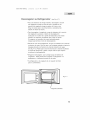
1. Ice Cube Tray
2. Automatic Interior Light
3. Temperature Control
4, Refrigerator Shelves
5. Adjustable Front leveling legs
(not shown)
6. Refrigerator Door Shelves
7. "Dispense-A-Can TM" Can Storage
8. Freezer Door Shelves
9. Ice Scraper

HDE03WNA-MANUAL 10/22/01 12:17 PM Pac_
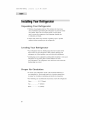
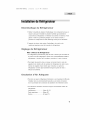
Unpacking Your Refrigerator
1, Remove all packaging material. This includes the foam base
and all adhesive tape holding the refrigerator accessories inside
and outside. Slide out and remove plastic or foam guard
used to secure the compressor from shipping damage due
to vibration and shock,
2, Inspect and remove any remains of packing, tape or printed
materials before powering on the refrigerator,
[eveMing Your Refrigerator
• Your refrigerator has two leveling legs which are located in the
front corners of your refrigerator, After properly placing your
refrigerator in its final position, you can level your refrigerator.
• Leveling legs can be adjusted by turning them clockwise to raise your
refrigerator or by turning them counterclockwise to lower
your refrigerator. The refrigerator door will close easier when the
leveling legs are raised,
Proper Air Circulation
• To assure your refrigerator works at the maximum efficiency it
was designed for, you should install it in a location where there
is proper air circulation, plumbing and electrical connections.
• The following are recommended clearances around the refrigerator:
Sides ............... 3/4 "(19mm)
Top .................... 1" (25mm)
Back .................. 1" (25ram)

HDE03WNA-MANUAL 10/22/01 12:17 PM Pac_-_
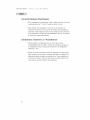
[me{[ri{a Requiremen[
• Make sure there is a suitable power Outlet (115 volts, 15 amps outlet)
with proper grounding to power the refrigerator.
• Avoid the use of three plug adapters or cutting off the third grounding in
order to accommodate a two plug outlet. This is a dangerous practice
since it provides no effective grounding for the refrigerator and may
result in shock hazard.
Install [imitations
Do not install your refrigerator in any location not properly insulated or
heated e.g. garage etc. Your refrigerator was not designed to operate in
temperature settings below 55 ° Fahrenheit.
Select a suitable location for the refrigerator on a hard even
surface away from direct sunlight or heat source e.g. radiators,
baseboard heaters, cooking appliances etc. Any floor unevenness
should be corrected with the leveling legs located on the front bottom
corners of the refrigerator.

HDE03WNA-MANUAL 10/22/01 12:17 PM Pac_9
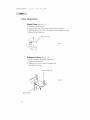
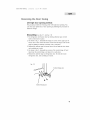
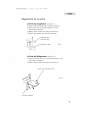
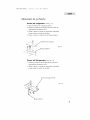
Door A ignment
Freezer Door: (see fig. # 1)
1, Remove the top hinge cover.
2. Loosen the top hinge screws using a phillips head screwdriver.
3, Adjust the door or put a spacer in between and then tighten the screws.
4. Replace the top hinge cover.
9 box cover
fig. # 1
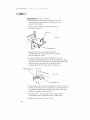
Refrigerator Door: (see fig. # 2)
1. Loosen and remove the bottom hinge using a
phillips head screwdriver.
2, Adjust the door, or put a spacer in between and
then tighten the screws,
bottom hinge axle
fig. # 2
/
Bottom hinge

HDE03WNA-MANUAL 10/22/01 12:17 PM Pa_
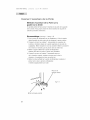
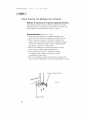
Reversing the Door Swing
Left/right door opening method:
This product provides the reversing of the left/right door opening. You
can select your preference of door opening by following the procedure to
make the change,
Dismantling: (see rig. # 1 and rig. # 3)
1, Fix refrigerator and freezer door by sticking adhesive tape on both
sides to hold doors in place.
2, As shown in fig. 1, dismantle the hinge box cover on the upper part of
freezer door, Then remove the three screws from the hinge, Take out the
hinge by pulling it vertically, and keep it in a safe place,
3, Remove the adhesive tape on freezer door, lift and take the door down,
and carefully put it aside.
4, As shown in fig. 3, dismantle two screws of the central hinge, lift and
take down the central hinge, and keep it in a safe place.
5. Remove the adhesive tape on refrigerator door, lift and take down
refrigerator door, and carefully put it aside,
fig, # 3
Central hinge axle
X
\
Central hinge pad

HDE03WNA-MANUAL 10/22/01 12:17 PM Pac_'_0
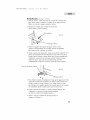
Reinstallation: (see fig. # 4 and # 5)
1, Remove the lower pivot pin from the bracket of the lower
hinge by turning counter clockwise. Move the pin to the
opposite hole and tighten,
2, Loosen the screws holding the lower hinge bracket
and remove the hinge,
,ivot pin
fig. # 4
Bottom hinge
3. Align the holes in the lower hinge bracket to the
corresponding holes in the opposite side of the cabinet.
insert and tighten the screws,
4, To install refrigerator door: make the left bottom hole of the
refrigerator compartment door fall over the lower hinge axle, move
door forward to make it straight and in alignment with central hinge.
Install the central hinge again, turn the hinge axle until it
completely enters the door body, then fix it with screws.
Central hinge axle
fig, # 5
// /_ -_
_ Central hinge pad
5. To install freezer door: make the left bottom hole of freezer door fall
over the central hinge axle; raise upper hinge, so that hinge axle can
be installed in the upper hole of the upper part of the freezer door;
adjust door to make it straight and level.
6. As shown in Fig. 1, install the upper freezer hinge to the left
corresponding position. (tighten the screws of upper hinge)
7, Replace the hinge cover as shown in Fig. 1.
9

HDE03WNA-MANUAL 10/22/01 12:17 PM Pa_l
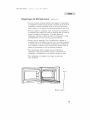
General Features
Adjustable temperature dial:
Your refrigerator will automatically
maintain the temperature level you
select. The temperature control dial has
7 settings plus off. 1 is the warmest. 7
is the coldest, Turning the dial to OFF
stops cooling in both the refrigeration
and freezer sections, At first, set the
dial to 4 and allow 24 hours to pass
before adjusting the temperature to your
needs.
(Note: If the refrigerator has
been placed in a horizontal or
tilted position for any period
of time wait 24 hours before
plugging the unit in.)
Refrigerator Section
Interior Light:
Your refrigerator is equipped with an
automatic interior light in the fresh
food section for you to easily locate
your food.
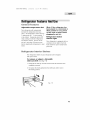
Refrigerator _nterior $heMves
The refrigerator shelves of your refrigerator were designed
with you in mind,
To remove or adjust a full-width
slide-out shelf: (seefig. # 6)
1, Gently tilt the shelf up and slide forward until the shelf has been
completely removed,
2, To replace the shelf, gently slide the shelf back until it rests in
the locking position.
fig. # 6
lO

HDE03WNA-MANUAL 10/22/01 12:17 PM Pac/'_2
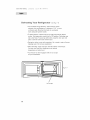
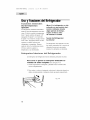
Defrosting Your Refrigerator (seeFig.# 7)
• For maximum energy efficiency, defrost freezer section
whenever frost accumulates to a thickness of 1/4" or more
on freezer walls Note that frost tends to accumulate
more during the summer months,
• To defrost freezer, remove food and ice cube tray from the freezer
section. Turn temperature control dial to OFF position Defrosting may
take a few hours To speed up defrost time, keep the door open and
place a bowl of warm water in the freezer
• During the defrost, water will accumulate. Use a towel to wipe off excess
dripping water Do not leave unattended,
• After defrosting, empty and wipe down the interior of the freezer.
You may now reset your refrigerator to the desired
temperature and return food.
• Your freezer has been equipped with an ice scraper
for your convenience.
fig. # 7
ice scraper
11

HDE03WNA-MANUAL 10/22/01 12:17 PM Pac_'_3
Food
Storage Information
Fresh Food
• When storing fresh food, which is not prepackaged, be sure to wrap or
store food in airtight and moisture proof material unless otherwise
noted This will ensure proper shelf life and prevent the transfer of
odors and tastes
• Wipe containers before storing to avoid needless spills
• Eggs should be stored in an upright position in their original carton to
maximize shelf life
• Fruit should be washed and dried then stored in a crisper set for low
humidity If you do not have humidity controlled crispers place the items
in sealed plastic bags before storing in the crisper
• Vegetables with skins should be stored in plastic bags or containers and
stored in crisper with low humidity setting
• Leafy vegetables should be washed and drained and then stored in
plastic bags or containers in crisper with high humidity setting
• Hot food should be allowed to cool before storing in the refrigeration,
This will prevent unnecessary energy use
• Fresh seafood should be used the same day as purchased
• When storing meats in the fresh food section, keep in the original
packaging or rewrap as necessary Follow the suggestions below for
safe storage:
Chicken
Ground Beef
Cold Cuts
Steaks/Roasts
Smoked/Cured Meats
All others
12 Days
12 Days
35 Days
35 Days
710 Days
12 Days
If longer periods of storage are required, store immediately in the freezer
section.
12

HDE 03 WNA -MANUAL 10/22/01 12:17 PM Pa<_4
Frozen Food
• Proper freezer storage requires correct packaging. All foods must be in
packages, which do not allow the flow of air or moisture in, or out.
Improper storage will result in odor and taste transfer and will result in
the drying out of the improperly packaged food.
• Follow package or container instructions for proper storage.
• Packaging Recommendations:
Plastic containers with air tight lids
Heavy duty aluminum foil
Plastic wrap made from saran film
Self-sealing plastic bags
• Do not refreeze defrosted/thawed foods,
• It is recommended that the freezing date be marked on the packaging,
Norma Operating Sounds You May Hear
• The fan circulating air inside the interior of your unit to maintain the
temperature you have selected,
• Boiling water, gurgling sounds or slight vibrations that are the result of
the refrigerant circulating through the cooling coils.
• The thermostat control will click when it cycles on and off,
13

HDE03WNA-MANUAL 10/22/01 12:17 PM Pac_-_5
0 eaning and Maintenance
Warning: To avoid electric shock always unplug your
refrigerator before cleaning. Ignoring this warning
may result in death or injury.
Caution: Before using cleaning products, always read and
follow manufacturer's instructions and warnings to
avoid personal injury or product damage.
General:
• Prepare a cleaning solution of 3-4 tablespoons of
baking soda mixed with warm water. Use sponge or
soft cloth, dampened with the cleaning solution, to
wipe down your refrigerator.
• Rinse with clean warm water and dry with a soft cloth,
• Do not use harsh chemicals, abrasives, ammonia,
chlorine bleach,concentrated detergents, solvents or
metal scouring pads. SOME or these chemicals may
dissolve, damage and/or discolor your refrigerator,
Door Gaskets:
Clean door gaskets every three months according to
general instructions. Gaskets must be kept clean and
pliable to assure a proper seal.
Petroleum jelly applied lightly on the hinge side of gas-
kets will keep the gasket pliable and assure a good
seal.
14

HDE03WNA-MANUAL 10/22/01 12:17 PM Pa_6
Hght Bulb RepMaee_ent
1. Switch off power to refrigerator,
2. Remove the thermostat control knob.
3, Allow light bulb to cool before removing.
4. Pinch the plastic cover between fingers and
thumb and gently pull to the left.
5. Remove the bulb by screwing it counter-clockwise.
6, Always replace with appliance type light bulb rated at 15 watts
or lesser wattage.
7. Do not exceed the 15 watts rating at any time.
8, To replace cover, insert rear clips in first and gently push front
clip in until the cover snaps into place,
9, Push the thermostat control knob back in place,
Power interruptions
• Occasionally there may be power interruptions due to thunderstorms or
other causes, Remove the power cord from AC outlet when a power
outage occurs. When power has been restored, replug power cord to
AC outlet. If outage is for a prolonged period, inspect and discard
spoiled or thawed food in freezer and refrigerator, Clean
refrigerator before reusing.
Vacation and Mevin 9 Care
• For long vacations or absences, empty food from refrigerator and
freezer, move the temperature DIAL to the O[[ position and clean the
refrigerator and door gaskets according to "General cleaning" section.
Prop doors open, so air can circulate inside,When moving always move
the refrigerator vertically. Do not move with the unit lying down, Possible
damage to the sealed system could occu£
15

HDE 03 WNA -MANUAL 10/22/01 12:17 PM Pac_7
Refrigerator Does Not Operate
• Check if thermostat control is not in the "OFF" position.
• Check if refrigerator is plugged in.
• Check if there is power at the ac outlet, by checking the circuit breaker.
Food temperature appears too warm
• Frequent door openings.
• Allow time for recently added warm food to reach fresh food or
freezer temperature,
• Check gaskets for proper seal.
• Adjust temperature control to colder setting.
Food temperature is too cold
• If temperature control setting is too cold, adjust to a warmer setting
and allow several hours for temperature to adjust.
Refrigerator runs too frequently
• This may be normal to maintain constant temperature during
high temperature and humid days.
• Doors may have been opened frequently or for an extended
period of time,
• Check gasket for proper seal.
• Check to see if doors are completely closed,
16

HDE03WNA-MANUAL 10/22/01 12:17 PM Pac_'_8
Moisture build up on interior or exterior
of the refrigerator:
• This is normal during high humidity periods
• Prolonged or frequent door openings
• Check door gaskets for proper seal
Refrigerator has an odor:
• Interior needs cleaning
• Foods improperly wrapped or sealed are giving off odors
Refrigerator light does not work:
• Check power supply
• Tighten bulb in socket
• Replace burned out bulb
Refrigerator/Freezer door does not shut properly:
• Level the refrigerator
• Re align refrigerator/freezer door
• Check for blockages e g food containers, crisper cover,
shelves, bins etc,
17

HDE03WNA- MANUAL 10/22/01 12:17 PM Pac_9
What is covered and for how
long?
This warranty covers all defects in work-
manship or materials for a period of:
12 months labor (carry-in-only)
12 months parts
5 years sealed system
The warranty commences on the da'e
the item was purchased and 1he original
purchase receipt must be presented to
the authorized service center before
warranty repairs are rendered,
EXCEPTIONS: Commercial or
Rental Use warranty
90 days labor (carry-in only)
90 days pa=ts
No ether warranty applies
What is covered.
The mechanical and electrical parts,
which serve as a functional, purpose
of this appliance for a period of 12
months. This includes all parts except
finish, and trim.
The components of 1he sealed system
e.g. hermetic compressor, condenser
and evaporator from manufacturing
defects for a period of 5 years from
the date of purchase, Any damages
to such components caused by
mechanical abuse or improper
handling or shipping will not be
covered.
What will be done?
1, We will repair or replace, at our dis-
cretion any mechanical or electrical
part which proves to be defective in
normal usage during the warranty
period so spedfied,
2. There will be no charge to the
purchaser for parts and labor on any
covered items during the initial 12
monlh period, Beyond this period
only parts are covered in the remain-
ing warranty, Labor is not provided
and must be paid by the customer.
3. Contact your nearest authorized
service center, For the name of the
nearest service center please call
1-877-337-3639
THIS WARRANTY COVERS
APPLIANCES WITHIN THE
CONTINENTAL UNITED STATES,
PUERTO RICO AND CANADA. IT
DOES NOT COVER THE FOLLOW-
ING
Damages from improper im:tallation.
Damages in shipping.
Defects other than manufacturing.
Damage from misuse, abuse, accident,
alteration, lack of proper care and
maintenance or incorrect current or
voltage.
Damage from other than household use.
Damage from service by other than an
authorized dealer or service center.
Decorative trims or replaceable
lightbulbs.
Transportation and shipping.
Labor (after the initial 12 months).
THIS LIMITED WARRANTY IS GIVEN IN
LIEU OF ALL OTHER WARRANTIES,
EXPRESSED OR, INCLUDING THE
WARRANTIES OF MERCHANTABILITY
AND FITNESS FOR A PARTICULAR
PURPOSE
The remedy provided in this warranty is
exclusive and is granted in lieu of all
other remedies,
This warranty does not cover incidental
or consequential damages, so the above
limitations may not apply to you. Some
States do not allow limitations on how
long an implied warranty lasts, so the
above limitations may not apply to you.
This warranty gives you specific legal
rights, and you may have other rights,
which vary, from state to state.
Haler America Trading LLC.
New York, NY, 10018,
18

HDE03WNA-MANUAL 10/22/01 12:17 PM Pac_0
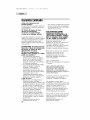
MESURESDESECURITE
Lire I'ensemble des instructions avant d'utiliser I'appareil.
Lors de I'utilisation de cet appareil, prendre toutes les
mesures de securite de base, y compris les suivantes:
1) N'utiliser cet appareil que pour I'usage pour lequel il est prevu, tel qu'il est
indique dans le guide d'utilisation et d'entretien.
2) Ce refrigerateur doit etre correctement installe conformement aux
instructions d'installation avant d'etre utilise, Consulter les instructions
de raise a la terre du chapitre Installation.
3) Nejamais tirer sur le cordon d'alimentation pour debrancher le
refrigerateur. Toujours saisir ferrnement la fiche et la retirer
completement de la prise,
4) Reparer ou remplacer immediatement tout cordon electrique effiloche ou
endommage d'une quelconque maniere, Ne pas utiliser un cordon fissure,
abrase ou dont la prise ou le connecteur est endommage.
5) Debrancher le refrigerateur avant de le nettoyer ou d'effectuer des
reparations. Remarque: Si ce produit doit faire I'objet d'une
maintenance pour quelque raison que ce soit, il est vivement
recommande de confier cette tbche a un technicien agree.
6) Ne pas utiliser d'appareils electriques ou d'objets pointus pour degivrer le
rdrigerateur.
7) Si vous n'avez plus I'usage de votre ancien refrigerateur, nous vous
conseillons d'en retirer les portes, Ceci permet d'eviter tout danger
potentiel pour les enfants,
8) Une lois le refrigerateur en fonctionnement, ne pas toucher les surfaces
froides du compartiment de congelation, en particulier avec des mains
mouillees ou humides, /a peau risquerait d'adherer a ces surfaces
extremement froides,
9) Ne pas recongeler les aliments qui ont ere completement decongeles. /e
bulletin Maisons et ]ardins du Ministere de I'Agriculture des Etats-Unis n
69 stipule que: " .../es aliments congeles peuvent etre recongeles en route
securite s'ils contiennent toujours des cristaux de glace ou si leur
temperature reste inferieure a 4,5°C ".
" .../es viandes hachees, la volaille et le poisson presentant une odeur
desagreable ou une couleur suspecte ne doivent ni etre recongeles, ni etre
consommes. /a creme glacee degelee doit etrejetee. Tout aliment
presentant une odeur ou couleur douteuse doit etrejete, l'ingestion d'un
aliment de ce type peut s'averer dangereuse, "
La page est en cours de chargement...
La page est en cours de chargement...
La page est en cours de chargement...
La page est en cours de chargement...
La page est en cours de chargement...
La page est en cours de chargement...
La page est en cours de chargement...
La page est en cours de chargement...
La page est en cours de chargement...
La page est en cours de chargement...
La page est en cours de chargement...
La page est en cours de chargement...
La page est en cours de chargement...
La page est en cours de chargement...
La page est en cours de chargement...
La page est en cours de chargement...
La page est en cours de chargement...
La page est en cours de chargement...
La page est en cours de chargement...
La page est en cours de chargement...
La page est en cours de chargement...
La page est en cours de chargement...
La page est en cours de chargement...
La page est en cours de chargement...
La page est en cours de chargement...
La page est en cours de chargement...
La page est en cours de chargement...
La page est en cours de chargement...
La page est en cours de chargement...
La page est en cours de chargement...
La page est en cours de chargement...
La page est en cours de chargement...
La page est en cours de chargement...
La page est en cours de chargement...
La page est en cours de chargement...
La page est en cours de chargement...
La page est en cours de chargement...
La page est en cours de chargement...
-
 1
1
-
 2
2
-
 3
3
-
 4
4
-
 5
5
-
 6
6
-
 7
7
-
 8
8
-
 9
9
-
 10
10
-
 11
11
-
 12
12
-
 13
13
-
 14
14
-
 15
15
-
 16
16
-
 17
17
-
 18
18
-
 19
19
-
 20
20
-
 21
21
-
 22
22
-
 23
23
-
 24
24
-
 25
25
-
 26
26
-
 27
27
-
 28
28
-
 29
29
-
 30
30
-
 31
31
-
 32
32
-
 33
33
-
 34
34
-
 35
35
-
 36
36
-
 37
37
-
 38
38
-
 39
39
-
 40
40
-
 41
41
-
 42
42
-
 43
43
-
 44
44
-
 45
45
-
 46
46
-
 47
47
-
 48
48
-
 49
49
-
 50
50
-
 51
51
-
 52
52
-
 53
53
-
 54
54
-
 55
55
-
 56
56
-
 57
57
-
 58
58


Haier HDE03WNA Manuel utilisateur
- Catégorie
- Réfrigérateurs combinés
- Taper
- Manuel utilisateur
dans d''autres langues
- English: Haier HDE03WNA User manual
- español: Haier HDE03WNA Manual de usuario
Documents connexes
-
Haier HBP08GNA Manuel utilisateur
-
-
-
Haier HCM036EA Manuel utilisateur
-
-
-
-
-
Haier HUM013EA Le manuel du propriétaire
-