Bella 1.5L Deep Fryer, Stainless Steel Le manuel du propriétaire
- Catégorie
- Petits appareils de cuisine
- Taper
- Le manuel du propriétaire

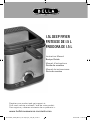
1.5L DEEP FRYER
FRITEUSE DE 1.5 L
FREIDORA DE 1.5 L
Instruction Manual
Recipe Guide
Manuel d’instructions
Guide de recettes
Manual de instrucciones
Guía de recetas
Register your product and get support at:
Pour vous inscrire et obtenir l’aide de votre produit:
Para registrar y obtener asistencia de su producto ir:
www.bellahousewares.com/welcome
SO-313008_14489_BELLA_1.5L deep fryer_JCP_IM_r4.indd 1 2016-04-08 11:37 AM

Table of Contents
Important Safeguards .................................................................................................................................. 1
Additional Important Safeguards ...............................................................................................................2
Notes on the Plug .........................................................................................................................................3
Notes on the Cord (Detachable Cord Instructions) .................................................................................3
Plasticizer Warning ....................................................................................................................................... 3
Electric Power................................................................................................................................................3
Getting to Know your 1.5L Deep Fryer .....................................................................................................4
Assembling the Frying Basket Handle .......................................................................................................4
Before Using for the First Time ..................................................................................................................4
Operating Instructions .................................................................................................................................5
Helpful Hints .............................................................................................................................................. 5-6
Draining & Recycling Oil ..............................................................................................................................6
Deep Frying Chart ....................................................................................................................................6-7
User Maintenance Instructions ...................................................................................................................7
Care & Cleaning Instructions ...................................................................................................................7-8
Storing Instructions ......................................................................................................................................8
Trouble Shooting ..........................................................................................................................................8
Recipe Guide ............................................................................................................................................9-12
Warranty ......................................................................................................................................................13
Table des matières
Consignes de sécurité importantes .........................................................................................................14
Autres consignes de sécurité importantes ........................................................................................15-16
Notes sur la che ........................................................................................................................................ 16
Notes sur le cordon (consignes relatives au cordon amovible)...........................................................16
Avertissement de migration de plastiants ............................................................................................16
Alimentation électrique .............................................................................................................................16
Caractéristiques de votre appareil ........................................................................................................... 17
Assemblage de la poignée du panier de friture ..................................................................................... 17
Avant la première utilisation .....................................................................................................................17
Mode d’emploi ............................................................................................................................................18
Conseils utiles ............................................................................................................................................. 19
Vidange et recyclage de l’huile .................................................................................................................19
Tableau de friture .......................................................................................................................................20
Réparation ...................................................................................................................................................20
Entretien et nettoyage ...............................................................................................................................21
Rangement ..................................................................................................................................................21
Dépannage ...................................................................................................................................................22
Recettes ................................................................................................................................................. 23-26
Garantie........................................................................................................................................................27
Índice
Medidas de seguridad importantes .........................................................................................................28
Otras medidas de seguridad importantes ........................................................................................ 29-30
Notas sobre el enchufe .............................................................................................................................. 30
Notas sobre el cable (Instrucciones del cable desmontable) ...............................................................30
Advertencia sobre los plasticantes ........................................................................................................ 30
Corriente eléctrica ......................................................................................................................................30
Conozca su electrodoméstico ...................................................................................................................31
Ensamblaje del mango de la canasta freidora .......................................................................................31
Antes de utilizar por primera vez .............................................................................................................31
Instrucciones de funcionamiento ............................................................................................................. 32
Consejos útiles ............................................................................................................................................ 33
Drenaje y reciclado de aceite .................................................................................................................... 33
Tabla de cocción .........................................................................................................................................34
Instrucciones de mantenimiento para el usuario ..................................................................................34
Instrucciones de cuidado y limpieza ........................................................................................................35
Instrucciones de almacenamiento ...........................................................................................................35
Solución de problemas .............................................................................................................................. 36
Recetas ................................................................................................................................................... 36-40
Garantía........................................................................................................................................................41
SO-313008_14489_BELLA_1.5L deep fryer_JCP_IM_r4.indd 2 2016-04-08 11:37 AM

1
IMPORTANT SAFEGUARDS
When using electrical appliances, basic safety precautions should always be
followed, including the following:
1. READ ALL INSTRUCTIONS.
2. Do not touch hot surfaces. Use handles or knobs. Use oven mitts or
potholders.
3. To protect against electric shock do not immerse cord, plugs, or appliance
in water or other liquid.
4. This appliance is not intended for use by persons (including children)
with reduced physical, sensory or mental capabilities, or lack of experience
and knowledge, unless they have been given supervision or instruction
concerning use of the appliance by a person responsible for their safety.
5. Close supervision is necessary when any appliance is used by or near
children.
6. Turn the temperature dial to MIN and unplug from outlet when not in use
and before cleaning. Allow to cool before putting on or taking off parts,
and before cleaning the appliance.
7. Do not operate any appliance with a damaged cord or plug or after
the appliance malfunctions, or has been damaged in any manner.
Return appliance to the nearest authorized service facility for examination,
repair or adjustment.
8. The use of accessory attachments not recommended by the appliance
manufacturer may cause injuries.
9. Do not use outdoors.
10. Do not let cord hang over edge of table or counter, or touch hot surfaces.
11. Do not place on or near a hot gas or electric burner, or in a heated oven.
12. Extreme caution must be used when moving an appliance containing hot oil
or other hot liquids.
13. Always attach plug to appliance rst, then plug cord in the wall outlet.
To disconnect, turn the temperature dial to MIN. Then remove plug from
wall outlet.
14. Do not leave this appliance unattended during use.
15. Do not use appliance for other than intended use.
16. Extreme caution must be used when moving the Deep Fryer containing
hot oil.
17. Be sure handle is properly assembled to the frying basket. Lower lid,
t handle into handle grooves on the lid to lock into place while heating
or frying
FOR HOUSEHOLD USE ONLY
SAVE THESE INSTRUCTIONS
SO-313008_14489_BELLA_1.5L deep fryer_JCP_IM_r4.indd 1 2016-04-08 11:37 AM

2
ADDITIONAL IMPORTANT
SAFEGUARDS
CAUTION, HOT SURFACES: This appliance generates heat and escaping steam
during use. Proper precautions must be taken to prevent the risk of burns,
res or other injury to persons or damage to property.
CAUTION: This appliance is hot during operation and retains heat for some
time after turning OFF. Always use oven mitts when handling hot materials
and allow metal parts to cool before cleaning. Do not place anything on top
of the appliance while it is operating or while it is hot.
1. All users of this appliance must read and understand this instruction manual
before operating or cleaning the appliance.
2. The cord to this appliance should be plugged into a 120V AC electrical
outlet only.
3. If this appliance begins to malfunction during use, immediately unplug
the cord. Do not use or attempt to repair the malfunctioning appliance.
4. Do not immerse detachable power cord in any liquid. If the cord falls in water
or other liquid, DISCARD IMMEDIATELY and replace it with a new cord. If the
supply cord to this appliance is damaged, it must be replaced by contacting
consumer service.
5. Keep the cord out of reach from children and infants to avoid the risk of
electric shock and choking.
6. Use frying basket handle to raise and lower frying basket. Always raise frying
basket out of hot oil and allow cooked food to rest for 5 to 10 seconds before
removing food from frying basket.
7. Do not use this appliance if the viewing window is cracked.
8. Dry damp foods before placing into oil. When deep frying frozen foods,
remove any excessive ice as it can cause hot oil to spatter.
9. Always keep lid closed while the appliance is frying foods.
10. Do not obstruct the ltered air outlet vent on top of lid with any objects.
Avoid contact with escaping steam from the ltered air outlet during
operation.
11. Keep appliance at least 4 inches away from walls or other objects during
operation. Do not place any objects on top of appliance while it is operating.
Place the appliance on a at surface that is resistant to heat.
12. Be sure oil tank is lled with oil to a level above MIN as marked.
Do not operate appliance without oil or with an insufcient amount of oil.
Do not over-ll the tank with oil past the MAX mark.
WARNING: Under- or over-lling the oil tank may damage the Deep Fryer
and could result in serious personal injury.
13. Always pour unheated oil into tank before plugging in and heating. Never
pour oil into heated tank.
14. Ensure that there are no ammable objects on or near the appliance.
If the oil catches re, unplug the appliance and replace the lid. Never use
water to extinguish the re.
15. Do not operate this appliance if the lid and the tank are not completely dry.
16. It is not recommended to move the Deep Fryer containing hot oil.
Allow to cool before moving.
17. Do not use this Deep Fryer to boil water.
SO-313008_14489_BELLA_1.5L deep fryer_JCP_IM_r4.indd 2 2016-04-08 11:37 AM

3
NOTES ON THE PLUG
This appliance has a polarized plug (one blade is wider than the other).
To reduce the risk of electric shock, this plug will t in a polarized outlet only
one way. If the plug does not t fully into the outlet, reverse the plug. If it still
does not t, contact a qualied electrician. Do not modify the plug in any way.
NOTES ON THE CORD (DETACHABLE CORD INSTRUCTIONS)
CAUTION: A short detachable power-supply cord is provided to reduce the risk
of personal injury resulting from becoming entangled in or tripping over a
longer cord.
The cord is designed to break away from the appliance quickly and smoothly
to prevent the unit from tipping over when someone unintentionally pulls on
the cord.
This detachable cord is designed for use with this appliance only. Do not try using
it on any other appliance.
WARNING: Serious hot-oil burns may result from an appliance being pulled off a
countertop. Do not allow the cord to hang over the edge of the counter where it
may be grabbed by children or become entangled with the user. Do not use with
an extension cord.
PLASTICIZER WARNING
CAUTION: To prevent Plasticizers from migrating to the nish of the counter
top or table top or other furniture, place NON-PLASTIC coasters or place mats
between the appliance and the nish of the counter top or table top. Failure to
do so may cause the nish to darken; permanent blemishes may occur or stains
can appear.
ELECTRIC POWER
If the electrical circuit is overloaded with other appliances, your appliance may
not operate properly. It should be operated on a separate electrical circuit from
other appliances.
Note: keep illustration
callouts aligned
SO-313008_14489_BELLA_1.5L deep fryer_JCP_IM_r4.indd 3 2016-04-08 11:37 AM

4
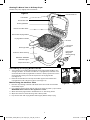
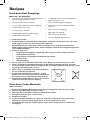
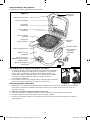
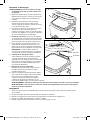
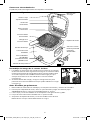
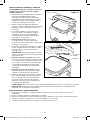
Getting To Know Your 1.5L Deep Fryer
Product may vary slightly from illustration
Assembling the Frying Basket Handle
1. Your Deep Fryer will be shipped with the frying basket handle in the
storage position. To attach a handle to a frying basket, hold the arms
of the handle inside frying basket as shown. Gently squeeze the arms
of the handle so they t into the eyelets on the frying basket
(see Figure 2).
2. Release the handle arms and push handle against the back of the
frying basket until it locks into place (see Figure 3).
Before Using for the First Time
1. Remove all packing material and labels from the inside and outside
of the Deep Fryer.
2. Use a damp cloth to clean the oil tank; then wipe dry with a paper towel.
WARNING: Never immerse the appliance in water.
3. Wash lid and frying basket in dishwasher or in hot soapy water.
4. Wipe the stainless steel housing with a damp cloth.
5. Dry the oil tank and frying basket thoroughly before deep frying.
PREHEAT
Temperature Dial
Removable Frying Basket
Cool Touch
Handles
Stainless Steel Housing
Detachable
Magnetic
Polarized Plug
Frying Basket Handle
Oil Tank
Drainage Hook
Figure 1
Permanent Odor Filter
Lid Handle
Viewing Window
Non-Slip Fee
PREHEAT & READY
Indicator Lights
Removable Lid
Handle Grooves
Figure 2 Figure 3
SO-313008_14489_BELLA_1.5L deep fryer_JCP_IM_r4.indd 4 2016-04-08 11:37 AM

5
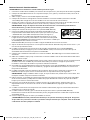
Operating Instructions
WARNING! This unit should not be used to boil water.
1. See the Deep Frying Chart for suggested temperatures and cooking times.
2. Place the appliance on a clean, dry, at, heat-resistant surface close to an electrical outlet.
3. Open the lid and remove the frying basket from the oil tank.
4. Secure the frying basket handle to the frying basket (refer to “Assembling Frying Basket Handles”
section of this instruction manual).
5. Pour 1.5 liters (6 cups) cooking oil into the tank between MIN and MAX level and close the lid.
WARNING: Under- or over-lling the oil tank may damage the appliance and could result in serious
personal injury.
6. Set the temperature dial to MIN.
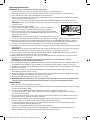
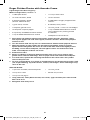
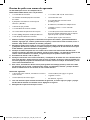
7. Connect the detachable magnetic power cord to the appliance
receptacle, with the “THIS SIDE UP” topside (see Figure 4.)
8. Make sure the cord is rmly in place. Then connect the polarized
plug to the wall outlet. The red PREHEAT light will illuminate as the
appliance heats the oil.
CAUTION: Do not let the cord hang over the edge of table or counter.
9. Turn the temperature dial to the desired frying temperature. Allow 7 to 10 minutes for preheat time.
10. When the oil reaches the selected cooking temperature, the red PREHEAT light will turn off and
the blue READY light will illuminate, indicating the appliance has reached the set temperature.
11. Carefully place food into the frying basket. Do not overll frying basket with food.
12. Use the lid handle to open the lid. Carefully and gently lower frying basket with food into the hot oil.
Close the lid.
WARNING: This appliance generates heat and escaping steam during use. Use proper precautions
to prevent the risk of burns, res, or other injury to persons or damage to property.
13. As the appliance cooks the food, the red PREHEAT and blue READY light will cycle on and off as
proper cooking temperature of the oil is maintained.
14. When food is done, using oven mitts, open the lid and hook the frying basket on the oil tank rim
to drain oil for 5 to 10 seconds.
WARNING: Use caution when opening lid; steam escapes as soon as the lid is opened.
Use oven mitts when handling hot materials.
15. Use a heat-resistant long-handled fork or tongs to remove cooked food or pour cooked foods from
frying basket onto absorbent paper towels or clean brown grocery bags to soak up excess oil.
16. To deep fry another batch of food, always check oil level. Make sure oil tank is lled at least to MIN.
Add oil as necessary.
17. When the oil reaches the selected cooking temperature, follow the instructions previously
described and continue deep frying.
18. When all cooking is complete, turn the temperature control to MIN. Unplug the plug from the wall
outlet, then detach the cord from the appliance receptacle.
19. Close the lid and allow oil and the Deep Fryer to cool.
20. WARNING! Oil will remain hot for an extended period of time. Be sure all parts of the Deep Fryer
and the oil have cooled completely before discarding or storing oil and cleaning the unit.
Helpful Hints
• Never over-ll the frying basket with food.
• Fry more batches of smaller amounts of food. Best results are obtained when the hot oil can freely
circulate all around the food.
• In general, pre-cooked foods require higher temperatures and less cooking time.
• Cut or sort food into uniform sizes. Cook same-size pieces together so they will be cooked in
the same amount of time.
• Be sure foods are free from ice crystals and excess moisture before frying. Water on the surface
of the food can cause the oil to spatter and foam.
• When using a breading, evenly coat the food to be fried. Fine, uniform crumbs stick better than
coarse, uneven ones. Shake off all extra breading to help keep oil clean.
• To prevent contamination of the oil, do not add salt or other spices to the food during frying
or when the food is draining above the oil.
• Space out coated foods so they do not touch while cooking.
• For best results when frying doughs or foods dipped in a liquid batter, place the foods into
the frying basket rst and then lower the frying basket into the hot oil.
Figure 4
SO-313008_14489_BELLA_1.5L deep fryer_JCP_IM_r4.indd 5 2016-04-08 11:37 AM

6
• Always use the frying basket to lift food out of the oil; hook the frying basket to the rim and allow
oil to drain. Then remove fried food from the frying basket.
• Place fried foods on brown grocery bags to drain oil and keep fried foods crispy.
Frying Oil
• Never over-ll or under-ll the fryer with oil. Both the MIN and MAX oil levels are marked on
the inside of the tank.
WARNING: Under- or over-lling the oil tank may damage the appliance and could result in serious
personal injury.
• Always use oil with low water content like sunower oil, grapeseed oil, vegetable oil or corn oil.
Never use hard fats, olive oil or oil with a high water content.
WARNING! Never, under any circumstances, add water or any other liquid to the oil.
• Never mix different oils together to fry foods.
• Never use butter or margarine to fry foods.
• When frying sh or seafood, the oil may absorb a “shy” taste or odor. To eliminate transferring
this “shy” taste or odor to other foods, we suggest changing the oil before frying other foods.
Draining & Recycling Oil
WARNING! Be careful around hot parts and hot spitting oil. Remember that the oil is actually hotter
than boiling water! Never put hands in the oil. Always keep hands and face away from rising steam
or spitting oil.
• Oil should be drained and recycled regularly.
• DO NOT pour oil from the appliance without rst removing frying basket from the appliance body.
NOTE: DO NOT pour used oil down any household drain. Discard used oil into a container with a lid
and dispose in garbage.
• Filter the cooled oil through a ne sieve into a wide-neck, airtight, covered container.
Use a funnel to avoid oil spillage.
NOTE: Neatly arranged paper towels or piece of clean cotton material can be placed in
the frying basket to lter used oil.
• As oil will absorb food avors and odors, it’s a good idea to label the container with the type
of food that was cooked in the oil. For example: sweet desserts, vegetables, chicken, sh, etc.
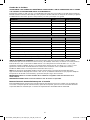
Deep Frying Chart
WARNING! ALWAYS USE A MEAT THERMOMETER TO ENSURE THAT MEAT AND FISH ARE COOKED
THOROUGHLY BEFORE EATING. The following chart is intended as a guide only. The quantity of food
fried at one time may alter the total cooking time necessary. Remember, frying smaller batches will result
in shorter cooking times and higher food quality. Adjust frying temperature and times as necessary to
suit your taste.
FOOD TEMP FRY TIME
Donuts 350ºF 4 - 6 minutes
Mushrooms 300ºF 3 - 4 minutes
Eggplant 350ºF 5 - 8 minutes
Broccoli 350ºF 3 - 5 minutes
Onion Rings (fresh) 350ºF 3 - 5 minutes
Onion Rings (frozen) 375ºF 3 - 5 minutes
French Fried Potatoes (fresh, hand cut, 1/4 to 1/3-in. thick)
Blanch 300ºF 6 - 8 minutes
Deep Fry 350ºF 3 - 4 minutes
French Fried Potatoes
(Frozen)
375ºF 7 - 10 minutes
Chicken Wings 350ºF 8 - 10 minutes
Chicken Tenders/Fingers 350ºF 3 - 6 minutes
Chicken Pieces 375ºF 12 - 15 minutes
Chicken Nuggets (frozen) 350ºF 6 - 7 minutes
Shrimp (fresh, thawed)regular or jumbo 350ºF 4 - 8 minutes
Shrimp (frozen) regular or jumbo 375ºF 3 - 5 minutes
SO-313008_14489_BELLA_1.5L deep fryer_JCP_IM_r4.indd 6 2016-04-08 11:37 AM

7 7
PLEASE NOTE:
The USDA recommends that meats such as beef and lamb, etc. should be cooked to an internal
temperature of 145ºF/63ºC. Pork should be cooked to an internal temperature of 160ºF/71ºC and poultry
products should be cooked to an internal temperature of 170ºF/77ºC - 180ºF/82ºC to be sure any harmful
bacteria has been killed. When reheating meat/poultry products, they should also be cooked to an internal
temperature of 165ºF/74ºC.
NOTE: Frozen foods may require different cooking times and temperatures; follow package directions.
Use 375ºF/191ºC for all foods that have package instructions for a higher temperature and adjust times
as necessary.
IMPORTANT: Remove ice crystals from frozen foods before placing in the hot oil.
CAUTION: NEVER ll any frying basket more than 2/3 full.
User Maintenance Instructions
This appliance requires little maintenance. It contains no user-serviceable parts. Any servicing requiring
disassembly other than cleaning must be performed by a qualied appliance repair technician.
Care & Cleaning Instructions
WARNING! Allow the Deep Fryer to cool
fully before emptying the oil and cleaning
the appliance.
1. Detach the cord from the appliance receptacle
and unplug the Deep Fryer. Make sure the
oil/oil tank has cooled completely.
2. Remove the frying basket from the oil tank.
Use caution when removing the frying basket
as oil may drip from the basket.
3. The frying basket and lid are dishwasher-safe.
4. For best results, remove lid from Deep Fryer
and place in the top rack of your dishwasher
to clean.
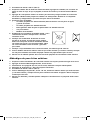
5. Lid Removal: Open the lid to a 20º angle.
Firmly pull the lid pin up and out of the hinge.
(See Figure 5.)
6. To replace, tilt the lid at a 20º angle.
Press rmly on one side until the lid pin
snaps into the hinge. (See Figure 6.)
IMPORTANT: Always dry lid thoroughly
and replace clean lid (see Figure 6) before
next use.
7. Drain & Recycle Oil: Grasp housing and
slowly pour used oil from the tank into a
wide mouth bottle or container for recycling.
(Refer to the Draining & Recycling Oil section
of this instruction manual for detailed
instructions.)
8. Oil Tank Cleaning: Fill empty tank with hot,
soapy water and allow to soak for 10 minutes.
Use a stiff nylon brush to remove stubborn
or burned-on residue. Wipe dry with a clean
kitchen rag or paper towels. Do not use harsh
or abrasive cleaning products as they may
damage the surface of the tank.
WARNING: Never immerse the appliance
housing in water or other liquids.
CAUTION: Make sure the oil tank is
completely dry after cleaning and before
next use.
PREHEAT
Figure 5
Figure 6
Lid pin
Hinge
SO-313008_14489_BELLA_1.5L deep fryer_JCP_IM_r4.indd 7 2016-04-08 11:37 AM

8 8
Storing Instructions
1. Make sure your Deep Fryer is unplugged and all parts are clean and dry before storing.
2. Never store the Deep Fryer while it is hot or wet.
3. Fold the clean frying basket handle into the storage position.
4. Store the detachable cord in the frying basket and close the lid
5. Store appliance in its box or in a clean, dry place.
Trouble Shooting
Appliance does not operate
• Make sure the detachable power supply cord is properly attached to the receptacle.
• WARNING: Always check to make sure there is sufcient oil in the oil tank before plugging
in the Deep Fryer. Dry frying will cause damage to the Deep Fryer
Oil temperature is too high
• Not enough oil in oil tank. Unplug Deep Fryer and check oil level. Oil level should be between
MIN and MAX ll lines. Add oil as necessary.
• WARNING: Always check to make sure there is sufcient oil in the oil tank before plugging
in the Deep Fryer.
Oil bubbles over
• Too much oil in Deep Fryer oil tank. Never ll with oil above the MAX ll line.
• Too much food added to frying basket. Fry smaller quantities at a time.
• Food is too wet. Pat dry with paper towels before placing in frying basket.
Food tastes greasy or not crisp
• The wrong type of oil has been used. Use a high-quality oil such as vegetable, canola or corn.
• Too much food added to frying basket. Fry smaller quantities at a time - especially frozen foods.
• Frying temperature is too low. Allow unit to preheat or reheat to the recipe temperature prior
to use. Adjust recipe temperature if needed.
Food or Deep Fryer emits unpleasant odors
• Oil has deteriorated. Change oil as needed.
• Lid odor lter is saturated. Remove lid and clean in hot, soapy water. The lid is dishwasher safe.
For best results, remove lid (see Figure 5) from Deep Fryer and place in the top rack of dishwasher
to clean. Always dry lid thoroughly and replace clean lid (see gure 6) before next use.
Refer to Lid Removal section of Care & Cleaning Instructions for a detailed explanation.
• Used oil absorbs food odors. Do not fry desserts in oil that has been used to fry sh.
SO-313008_14489_BELLA_1.5L deep fryer_JCP_IM_r4.indd 8 2016-04-08 11:37 AM

9
Recipes
9
Fried Asian Beef Dumplings
Makes 40 – 48 dumplings
• 1 lb. (2 cups) ground beef (may substitute
ground turkey, chicken, or pork)
• 1/2 cup onions, nely chopped
• 1/2 cup water chestnuts, nely chopped
• 2 tablespoons soy sauce
• 2 cloves garlic, minced
• 3 tablespoons freshly grated ginger
• 1 tablespoon sesame oil
• 1 tablespoon Sriracha sauce (optional)
• egg roll wraps, 2” x 3”
(may substitute gyoza wrappers)
• alfalfa sprouts (may substitute bean
sprouts)
• ponzu sauce (for dipping)
• egg wash (for sealing)
• corn starch (for dusting)
• 1/2 cup chopped green onions
1. Preheat oil to 350ºF.
2. Prepare Filling: In a medium sized mixing bowl, add onions, water chestnuts, soy sauce,
garlic, ginger, sesame oil, and Sriracha sauce. Mix well.
3. Add ground beef. Use your hands to blend, taking care not to overwork the mixture.
NOTE: Filling can be prepared ahead. Store in airtight container and refrigerate until ready
to assemble dumplings.
4. Prepare a work area:
• Small bowl with eggwash (whisk egg with a splash of water) and pastry brush
• Small bowl of cornstarch
• Large plate or cutting board dusted with cornstarch
• Egg roll wraps
• Dumpling lling.
5. Dust a clean, dry work surface with corn starch. Work 3 to 6 wonton wraps at a time.
6. Place 1/2 teaspoon ground beef mixture into the center of the egg roll wrap. Top with
a pinch of alfalfa sprouts. Brush the edges of the wrap with egg wash. Bring all four corners
up into the middle and press to seal.
7. Place 1 layer of dumplings into the frying basket,
do not crowd the frying basket.
8. Fry the beef dumplings for 3 minutes, or until
golden brown and crispy. Remove to a plate lined
with paper towels or brown paper bags to drain.
9. Garnish with chopped green onions. Serve with a
small bowl of Ponzu sauce for dipping.
Fried Asian Turkey Meatballs
Makes 24 meatballs
1. Prepare the Fried Beef Dumplings recipe above using ground turkey in place of beef.
2. Add one egg. Mix lightly, do not over-mix.
3. Roll meat into 1-inch balls; roll balls in panko bread crumbs.
4. Refrigerate 30 minutes to 1 hour to rm.
5. Preheat oil to 350ºF.
6. Fry the breaded meatballs, 6 at a time, for 3 minutes until golden brown and crispy.
Remove to a plate lined with paper towels or brown paper bags to drain.
7. Garnish with Sriracha and chopped green onions. Place Ponzu sauce in a small bowl
for dipping.
SO-313008_14489_BELLA_1.5L deep fryer_JCP_IM_r4.indd 9 2016-04-08 11:37 AM

10 10
Finger Chicken Flautas with Avocado Cream
A great nger-food hit at any party
Makes 24 nger autas, serves 6 - 8
• 1 tablespoon butter
• 1/2 small red onion, diced
• 2 jalapeno peppers, diced
(remove seeds and ribs)
• 1 garlic clove, minced
• 1 teaspoon ground cumin
• 1/2 teaspoon cayenne pepper
• 2 cups nely shredded rotisserie chicken
• 1 cup shredded white Mexican cheese
• 1-1/2 cups fresh salsa
• 12 corn tortillas
• 2 tablespoons roughly chopped fresh
cilantro
• 6 radishes, thinly sliced
• 1/2 lime, juiced + 1 lime cut into wedges
• 1 cup shredded white Mexican cheese
(may substitute any melting cheese
or cheeses)
• toothpicks to secure autas
1. Saute onion and jalapeno in butter until tender, about 5 minutes. Add garlic, cumin,
and cayenne pepper and cook until fragrant, another 2 minutes. Allow onion/jalapeno
mixture to cool.
2. Toss the chicken with 3/4 cup salsa in a medium bowl. Add the onion/jalapeno mixture.
3. Wrap the tortillas in paper towels and microwave until pliable, about 30 seconds.
Spoon chicken lling down the center of each tortilla. Roll each tortilla tightly around
the lling; secure with 2 toothpicks, left and right of center. Cut each auta in half;
make sure toothpicks in autas are secure.
4. Preheat oil to 375ºF.
5. Place 5 to 6 autas in the frying basket and lower into oil. Fry 2 to 3 minutes until
golden brown. Remove with tongs; drain on paper towels and remove the toothpicks.
6. In a small bowl, squeeze the remaining lime half over the radish slices and sprinkle
with 1/4 teaspoon salt.
7. To serve, arrange autas on a platter of shredded lettuce and drizzle with avocado cream
(see recipe following). Top with radishes, cilantro, lime wedges. Serve remaining 3/4 cup
salsa on the side.
Avocado Cream
• 1 ripe Hass avocado, halved and pitted
• 1/4 cup sour cream
• 1/4 cup non-fat yogurt
• 1/2 lime, juiced
• Kosher salt, to taste
1. Using a blender, slowly blend avocado, sour cream, yogurt and lime juice until smooth.
Add salt to taste.
2. Refrigerate until ready to use.
SO-313008_14489_BELLA_1.5L deep fryer_JCP_IM_r4.indd 10 2016-04-08 11:37 AM

11
Fried Chicken Strips with BBQ Sauce
Makes 4 entrée servings
• 2 lbs. boneless, skinless chicken
breasts or chicken tenders
• 1.5 liters canola oil for frying
• 3 eggs
• 1 cup all-purpose our
• 2 cups panko bread crumbs
• 1 teaspoon garlic powder
• 1 teaspoon lemon-pepper
• 1/2 teaspoon cayenne
• 1/2 teaspoon salt
• 1/2 teaspoon pepper
Marinade:
• 1 quart buttermilk
• 1/2 tablespoons salt
• 1/2 tablespoons sugar
• 2 cloves garlic peeled and crushed
1. Cut the chicken breasts into long strips and set aside.
2. Place our in gallon-size locking plastic bag.
3. Combine the buttermilk and marinade ingredients in a large nonreactive bowl. Mix well.
4. Immerse the chicken strips in the marinade, mix well, cover tightly, and refrigerate for
at least 2 hours or up to 24 hours.
5. Preheat oil to 350º F.
6. Beat the 3 eggs in a shallow bowl.
7. Add the panko to a pie plate or shallow bowl and season with garlic powder, lemon-pepper,
cayenne, salt and pepper.
8. Place the chicken strips into the our bag, shake well to coat. Remove from bag and shake
off excess our.
9. Dip oured chicken strips into the beaten eggs.
10. Dredge egg-dipped chicken strips into the seasoned panko.
11. Using oven mitts and heat-resistant tongs, place 4 to 5 pieces of battered chicken into
the frying basket.
NOTE: Never over-ll the frying basket. Frying basket should never be more than 2/3 full
of food to be fried.
12. Fry 3 to 5 minutes, watching the browning process through the viewing window.
13. Using the tongs, turn chicken. Allow to cook for another 4 to 5 minutes until done.
14. Always use the fry basket to lift chicken out of the oil; hook the basket to the rim
and allow oil to drain. Then remove chicken from the frying basket and onto a plate
of absorbent paper towels.
15. Serve with your favorite BBQ sauce.
11
SO-313008_14489_BELLA_1.5L deep fryer_JCP_IM_r4.indd 11 2016-04-08 11:37 AM

12
Double Fried Potatoes
Serves 4 - 8
• 4 (4 to 5-inches long) russet potatoes (about 2 lbs.)
• 1 tablespoon ne-grain sea salt (to taste)
• 1 teaspoon freshly ground black pepper
1. Peel potatoes. Cut into 1/3-inch slices and then slice into 1/3-inch sticks.
2. Soak potatoes in a large bowl of water, for at least 30 minutes, up to 24 hours.
This helps to remove excess starch from the potatoes and prevents them from oxidizing.
3. Preheat oil to 300ºF.
4. Remove potatoes from the water, and pat dry to remove excess water.
5. Add raw fries to the deep frying basket in batches, do not crowd. Lower raw potatoes into
preheated oil. Blanch until potatoes are light brown, 6 to 8 minutes.
6. Remove potatoes, gently shaking off excess oil and let drain on a rack or wire grate.
This allows all sides of the potatoes to dry.
7. Repeat until all of the potatoes are par cooked.
8. Allow blanched potatoes to rest until cooled, at least 40 minutes.
9. Raise heat of oil to 350º F.
10. Double fry potatoes until golden brown, about 3 to 4 minutes. Remove from oil,
shake off excess, toss fries onto brown paper bags.
11. Season warm potatoes with salt and pepper. Repeat until all potatoes are fried.
OMG EZ Doughnuts
Makes 10 doughnuts.
• 1.5 liters vegetable oil for frying
• 1 can of 10 refrigerated biscuits
• powdered sugar or cinnamon sugar mixture
• honey
1. Preheat oil to 350º F.
2. Separate dough into biscuits. Using a cookie cutter*, cut a hole in center of each.
3. Using oven mitts and a heat-resistant metal spoon, place 3-4 doughnuts into the frying
basket.
4. Lower fryer basket into oil and add lid.
5. Cook 2 to 3 minutes, watching the browning process through the viewing window.
6. Using the oven mitts and metal spoon, turn each doughnut over. Allow to cook for another
2 to 3 minutes until done.
NOTE: Keep all of the dough holes until the end and fry as a separate batch.
7. Always use the frying basket to lift doughnuts out of the oil; hook the basket to the rim
and allow oil to drain. Then remove donuts from the frying basket onto a plate lined with
absorbent paper towels.
8. Soften honey in microwave for 10 seconds. Remove fried doughnuts to serving platter.
Drizzle honey over the tops of the doughnuts, dust with powdered sugar or
cinnamon sugar mixture.
9. Best eaten while warm.
VARIATIONS: Drizzle with honey and top with: sweetened coconut, party sprinkles,
grated chocolate, mini chips, chopped nuts.
*NOTE: Use the bottle top (of the oil bottle) or any small round top to cut a donut hole.
12
SO-313008_14489_BELLA_1.5L deep fryer_JCP_IM_r4.indd 12 2016-04-08 11:37 AM

Limited TWO-YEAR Warranty
SENSIO Inc. hereby warrants that for a period of TWO YEARS from the date
of purchase, this product will be free from mechanical defects in material and
workmanship, and for 90 days in respect to non-mechanical parts. At its sole
discretion, SENSIO Inc. will either repair or replace the product found to be
defective, or issue a refund on the product during the warranty period.
The warranty is only valid for the original retail purchaser from the date of initial
retail purchase and is not transferable. Keep the original sales receipt, as proof
of purchase is required to obtain warranty validation. Retail stores selling this
product do not have the right to alter, modify, or in any way revise the terms and
conditions of the warranty.
EXCLUSIONS:
The warranty does not cover normal wear of parts or damage resulting from
any of the following: negligent use of the product, use of improper voltage or
current, improper routine maintenance, use contrary to the operating instructions,
disassembly, repair, or alteration by anyone other than qualied SENSIO Inc.
personnel. Also, the warranty does not cover Acts of God such as re, oods,
hurricanes, or tornadoes.
SENSIO Inc. shall not be liable for any incidental or consequential damages
caused by the breach of any express or implied warranty. Apart from the extent
prohibited by applicable law, any implied warranty of merchantability or tness
for a particular purpose is limited in time to the duration of the warranty. Some
states, provinces or jurisdictions do not allow the exclusion or limitation of
incidental or consequential damages, or limitations on how long an implied
warranty lasts, and therefore, the above exclusions or limitations may not apply to
you. The warranty covers specic legal rights which may vary by state, province
and/or jurisdiction.
HOW TO OBTAIN WARRANTY SERVICE:
You must contact Customer Service at our toll-free number: 1-866-832-4843.
A Customer Service Representative will attempt to resolve warranty issues
over the phone. If the Customer Service Representative is unable to resolve the
problem, you will be provided with a case number and asked to return the product
to SENSIO Inc. Attach a tag to the product that includes: your name, address,
daytime contact telephone number, case number, and description of the problem.
Also, include a copy of the original sales receipt. Carefully package the tagged
product with the sales receipt, and send it (with shipping and insurance prepaid)
to SENSIO Inc.’s address. SENSIO Inc. shall bear no responsibility or liability for
the returned product while in transit to SENSIO Inc.’s Customer Service Center.
13
SO-313008_14489_BELLA_1.5L deep fryer_JCP_IM_r4.indd 13 2016-04-08 11:37 AM

14
CONSIGNES DE SÉCURITÉ
IMPORTANTES
Respecter les consignes de sécurité de base au moment d’utiliser des appareils
électriques, y compris les suivantes.
1. LIRE TOUTES LES DIRECTIVES.
2. Ne pas toucher les surfaces chaudes. Ne se servir que des poignées ou des
boutons de l’appareil. Utiliser des gants de cuisine ou des poignées.
3. Pour éviter les décharges électriques, ne pas immerger le cordon, la che, la
prise ou l’appareil dans de l’eau ou dans d’autres liquides.
4. Cet appareil n’est pas destiné à être utilisé par des personnes (y compris
les enfants) dont les capacités physiques, sensorielles ou mentales sont
limitées ou qui ne possèdent ni l’expérience ni les compétences nécessaires
pour utiliser l’appareil, à moins qu’elles soient supervisées ou qu’elles aient
reçu des directives d’utilisation adéquates de l’appareil par la personne
responsable de leur sécurité.
5. Une surveillance étroite est nécessaire quand un appareil est utilisé par un
enfant ou près de lui.
6. Tourner le bouton de réglage de la température à la position MIN et
débrancher le cordon de la prise lorsque l’appareil n’est pas utilisé et avant
de le nettoyer. Laisser refroidir l’appareil avant de poser ou d’enlever des
pièces et avant de le nettoyer.
7. Éviter d’utiliser l’appareil si son cordon d’alimentation ou sa che électrique
sont endommagés, ou si l’appareil est défectueux ou endommagé de quelque
façon que ce soit. Apporter l’appareil au centre de service autorisé le plus
près pour en faire faire l’évaluation, la réparation ou l’ajustement.
8. L’utilisation d’accessoires non recommandés par le fabricant de l’appareil
peut causer des blessures.
9. Ne pas utiliser l’appareil à l’extérieur.
10. Ne pas laisser le cordon pendre d’un bord de table ou d’un comptoir, ni
entrer en contact avec une surface chaude.
11. Ne pas poser l’appareil sur un élément de cuisinière électrique ou à gaz, ni à
proximité, ni dans un four chaud.
12. Être très prudent au moment de déplacer un appareil contenant de l’huile
chaude ou d’autres liquides chauds.
13. Toujours brancher le cordon d’alimentation sur l’appareil avant de brancher
la che dans la prise murale. Pour débrancher l’appareil, tourner le bouton de
réglage de la température à la position MIN. Débrancher ensuite la che de la
prise murale.
14. Ne pas laisser l’appareil sans surveillance pendant son fonctionnement.
15. Ne pas utiliser l’appareil à une n autre que celle pour laquelle il a été conçu.
16. Être très prudent au moment de déplacer un appareil qui contient de l’huile
chaude.
17. S’assurer que la poignée est bien assemblée avec le panier de friture.
Abaisser le couvercle et insérer la poignée dans les rainures du couvercle
pour que l’ensemble reste en place pendant le chauffage ou la friture.
POUR USAGE DOMESTIQUE
SEULEMENT
SO-313008_14489_BELLA_1.5L deep fryer_JCP_IM_r4.indd 14 2016-04-08 11:37 AM

15
CONSERVER CES CONSIGNES
AUTRES CONSIGNES DE
SÉCURITÉ IMPORTANTES
MISE EN GARDE! SURFACES CHAUDES : Cet appareil dégage de la chaleur
et de la vapeur pendant son utilisation. Prendre les précautions nécessaires
pour prévenir les risques de brûlures, d’incendie, de blessures et de dommages
matériels.
MISE EN GARDE : Cet appareil devient chaud pendant son fonctionnement et
demeure chaud pendant un certain temps après son arrêt. Toujours utiliser des
gants de cuisine pour manipuler des objets chauds et laisser refroidir les parties
métalliques avant le nettoyage. Ne pas placer d’objet sur le dessus de l’appareil
pendant son fonctionnement ou lorsqu’il est chaud.
1. Tous les utilisateurs doivent lire et comprendre lemode d’emploi avant
d’utiliser ou de nettoyer l’appareil.
2. Le cordon de l’appareil doit être branché sur une prise de 120V ca.
3. Si l’appareil se met à fonctionner anormalement, débrancher immédiatement
le cordon. Ne pas utiliser ni tenter de réparer l’appareil défectueux.
4. Ne pas immerger le cordon d’alimentation amovible dans un liquide. Si le
cordon tombe dans de l’eau ou un autre liquide, le JETER IMMÉDIATEMENT
et le remplacer par un nouveau cordon. Si le cordon est endommagé, le
remplacer en communiquant avec le service à la clientèle.
5. Tenir le cordon hors de la portée des enfants et des bébés pour éviter les
décharges électriques et les risques d’étouffement.
6. Utiliser la poignée du panier à friture pour soulever et abaisser le panier.
Toujours soulever le panier à friture hors de l’huile chaude et laisser les
aliments frits reposer de 5 à 10 secondes avant de les retirer du panier.
7. Ne pas utiliser l’appareil si la fenêtre d’observation est ssurée.
8. Sécher les aliments humides avant de les déposer dans l’huile. Pour la
friture d’aliments congelés, retirer tout excédent de givre an de prévenir les
éclaboussures d’huile chaude.
9. Toujours tenir le couvercle fermé pendant la friture des aliments.
10. Ne pas bloquer la bouche d’aération avec ltre située sur le dessus du
couvercle. Éviter tout contact avec la vapeur qui se dégage par la bouche
d’aération avec ltre lorsque l’appareil est en marche.
11. Tenir l’appareil à au moins 10 cm (4 po) des murs ou des autres objets
pendant son fonctionnement. Ne pas placer d’objet sur le dessus de l’appareil
pendant son fonctionnement. Placer l’appareil sur une surface plane qui
résiste à la chaleur.
12. Conrmer que le niveau d’huile dans le réservoir est au-dessus du repère
MIN. Ne jamais mettre en marche l’appareil lorsque le réservoir d’huile est
vide ou que la quantité d’huile qui s’y trouve est insufsante. Le niveau
d’huile dans le réservoir ne doit jamais dépasser le repère MAX.
AVERTISSEMENT : Un niveau d’huile trop bas ou trop élevé peut
endommager l‘appareil et causer de graves blessures.
13. Toujours verser l’huile froide dans le réservoir avant de brancher l’appareil et
de le faire chauffer. Ne jamais verser l’huile dans un réservoir chaud.
SO-313008_14489_BELLA_1.5L deep fryer_JCP_IM_r4.indd 15 2016-04-08 11:37 AM

16
14. Ne jamais placer d’objet inammable sur l’appareil ou à proximité de celui-ci.
Si l’huile prend feu, débrancher l’appareil et fermer le couvercle. Ne jamais
tenter d’éteindre un feu d’huile avec de l’eau.
15. Le couvercle et le réservoir doivent être secs avant de mettre en marche
l’appareil.
16. Il n’est pas recommandé de déplacer la friteuse lorsqu’elle contient de l’huile
chaude. Attendre que l’huile soit froide avant de déplacer l’appareil.
17. Ne pas utiliser l’appareil pour faire bouillir de l’eau.
REMARQUE SUR LA FICHE
Cet appareil est muni d’une che polarisée (une lame plus large que l’autre).
An d’éviter tout risque d’électrocution, on ne peut brancher la che que
dans un seul sens. Si la che ne s’insère pas complètement dans la prise, on
doit la tourner dans l’autre sens. Si cela ne fonctionne toujours pas, on doit
communiquer avec un électricien qualié. On ne doit en aucun cas modier la
che soi-même.
NOTES SUR LE CORDON (CONSIGNES RELATIVES AU CORDON AMOVIBLE)
MISE EN GARDE : L’appareil est doté d’un cordon d’alimentation court
amovible pour réduire le risque de blessures qui pourraient survenir en cas
d’entremêlement ou de trébuchement sur un cordon plus long.
Le cordon est conçu pour se détacher rapidement et aisément de l’appareil an
d’empêcher l’appareil de tomber lorsqu’une personne tire par mégarde sur le
cordon.
Il ne doit être utilisé qu’avec l’appareil pour lequel il a été conçu. Ne pas tenter de
l’utiliser avec tout autre appareil.
AVERTISSEMENT : Un appareil qui tombe du comptoir peut causer de graves
brûlures. Ne pas laisser le cordon pendre d’un bord du comptoir, puisque
les enfants pourraient l’attraper ou que l’utilisateur pourrait s’y accrocher. Ne
pas utiliser de rallonge électrique.
AVERTISSEMENT DE MIGRATION DE PLASTIFIANTS
MISE EN GARDE : Pour éviter la migration de plastiants vers le ni de comptoirs,
de tables ou de tout autre meuble, placer des sous-plats ou des napperons faits
de matière NON PLASTIQUE entre l’appareil et le dessus du comptoir ou de la
table. Si cette consigne n’est pas respectée, le ni noircira et s’en suivront des
ternissures permanentes ou des taches indélébiles.
ALIMENTATION ÉLECTRIQUE
Si le circuit électrique est surchargé parce qu’il doit également alimenter d’autres
appareils, l’appareil pourrait ne pas fonctionner correctement. Il doit être alimenté
par un circuit électrique distinct de tout autre appareil.
Note: keep illustration
callouts aligned
SO-313008_14489_BELLA_1.5L deep fryer_JCP_IM_r4.indd 16 2016-04-08 11:37 AM

17
Caractéristiques de l’appareil
L’appareil peut différer légèrement de l’illustration.
Assemblage de la poignée du panier de friture
1. Lors de l’expédition, les poignées du panier de friture sont placées
en position de rangement. Pour xer une poignée à un panier de
friture, tenir les montants à l’intérieur de ce dernier comme sur
l’illustration. Appuyer doucement sur les montants de la poignée
pour qu’ils s’insèrent dans les œillets du panier de friture
(se reporter à la gure 2).
2. Les relâcher et pousser la poignée contre le dos du panier de friture
jusqu’à ce qu’elle s’enclenche (se reporter à la gure 3).
Avant la première utilisation
1. Retirer tous les matériaux d’emballage et les étiquettes qui se trouvent à l’intérieur et à l’extérieur
de la friteuse. Utilisez un chiffon humide pour nettoyer la cuve d’huile puis essuyez avec une
serviette en papier.
2. Attention : Ne jamais immerger l’appareil dans l’eau
3. Laver le couvercle et le panier de friture au lave-vaisselle ou à l’eau chaude savonneuse.
4. Essuyer le boîtier en acier inoxydable avec un chiffon humide.
5. Assurez-vous de bien sécher la cuve d’huile et le panier à friture avant de commencer à utiliser
votre appareil
PREHEAT
Bouton de réglage de
température
Panier de friture
amovible
Poignées isolées
Boitier en acier
inoxydable
Réservoir
d’huile
Poignée du
panier de friture
Fiche polarisée
magnétique
détachable
Crochet d’égouttement
Couvercle amovible
Figure 1
Filtre à odeurs
permanent
Poignée du couvercle
Fenêtre de
visualisation
Non-Slip Fee
Témoins lumineux
PREHEAT (Préchauffage)
et READY (Prêt).
Rainures de
la poignée
Figure 2 Figure 3
SO-313008_14489_BELLA_1.5L deep fryer_JCP_IM_r4.indd 17 2016-04-08 11:37 AM

18
Mode d’emploi
AVERTISSEMENT! Cet appareil ne doit pas être utilisé pour faire bouillir de l’eau.
1. Consulter le tableau de friture pour les températures et les temps de cuisson suggérés.
2. Placer l’appareil sur une surface plane, propre, sèche, résistante à la chaleur près d’une
prise de courant.
3. Ouvrir le couvercle et enlever le panier du réservoir d’huile.
4. Fixer la poignée au panier de friture (consulter la section « Assemblage des poignées du panier
de friture » de ce mode d’emploi).
5. Verser l’huile de cuisson liquide dans le réservoir pour qu’il soit entre les repères MIN et MAX
et fermer le couvercle. AVERTISSEMENT : Un niveau d’huile trop bas ou trop élevé peut
endommager l’appareil et causer de graves blessures.
6. Régler le bouton de réglage de la température à la position MIN.
7. Brancher le cordon magnétique détachable dans la prise de l’appareil
de manière à ce que l’indication « THIS SIDE UP » (ce côté vers le
haut) soit vers le haut (se reporter à la gure 4).
8. S’assurer que le cordon est bien en place, puis connecter la che
polarisée à la prise de courant.
Le témoin lumineux PREHEAT (Préchauffage) s’allumera pendant que
l’appareil chauffe l’huile.
MISE EN GARDE : Ne pas laisser le cordon pendre de la surface d’une table ou d’un comptoir.
9. Ajuster le régulateur de température à l’intensité désirée. Allouer environ 7 à 10 minutes pour
le temps de préchauffage.
10. Lorsque l’huile atteint la température de cuisson sélectionnée, le témoin lumineux rouge
PREAHEAT (Préchauffage) s’éteint et le témoin lumineux bleu READY (Prêt) s’allume.
11. Déposer les aliments dans le panier à friture. Ne pas surcharger le panier d’aliments.
12. Ouvrir le couvercle et saisir la poignée du panier a friture contenant la nourriture et l’abaisser
doucement dans le réservoir à friture. Fermer le couvercle
AVERTISSEMENT : L’appareil dégage de la chaleur et de la vapeur pendant son fonctionnement.
Prendre les précautions nécessaires pour prévenir les risques de brûlures, d’incendie, de blessures
et de dommages matériels.
13. Pendant que l’appareil cuit la nourriture, le témoin lumineux rouge PREHEAT (Préchauffage)
et le témoin lumineux bleu READY (Prêt) clignotent pendant que la température de cuisson
adéquate est maintenue. MISE EN GARDE : Ne pas ouvrir le couvercle pendant la cuisson !
Les éclaboussures d’huile chaude peuvent causer de graves brûlures ou blessures.
14. Lorsque les aliments sont cuits, mettre des gants de cuisine, ouvrir le couvercle et accrocher
soigneusement le panier sur la partie avant du réservoir d’huile en utilisant les deux crochets
métalliques. Laisser égoutter les aliments frits de 5 à 10 secondes.
AVERTISSEMENT : Être très prudent au moment d’ouvrir le couvercle puisque la vapeur s’échappe
aussitôt qu’il est ouvert. Utiliser des gants de cuisine pour manipuler les objets chauds.
15. Utiliser une fourchette ou des pinces à long manche résistantes à la chaleur pour retirer la
nourriture cuite, déposer les aliments cuits sur des essuie-tout absorbants ou utiliser des sacs
d’épicerie bruns propres pour absorber l’excès d’huile.
16. Toujours vérier le niveau d’huile avant d’enchaîner sur une autre friture. S’assurer que le réservoir
d’huile est au moins rempli jusqu’à la ligne MIN. Ajouter de l’huile au besoin.
17. Lorsque l’huile atteint la température de cuisson sélectionnée, suivre les instructions mentionnées
précédemment et continuer à frire.
18. Lorsque la cuisson est terminée, tourner le régulateur de température sur MIN.
19. Débrancher la che de la prise murale, puis débrancher le cordon de la che de l’appareil.
20. Fermer le couvercle et laisser l’huile et la friteuse refroidir.
AVERTISSEMENT ! L’huile reste chaude pendant un bon moment. Toutes les pièces de l’appareil
et l’huile doivent être froides avant de jeter ou d’entreposer l’huile et de nettoyer l’appareil.
Figure 4
SO-313008_14489_BELLA_1.5L deep fryer_JCP_IM_r4.indd 18 2016-04-08 11:37 AM
La page charge ...
La page charge ...
La page charge ...
La page charge ...
La page charge ...
La page charge ...
La page charge ...
La page charge ...
La page charge ...
La page charge ...
La page charge ...
La page charge ...
La page charge ...
La page charge ...
La page charge ...
La page charge ...
La page charge ...
La page charge ...
La page charge ...
La page charge ...
La page charge ...
La page charge ...
La page charge ...
La page charge ...
-
 1
1
-
 2
2
-
 3
3
-
 4
4
-
 5
5
-
 6
6
-
 7
7
-
 8
8
-
 9
9
-
 10
10
-
 11
11
-
 12
12
-
 13
13
-
 14
14
-
 15
15
-
 16
16
-
 17
17
-
 18
18
-
 19
19
-
 20
20
-
 21
21
-
 22
22
-
 23
23
-
 24
24
-
 25
25
-
 26
26
-
 27
27
-
 28
28
-
 29
29
-
 30
30
-
 31
31
-
 32
32
-
 33
33
-
 34
34
-
 35
35
-
 36
36
-
 37
37
-
 38
38
-
 39
39
-
 40
40
-
 41
41
-
 42
42
-
 43
43
-
 44
44


Bella 1.5L Deep Fryer, Stainless Steel Le manuel du propriétaire
- Catégorie
- Petits appareils de cuisine
- Taper
- Le manuel du propriétaire
dans d''autres langues
Documents connexes
Autres documents
-
George Foreman GSF026BC Manuel utilisateur
-
Weston 03-1200-W Mode d'emploi
-
-
-
Hamilton Beach 35200 Mode d'emploi
-
-
Hamilton Beach 35030 - 12 Cup Oil Capacity Deep Fryer Manuel utilisateur
-
Hamilton Beach 35326 Mode d'emploi
-
Proctor Silex 35000 Mode d'emploi
-
Sunbeam 3240 Manuel utilisateur