
GEAppliances.com
Refrigerators
Bottom Freezer
225D2649P003 49-60653 03-11 GE
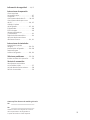
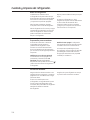
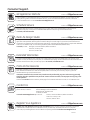
Safety Instructions . . . . . . . . . . .2, 3
Operating Instructions
Automatic Icemaker . . . . . . . . . . . . . . .20
Care and Cleaning . . . . . . . . . . . . .21, 22
Control for LCD Models . . . . . . . . . .4–11
Control for Non-LCD Models . . . .12, 13
Crispers and Pans . . . . . . . . . . . . . . . . .18
Dispenser . . . . . . . . . . . . . . . . . . . . . . . . .14
Freezer . . . . . . . . . . . . . . . . . . . . . . . . . . . .19
Fresh Food Storage Options . . . .16, 17
Replacing the Light Bulbs . . . . . . . . . .23
Water Filter . . . . . . . . . . . . . . . . . . . . . . . .15
Installation Instructions
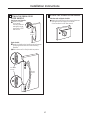
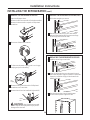
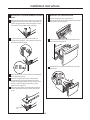
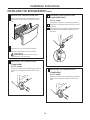
Installing the Refrigerator . . . . . .26–34
Installing the Water Line . . . . . . . .35–37
Preparing to Install
the Refrigerator . . . . . . . . . . . . . . . .24, 25
Troubleshooting Tips . . . . . .38–42
Normal Operating Sounds . . . . . . . . . .38
Consumer Support
Consumer Support . . . . . . . .Back Cover
Owner’s Registration
for Canadian Customers . . . . . . . .43, 44
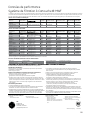
Performance Data Sheet . . . . . . . . . . .47
State of California Water
Treatment Device Certificate . . . . . . .48
Warranty for Canadian
Customers . . . . . . . . . . . . . . . . . . . . . . . . .46
Warranty for U.S. Customers . . . . . . .45
Réfrigérateurs
Congélateur inférieur
Refrigeradores
Congelador inferior
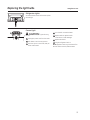
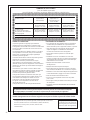
Write the model and serial
numbers here:
Model # ____________________
Serial # ____________________
Find these numbers on a label
on the left side, near the middle
of the refrigerator compartment.
Profile
™
Models 26, 29,
GE Adora 29
Manuel d’utilisation
et d’installation
Owner’s Manual and
Installation Instructions
Manual del
propietario y
instalación
La section française commence à la page 49
La sección en español empieza en la página 95

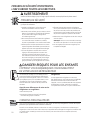
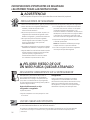
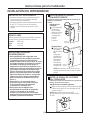
IMPORTANT SAFETY INFORMATION.
READ ALL INSTRUCTIONS BEFORE USING.
WARNING!
Use this appliance only for its intended purpose as described in this Owner’s Manual.
SAFETY PRECAUTIONS
When using electrical appliances, basic safety precautions should be followed, including the following:
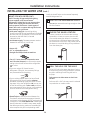
This refrigerator must be properly installed
and located in accordance with the Installation
Instructions before it is used.
Do not allow children to climb, stand or hang
on the shelves in the refrigerator. They could
damage the refrigerator and seriously injure
themselves.
Do not touch the cold surfaces in the freezer
compartment when hands are damp or wet.
Skin may stick to these extremely cold surfaces.
Do not store or use gasoline or other flammable
vapors and liquids in the vicinity of this or any
other appliance.
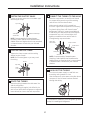
Keep fingers out of the “pinch point” areas;
clearances between the doors and between
the doors and cabinet are necessarily small.
Be careful closing doors when children are
in the area.
In refrigerators with automatic icemakers,
avoid contact with the moving parts of the
ejector mechanism, or with the heating element
that releases the cubes. Do not place fingers or
hands on the automatic icemaking mechanism
while the refrigerator is plugged in.
Unplug the refrigerator before cleaning and making
repairs.
NOTE: We strongly recommend that any servicing
be performed by a qualified individual.
Do not refreeze frozen foods which have thawed
completely.
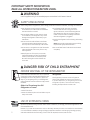
PROPER DISPOSAL OF THE REFRIGERATOR
Child entrapment and suffocation are not problems
of the past. Junked or abandoned refrigerators are
still dangerous…even if they will sit for “just a few
days.” If you are getting rid of your old refrigerator,
please follow the instructions below to help prevent
accidents.
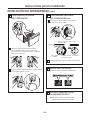
Before You Throw Away Your Old
Refrigerator or Freezer:
Take off the doors.
Leave the shelves in place so that children may not
easily climb inside.
Refrigerants
All refrigeration products contain refrigerants,
which under federal law must be removed prior
to product disposal. If you are getting rid of an old
refrigeration product, check with the company
handling the disposal about what to do.
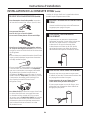
USE OF EXTENSION CORDS
Because of potential safety hazards under certain conditions, we strongly recommend against the use
of an extension cord.
However, if you must use an extension cord, it is absolutely necessary that it be a UL-listed (in the United States)
or a CSA certified (in Canada), 3-wire grounding type appliance extension cord having a grounding type plug
and outlet and that the electrical rating of the cord be 15 amperes (minimum) and 120 volts.
DANGER! RISK OF CHILD ENTRAPMENT
2

3
GEAppliances.com
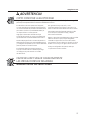
WARNING!
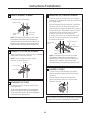
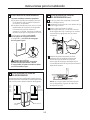
HOW TO CONNECT ELECTRICITY
Do not, under any circumstances, cut or remove the third (ground) prong from the power cord.
For personal safety, this appliance must be properly grounded.
The power cord of this appliance is equipped
with a 3-prong (grounding) plug which mates
with a standard 3-prong (grounding) wall outlet
to minimize the possibility of electric shock hazard
from this appliance.
Have the wall outlet and circuit checked by
a qualified electrician to make sure the outlet
is properly grounded.
Where a standard 2-prong wall outlet is encountered,
it is your personal responsibility and obligation to
have it replaced with a properly grounded 3-prong
wall outlet.
The refrigerator should always be plugged into its
own individual electrical outlet which has a voltage
rating that matches the rating plate.
This provides the best performance and also prevents
overloading house wiring circuits which could cause
a fire hazard from overheated wires.
Never unplug your refrigerator by pulling
on the power cord. Always grip plug firmly
and pull straight out from the outlet.
Repair or replace immediately all power cords that
have become frayed or otherwise damaged. Do not
use a cord that shows cracks or abrasion damage
along its length or at either end.
When moving the refrigerator away from the wall,
be careful not to roll over or damage the power cord.
READ AND FOLLOW THIS SAFETY INFORMATION CAREFULLY.
SAVE THESE INSTRUCTIONS

4
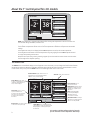
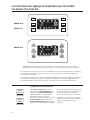
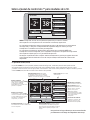
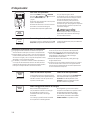
About the 7”control panel for LCD models.
The temperature controls are preset in the factory at 38°F for the refrigerator compartment and –2°F
for the freezer compartment. Allow 24 hours for the temperature to stabilize to the preset recommended
settings.
The temperature controls can display both the SET temperature as well as the actual temperature
in the refrigerator and freezer. The actual temperature may vary slightly from the SET temperature based
on usage and operating environment.
Reset the LCD screen at any time by inserting a paper clip into the small hole next to the SD card slot under
the front edge of the dispenser opening.
NOTE: The refrigerator is shipped with protective film covering the temperature controls. If this film was
not removed during installation, remove it now.
FREEZER
-2
FRESH FOOD
38
L
OCK
S
UBSTITUTIONS
P
HOTOS
N
UTRITION
F
ACTS
C
ONVERSIONS
S
ETTINGS
12:00 PM
HOLD 3 SECONDS
W
ATER
D
ISPENSER
W
ATER
F
ILTER:
G
OOD
EXTRAS
FREEZER
-2
FRESH FOOD
38
LOCK
SUBSTITUTIONS
PHOTOS
NUTRITION FACTS
CONVERSIONS
SETTINGS
12:47 PM
HOLD 3 SECONDS
WATERDISPENSER
WATER FILTER: GOOD
EXTRAS
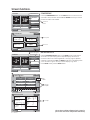
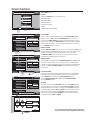
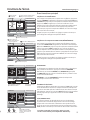
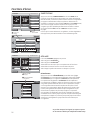
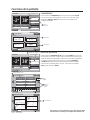
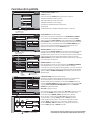
The HOME screen is the default display on the refrigerator. From this screen you can change the fresh food and freezer
temperatures, select the desired ice and water dispenser setting and access other functions as listed below. To return
to this screen at any time, press the HOME button in the lower right hand corner of the screen.
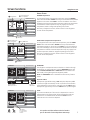
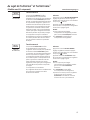
The Home Screen
Fresh Food Button: Displays actual as well as set
temperatures in fresh food compartment. When
TurboCool is active, it will be displayed.
Status Bar: Shows status of water filter.
Conversions Tool: Accesses
the conversions function.
Nutrition Facts: Find basic nutrition
information for common food items,
including fruits, vegetables, meats
and cheeses.
Photos: Upload photographs
to your refrigerator. Organize
and arrange photos into
a screensaver or slideshow.
Substitutions Feature: A catalog of
substitutions for common ingredients
which are not readily available.
Settings Menu: Access refrigerator functions
such as TurboCool, Energy Saver and Door Alarm.
Change brightness of the display and replace
the water filter.
Dispenser Tab: Select water, crushed ice or cubed
ice. Also access the dispenser light.
Feature Lock: Hold for 3 seconds
to prevent accidental use of
the dispenser. The lock will change
from open to closed to indicate
the dispenser and controls have
been locked.
Freezer Button: Displays actual
as well as set temperatures in freezer
compartment. When TurboFreeze is
active, it will be displayed.
This product includes software which is based in
part on the work of the Independent JPEG Group

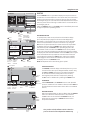
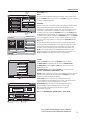
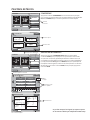
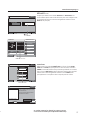
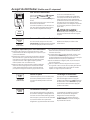
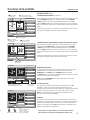
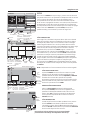
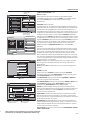
FREEZER Temperature:
To change the freezer compartment temperature, press the FREEZER
button and use the UP or DOWN arrow keys until the desired temperature
appears on the screen. Press SAVE to confirm the selection. The control
will display both the actual and set temperature until the set temperature
is reached. The actual temperature may vary slightly from the SET
temperature, based on usage and operating environment.
Each time you adjust the controls, allow 24 hours for the refrigerator
to reach the set temperature.
FRESH FOOD Compartment Temperature:
To change the fresh food compartment temperature, press the FRESH
FOOD button and use the UP or DOWN arrow keys until the desired
temperature appears on the screen. Press SAVE to confirm the selection.
The control will display both the actual and set temperature until the set
temperature is reached. The actual temperature may vary slightly from
the SET temperature, based on usage and operating environment.
Each time you adjust the controls, allow 24 hours for the refrigerator
to reach the set temperature.
DISPENSER:
The refrigerator can dispense water, crushed ice or cubed ice through
the dispenser. To make a selection, press the DISPENSER button and
choose WATER, CRUSHED ICE or CUBED ICE. After the selection has
been made, press a glass against the dispenser paddle.
NOTE: The DISPENSER button is available from almost every feature
screen.
Dispenser LIGHT:
The dispenser light default setting is OFF. When the dispenser paddle
is pushed, the light automatically comes on (off after 5 seconds when
pad is released). To turn the light on manually, press the LIGHT button.
The dispenser light will stay on until the LIGHT button is pressed again.
LOCK:
To prevent accidental use of the control or dispenser, the control is
equipped with a lock feature. When locked, the dispenser and LCD
functions are not available. Press and hold the LOCK button for
3 seconds to lock or unlock the dispenser.
5
Screen functions. GEAppliances.com
Home Screen
FREEZER
0
FRESH FOOD
38
LOCK
SUBSTITUTIONS
PHOTOS
NUTRITION FACTS
CONVERSIONS
SETTINGS
12:00 PM
HOLD 3 SECONDS
WATERDISPENSER
WATER FILTER: GOOD
EXTRAS
FREEZER
ACTUAL: 0
˚
F
(R
ECOMMENDED: 0
˚
F)
-2
SAVE
S
ET
T
EMP
F
REEZER
0
F
RESH
F
OOD
38
L
OCK
S
UBSTITUTIONS
P
HOTOS
N
UTRITION
F
ACTS
C
ONVERSIONS
S
ETTINGS
12:00 PM
HOLD 3 SECONDS
WATERDISPENSER
WATER FILTER: GOOD
E
XTRAS
S
AVE
S
ET
T
EMP
F
RESH
F
OOD
A
CTUAL: 38
˚
F
(R
ECOMMENDED: 38
˚
F)
38
FREEZER
-2
FRESH FOOD
38
LOCK
SUBSTITUTIONS
PHOTOS
NUTRITION FACTS
CONVERSIONS
SETTINGS
12:00 PM
HOLD 3 SECONDS
W
ATER
D
ISPENSER
WATER FILTER: GOOD
EXTRAS
D
ISPENSER
W
ATER
C
RUSHED
I
CE
C
UBED
I
CE
L
IGHT
FREEZER
-2
FRESH FOOD
38
LOCK
SUBSTITUTIONS
PHOTOS
NUTRITION FACTS
CONVERSIONS
SETTINGS
12:00 PM
HOLD 3 SECONDS
L
OCKED
D
ISPENSER
WATER FILTER: GOOD
EXTRAS
FREEZER Button
Up and Down Arrows
to set temperature
SAVE Button
SAVE Button
Up and Down Arrows
to set temperature
FRESH FOOD Button
DISPENSER Button
WATER option chosen
Dispenser
LIGHT Button
LOCK Button
Press and Hold for
3 seconds to Lock
or Unlock
Locked Unlocked
This product includes software which is based in
part on the work of the Independent JPEG Group

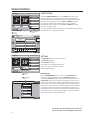
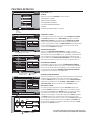
Screen functions.
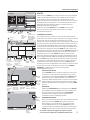
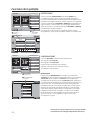
Press the CONVERSIONS button on the HOME screen to convert from one
unit and/or value to another. Use the UP and DOWN arrow keys to choose
the amount and/or units needed.
CONVERSIONS
WATER FILTER: GOOD
WATERDISPENSER
BACK
HOME
C
ONVERSIONS
P
ORTIONS
Half:
3
/
4
cups
Double: 3 cups
1
1
/
2
Cups
U
NITS
Ounces: 16
Milliliters: 470
W
ATER
D
ISPENSER
B
ACK
H
OME
N
UTRITION
F
ACTS
BEANS, GREEN
A B C D E F G H I J
AVOCADO
APPLE
BEANS, YELLOW
BANANA
ASPARAGUS
PAGE
1
0F
8
Choose portion
Choose unit
Choose ingredient or letter
Conversions
Button
Page
Number
Scroll Page
or Alphabet
WATERDISPENSER
HOME
BACK
Sodium 1mg 0%
Total Carbs 19g 6%
Dietary Fiber 3g 12%
Sugars 14g
Protein 0g
Vitamin A 75
Vitamin C 63
Calcium 8
Iron 0.17
* Percent Daily Values (DV) are
based on a 2,000 calorie diet.
Apple
Serving Size 138g
Calories 72
Calories from Fat 0
Total Fat 0g 0%
Sat Fat 0g 0%
Trans Fat 0g 0%
Cholesterol 0g 0%
Amount Per Serving %DV*
NUTRITION FACTS
Scroll Right
Scroll Left
Press the NUTRITION FACTS button on the HOME screen to see nutrition
information. Six options along with an alphabet display are shown on
the screen. Select one of these ingredients or scroll by page or alphabet
character to proceed. The LEFT and RIGHT arrow keys on the display allow
you to scroll left or right on the top or bottom display. To go back
to the HOME screen, press the HOME button.
NUTRITION FACTS
FREEZER
-2
FRESH FOOD
38
LOCK
SUBSTITUTIONS
PHOTOS
NUTRITION FACTS
CONVERSIONS
SETTINGS
12:00 PM
HOLD 3 SECONDS
WATERDISPENSER
WATER FILTER: GOOD
EXTRAS
Nutrition Facts Button
F
REEZER
-2
F
RESH
F
OOD
38
L
OCK
S
UBSTITUTIONS
P
HOTOS
N
UTRITION
F
ACTS
C
ONVERSIONS
S
ETTINGS
12:00 PM
HOLD 3 SECONDS
WATERDISPENSER
W
ATER
F
ILTER:
G
OOD
EXTRAS
6
This product includes software which is based in
part on the work of the Independent JPEG Group

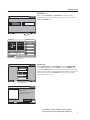
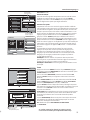
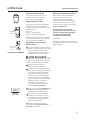
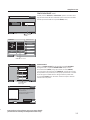
Use the PHOTOS button to upload and display favorite photos that can
be used as a 15-minute slide show or as a screen saver. The screen saver
shows on the LCD screen after 2 minutes of inactivity. After 15 minutes,
the backlight will go out. If the slide show is selected instead of the screen
saver, the photos will scroll through in a slide show for 15 minutes before
the backlight goes out.
Select the PHOTOS button on the HOME screen to see default photos and
to begin the process of uploading photos.
UPLOADING PHOTOS
To upload photos, insert an SD card into the slot below the display.
Up to 100 photos (6 per page) from the SD card are displayed as
thumbnails in chronological order. Up to 30 photos can be uploaded.
Photos can be selected one at a time on the screen or by using the
ALL button if all photos (30 max) from the SD card are to be uploaded.
To deselect all photos, select the NONE button. When photos have
been selected, press the UPLOAD button. Uploading 30 photos will
take between 3 and 16 minutes. The CANCEL button can be pressed
at any time to stop the uploading process. When the upload is complete,
the display will show UPLOAD COMPLETE. Select the EJECT button to eject
the SD card and wait to be prompted to remove the card. If the card
is removed without pressing the EJECT button, there is the possibility
of damaging the files on the SD card. When the SD card is removed,
the display returns to the PHOTOS screen.
NOTE: The dispenser will not work during photo upload.
SELECTING PHOTOS
The PHOTOS screen will display 6 thumbnail photos or you can
choose the full screen option. Navigate between screens using
the LEFT and RIGHT arrow keys on the sides of the display.
On the thumbnail screen, select photos one at a time by
touching that photo, select all of the photos by selecting
the ALL button or deselect all by selecting the NONE button.
SLIDESHOW
Select SLIDE SHOW on the PHOTOS screen to view uploaded
photos in a slide show from newest to oldest. (This does NOT set
the slide show as the screen saver. That is done in the SYSTEMS
section.)
DELETING PHOTOS
With photos selected that you want to delete, select the DELETE
button from either the thumbnail screen or the full screen.
The ALL button can be used with the DELETE feature. You
will be given an opportunity to CANCEL the action before
the photos are deleted.
7
GEAppliances.com
PHOTOS
F
REEZER
-2
F
RESH
F
OOD
38
L
OCK
S
UBSTITUTIONS
P
HOTOS
N
UTRITION
F
ACTS
C
ONVERSIONS
S
ETTINGS
12:00 PM
HOLD 3 SECONDS
W
ATER
D
ISPENSER
W
ATER
F
ILTER:
G
OOD
E
XTRAS
W
ATER
D
ISPENSER
B
ACK
H
OME
P
HOTOS
ALL NONE SLIDE SHOW DELETE
S
ELECT
0/12
selected
V
IEW
PAGE
1
0F
2
Number of pages available
DELETE
Button
ALL Button
to Select
All Photos
Number
of photos
available
WATER FILTER: GOOD
WATERDISPENSER
BACK
HOME
C
ONVERSIONS
P
O
RTIONS
Half:
3
/
4
cups
Double: 3 cups
1
1
/
2
Cups
U
NITS
Ounces: 16
Milliliters: 470
Memory Meter:
Total number of
photos available
for upload (Max. 30)
Select
photos
Selected photo
Arrow
Key
SLIDESHOW
Button
W
ATER
D
ISPENSER
B
ACK
H
OME
P
HOTOS
DELETE
V
IEW
PHOTO
4
0F
12
Photos
stored in
internal
memory
Photos
Button
Insert
SD Card
EJECT
Button
UPLOAD
Button
NONE Button
to Deselect
All Photos
on SD Card
ALL Button
to Select All
Photos on
SD Card
View
photos
full screen
NONE Button
to Deselect
All Photos
View photos
as thumbnails
DELETE
Button
Speaker Reset
This product includes software which is based in
part on the work of the Independent JPEG Group

Screen functions.
FREEZER
-2
FRESH FOOD
38
SUBSTITUTIONS
PHOTOS
NUTRITION FACTS
CONVERSIONS
SETTINGS
12:00 PM
HOLD 3 SECONDS
L
OCKED
D
ISPENSER
WATER FILTER: GOOD
EXTRAS
LOCK
W
ATER
D
ISPENSER
B
ACK
H
OME
S
UBSTITUTIONS
BREAD CRUMBS
A B C D E F G H I J
BAKING POWDER
ALLSPICE
BROTH
BAKING SODA
APPLE PIE SPICE
PAGE
1
0F
10
SUBSTITUTIONS
Button
Select the SUBSTITUTIONS button on the HOME screen. The screen
displayed gives tips for using substitutions in recipes. Continue on to
the next screen where 6 ingredients per page are displayed in the upper
section. Select an ingredient or use the LEFT and RIGHT arrow keys
to move from page to page. The lower section is for navigating
alphabetically. Select a letter or use the LEFT and RIGHT arrow keys
to move from page to page.
Once an ingredient has been selected, a list of ingredients and proportions
are listed that can be used as a substitute.
SUBSTITUTIONS
F
REEZER
-2
F
RESH
F
OOD
38
S
UBSTITUTIONS
P
HOTOS
N
UTRITION
F
ACTS
C
ONVERSIONS
S
ETTINGS
12:00 PM
HOLD 3 SECONDS
WATERDISPENSER
W
ATER
F
ILTER:
G
OOD
E
XTRAS
L
OCK
Select an
ingredient
W
ATER
D
ISPENSER
B
ACK
H
OME
SCREEN
SYSTEM
WATER FILTER
REFRIGERATOR
S
ETTINGS
SETTINGS
Button
REFRIGERATOR
Button
The SETTINGS feature will give you access to:
TurboCool
™
settings
TurboFreeze
™
settings
instructions for changing the water filter
access to systems such as door alarm
Metric/English display
REFRIGERATOR
Press the REFRIGERATOR button to access the TurboCool setting
for the fresh food compartment and the TurboFreeze setting for
the freezer. TurboCool rapidly cools the fresh food compartment and
TurboFreeze rapidly cools the freezer compartment in order to more
quickly cool foods. Use these features when adding a large amount of
food to either compartment, putting away foods after they have been
sitting out at room temperature or when putting away warm leftovers.
It can also be used if the refrigerator has been without power for an
extended period. The compressor and fresh food or freezer fan will run
immediately for up to 3 1/2 hours (fresh food) or 2 1/2 hours (freezer)
and then return to the original setting value.
SETTINGS
8
This product includes software which is based in
part on the work of the Independent JPEG Group

When you press TurboCool or TurboFreeze, a check mark shows
in the box next to the button showing that it is turned on. It will also be
listed on the HOME screen.
WATER FILTER
Select WATER FILTER from the SETTINGS screen. The WATER FILTER
screen displays whether the filter is GOOD, it is time to ORDER a filter,
or it is time to REPLACE the filter. Follow on-screen instructions as shown
in the example to order or replace the water filter. The status of the water
filter can also be found on the HOME screen in the upper right hand
corner when the door is open.
9
GEAppliances.com
SETTINGS (cont.)
FREEZER
-2
FRESH FOOD
TURBO COOL
LOCK
SUBSTITUTIONS
PHOTOS
NUTRITION FACTS
CONVERSIONS
SETTINGS
12:00 PM
HOLD 3 SECONDS
WATERDISPENSER
WATER FILTER: GOOD
EXTRAS
W
ATER
D
ISPENSER
BACK
HOME
SCREEN
SYSTEM
WATER FILTER
REFRIGERATOR
S
ETTINGS
WATER FILTER Button
W
ATER
D
ISPENSER
B
ACK
H
OME
T
URBO
C
OOL
T
URBO
F
REEZE
R
EFRIGERATOR
W
ATER
D
ISPENSER
B
ACK
H
OME
Water Filter Replacement Info: Replace with a
GE “MWF” water filter. In the US go to ge.com
or call 1-800-626-2002.
In Canada consult the yellow pages for the
nearest Mabe Service Center.
R
EPLACE
R
EMIND
L
ATER
WATER FILTER
FILTER STATUS: GOOD
TURBO COOL
Button
TURBO COOL Selected
This product includes software which is based in
part on the work of the Independent JPEG Group

Screen functions.
SYSTEM
Select the SYSTEM button to have access to:
DOOR ALARM
BUTTON TONES
ENERGY SAVER
COOLING SYSTEM
TIME
UNITS (ENGLISH or METRIC)
DOOR ALARM
There is a check mark beside the button if the DOOR ALARM is ON
(default). To turn it OFF, select the DOOR ALARM button (check will
be gone). The DOOR ALARM will sound if the refrigerator door is open
longer than 3 minutes. The DOOR OPEN alarm screen will be displayed
and a beeper will sound in 1-minute intervals until the door is closed
or the SILENCE button is selected.
BUTTON TONES
Press the BUTTON TONES button to control the sound of the LCD buttons.
When button sound is ON (default), the beeper sounds a tone each time
a button is pressed per audio specifications. To turn it off, select
the BUTTON TONES button (check will be gone). This also activates
or deactivates the Refreshment Center tone.
ENERGY SAVER
This refrigerator is shipped with the ENERGY SAVER feature ON (check).
Over time, moisture can form on the front surface of the refrigerator
cabinet. If moisture does appear on the front surface of the refrigerator
cabinet, turn OFF the ENERGY SAVER by pressing the button (check
will be gone).
COOLING SYSTEM
This feature turns off the cooling system in the fresh food and freezer
compartments without shutting off the electricity to the refrigerator.
On the SYSTEM screen, select the COOLING SYSTEM button.
To turn COOLING SYSTEM ON or OFF, select COOLING SYSTEM
from the SYSTEM screen.
SET TIME
To set the clock, select the SET TIME button from the SYSTEM screen.
To change the hours and minutes, use the UP and DOWN arrow keys
above and below the numbers. To change from AM to PM, select the
corresponding pad. Select SAVE or CANCEL. You can change the time
to a 24-hour clock by selecting the 24 HR button. Change the hours
and minutes using the UP and DOWN arrow keys above and below
the numbers. Select SAVE or CANCEL.
SETTINGS (cont.)
W
ATER
D
ISPENSER
BACK
HOME
SCREEN
SYSTEM
WATER FILTER
REFRIGERATOR
S
ETTINGS
W
ATER
D
ISPENSER
BACK
HOME
ICE MAKER
METRIC
ENGLISH
(SET TIME)
C
OOLING
S
YSTEM
ENERGY SAVER
BUTTON TONES
DOOR ALARM
S
YSTEM
T
IME
U
NITS
W
ATER
D
ISPENSER
BACK
HOME
ICE MAKER
METRIC
ENGLISH
(SET TIME)
C
OOLING
S
YSTEM
ENERGY SAVER
BUTTON TONES
DOOR ALARM
S
YSTEM
T
IME
U
NITS
W
ATER
D
ISPENSER
BACK
HOME
ICE MAKER
METRIC
ENGLISH
(SET TIME)
C
OOLING
S
YSTEM
ENERGY SAVER
BUTTON TONES
DOOR ALARM
S
YSTEM
T
IME
U
NITS
PM
AM
24 HR
12 HR
T
IME
FORMAT
C
ANCEL
S
AVE
12 00
10
DOOR
ALARM
Button
SYSTEM
Button
SET TIME
Button
Set Time
ENERGY SAVER
Button
COOLING
SYSTEM
Button
SAVE or CANCEL
This product includes software which is based in
part on the work of the Independent JPEG Group

UNITS
To change the temperature readings from English units to Metric units,
press the METRIC button. Units shown on the HOME screen will now read
in Celsius instead of Fahrenheit.
ICEMAKER
The unit comes with an icemaker installed. The icemaker rate of 9 cubes
per cycle will depend on freezer compartment temperature, room
temperature, number of door openings and other use conditions. If the
refrigerator is operated before the water connection is made to the
icemaker, press and release the ICEMAKER button on the SYSTEM screen
to disengage the icemaker. When the refrigerator has been connected to
the water supply, press and release the ICEMAKER button on the SYSTEM
screen to engage the icemaker. A newly installed refrigerator may take
12 to 24 hours to begin making ice cubes and the ICEMAKER default is
ON (check).
You will hear a buzzing sound each time the icemaker fills with water.
Throw away the first few batches of ice to allow the water line to clear.
It is normal for several cubes to be joined together. If ice is not used
frequently, old ice cubes will become cloudy, taste stale and shrink.
NOTE: In homes with lower-than-average water pressure, you may
hear the icemaker cycle multiple times when making one batch of ice.
NOTE: Turn OFF the icemaker if the water supply is shut off.
SCREEN
Select the SCREEN button from the SETTINGS screen to adjust
the BRIGHTNESS of the display and to choose a SCREEN SAVER.
For BRIGHTNESS, use the LEFT and RIGHT arrow keys to dim and
brighten the screen.
For SCREEN SAVER, use the UP and DOWN arrow keys to choose
DEFAULT, SLIDE SHOW, BACKGROUND or OFF.
DEFAULT gives a slide show of factory pre-loaded pictures at 10-second
intervals. These pictures are not viewable in the PHOTOS screen and
remain even when all photos are deleted.
SLIDE SHOW takes the most recently selected photo among
user-uploaded pictures and displays this one first, then the remaining
random photos at 10-second intervals for 15 minutes.
BACKGROUND takes the most recently selected photo among
user-uploaded pictures and displays this as a static image.
After 15 minutes of displaying this screen with no activity,
the backlight will go OFF.
OFF sets no BACKGROUND, SCREEN SAVER or SLIDE SHOW.
SETTINGS (cont.)
W
ATER
D
ISPENSER
BACK
HOME
ICE MAKER
METRIC
ENGLISH
(SET TIME)
C
OOLING
S
YSTEM
ENERGY SAVER
BUTTON TONES
DOOR ALARM
S
YSTEM
T
IME
U
NITS
FREEZER
C
-18
C
3
FRESH FOOD
SUBSTITUTIONS
PHOTOS
NUTRITION FACTS
CONVERSIONS
SETTINGS
12:00 PM
HOLD 3 SECONDS
W
ATERD
ISPENSER
WATER FILTER: GOOD
EXTRAS
LOCK
W
ATER
D
ISPENSER
BACK
HOME
SCREEN
SYSTEM
WATER FILTER
REFRIGERATOR
S
ETTINGS
W
ATER
D
ISPENSER
HOME
BACK
B
RIGHTNESS
D
EFAULT
ENTER
B
RIGHTNESS
S
CREEN
S
AVER
S
CREEN
11
GEAppliances.com
Set Brightness
of Screen
Set Screen Saver and/or
Background
METRIC
Button
ICEMAKER
Button
SCREEN
Button
This product includes software which is based in
part on the work of the Independent JPEG Group

12
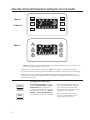
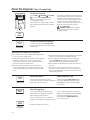
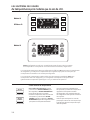
About the control with temperature settings for non-LCD models.
The temperature controls are preset in the factory at 38°F for the refrigerator compartment and -2°F for
the freezer compartment. Allow 24 hours for the temperature to stabilize to the preset recommended settings.
The temperature controls can display both the SET temperature as well as the actual temperature in the
refrigerator and freezer. The actual temperature may vary slightly from the SET temperature based on usage
and operating environment.
To change the temperature, press and
release the ADJUST FREEZER or ADJUST
REFRIGERATOR pad. The display will
show the actual temperature. To change
the temperature, tap either the ADJUST
FREEZER or ADJUST REFRIGERATOR pad
until the desired temperature is displayed.
Once the desired temperature has been
set, the temperature display will return
to the actual refrigerator and freezer
temperatures after 10 seconds. Several
adjustments may be required.
Each time you adjust controls, allow
24 hours for the refrigerator to reach
the temperature you have set.
Changing the Temperature
NOTE: The refrigerator is shipped with protective film covering the temperature controls. If this film was
not removed during installation, remove it now.
(Hold 3 sec
to Lock Control)
ICE OFF/
LOCK
(Hold 3 sec
for Turbo Cool)
ADJUST
REFRIGERATOR
Light ON/OFF
(Hold 3 seconds)
ALARM/
LIGHT
(Hold 3 sec
to Reset Filter)
ICE &
WATER
(Hold 3 sec
for Turbo Freeze)
ADJUST
FREEZER
ENERGY
SAVER
TURBO FREEZE
TURBO COOL
RESET FILTER
CUBED CRUSHED
WATER
ICE
OFF
˚
F
38˚ F Recommended
˚
F
-2˚ F Recommended
CLIMATE KEEPER
(Hold 3 sec
for Turbo Cool)
ADJUST
R
EFRIGERATOR
(Hold 3 sec
for Turbo Freeze)
ADJUST
FREEZER
Model 26
Model 29
GE Adora 29

13
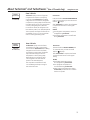
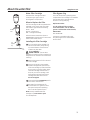
About TurboCool
™
and TurboFreeze.
™
(Non-LCD models Only)
GEAppliances.com
How it Works
TurboCool rapidly cools the refrigerator
compartment in order to more quickly
cool foods. Use TurboCool when adding
a large amount of food to the refrigerator
compartment, putting away foods after they
have been sitting out at room temperature
or when putting away warm leftovers.
It can also be used if the refrigerator has
been without power for an extended period.
The compressor and fresh food fan will run
immediately for up to 2
1
⁄2 hours and then
return to the original setting value.
How to Use
Press and hold the ADJUST REFRIGERATOR
pad for 3 seconds until you hear the sound
and the displays.
After TurboCool is complete, the refrigerator
compartment will return to the original
setting.
NOTES:
The refrigerator temperature cannot be
changed during TurboCool.
The freezer temperature is not affected
during TurboCool.
(Hold 3 sec
for Turbo Cool)
ADJUST
R
EFRIGERATOR
How it Works
TurboFreeze rapidly cools the freezer
compartment in order to more quickly
cool foods. Use TurboFreeze when adding
a large amount of food to the freezer
compartment, putting away foods after
they have been sitting out at room
temperature or when putting away
warm leftovers. It can also be used
if the refrigerator has been without
power for an extended period.
The compressor and freezer fan will
run immediately and keep running for
two-and-a-half hours.
How to Use
Press and hold the ADJUST FREEZER pad
for 3 seconds until you hear the sound
and the displays.
After TurboFreeze is complete, the freezer
compartment will return to the original
setting.
NOTES:
The freezer temperature cannot
be changed during TurboFreeze.
The refrigerator temperature is
not affected during TurboFreeze.
When opening the freezer door during
TurboFreeze, the fans will turn off when
the door is opened.
(Hold 3 sec
for Turbo Freeze)
ADJUST
FREEZER

14
About the dispenser.
(Non-LCD models Only)
To Use the Dispenser
Select CUBED , CRUSHED or WATER
by pressing the ICE & WATER pad.
Press the glass gently against the top
of the dispenser cradle.
The spill shelf is not self-draining. To reduce
water spotting, the shelf should be cleaned
regularly.
If no water is dispensed when the refrigerator
is first installed, there may be air in the water
line system. Press the dispenser arm for at
least two minutes to remove trapped air from
the water line and to fill the water system.
To flush out impurities in the water line, throw
away the first six full glasses of water.
CAUTION: Never put fingers
or any other objects into the ice crusher
discharge opening.
To Lock and Unlock the Dispenser
To lock, press and hold the ICE OFF/LOCK
pad for 3 seconds. Repeat this step to unlock
the dispenser.
(Hold 3 sec
to Lock Control)
ICE OFF/
LOCK
(Hold 3 sec
to Lock Control)
I
CE
O
FF/
L
OCK
(Hold 3 sec
for Turbo Cool)
A
DJUST
R
EFRIGERATOR
Light ON/OFF
(Hold 3 seconds)
A
LARM/
L
IGHT
(Hold 3 sec
to Reset Filter)
I
CE &
W
ATER
(Hold 3 sec
for Turbo Freeze)
A
DJUST
F
REEZER
E
NERGY
S
AVER
T
URBO
F
REEZE
T
URBO
C
OOL
R
ESET
F
ILTER
C
UBED
C
RUSHED
W
ATER
ICE
OFF
˚
F
38˚ F Recommended
˚
F
-2˚ F Recommended
C
LIMATE
K
EEPER
Spill Shelf
ICE &
WATER
Important Facts About Your Dispenser
Do not add ice from trays or bags to the storage drawer.
It may not crush or dispense well.
Avoid overfilling glass with ice and use of narrow glasses.
Backed-up ice can jam the chute or cause the door
in the chute to freeze shut. If ice is blocking the chute,
poke it through with a wooden spoon.
Beverages and foods should not be quick-chilled in
the ice storage drawer. Cans, bottles or food packages
in the storage drawer may cause the icemaker or auger
to jam.
To keep dispensed ice from missing the glass, put the glass
close to, but not touching, the dispenser opening.
Some crushed ice may be dispensed even though you
selected CUBED ICE. This happens occasionally when
a few cubes accidentally get directed to the crusher.
After crushed ice is dispensed, some water may drip from
the chute.
Sometimes a small mound of snow will form on the door
in the ice chute. This condition is normal and usually occurs
when you have dispensed crushed ice repeatedly. The snow
will eventually evaporate.
About Energy Saver
This product is equipped with an Energy
Saver feature. The refrigerator is shipped
with the Energy Saver feature on.
Over time, moisture can form on the front
surface of the refrigerator cabinet and cause
rust. If moisture does appear on the front
surface of the refrigerator cabinet, turn off
the Energy Saver feature by pressing
and releasing the ENERGY SAVER pad
on the control panel.
About Door Alarm About Dispenser Light
The door alarm will sound if any door
is open for more than 3 minutes. The beeping
stops when you close the door.
Press and hold the ALARM/LIGHT pad for
3 seconds to turn on the dispenser light.
To turn off, press and hold the pad again
for 3 seconds.
ENERGY
SAVER
Light ON/OFF
(Hold 3 seconds)
ALARM/
LIGHT
(Hold 3 sec
to Reset Filter)
ICE &
WATER
See About the Water Filter, Step 7

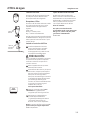
About the water filter. GEAppliances.com
Water Filter Cartridge
The water filter cartridge is located
in the back upper right corner of
the refrigerator compartment.
When to Replace the Filter
The filter cartridge should be replaced when
indicated on the control panel. The water
filter indicator light shows the following:
Green – Good
Orange – Change soon
Red – Change immediately
Follow the screen instructions shown in
WATER FILTER in the About the 7”LCD Control
Panel for LCD Models section.
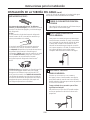
Installing the Filter Cartridge
If you are replacing the cartridge, first
remove the old one by slowly turning
it counterclockwise. A small amount
of water may drip down.
CAUTION: If air has been
trapped in the system, the filter cartridge may
be ejected as it is removed. Use caution when
removing.
Remove the protective foil from the end
of the cartridge.
Lining up the arrow on the cartridge
and the cartridge holder, place the top
of the new cartridge up inside the holder.
Do not push it up into the holder. Slowly
rotate the cartridge clockwise until it
stops. As you turn the cartridge, it will
automatically raise itself into position.
Cartridge will rotate about 1/4 turn.
Do not overtighten.
Press and hold the ICE & WATER pad for
3 seconds to reset the filter.
Run water from the dispenser for
3 minutes (about 1
1
⁄2 gallons) to clear
the system and prevent sputtering.
See To Use the Dispenser section.
NOTE: A newly installed water filter
cartridge may cause water to spurt
from the dispenser.
Filter Bypass Plug
You must use the filter bypass plug when
a replacement filter cartridge is not available.
The icemaker will not operate without
the filter or filter bypass plug.
Replacement Filters:
To order additional filter cartridges
in the United States, visit our Website,
ge.com or call GE Parts and Accessories,
800.626.2002.
Filter Model MWF
Customers in Canada should consult
the yellow pages for the nearest Mabe
Service Center.
Cartridge
Holder
Filter
Bypass
Plug
15

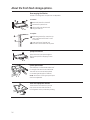
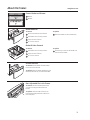
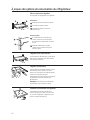
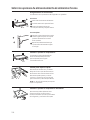
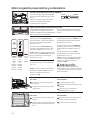
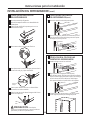
Rearranging the Shelves
To remove:
Remove all items from the shelf.
Tilt the shelf up at the front.
Lift the shelf up at the back and
bring the shelf out.
To replace:
While tilting the shelf up, insert the top
hook at the back of the shelf in a slot
on the track.
Lower the front of the shelf until
the bottom of the shelf locks into place.
Spillproof Shelves
Spillproof shelves have special edges to
help prevent spills from dripping to lower
shelves.
Shelves in the refrigerator compartment are adjustable.
Quick Space Shelf
This shelf splits in half and slides under itself
for storage of tall items on the shelf below.
This shelf can be removed and replaced
or relocated (just like spillproof shelves).
NOTE: The location of the upper Quick Space
Shelf is not adjustable.
About the fresh food storage options.
16
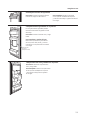
Slide-Out Spillproof Shelves
These shelves can be slid out to provide
easy access to items near the back of
the refrigerator and to provide easy cleaning.

17
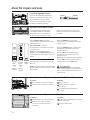
GEAppliances.com
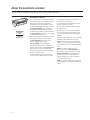
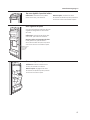
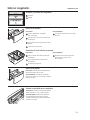
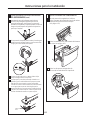
Non-Adjustable Bins on the Door
To remove: Lift the bin straight up, then
pull out.
To replace: Engage the bin in the molded
supports on the door and push down.
It will lock in place.
Adjustable Bins on the Door
Adjustable bins can easily be carried from
refrigerator to work area.
To remove: Lift bin straight up, then pull out.
To replace or relocate: Slide in the bin just
above the molded door supports, and push
down. The bin will lock in place.
Non-Adjustable Dairy Bin
To remove: Lift the dairy bin straight up,
then pull out.
To replace: Engage the bin in the molded
door supports and push down. The bin will
lock in place.
Refreshment
Center Door
(on some
models)

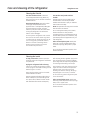
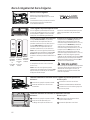
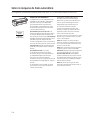
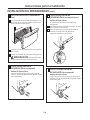
Fruit and Vegetable Crisper
Lower
Higher
Adjustable Deli/Produce Drawer
The Adjustable Deli/Produce Drawer
is a full-width drawer with adjustable
temperature control. This drawer can
be used for large miscellaneous items.
There is a temperature control which can
adjust the amount of cold air allowed into
the drawer.
To remove:
Pull the drawer out to the stop position.
Lift the front of the drawer up and out.
To replace:
Lift the cover up.
Engage the pantry rollers into
the side rails.
Push the drawer inward (until it is
in place).
How to Remove and Replace the Adjustable Deli/Produce Drawer
To remove:
Pull the drawer out to the stop position.
Raise the front side of the divider
to unhook it from the rear wall of
the drawer.
To replace:
Hook the back of the divider over the rear
wall of the drawer.
Push the divider down.
How to Remove and Replace Drawer Divider
When Produce Drawer is selected,
the temperature of the drawer can be kept
around 38°F (3.2°C).
When Deli Drawer is selected,
the temperature of the drawer can be kept
around 34°F (1°C).
NOTE: Fruits and vegetables may be
damaged using the Deli Drawer setting. Do
not store lettuce or other leafy produce in this
drawer.
Adora 29-cu.-ft. models
The Temperature of the Drawer is around
34°F (1°C).
NOTE: Fruits and vegetables may be damaged
using
this pantry. Do not store lettuce or other
leafy produce.
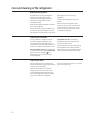
When the CITRUS button is selected,
the temperature of the drawer can be kept
around 41°F (5°C).
When the PRODUCE button is selected, the
temperature of the drawer can be kept
around 37°F (3°C).
When the DELI button is selected, the
temperature of the drawer can be kept
around 34°F (1°C).
NOTE: Fruits and vegetables may be damaged
using the DELI setting. Do not store lettuce or
other leafy produce at the DELI setting.
CAUTION: Do not store glass
bottles at this setting for a long period of time,
If they are frozen, they can break and cause
personal injury.
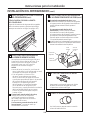
About the crispers and pans.
18
26 Model
Controls
(located
on
right side
of drawer)
Control for 26-cu.-ft. models Control for 29-cu.-ft. models
29 Model
Controls
(located
on
right side
of drawer)
Keep fruits and vegetables organized in
separate compartments for easy access.
Excess water that may accumulate
in the bottom of the drawers or under
the drawers should be wiped dry.
Deli
Deli P
an
an
29 Adora
Model

About the freezer. GEAppliances.com
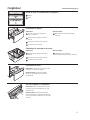
Freezer Basket and Drawer
Basket.
Drawer.
Basket Removal
To remove:
Remove Freezer Bin. (See below.)
Pull basket out to the stop position.
Tilt up the rear of the bin.
Lift it out to remove.
To replace:
Place the basket into the rail assembly.
Basket Divider Removal
To remove:
Pull basket out to the stop position.
Tilt up the rear of the bin.
Lift it out to remove.
To replace:
Hook the top corners of the divider over
the hole of the basket.
Drawer Removal
Non-Adjustable Bin in the Freezer
To remove: Pull the brackets upward until
you hear a clicking sound and remove
the bin.
To replace: Hook the ends of the bin into
both brackets and push down until the bin
locks into place.
19
To remove: Pull the drawer forward and up
to remove it from the rails.
To replace: Place the drawer wheels onto the
rails and push back as you lower the drawer.

Automatic Icemaker
The unit comes with an icemaker installed.
The icemaker rate of 9 cubes per cycle will
depend on the freezer compartment
temperature, room temperature, number
of door openings and other use conditions.
For Non-LCD Models: If the refrigerator
is operated before the water connection
is made to the icemaker, press and release
the ICE OFF/LOCK pad on the control panel
to disengage the icemaker.
When the refrigerator has been connected
to the water supply, press and release
the ICE OFF/LOCK pad on the control
panel to engage the icemaker.
For LCD Models: If the refrigerator is
operated before the water connection is
made to the icemaker, see ICEMAKER under
the Screen Functions of LCD Operations
section and follow the screen commands
to turn the icemaker OFF.
A newly installed refrigerator may take
12 to 24 hours to begin making ice cubes.
You will hear a buzzing sound each time
the icemaker fills with water.
Throw away the first few batches of ice to
allow the water line to clear.
Be sure nothing interferes with the sweep
of the feeler arm.
When the bin fills to the level of the feeler
arm, the icemaker will stop producing ice.
It is normal for several cubes to be joined
together.
If ice is not used frequently, old ice cubes will
become cloudy, taste stale and shrink.
NOTE: In homes with lower-than-average
water pressure, you may hear the icemaker
cycle multiple times when making one batch
of ice.
NOTE: If the water supply is shut off,
press and release the ICE OFF/LOCK pad
on the control panel of the non-LCD model.
For the LCD model, see ICEMAKER under
the Screen Functions of LCD Operations
section and follow the screen commands
to turn the icemaker OFF.
NOTE: It is normal to hear ice falling into the
ice compartment. It will make a marble-like
sound.
A newly installed refrigerator may take 12 to 24 hours to begin making ice.
(Hold 3 sec
to Lock Control)
ICE OFF/
LOCK
20
About the automatic icemaker.
La page charge ...
La page charge ...
La page charge ...
La page charge ...
La page charge ...
La page charge ...
La page charge ...
La page charge ...
La page charge ...
La page charge ...
La page charge ...
La page charge ...
La page charge ...
La page charge ...
La page charge ...
La page charge ...
La page charge ...
La page charge ...
La page charge ...
La page charge ...
La page charge ...
La page charge ...
La page charge ...
La page charge ...
La page charge ...
La page charge ...
La page charge ...
La page charge ...
La page charge ...
La page charge ...
La page charge ...
La page charge ...
La page charge ...
La page charge ...
La page charge ...
La page charge ...
La page charge ...
La page charge ...
La page charge ...
La page charge ...
La page charge ...
La page charge ...
La page charge ...
La page charge ...
La page charge ...
La page charge ...
La page charge ...
La page charge ...
La page charge ...
La page charge ...
La page charge ...
La page charge ...
La page charge ...
La page charge ...
La page charge ...
La page charge ...
La page charge ...
La page charge ...
La page charge ...
La page charge ...
La page charge ...
La page charge ...
La page charge ...
La page charge ...
La page charge ...
La page charge ...
La page charge ...
La page charge ...
La page charge ...
La page charge ...
La page charge ...
La page charge ...
La page charge ...
La page charge ...
La page charge ...
La page charge ...
La page charge ...
La page charge ...
La page charge ...
La page charge ...
La page charge ...
La page charge ...
La page charge ...
La page charge ...
La page charge ...
La page charge ...
La page charge ...
La page charge ...
La page charge ...
La page charge ...
La page charge ...
La page charge ...
La page charge ...
La page charge ...
La page charge ...
La page charge ...
La page charge ...
La page charge ...
La page charge ...
La page charge ...
La page charge ...
La page charge ...
La page charge ...
La page charge ...
La page charge ...
La page charge ...
La page charge ...
La page charge ...
La page charge ...
La page charge ...
La page charge ...
La page charge ...
La page charge ...
La page charge ...
La page charge ...
La page charge ...
La page charge ...
La page charge ...
La page charge ...
La page charge ...
-
 1
1
-
 2
2
-
 3
3
-
 4
4
-
 5
5
-
 6
6
-
 7
7
-
 8
8
-
 9
9
-
 10
10
-
 11
11
-
 12
12
-
 13
13
-
 14
14
-
 15
15
-
 16
16
-
 17
17
-
 18
18
-
 19
19
-
 20
20
-
 21
21
-
 22
22
-
 23
23
-
 24
24
-
 25
25
-
 26
26
-
 27
27
-
 28
28
-
 29
29
-
 30
30
-
 31
31
-
 32
32
-
 33
33
-
 34
34
-
 35
35
-
 36
36
-
 37
37
-
 38
38
-
 39
39
-
 40
40
-
 41
41
-
 42
42
-
 43
43
-
 44
44
-
 45
45
-
 46
46
-
 47
47
-
 48
48
-
 49
49
-
 50
50
-
 51
51
-
 52
52
-
 53
53
-
 54
54
-
 55
55
-
 56
56
-
 57
57
-
 58
58
-
 59
59
-
 60
60
-
 61
61
-
 62
62
-
 63
63
-
 64
64
-
 65
65
-
 66
66
-
 67
67
-
 68
68
-
 69
69
-
 70
70
-
 71
71
-
 72
72
-
 73
73
-
 74
74
-
 75
75
-
 76
76
-
 77
77
-
 78
78
-
 79
79
-
 80
80
-
 81
81
-
 82
82
-
 83
83
-
 84
84
-
 85
85
-
 86
86
-
 87
87
-
 88
88
-
 89
89
-
 90
90
-
 91
91
-
 92
92
-
 93
93
-
 94
94
-
 95
95
-
 96
96
-
 97
97
-
 98
98
-
 99
99
-
 100
100
-
 101
101
-
 102
102
-
 103
103
-
 104
104
-
 105
105
-
 106
106
-
 107
107
-
 108
108
-
 109
109
-
 110
110
-
 111
111
-
 112
112
-
 113
113
-
 114
114
-
 115
115
-
 116
116
-
 117
117
-
 118
118
-
 119
119
-
 120
120
-
 121
121
-
 122
122
-
 123
123
-
 124
124
-
 125
125
-
 126
126
-
 127
127
-
 128
128
-
 129
129
-
 130
130
-
 131
131
-
 132
132
-
 133
133
-
 134
134
-
 135
135
-
 136
136
-
 137
137
-
 138
138
-
 139
139
-
 140
140


dans d''autres langues
- English: GE Adora 29 User manual
- español: GE Adora 29 Manual de usuario
Documents connexes
-
GE CSB42WSKSS Cafe 29.6 Cu. Ft. Stainless Steel Side-By-Side Refrigerator Mode d'emploi
-
GE PFSF6PKXWW Le manuel du propriétaire
-
GE PGCS1NFXSS Manuel utilisateur
-
-
Yes CFE28TSHSS Le manuel du propriétaire
-
-
GE Cafe Series CFE28UELDS Le manuel du propriétaire
-
GE GLE12HSLSS Guide d'installation
-
 GE Adora GFE28GSKSS Manuel utilisateur
-
GE CYE22UP2MS1 Guide d'installation

Autres documents
-
GE Profile PSB42YSKSS Dispatcher Installation Instructions
-
-
KitchenAid KFIL27CXMP0 Le manuel du propriétaire
-
-
LG LSC27950SB Le manuel du propriétaire
-
GEAppliances PFE28RSH Technical Service Manual
-
 Cafe CWE23SSHSS Le manuel du propriétaire
-
 Cafe CFE28TSHSS Le manuel du propriétaire
-
Whirlpool WRF535SWHZ Mode d'emploi

